> ## Documentation Index
> Fetch the complete documentation index at: https://chatbotx.io/docs/llms.txt
> Use this file to discover all available pages before exploring further.
# Condition
> Learn how to use Condition nodes in ChatbotX Flows to evaluate contact data and route customers to the right branch.
A **Condition** node evaluates contact data and routes each customer to the appropriate Flow branch. Use it when customers need different content based on Tags, channels, purchase history, engagement, or Custom Fields.
For example, customers who have completed a purchase can receive setup instructions, while customers who have not purchased can receive an offer.
## Add a Condition node
In Flow Builder, add a Condition from the node menu or connect it from the output of an existing node.
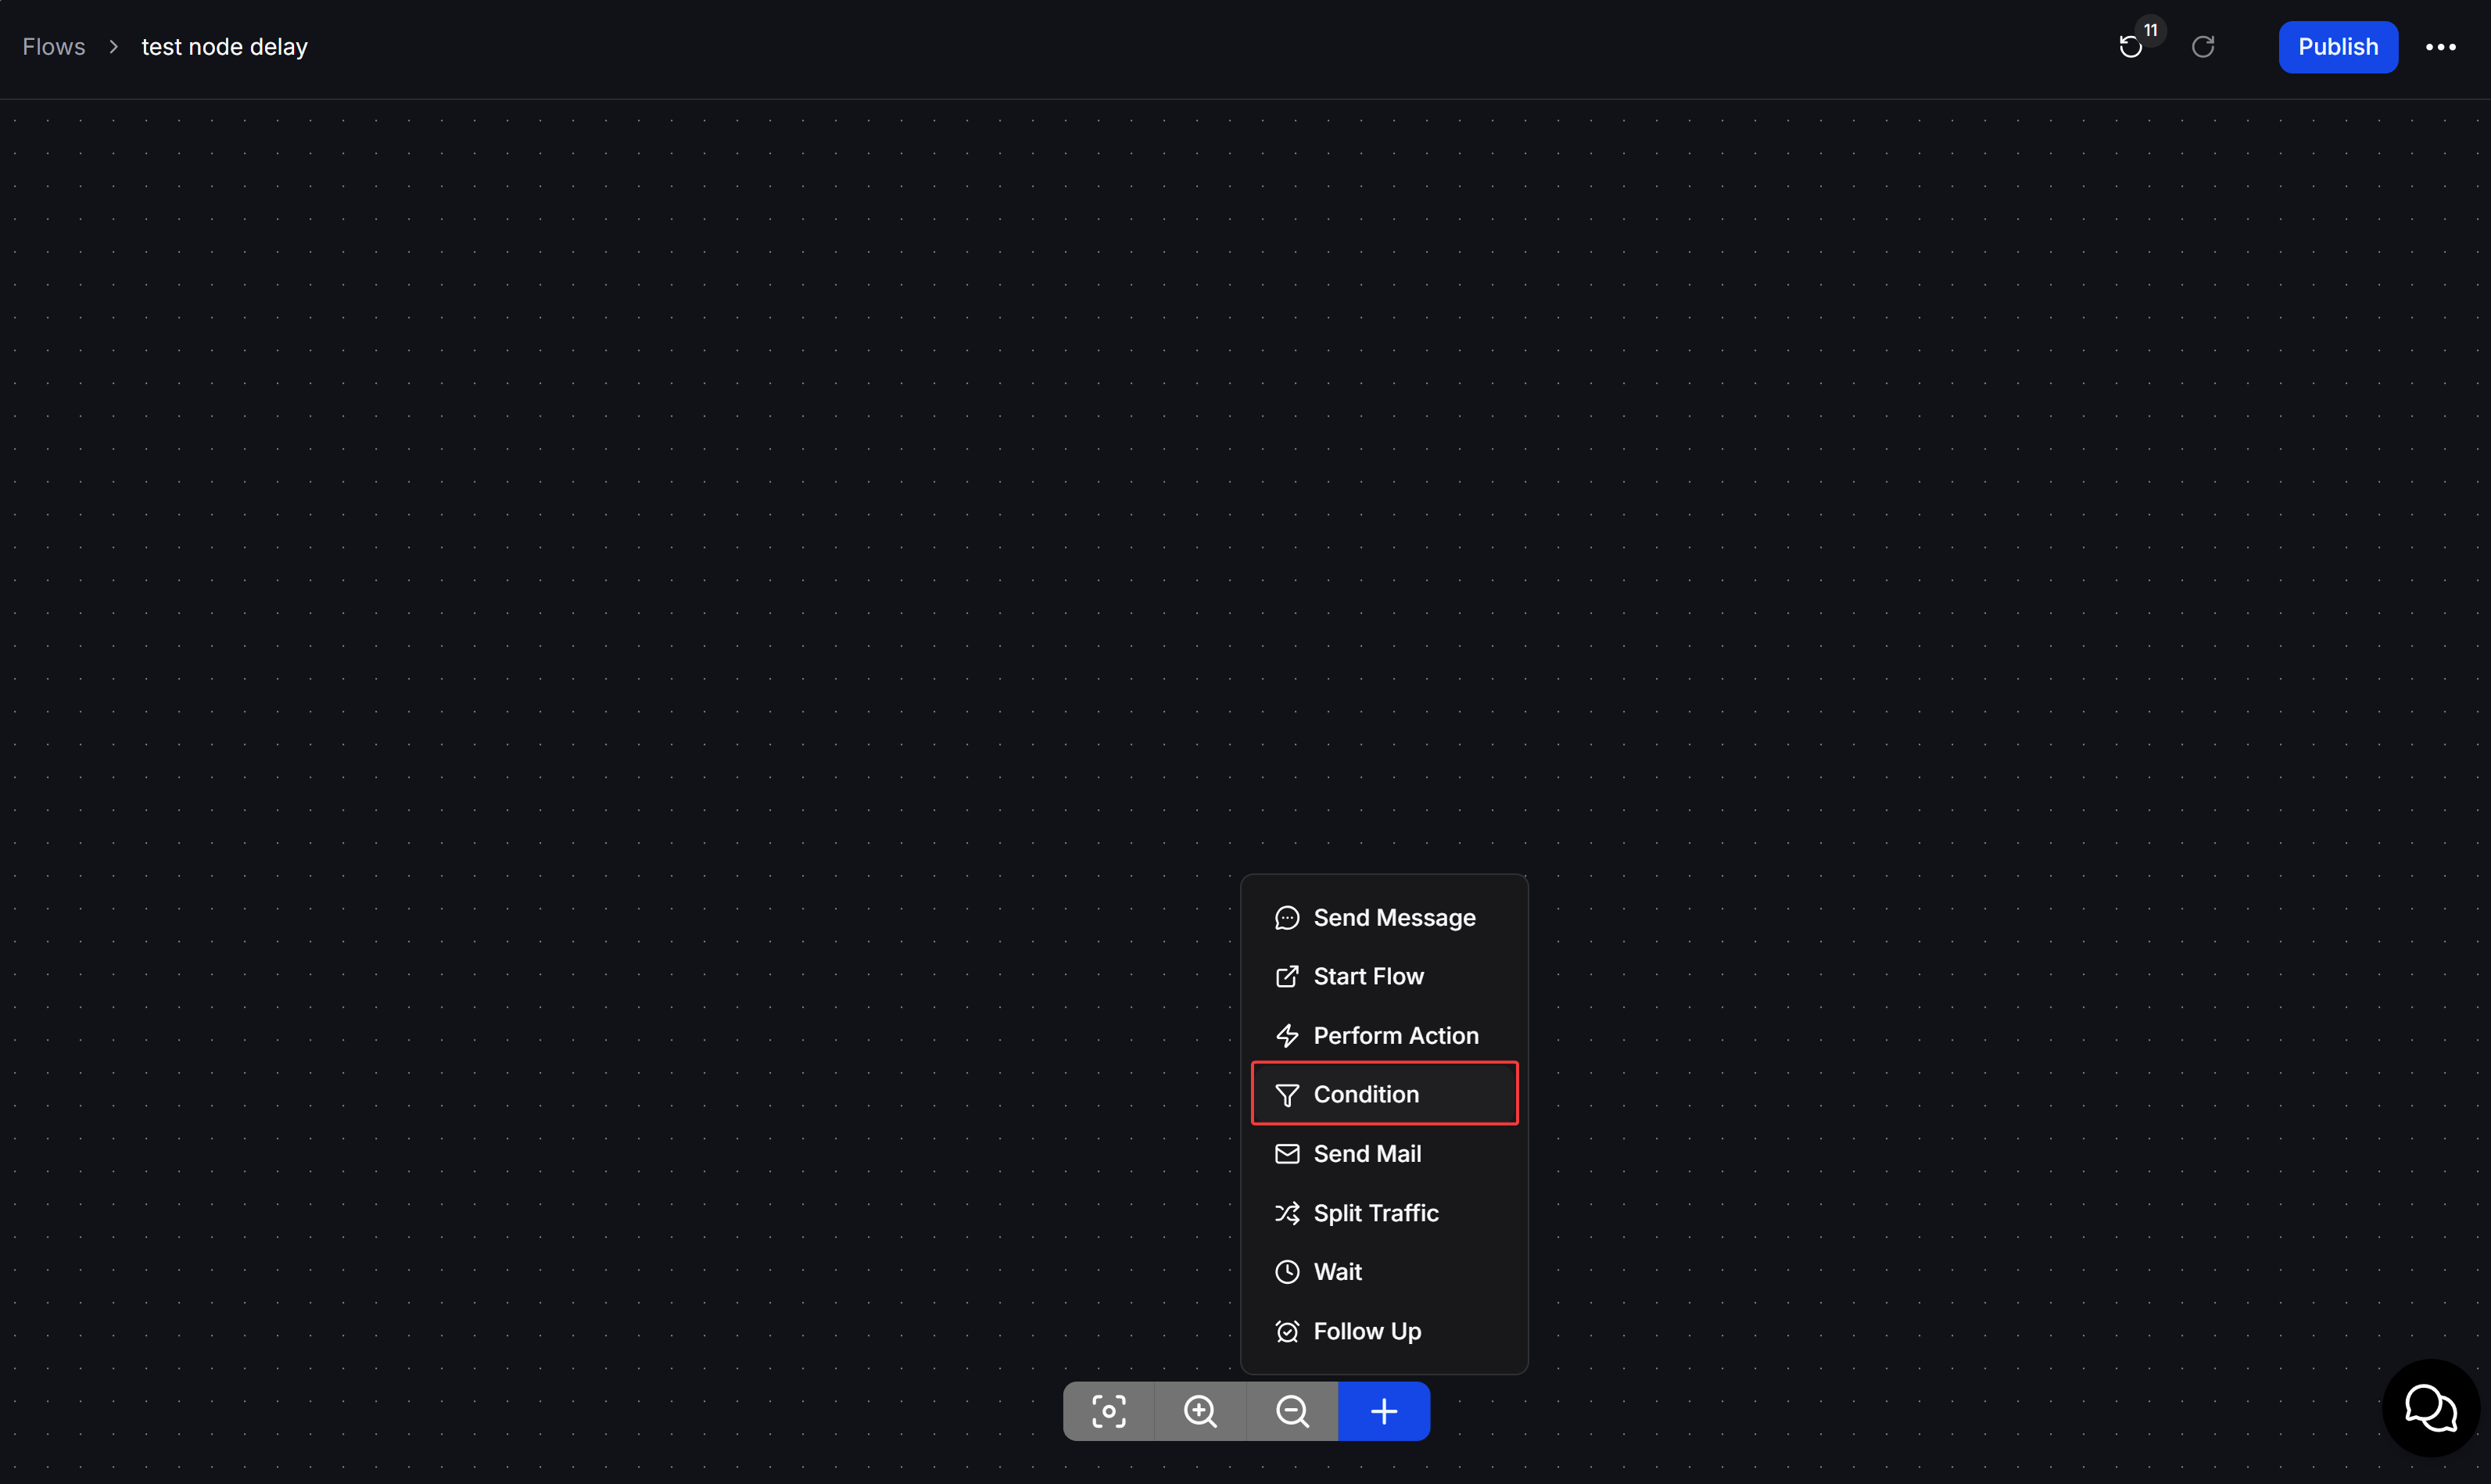
Click the **+** button in the toolbar below the canvas, or drag from the output of the previous node.
Select **Condition** from the node menu. The Condition node appears on the canvas. Click it to open the settings panel on the left.
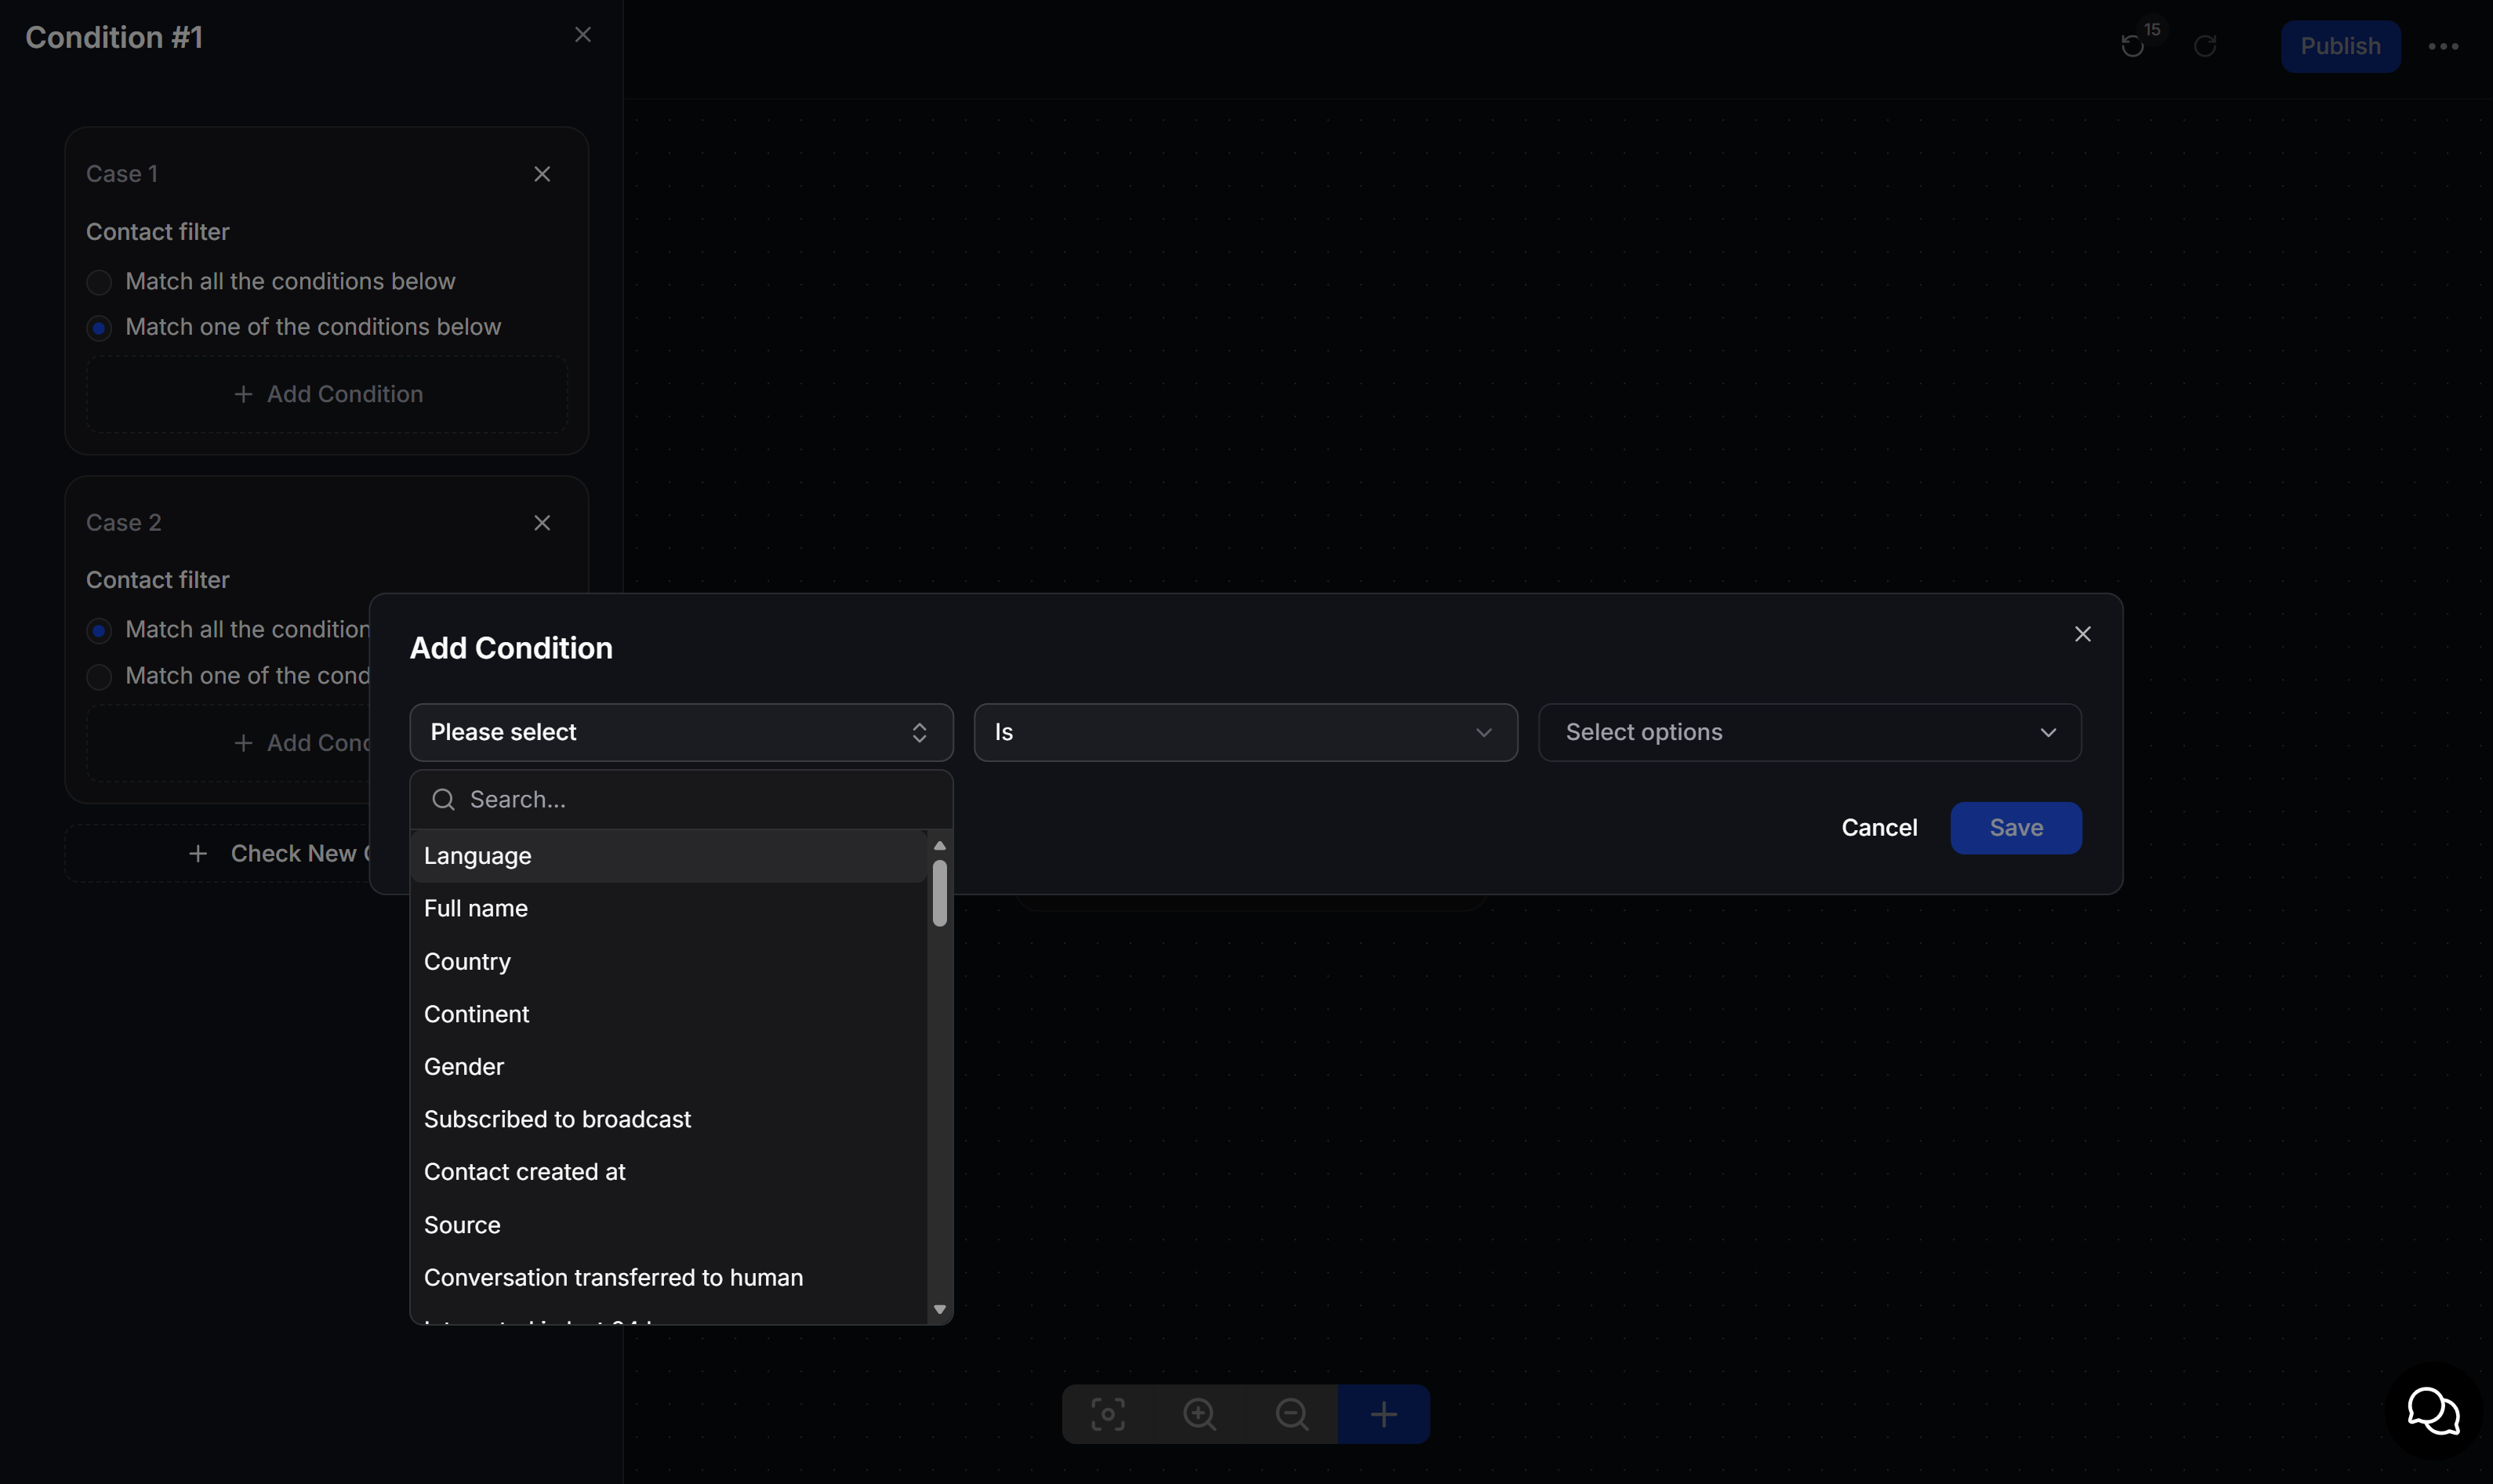
 Click **+ Add Condition**, then select a data field, comparison operator, and value. Click **Save** to save the condition.
 ## Configure condition branches
Each Condition node can contain multiple **Cases**. Every Case creates a separate branch that you can connect to the next node, such as **Send Message**, **Perform Action**, or another Flow.
Choose one of these matching options within each Case:
| Option | How it works | When to use it |
| ------------------------------------- | --------------------------------------------------------- | ------------------------------------------------------------------------------------ |
| **Match all the conditions below** | The contact must meet every condition in the Case. | Send an offer only to customers in the United States **and** tagged as `VIP`. |
| **Match one of the conditions below** | The contact must meet at least one condition in the Case. | Send a message to customers marked for Follow Up **or** with an unread conversation. |
Click **+ Add Condition** to add another condition to the Case. Click **+ Check New Condition** to create another Case. The node also provides an output for contacts who do not match any Case, allowing the Flow to continue through a fallback branch.
> **Note:** A contact may qualify for multiple Cases if their conditions overlap. Keep Cases clearly separated when each customer should follow only one branch.
## Available data for conditions
When adding a condition, select the data field in the first input, the operator in the second, and the comparison value in the last. Available operators depend on the data type. Text fields can use **Contains** or **Starts with**, number fields can use **Greater than** or **Interval**, and date fields can use a date range or specific date.
| Data group | Example conditions |
| ------------------------------- | --------------------------------------------------------------------------------------------------------------------------------- |
| **Contact** | Language, Full name, Country, Gender, Source, Current channel, Tags, Follow Up, Archived, Blocked, and Contact created date. |
| **Conversation and engagement** | Last sent, Last delivered, Last seen, Last interaction, Unreplied, Unread, Sent message, and Conversation assigned. |
| **Opportunities** | Has opportunity, Has open opportunity, Has won opportunity, and Has lost opportunity. |
| **Channels and campaigns** | Instagram, Facebook/Instagram Comment, SMS, Email, Broadcast, Sequence, Executed Flow, and Entry Point Link conditions. |
| **Time and commerce** | Working hours, current date or time, purchase history, purchased products, total spent, number of orders, and shopping cart data. |
| **Custom data** | **Custom Fields** using Short text, Number, Long text, JSON, and Date/Date time types. |
See [Custom Fields](/docs/automation/custom-fields) to create business-specific fields for your condition branches.
## Example: route customers to the right support message
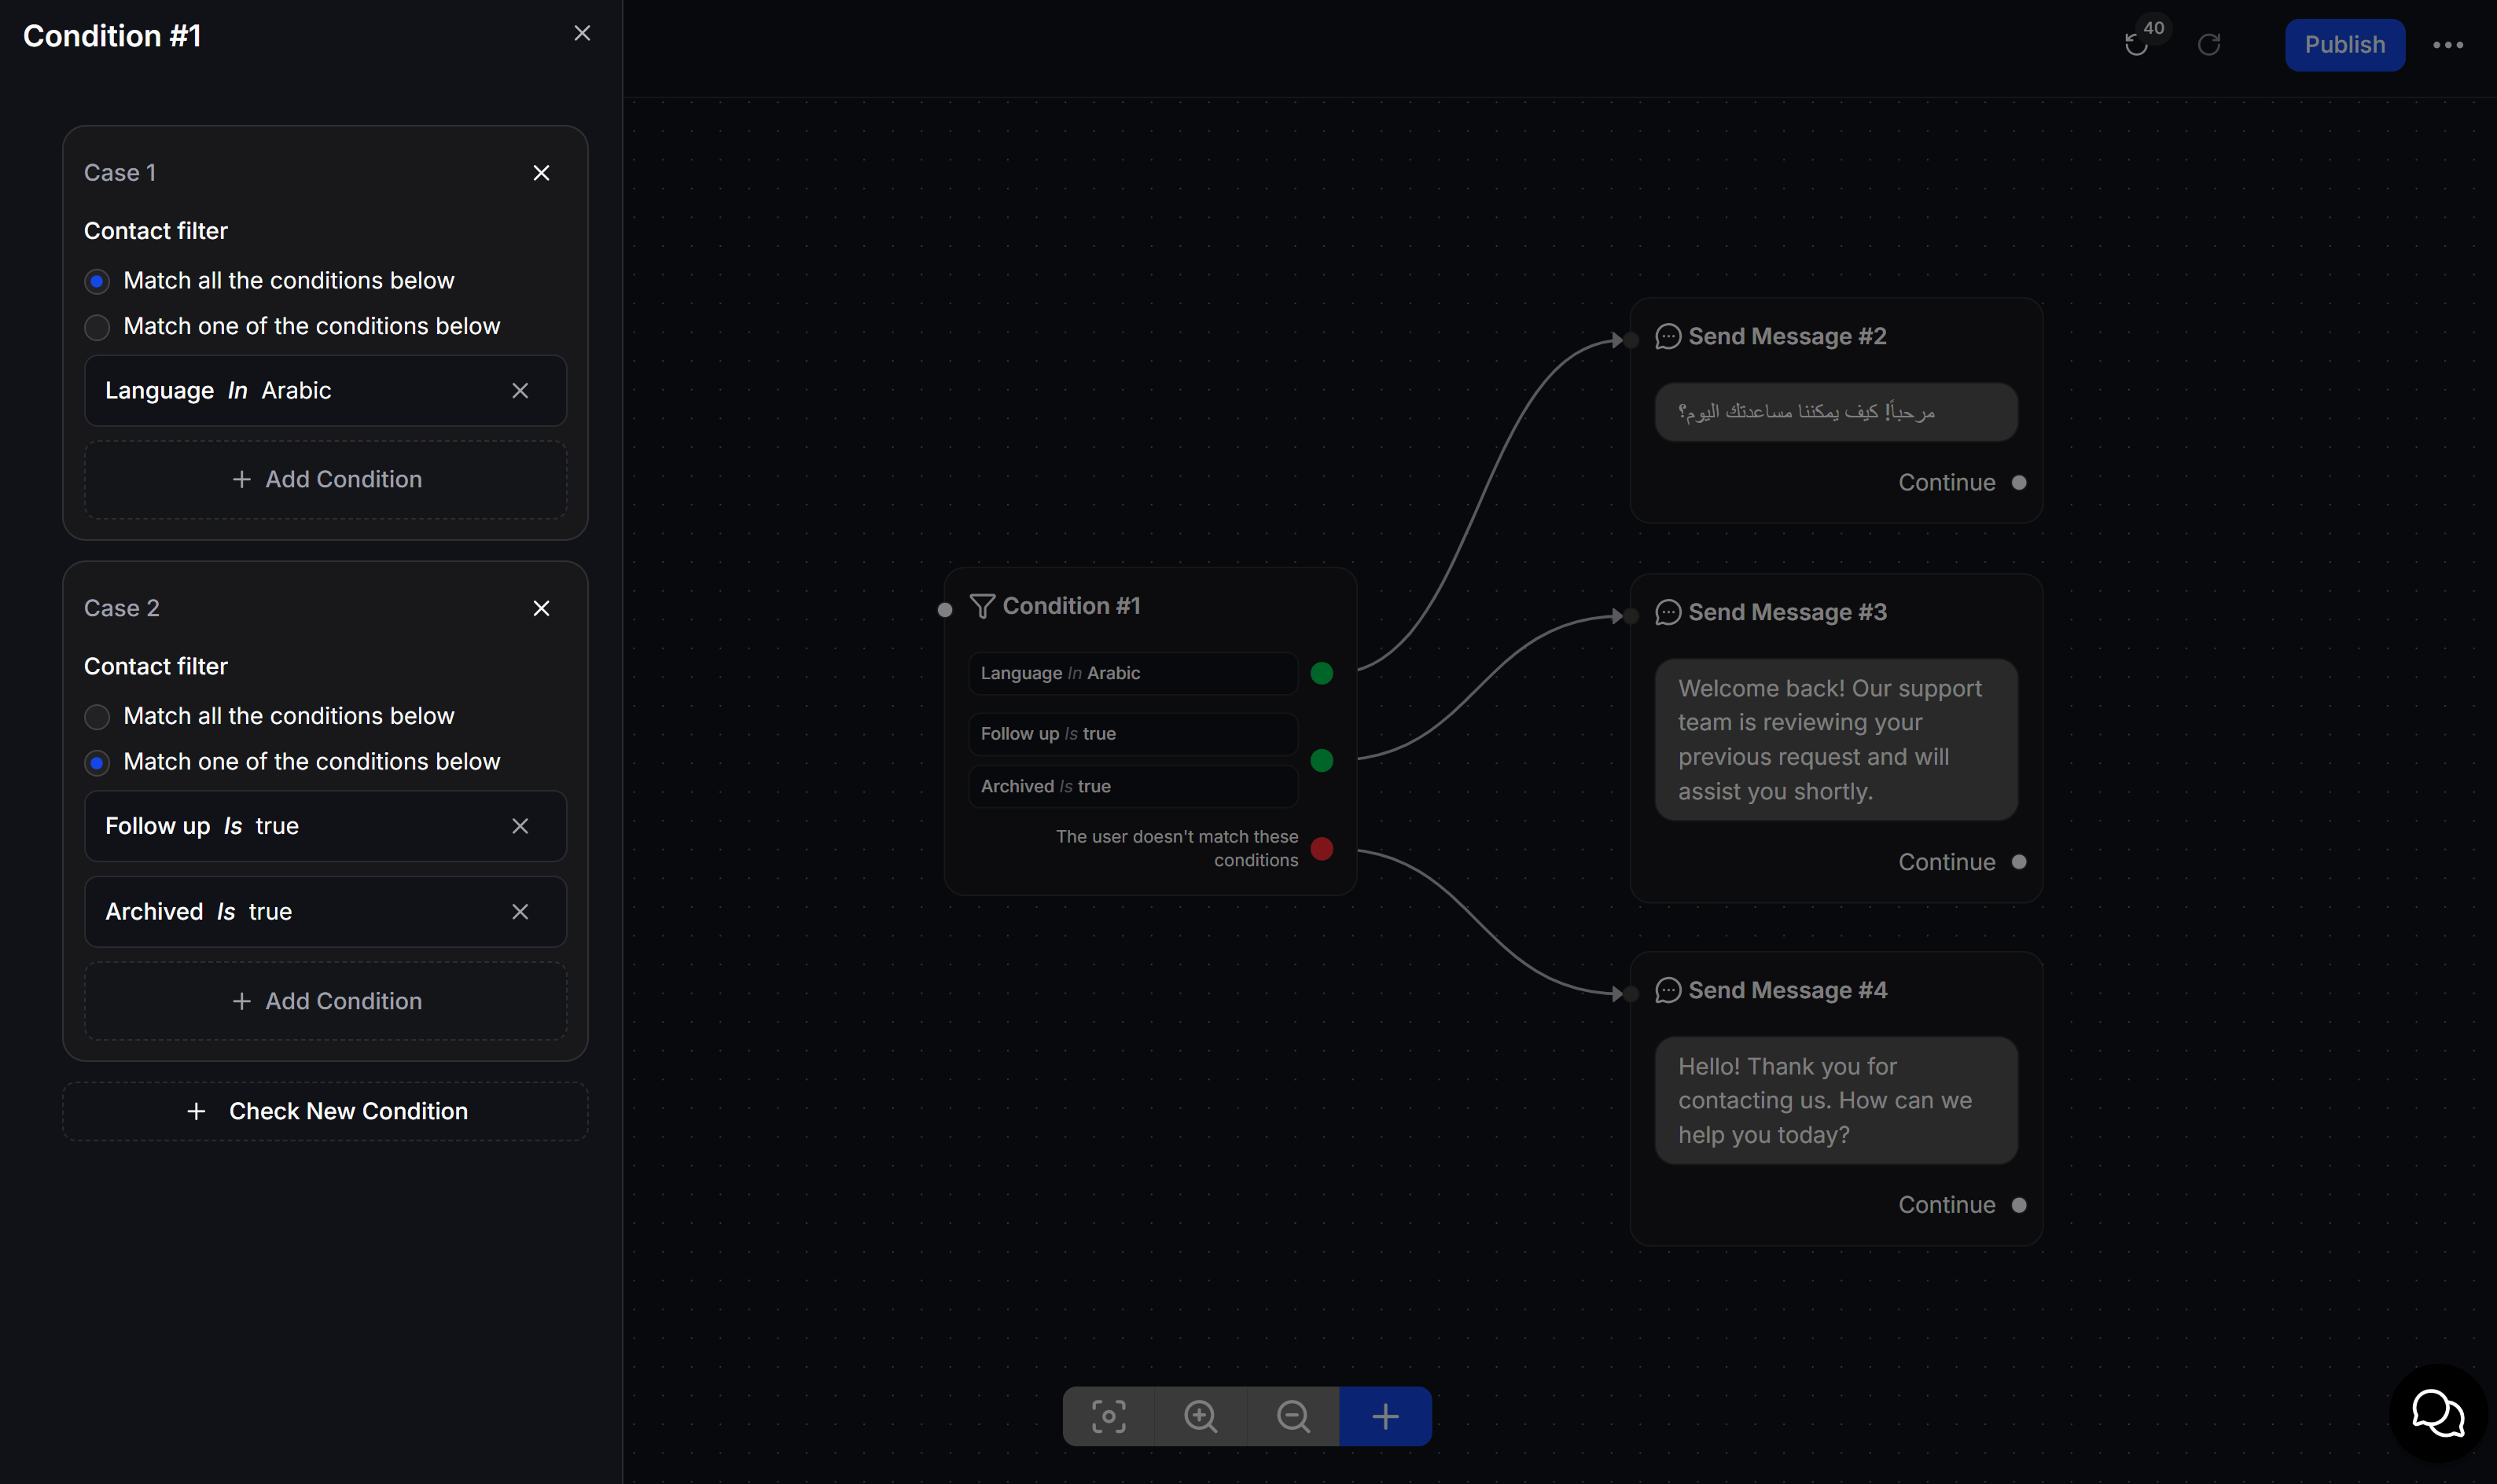
A store wants to route customers into the following groups after they send a message:
* Customers whose language is Arabic receive a message in Arabic.
* Customers marked for Follow Up or Archived enter a dedicated support branch.
* All remaining customers receive the default message.
Create two Cases in the Condition node:
1. Case 1: select **Language** → **Is** → `Arabic`.
2. Case 2: select **Match one of the conditions below**, then add **Follow Up** → **Is** → `Yes` and **Archived** → **Is** → `Yes`.
Connect each Case output to its corresponding **Send Message** node. Connect the unmatched output to the default message so every customer has a next step in the Flow.
## Configure condition branches
Each Condition node can contain multiple **Cases**. Every Case creates a separate branch that you can connect to the next node, such as **Send Message**, **Perform Action**, or another Flow.
Choose one of these matching options within each Case:
| Option | How it works | When to use it |
| ------------------------------------- | --------------------------------------------------------- | ------------------------------------------------------------------------------------ |
| **Match all the conditions below** | The contact must meet every condition in the Case. | Send an offer only to customers in the United States **and** tagged as `VIP`. |
| **Match one of the conditions below** | The contact must meet at least one condition in the Case. | Send a message to customers marked for Follow Up **or** with an unread conversation. |
Click **+ Add Condition** to add another condition to the Case. Click **+ Check New Condition** to create another Case. The node also provides an output for contacts who do not match any Case, allowing the Flow to continue through a fallback branch.
> **Note:** A contact may qualify for multiple Cases if their conditions overlap. Keep Cases clearly separated when each customer should follow only one branch.
## Available data for conditions
When adding a condition, select the data field in the first input, the operator in the second, and the comparison value in the last. Available operators depend on the data type. Text fields can use **Contains** or **Starts with**, number fields can use **Greater than** or **Interval**, and date fields can use a date range or specific date.
| Data group | Example conditions |
| ------------------------------- | --------------------------------------------------------------------------------------------------------------------------------- |
| **Contact** | Language, Full name, Country, Gender, Source, Current channel, Tags, Follow Up, Archived, Blocked, and Contact created date. |
| **Conversation and engagement** | Last sent, Last delivered, Last seen, Last interaction, Unreplied, Unread, Sent message, and Conversation assigned. |
| **Opportunities** | Has opportunity, Has open opportunity, Has won opportunity, and Has lost opportunity. |
| **Channels and campaigns** | Instagram, Facebook/Instagram Comment, SMS, Email, Broadcast, Sequence, Executed Flow, and Entry Point Link conditions. |
| **Time and commerce** | Working hours, current date or time, purchase history, purchased products, total spent, number of orders, and shopping cart data. |
| **Custom data** | **Custom Fields** using Short text, Number, Long text, JSON, and Date/Date time types. |
See [Custom Fields](/docs/automation/custom-fields) to create business-specific fields for your condition branches.
## Example: route customers to the right support message
A store wants to route customers into the following groups after they send a message:
* Customers whose language is Arabic receive a message in Arabic.
* Customers marked for Follow Up or Archived enter a dedicated support branch.
* All remaining customers receive the default message.
Create two Cases in the Condition node:
1. Case 1: select **Language** → **Is** → `Arabic`.
2. Case 2: select **Match one of the conditions below**, then add **Follow Up** → **Is** → `Yes` and **Archived** → **Is** → `Yes`.
Connect each Case output to its corresponding **Send Message** node. Connect the unmatched output to the default message so every customer has a next step in the Flow.
 ## Condition design tips
* Use only the conditions required for the decision so the Flow stays easy to read and maintain.
* Use **Match all the conditions below** for a specific audience. For example, target customers tagged as `VIP` whose total spending is greater than `$200`.
* Always connect the unmatched output so customers do not stop in the middle of the Flow.
* Name downstream nodes by purpose, such as `VIP Offers`, `Arabic Support`, or `Follow-up Support`, so your team can review the Flow quickly.
## Condition design tips
* Use only the conditions required for the decision so the Flow stays easy to read and maintain.
* Use **Match all the conditions below** for a specific audience. For example, target customers tagged as `VIP` whose total spending is greater than `$200`.
* Always connect the unmatched output so customers do not stop in the middle of the Flow.
* Name downstream nodes by purpose, such as `VIP Offers`, `Arabic Support`, or `Follow-up Support`, so your team can review the Flow quickly.