> ## Documentation Index
> Fetch the complete documentation index at: https://chatbotx.io/docs/llms.txt
> Use this file to discover all available pages before exploring further.
# External API Request
> Learn how to configure External API Request in ChatbotX to connect to external servers, retrieve real-time data, and automate workflows.
**External API Request** is a powerful action block in the **Tools** section of ChatbotX's Flow Builder. It enables your chatbot to establish two-way, real-time communication with your custom servers, CRMs (HubSpot, Salesforce), ERPs, e-commerce websites, or any external web services using the HTTP protocol.
With External API Request, your chatbot goes beyond fixed answers. It can actively check account balances, verify inventory stock, retrieve shipping statuses, or send newly captured contact data directly to your business management platforms.
## How to Create an External API Request Block in Flow Builder
To add an External API Request block to your conversation flow:
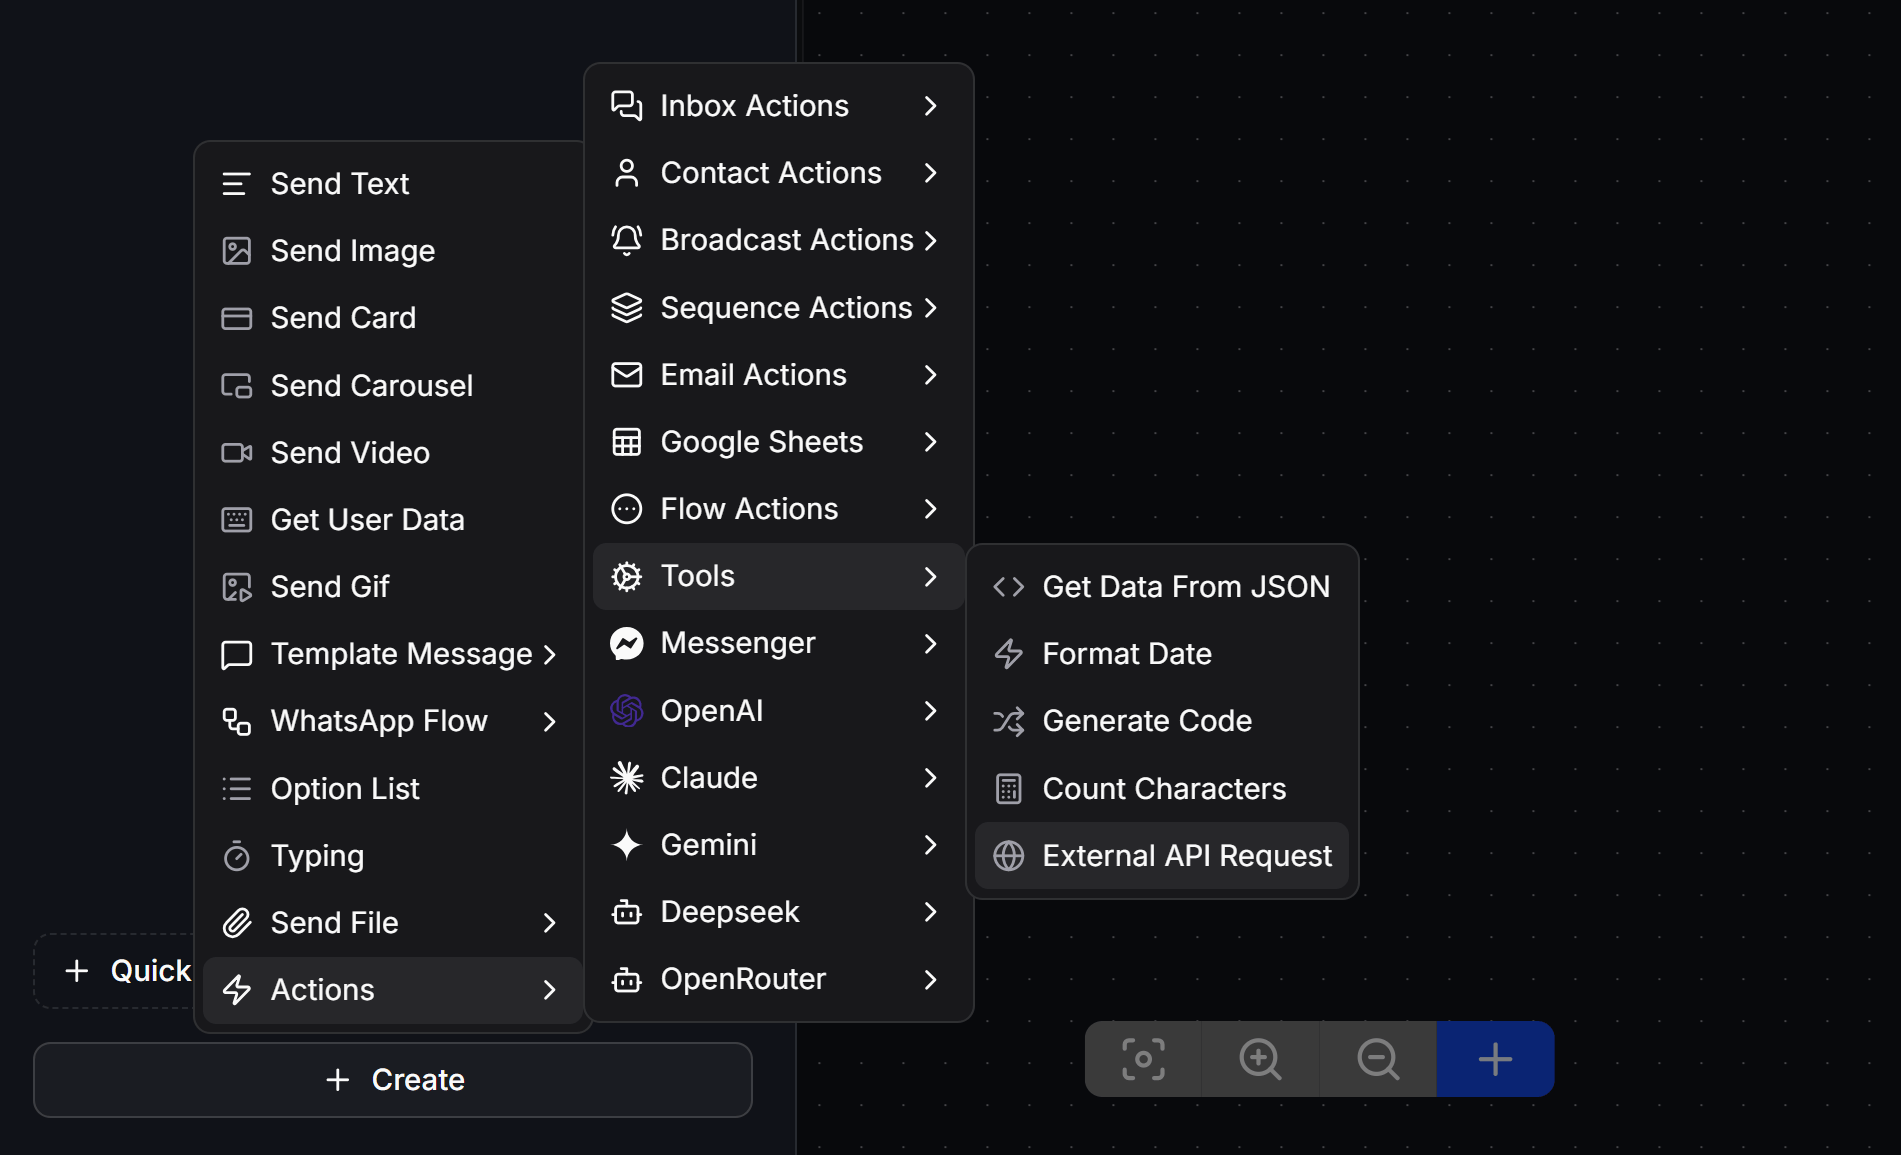
1. Inside Flow Builder, click the **+** (or **Create**) button.
2. Hover over **Actions** $\rightarrow$ select **Tools** $\rightarrow$ click **External API Request**.
3. A new action block will appear on the canvas.
 ## Detailed Configuration Guide for External API Request
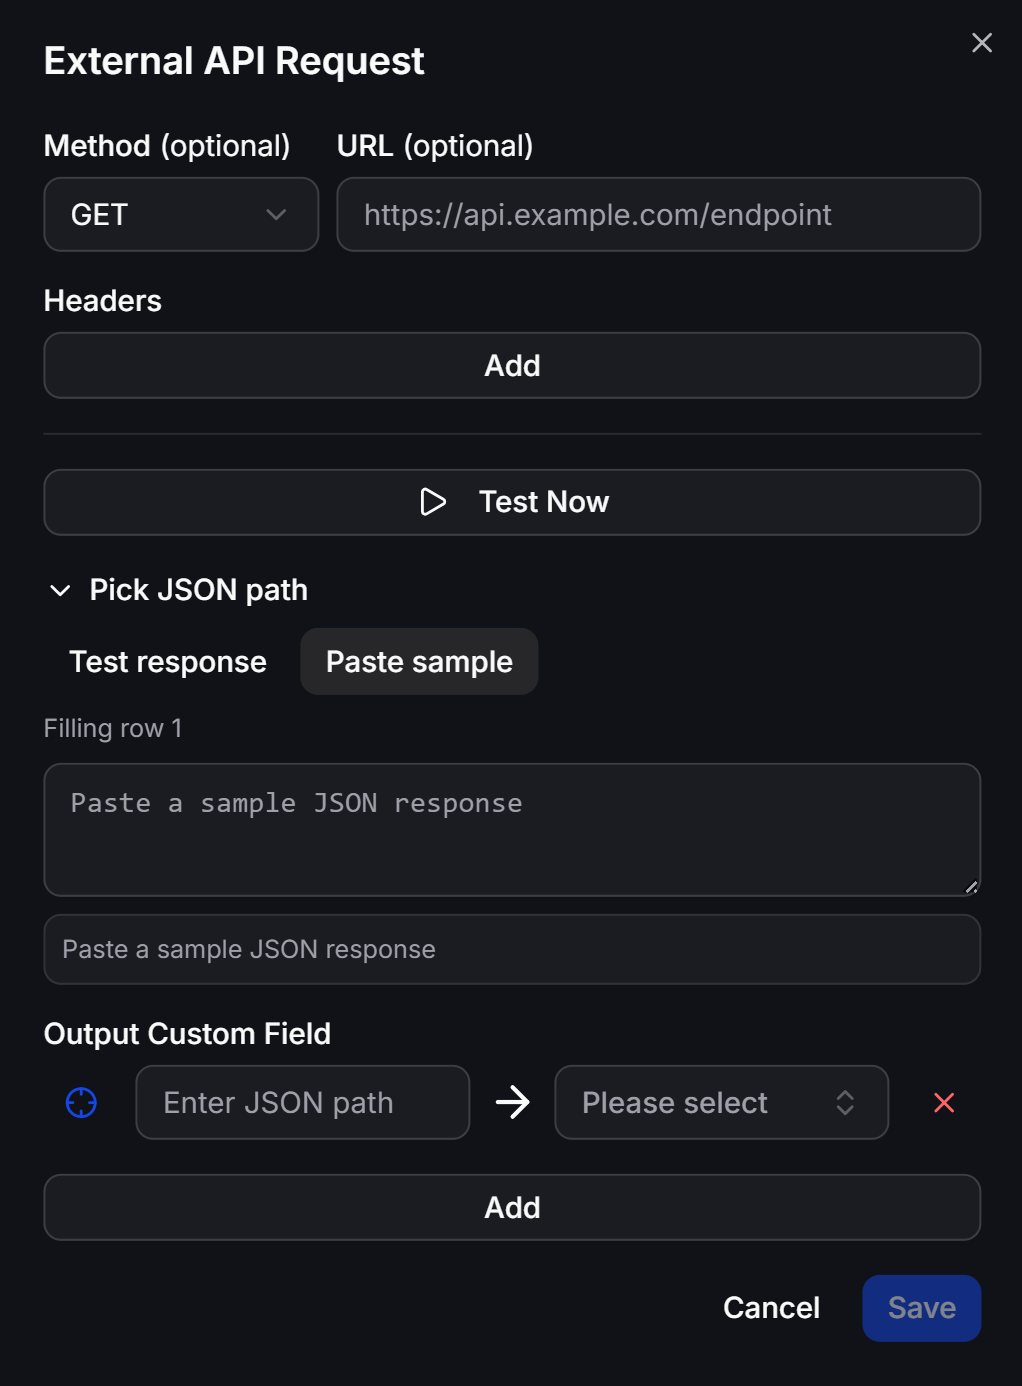
Click the **External API Request** block on the canvas to open the settings panel. The configuration window includes the following key sections:
## Detailed Configuration Guide for External API Request
Click the **External API Request** block on the canvas to open the settings panel. The configuration window includes the following key sections:
 ### Request Method
Select the HTTP method that corresponds to the operation you want your server to perform:
* **GET**: Used to look up and retrieve data from your server (e.g., checking coupon codes, verifying product inventory, fetching order status).
* **POST**: Used to send new data to your server (e.g., pushing leads to CRM, creating new orders, registering events).
* **PUT / PATCH**: Used to update existing data on your server (e.g., updating delivery address, modifying loyalty points).
* **DELETE**: Used to request data deletion on your server.
### Request URL and Endpoint
Enter the API URL of your server (e.g., `https://api.yourdomain.com/v1/orders`).
**Dynamic Variable Insertion:** You can insert customer Custom Fields or System Fields directly into the URL using `{{field_name}}` syntax.
For example: `https://api.yourdomain.com/v1/orders/{{order_id}}` (where `order_id` is automatically replaced with the actual order code of the customer currently in chat).
### Request Headers
Define HTTP header values for security authentication or to declare content format:
* **Authorization**: `Bearer YOUR_API_KEY` (API authentication token).
* **Content-Type**: `application/json` (Declares that the outgoing request body format is JSON).
When executing an API request, ChatbotX automatically appends the active contact's ID in the HTTP Header as `X-USER-ID`. Your server can use this header to identify the specific contact.
### Request Body (for POST/PUT)
When using **POST** or **PUT** methods, select the data format (typically **JSON**) and input the payload structure to send to your server. You can freely insert ChatbotX variables into the JSON string:
```json theme={null}
{
"full_name": "{{full_name}}",
"phone": "{{phone}}",
"email": "{{email}}",
"selected_product": "{{product_code}}"
}
```
### Response Mapping
Once your server processes the request and responds with a JSON payload, you have 2 ways to handle the output:
#### Option 1: Map Response to Custom Fields (Response Mapping)
Use **JSON Path** syntax (e.g., `$.data.order_status` or `$.result.points`) to extract specific values from the JSON response and save them directly into pre-created **Custom Fields** in ChatbotX. You can then use these Custom Field variables in subsequent message blocks to reply to the user.
#### Option 2: Render Dynamic Content
If you want your server to dynamically generate visual interactive interfaces (Cards, Carousels, Quick Replies) and execute system Actions, enable **Dynamic Content** mode. Your server must return a structured JSON payload conforming to `{"messages": [...], "actions": [...]}` for ChatbotX to render.
For detailed instructions and payload specifications, refer to the [Dynamic Content](/automation/dynamic-content) guide.
## Real-World Use Cases
### Example 1: Automated Order Status Lookup
**Scenario:** A customer inputs their order ID during a chat, and the Bot automatically calls your website API to fetch and display the status.
Use a **Get User Data** block to ask for the order ID and save it to a Custom Field named `order_code`.
Configure the External API Request block with the **GET** method pointing to `https://api.myshop.com/orders/{{order_code}}`.
Extract `$.data.status` from the JSON response and map it to the Custom Field `order_status`.
Create a Text Message block following the API node: "Your order {{order_code}} is currently: {{order_status}}."
### Example 2: Save Customer Leads to CRM / Google Sheets
**Scenario:** When a customer provides their Name, Phone number, and Email for consultation, the Bot automatically forwards this data to your CRM system's webhook.
* **Method:** `POST`
* **URL:** `https://crm.yourcompany.com/api/v1/leads`
* **Request Body:**
```json theme={null}
{
"name": "{{full_name}}",
"phone": "{{phone}}",
"email": "{{email}}",
"source": "ChatbotX Messenger"
}
```
## Best Practices and System Warnings
Use the **Test Request** button inside the settings modal to send a live test to your server. The system will display the actual JSON response payload, making it easy to determine the exact JSON Path for mapping variables to Custom Fields.
**Response Timeout:** Your server must respond within a maximum of 10 seconds and return an HTTP Success status code (`200 OK`). If the server responds too slowly or throws an error (`500 Internal Server Error`), the API block will bypass automatically so the customer's flow is not blocked.
Ensure the Custom Fields where you want to store the API response are pre-created under **Settings** $\rightarrow$ **Custom Fields** in ChatbotX.
### Request Method
Select the HTTP method that corresponds to the operation you want your server to perform:
* **GET**: Used to look up and retrieve data from your server (e.g., checking coupon codes, verifying product inventory, fetching order status).
* **POST**: Used to send new data to your server (e.g., pushing leads to CRM, creating new orders, registering events).
* **PUT / PATCH**: Used to update existing data on your server (e.g., updating delivery address, modifying loyalty points).
* **DELETE**: Used to request data deletion on your server.
### Request URL and Endpoint
Enter the API URL of your server (e.g., `https://api.yourdomain.com/v1/orders`).
**Dynamic Variable Insertion:** You can insert customer Custom Fields or System Fields directly into the URL using `{{field_name}}` syntax.
For example: `https://api.yourdomain.com/v1/orders/{{order_id}}` (where `order_id` is automatically replaced with the actual order code of the customer currently in chat).
### Request Headers
Define HTTP header values for security authentication or to declare content format:
* **Authorization**: `Bearer YOUR_API_KEY` (API authentication token).
* **Content-Type**: `application/json` (Declares that the outgoing request body format is JSON).
When executing an API request, ChatbotX automatically appends the active contact's ID in the HTTP Header as `X-USER-ID`. Your server can use this header to identify the specific contact.
### Request Body (for POST/PUT)
When using **POST** or **PUT** methods, select the data format (typically **JSON**) and input the payload structure to send to your server. You can freely insert ChatbotX variables into the JSON string:
```json theme={null}
{
"full_name": "{{full_name}}",
"phone": "{{phone}}",
"email": "{{email}}",
"selected_product": "{{product_code}}"
}
```
### Response Mapping
Once your server processes the request and responds with a JSON payload, you have 2 ways to handle the output:
#### Option 1: Map Response to Custom Fields (Response Mapping)
Use **JSON Path** syntax (e.g., `$.data.order_status` or `$.result.points`) to extract specific values from the JSON response and save them directly into pre-created **Custom Fields** in ChatbotX. You can then use these Custom Field variables in subsequent message blocks to reply to the user.
#### Option 2: Render Dynamic Content
If you want your server to dynamically generate visual interactive interfaces (Cards, Carousels, Quick Replies) and execute system Actions, enable **Dynamic Content** mode. Your server must return a structured JSON payload conforming to `{"messages": [...], "actions": [...]}` for ChatbotX to render.
For detailed instructions and payload specifications, refer to the [Dynamic Content](/automation/dynamic-content) guide.
## Real-World Use Cases
### Example 1: Automated Order Status Lookup
**Scenario:** A customer inputs their order ID during a chat, and the Bot automatically calls your website API to fetch and display the status.
Use a **Get User Data** block to ask for the order ID and save it to a Custom Field named `order_code`.
Configure the External API Request block with the **GET** method pointing to `https://api.myshop.com/orders/{{order_code}}`.
Extract `$.data.status` from the JSON response and map it to the Custom Field `order_status`.
Create a Text Message block following the API node: "Your order {{order_code}} is currently: {{order_status}}."
### Example 2: Save Customer Leads to CRM / Google Sheets
**Scenario:** When a customer provides their Name, Phone number, and Email for consultation, the Bot automatically forwards this data to your CRM system's webhook.
* **Method:** `POST`
* **URL:** `https://crm.yourcompany.com/api/v1/leads`
* **Request Body:**
```json theme={null}
{
"name": "{{full_name}}",
"phone": "{{phone}}",
"email": "{{email}}",
"source": "ChatbotX Messenger"
}
```
## Best Practices and System Warnings
Use the **Test Request** button inside the settings modal to send a live test to your server. The system will display the actual JSON response payload, making it easy to determine the exact JSON Path for mapping variables to Custom Fields.
**Response Timeout:** Your server must respond within a maximum of 10 seconds and return an HTTP Success status code (`200 OK`). If the server responds too slowly or throws an error (`500 Internal Server Error`), the API block will bypass automatically so the customer's flow is not blocked.
Ensure the Custom Fields where you want to store the API response are pre-created under **Settings** $\rightarrow$ **Custom Fields** in ChatbotX.