> ## Documentation Index
> Fetch the complete documentation index at: https://chatbotx.io/docs/llms.txt
> Use this file to discover all available pages before exploring further.
# Keywords
> Learn how to use Keywords in ChatbotX to trigger automatic replies when customers send predefined phrases.
**Keywords** let ChatbotX detect specific phrases in a customer's message and automatically trigger either a static reply or a matching Flow.
This is an effective way to create fast-response rules for predictable situations, such as guiding customers to a menu, checking order information, or answering frequently asked questions.
For more natural conversations that require deeper context analysis, ChatbotX recommends combining Keywords with **AI Agent** support.
## 1. Management interface
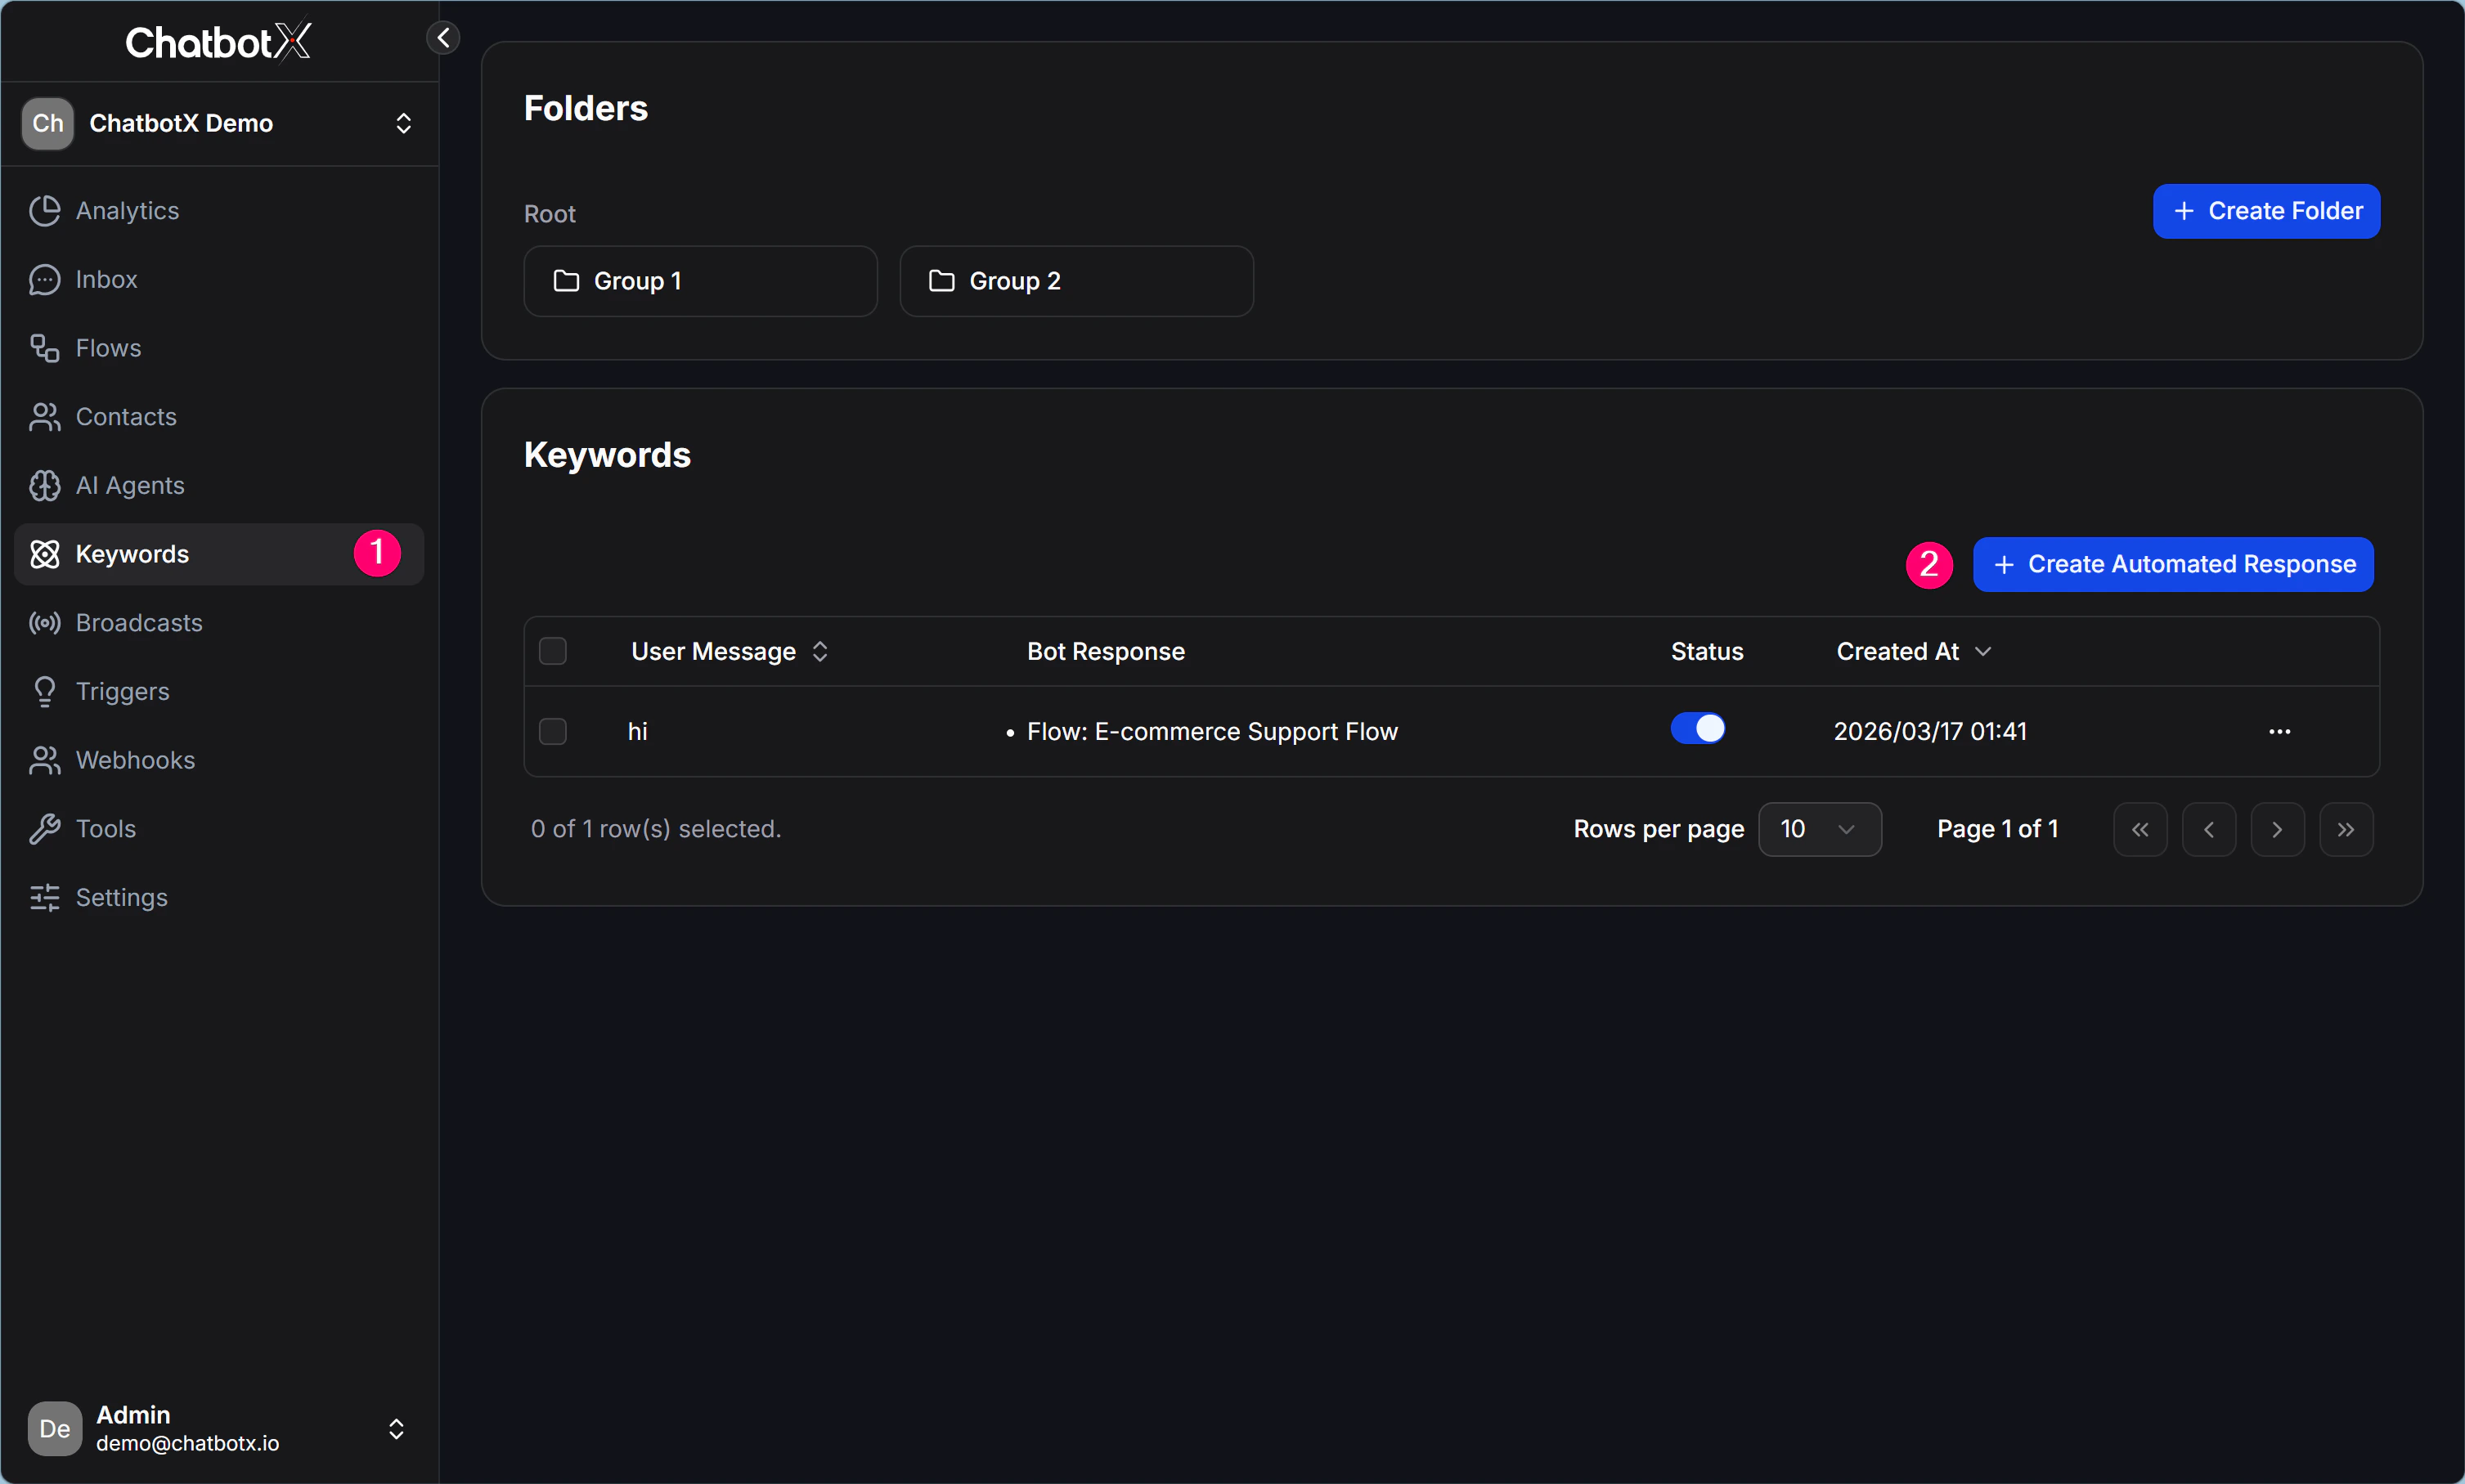
To access this feature, open **Keywords** from the left navigation. The interface is split into 2 main parts:
* **Folders:** Lets you organize keyword rules by campaign or use case, such as `Promotions` or `Customer Support`. You can create a new folder with **+ Create Folder**.
* **Keywords list:** Shows every keyword rule in a table:
* **User Message:** The phrase the system should recognize, such as `price`, `consultation`, or `menu`.
* **Bot Response:** The response action, either a text reply or a Flow trigger.
* **Status:** Whether the keyword rule is on or off.
* **Created At:** When the keyword rule was created.
 ## 2. How to set up an automated response
ChatbotX creates keyword rules through a simple modal. To start, click **+ Create Automated Response** in the top-right corner.
### Step 1: Set up User Message
* **User Message input:** Enter the keywords the system should recognize.
* **(+) Add more:** Add multiple keyword variations that should trigger the same response, such as `price quote` and `pricing`.
### Step 2: Set up Bot Response
When the system detects a matching keyword, you can choose one of these response types:
* **(+) Add text reply:** Sends a text message immediately. This works best for short and direct replies.
* **(+) Add flow reply:** Lets you choose an existing Flow from a dropdown list. When the keyword is matched, that Flow starts automatically.
## 2. How to set up an automated response
ChatbotX creates keyword rules through a simple modal. To start, click **+ Create Automated Response** in the top-right corner.
### Step 1: Set up User Message
* **User Message input:** Enter the keywords the system should recognize.
* **(+) Add more:** Add multiple keyword variations that should trigger the same response, such as `price quote` and `pricing`.
### Step 2: Set up Bot Response
When the system detects a matching keyword, you can choose one of these response types:
* **(+) Add text reply:** Sends a text message immediately. This works best for short and direct replies.
* **(+) Add flow reply:** Lets you choose an existing Flow from a dropdown list. When the keyword is matched, that Flow starts automatically.
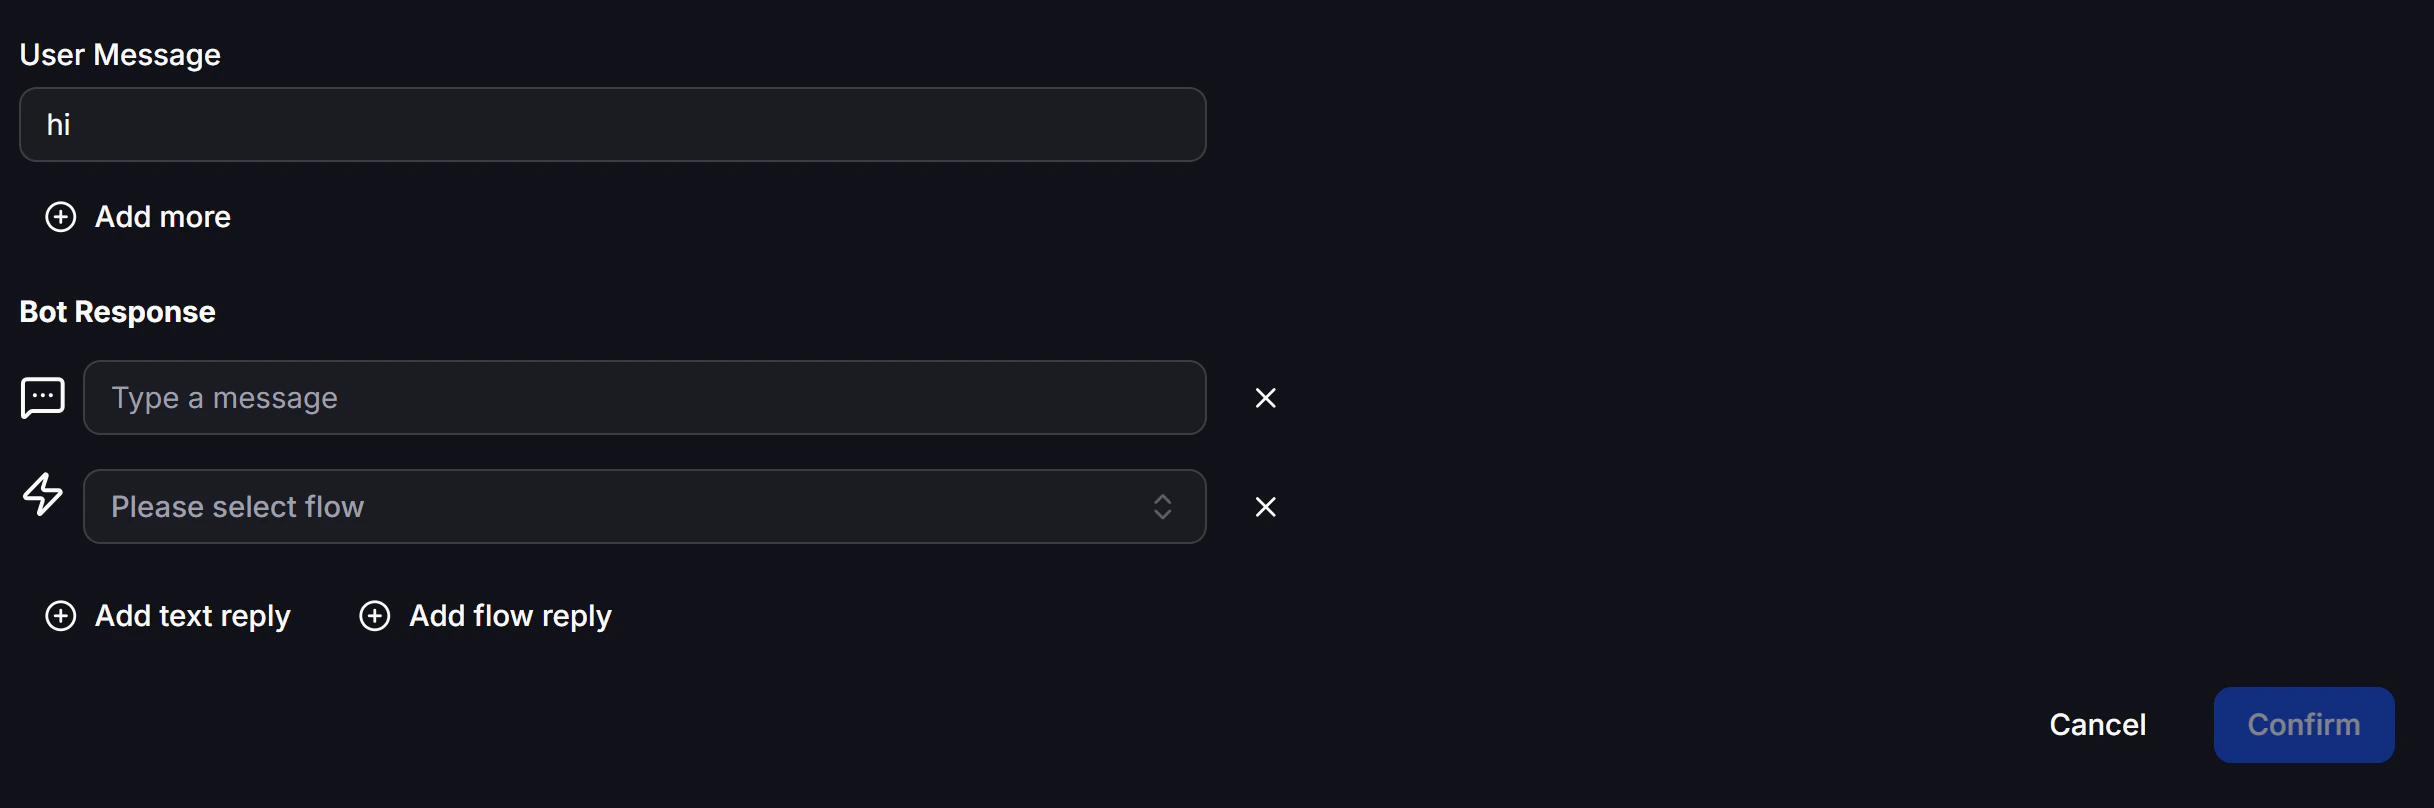 After finishing the setup, click **Confirm** to save the rule.
## 3. Automation priority
When rule-based automation and AI are both active, ChatbotX follows a priority order to handle the customer's message as accurately as possible:
1. **Keywords:** Highest priority. The system always checks the Keywords list first. If the message contains a valid keyword, the matching action runs immediately and processing stops there.
2. **OpenAI / LLMs:** If no keyword matches, the message is sent to the highest-priority AI model, which is OpenAI by default, for analysis and response.
3. **Fallback AI models (Claude / Gemini / xAI / DeepSeek...):** If the main AI model fails to connect or times out, the system automatically forwards the request to preconfigured backup models so the customer experience is not interrupted.
4. **Default Reply:** This is the final fallback when all automation and AI options are unavailable. The system sends a fixed message, such as a delay notice or a handoff message to a human agent.
After finishing the setup, click **Confirm** to save the rule.
## 3. Automation priority
When rule-based automation and AI are both active, ChatbotX follows a priority order to handle the customer's message as accurately as possible:
1. **Keywords:** Highest priority. The system always checks the Keywords list first. If the message contains a valid keyword, the matching action runs immediately and processing stops there.
2. **OpenAI / LLMs:** If no keyword matches, the message is sent to the highest-priority AI model, which is OpenAI by default, for analysis and response.
3. **Fallback AI models (Claude / Gemini / xAI / DeepSeek...):** If the main AI model fails to connect or times out, the system automatically forwards the request to preconfigured backup models so the customer experience is not interrupted.
4. **Default Reply:** This is the final fallback when all automation and AI options are unavailable. The system sends a fixed message, such as a delay notice or a handoff message to a human agent.