> ## Documentation Index
> Fetch the complete documentation index at: https://chatbotx.io/docs/llms.txt
> Use this file to discover all available pages before exploring further.
# Meta CAPI Event
> Set up Meta CAPI Event in ChatbotX to send Lead Submitted events from Flows to Meta Conversions API for Messenger, Instagram, and WhatsApp.
## Overview of Meta CAPI Event
**Meta CAPI Event** is an Action that sends conversion events from ChatbotX to the Meta Conversions API. Use it after a contact submits their details or completes a registration to record a lead for an advertising campaign.
The Action supports **Messenger**, **Instagram**, and **WhatsApp**. For WhatsApp, events are sent only for conversations that started from a click-to-WhatsApp ad.
## Set up the Dataset
A Dataset is where Meta receives and stores conversion events. Set up the Dataset for the Business Manager and Facebook Page that should receive the events.
Set up the Dataset in the settings for each channel:
1. Open **Settings**.
2. Select **Channels**.
3. Select the channel you want to configure: **WhatsApp**, **Messenger**, or **Instagram**.
4. Open **Manage** for the channel you want to connect.
5. Open the **Ads Optimization** tab.
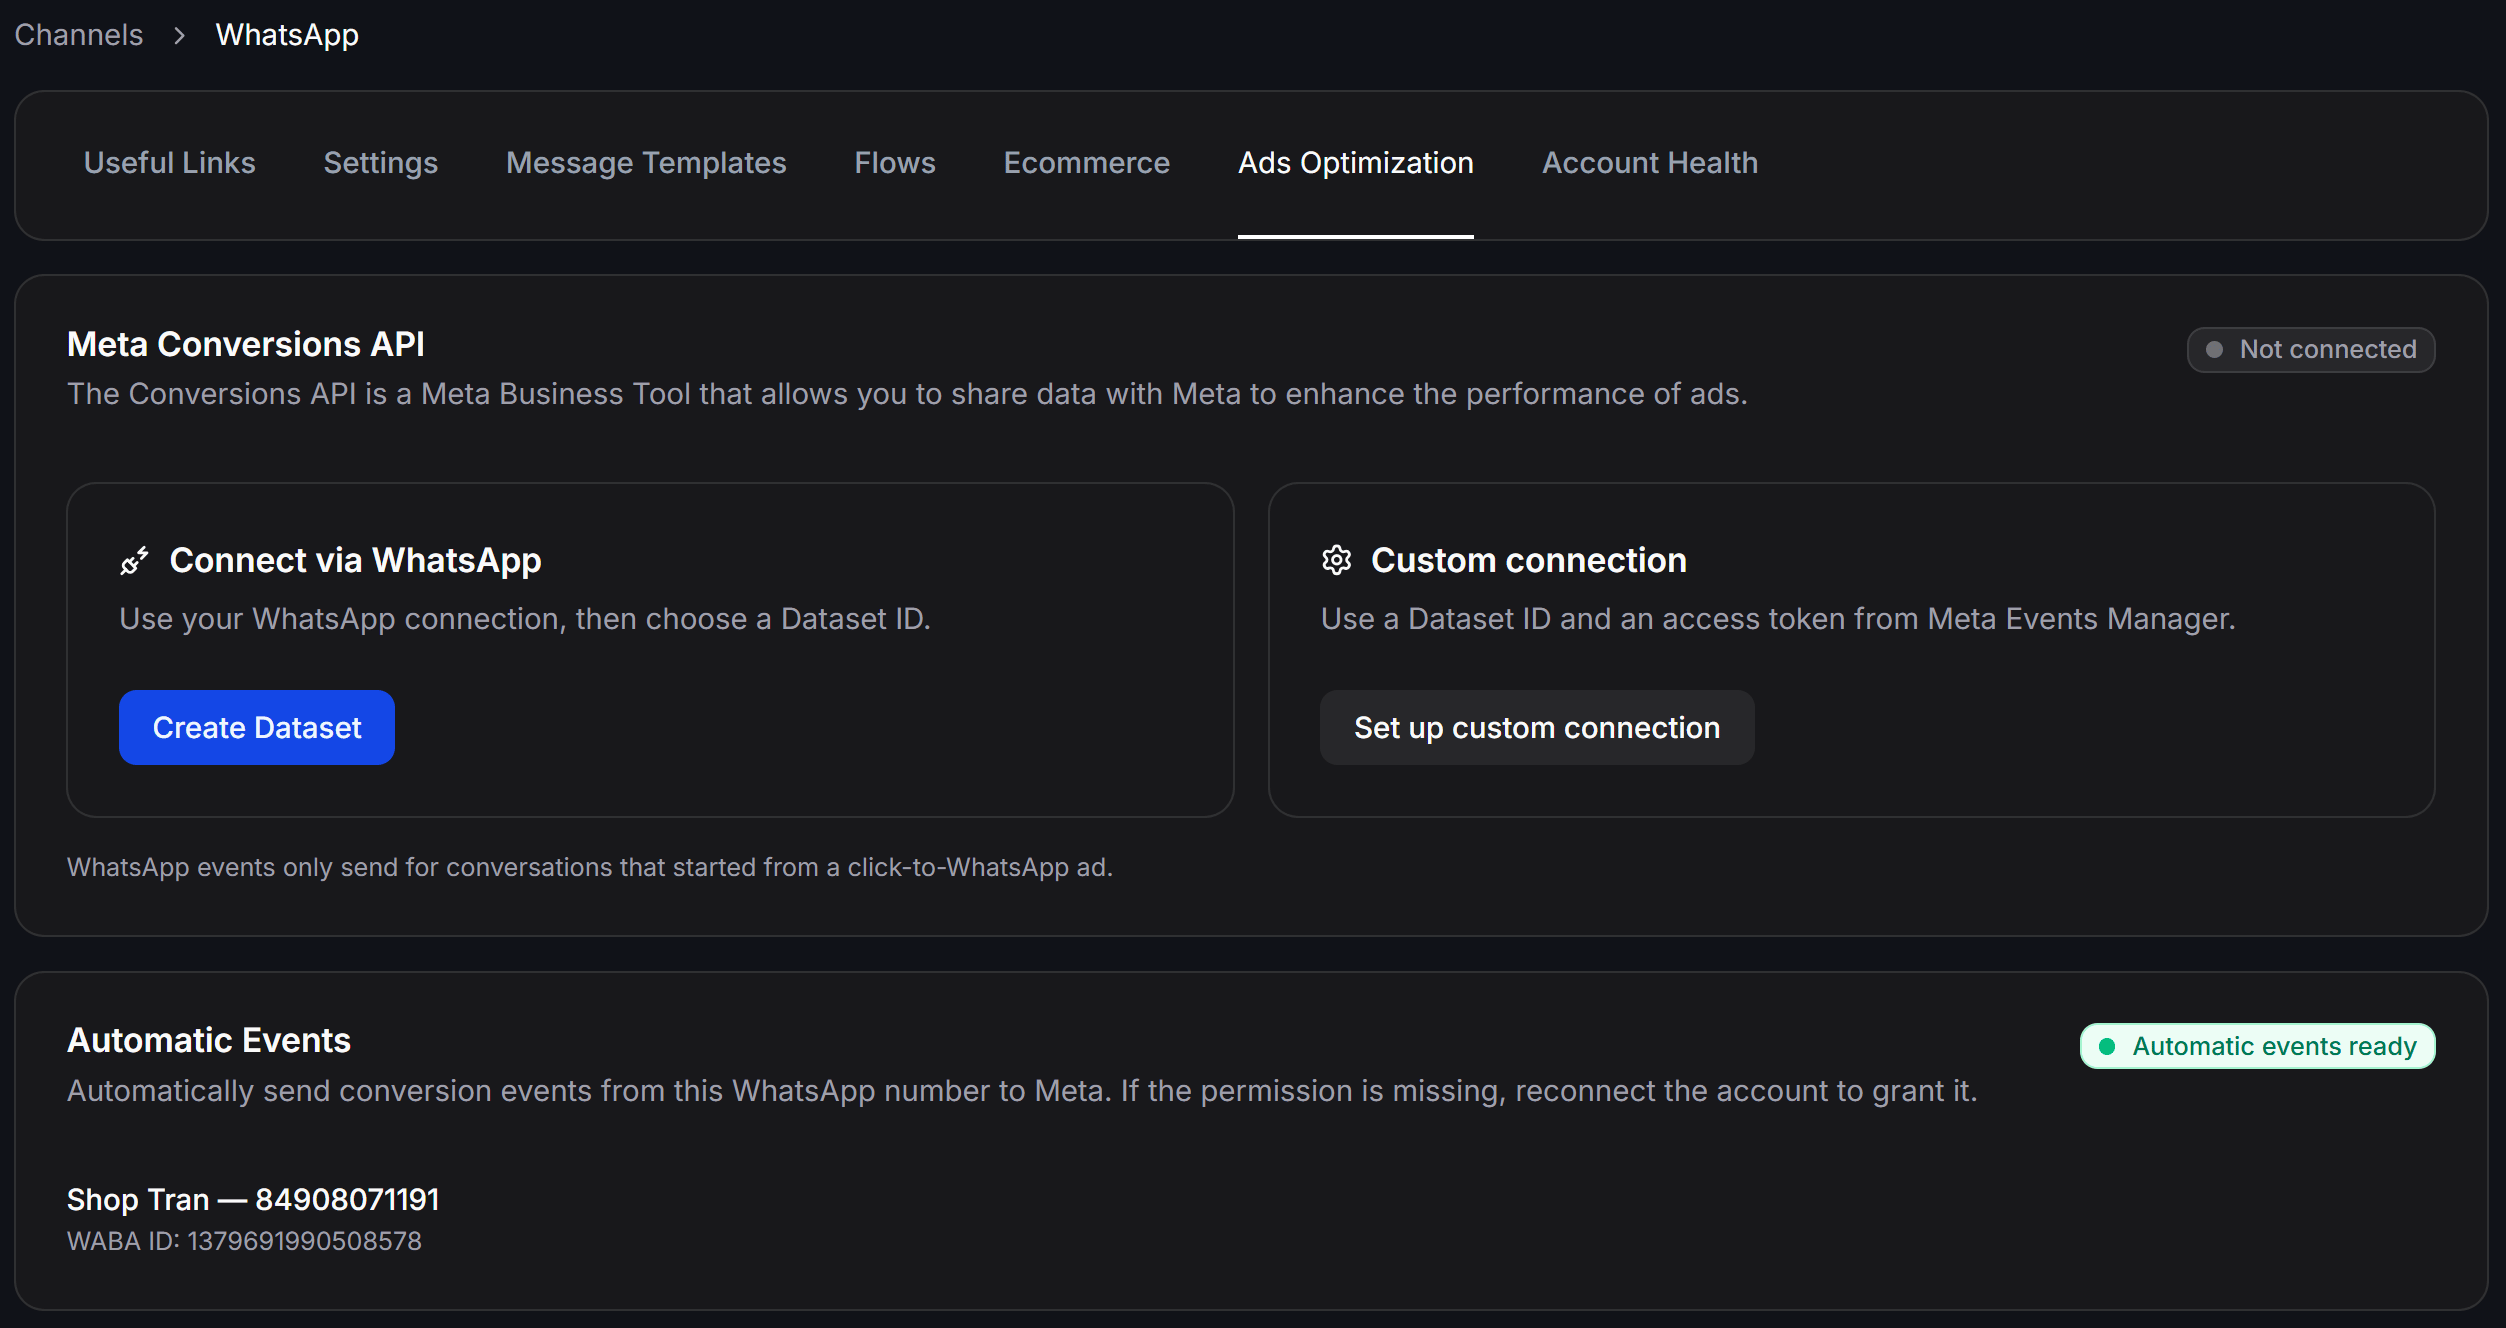
In the **Meta Conversions API** card:
* Select **Create Dataset** to create a Dataset and connect it through the current account or channel.
* Or select **Set up custom connection** if you already have a **Dataset ID** and **Access Token** from Meta Events Manager.
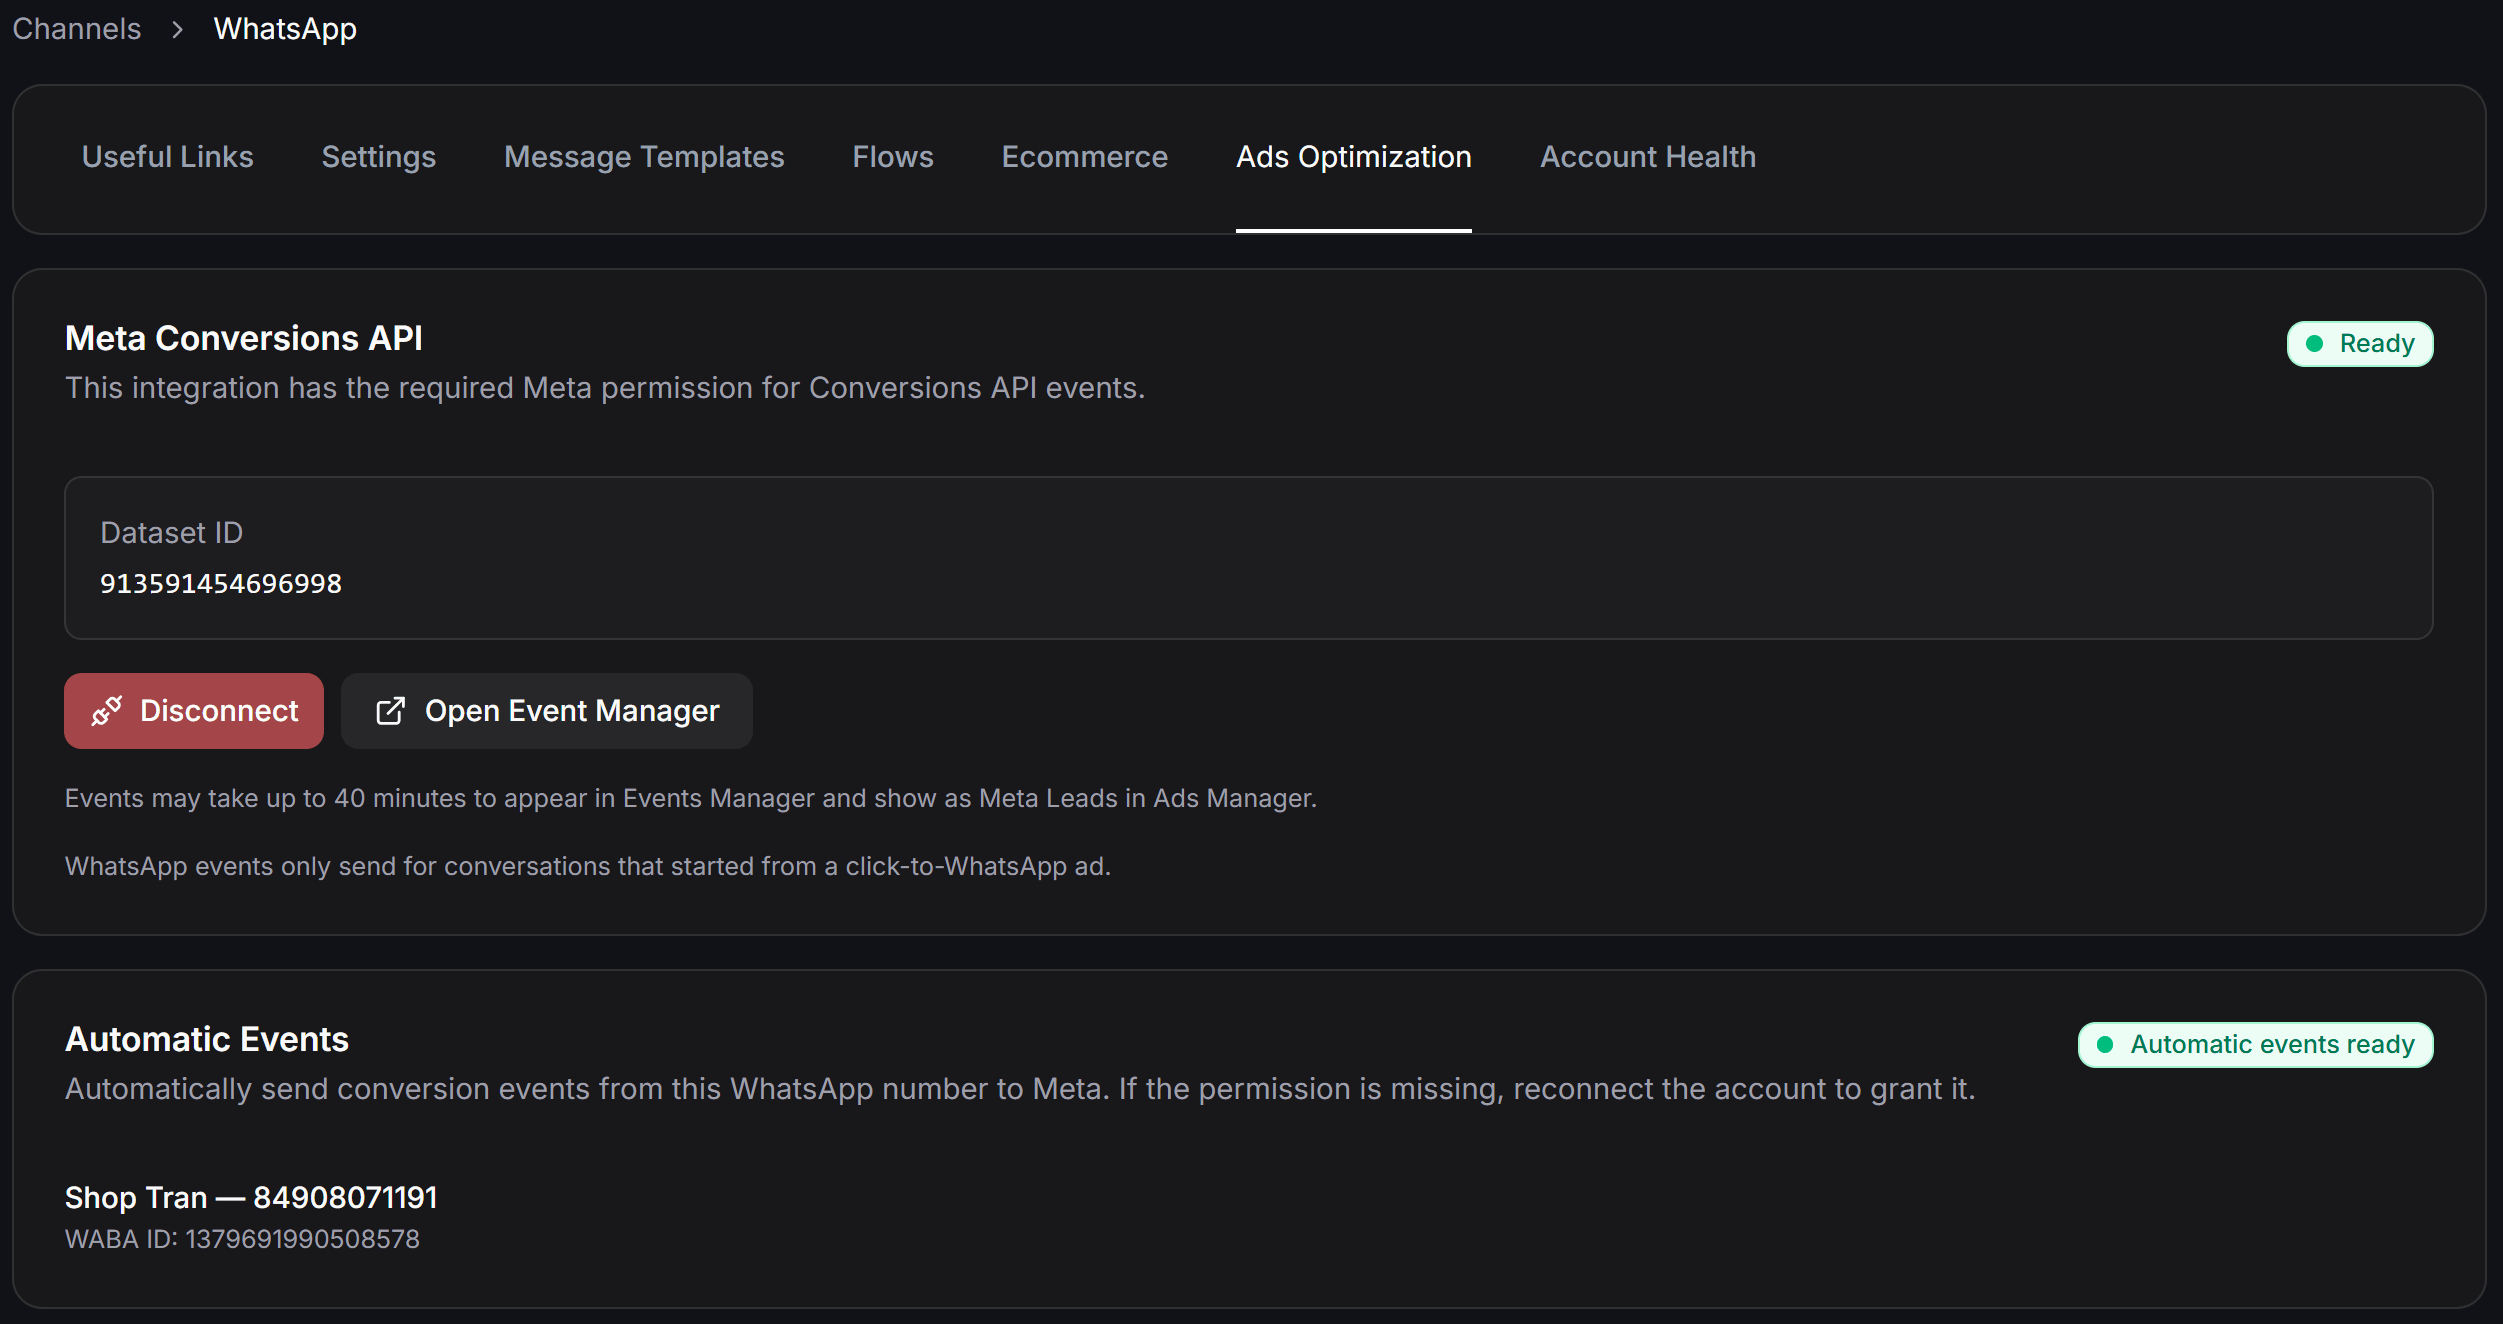
After the connection succeeds, verify that the card shows **Ready** and the **Dataset ID**.
The example below uses **WhatsApp**. The interface and steps are similar for **Messenger** and **Instagram**. In the **Meta Conversions API** card, choose the connection method that matches your Dataset.
 After connecting, the card shows the **Ready** status, **Dataset ID**, **Disconnect**, and **Open Event Manager** buttons. The **Automatic Events** section shows the status and channel that sends events. Meta may take up to 40 minutes to display events in **Events Manager**.
 ## Add Meta CAPI Event to a Flow
Add the Action after the contact submits their details or confirms a registration.
### How it works
The **Send Meta CAPI Event** block does not require you to choose a channel in the Flow. When a contact reaches this block, ChatbotX identifies the channel of the current conversation and sends the event using the Dataset created and connected for that channel. For example, a contact chatting through WhatsApp uses the WhatsApp configuration, while contacts on Messenger or Instagram use the corresponding configuration. Connect a Dataset for every channel that the Flow may receive contacts from.
Go to **Flows** and open the Flow where you want to record a lead.
Add a **Perform Action** node where the event should be sent.
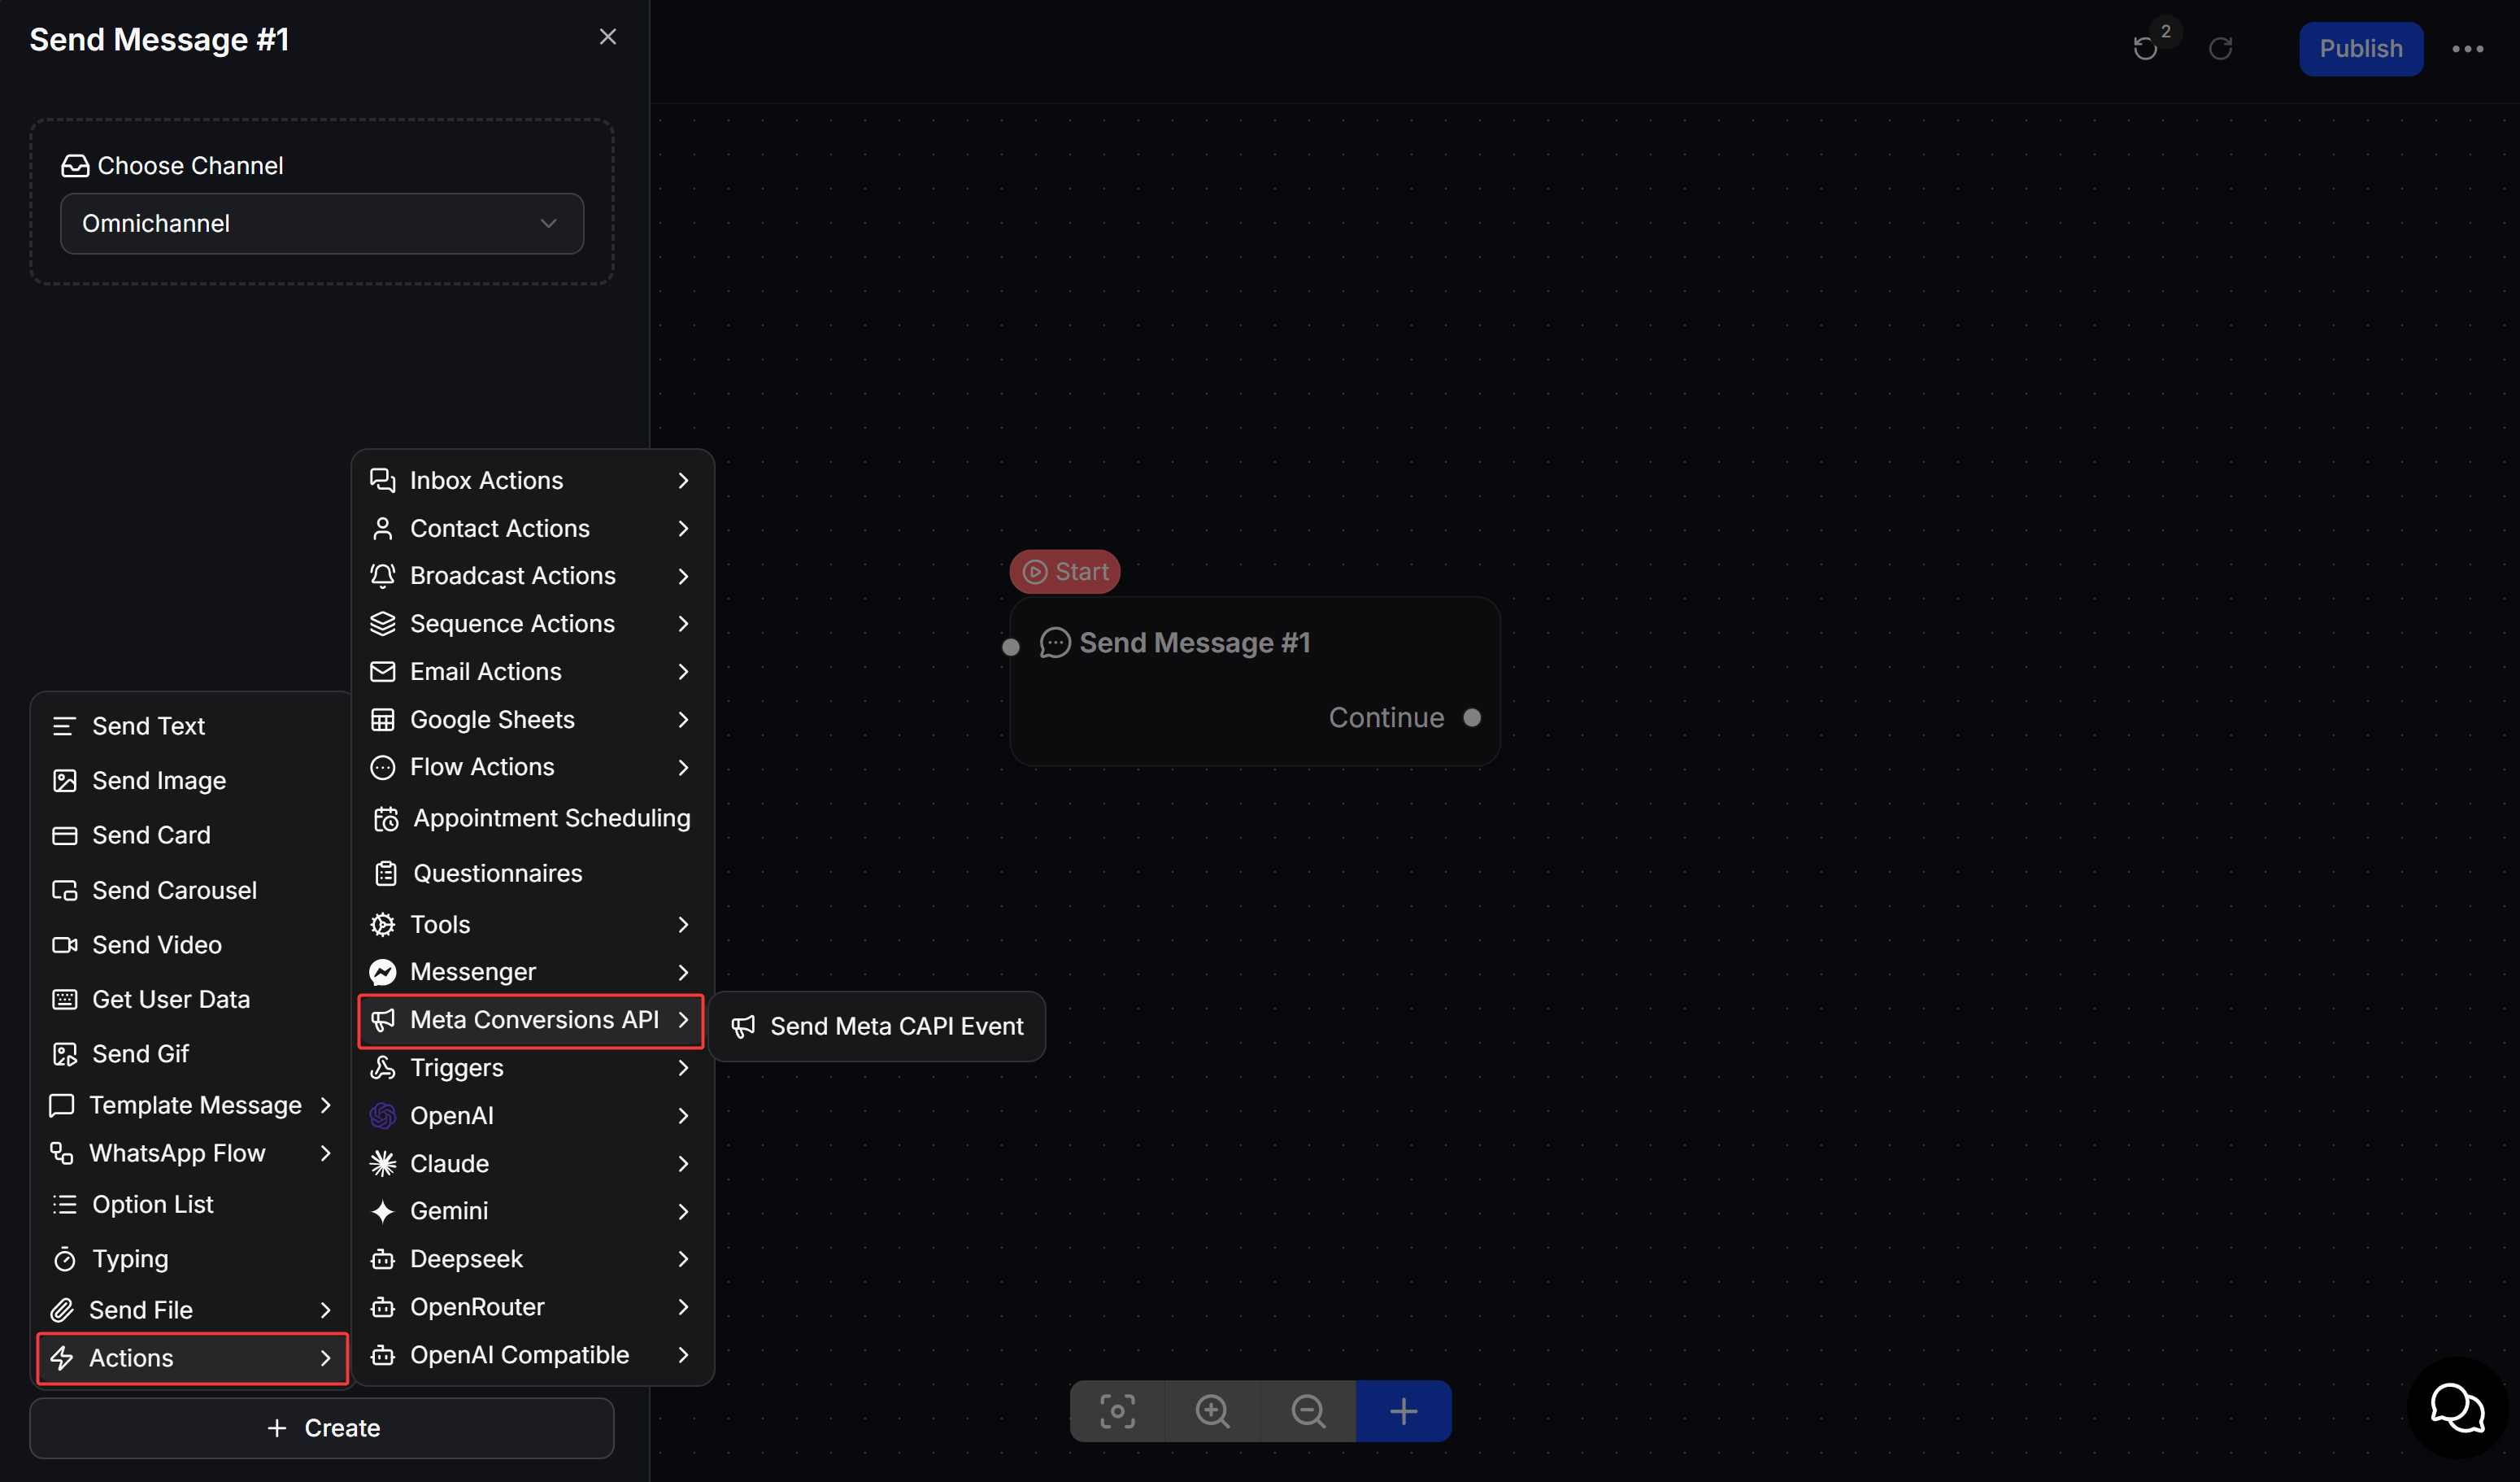
In the Actions list, select **Meta Conversions API** > **Send Meta CAPI Event**.
## Add Meta CAPI Event to a Flow
Add the Action after the contact submits their details or confirms a registration.
### How it works
The **Send Meta CAPI Event** block does not require you to choose a channel in the Flow. When a contact reaches this block, ChatbotX identifies the channel of the current conversation and sends the event using the Dataset created and connected for that channel. For example, a contact chatting through WhatsApp uses the WhatsApp configuration, while contacts on Messenger or Instagram use the corresponding configuration. Connect a Dataset for every channel that the Flow may receive contacts from.
Go to **Flows** and open the Flow where you want to record a lead.
Add a **Perform Action** node where the event should be sent.
In the Actions list, select **Meta Conversions API** > **Send Meta CAPI Event**.
 ## Configure the event
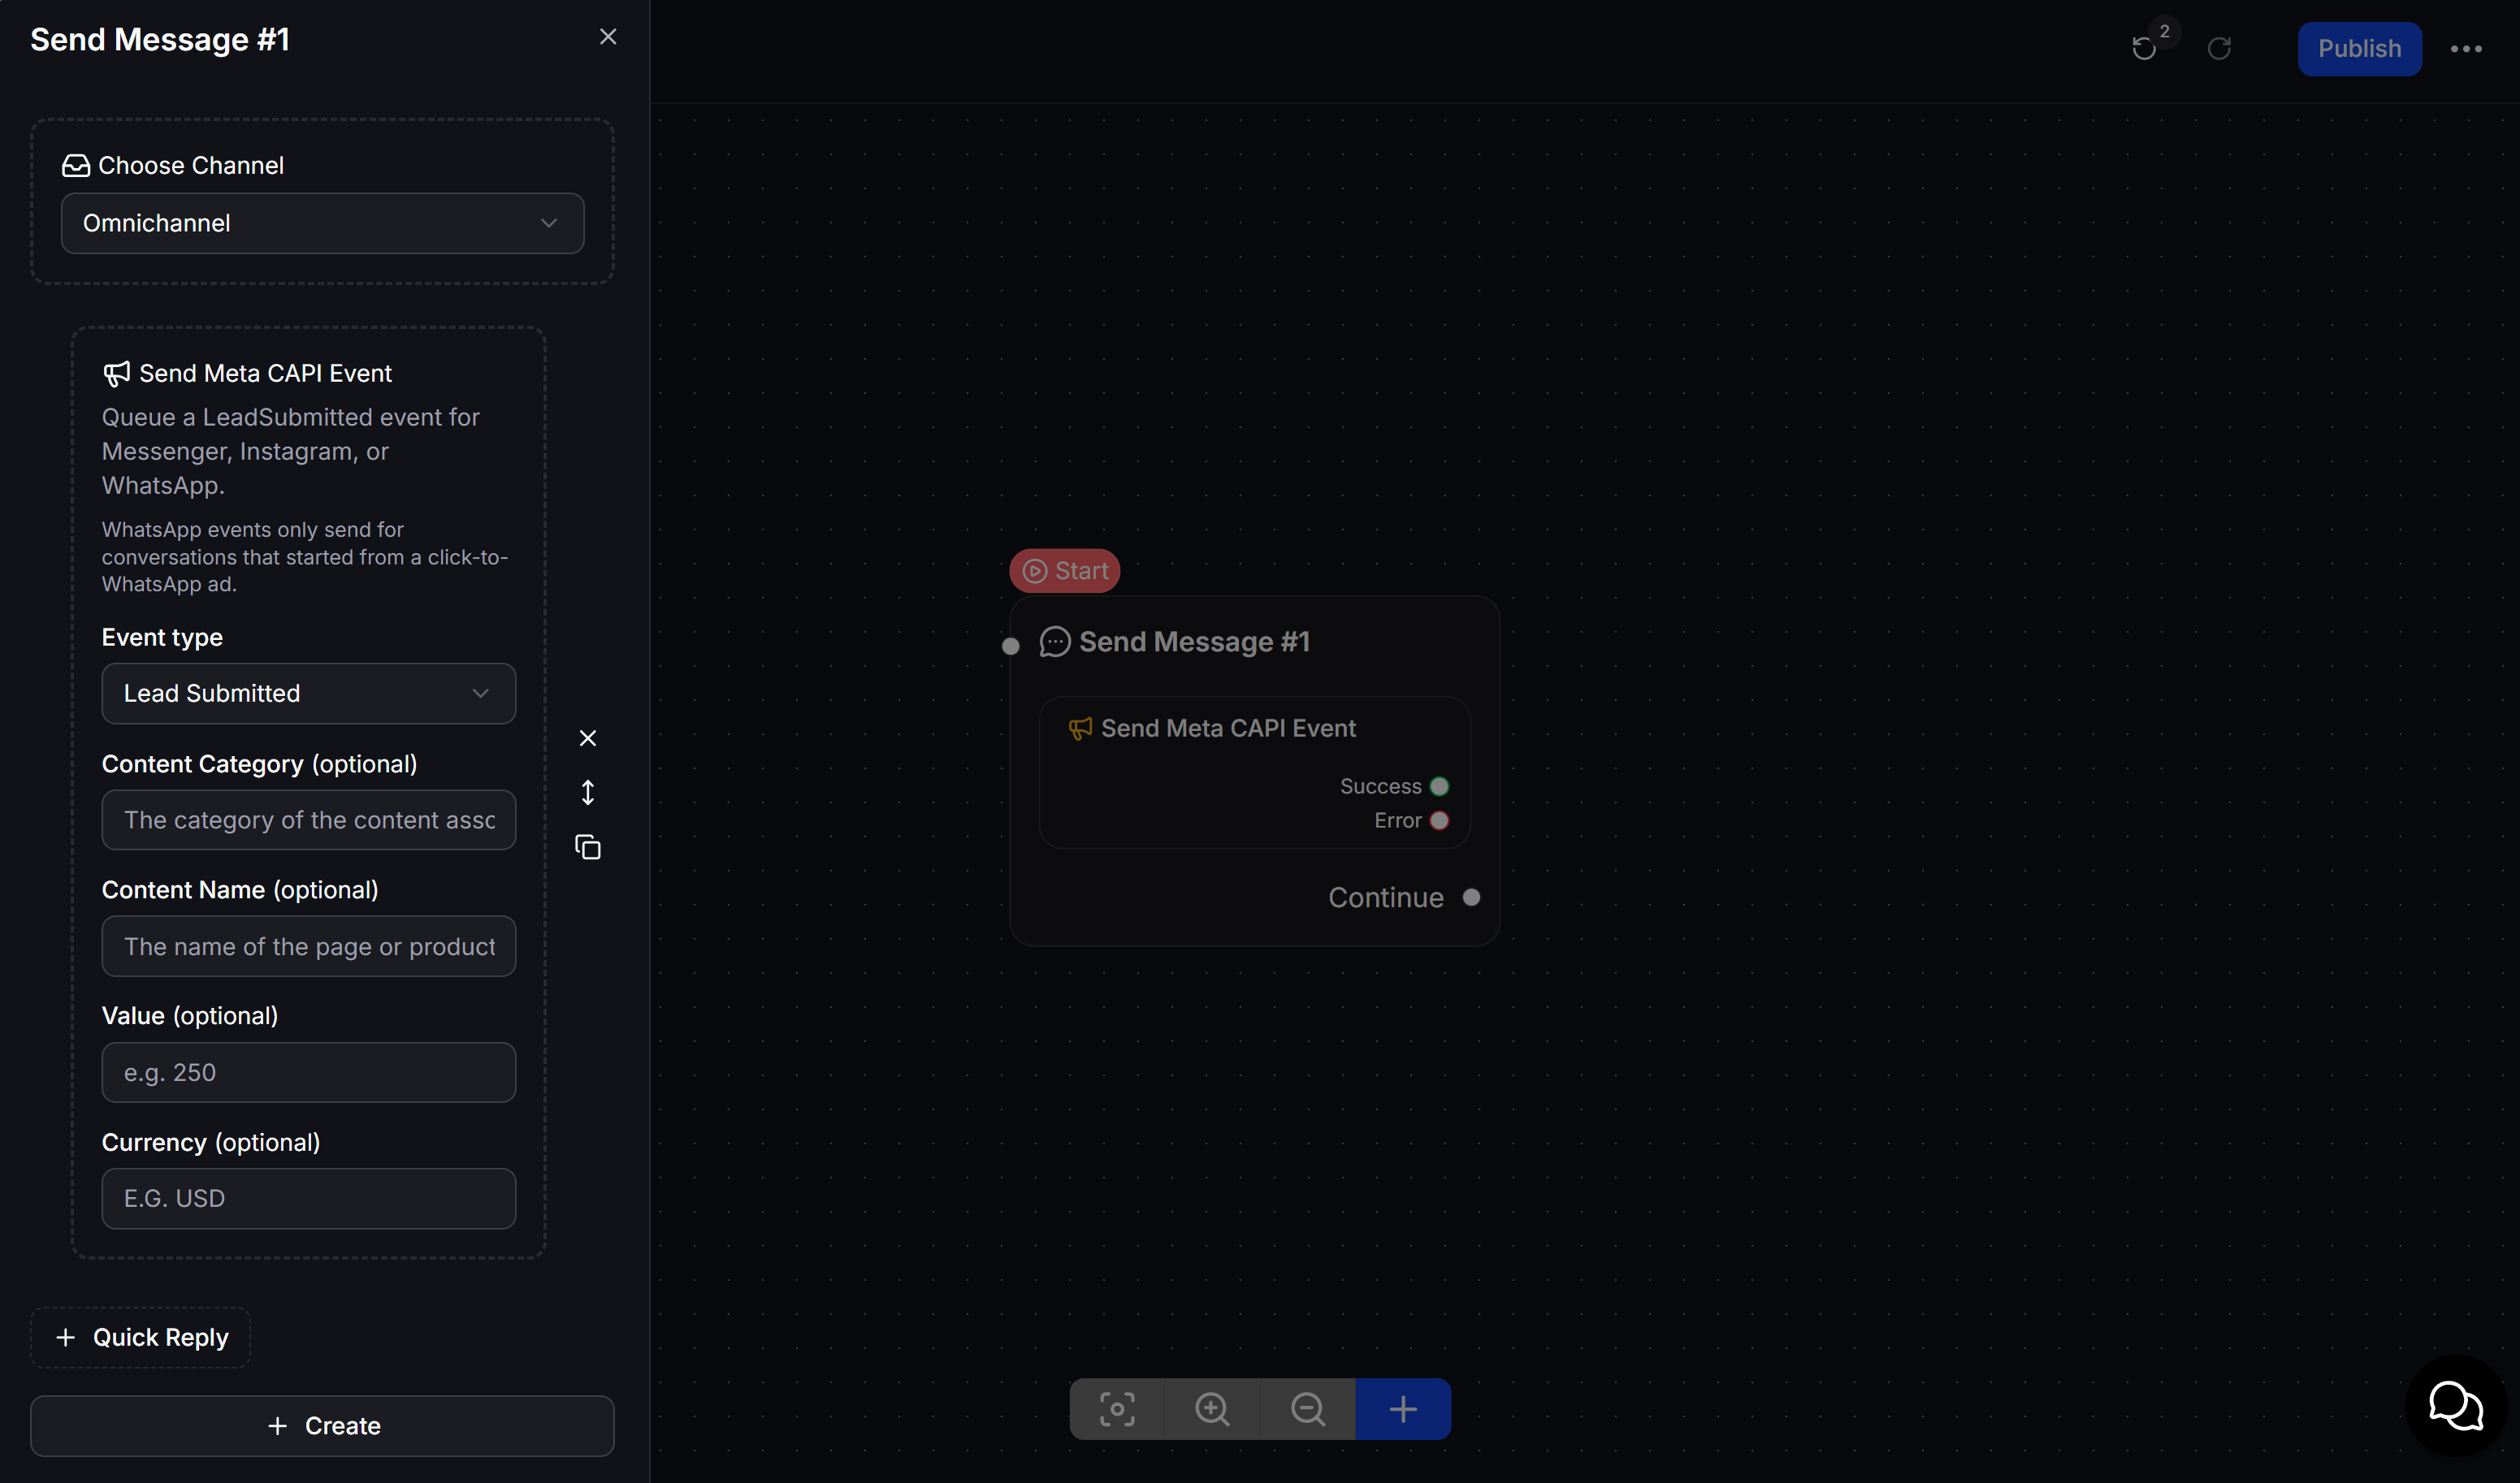
In the Action settings panel, configure the following fields:
* **Event type**: Select the event type to send to Meta. Available options:
* `Purchase`
* `Lead Submitted`
* `Order Created`
* `Order Shipped`
* `Order Canceled`
* `Order Returned`
* `Qualified Lead`
* `View Content`
* `AddToCart`
* `Initiate Checkout`
* **Content Category** *(optional)*: The category of the lead, such as `Consultation` or `Course`.
* **Content Name** *(optional)*: The product, service, or offer the contact is interested in.
* **Value** *(optional)*: The estimated value of the lead or transaction.
* **Currency** *(optional)*: The currency used with **Value**, such as `VND` or `USD`.
## Configure the event
In the Action settings panel, configure the following fields:
* **Event type**: Select the event type to send to Meta. Available options:
* `Purchase`
* `Lead Submitted`
* `Order Created`
* `Order Shipped`
* `Order Canceled`
* `Order Returned`
* `Qualified Lead`
* `View Content`
* `AddToCart`
* `Initiate Checkout`
* **Content Category** *(optional)*: The category of the lead, such as `Consultation` or `Course`.
* **Content Name** *(optional)*: The product, service, or offer the contact is interested in.
* **Value** *(optional)*: The estimated value of the lead or transaction.
* **Currency** *(optional)*: The currency used with **Value**, such as `VND` or `USD`.
 ## Example: record a consultation lead
Suppose you have a service consultation Flow where a contact selects **Register for consultation**, enters their name and phone number, and receives a confirmation message.
Place **Send Meta CAPI Event** immediately after the contact submits all required details. Select **Lead Submitted**, set **Content Category** to `Consultation`, set **Content Name** to `Chatbot implementation package`, and enter **Value** if your business assigns a value to each lead. When the Flow reaches this Action, ChatbotX sends the lead event to the configured Dataset.
## Notes
* Complete the Facebook Ads connection, grant the required permissions, and configure the Dataset before adding the Action to a Flow.
* Verify the selected Business Manager and Facebook Page to avoid sending events to an unrelated Dataset.
* For WhatsApp, use Meta CAPI Event only for conversations that started from a click-to-WhatsApp ad.
## Example: record a consultation lead
Suppose you have a service consultation Flow where a contact selects **Register for consultation**, enters their name and phone number, and receives a confirmation message.
Place **Send Meta CAPI Event** immediately after the contact submits all required details. Select **Lead Submitted**, set **Content Category** to `Consultation`, set **Content Name** to `Chatbot implementation package`, and enter **Value** if your business assigns a value to each lead. When the Flow reaches this Action, ChatbotX sends the lead event to the configured Dataset.
## Notes
* Complete the Facebook Ads connection, grant the required permissions, and configure the Dataset before adding the Action to a Flow.
* Verify the selected Business Manager and Facebook Page to avoid sending events to an unrelated Dataset.
* For WhatsApp, use Meta CAPI Event only for conversations that started from a click-to-WhatsApp ad.