> ## Documentation Index
> Fetch the complete documentation index at: https://chatbotx.io/docs/llms.txt
> Use this file to discover all available pages before exploring further.
# How to Connect and Use the API Channel in ChatbotX
> Discover ChatbotX API Channels, real-world use cases for custom apps, CRM, SMS gateways, personal WhatsApp, and official API Reference.
The **API Channel** is ChatbotX's universal custom messaging integration gateway, allowing you to connect any messaging platform, mobile application, custom website, or backend enterprise system into your ChatbotX Workspace.
Unlike standard channels like Facebook Messenger, Zalo OA, or Instagram, the API Channel offers maximum flexibility by putting full connection control into your hands through standard REST APIs and bidirectional Webhooks.
Every customer message arriving from your custom systems is seamlessly ingested into the centralized **ChatbotX Inbox**, instantly triggering Flow Automation sequences, smart AI Agent responses, or live support agent routing rules.
## Real-World Applications & Use Cases
The API Channel opens up unlimited automation possibilities for your business:
### 1. In-App Chat for Custom Mobile Apps and Websites
If your company has a proprietary mobile application (E-commerce app, food delivery, fintech, member portal), you can embed a native chat interface within your app and bridge it directly to ChatbotX. Customers chat comfortably inside your app while your support team and AI Agents manage all conversations inside ChatbotX Inbox.
### 2. Connect Third-Party Messaging Platforms
You can connect international or specialized messaging networks that are not natively built into ChatbotX, such as Viber, dedicated Telegram bots, LINE, WeChat, Discord, or internal company chat tools.
### 3. Bidirectional SMS Gateway
Integrate with telecommunications providers or SMS gateways (such as Twilio, SpeedSMS, eSMS). When customers reply to brand SMS notifications, their messages are pushed into ChatbotX for automated AI handling and outbound reply delivery via SMS.
### 4. Connect Personal WhatsApp or WhatsApp Web Numbers
Empower your business to use existing personal or business phone numbers for 1:1 customer communication via an external gateway bridge (such as WAHA) without incurring Meta Cloud API per-conversation charges.
### 5. Synchronize with Enterprise Systems (CRM, ERP, Helpdesk)
Connect enterprise platforms such as Salesforce, HubSpot, Zoho, or Odoo to dispatch real-time order alerts, contract status updates, or customer support tickets automatically.
## How to Create an API Channel on ChatbotX
To start integrating a custom channel into your Workspace:
### Step 1: Navigate to API Channel Settings
1. Log in to your **ChatbotX** Workspace.
2. In the left navigation menu, click **Settings**.
3. Select the **Channels** tab in the top bar.
4. Scroll down to the channel list and select **API**.
5. Click the **Add API** button in the upper-right corner.
 ### Step 2: Configure Channel Details
In the **Add API** modal window, fill in:
* **Name:** Enter a descriptive name for your channel (e.g., `Mobile Customer App`, `SMS Support Gateway`, or `WhatsApp Sales`).
* **Callback URL:** Enter your server's Webhook URL to receive bidirectional message replies dispatched from ChatbotX when AI Agents or support staff respond in Inbox.
> **💡 Important Note:** The API Channel is specifically designed for establishing **bidirectional, interactive messaging channels**. If your goal is simply to send one-way broadcast notifications from an external server or perform backend data operations (such as managing contacts or triggering automation flows), you **do not need to create an API Channel**. Instead, please refer directly to the general ChatbotX REST API documentation at:\
> 👉 **[API Overview - ChatbotX Documentation](https://chatbotx.io/docs/api-reference/api-overview)**
### Step 2: Configure Channel Details
In the **Add API** modal window, fill in:
* **Name:** Enter a descriptive name for your channel (e.g., `Mobile Customer App`, `SMS Support Gateway`, or `WhatsApp Sales`).
* **Callback URL:** Enter your server's Webhook URL to receive bidirectional message replies dispatched from ChatbotX when AI Agents or support staff respond in Inbox.
> **💡 Important Note:** The API Channel is specifically designed for establishing **bidirectional, interactive messaging channels**. If your goal is simply to send one-way broadcast notifications from an external server or perform backend data operations (such as managing contacts or triggering automation flows), you **do not need to create an API Channel**. Instead, please refer directly to the general ChatbotX REST API documentation at:\
> 👉 **[API Overview - ChatbotX Documentation](https://chatbotx.io/docs/api-reference/api-overview)**
 ### Step 3: Create Channel and Copy Channel API Token
1. Click the green **Create** button.
2. ChatbotX will generate your unique **Channel API Token** (prefixed with `cbx_api_...`).
3. Copy and securely store this token for your developers to use in API request authentication headers.
### Step 3: Create Channel and Copy Channel API Token
1. Click the green **Create** button.
2. ChatbotX will generate your unique **Channel API Token** (prefixed with `cbx_api_...`).
3. Copy and securely store this token for your developers to use in API request authentication headers.
 > **Note:** You can create multiple API Channels within the same Workspace to independently manage different data sources, branches, or communication apps.
## Technical API Reference (For Developers)
If you are a developer building custom integrations for your own software, ChatbotX provides an interactive API reference complete with endpoints, JSON schemas, and code samples:
👉 **[ChatbotX API Reference: API Channel Documentation](https://app.chatbotx.io/api#tag/api-channel)**
The interactive API Reference documentation covers:
* **Authentication:** How to pass your `Channel API Token` via the `Authorization: Bearer ` header.
* **Inbound Message API:** REST endpoints to push text, images, audio / voice notes, videos, and documents (PDF, DOCX, XLSX, File) into ChatbotX Inbox.
* **Outbound Webhooks:** Event payload structures received at your `Callback URL` when AI Agents or human team members reply in Inbox.
* **Contact Management:** Synchronizing subscriber profiles, custom fields, and conversation tags.
## Practical Guide: Integrating Personal WhatsApp via WAHA Gateway
Below is a practical implementation example of the API Channel: Connecting personal WhatsApp or WhatsApp Web numbers to ChatbotX using the **WAHA ChatbotX Gateway** (`craybull/waha-chatbotx-dashboard`).
> **Note:** You can create multiple API Channels within the same Workspace to independently manage different data sources, branches, or communication apps.
## Technical API Reference (For Developers)
If you are a developer building custom integrations for your own software, ChatbotX provides an interactive API reference complete with endpoints, JSON schemas, and code samples:
👉 **[ChatbotX API Reference: API Channel Documentation](https://app.chatbotx.io/api#tag/api-channel)**
The interactive API Reference documentation covers:
* **Authentication:** How to pass your `Channel API Token` via the `Authorization: Bearer ` header.
* **Inbound Message API:** REST endpoints to push text, images, audio / voice notes, videos, and documents (PDF, DOCX, XLSX, File) into ChatbotX Inbox.
* **Outbound Webhooks:** Event payload structures received at your `Callback URL` when AI Agents or human team members reply in Inbox.
* **Contact Management:** Synchronizing subscriber profiles, custom fields, and conversation tags.
## Practical Guide: Integrating Personal WhatsApp via WAHA Gateway
Below is a practical implementation example of the API Channel: Connecting personal WhatsApp or WhatsApp Web numbers to ChatbotX using the **WAHA ChatbotX Gateway** (`craybull/waha-chatbotx-dashboard`).
 ### Step 1: Deploy WAHA Gateway
Start the WAHA Gateway container on your computer or server using Docker:
```bash theme={null}
git clone https://github.com/craybull/waha-chatbotx-dashboard.git
cd waha-chatbotx-dashboard
docker compose -f docker-compose.chatbotx.yaml up -d
```
Once running, access the dashboard at `http://localhost:3000/dashboard` (or your custom domain URL).
### Step 2: Connect Your WhatsApp Account (Dashboard Step 1)
In the **Step 1: Connect WhatsApp Account** card on the left:
#### Method 1: Scan QR Code (Recommended)
1. Open WhatsApp on your phone.
2. Go to **Settings** > **Linked Devices**.
3. Tap **Link a Device** and point your phone's camera at the QR code displayed on the screen.
### Step 1: Deploy WAHA Gateway
Start the WAHA Gateway container on your computer or server using Docker:
```bash theme={null}
git clone https://github.com/craybull/waha-chatbotx-dashboard.git
cd waha-chatbotx-dashboard
docker compose -f docker-compose.chatbotx.yaml up -d
```
Once running, access the dashboard at `http://localhost:3000/dashboard` (or your custom domain URL).
### Step 2: Connect Your WhatsApp Account (Dashboard Step 1)
In the **Step 1: Connect WhatsApp Account** card on the left:
#### Method 1: Scan QR Code (Recommended)
1. Open WhatsApp on your phone.
2. Go to **Settings** > **Linked Devices**.
3. Tap **Link a Device** and point your phone's camera at the QR code displayed on the screen.
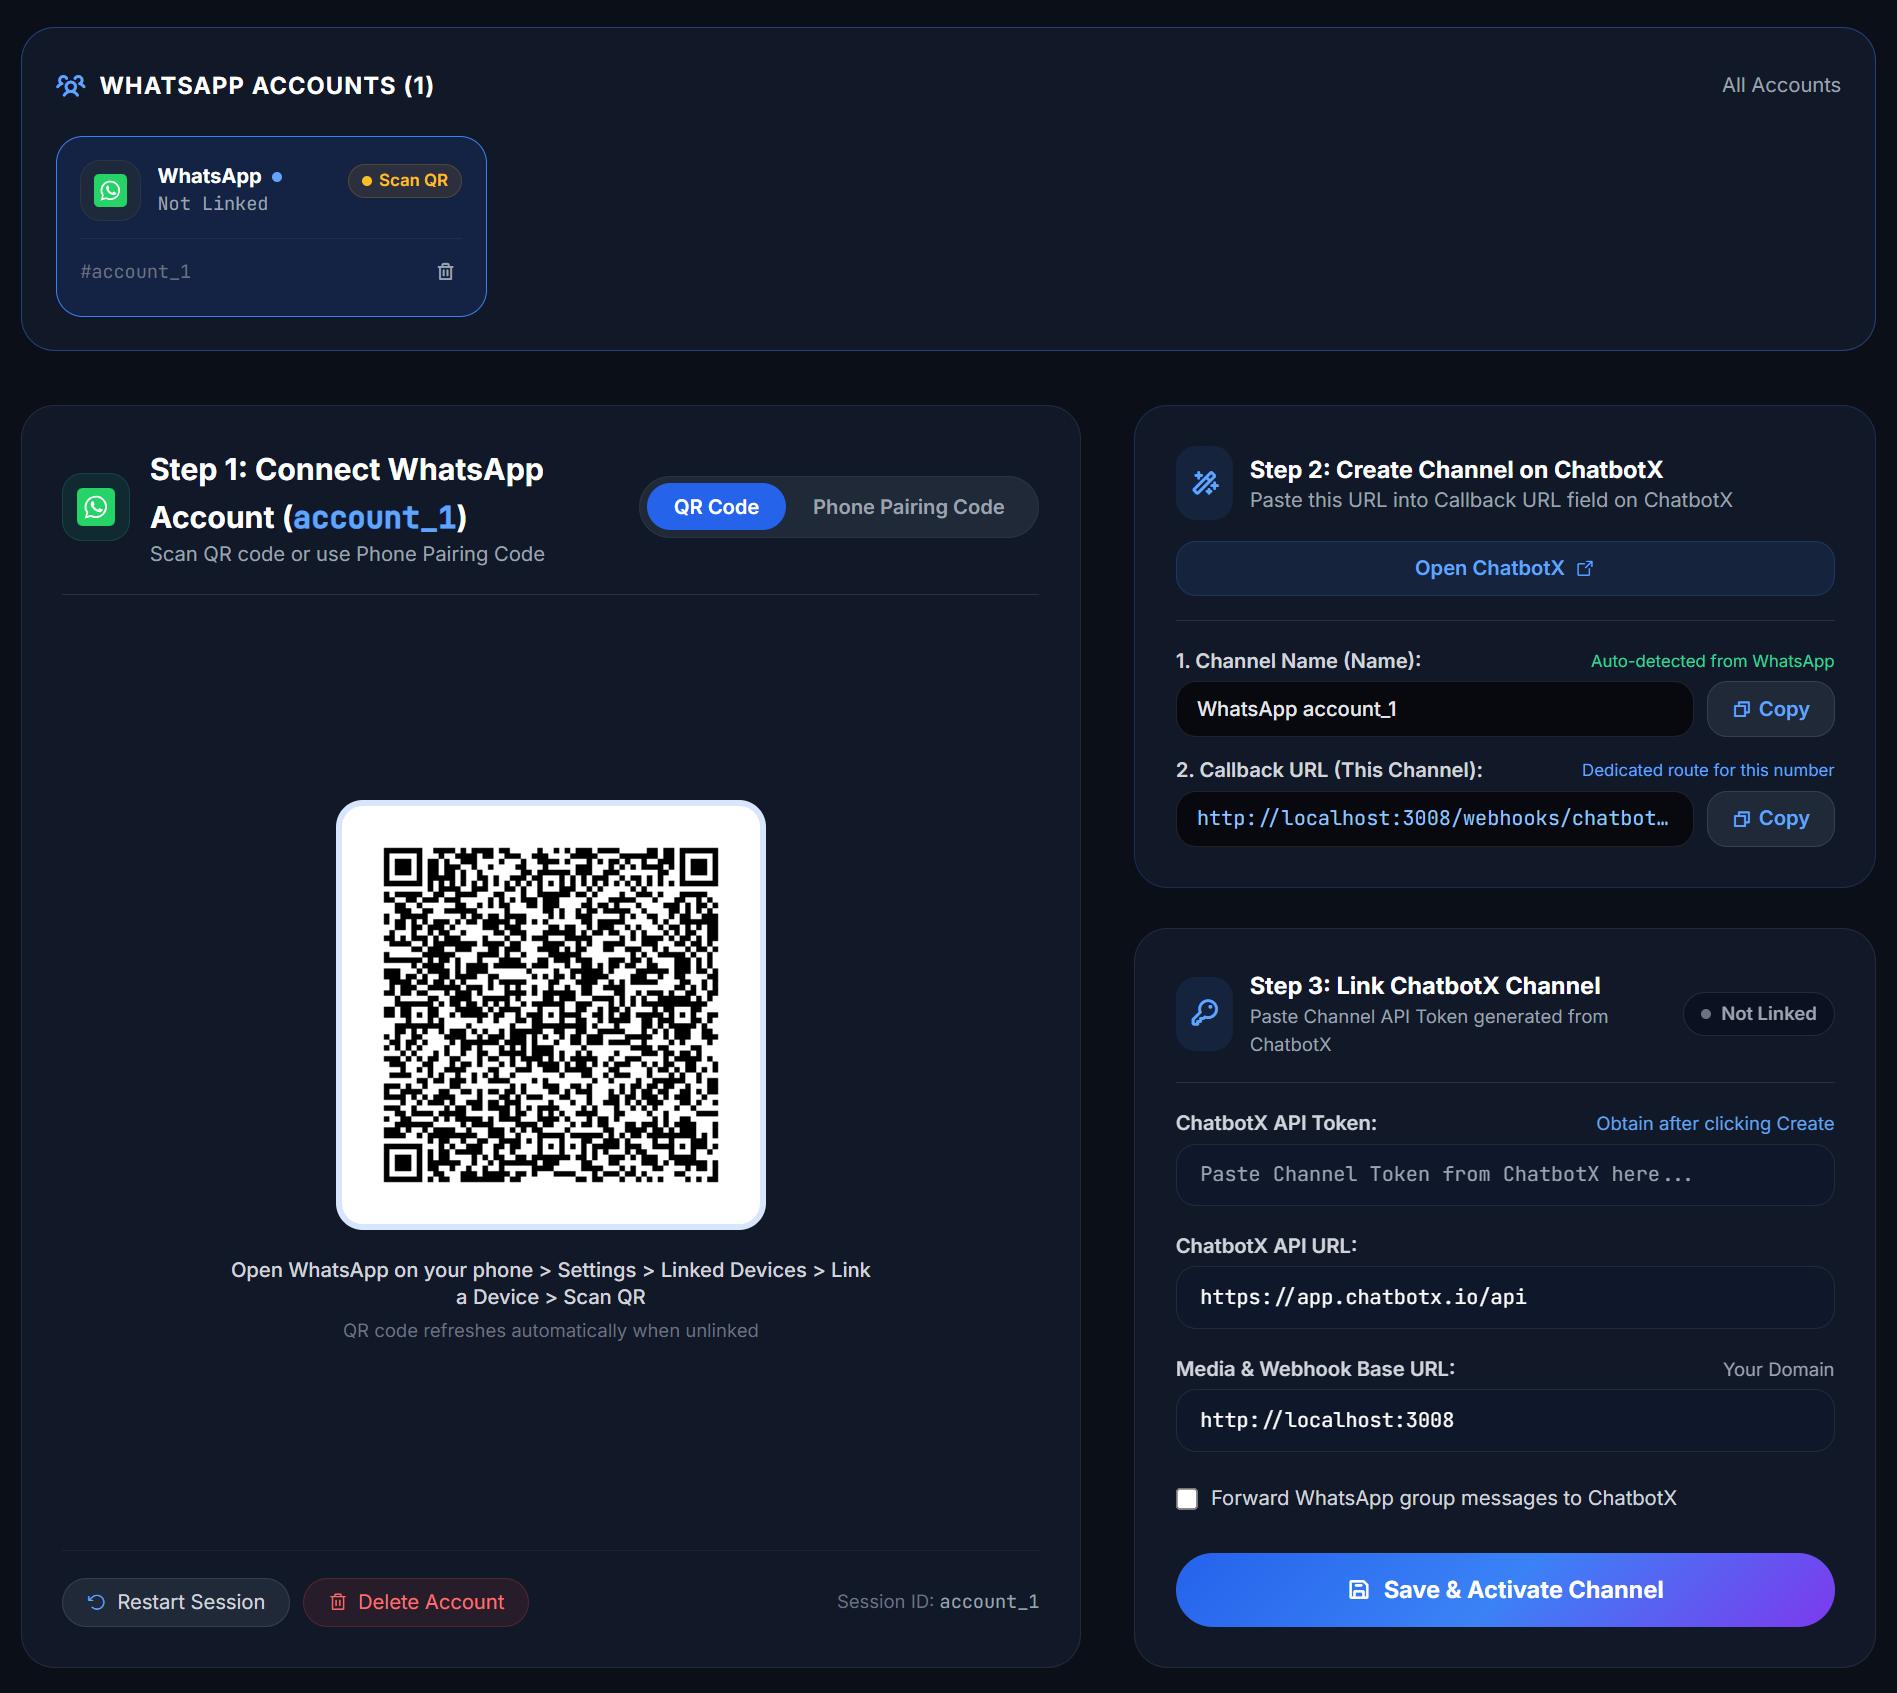 As soon as the scan succeeds, the dashboard automatically transitions to the green **Connected Online** status card displaying your WhatsApp profile name and phone number.
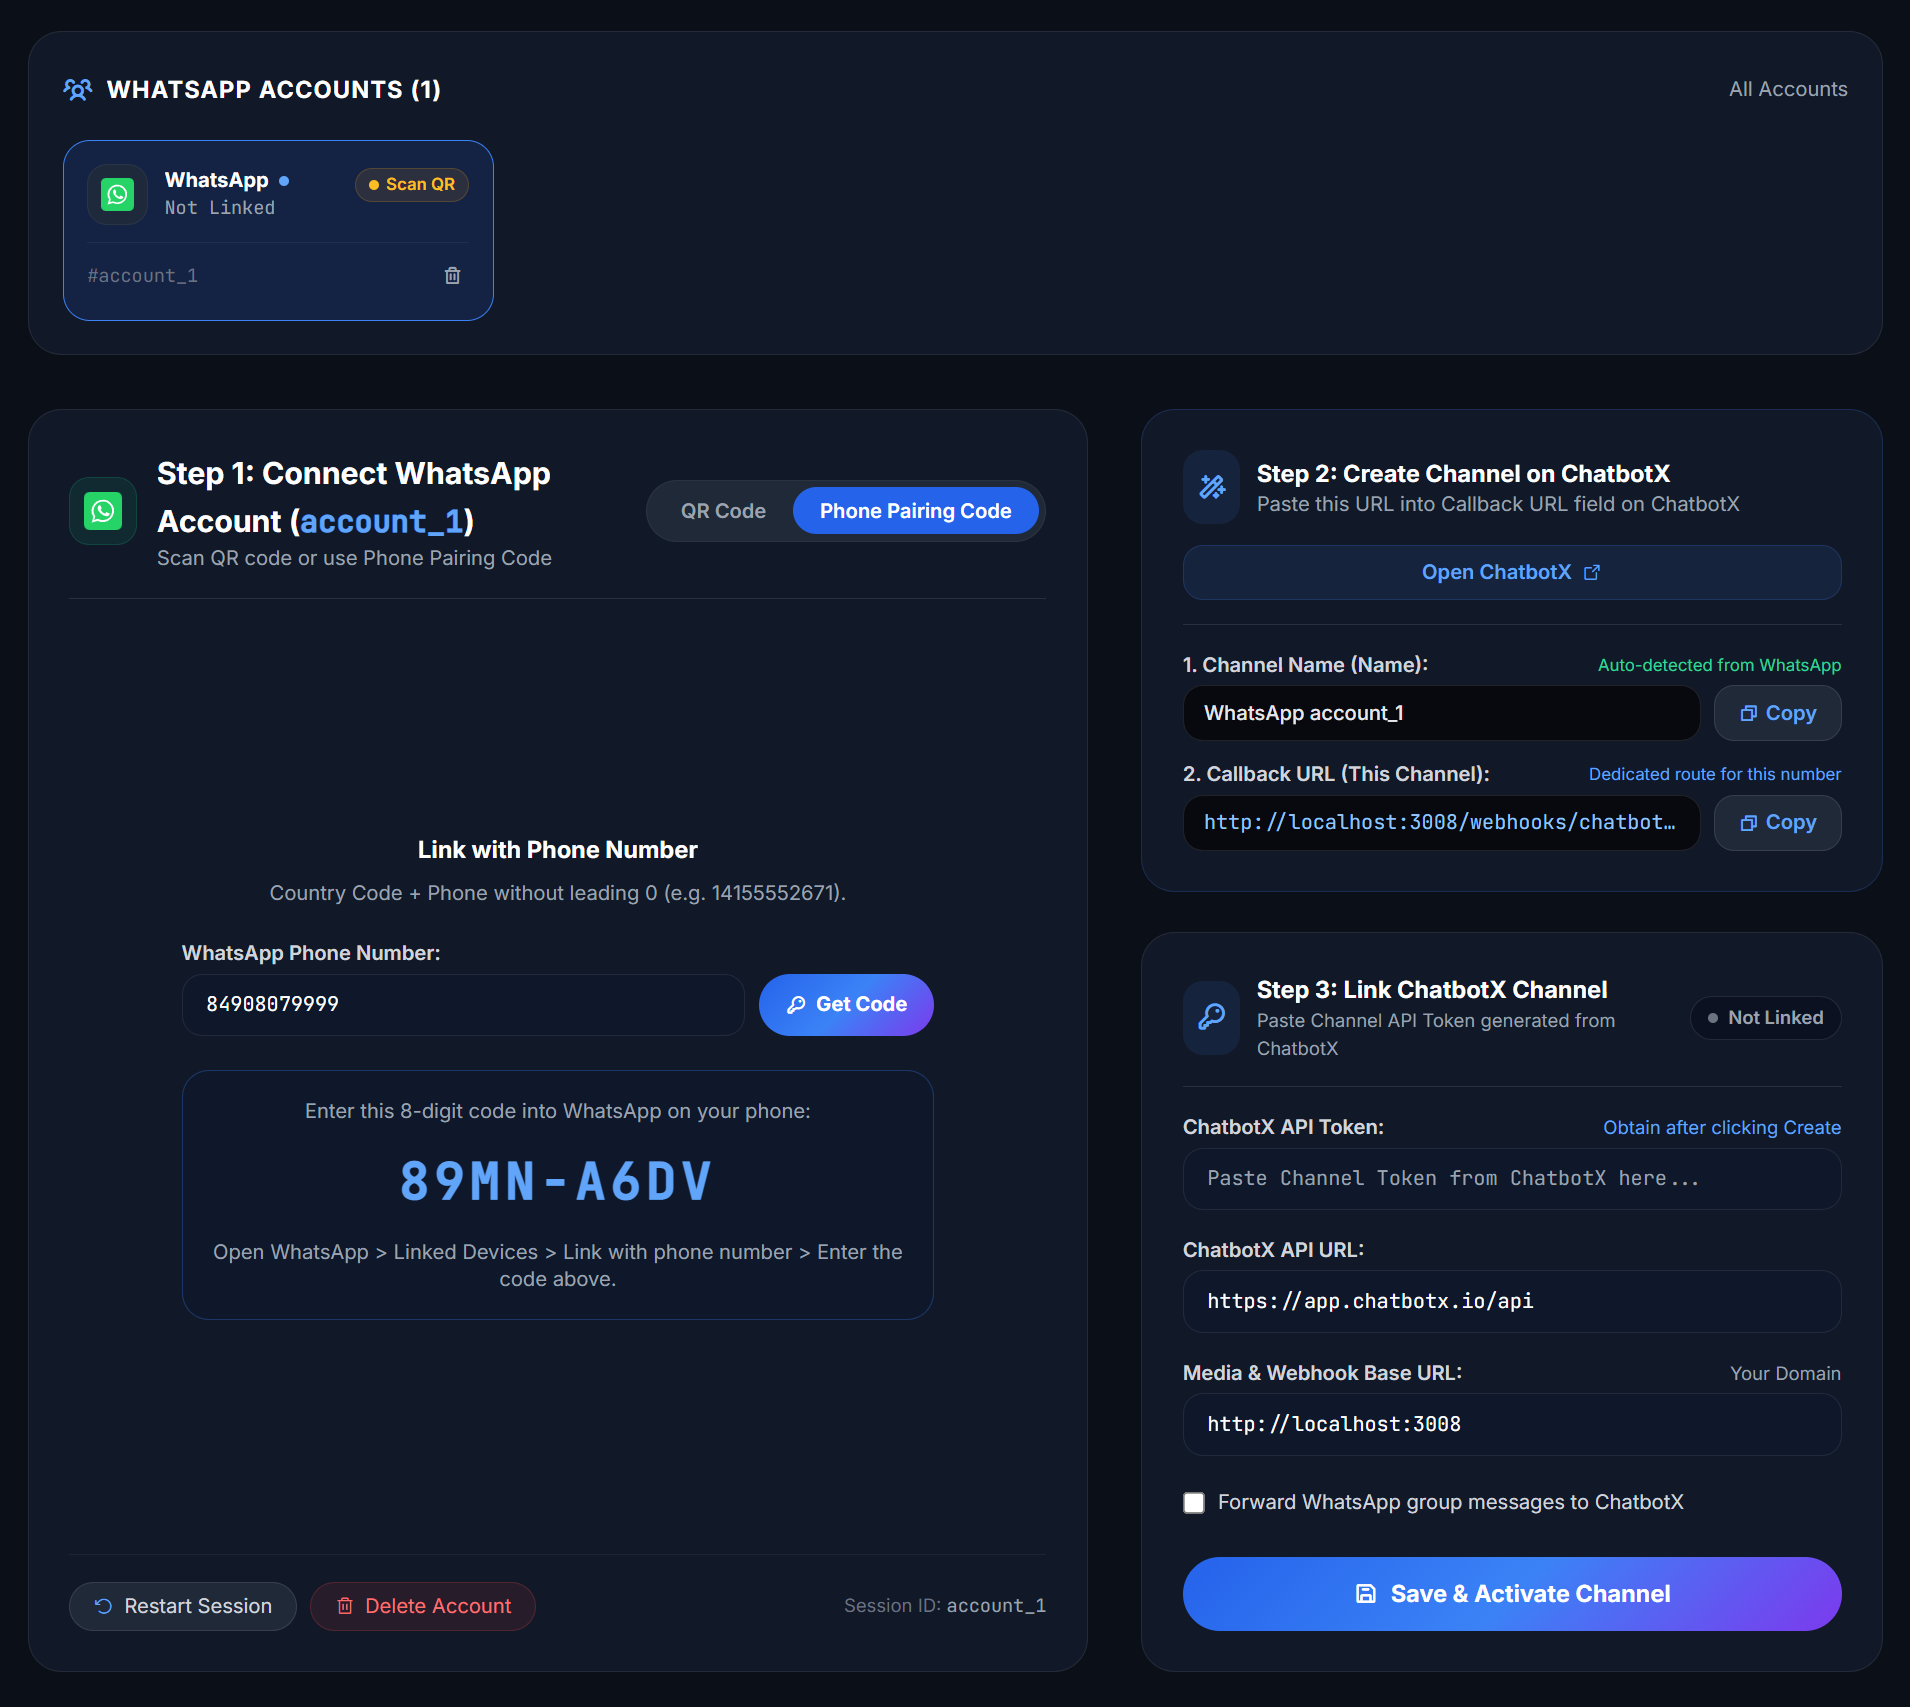
#### Method 2: Phone Pairing Code
1. Select the **Phone Pairing Code** tab if your camera cannot scan the QR code.
2. Enter your WhatsApp phone number in international format (without leading zeros, e.g., `14155552671`).
3. Click **Get Code** to receive an 8-digit code, then open WhatsApp on your phone > **Linked Devices** > **Link with phone number** > enter the code to pair.
As soon as the scan succeeds, the dashboard automatically transitions to the green **Connected Online** status card displaying your WhatsApp profile name and phone number.
#### Method 2: Phone Pairing Code
1. Select the **Phone Pairing Code** tab if your camera cannot scan the QR code.
2. Enter your WhatsApp phone number in international format (without leading zeros, e.g., `14155552671`).
3. Click **Get Code** to receive an 8-digit code, then open WhatsApp on your phone > **Linked Devices** > **Link with phone number** > enter the code to pair.
 ### Step 3: Create Channel on ChatbotX (Dashboard Step 2)
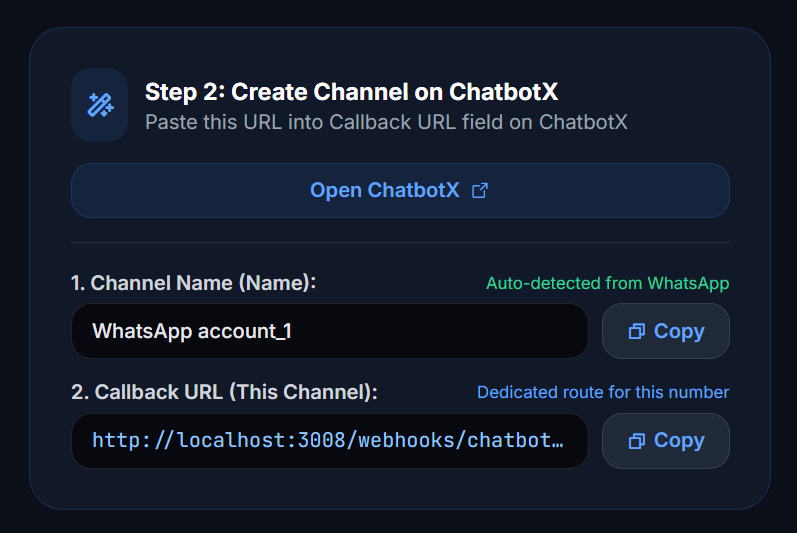
In the **Step 2: Create Channel on ChatbotX** card on the upper-right:
1. Click **Open ChatbotX** to launch the channel creation page in a new tab.
2. Copy the two pre-generated details:
* **Channel Name:** Suggested name automatically synced with your WhatsApp profile.
* **Callback URL:** Dedicated Webhook route for this specific WhatsApp number.
3. In ChatbotX, click **Add API**, paste the Channel Name and Callback URL, then click **Create**.
4. Copy the generated **Channel API Token**.
### Step 3: Create Channel on ChatbotX (Dashboard Step 2)
In the **Step 2: Create Channel on ChatbotX** card on the upper-right:
1. Click **Open ChatbotX** to launch the channel creation page in a new tab.
2. Copy the two pre-generated details:
* **Channel Name:** Suggested name automatically synced with your WhatsApp profile.
* **Callback URL:** Dedicated Webhook route for this specific WhatsApp number.
3. In ChatbotX, click **Add API**, paste the Channel Name and Callback URL, then click **Create**.
4. Copy the generated **Channel API Token**.
 ### Step 4: Save Token and Activate Channel (Dashboard Step 3)
In the **Step 3: Link ChatbotX Channel** card on the lower-right:
1. Paste your **Channel API Token** into the input field.
2. Check *Forward WhatsApp group messages to ChatbotX* if you want your bot to answer group chats.
3. Click **Save & Activate Channel** to complete setup.
### Step 4: Save Token and Activate Channel (Dashboard Step 3)
In the **Step 3: Link ChatbotX Channel** card on the lower-right:
1. Paste your **Channel API Token** into the input field.
2. Check *Forward WhatsApp group messages to ChatbotX* if you want your bot to answer group chats.
3. Click **Save & Activate Channel** to complete setup.
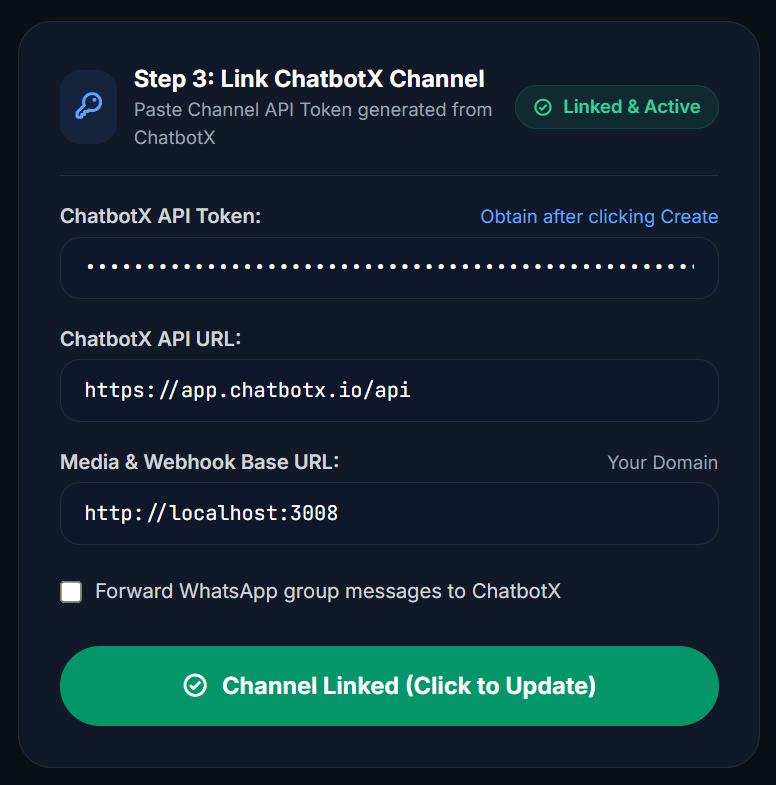 Upon successful activation, the badge turns green with **Linked & Active**. From this point forward, all incoming WhatsApp customer messages automatically synchronize into your ChatbotX Inbox.
### Step 5: Test Message Delivery
Directly verify message sending capabilities right inside the dashboard:
1. In the **Test Outbound Message** card (at the bottom-left), enter a recipient phone number with country code (e.g., `14155552671`).
2. Type your message and click **Send Test Message**.
3. The recipient will immediately receive the test message from your connected WhatsApp number.
Upon successful activation, the badge turns green with **Linked & Active**. From this point forward, all incoming WhatsApp customer messages automatically synchronize into your ChatbotX Inbox.
### Step 5: Test Message Delivery
Directly verify message sending capabilities right inside the dashboard:
1. In the **Test Outbound Message** card (at the bottom-left), enter a recipient phone number with country code (e.g., `14155552671`).
2. Type your message and click **Send Test Message**.
3. The recipient will immediately receive the test message from your connected WhatsApp number.
 ### Managing Multiple WhatsApp Accounts
If your business operates multiple phone numbers for different departments (e.g., Customer Support, Sales East, Sales West):
1. In the top accounts bar, click the **+ Add Account** button.
2. Enter an identifier for the new number (e.g., `sales_ny`, `support_la`).
3. Repeat the pairing and API Channel creation steps for each number.
## Frequently Asked Questions (FAQ)
ChatbotX does not impose artificial rate limits on API Channels. Processing throughput depends on your Workspace plan tier and the capacity of your self-hosted webhook infrastructure.
Yes. You can connect an unlimited number of WhatsApp accounts. Each phone number corresponds to an isolated API Channel in ChatbotX for easy organization and inbox management.
* **Use Personal WhatsApp (via WAHA Gateway):** Best for 1:1 customer engagement using your existing phone numbers, saving on Meta conversation costs, and sharing an inbox among multiple agents.
* **Use Official WhatsApp Cloud API:** Best for mass broadcast marketing campaigns to thousands of contacts and official green badge verified business accounts.
WhatsApp uses the Linked Devices protocol. Once paired, the Gateway server maintains an active independent session and continues receiving customer messages even if your phone is temporarily offline or turned off.
### Managing Multiple WhatsApp Accounts
If your business operates multiple phone numbers for different departments (e.g., Customer Support, Sales East, Sales West):
1. In the top accounts bar, click the **+ Add Account** button.
2. Enter an identifier for the new number (e.g., `sales_ny`, `support_la`).
3. Repeat the pairing and API Channel creation steps for each number.
## Frequently Asked Questions (FAQ)
ChatbotX does not impose artificial rate limits on API Channels. Processing throughput depends on your Workspace plan tier and the capacity of your self-hosted webhook infrastructure.
Yes. You can connect an unlimited number of WhatsApp accounts. Each phone number corresponds to an isolated API Channel in ChatbotX for easy organization and inbox management.
* **Use Personal WhatsApp (via WAHA Gateway):** Best for 1:1 customer engagement using your existing phone numbers, saving on Meta conversation costs, and sharing an inbox among multiple agents.
* **Use Official WhatsApp Cloud API:** Best for mass broadcast marketing campaigns to thousands of contacts and official green badge verified business accounts.
WhatsApp uses the Linked Devices protocol. Once paired, the Gateway server maintains an active independent session and continues receiving customer messages even if your phone is temporarily offline or turned off.