> ## Documentation Index
> Fetch the complete documentation index at: https://chatbotx.io/docs/llms.txt
> Use this file to discover all available pages before exploring further.
# Create Google App
> Learn how to create a custom Google App to obtain Client ID and Client Secret under your own brand.
Creating a custom Google App allows you to customize the Google OAuth consent screen to display your own brand name and logo when clients connect their accounts or use data synchronization features.
Your custom Google App configuration applies to the core features on your portal:
* Login with Google (Google Login).
* Spreadsheet synchronization (Google Sheets)
## Configuration Steps on Google Cloud Console
Perform the application registration following the workflow below:
* Log in to the [Google Cloud Console](https://console.cloud.google.com).
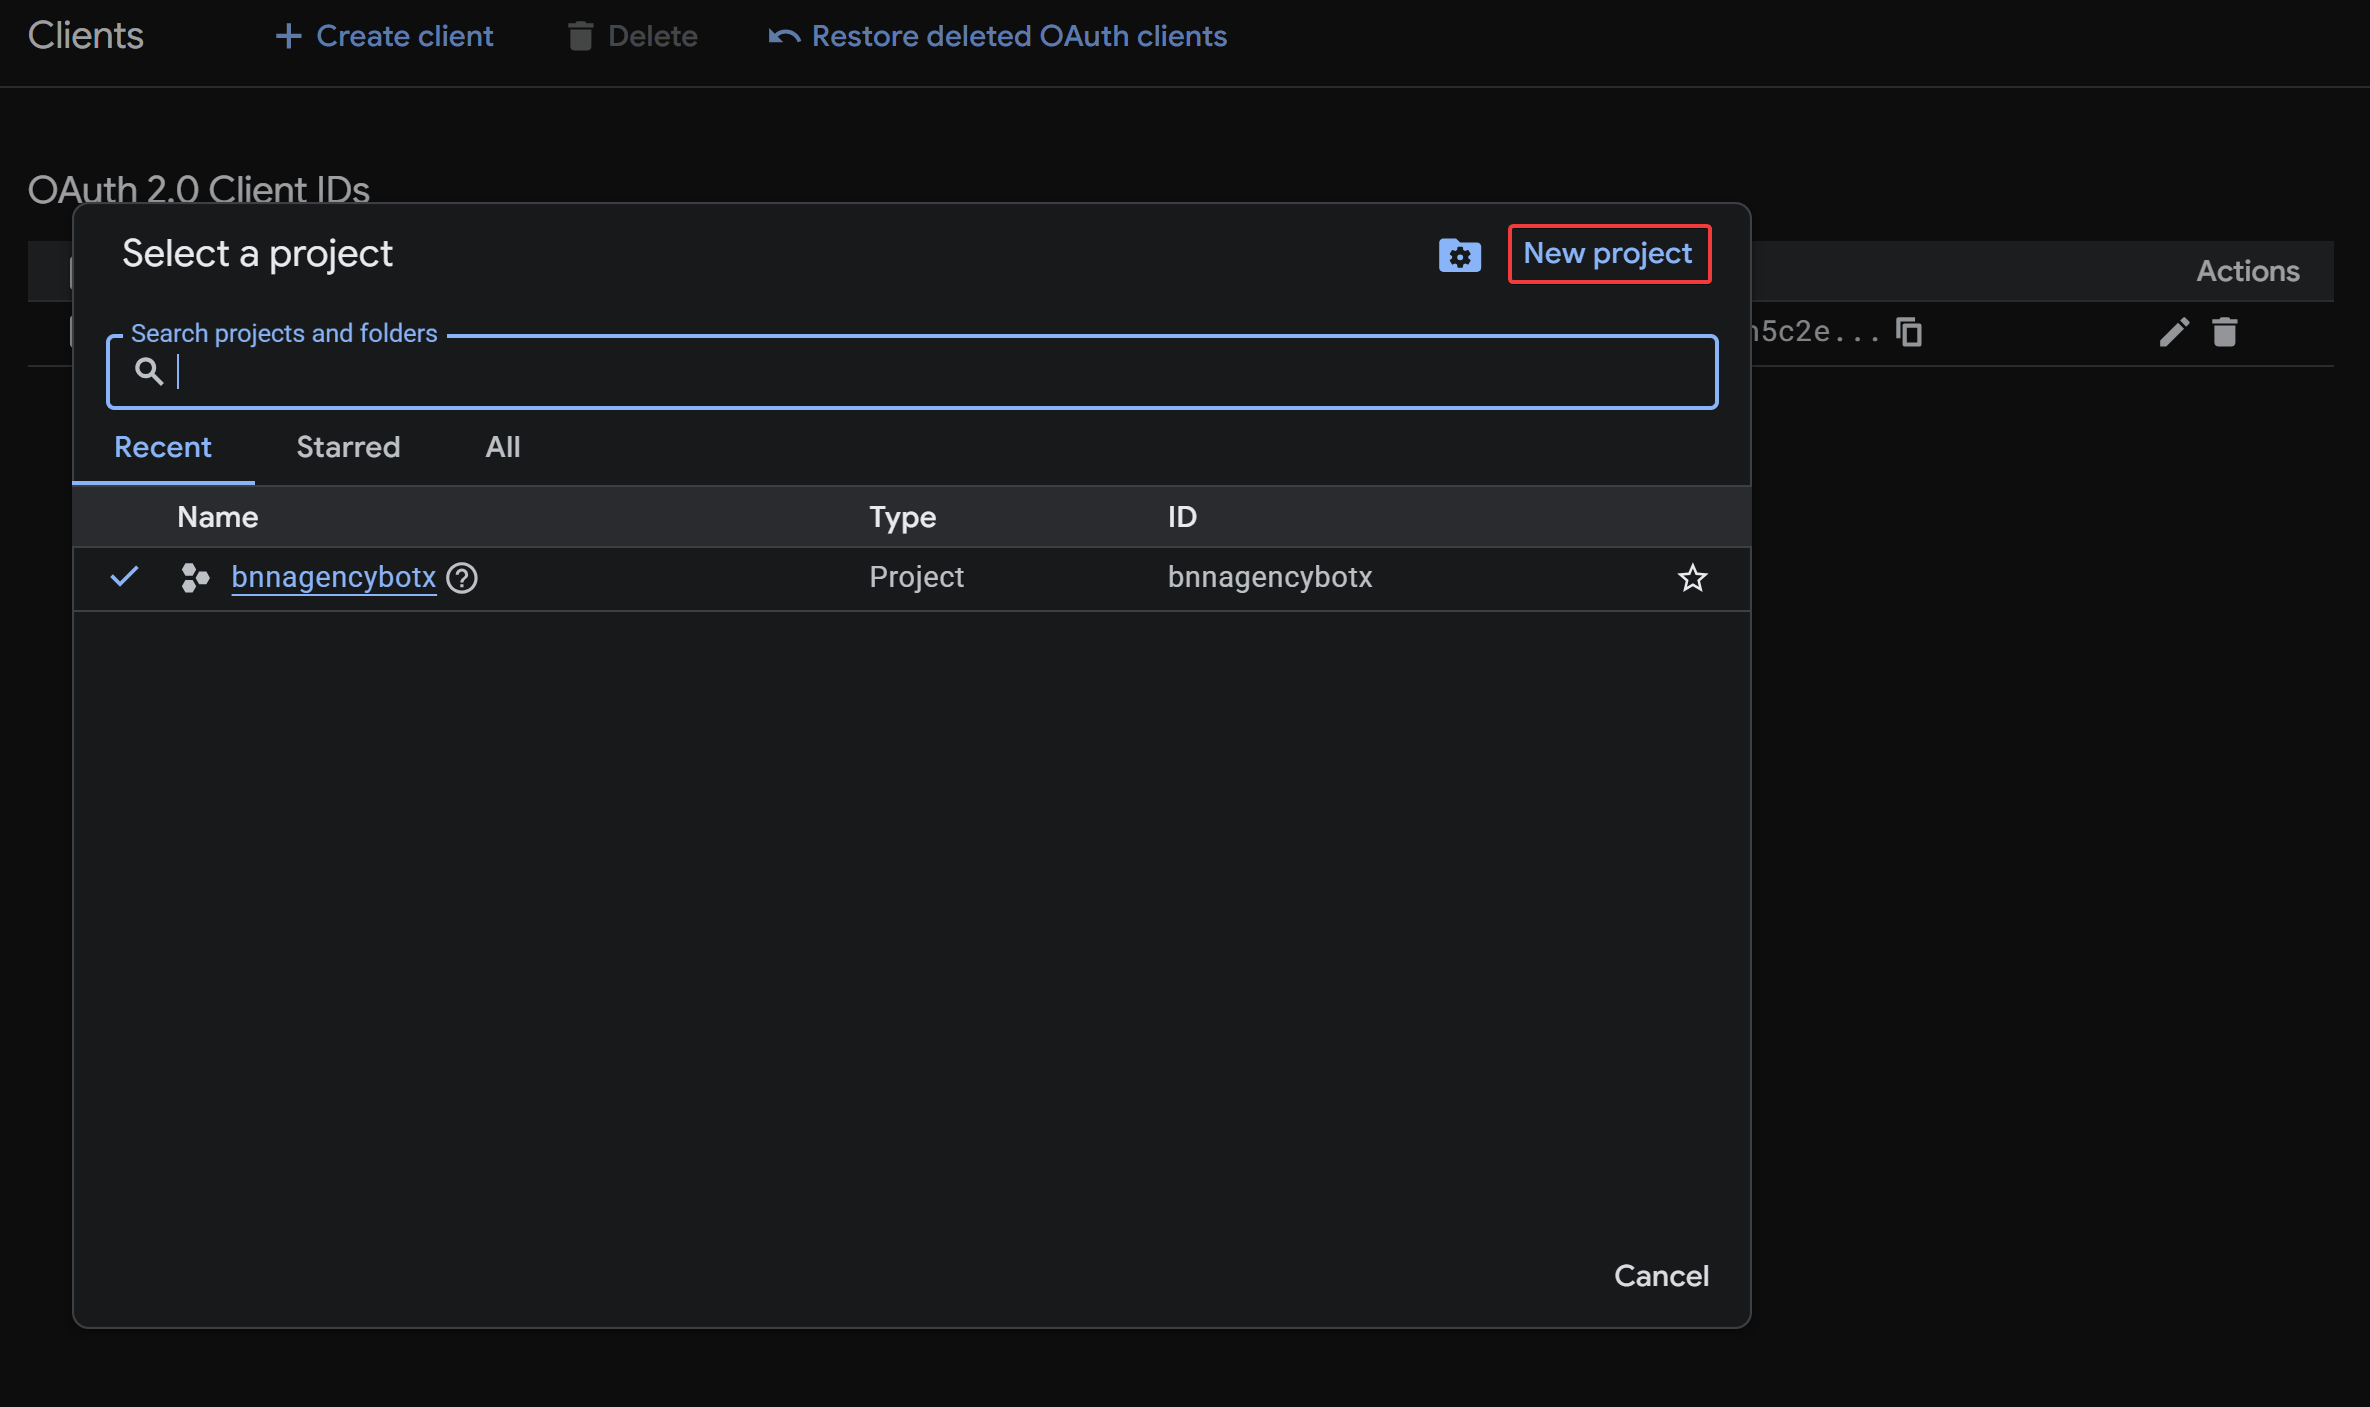
* Click the project dropdown in the top-left corner and select **New Project**.
* Enter a project name corresponding to your portal brand and click **Create** to initialize.
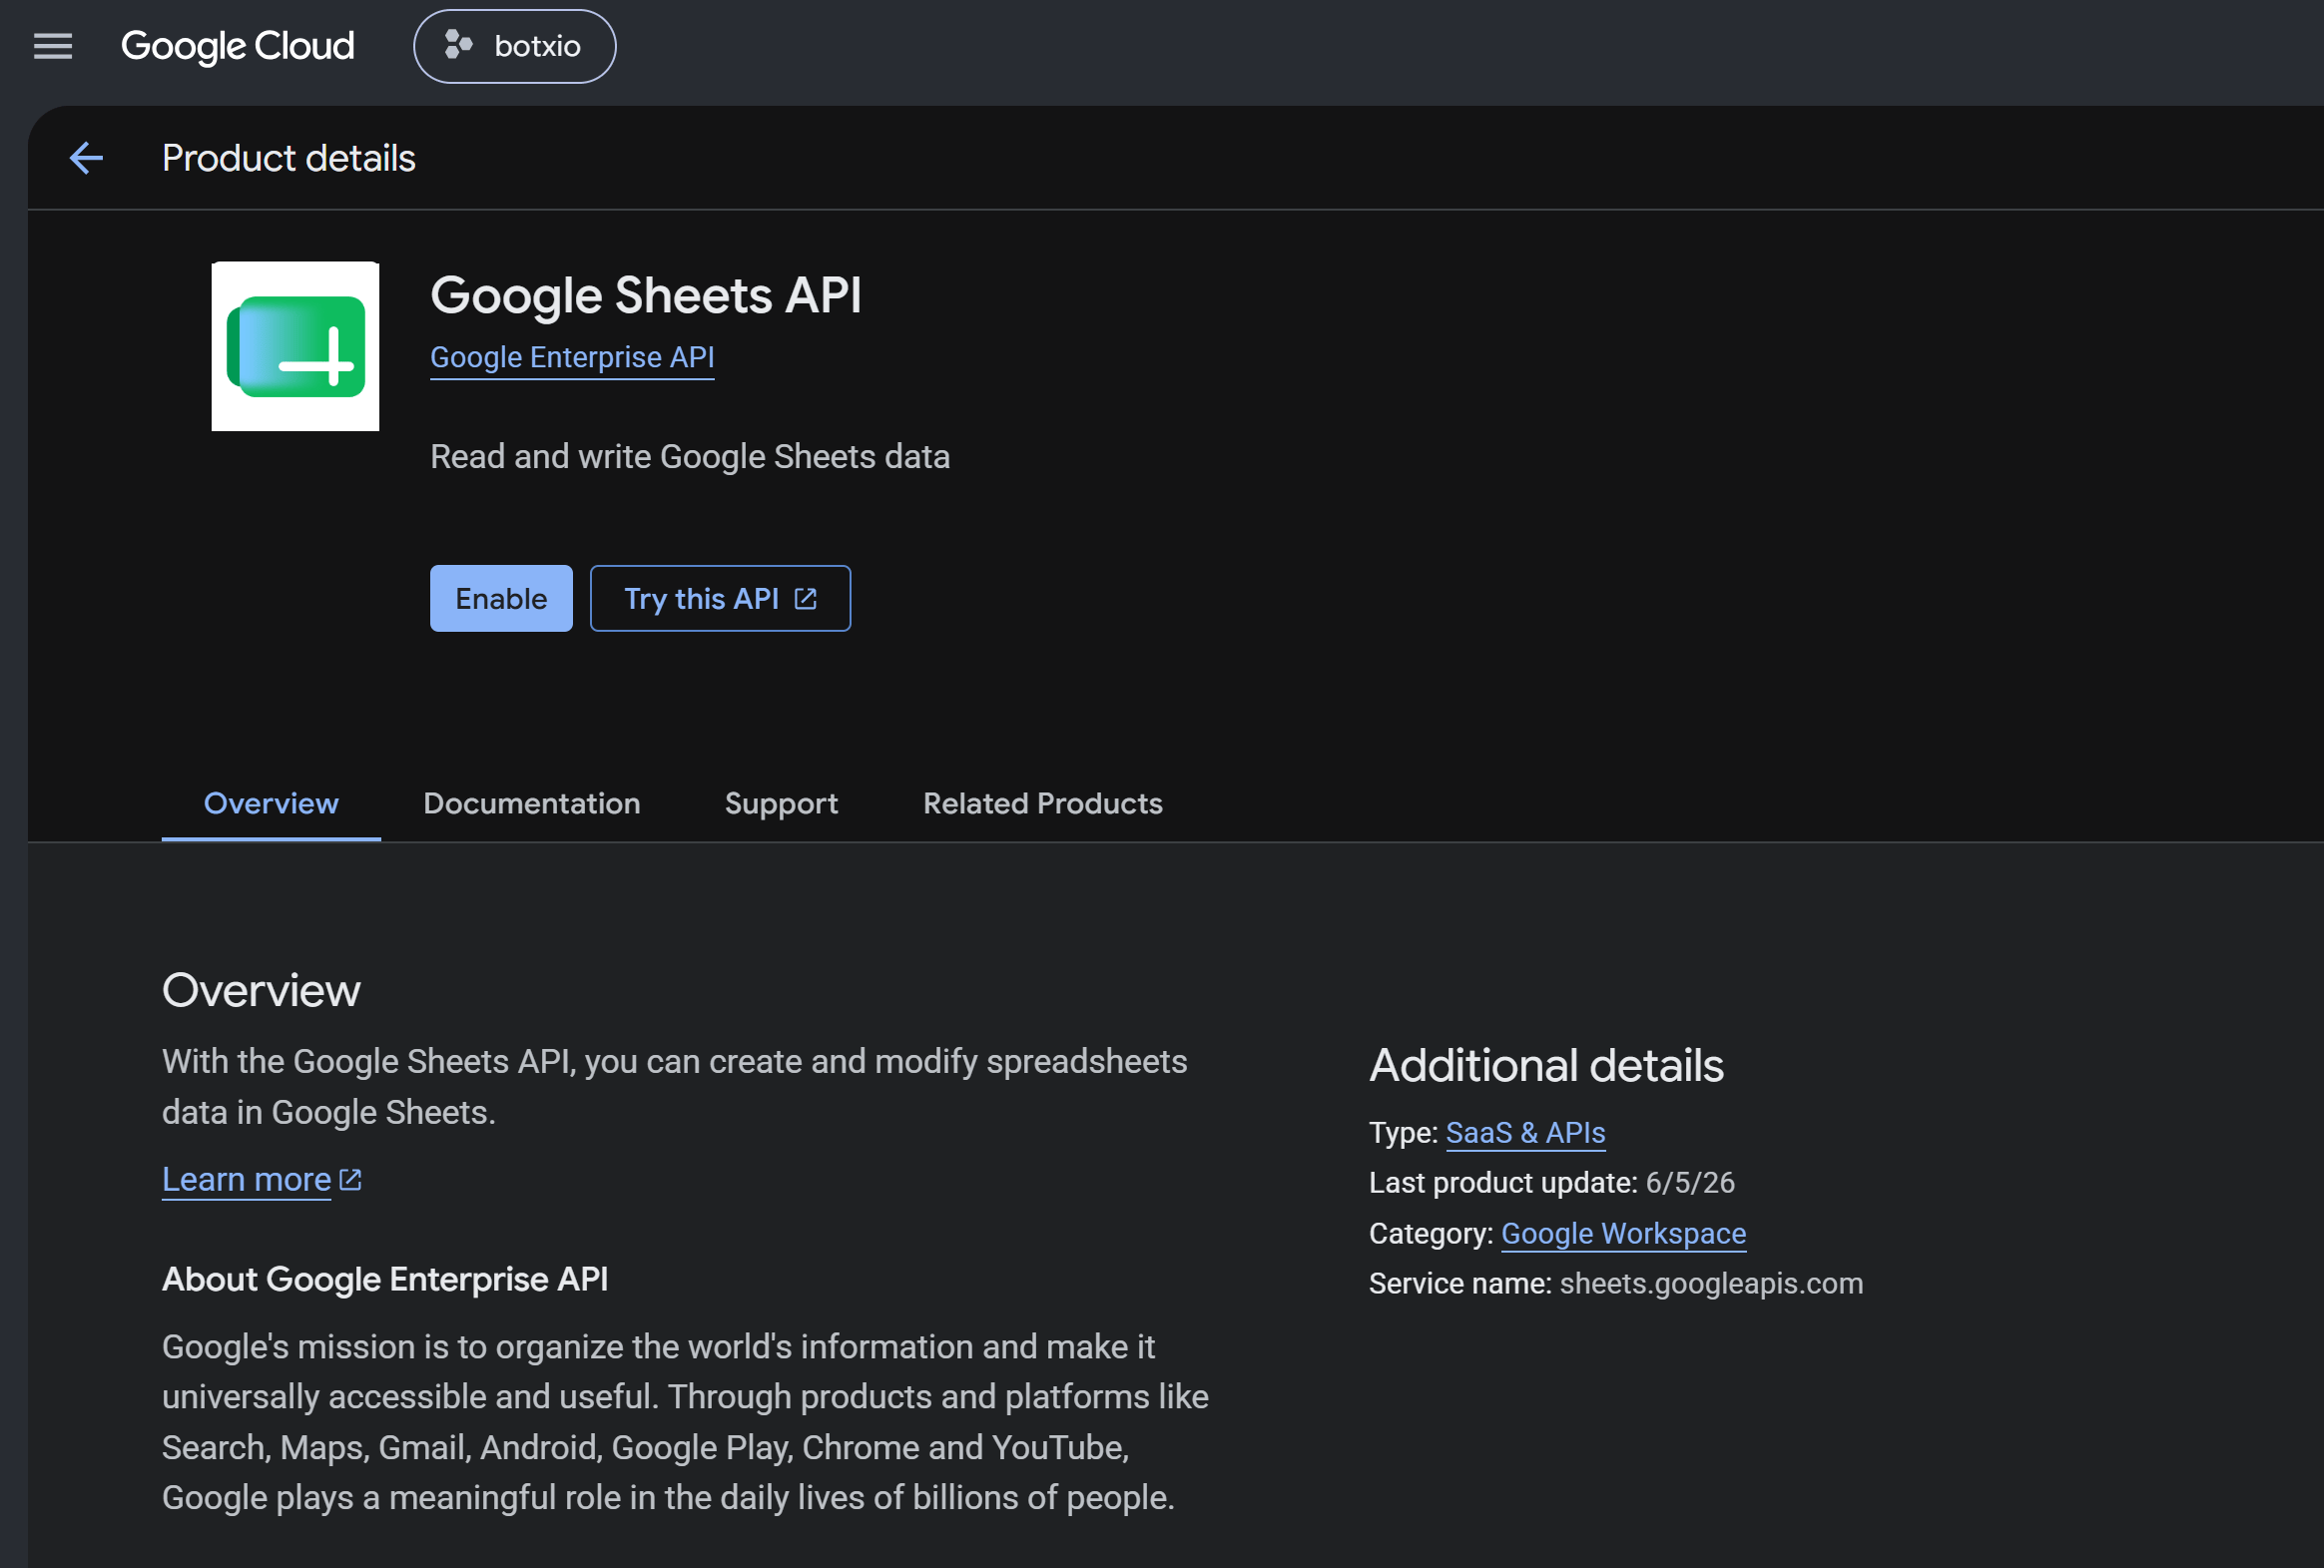
 Navigate to the **APIs & Services > Library** section using the search bar or side menu, search for and enable the following API library:
* **Google Sheets API**: Used to read and write data to client spreadsheets.
Navigate to the **APIs & Services > Library** section using the search bar or side menu, search for and enable the following API library:
* **Google Sheets API**: Used to read and write data to client spreadsheets.
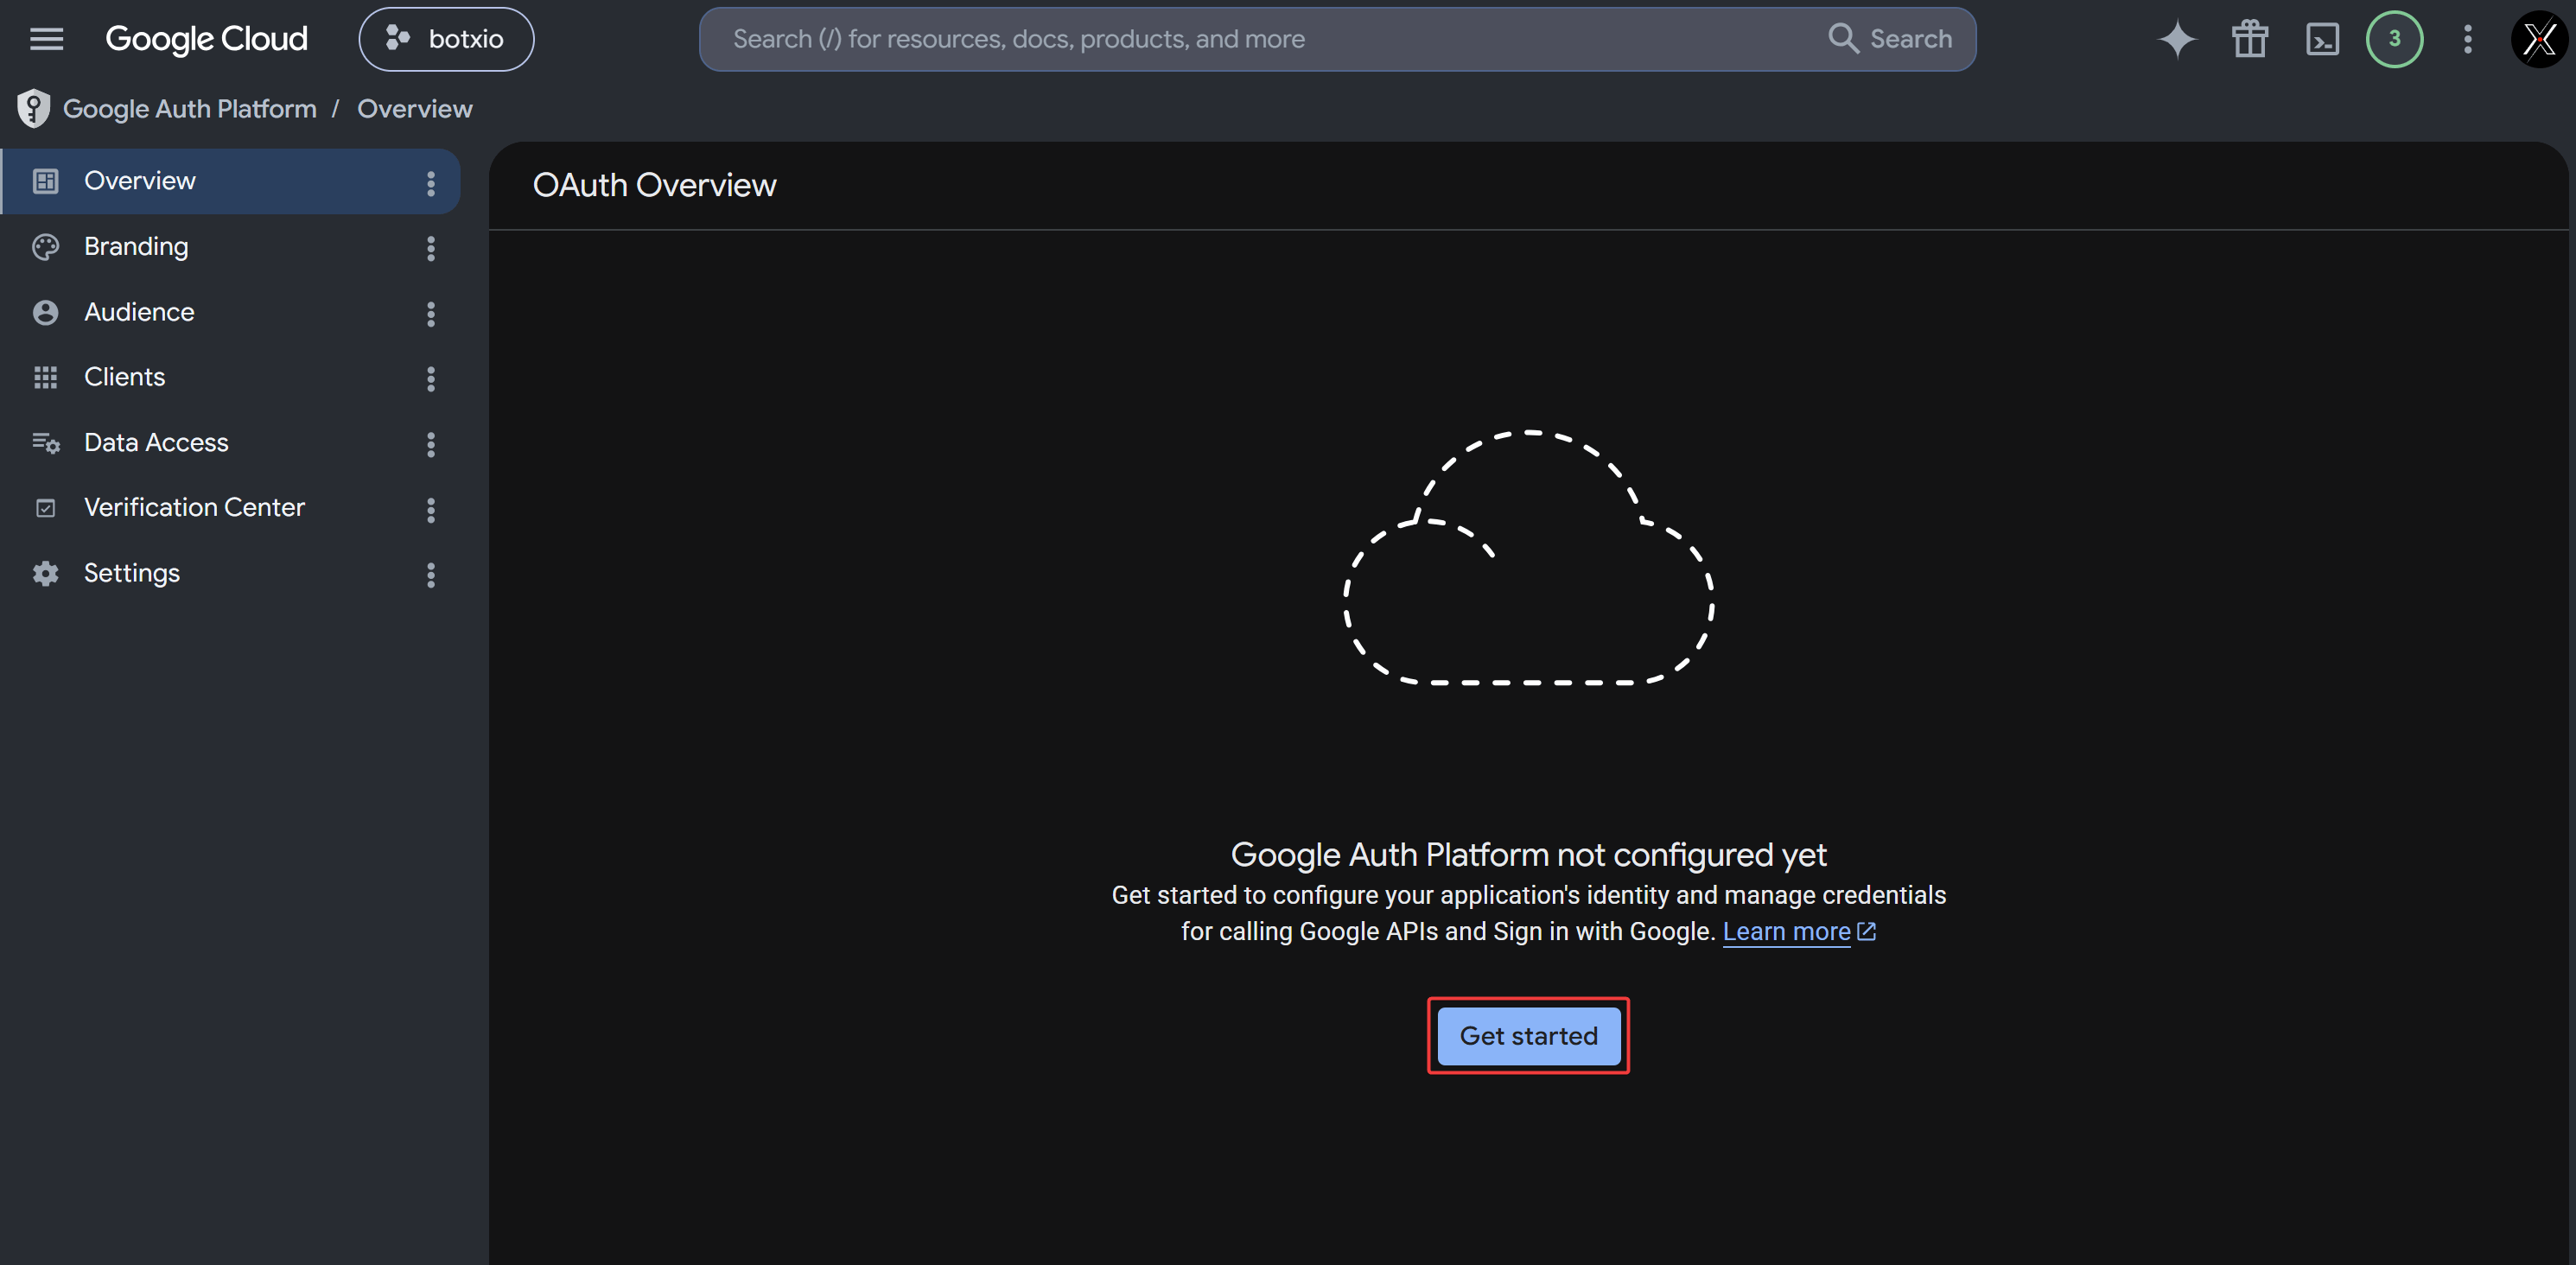
 Select **Google Auth Platform** on the left navigation menu. In the **OAuth Overview** interface, click **Get started**.
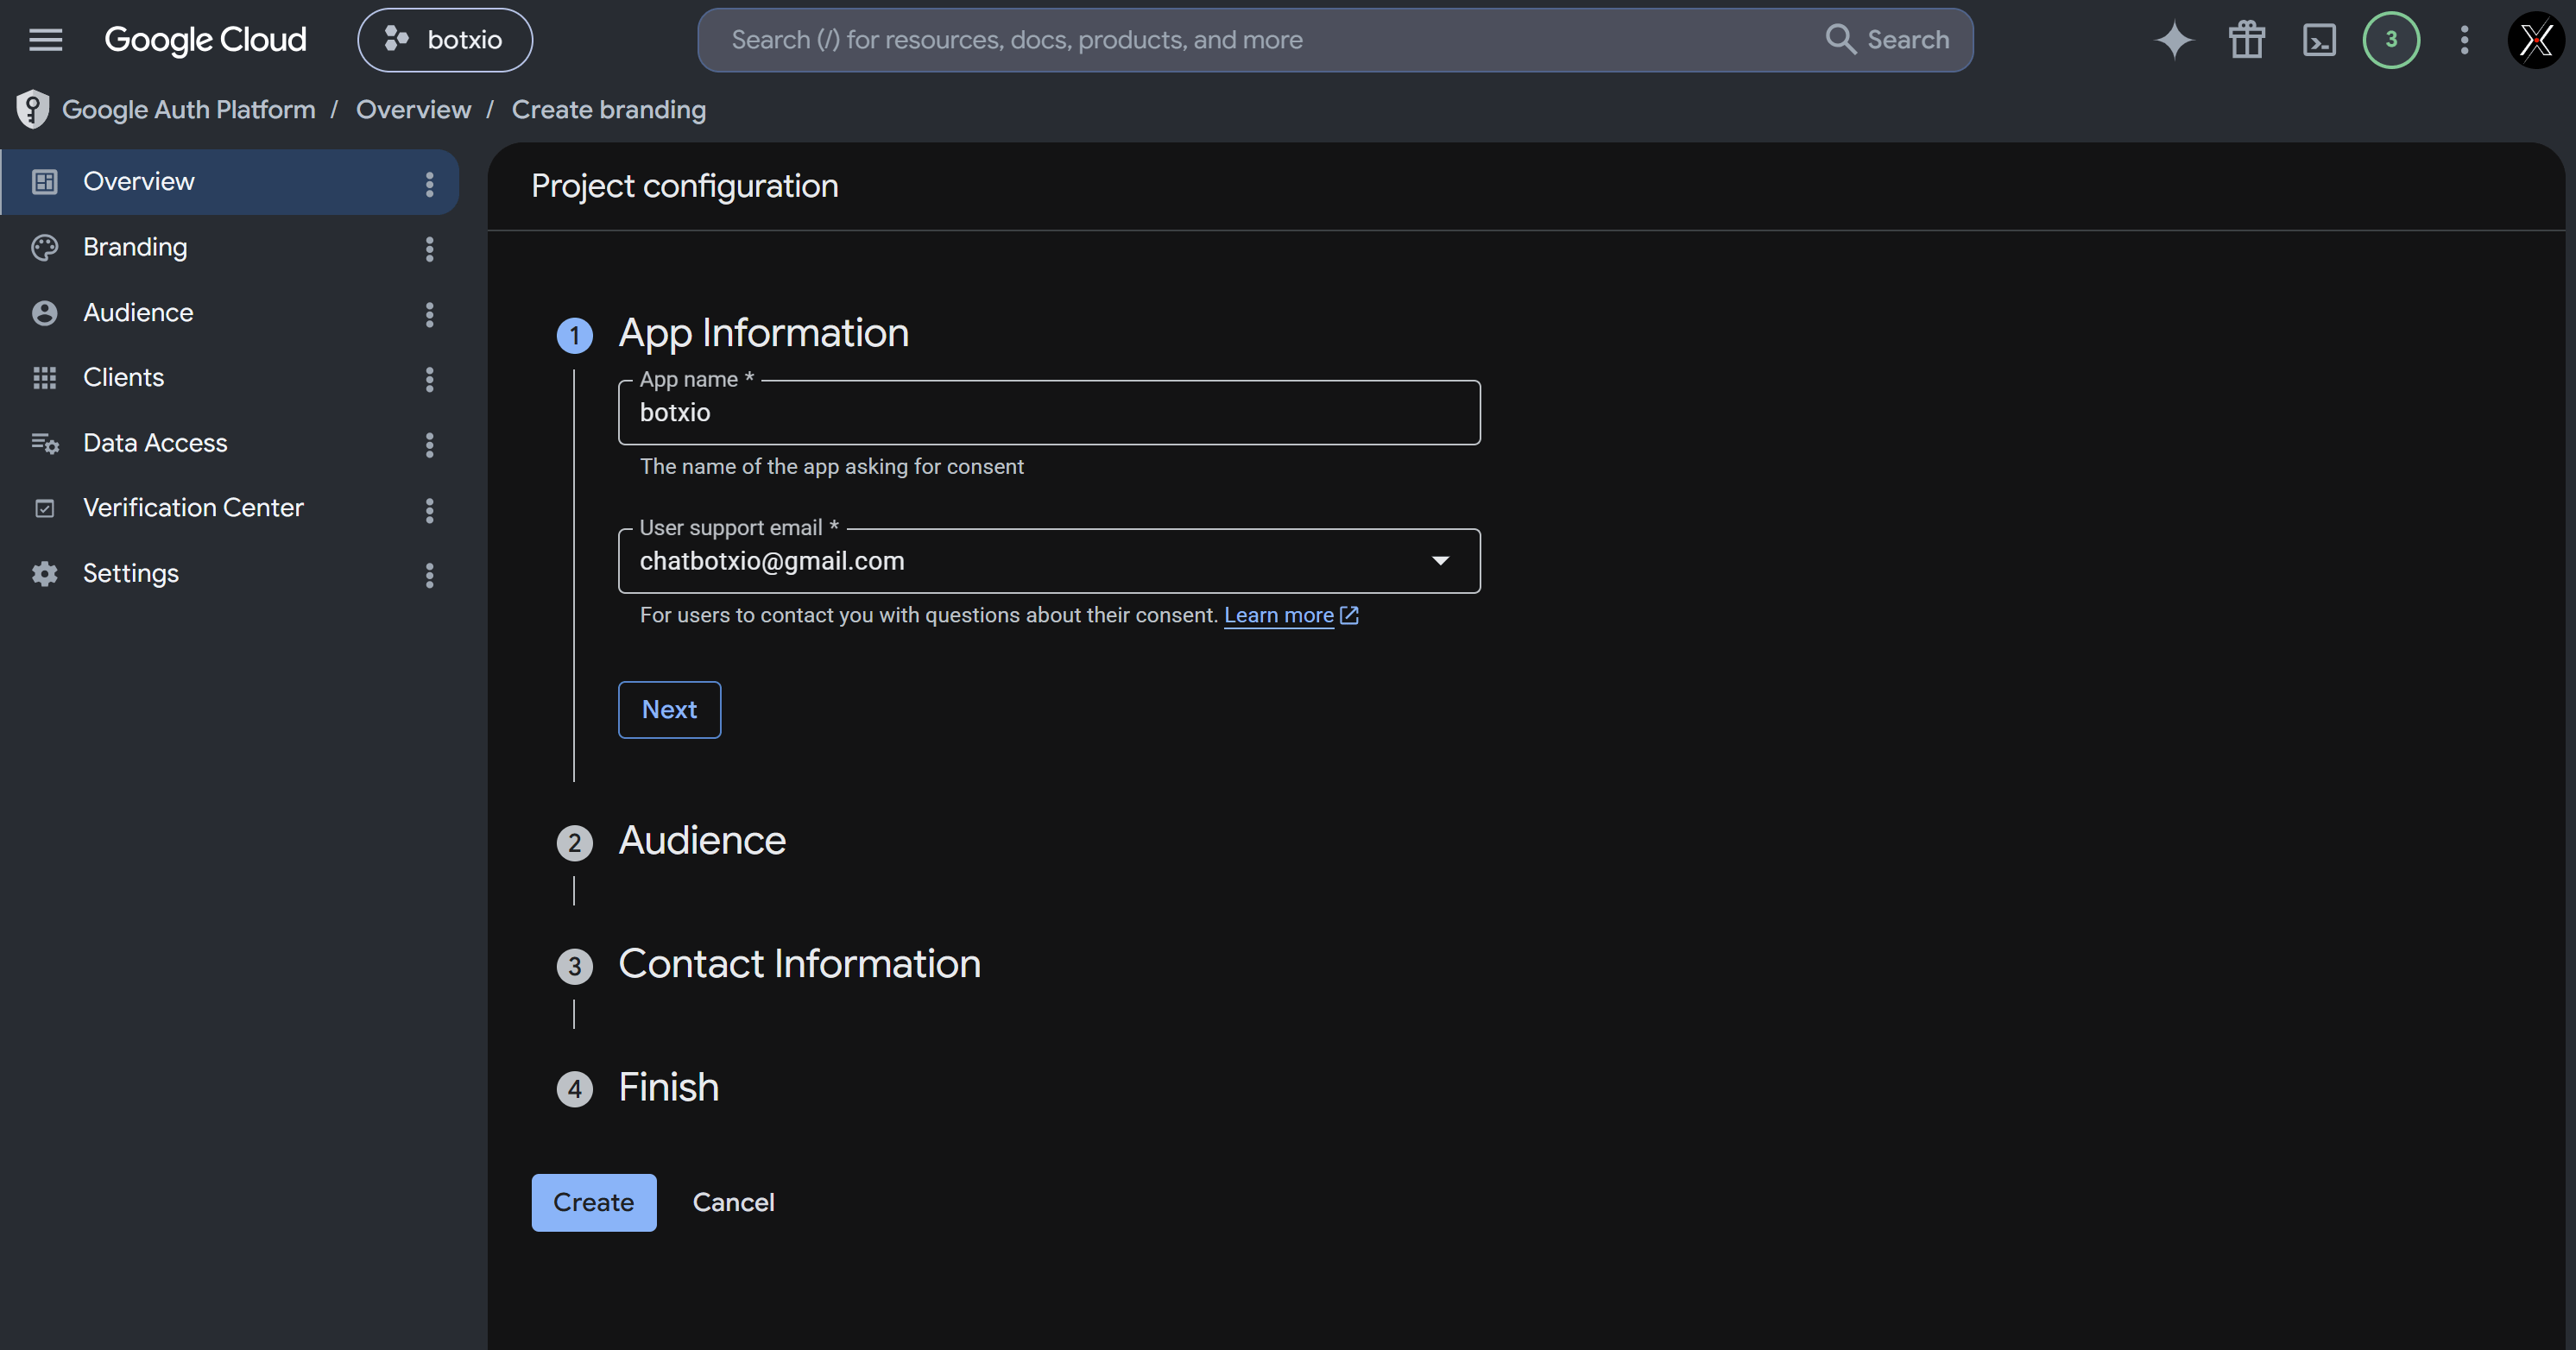
 The **Project configuration** wizard will appear. Enter the required information through 4 steps:
* **App Information**: Enter your brand name in the **App name** field and select a **User support email** from the dropdown menu. Click **Next**.
The **Project configuration** wizard will appear. Enter the required information through 4 steps:
* **App Information**: Enter your brand name in the **App name** field and select a **User support email** from the dropdown menu. Click **Next**.
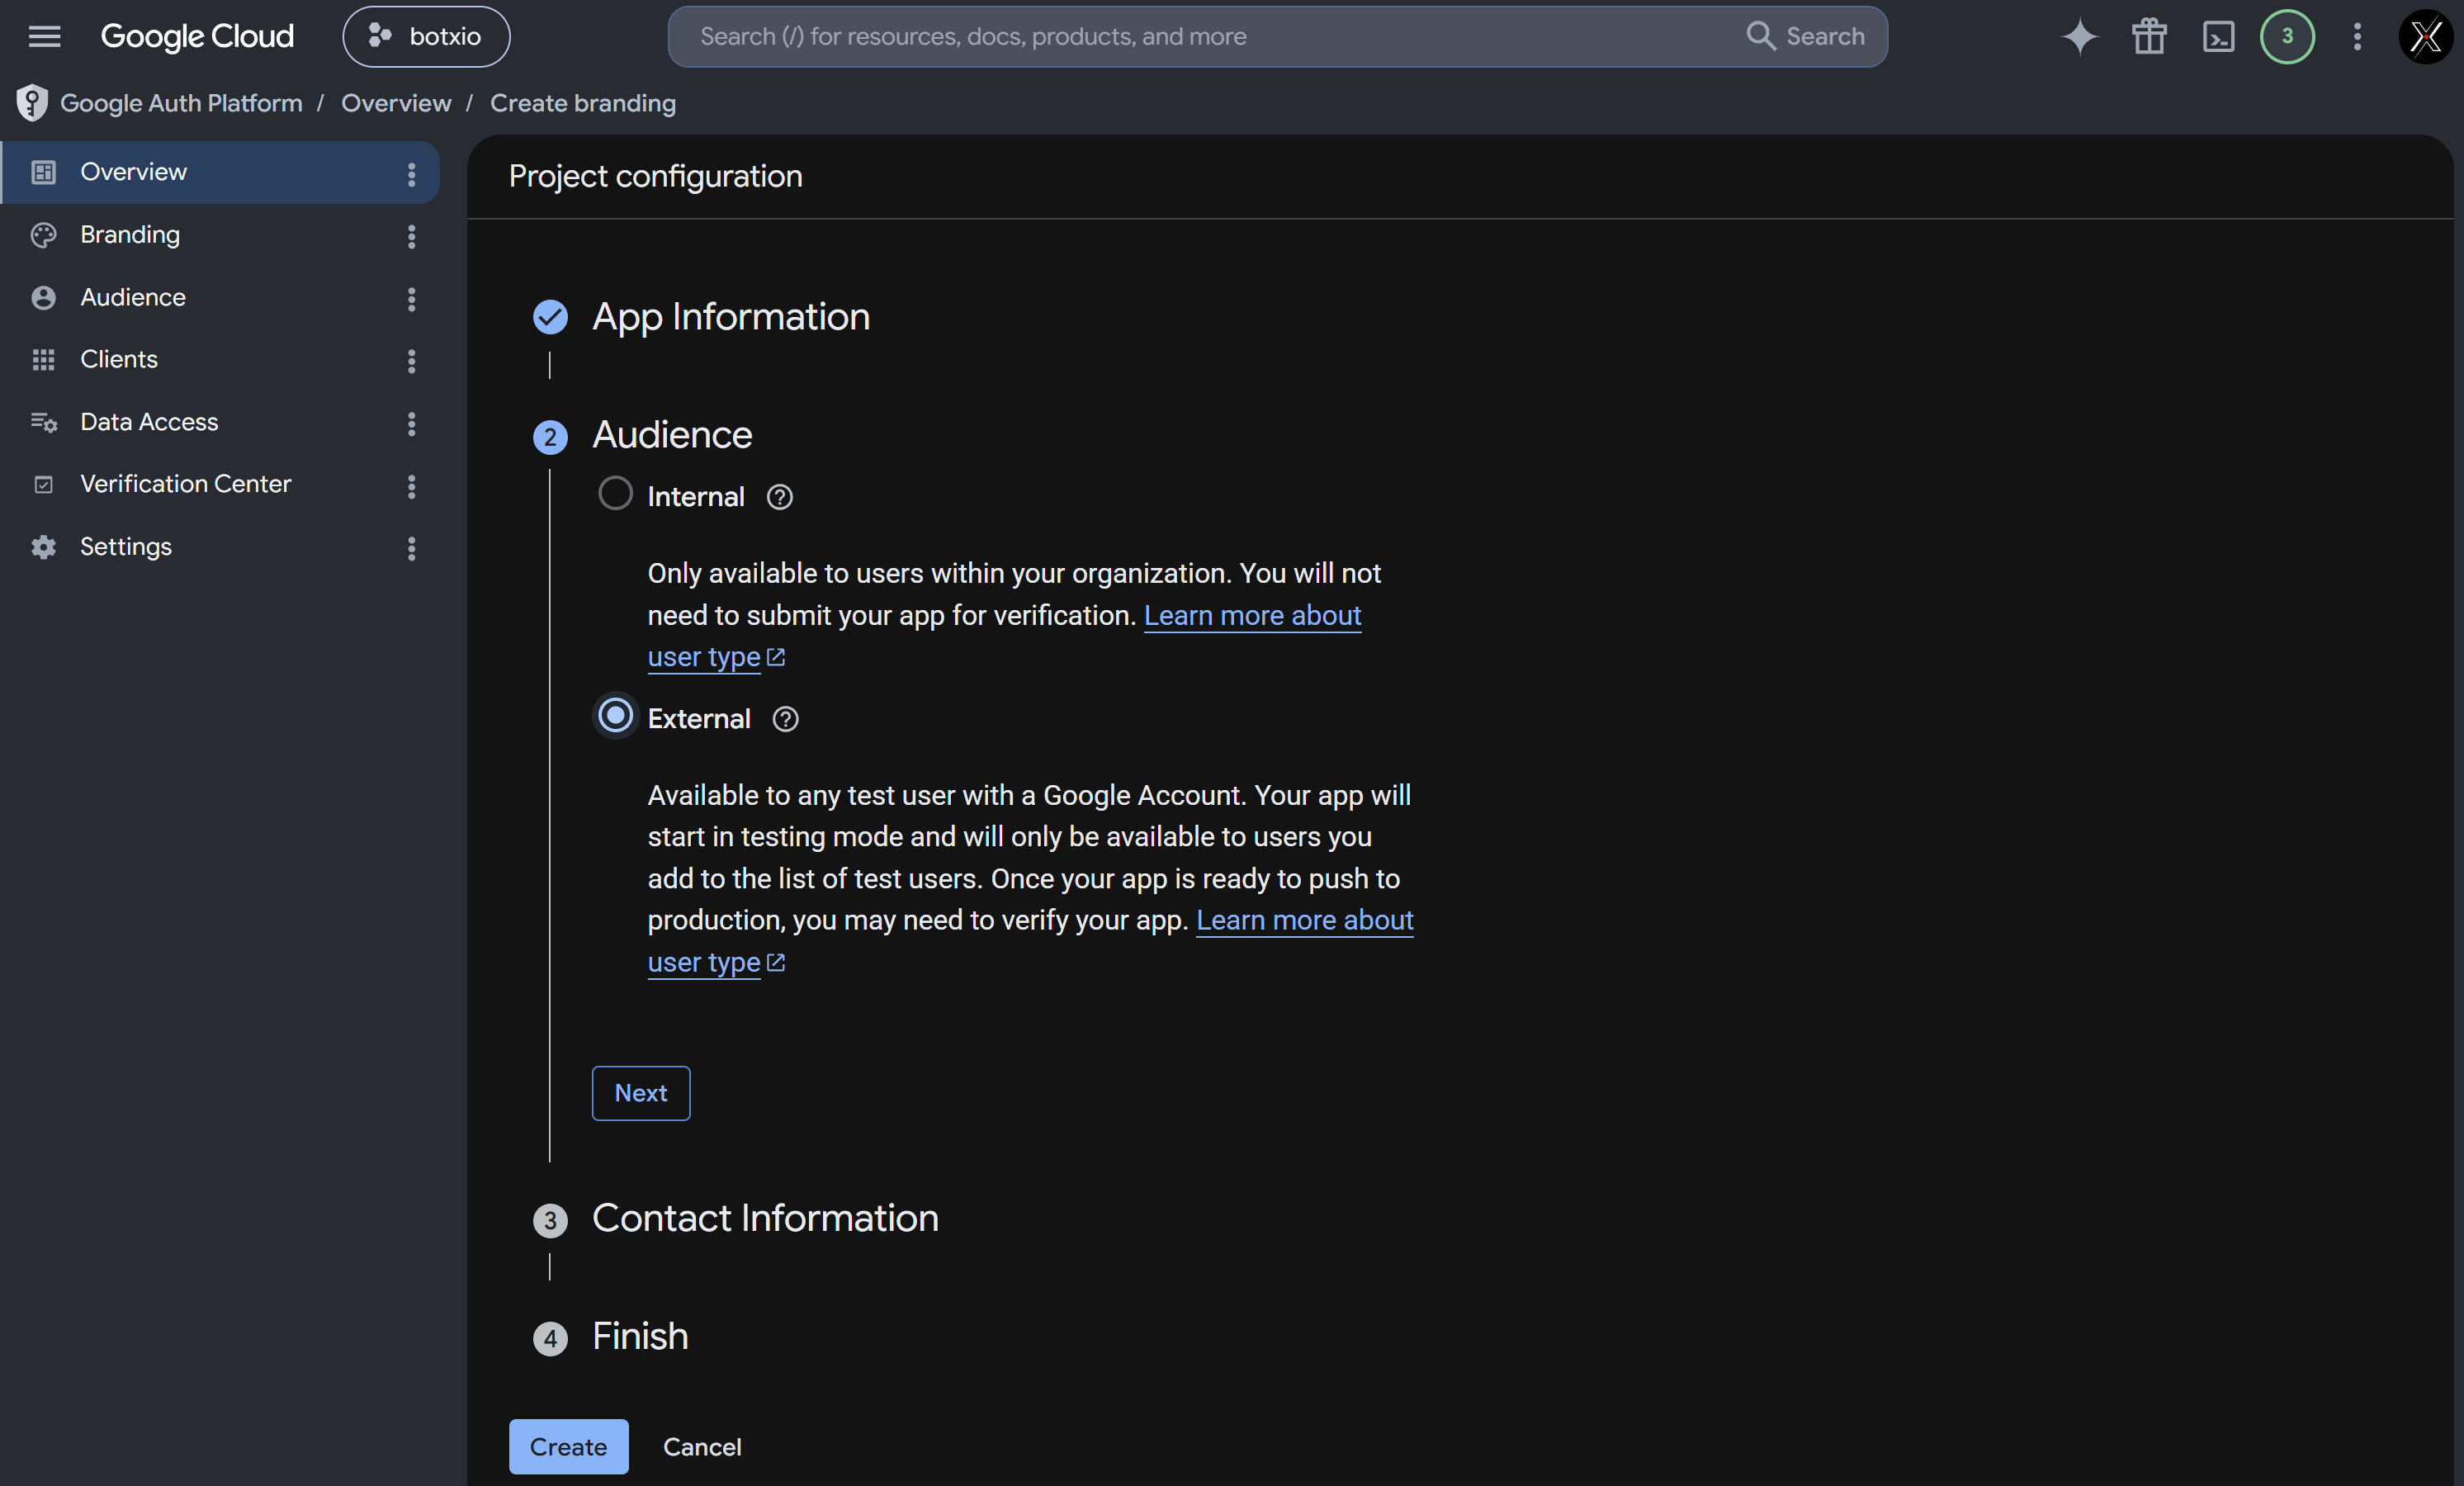
 * **Audience**: Configure your target audience. Check **External** to support clients using personal Google accounts outside your organization. Click **Next**.
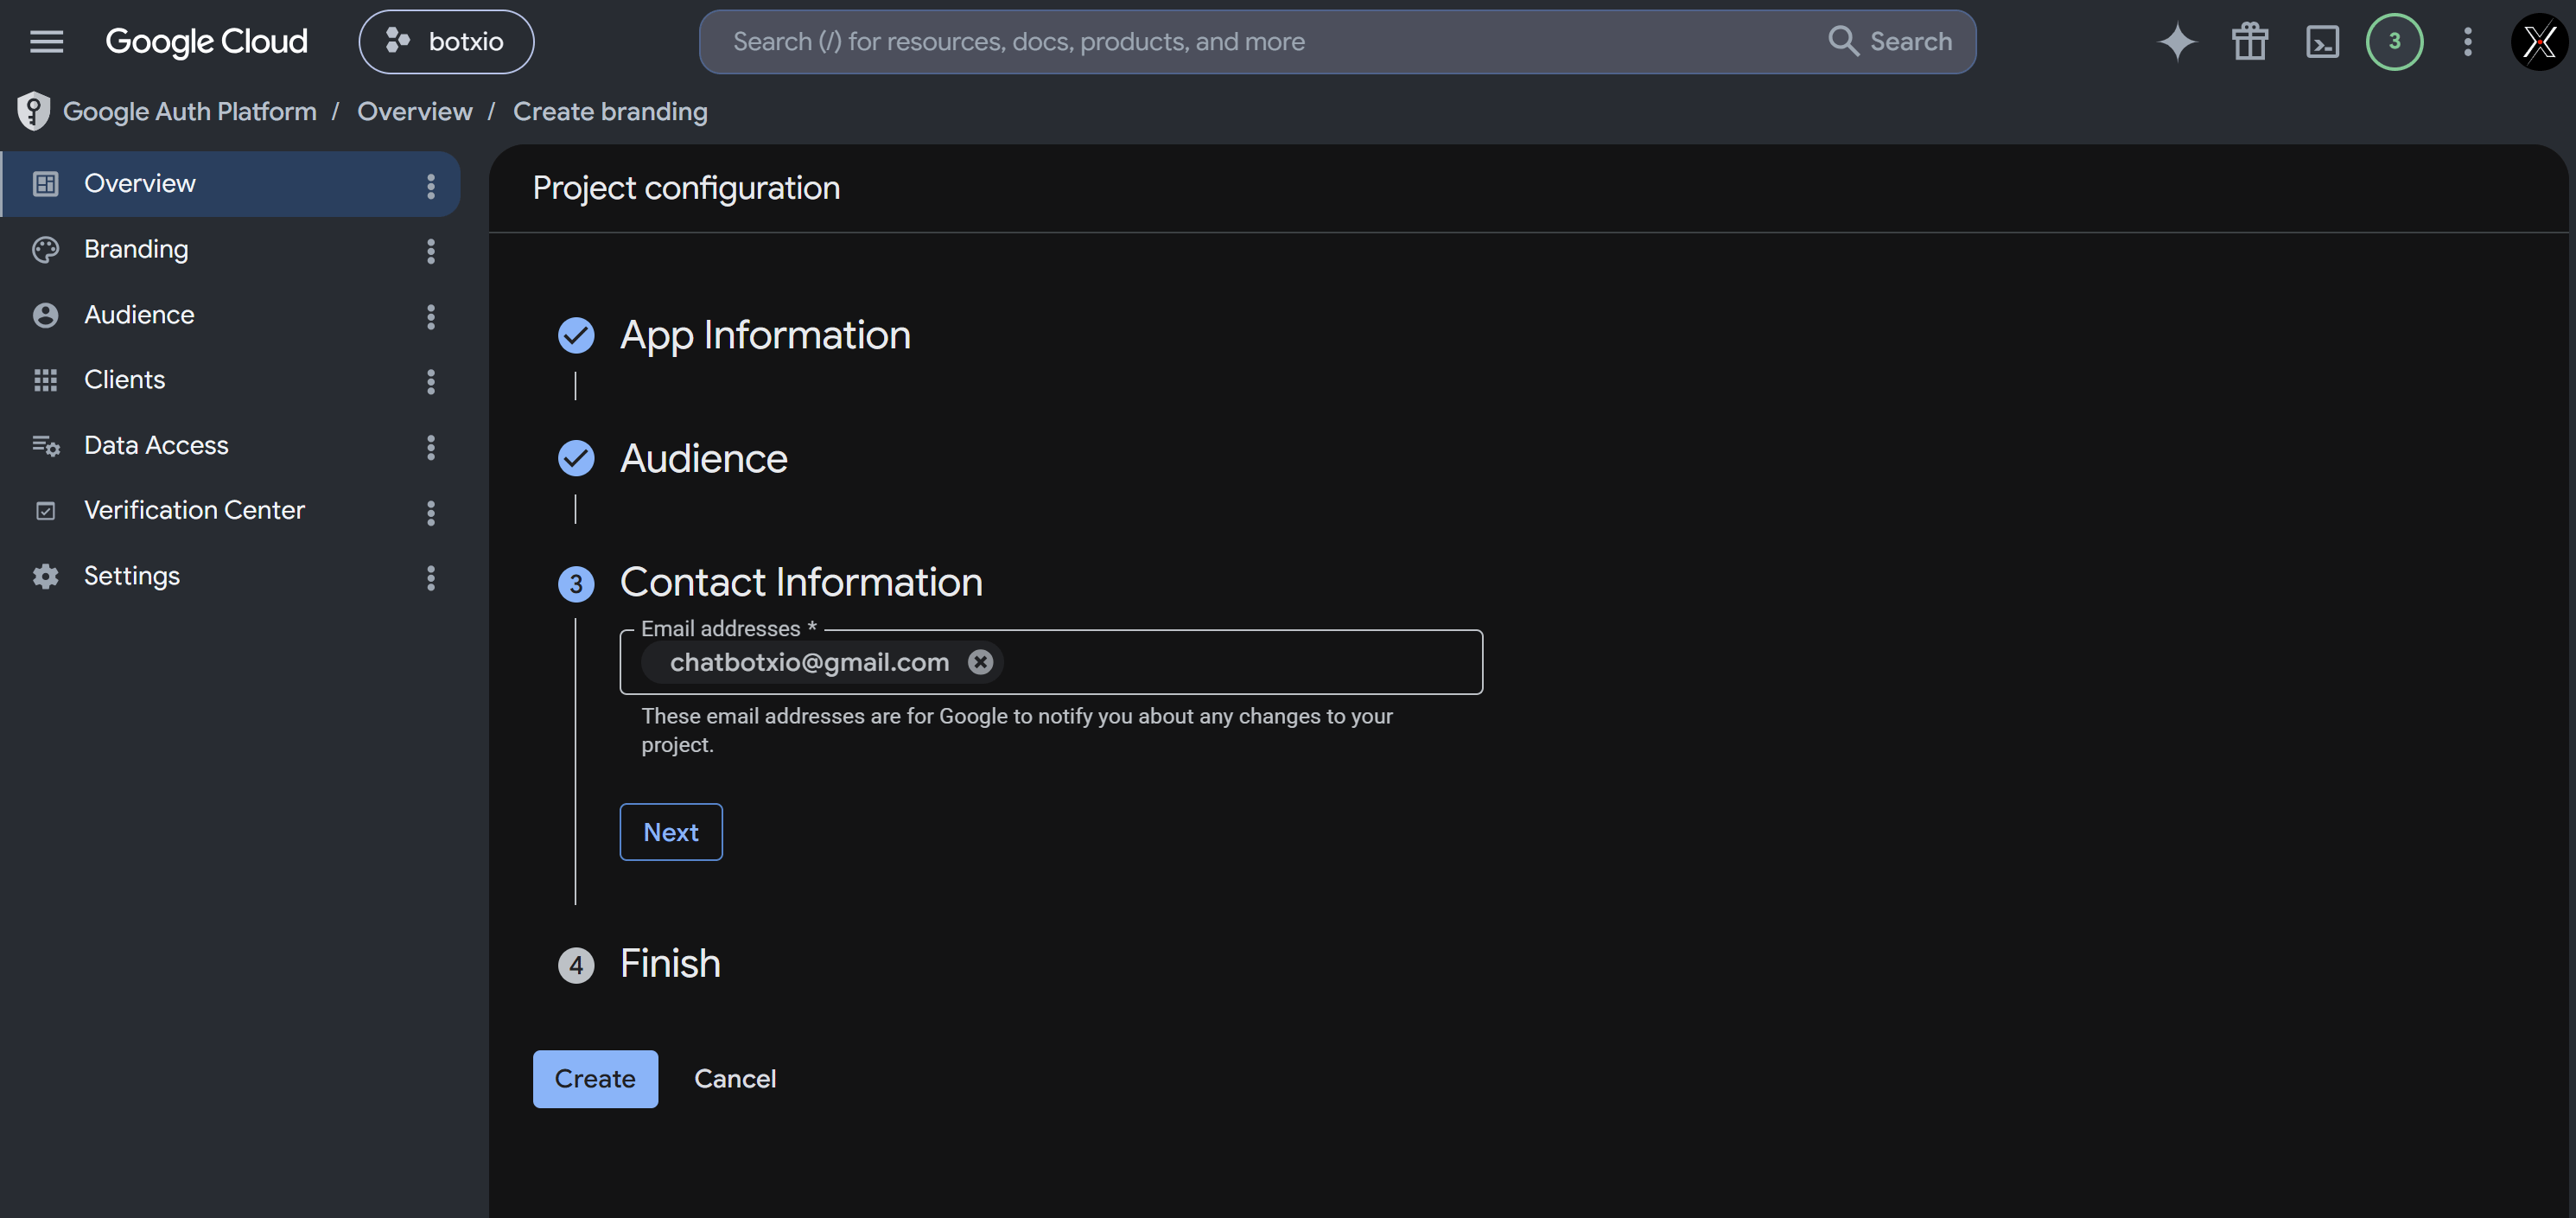
 * **Contact Information**: In the **Email addresses** field, enter your contact email address to receive project change notifications from Google. Click **Next**.
 * **Finish**: Check the agreement box **I agree to the Google API Services: User Data Policy**, click **Continue**, and then click the **Create** button to save configuration.
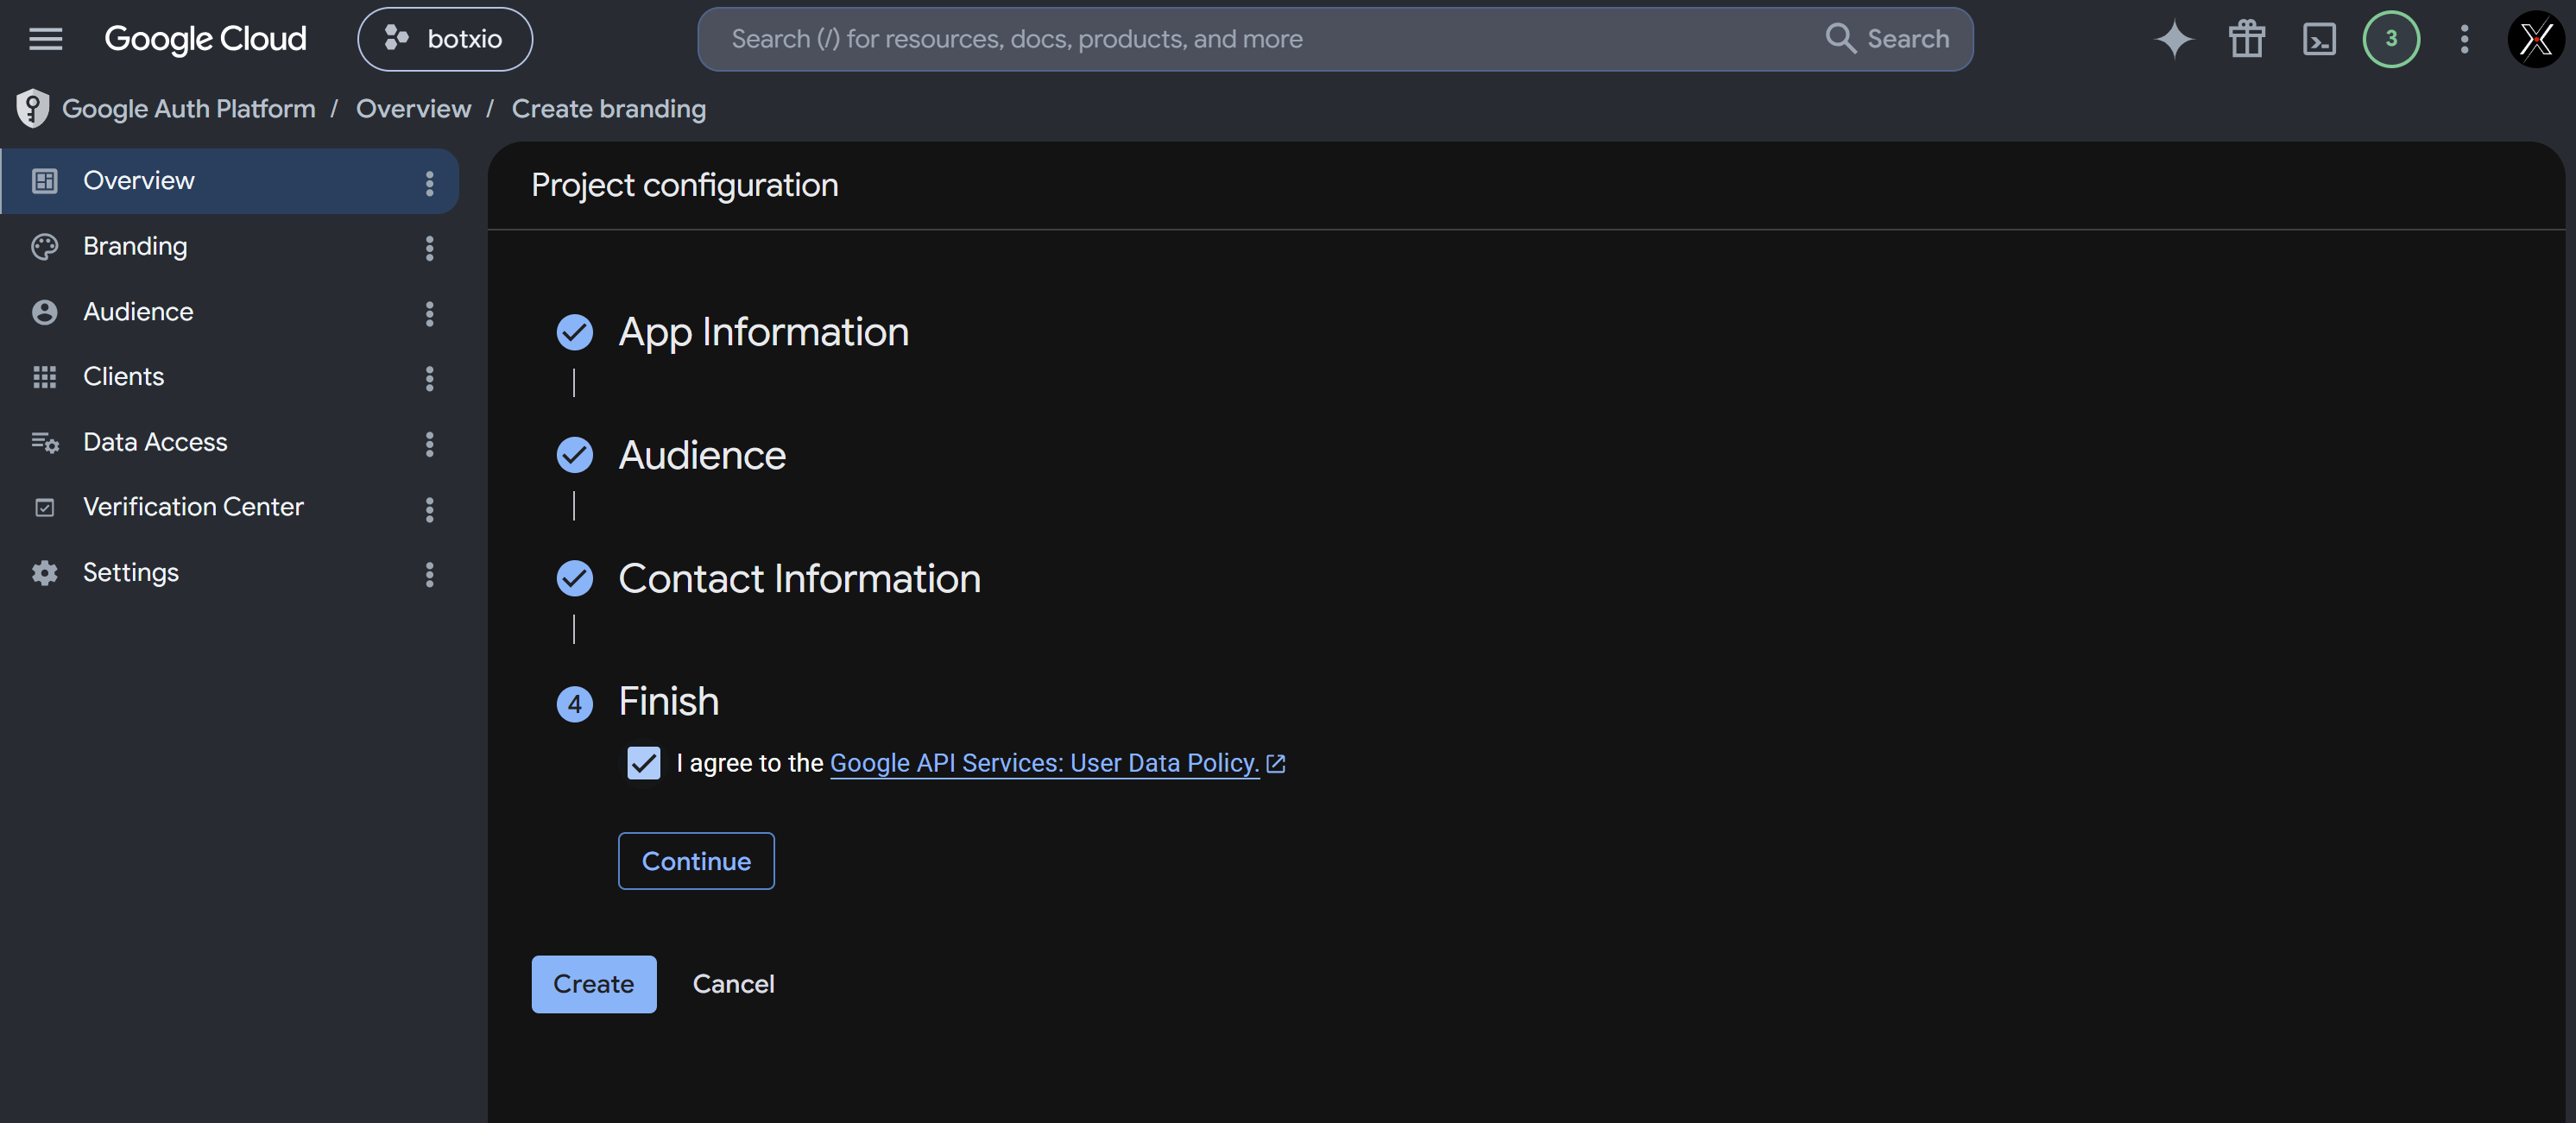 The system will display an **OAuth configuration created!** toast at the bottom of the screen and automatically redirect you to the overview dashboard.
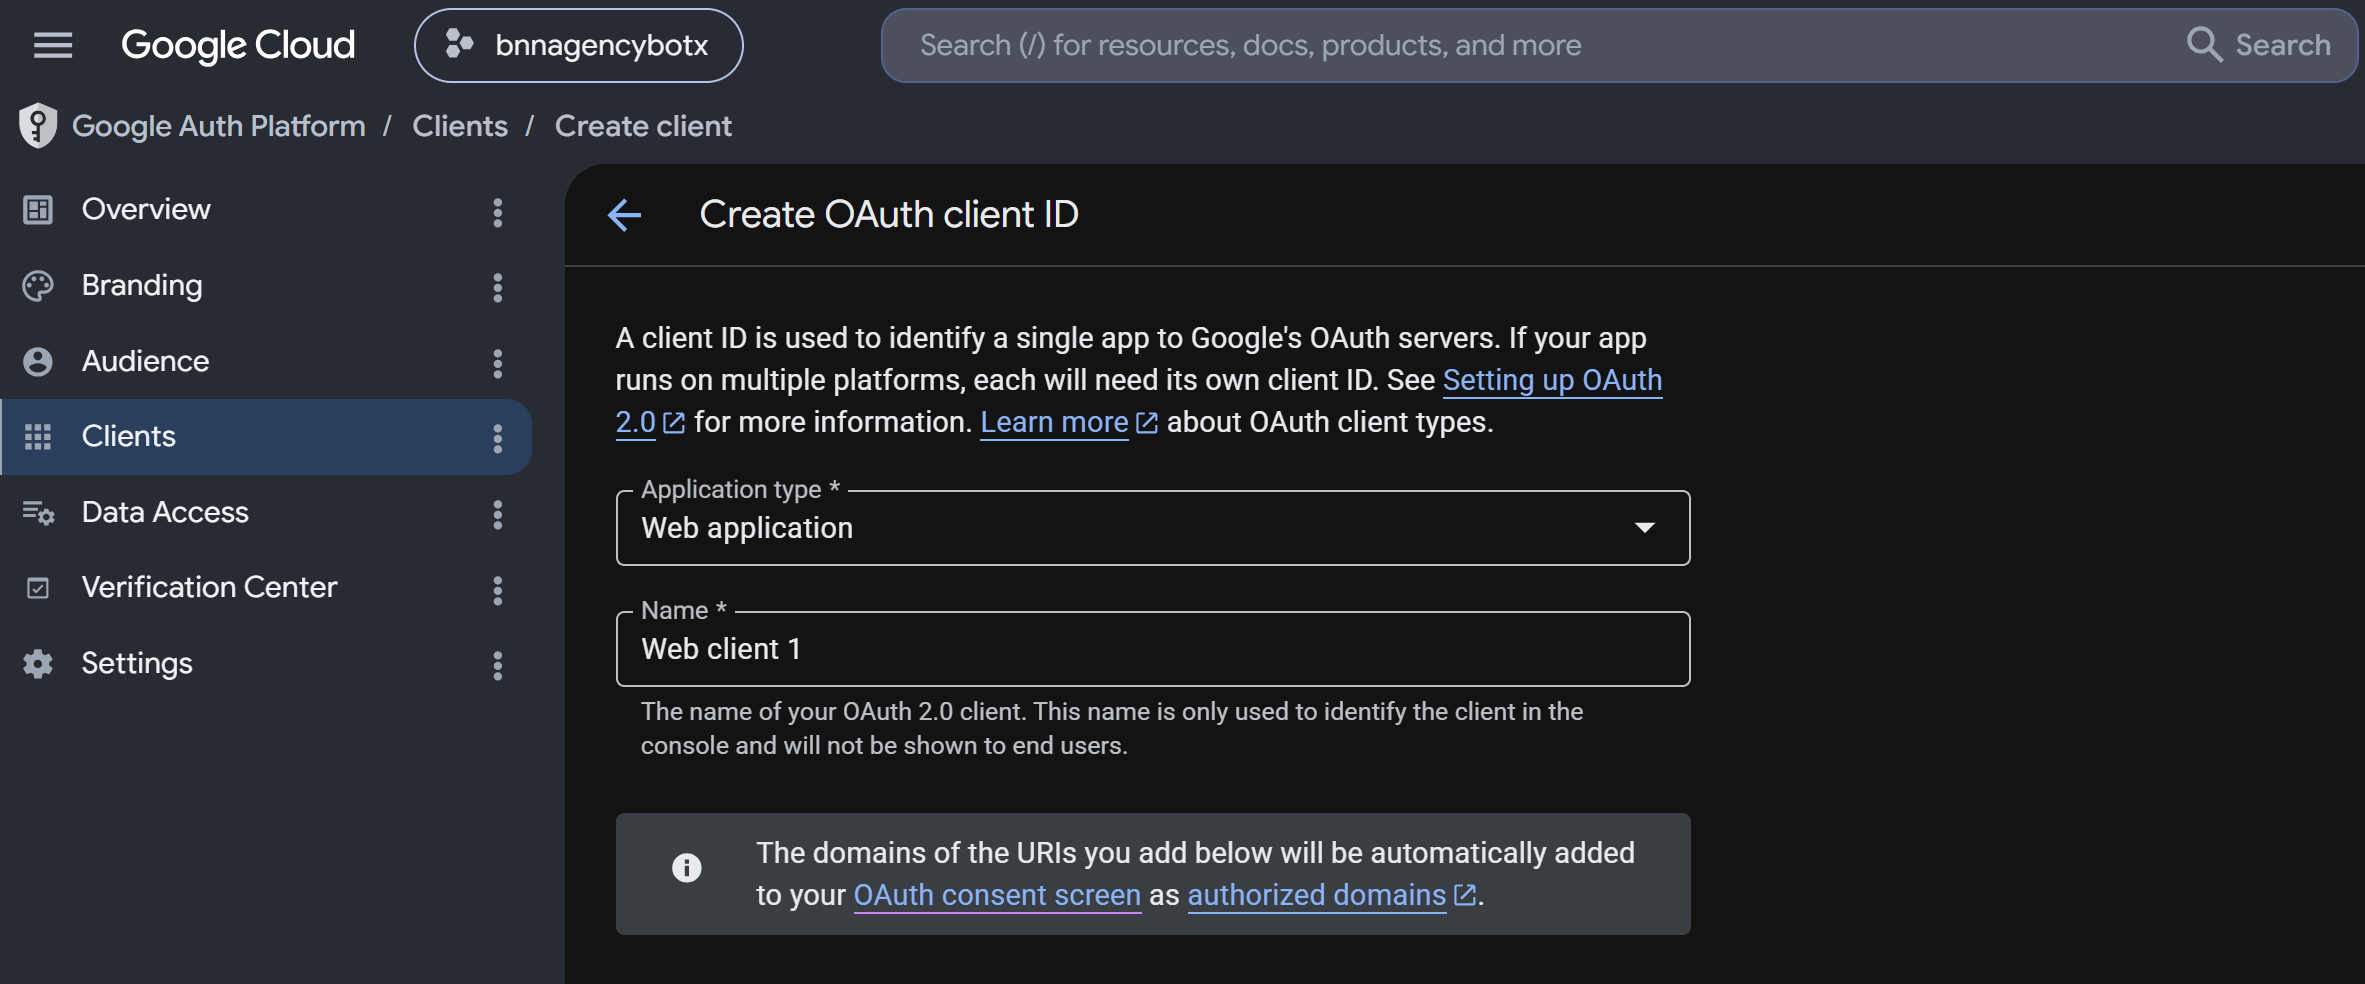
 To obtain your **Client ID** and **Client Secret**, switch to the **Clients** tab on the left menu:
* Click **+ Create client** at the top.
* Select **Web application** as the Application type.
* In the **Name** field, enter a name to identify this client (e.g., `Web client 1`).
To obtain your **Client ID** and **Client Secret**, switch to the **Clients** tab on the left menu:
* Click **+ Create client** at the top.
* Select **Web application** as the Application type.
* In the **Name** field, enter a name to identify this client (e.g., `Web client 1`).
 * In the **Authorized JavaScript origins** section, click **+ Add URI** and enter your main portal domain (e.g., `https://app.yourdomain.com`).
* In the **Authorized redirect URIs** section, click **+ Add URI** twice to add both callback redirect paths provided by the ChatbotX system:
* **Auth Callback URL** (Used for Google Sheets / bot Calendar):
```http theme={null}
https://yourdomain.com/integrations/google/callback
```
* **Sign-in Callback URL** (Used for the Login with Google feature):
```http theme={null}
https://yourdomain.com/api/auth/callback/google
```
* In the **Authorized JavaScript origins** section, click **+ Add URI** and enter your main portal domain (e.g., `https://app.yourdomain.com`).
* In the **Authorized redirect URIs** section, click **+ Add URI** twice to add both callback redirect paths provided by the ChatbotX system:
* **Auth Callback URL** (Used for Google Sheets / bot Calendar):
```http theme={null}
https://yourdomain.com/integrations/google/callback
```
* **Sign-in Callback URL** (Used for the Login with Google feature):
```http theme={null}
https://yourdomain.com/api/auth/callback/google
```
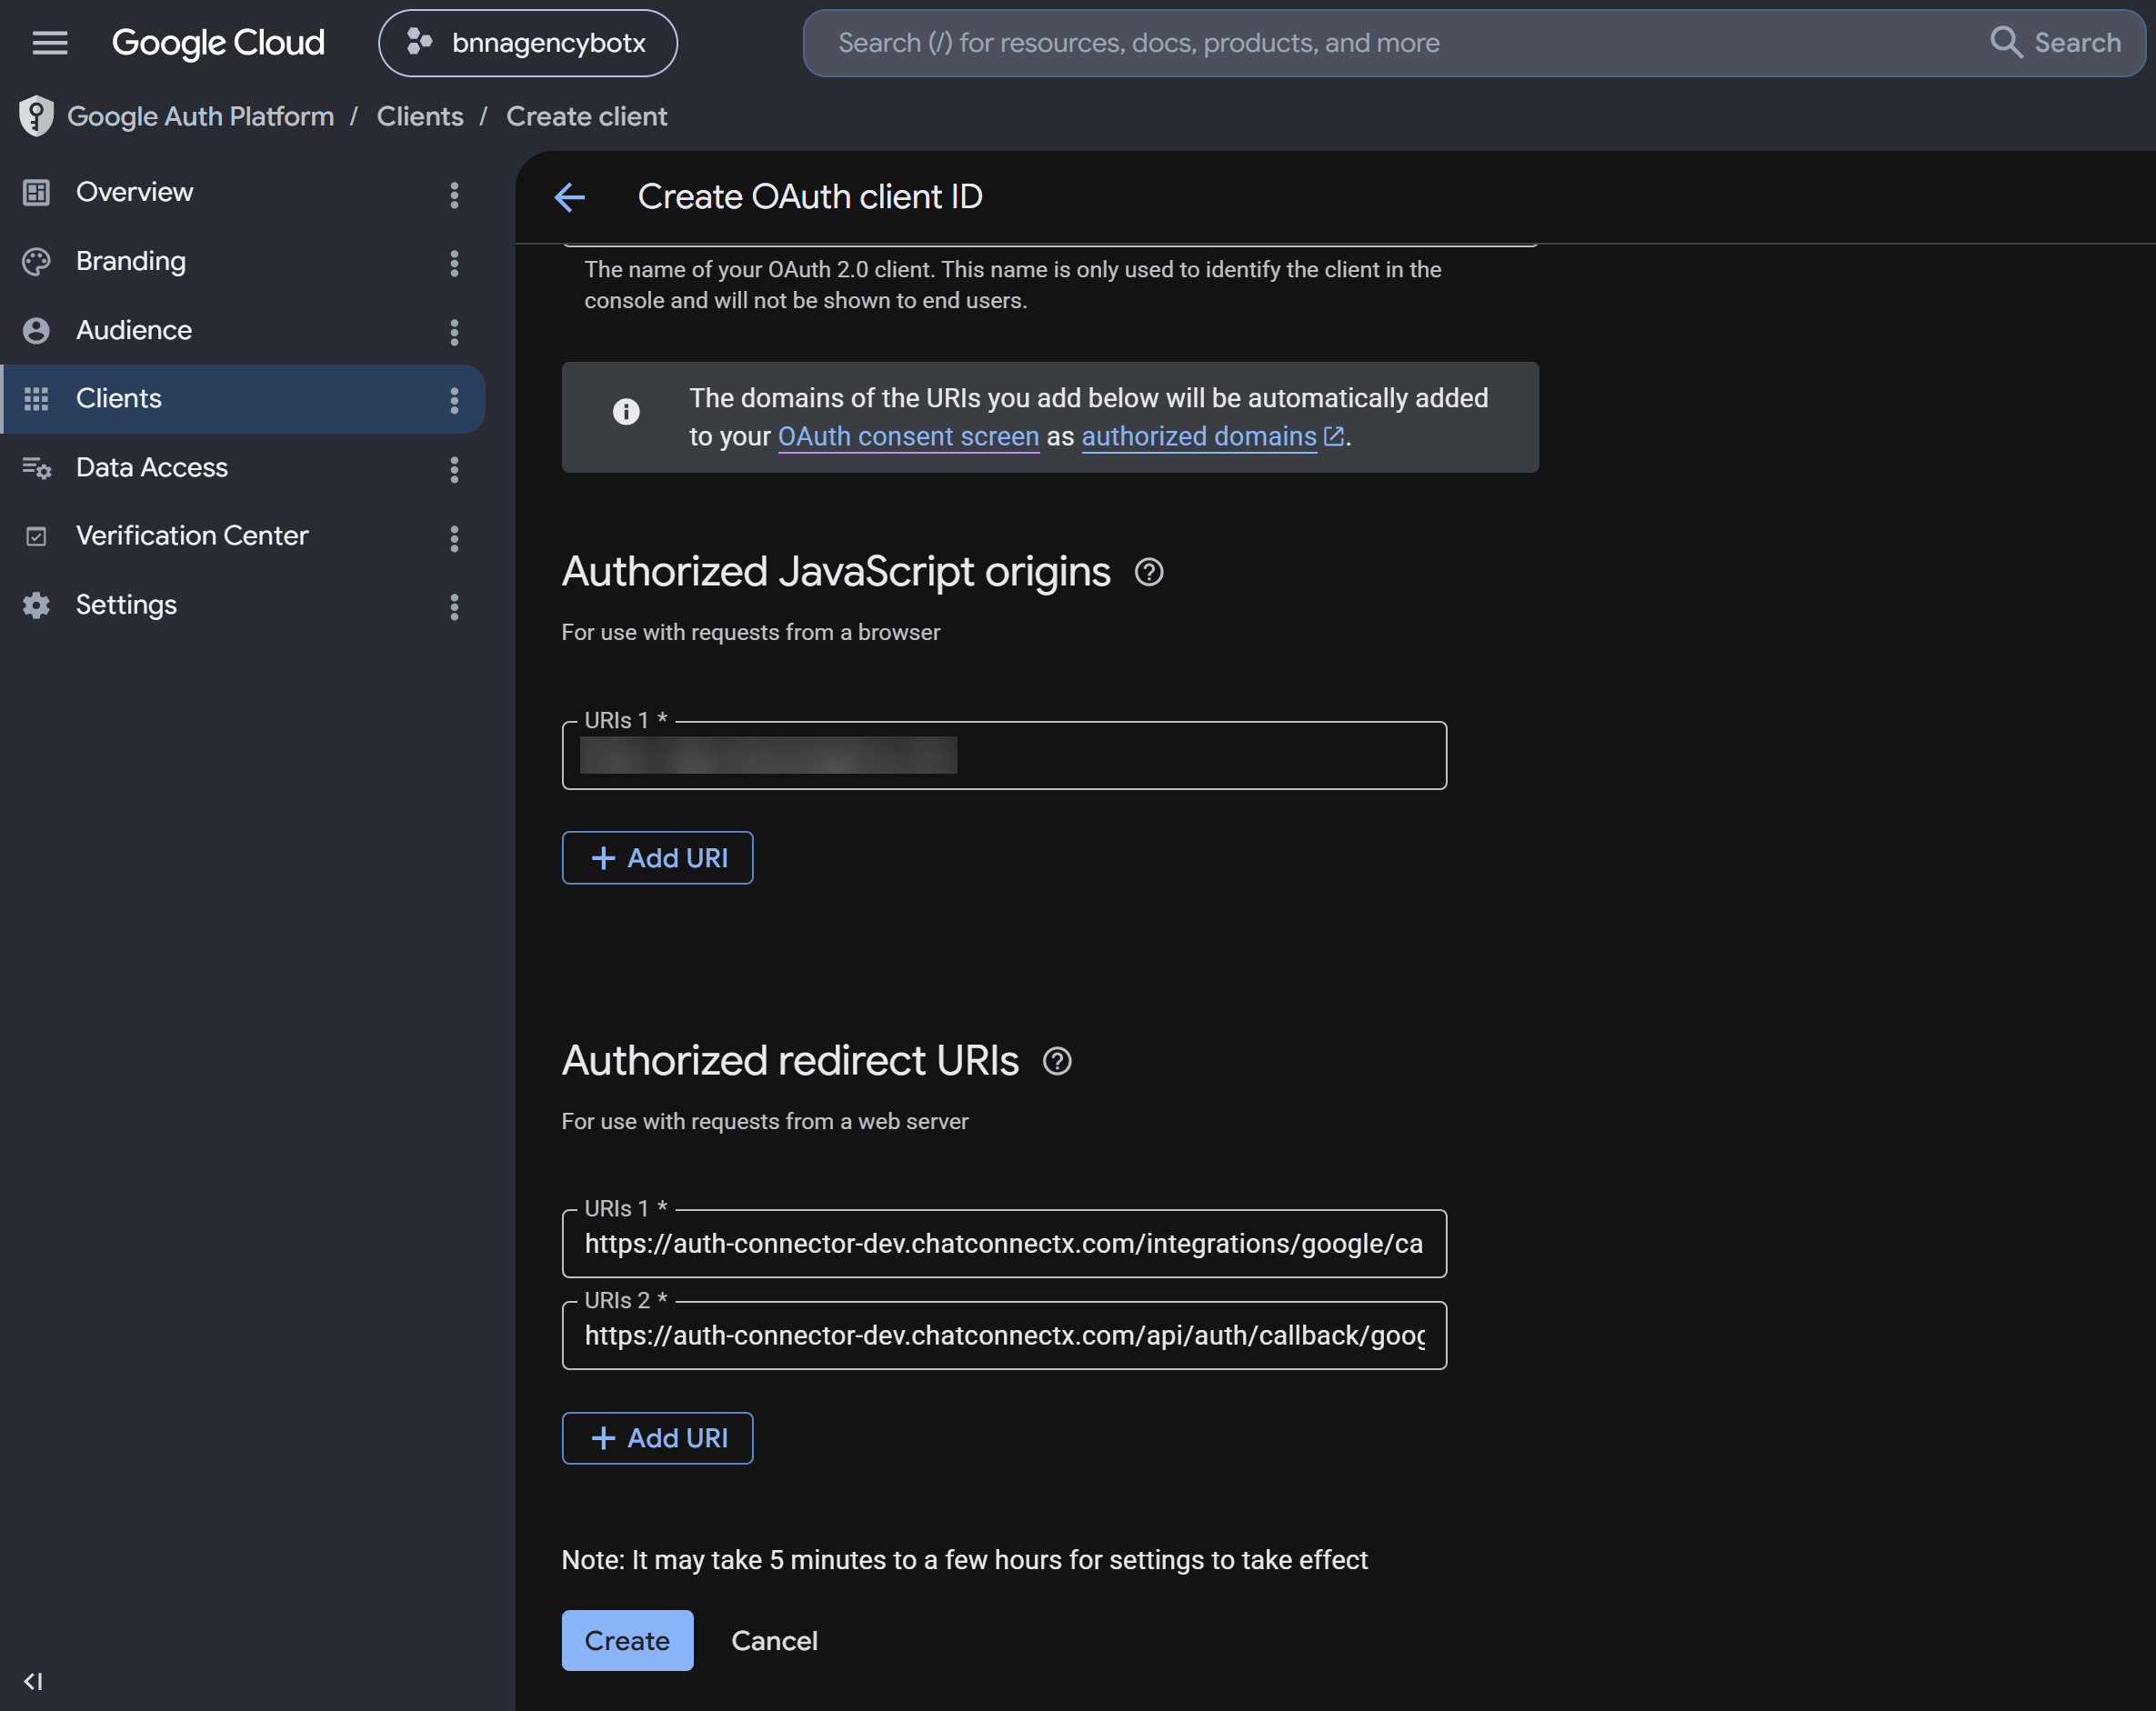 * Click **Create** at the bottom. A popup titled **OAuth client created** will appear showing your **Client ID** and **Client Secret**.
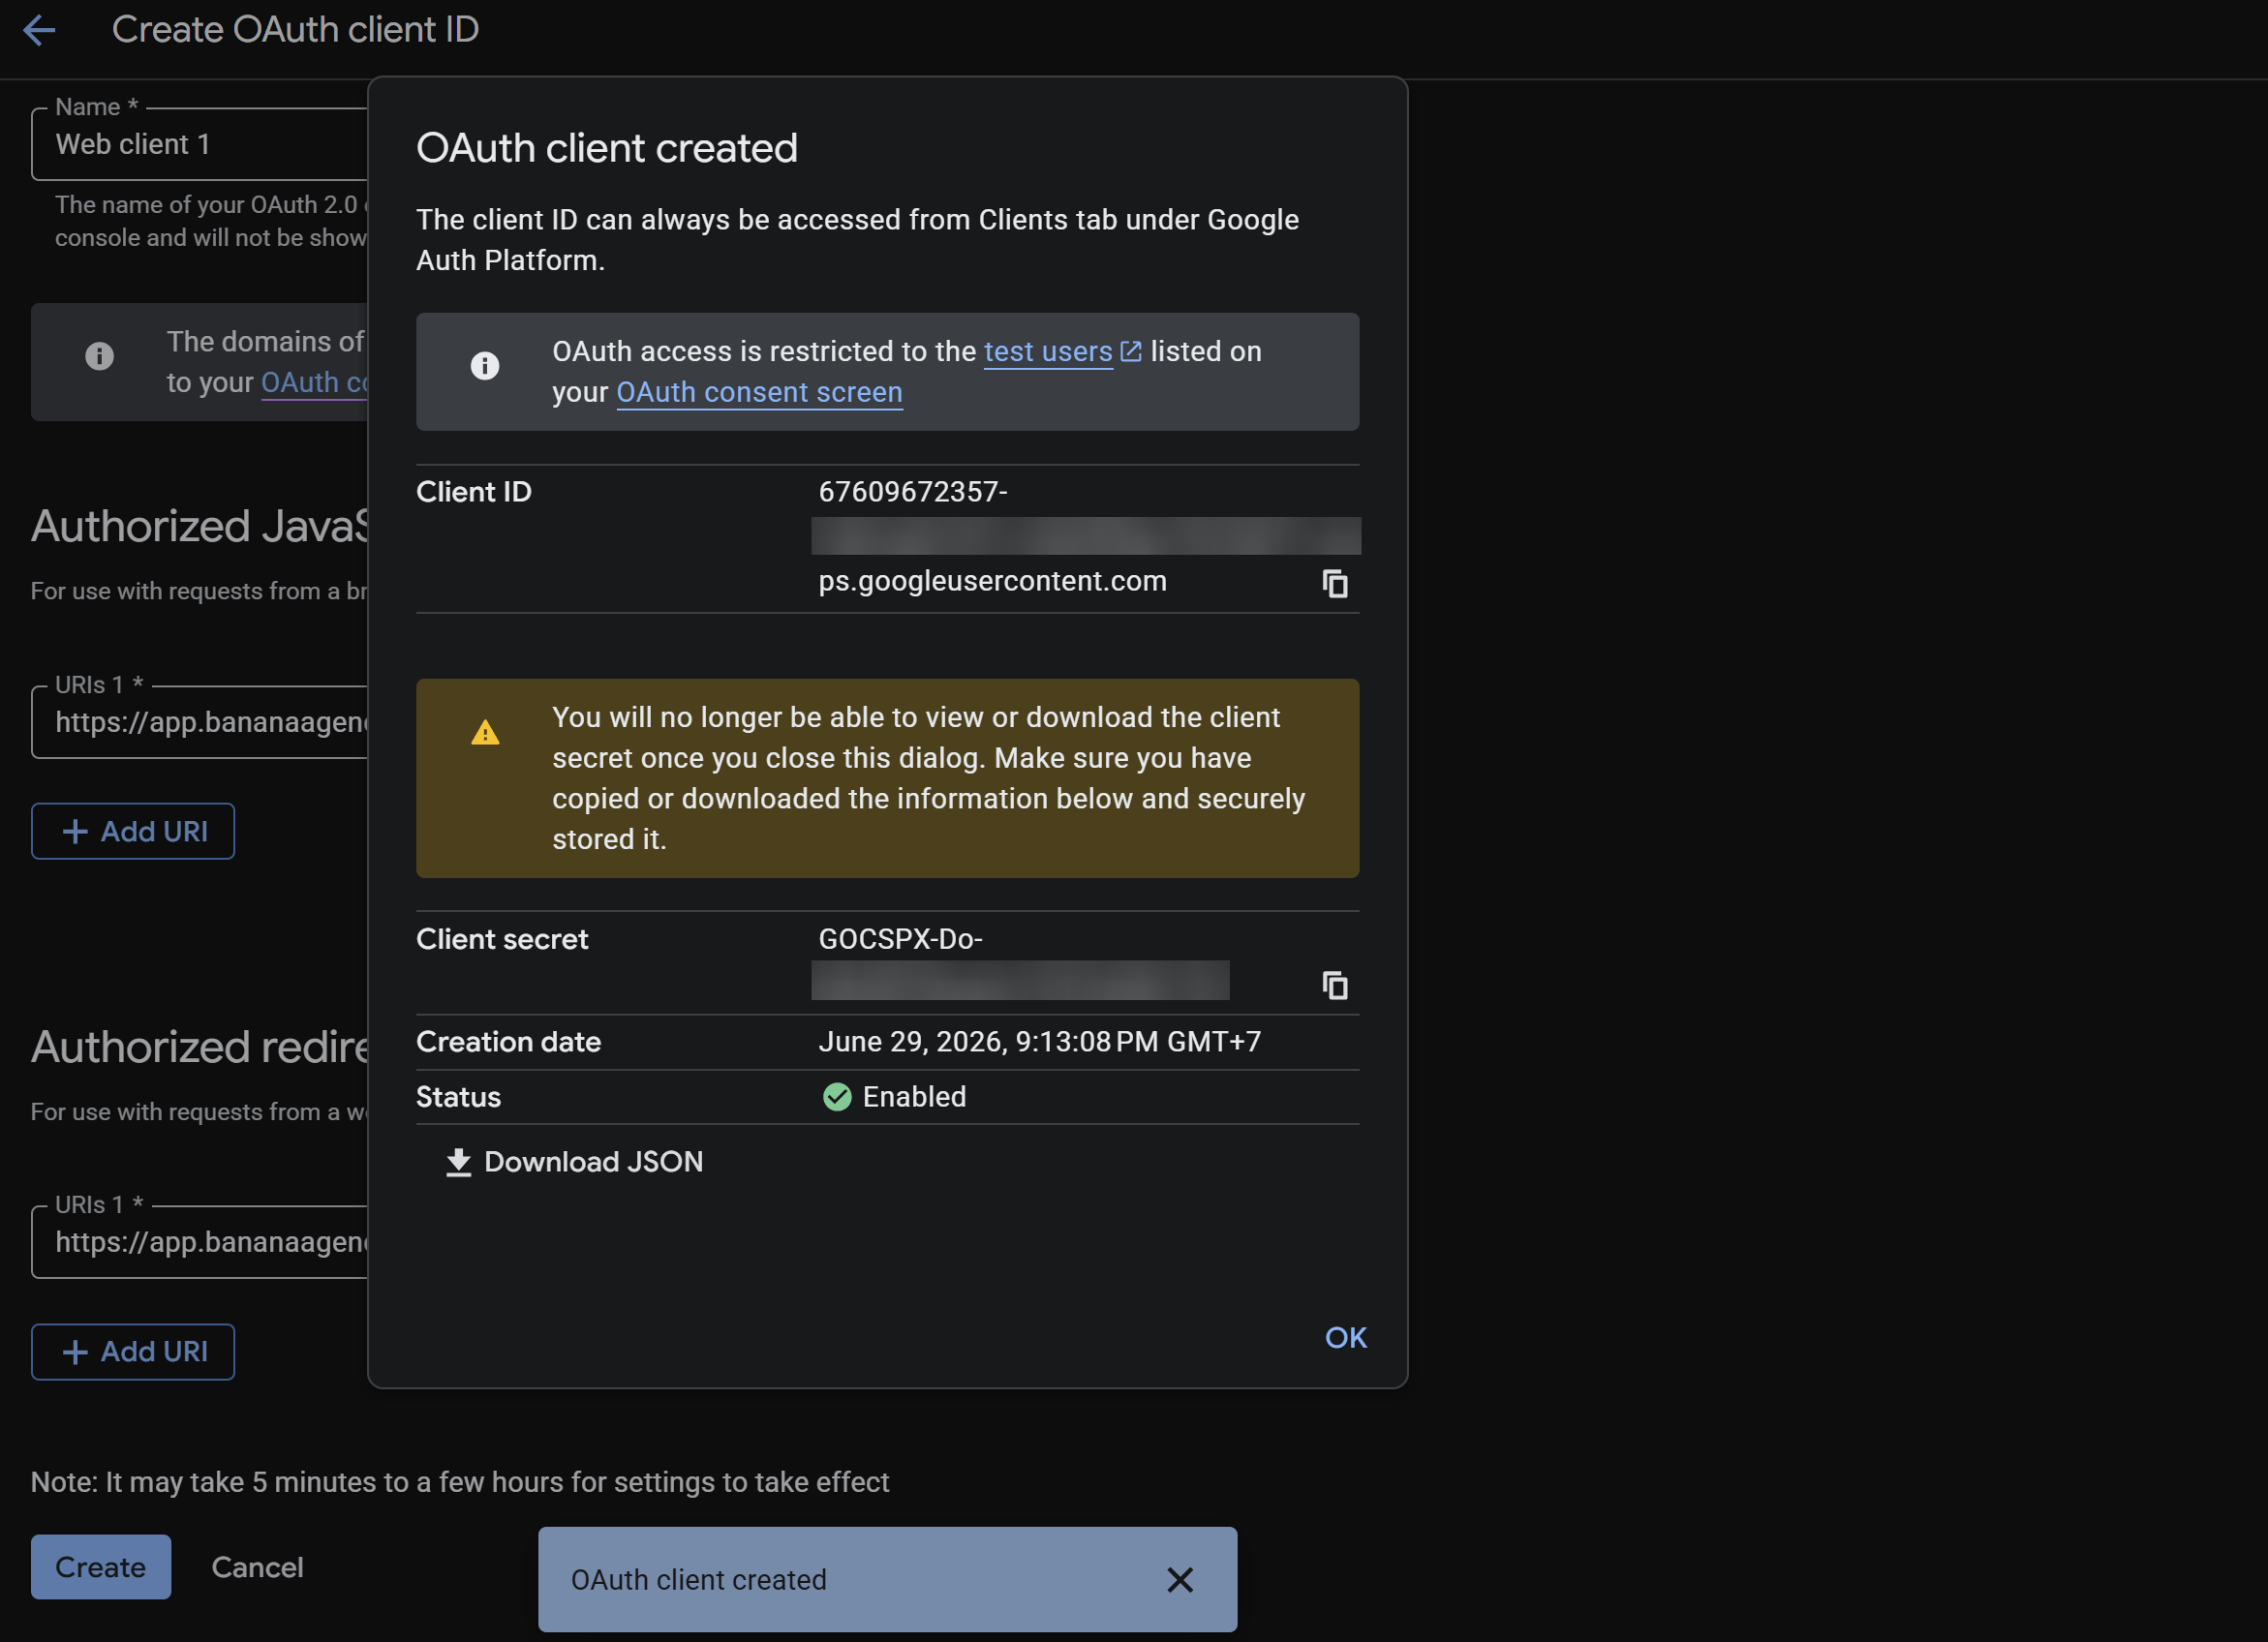 **Important Note:** Copy both the **Client ID** and **Client Secret** immediately and store them securely. Google will no longer allow you to view or download the **Client Secret** once you close this dialog.
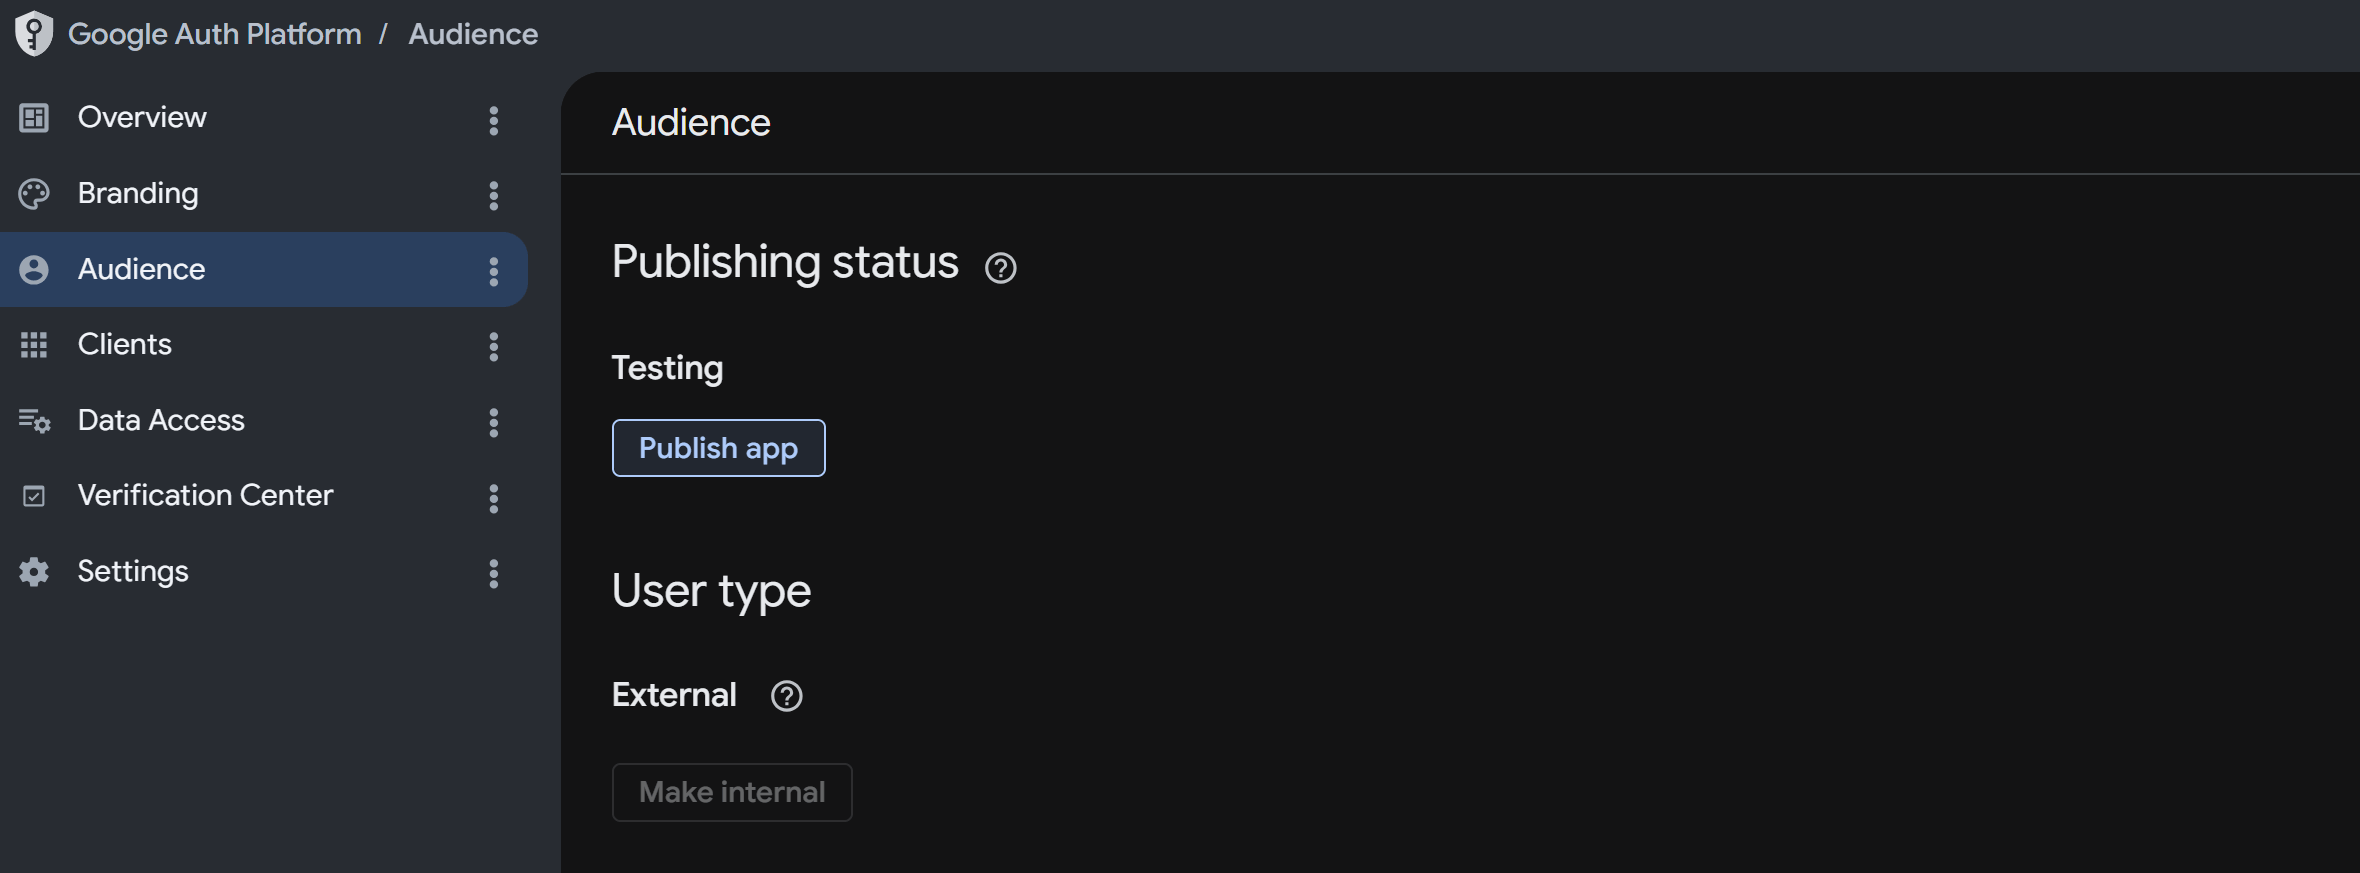
Select the **Audience** section from the left menu:
* Click **Publish App** to transition the application status from Testing to Production. This ensures that all users outside your test list can log in using your Google application.
**Important Note:** Copy both the **Client ID** and **Client Secret** immediately and store them securely. Google will no longer allow you to view or download the **Client Secret** once you close this dialog.
Select the **Audience** section from the left menu:
* Click **Publish App** to transition the application status from Testing to Production. This ensures that all users outside your test list can log in using your Google application.
 * Once the application is in production, Google requires you to complete verification steps in the **Verification Center** in the left menu:
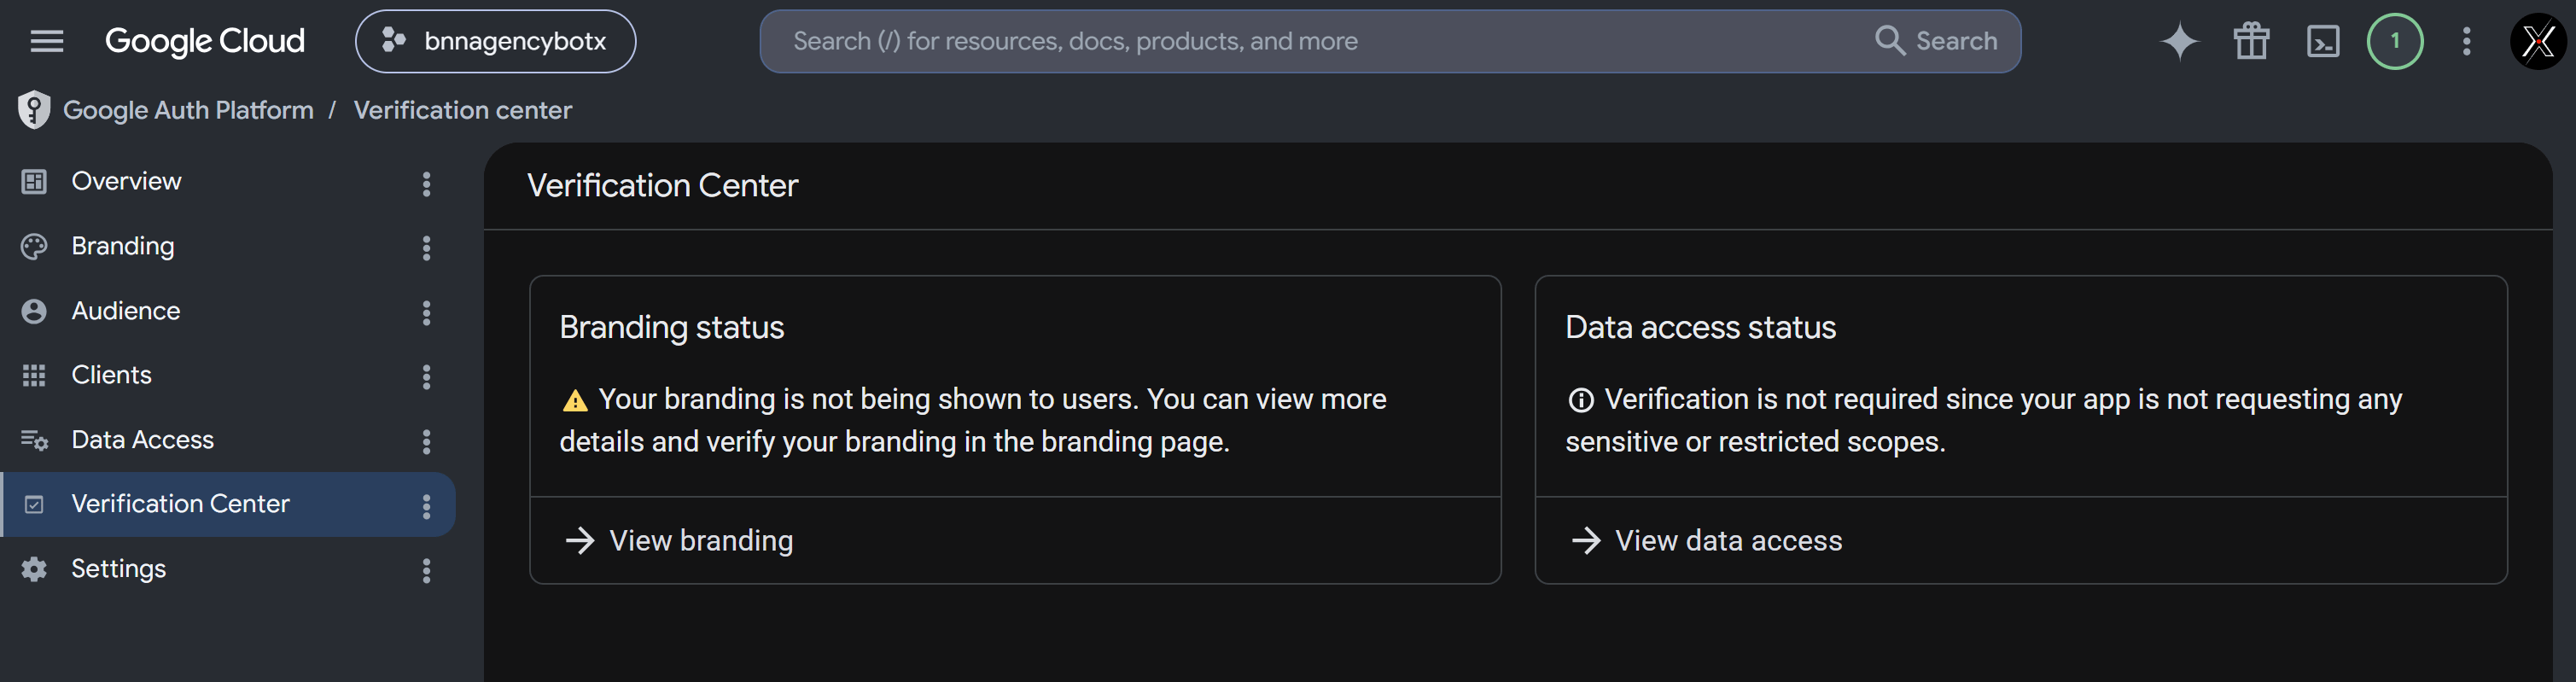 * **Branding status**: Google checks your logo, app name, and legal links (Privacy Policy, Terms of Service). Click **View branding** and complete the requested details. If not verified, users will see Google's security warning page (e.g., *"Google hasn't verified this app"*) during login.
* **Data access status**: Monitors verification for sensitive or restricted scopes. If your app does not request sensitive or restricted scopes (such as Sheets or Calendar at restricted levels), the status will display *"Verification is not required"*, and you can use it normally without any additional action.
## Configure Webhook Verify Token and Synchronize to Portal
To complete the Google App connection to your admin portal, prepare your integration details:
### What is the Webhook Verify Token?
The **Webhook Verify Token** is a custom security token that you define (choose a random alphanumeric string with a length between 16 and 32 characters).
This token is used as a secure shared key between your portal and Google APIs. When a calendar event is modified, Google sends a notification request containing this token in the HTTP header (`X-Goog-Channel-Token`). This allows your portal to verify that the request originates from Google and not from a malicious third party.
### Enter Credentials in the Admin Portal
Log in to your admin portal, navigate to **Super Admin > Platform Credentials**, find Google, and click **Edit**.
* **Branding status**: Google checks your logo, app name, and legal links (Privacy Policy, Terms of Service). Click **View branding** and complete the requested details. If not verified, users will see Google's security warning page (e.g., *"Google hasn't verified this app"*) during login.
* **Data access status**: Monitors verification for sensitive or restricted scopes. If your app does not request sensitive or restricted scopes (such as Sheets or Calendar at restricted levels), the status will display *"Verification is not required"*, and you can use it normally without any additional action.
## Configure Webhook Verify Token and Synchronize to Portal
To complete the Google App connection to your admin portal, prepare your integration details:
### What is the Webhook Verify Token?
The **Webhook Verify Token** is a custom security token that you define (choose a random alphanumeric string with a length between 16 and 32 characters).
This token is used as a secure shared key between your portal and Google APIs. When a calendar event is modified, Google sends a notification request containing this token in the HTTP header (`X-Goog-Channel-Token`). This allows your portal to verify that the request originates from Google and not from a malicious third party.
### Enter Credentials in the Admin Portal
Log in to your admin portal, navigate to **Super Admin > Platform Credentials**, find Google, and click **Edit**.
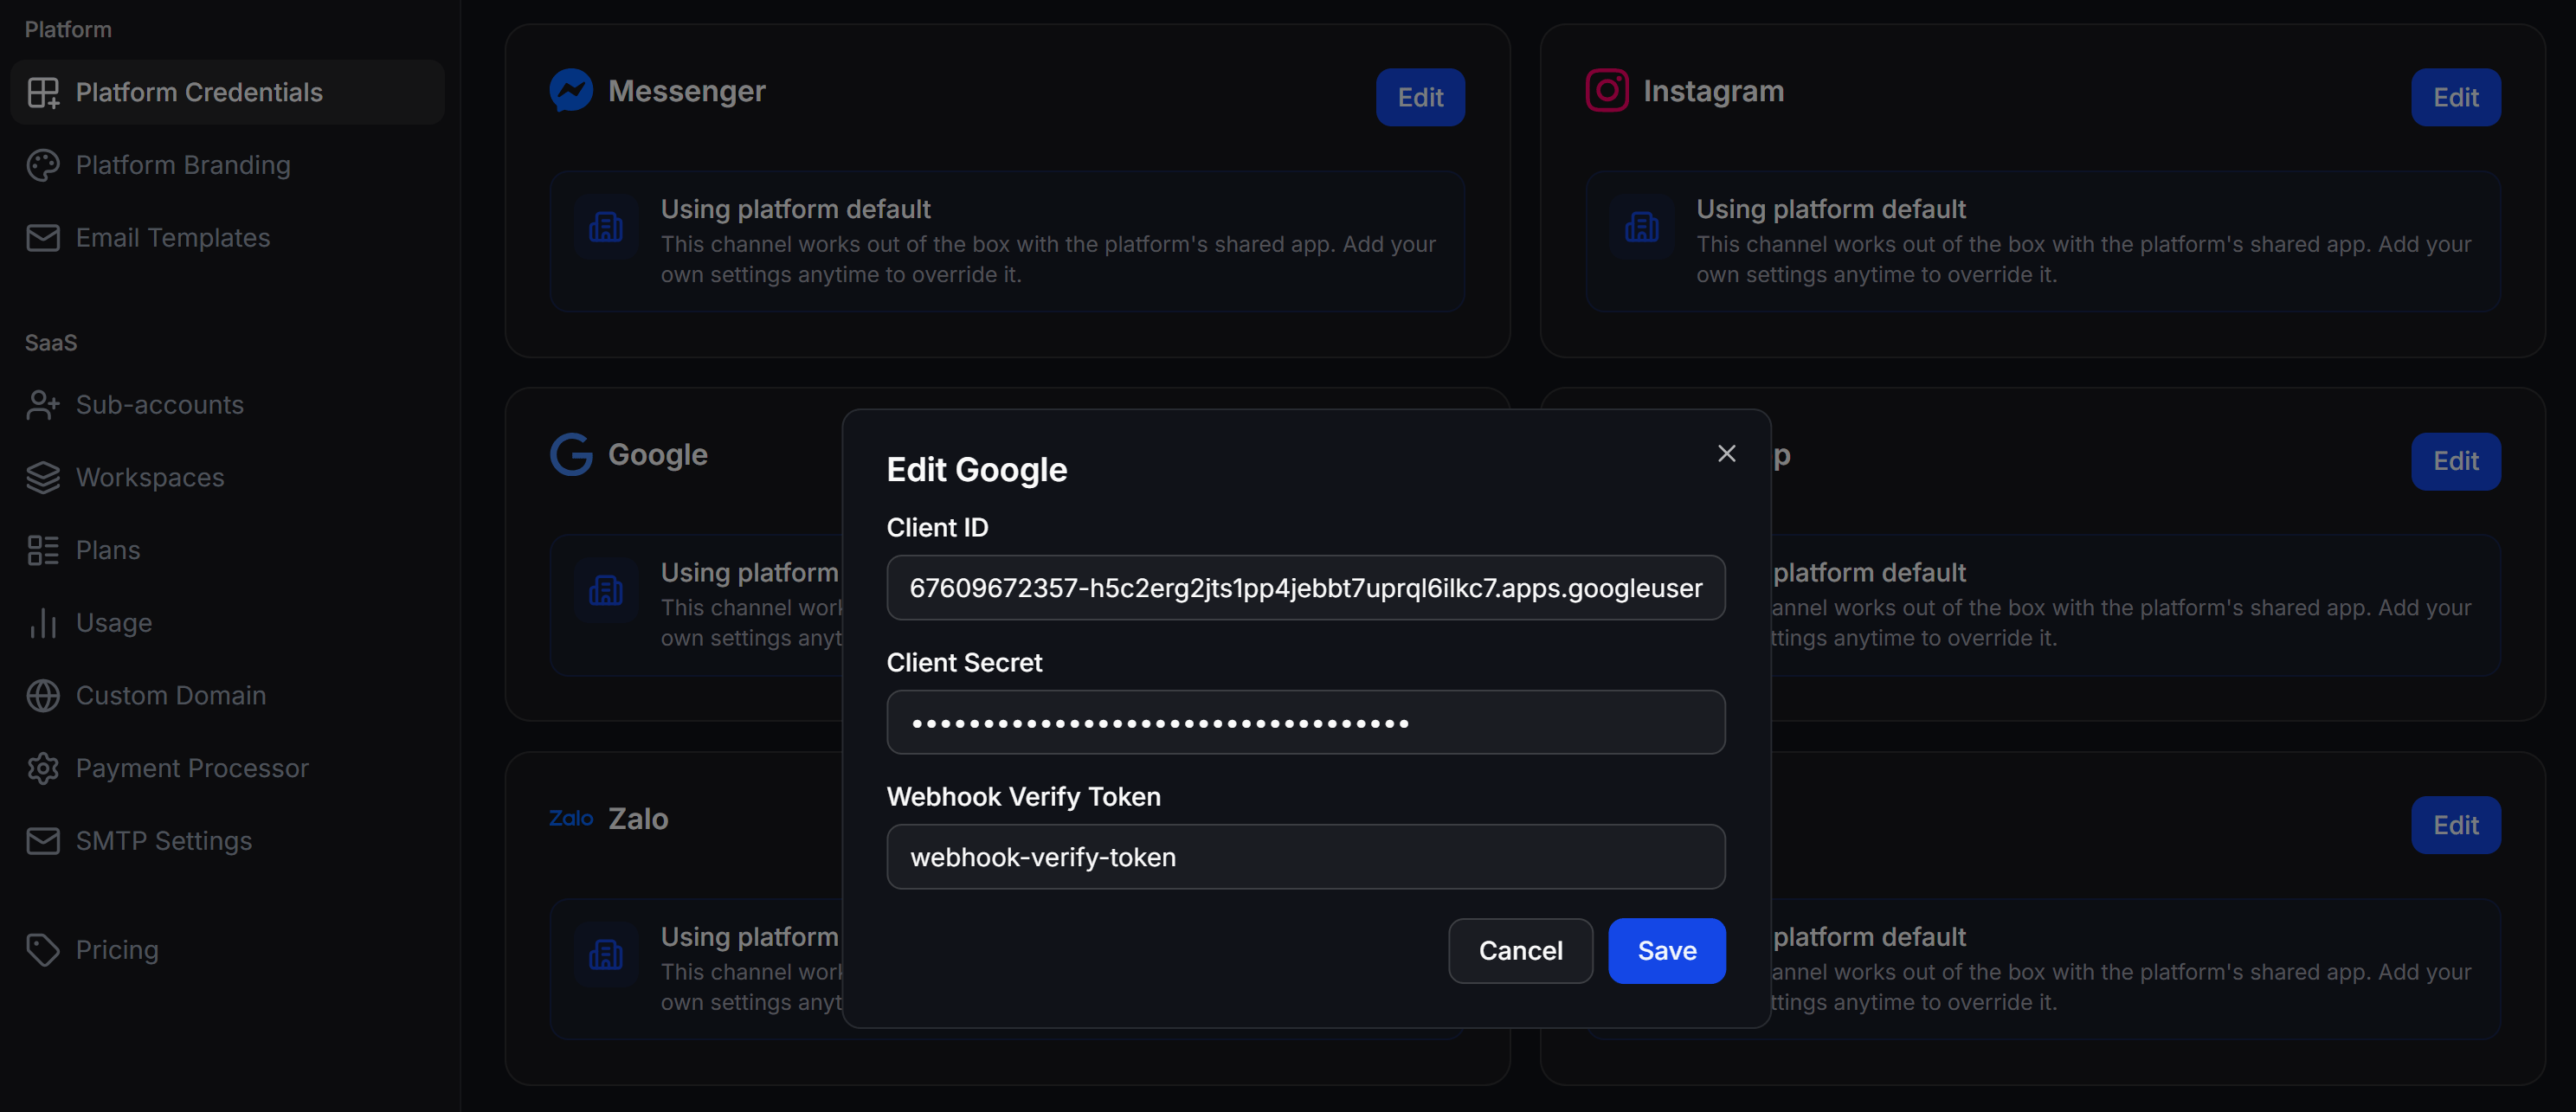 Enter the three parameters you prepared:
* **Client ID**: Paste the Client ID obtained from Google Cloud Console.
* **Client Secret**: Paste the Client Secret obtained from Google Cloud Console.
* **Webhook Verify Token**: Enter the custom security string you generated.
Click **Save** to apply the configuration and enable the custom Google App for all users across your portal.
Enter the three parameters you prepared:
* **Client ID**: Paste the Client ID obtained from Google Cloud Console.
* **Client Secret**: Paste the Client Secret obtained from Google Cloud Console.
* **Webhook Verify Token**: Enter the custom security string you generated.
Click **Save** to apply the configuration and enable the custom Google App for all users across your portal.