> ## Documentation Index
> Fetch the complete documentation index at: https://chatbotx.io/docs/llms.txt
> Use this file to discover all available pages before exploring further.
# Meta Business AI Integration for Messenger
> Learn how to activate Meta Business AI on Meta Business Suite and seamlessly hand over conversations to ChatbotX flows and human agents.
**Meta Business AI** (formerly referred to as Meta Business Agent) is an artificial intelligence assistant developed natively by Meta within Meta Business Suite for Facebook Pages. This capability enables businesses to deploy an intelligent frontline AI representative that automatically answers incoming inquiries 24/7 based on your business catalog and documentation.
When integrating Meta Business AI with ChatbotX, you unlock a powerful collaborative workflow: allow Meta's native AI to handle initial customer discovery and frequently asked questions, then automatically hand over control to ChatbotX flows for order checkout, structured lead qualification, and live agent escalation.
## Parallel Operations and the Handover Protocol
Within the Meta ecosystem, activating Meta Business AI on a Facebook Page introduces an exclusive response policy.
**Meta's exclusive response rule:**
At any given moment, Meta only allows one platform or application to hold primary ownership (Current owner) of a conversation thread. When Meta AI actively replies to an inquiry, external chatbot engines and regular messaging composers are placed in a listening-only Standby state to prevent conflicting, duplicate answers.
The **Meta Business AI** integration in ChatbotX bridges this transition through a reliable three-stage pipeline:
1. **Frontline Discovery (Meta AI handles):** When customers message your Page, Meta Business AI answers inquiries regarding products, general policies, and pricing using trained catalog sources.
2. **Automated Handover:** As soon as Meta AI finishes its consultation or detects that external assistance is needed, the thread is handed back to ChatbotX.
3. **Automated Flow Execution:** ChatbotX immediately triggers your designated Flow (such as order confirmation, storing customer attributes into Custom Fields, or syncing rows to Google Sheets) or routes the dialogue directly to human staff.
## Activating and Training AI in Meta Business Suite
To turn on Meta's business assistant for your Fanpage, follow these steps in Meta Business Suite:
Open [Meta Business Suite](https://business.facebook.com) and switch to the target Facebook Page you want to configure.
From the left navigation sidebar, select **All tools**, then locate and click **Business AI** (or **Meta Business Agent**).
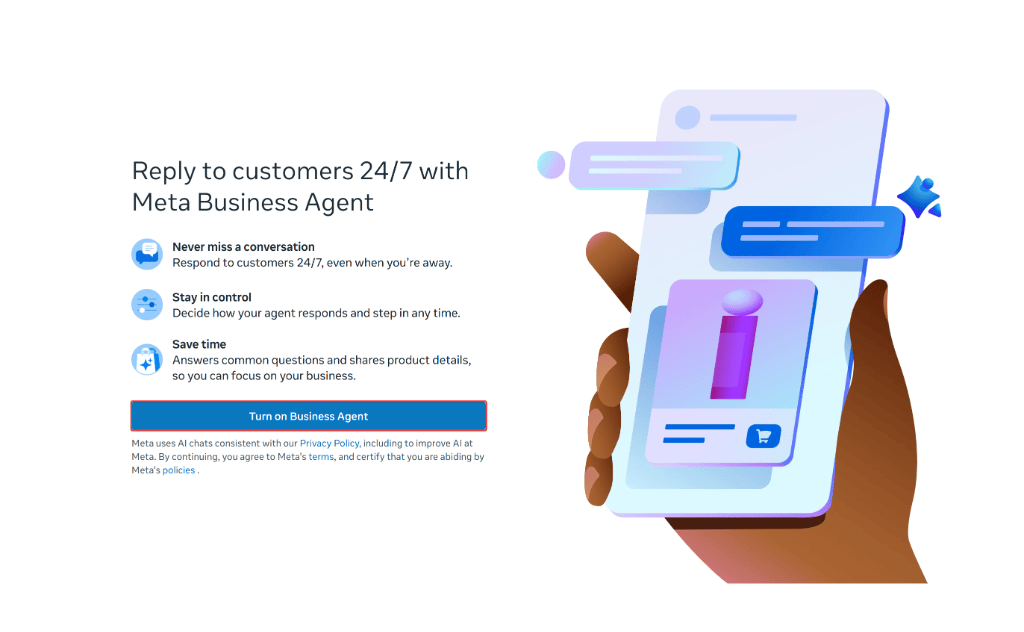
On the introductory landing card, click the blue **Turn on Business Agent** button.
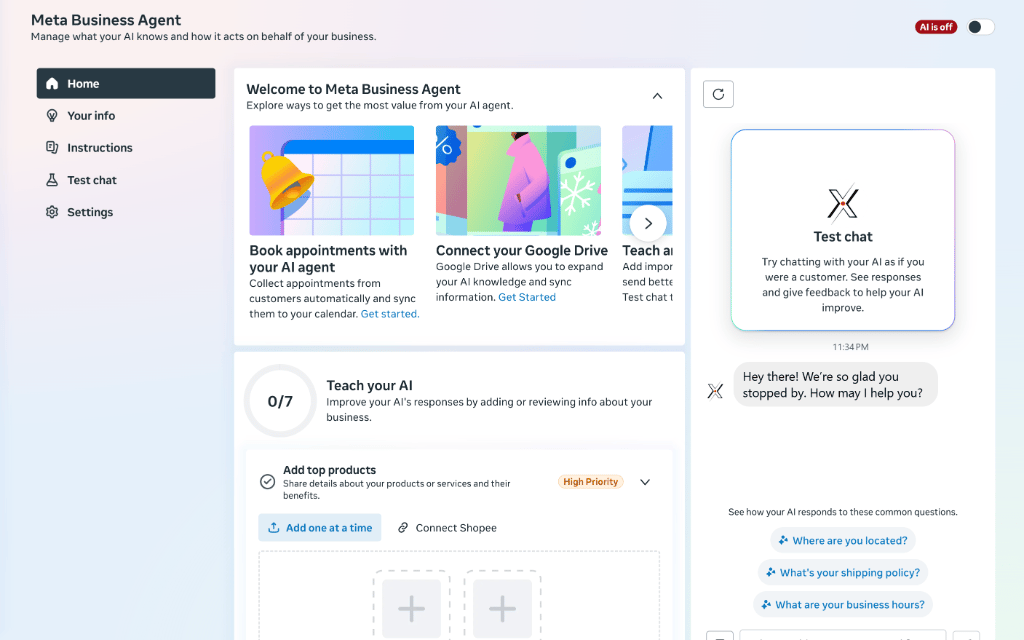
 Once activated, you will be taken to the central **Home** dashboard. Configure your AI knowledge sources:
* **Connect your Google Drive:** Link Google Drive accounts so your agent can index company policies, service guidelines, and product documents.
* **Add top products:** Provide structured product details by entering them manually or integrating your **Shopee** storefront catalog.
* **Book appointments with your AI agent:** Enable automatic customer appointment scheduling synced to your calendar.
* **Test chat:** Test your assistant's live conversational quality in the right-hand testing sandbox using common inquiries such as location, shipping policies, and business hours.
Once activated, you will be taken to the central **Home** dashboard. Configure your AI knowledge sources:
* **Connect your Google Drive:** Link Google Drive accounts so your agent can index company policies, service guidelines, and product documents.
* **Add top products:** Provide structured product details by entering them manually or integrating your **Shopee** storefront catalog.
* **Book appointments with your AI agent:** Enable automatic customer appointment scheduling synced to your calendar.
* **Test chat:** Test your assistant's live conversational quality in the right-hand testing sandbox using common inquiries such as location, shipping policies, and business hours.
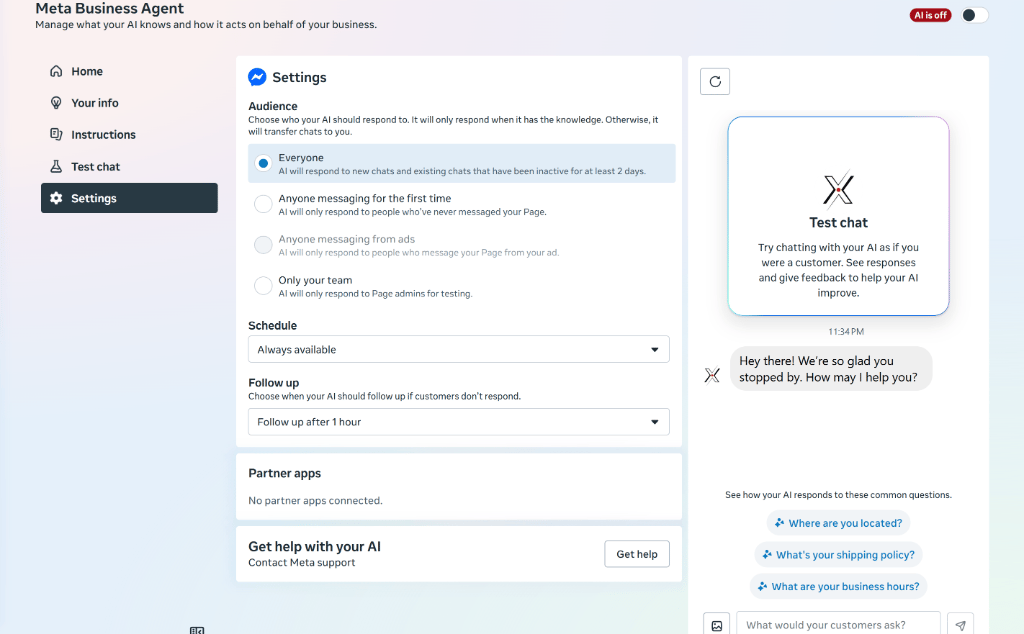
 Navigate to the **Settings** tab in the left menu to establish operating parameters:
* **Audience:** Choose which contacts the AI should engage (`Everyone` for all chats, `Anyone messaging for the first time`, or `Anyone messaging from ads`).
* **Schedule:** Set your operational window to `Always available` for uninterrupted 24/7 assistance.
* **Follow up:** Define how soon the assistant automatically re-engages inactive contacts (such as `Follow up after 1 hour`).
Navigate to the **Settings** tab in the left menu to establish operating parameters:
* **Audience:** Choose which contacts the AI should engage (`Everyone` for all chats, `Anyone messaging for the first time`, or `Anyone messaging from ads`).
* **Schedule:** Set your operational window to `Always available` for uninterrupted 24/7 assistance.
* **Follow up:** Define how soon the assistant automatically re-engages inactive contacts (such as `Follow up after 1 hour`).
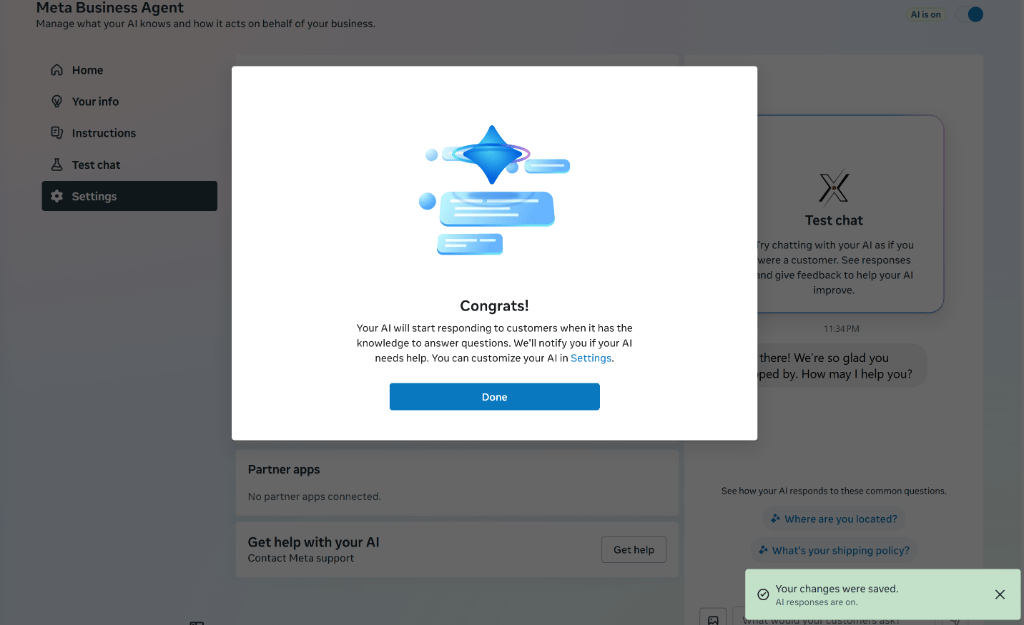
 Save your changes and toggle the upper-right switch to **AI is on**. A confirmation modal will appear confirming that your assistant is actively responding to customers.
 ## Configuring Handover Settings in ChatbotX
Once Meta AI is active on Facebook, configure the return behavior inside ChatbotX to catch conversations after Meta AI completes its session.
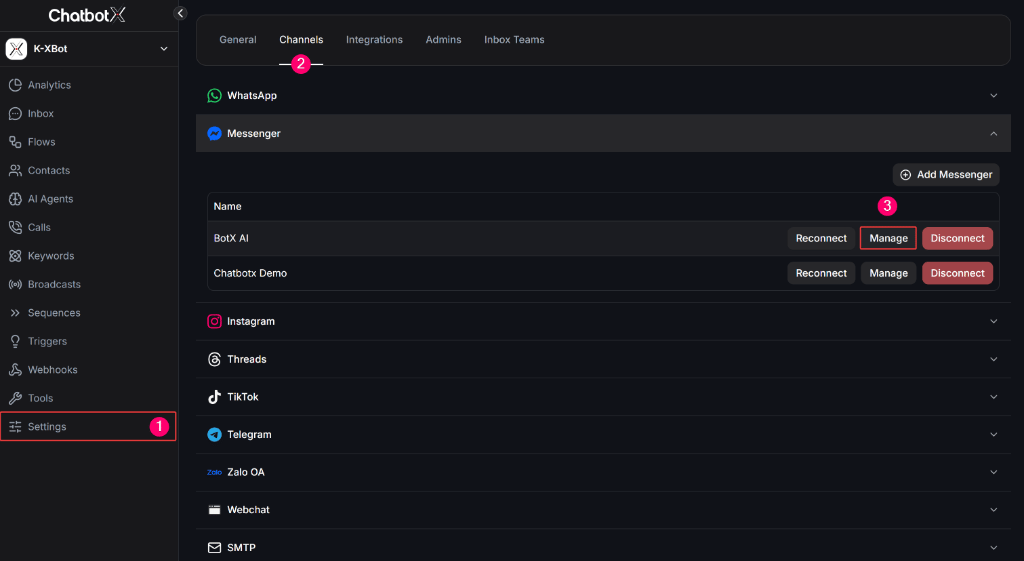
In ChatbotX, click **Settings (1)** from the main navigation menu, select the **Channels (2)** tab, locate your connected Facebook Page under **Messenger**, and click the **Manage (3)** button.
## Configuring Handover Settings in ChatbotX
Once Meta AI is active on Facebook, configure the return behavior inside ChatbotX to catch conversations after Meta AI completes its session.
In ChatbotX, click **Settings (1)** from the main navigation menu, select the **Channels (2)** tab, locate your connected Facebook Page under **Messenger**, and click the **Manage (3)** button.
 Inside the channel configuration view, switch to the **General Settings** tab, scroll down to the **Meta Business AI** section, and toggle on the primary master switch.
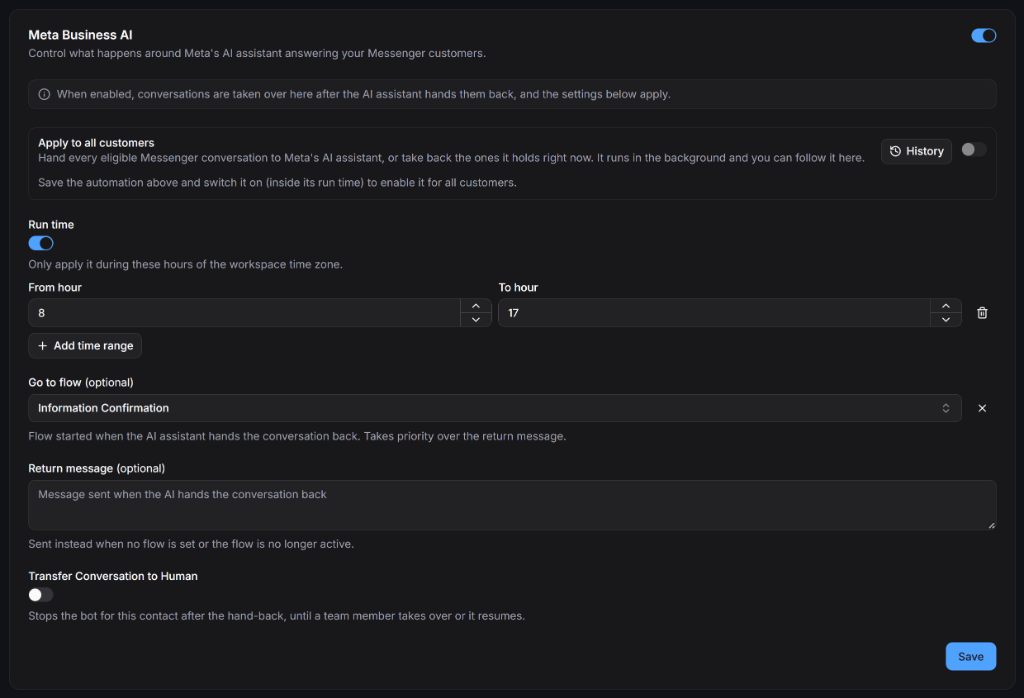 Tailor your handover settings to your business operations:
* **Apply to all customers:** Enable this toggle to apply the handover protocol to all eligible Messenger threads. Click **History** to review the log of past hand-offs.
* **Run time:** Specify your operational hours (`From hour` to `To hour`) based on workspace timezone. Click **+ Add time range** to support split shifts.
* **Go to flow (optional):** Choose the automated Flow that launches immediately after Meta AI hands back the thread (such as the `Information Confirmation` flow for order fulfillment).
* **Return message (optional):** Supply a fallback text reply sent if no Flow is chosen or if the selected Flow is inactive.
* **Transfer Conversation to Human:** Enable this switch if you want to stop the bot upon handover, keeping the thread open for a human team member to take over.
Click the blue **Save** button in the lower-right corner to persist your settings.
## Setting up Messenger Conversation Routing on Facebook
To guarantee that conversations handed back by Meta AI route into ChatbotX rather than disappearing or falling back to the default inbox, designate ChatbotX as the primary routing app in your Facebook Page settings.
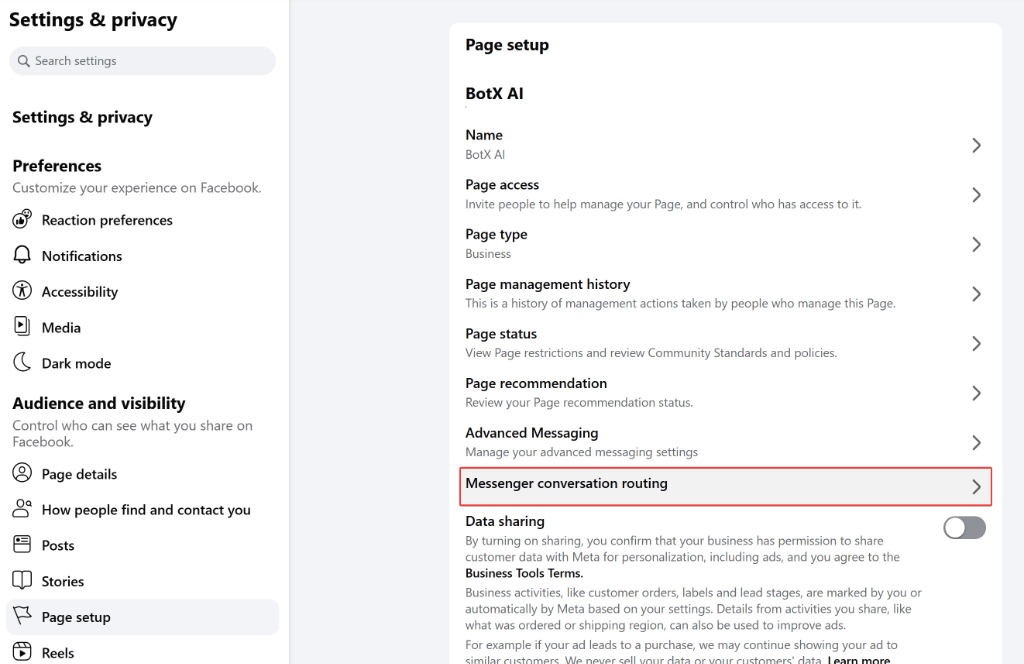
Switch your personal profile to the Facebook Page profile, open **Settings & privacy > Page setup**, and select **Messenger conversation routing**.
Tailor your handover settings to your business operations:
* **Apply to all customers:** Enable this toggle to apply the handover protocol to all eligible Messenger threads. Click **History** to review the log of past hand-offs.
* **Run time:** Specify your operational hours (`From hour` to `To hour`) based on workspace timezone. Click **+ Add time range** to support split shifts.
* **Go to flow (optional):** Choose the automated Flow that launches immediately after Meta AI hands back the thread (such as the `Information Confirmation` flow for order fulfillment).
* **Return message (optional):** Supply a fallback text reply sent if no Flow is chosen or if the selected Flow is inactive.
* **Transfer Conversation to Human:** Enable this switch if you want to stop the bot upon handover, keeping the thread open for a human team member to take over.
Click the blue **Save** button in the lower-right corner to persist your settings.
## Setting up Messenger Conversation Routing on Facebook
To guarantee that conversations handed back by Meta AI route into ChatbotX rather than disappearing or falling back to the default inbox, designate ChatbotX as the primary routing app in your Facebook Page settings.
Switch your personal profile to the Facebook Page profile, open **Settings & privacy > Page setup**, and select **Messenger conversation routing**.
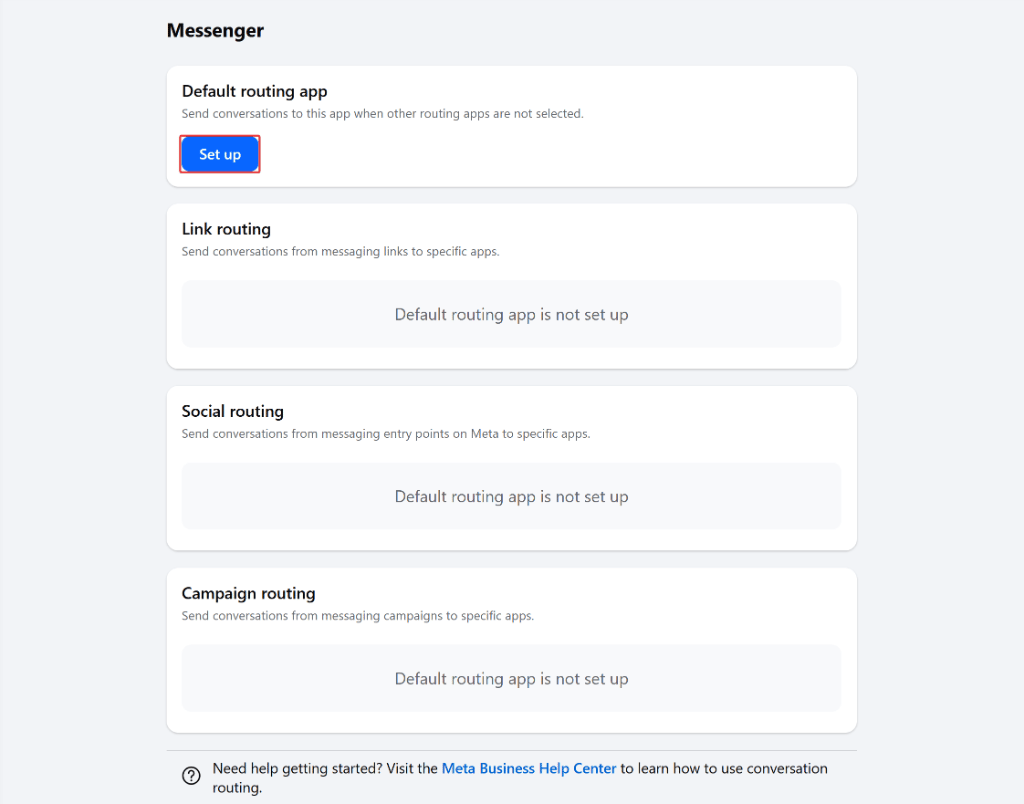
 In the Messenger routing console, click the blue **Set up** button within the **Default routing app** card.
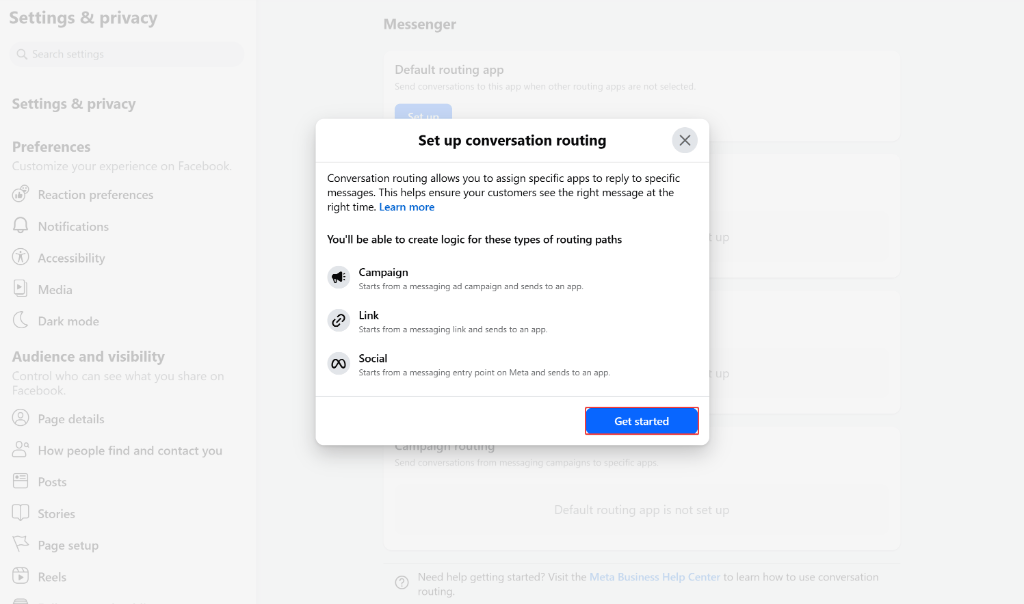
 In the **Set up conversation routing** dialog, click **Get started**.
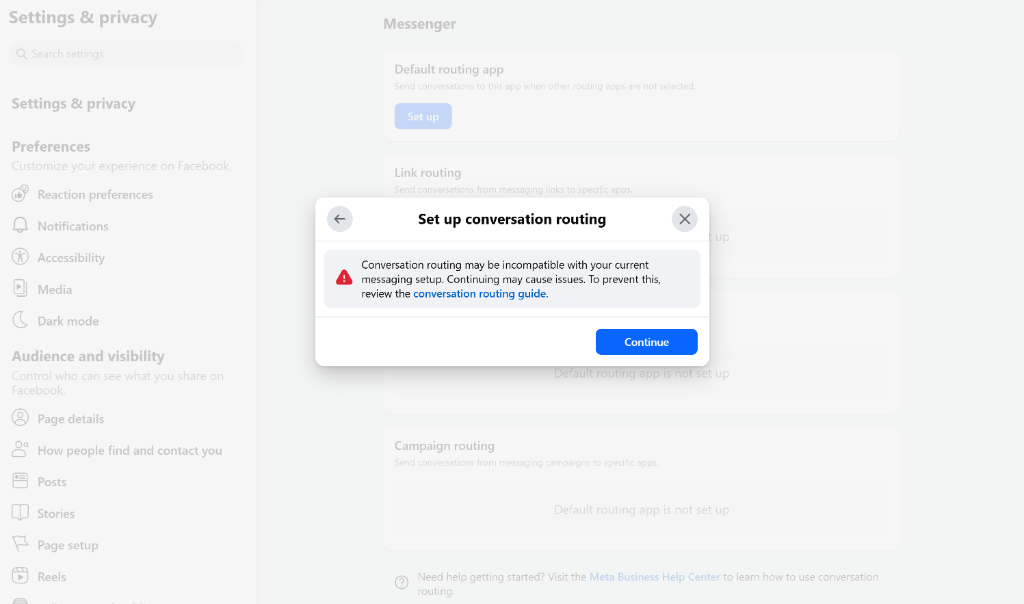
 Review Meta's messaging setup advisory and click **Continue**.
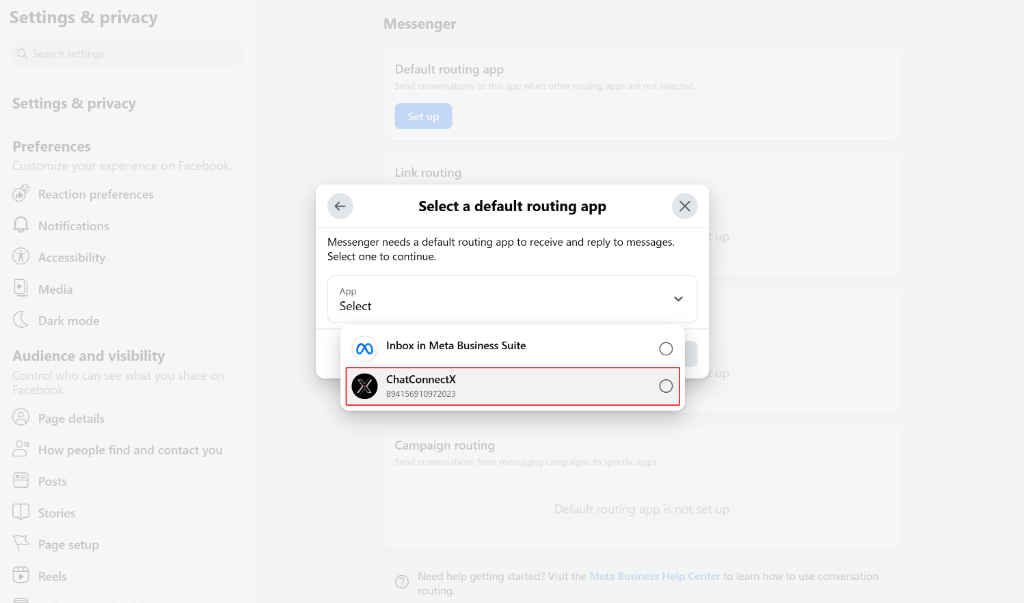
 Under **Select a default routing app**, open the dropdown menu and select **ChatConnectX** (the official verified Meta Application for ChatbotX, App ID: `894156910972023`). Confirm to finish.
 ## Automatically Extracting Customer Data with AI
When paired with ChatbotX, you can extract structured lead attributes from the raw conversational context that Meta AI generated during its session.
Upon thread handover, ChatbotX captures the entire dialogue history into a system variable (such as `{{bizai_chat_history}}`). You can process this history with an **AI Agent** or an **OpenAI / Claude** node in your handover Flow.
### Extraction Prompt Template
When setting up your AI block, apply the following strict extraction prompt:
```text theme={null}
You are an AI data extractor specialized in e-commerce customer conversations. Review the chat transcript carefully and extract the requested fields.
MANDATORY rules:
- ONLY return the exact raw value. Do not explain, do not add greetings, and do not wrap in quotation marks.
- If the requested information is absent from the transcript, return "Empty".
```
### Sample Extraction Fields
Configure specific extraction directives mapped to your ChatbotX Custom Fields:
* `Extract customer phone number from {{bizai_chat_history}}` -> Map to: `phone_number`
* `Extract customer recipient full name from {{bizai_chat_history}}` -> Map to: `full_name`
* `Extract detailed shipping address from {{bizai_chat_history}}` -> Map to: `address`
* `Extract customer product interest or inquiry topic from {{bizai_chat_history}}` -> Map to: `ai_answer`
Connect the success output of your AI node directly into a **Google Sheets** block to automatically log order rows into your fulfillment spreadsheets.
## Controlling AI in Livechat
While Meta Business AI actively consults with your leads, your support team can monitor live interactions from the ChatbotX **Inbox / Livechat** console and take over instantly when necessary.
### Monitoring Meta AI thread status
When a customer is engaged by Meta AI, the Livechat view provides real-time state indicators:
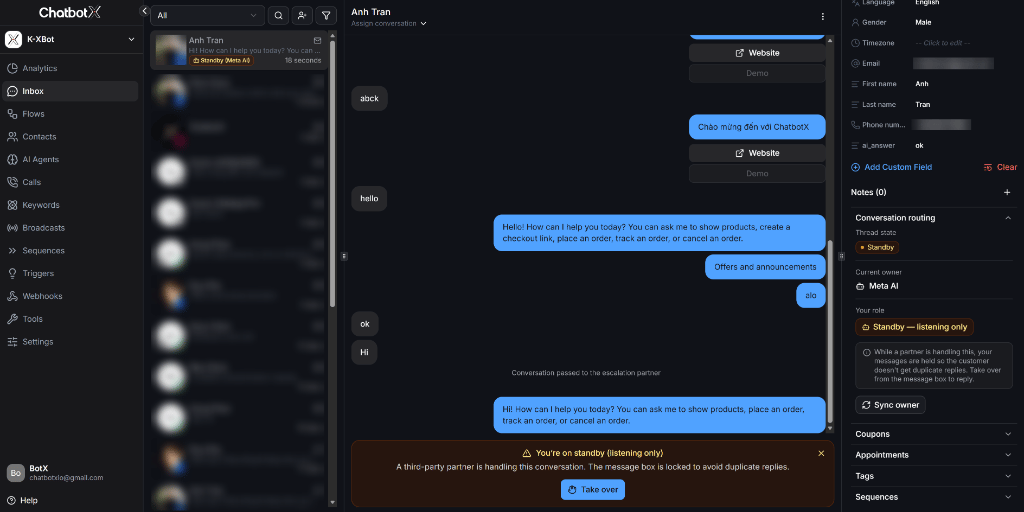
* The customer contact card in the inbox sidebar displays an orange badge: **Standby (Meta AI)**.
* The right sidebar under **Conversation routing** reflects `Thread state: Standby`, `Current owner: Meta AI`, and sets your role to `Standby - listening only`.
* The lower message composer is locked to prevent collisions, displaying an advisory banner: *"You're on standby (listening only). A third-party partner is handling this conversation. The message box is locked to avoid duplicate replies."*
## Automatically Extracting Customer Data with AI
When paired with ChatbotX, you can extract structured lead attributes from the raw conversational context that Meta AI generated during its session.
Upon thread handover, ChatbotX captures the entire dialogue history into a system variable (such as `{{bizai_chat_history}}`). You can process this history with an **AI Agent** or an **OpenAI / Claude** node in your handover Flow.
### Extraction Prompt Template
When setting up your AI block, apply the following strict extraction prompt:
```text theme={null}
You are an AI data extractor specialized in e-commerce customer conversations. Review the chat transcript carefully and extract the requested fields.
MANDATORY rules:
- ONLY return the exact raw value. Do not explain, do not add greetings, and do not wrap in quotation marks.
- If the requested information is absent from the transcript, return "Empty".
```
### Sample Extraction Fields
Configure specific extraction directives mapped to your ChatbotX Custom Fields:
* `Extract customer phone number from {{bizai_chat_history}}` -> Map to: `phone_number`
* `Extract customer recipient full name from {{bizai_chat_history}}` -> Map to: `full_name`
* `Extract detailed shipping address from {{bizai_chat_history}}` -> Map to: `address`
* `Extract customer product interest or inquiry topic from {{bizai_chat_history}}` -> Map to: `ai_answer`
Connect the success output of your AI node directly into a **Google Sheets** block to automatically log order rows into your fulfillment spreadsheets.
## Controlling AI in Livechat
While Meta Business AI actively consults with your leads, your support team can monitor live interactions from the ChatbotX **Inbox / Livechat** console and take over instantly when necessary.
### Monitoring Meta AI thread status
When a customer is engaged by Meta AI, the Livechat view provides real-time state indicators:
* The customer contact card in the inbox sidebar displays an orange badge: **Standby (Meta AI)**.
* The right sidebar under **Conversation routing** reflects `Thread state: Standby`, `Current owner: Meta AI`, and sets your role to `Standby - listening only`.
* The lower message composer is locked to prevent collisions, displaying an advisory banner: *"You're on standby (listening only). A third-party partner is handling this conversation. The message box is locked to avoid duplicate replies."*
 ### Taking over manually (Human Takeover)
If a customer requires customized pricing, urgent support, or expresses dissatisfaction, human agents can intervene immediately:
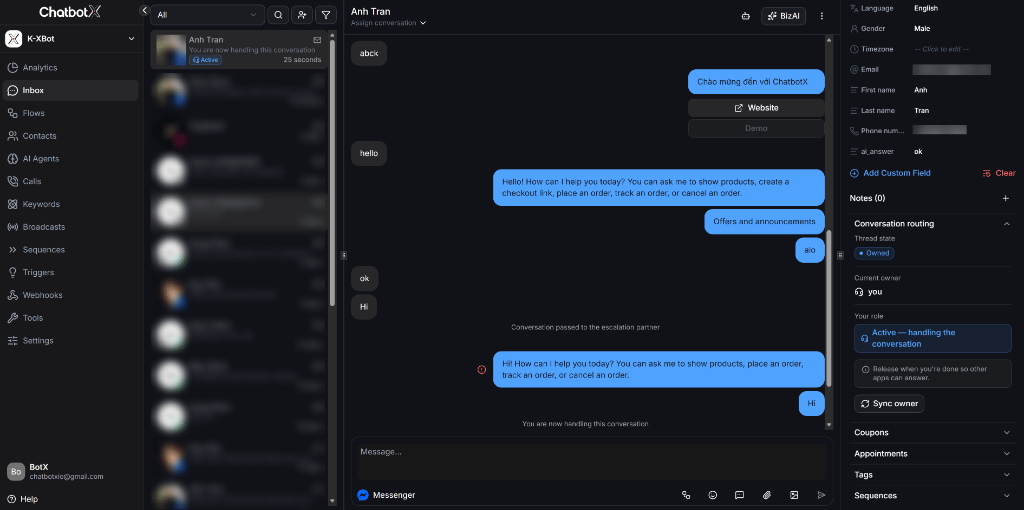
Click the blue **✋ Take over** button on the bottom notification bar.
The contact status instantly shifts to a blue **Active** indicator, and the message composer unlocks.
The routing status updates to `Thread state: Owned` and `Current owner: you`. Team members can type custom replies, upload attachments, or send automated flows.
### Taking over manually (Human Takeover)
If a customer requires customized pricing, urgent support, or expresses dissatisfaction, human agents can intervene immediately:
Click the blue **✋ Take over** button on the bottom notification bar.
The contact status instantly shifts to a blue **Active** indicator, and the message composer unlocks.
The routing status updates to `Thread state: Owned` and `Current owner: you`. Team members can type custom replies, upload attachments, or send automated flows.
 ### Handing control back to Meta AI
Once your team has resolved the specific question and wants Meta AI to resume automated consultation, return thread control with two clicks:
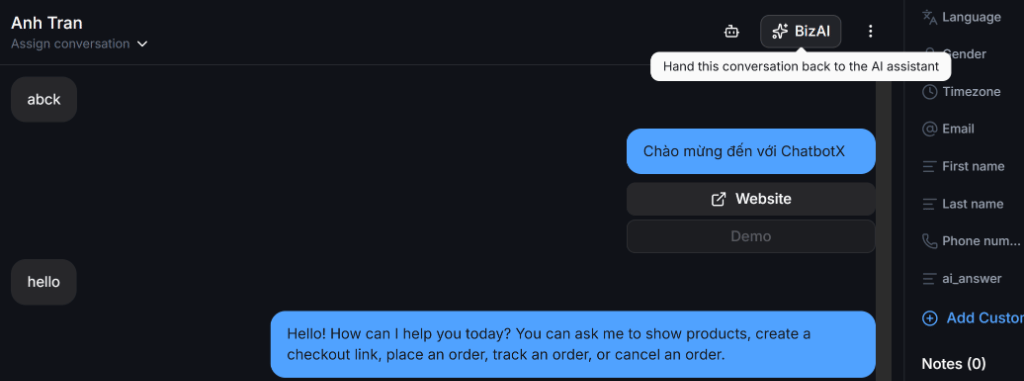
At the top-right corner of the active chat window, click the **✨ BizAI** button (hovering shows: *Hand this conversation back to the AI assistant*).
### Handing control back to Meta AI
Once your team has resolved the specific question and wants Meta AI to resume automated consultation, return thread control with two clicks:
At the top-right corner of the active chat window, click the **✨ BizAI** button (hovering shows: *Hand this conversation back to the AI assistant*).
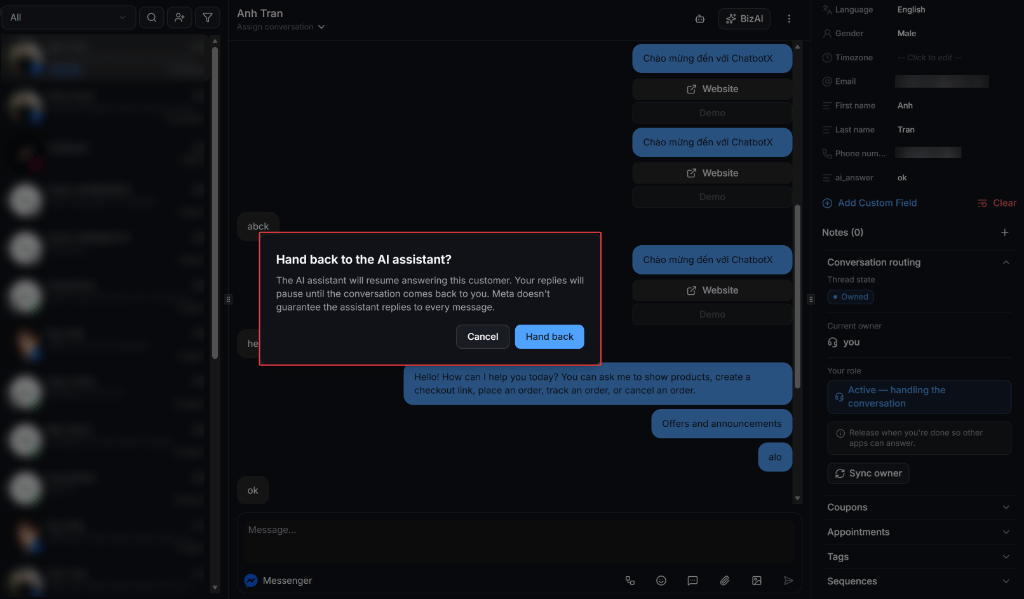
 In the **Hand back to the AI assistant?** dialog, click the blue **Hand back** button.
Conversation ownership immediately returns to Meta Business AI, and ChatbotX returns to Standby mode awaiting the next hand-off.
In the **Hand back to the AI assistant?** dialog, click the blue **Hand back** button.
Conversation ownership immediately returns to Meta Business AI, and ChatbotX returns to Standby mode awaiting the next hand-off.
 This documentation is built and hosted on [Mintlify](https://mintlify.com), a developer documentation platform.