> ## Documentation Index
> Fetch the complete documentation index at: https://chatbotx.io/docs/llms.txt
> Use this file to discover all available pages before exploring further.
# WhatsApp Embedded Signup
> Connect WhatsApp Business to ChatbotX via Meta's Embedded Signup flow.
## Prerequisites
Before you begin, make sure you have:
* A valid Facebook account
* A WhatsApp Business account (or the ability to create one)
* A ChatbotX installation with a publicly accessible URL
* Admin access to your ChatbotX installation
If you are developing locally, you will need a tunneling tool such as [ngrok](/channels/local-development-with-tunnels) to expose your local server to the internet.
## Step 1: Create a Facebook App
If you already have a Facebook App (for example, from your [Messenger channel setup](/channels/facebook-messenger)), you can reuse it and skip directly to [Step 2](#step-2--configure-credentials-in-chatbotx).
Go to the [Facebook Developer Portal](https://developers.facebook.com/apps/) and click **Create App**.
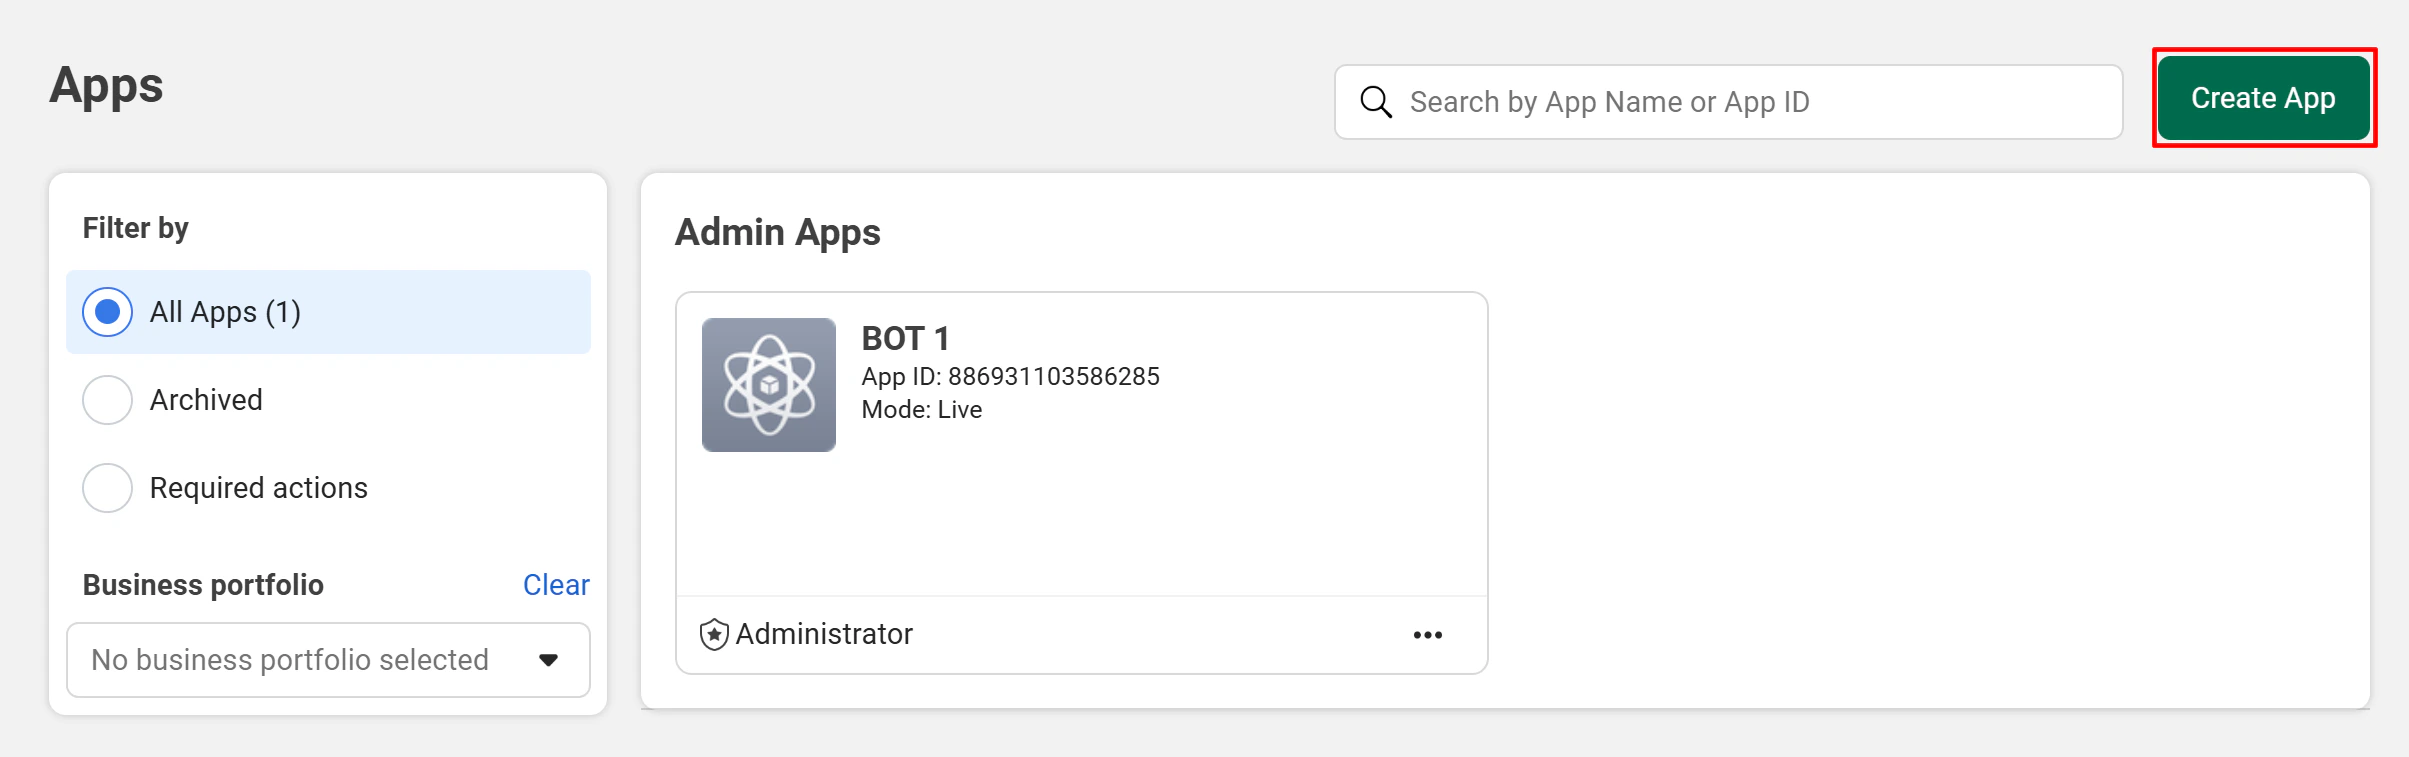 Enter your **App name** and **contact email**, then click **Next**.
 When asked for a use case, select **Other**.
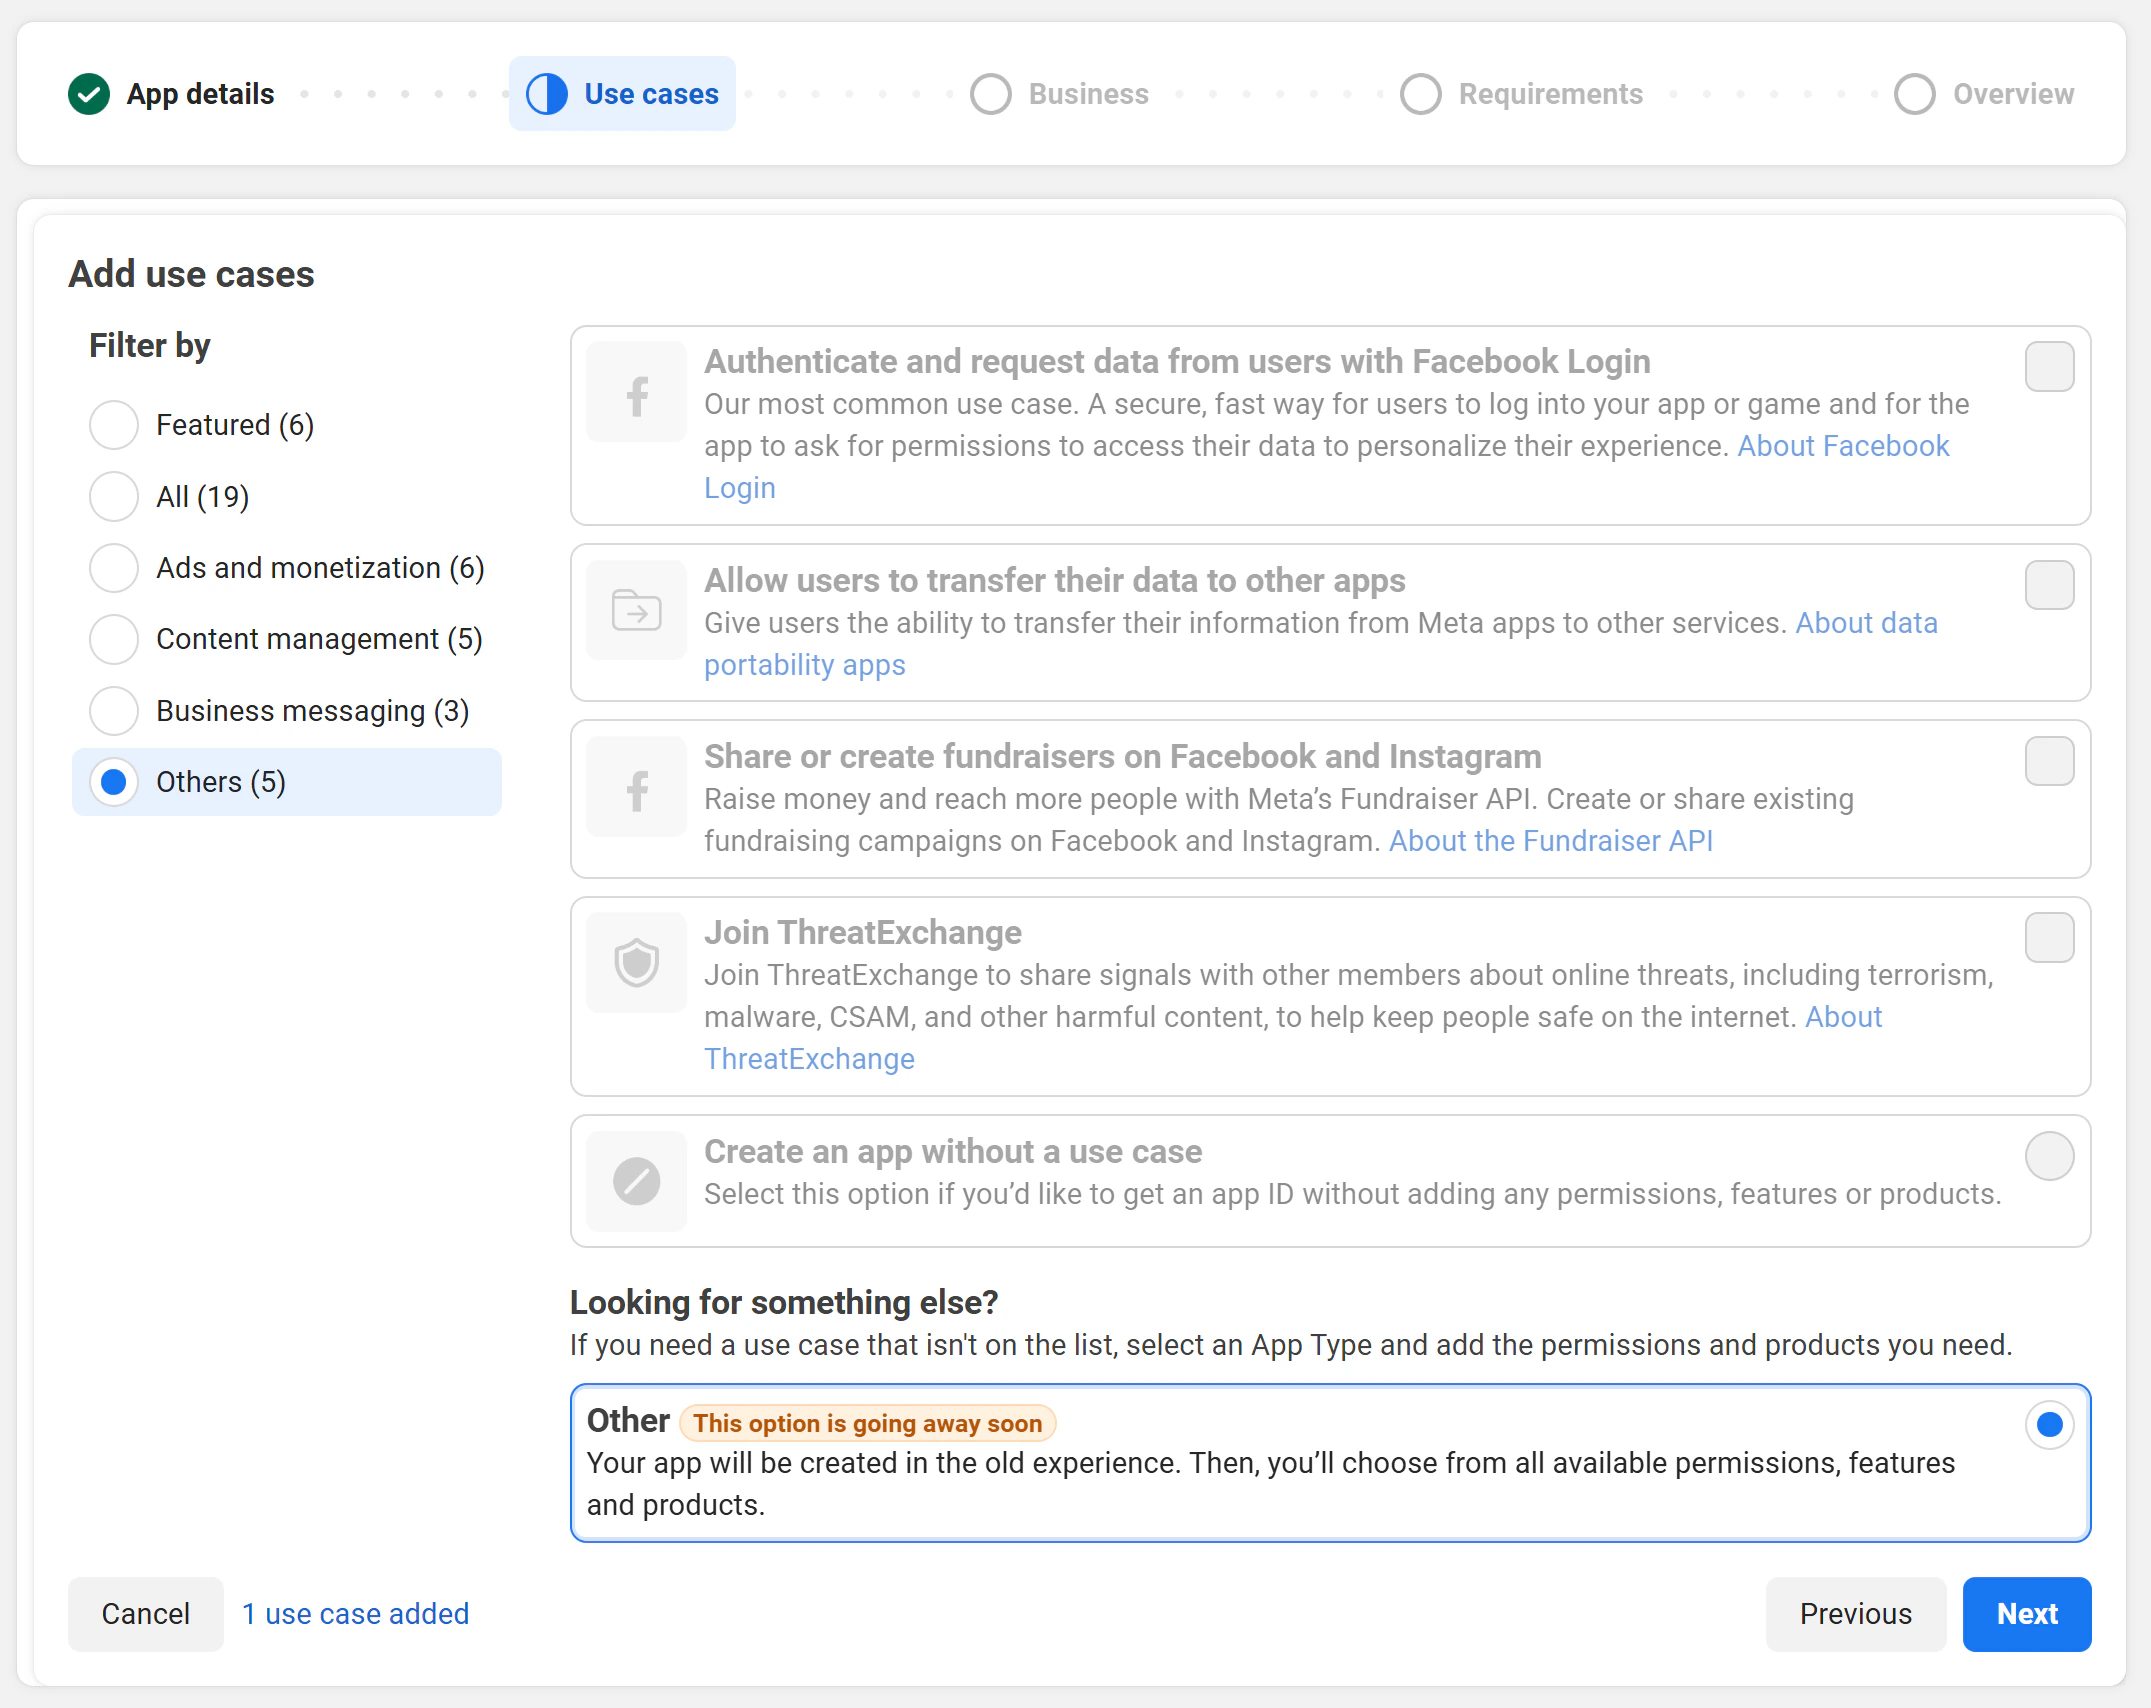 For the app type, choose **Business**.
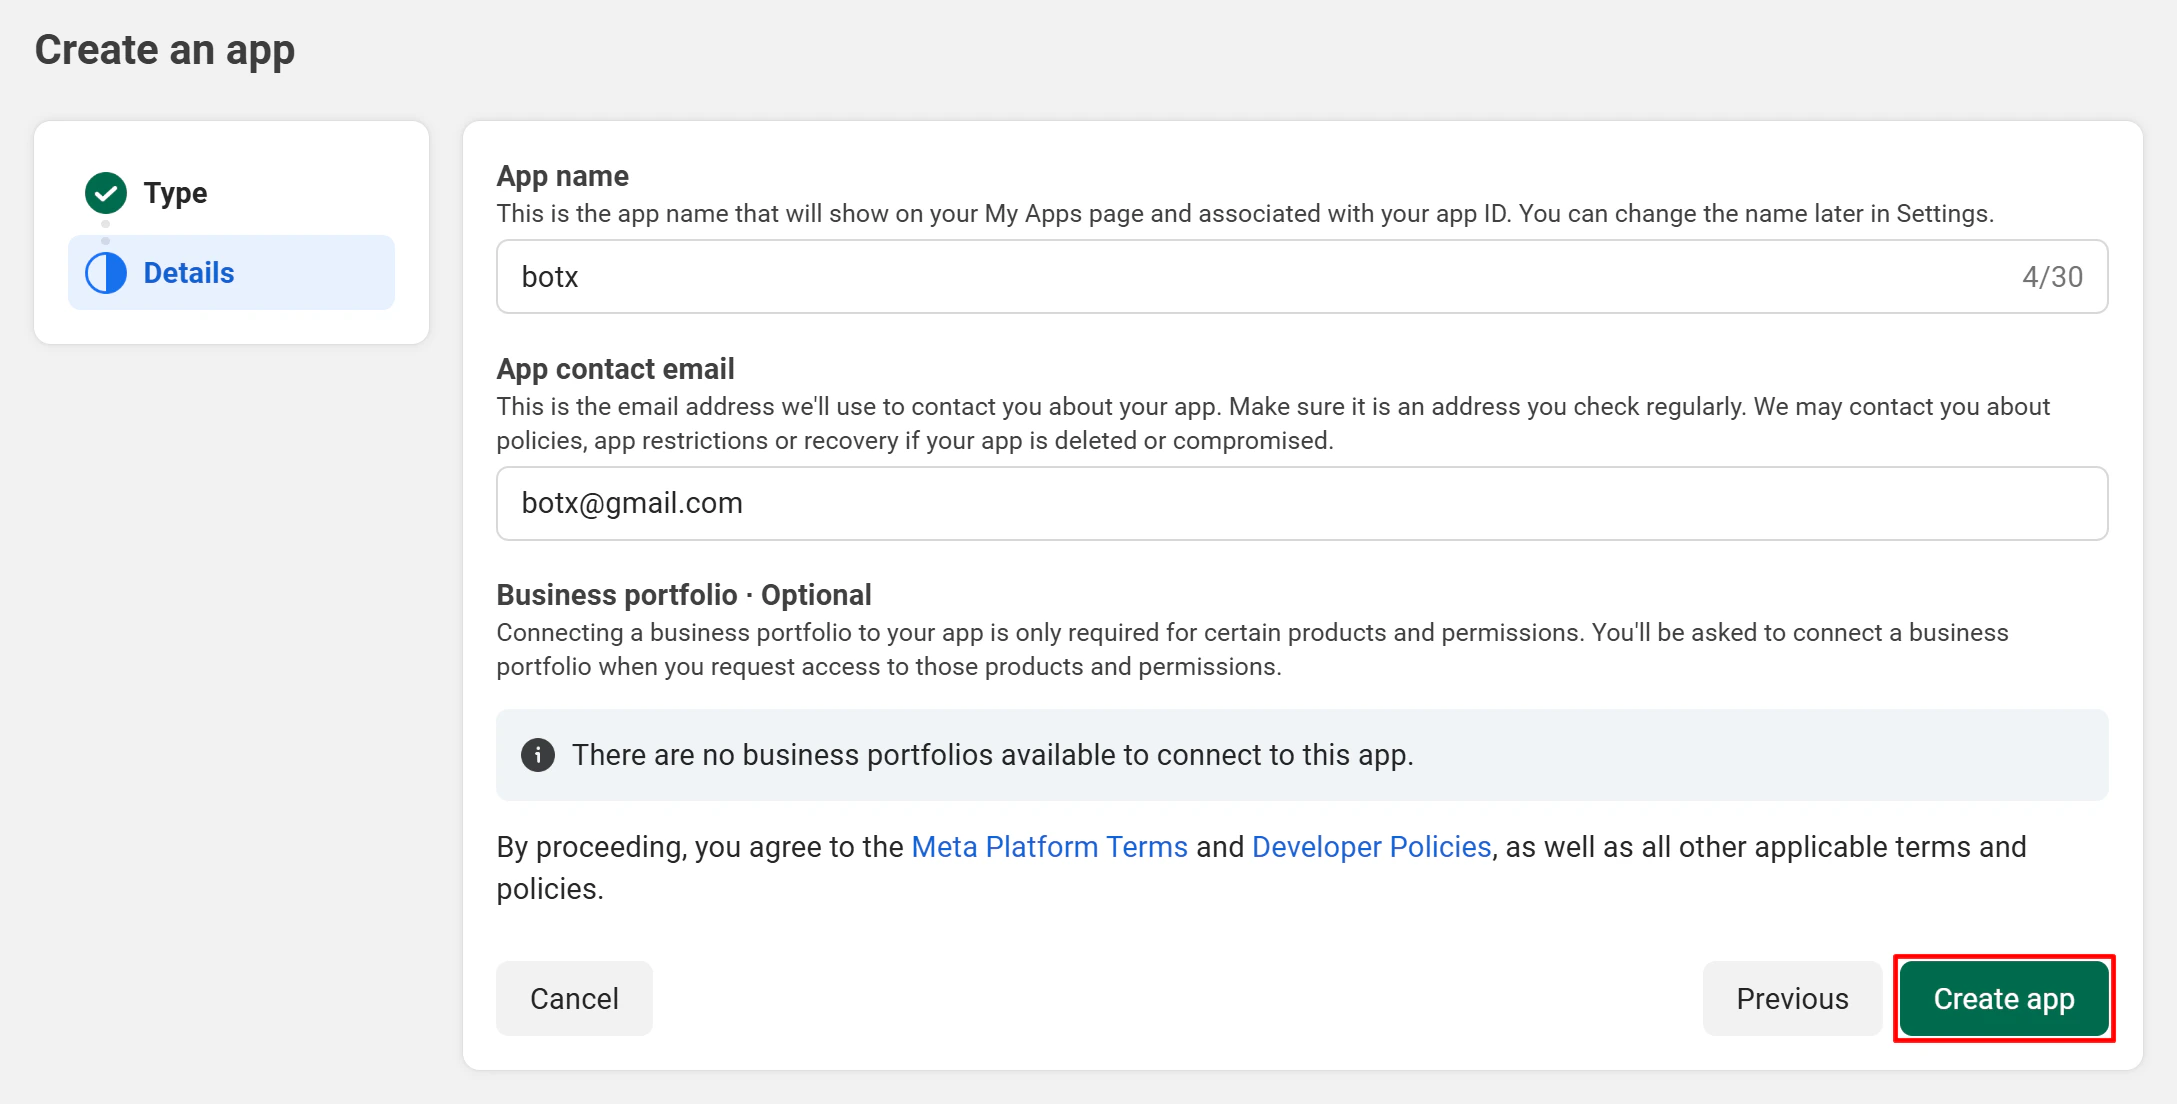
 Review your details and click **Create App** to finish.
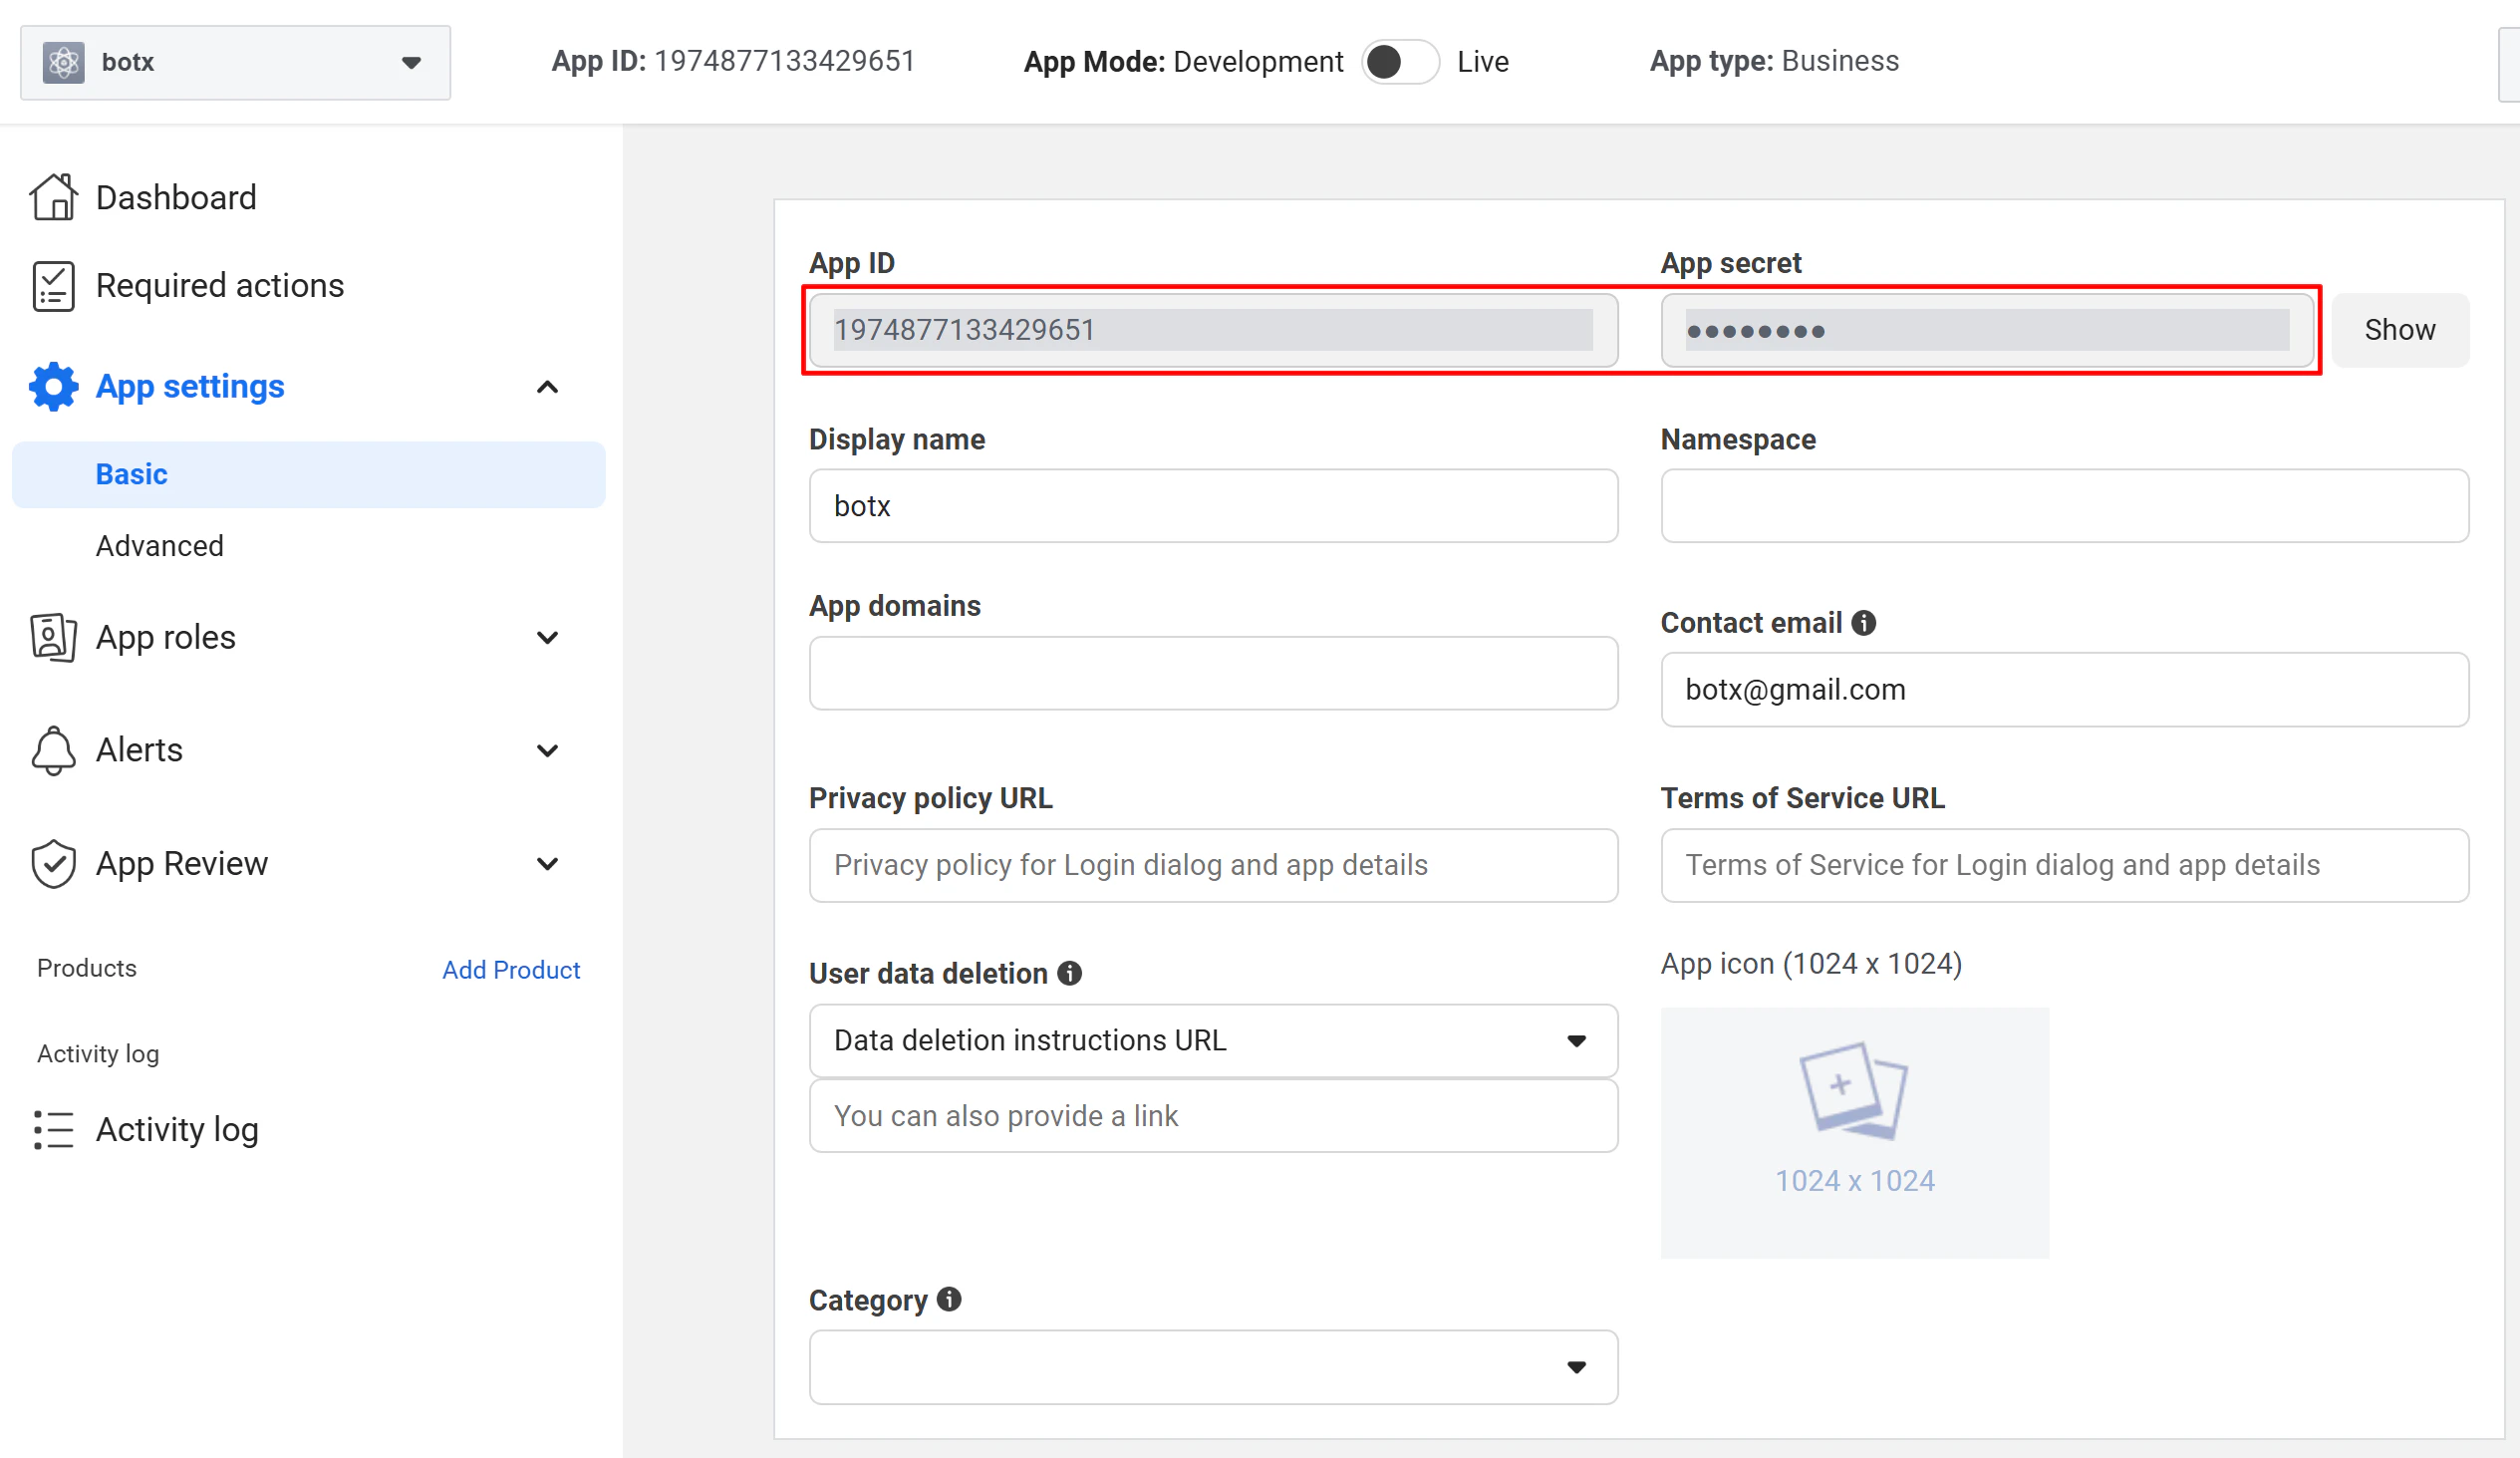
 After creating your app, go to **Settings → Basic** to find your **App ID** and **App Secret**. Click **Show** and authenticate with your Facebook password to reveal the App Secret. You will need both values in the next step.
 ## Step 2: Configure Credentials in ChatbotX
A Super Admin must enter the WhatsApp credentials in ChatbotX before the integration can work. Complete this step immediately after obtaining your App ID and App Secret.
In your ChatbotX installation, navigate to:
```text theme={null}
https://app.yourdomain.com/manage/integrations
```
Then select **WhatsApp**.
## Step 2: Configure Credentials in ChatbotX
A Super Admin must enter the WhatsApp credentials in ChatbotX before the integration can work. Complete this step immediately after obtaining your App ID and App Secret.
In your ChatbotX installation, navigate to:
```text theme={null}
https://app.yourdomain.com/manage/integrations
```
Then select **WhatsApp**.
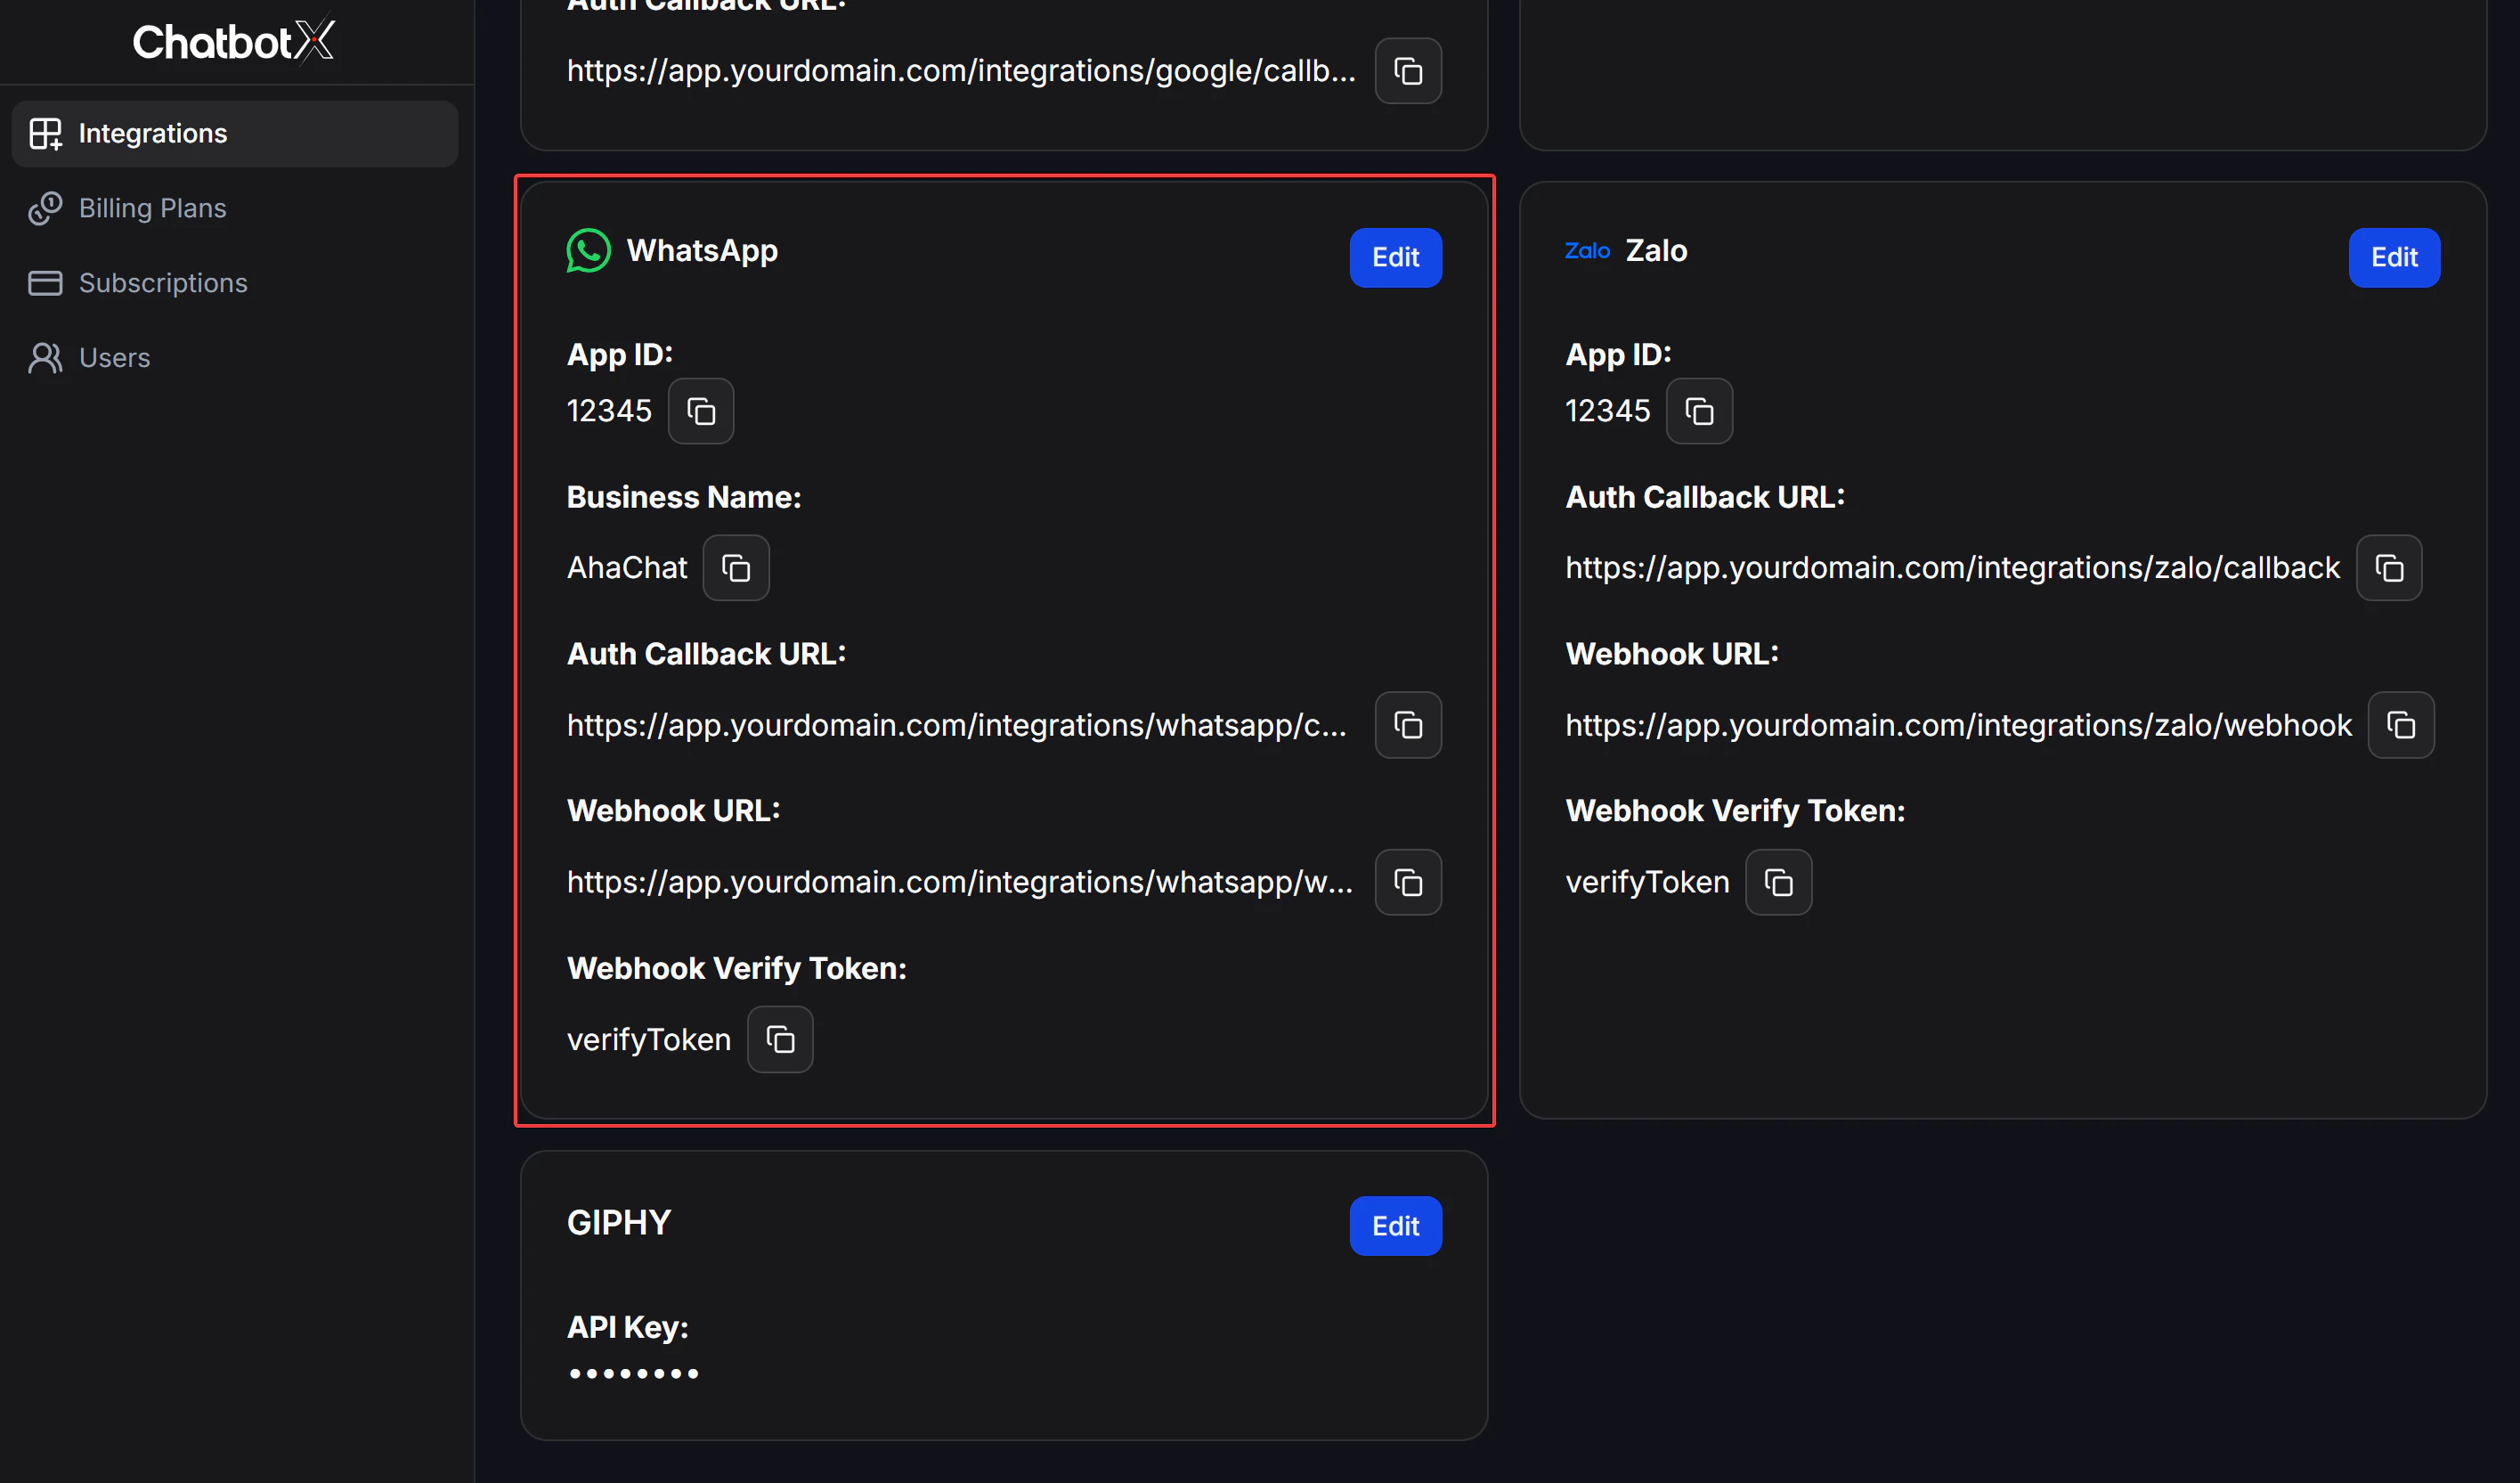 Find the **WhatsApp** card and click the **Edit** button to open the configuration modal.
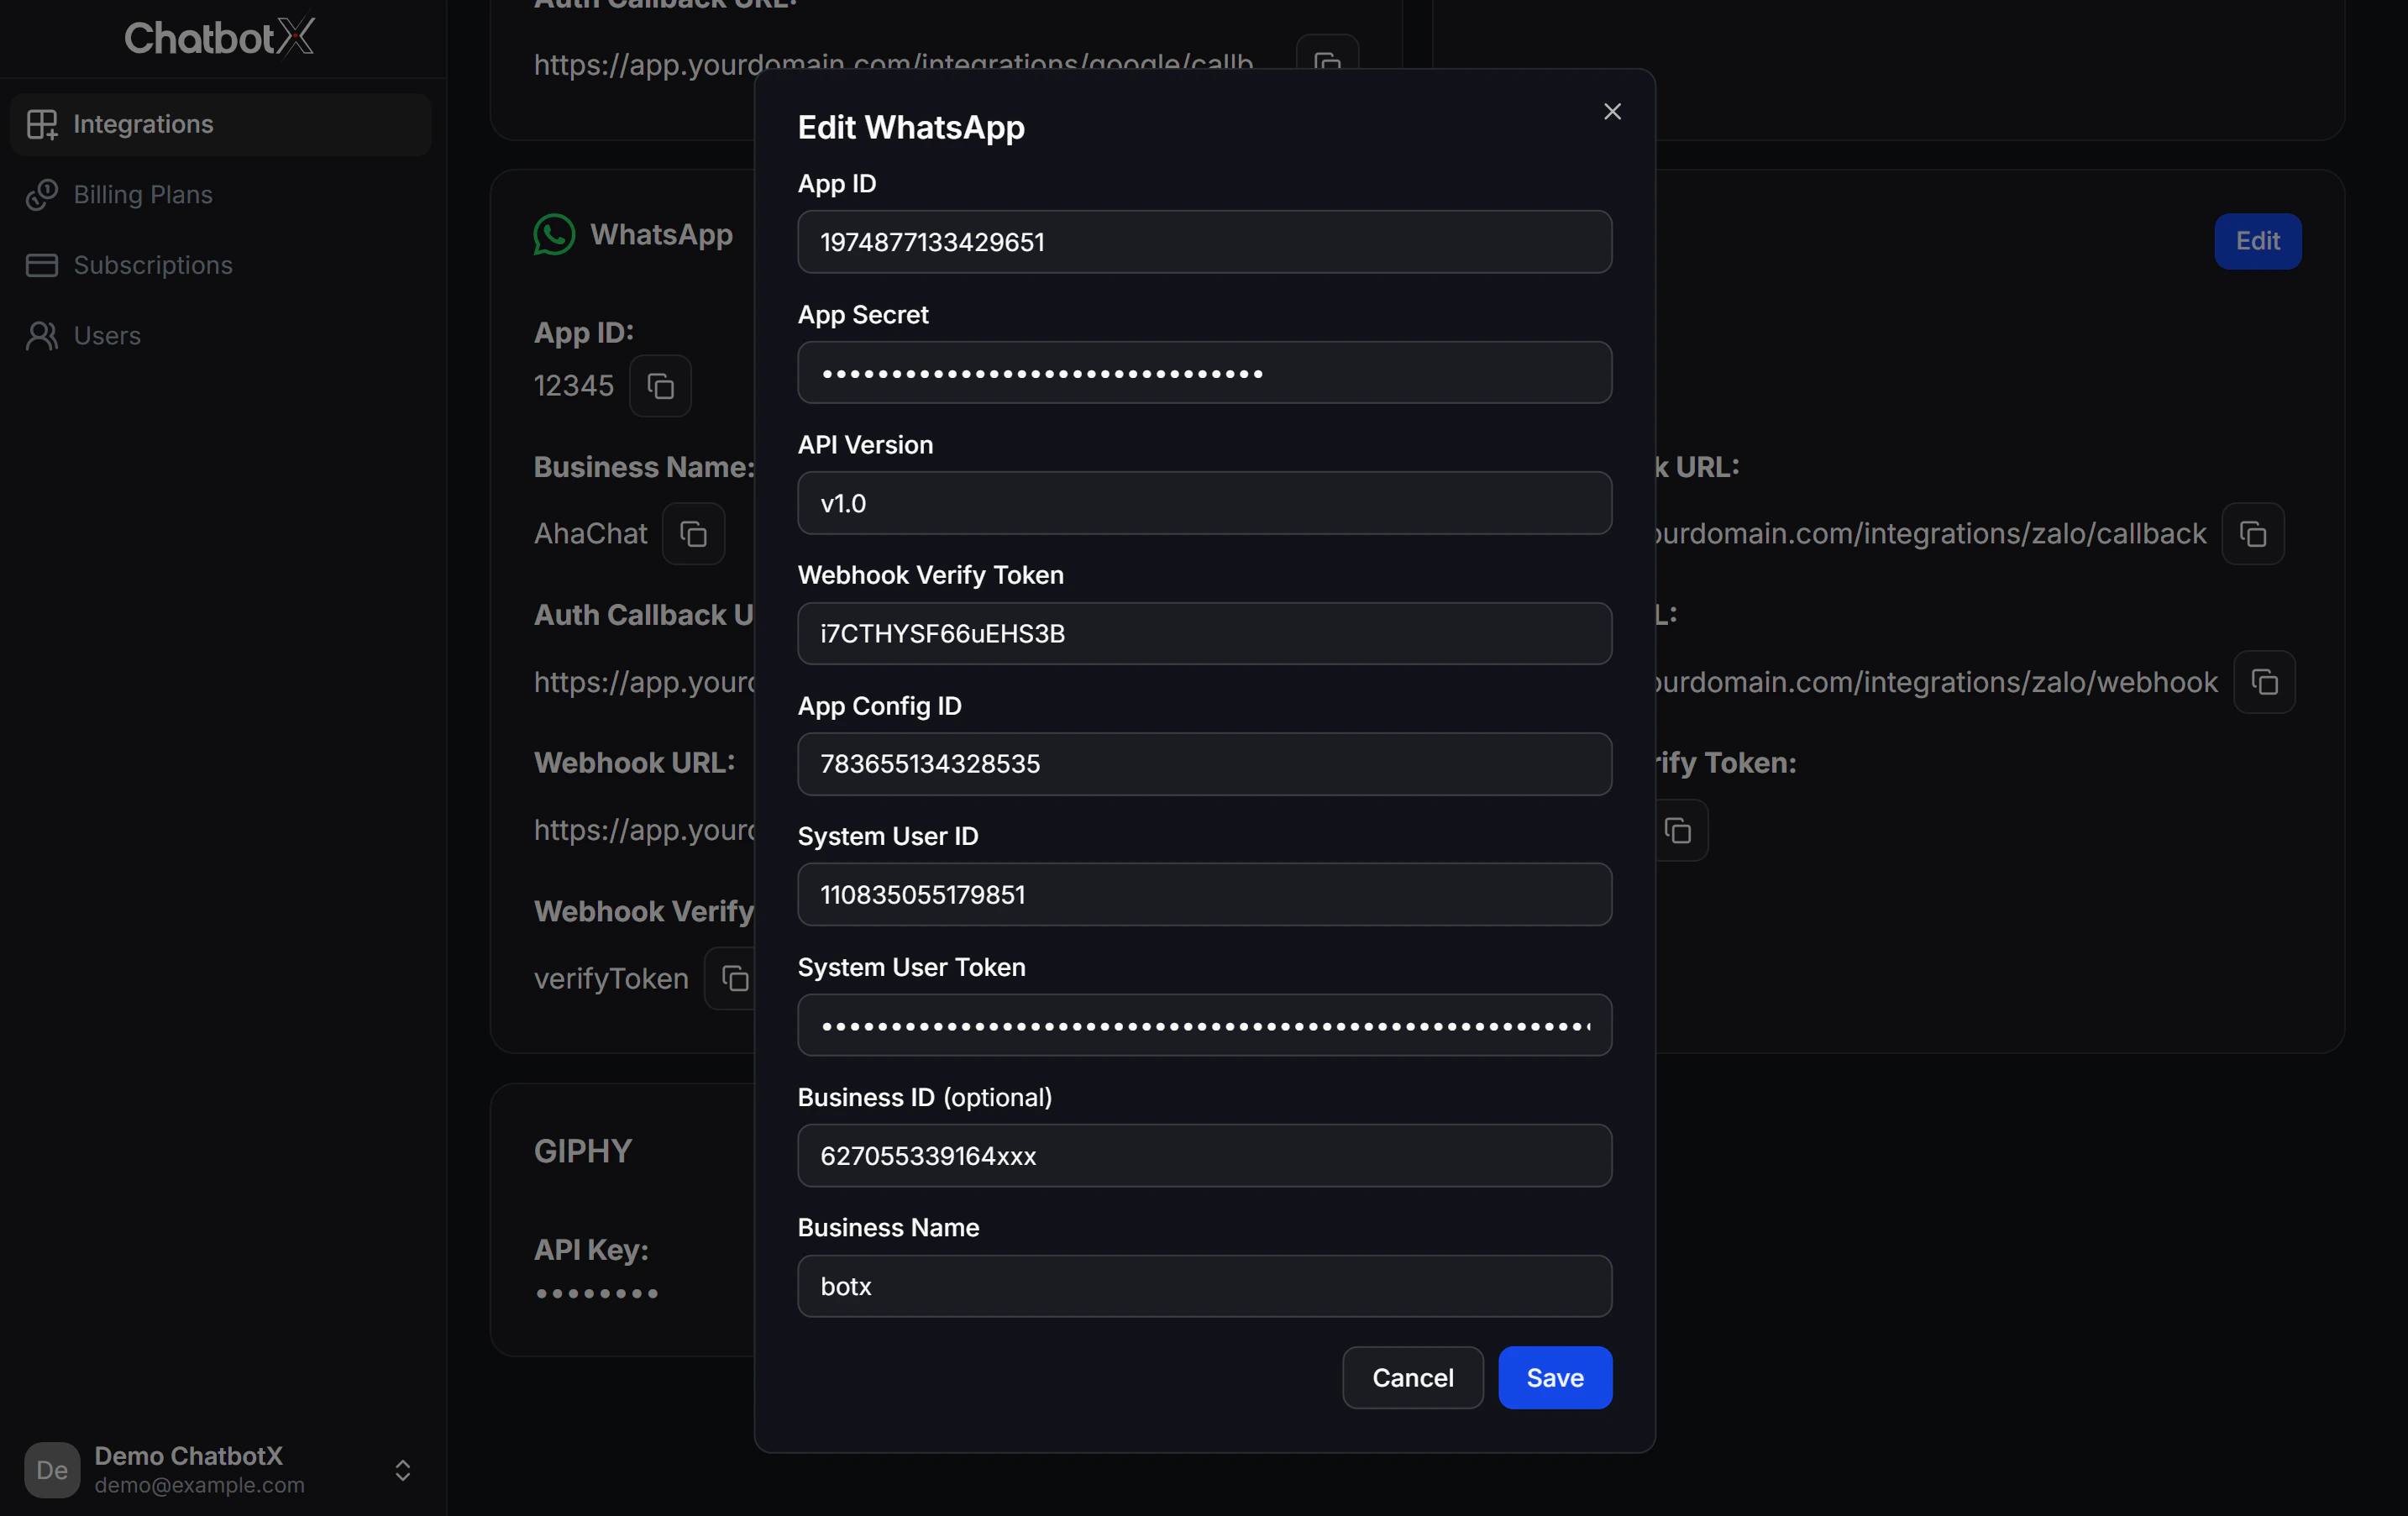 In the **Edit WhatsApp** modal, fill in the following fields:
| Field | Description | Where to find | Example |
| ----------------------------- | ------------------------------------------------- | ------------------------------------------------------------------------------------------------------------------------------------- | ------------------ |
| **Client ID** | Facebook **App ID** | [Meta Developer Portal](https://developers.facebook.com/apps/) → App → **Settings → Basic** | `1974877133429651` |
| **Client Secret** | Facebook **App Secret** | Same page → click **Show** | `●●●●●●●●●●` |
| **API Version** | Graph API version | App → **Settings → Advanced → API Version** | `v1.0` |
| **Webhook Verify Token** | Random string for webhook verification | Self-generated | `i7CTHYSF66uEHS3B` |
| **App Config ID** | Configuration ID from the Embedded Signup wizard | **Facebook Login for Business → Configurations**. See [Step 4](#step-4--obtain-configuration-id) | `783655134328535` |
| **System User ID** | System User's ID, obtained via Graph API Explorer | [Graph API Explorer](https://developers.facebook.com/tools/explorer/). See [Step 5](#step-5--obtain-system-user-id-and-token) | `110835055179851` |
| **System User Token** | Access token generated for your System User | [Meta Business Settings](https://business.facebook.com/settings/system-users). See [Step 5](#step-5--obtain-system-user-id-and-token) | `EAACanps...` |
| **Business ID**\*(optional)\* | Meta Business Portfolio ID | [Meta Business Settings](https://business.facebook.com/settings/) → **Business Info** | `627055339164xxx` |
| **Business Name** | Your business display name in ChatbotX | Your own business name | `botx` |
**Client ID** and **Client Secret** must exactly match the values in your Facebook App's **Settings → Basic**. If any value is incorrect, the WhatsApp Embedded Signup flow will fail silently.
Click **Save** to apply the settings. The WhatsApp card will now display your **Client ID** and **Business Name**. WhatsApp Embedded Signup will now be available as a channel when creating chatbots.
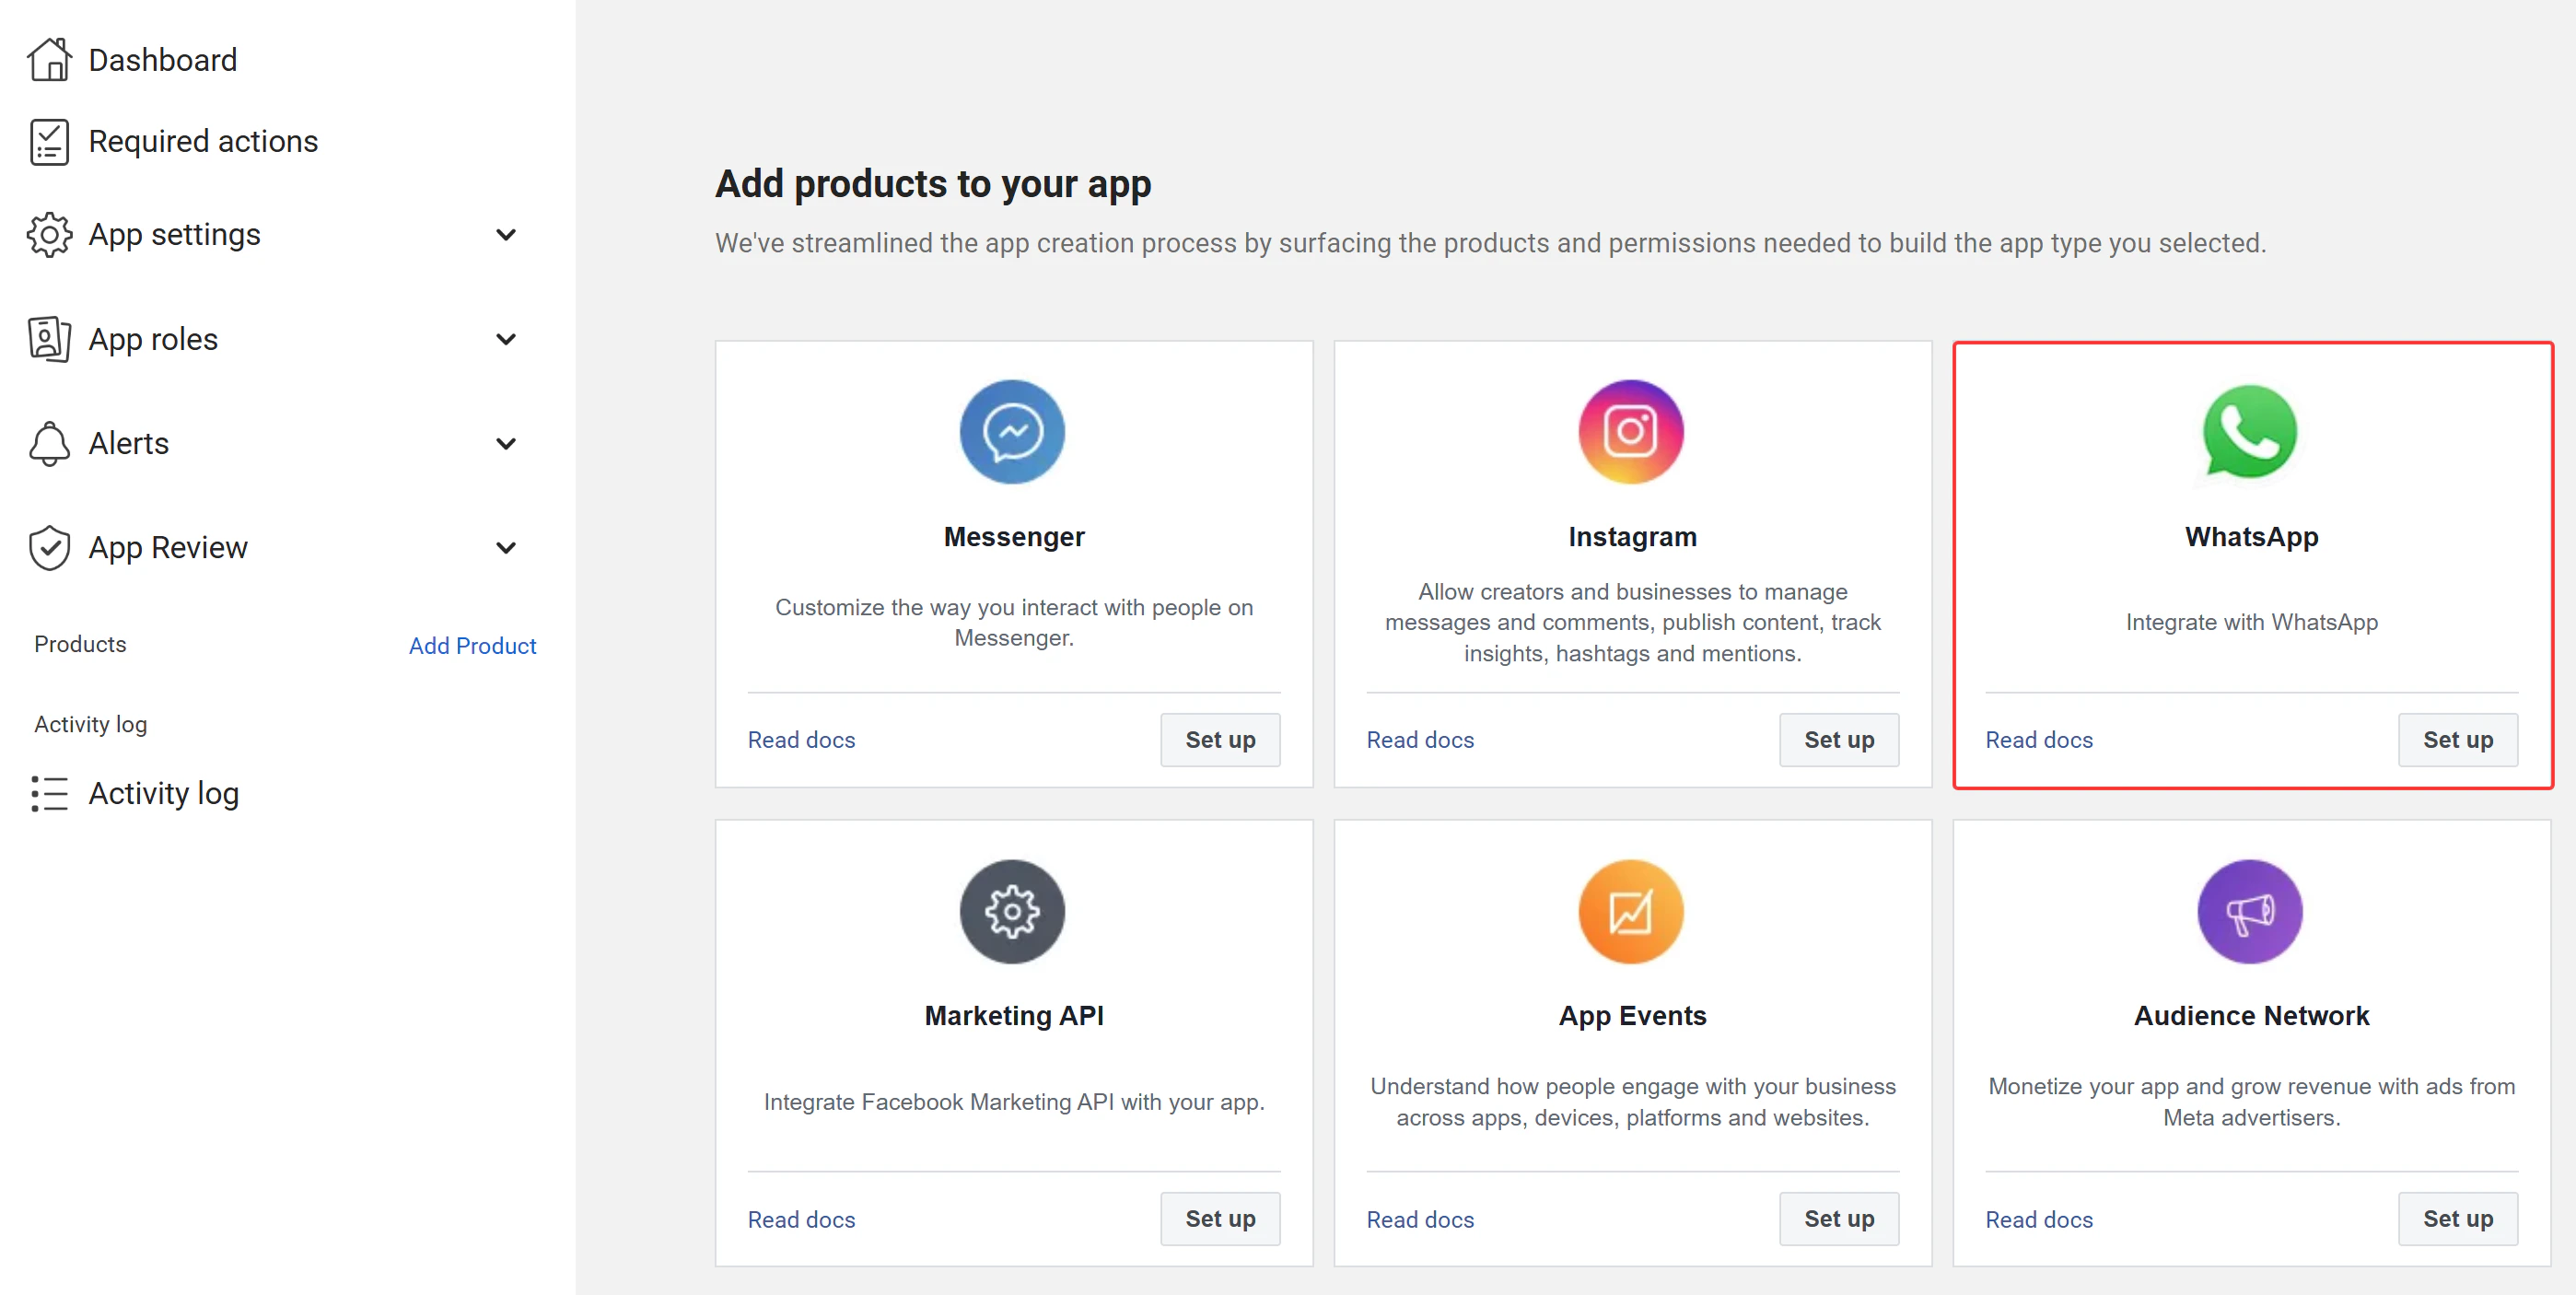
## Step 3: Configure the WhatsApp Product
In your Facebook app dashboard, click **Add Product** in the left sidebar. Find **WhatsApp** in the product list and click **Set Up**.
In the **Edit WhatsApp** modal, fill in the following fields:
| Field | Description | Where to find | Example |
| ----------------------------- | ------------------------------------------------- | ------------------------------------------------------------------------------------------------------------------------------------- | ------------------ |
| **Client ID** | Facebook **App ID** | [Meta Developer Portal](https://developers.facebook.com/apps/) → App → **Settings → Basic** | `1974877133429651` |
| **Client Secret** | Facebook **App Secret** | Same page → click **Show** | `●●●●●●●●●●` |
| **API Version** | Graph API version | App → **Settings → Advanced → API Version** | `v1.0` |
| **Webhook Verify Token** | Random string for webhook verification | Self-generated | `i7CTHYSF66uEHS3B` |
| **App Config ID** | Configuration ID from the Embedded Signup wizard | **Facebook Login for Business → Configurations**. See [Step 4](#step-4--obtain-configuration-id) | `783655134328535` |
| **System User ID** | System User's ID, obtained via Graph API Explorer | [Graph API Explorer](https://developers.facebook.com/tools/explorer/). See [Step 5](#step-5--obtain-system-user-id-and-token) | `110835055179851` |
| **System User Token** | Access token generated for your System User | [Meta Business Settings](https://business.facebook.com/settings/system-users). See [Step 5](#step-5--obtain-system-user-id-and-token) | `EAACanps...` |
| **Business ID**\*(optional)\* | Meta Business Portfolio ID | [Meta Business Settings](https://business.facebook.com/settings/) → **Business Info** | `627055339164xxx` |
| **Business Name** | Your business display name in ChatbotX | Your own business name | `botx` |
**Client ID** and **Client Secret** must exactly match the values in your Facebook App's **Settings → Basic**. If any value is incorrect, the WhatsApp Embedded Signup flow will fail silently.
Click **Save** to apply the settings. The WhatsApp card will now display your **Client ID** and **Business Name**. WhatsApp Embedded Signup will now be available as a channel when creating chatbots.
## Step 3: Configure the WhatsApp Product
In your Facebook app dashboard, click **Add Product** in the left sidebar. Find **WhatsApp** in the product list and click **Set Up**.
 After clicking **Set Up**, you will be redirected to the **WhatsApp Quickstart** dashboard. This confirms the WhatsApp product has been added successfully.
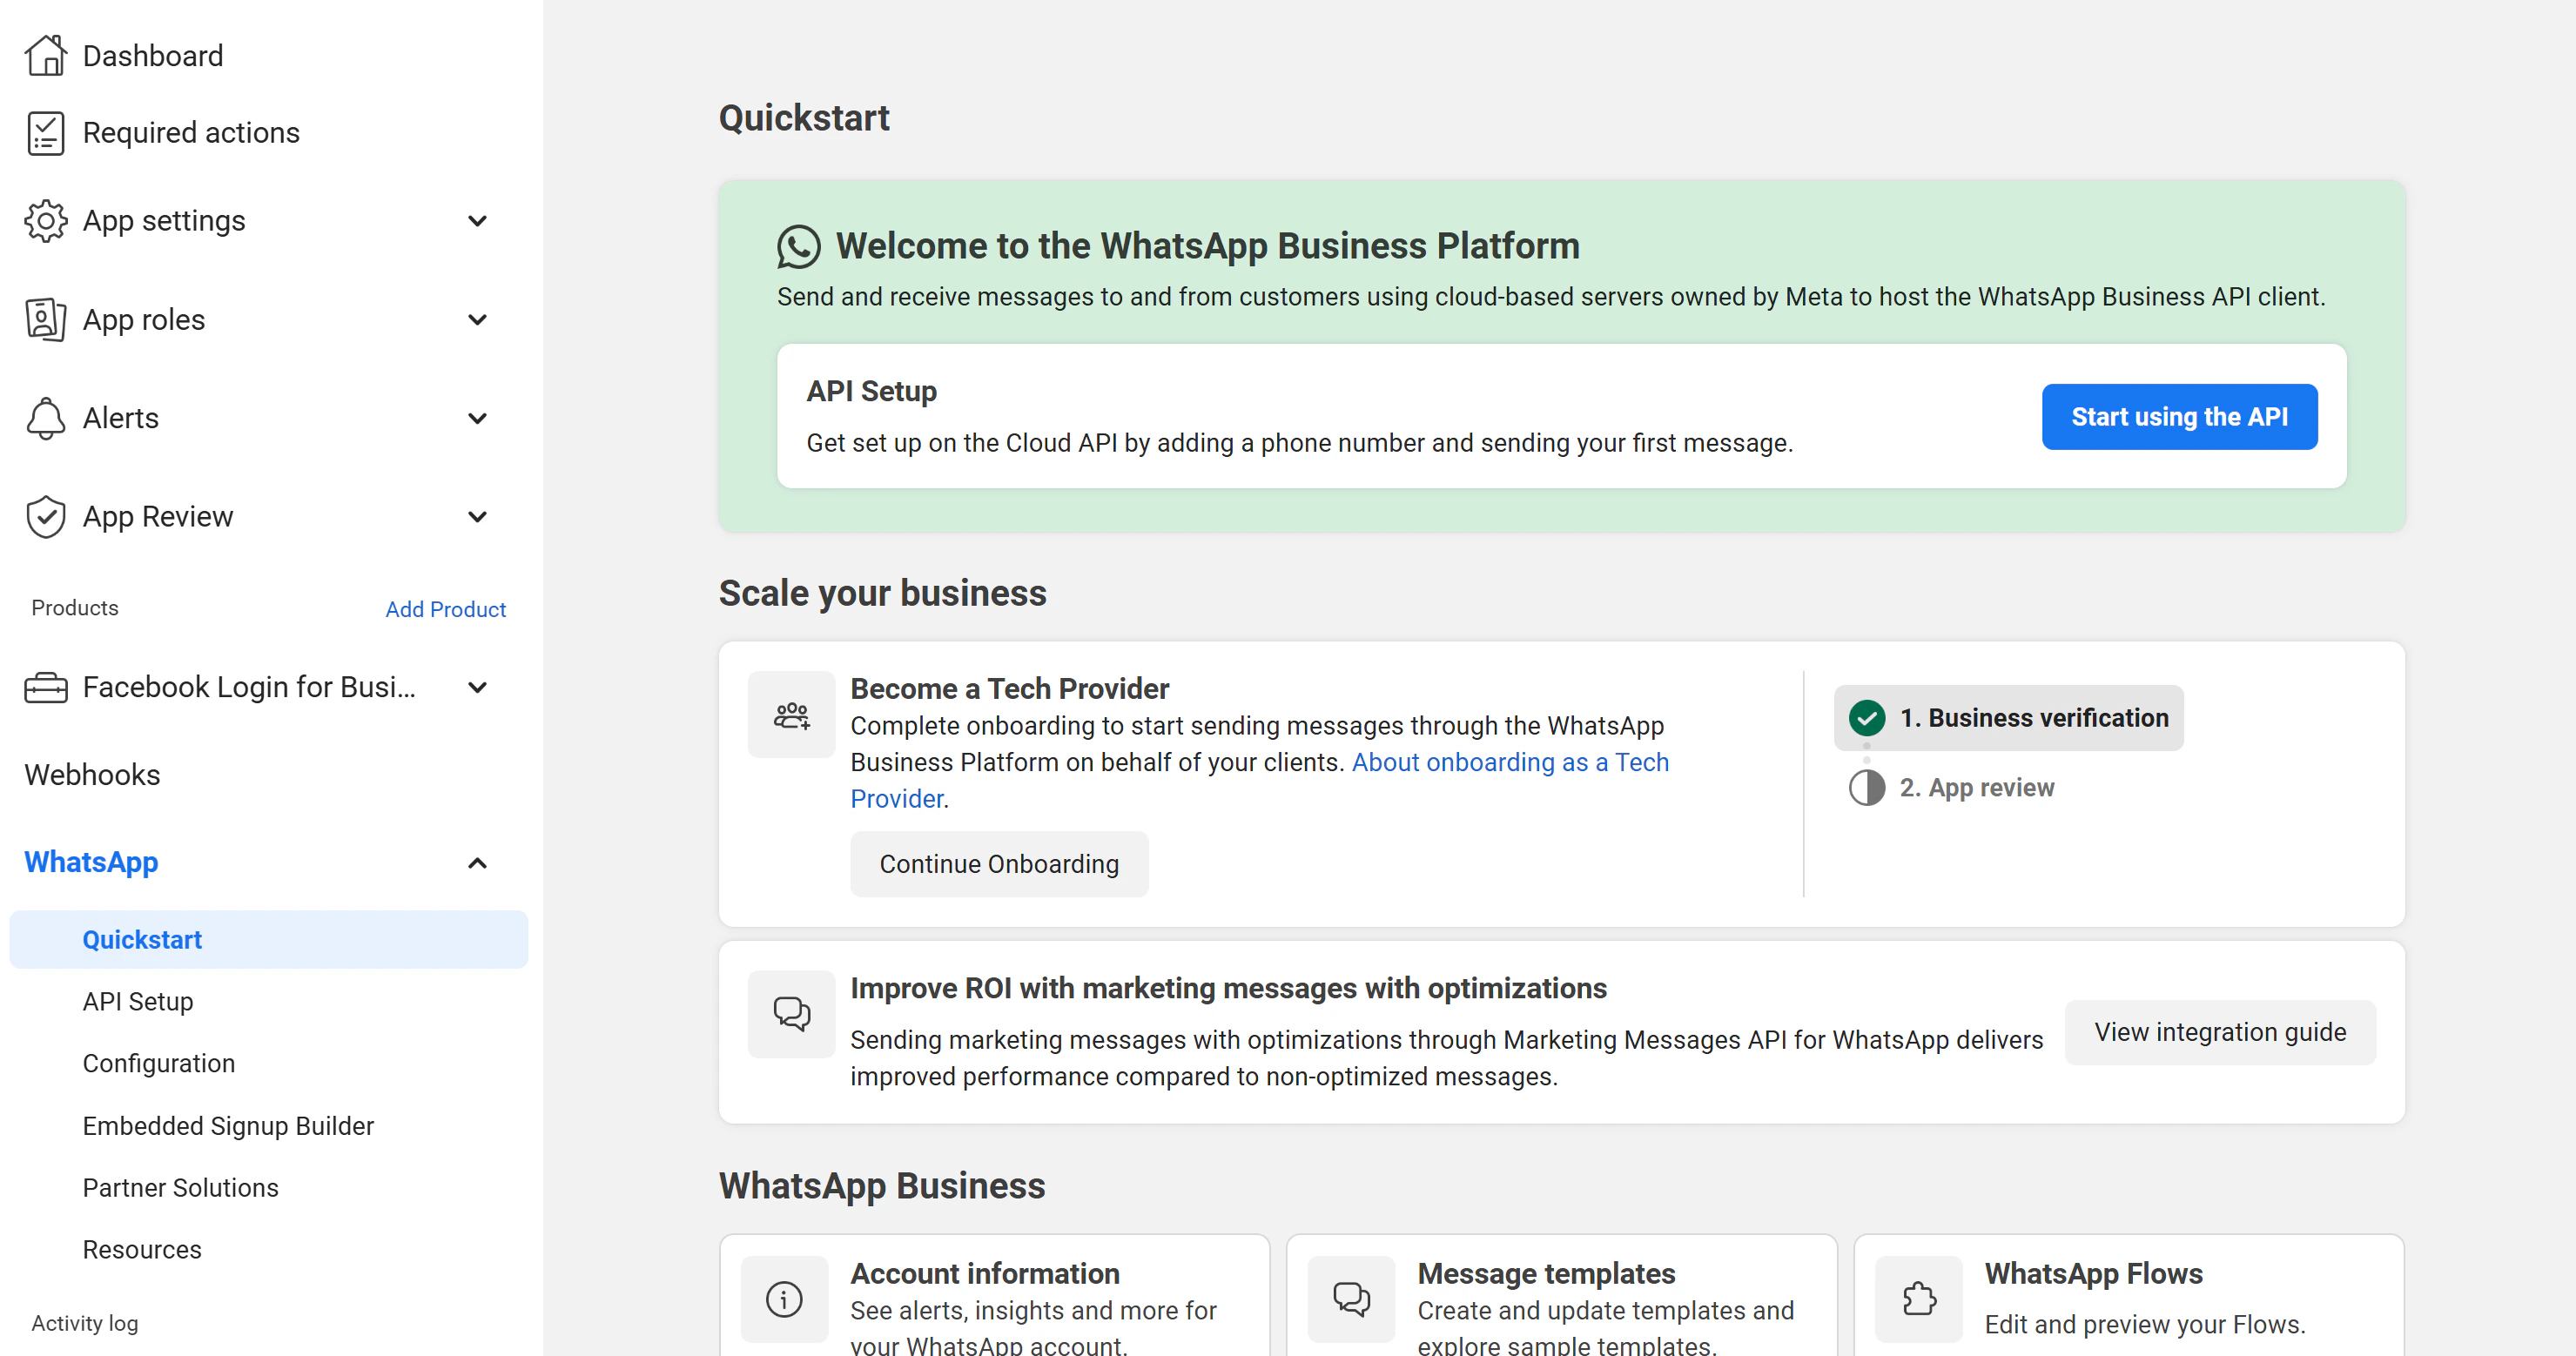 If you see a **"Missing valid payment method"** warning, click **Add payment method** to configure billing. Without a valid payment method, you will not be able to send messages beyond the free test tier.
**Do NOT click "Start using the API!"**. This button is for direct Cloud API setup, which requires manual webhook and phone number configuration. ChatbotX uses the **Embedded Signup** flow instead, which automates the entire process. Skip this section entirely.
The Embedded Signup flow requires the **Facebook Login for Business** product. Go back to the app dashboard, click **Add Product**, find **Facebook Login for Business**, and click **Settings**.
If you see a **"Missing valid payment method"** warning, click **Add payment method** to configure billing. Without a valid payment method, you will not be able to send messages beyond the free test tier.
**Do NOT click "Start using the API!"**. This button is for direct Cloud API setup, which requires manual webhook and phone number configuration. ChatbotX uses the **Embedded Signup** flow instead, which automates the entire process. Skip this section entirely.
The Embedded Signup flow requires the **Facebook Login for Business** product. Go back to the app dashboard, click **Add Product**, find **Facebook Login for Business**, and click **Settings**.
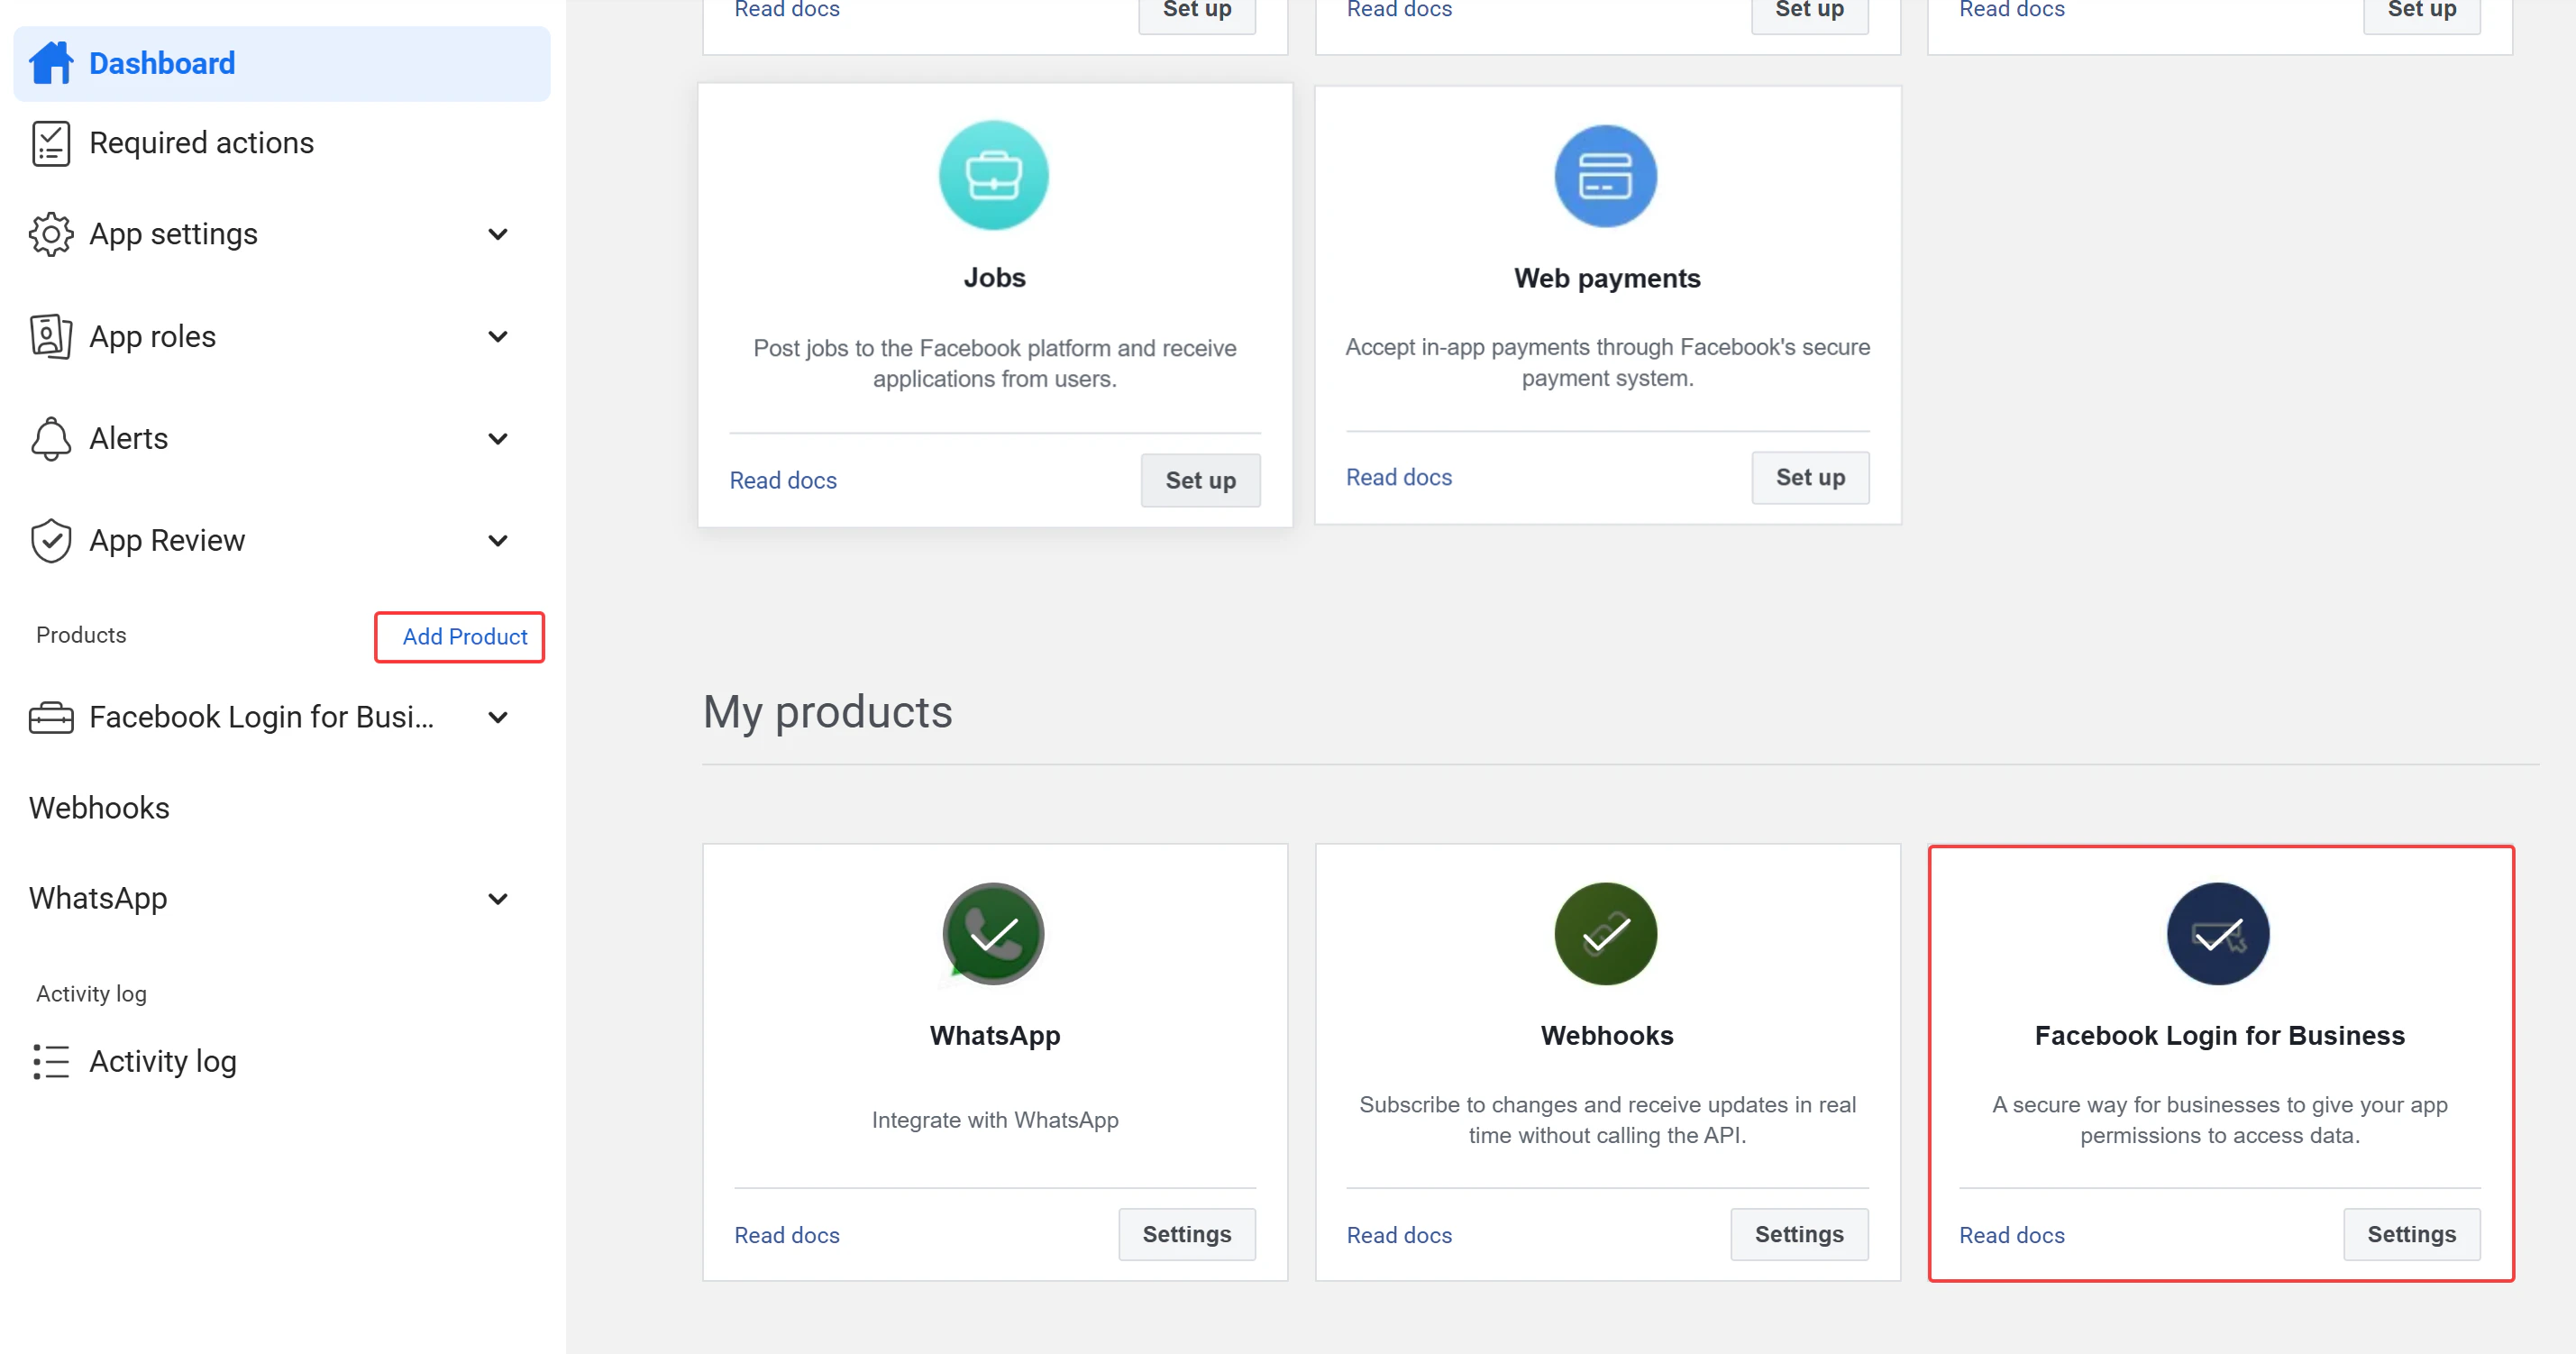 If you already have **Facebook Login for Business** added (for example, from a previous [Messenger](/channels/facebook-messenger) or [Instagram](/channels/instagram) setup), skip this step and proceed to Step 4.
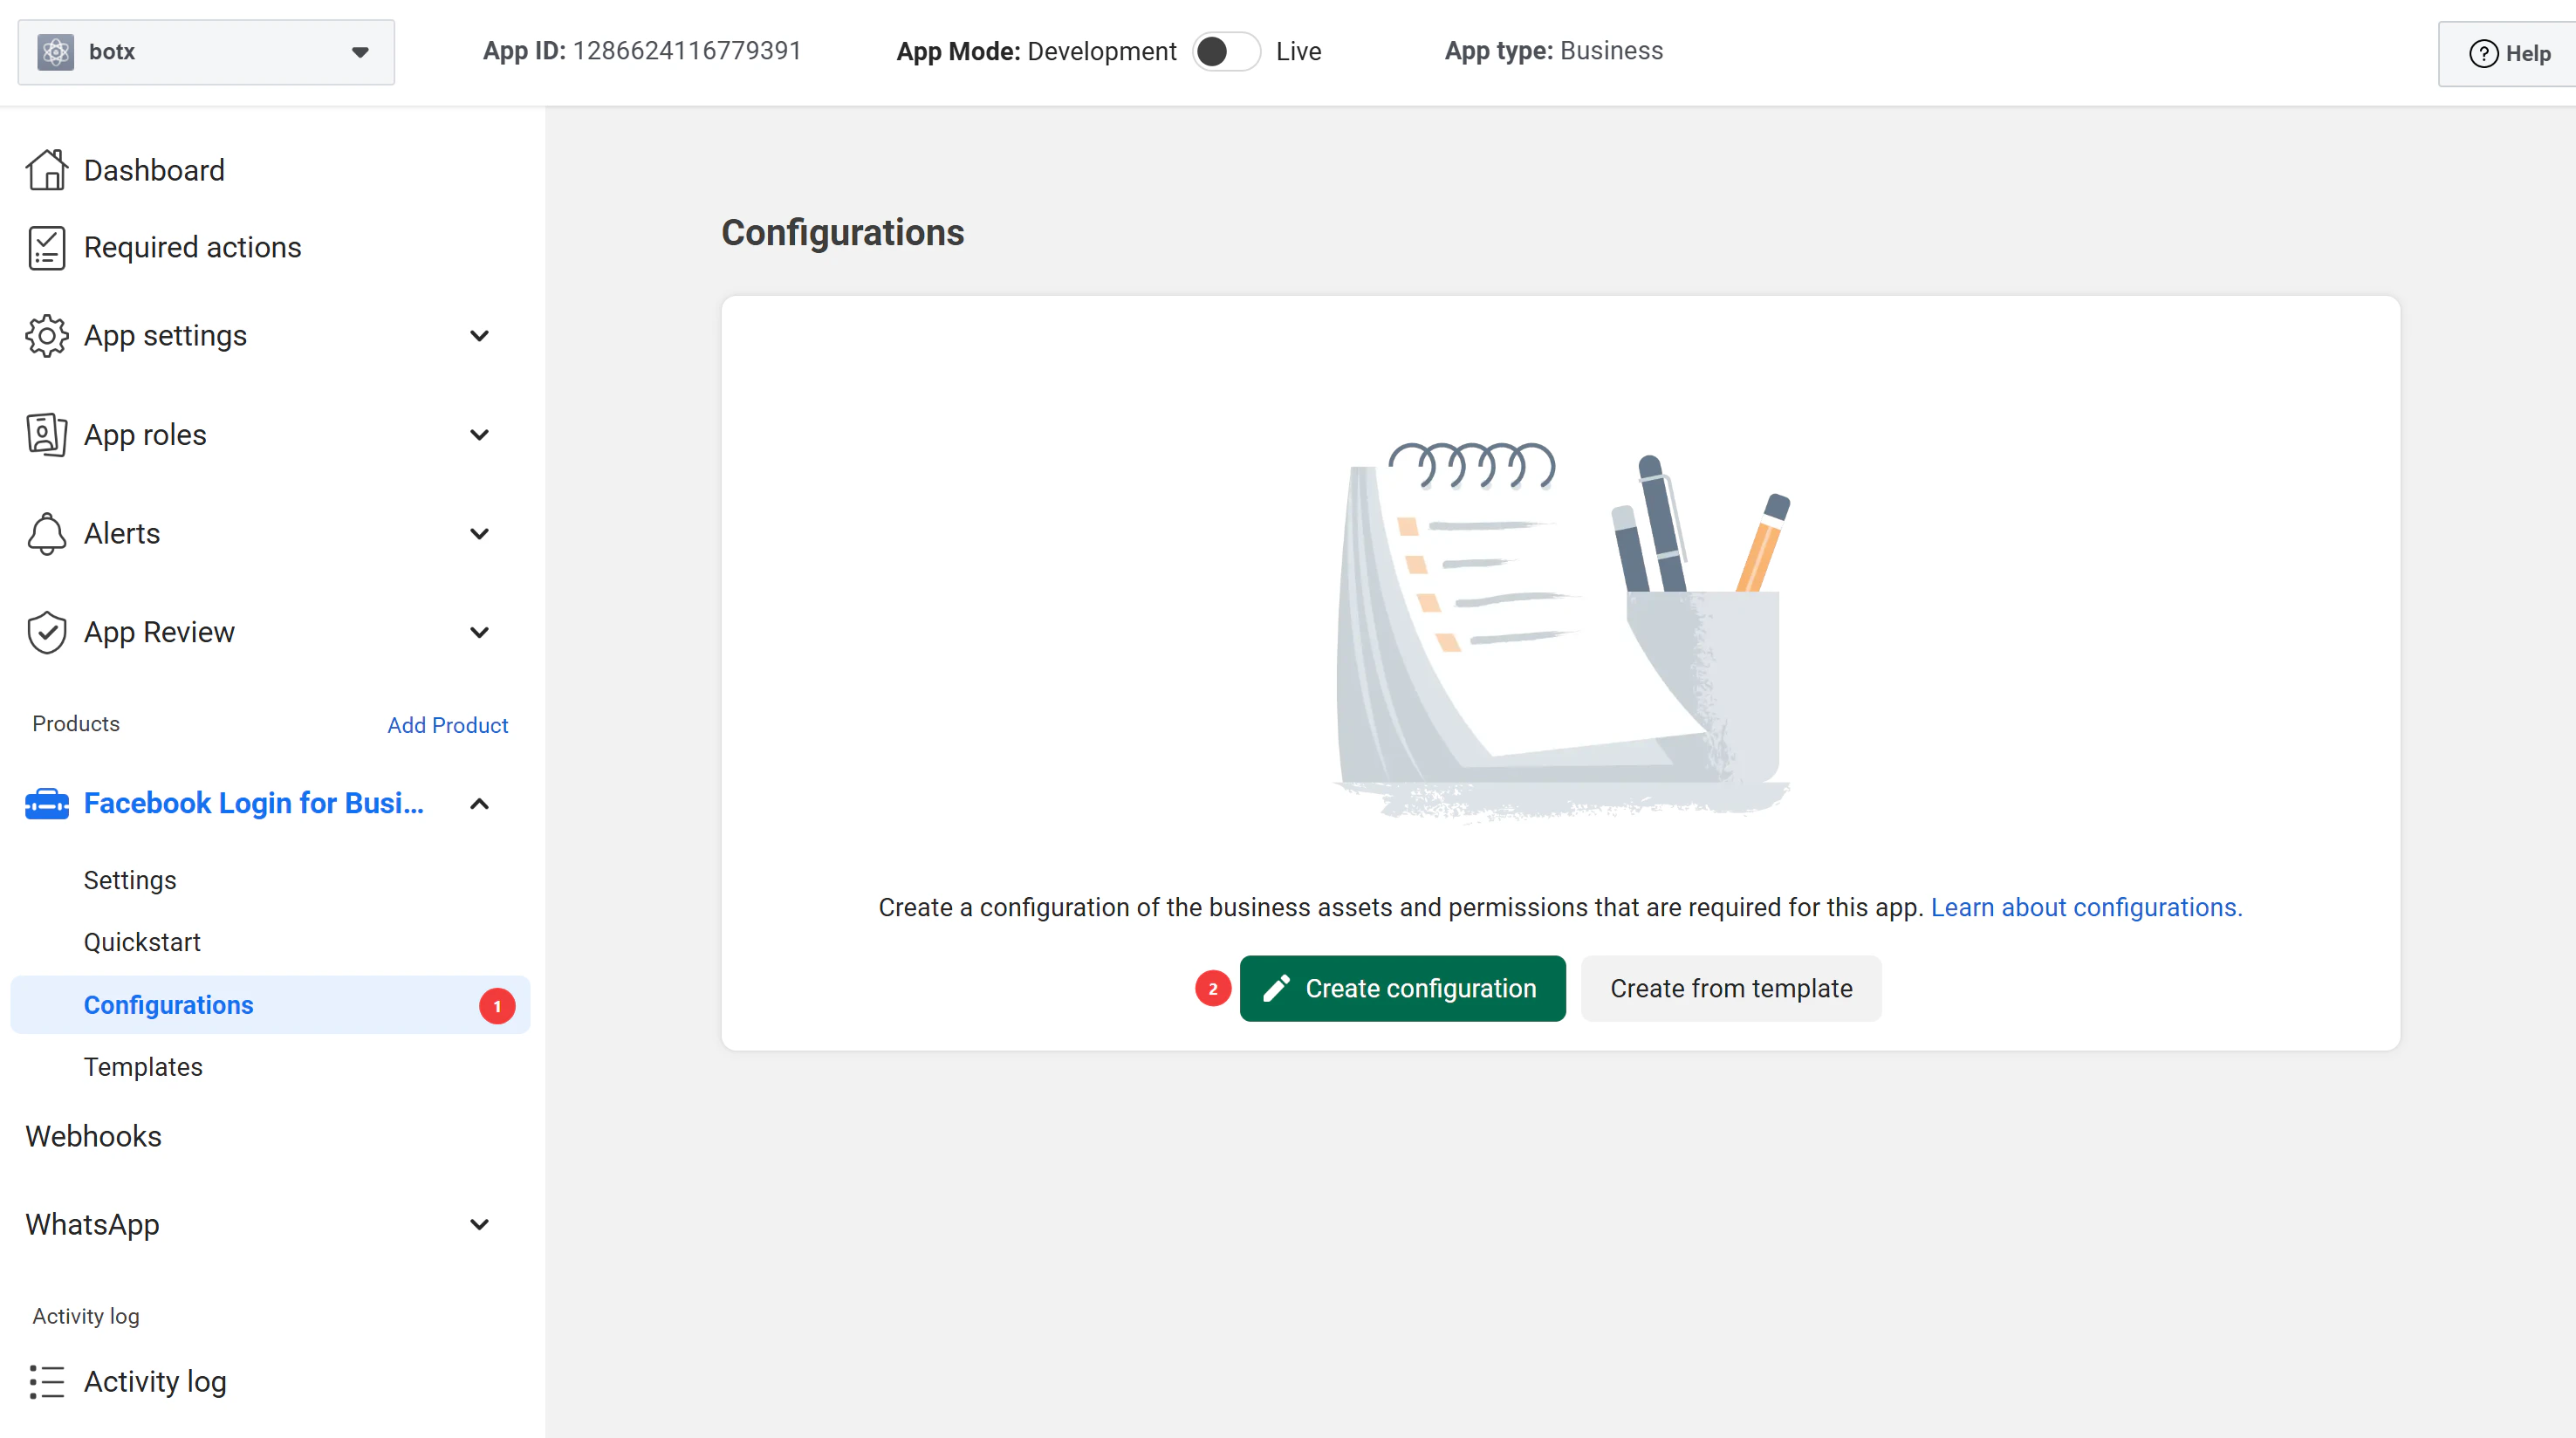
## Step 4: Obtain Configuration ID
The **Configuration ID** is the critical value that enables the WhatsApp Embedded Signup flow in ChatbotX. You obtain it from the **Facebook Login for Business** product settings through a 6-step configuration wizard.
In your Facebook app left sidebar, expand **Facebook Login for Business** and click **Configurations**. Click the **Create configuration** button to start the wizard.
If you already have **Facebook Login for Business** added (for example, from a previous [Messenger](/channels/facebook-messenger) or [Instagram](/channels/instagram) setup), skip this step and proceed to Step 4.
## Step 4: Obtain Configuration ID
The **Configuration ID** is the critical value that enables the WhatsApp Embedded Signup flow in ChatbotX. You obtain it from the **Facebook Login for Business** product settings through a 6-step configuration wizard.
In your Facebook app left sidebar, expand **Facebook Login for Business** and click **Configurations**. Click the **Create configuration** button to start the wizard.
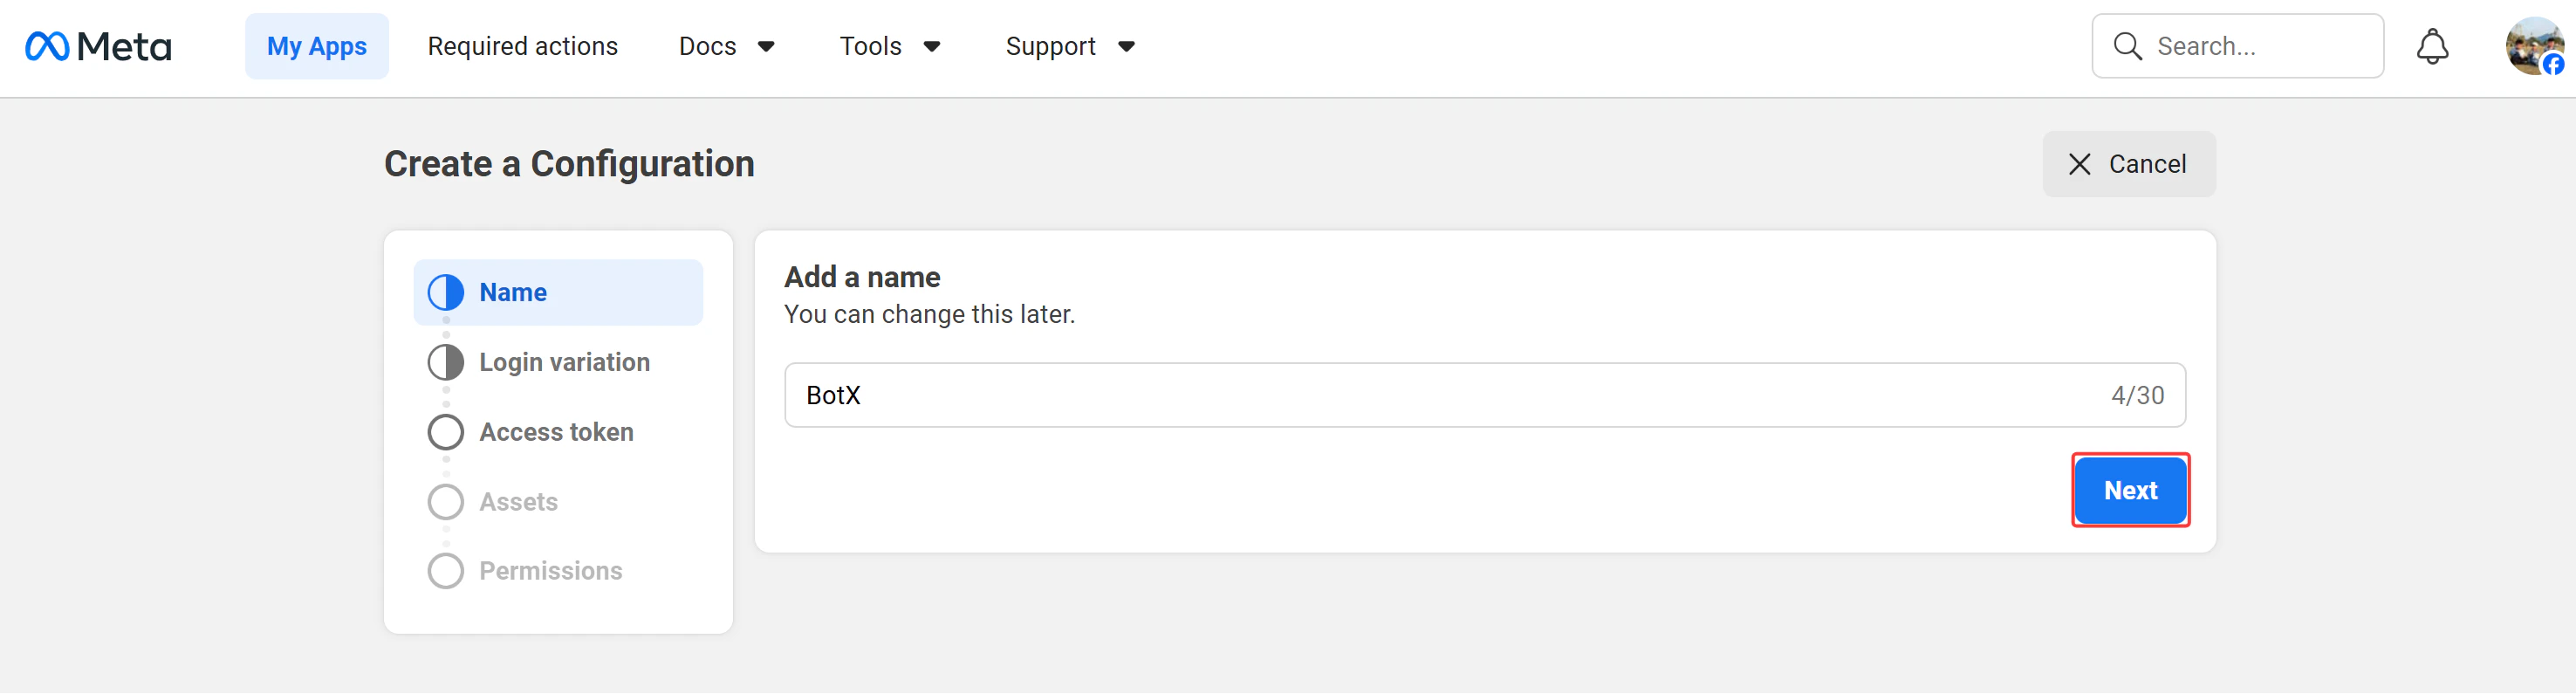
 Enter a descriptive name for this configuration (for example, `BotX`), then click **Next**.
 Select **WhatsApp Embedded Signup** as the login variation, then click **Next**.
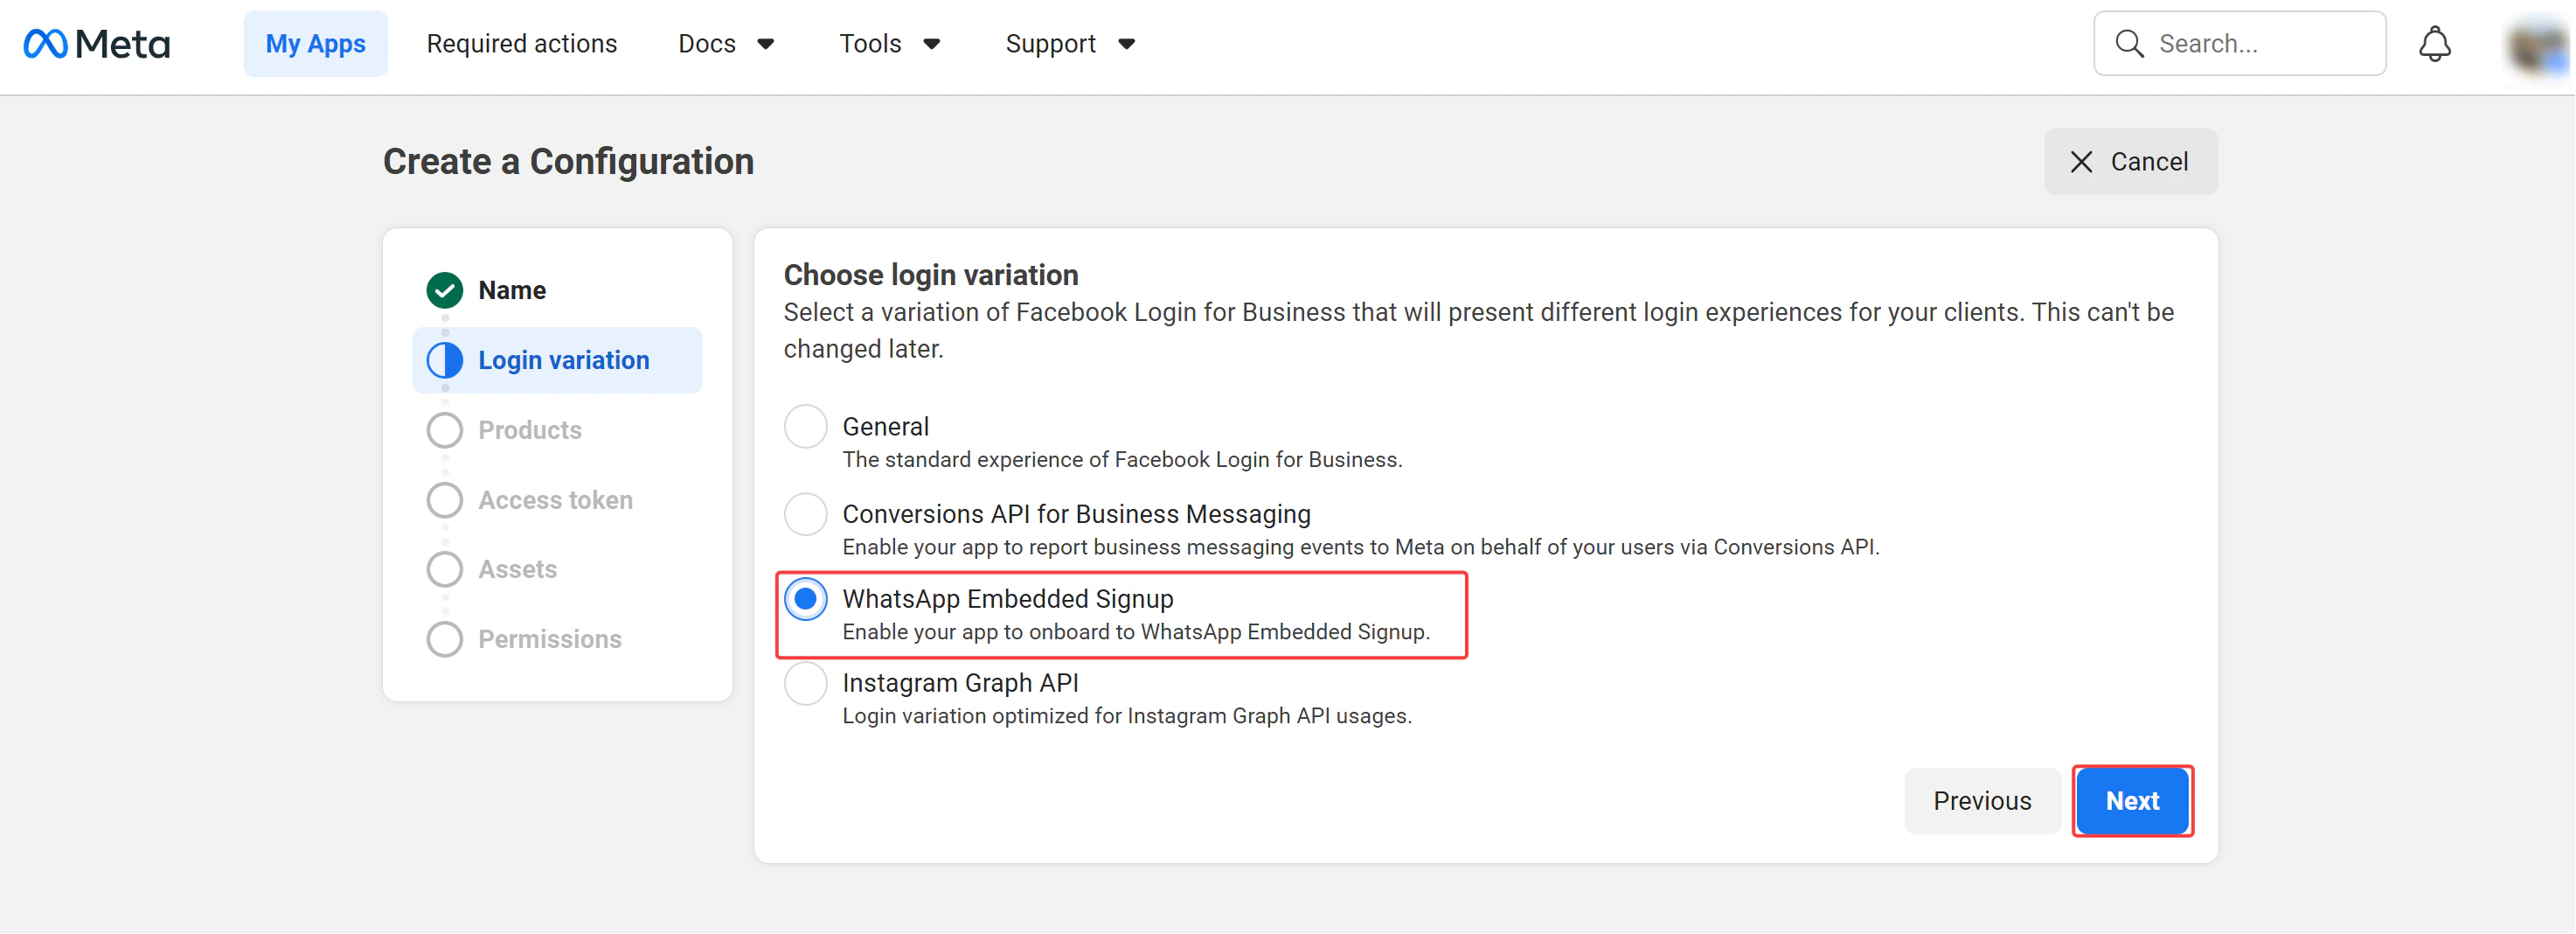 This setting **cannot be changed later**. Make sure to select **WhatsApp Embedded Signup** before clicking **Next**.
Check the **WhatsApp Cloud API** checkbox at minimum, then click **Next**.
This setting **cannot be changed later**. Make sure to select **WhatsApp Embedded Signup** before clicking **Next**.
Check the **WhatsApp Cloud API** checkbox at minimum, then click **Next**.
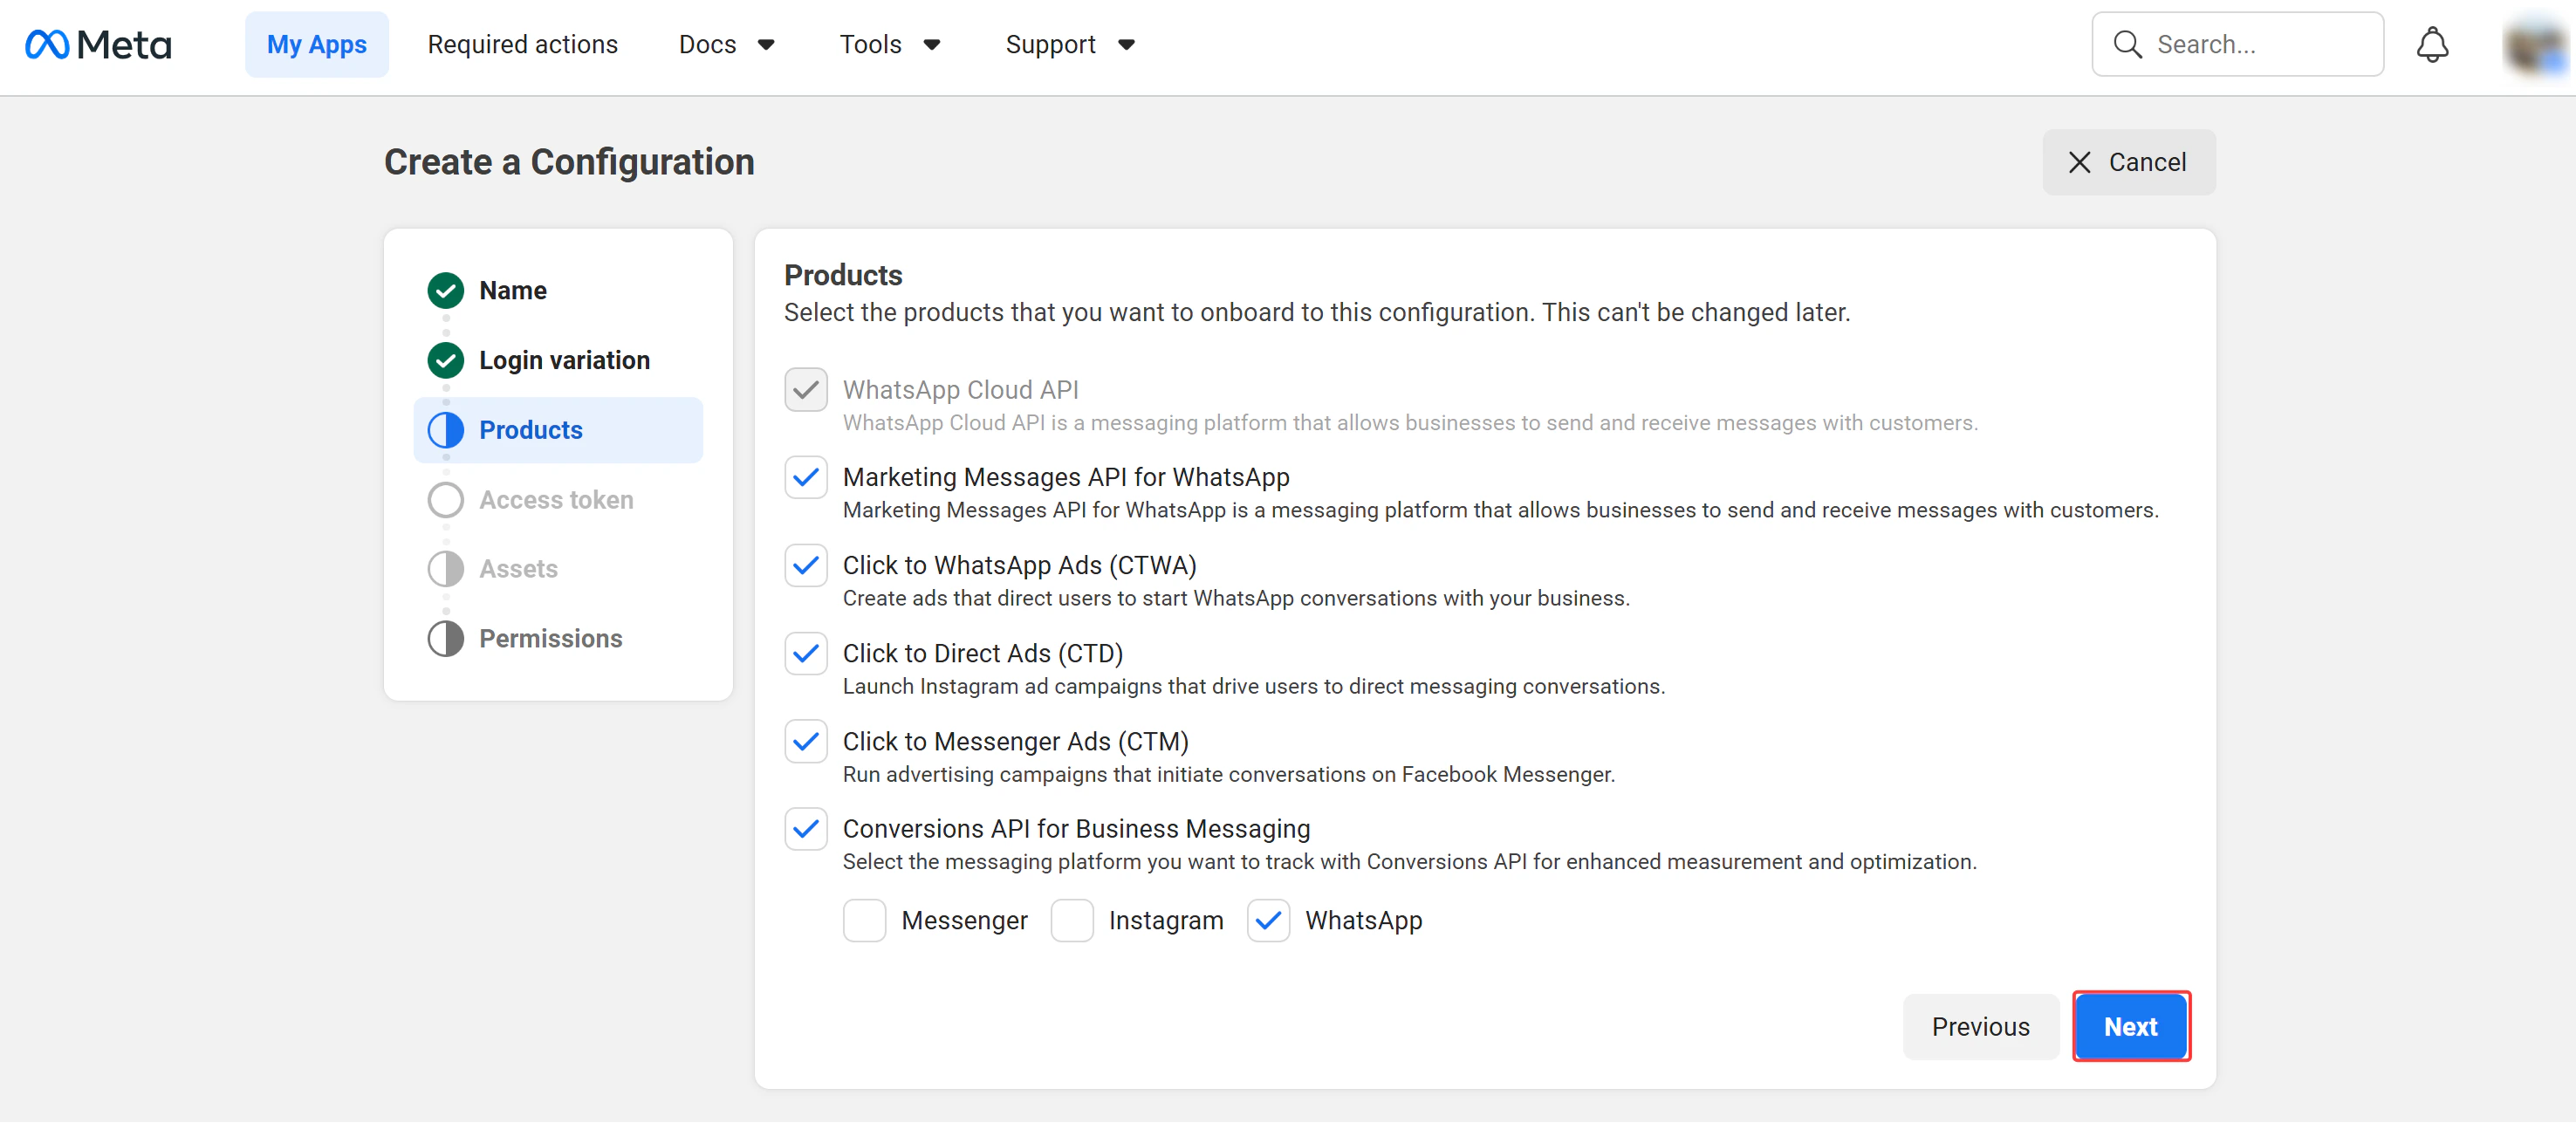 This setting **cannot be changed later**. Make sure to select at least **WhatsApp Cloud API** before clicking **Next**.
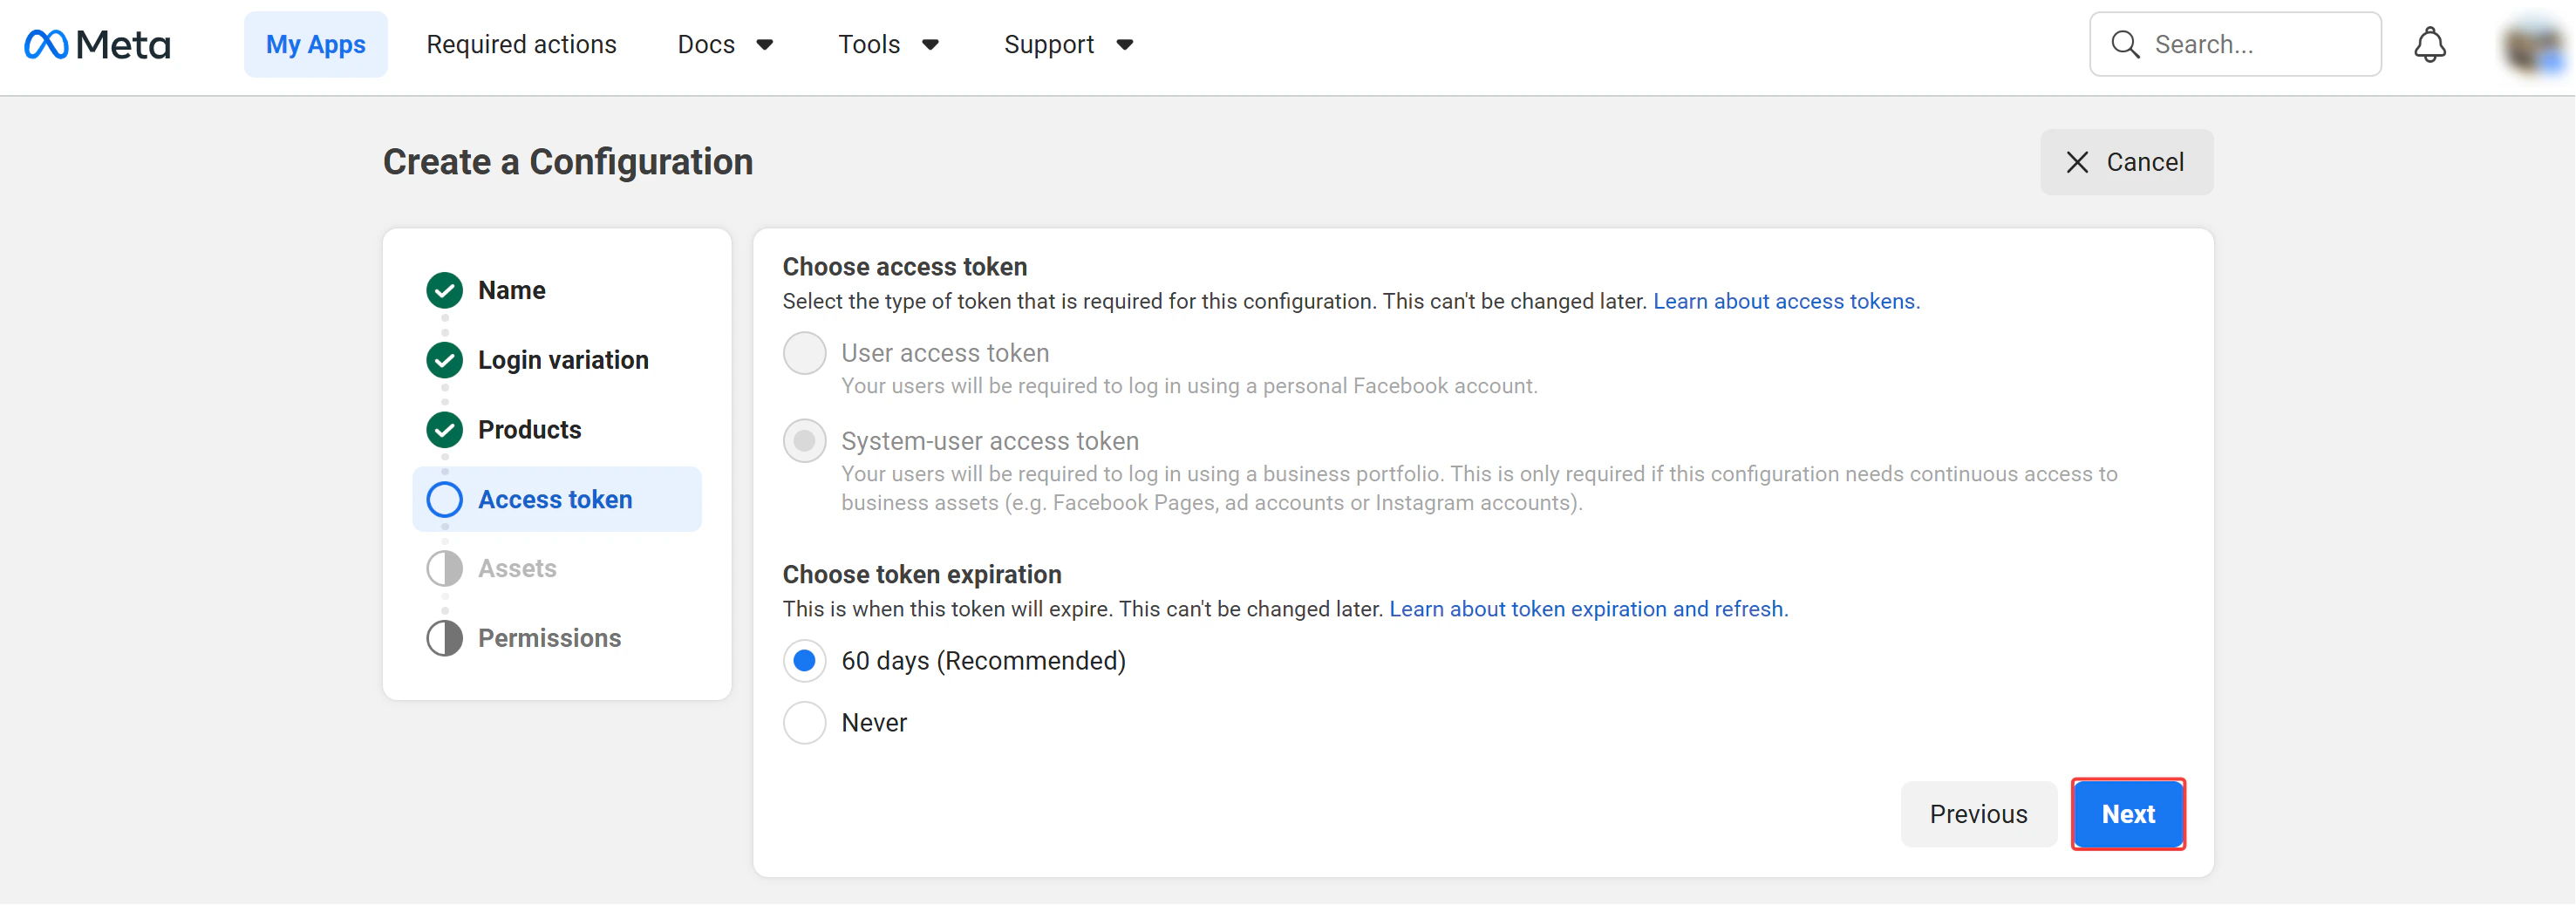
Set **Token expiration** to **Never** for uninterrupted service, then click **Next**.
This setting **cannot be changed later**. Make sure to select at least **WhatsApp Cloud API** before clicking **Next**.
Set **Token expiration** to **Never** for uninterrupted service, then click **Next**.
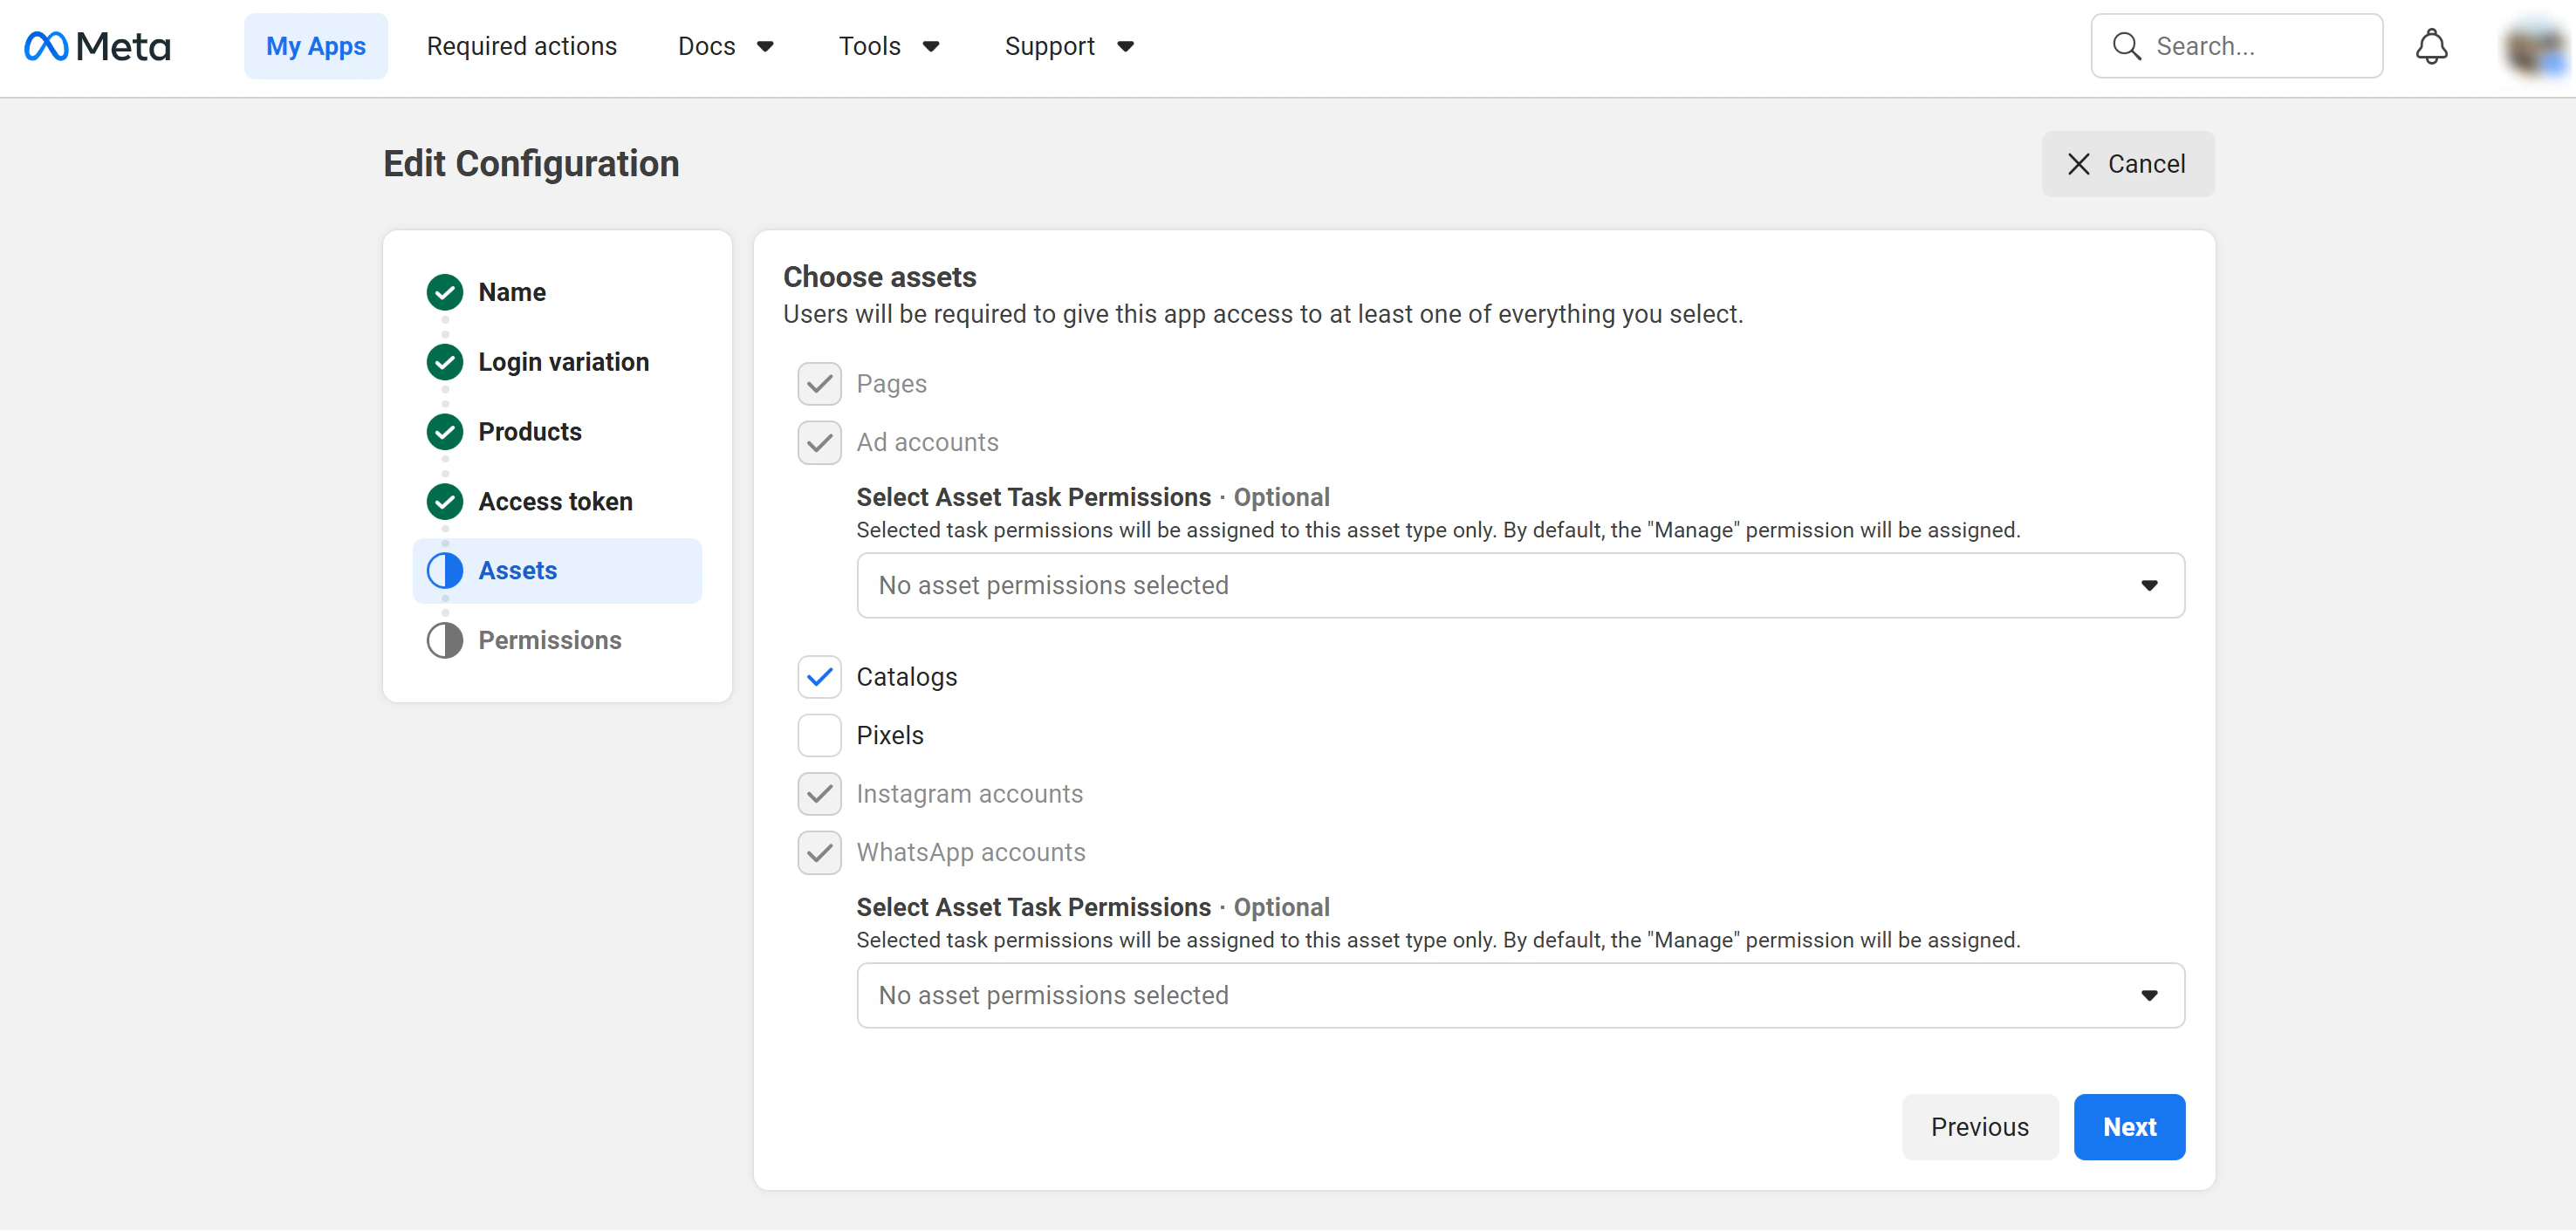
 Leave the default selections as-is — the wizard pre-selects the necessary assets based on your chosen products. Click **Next**.
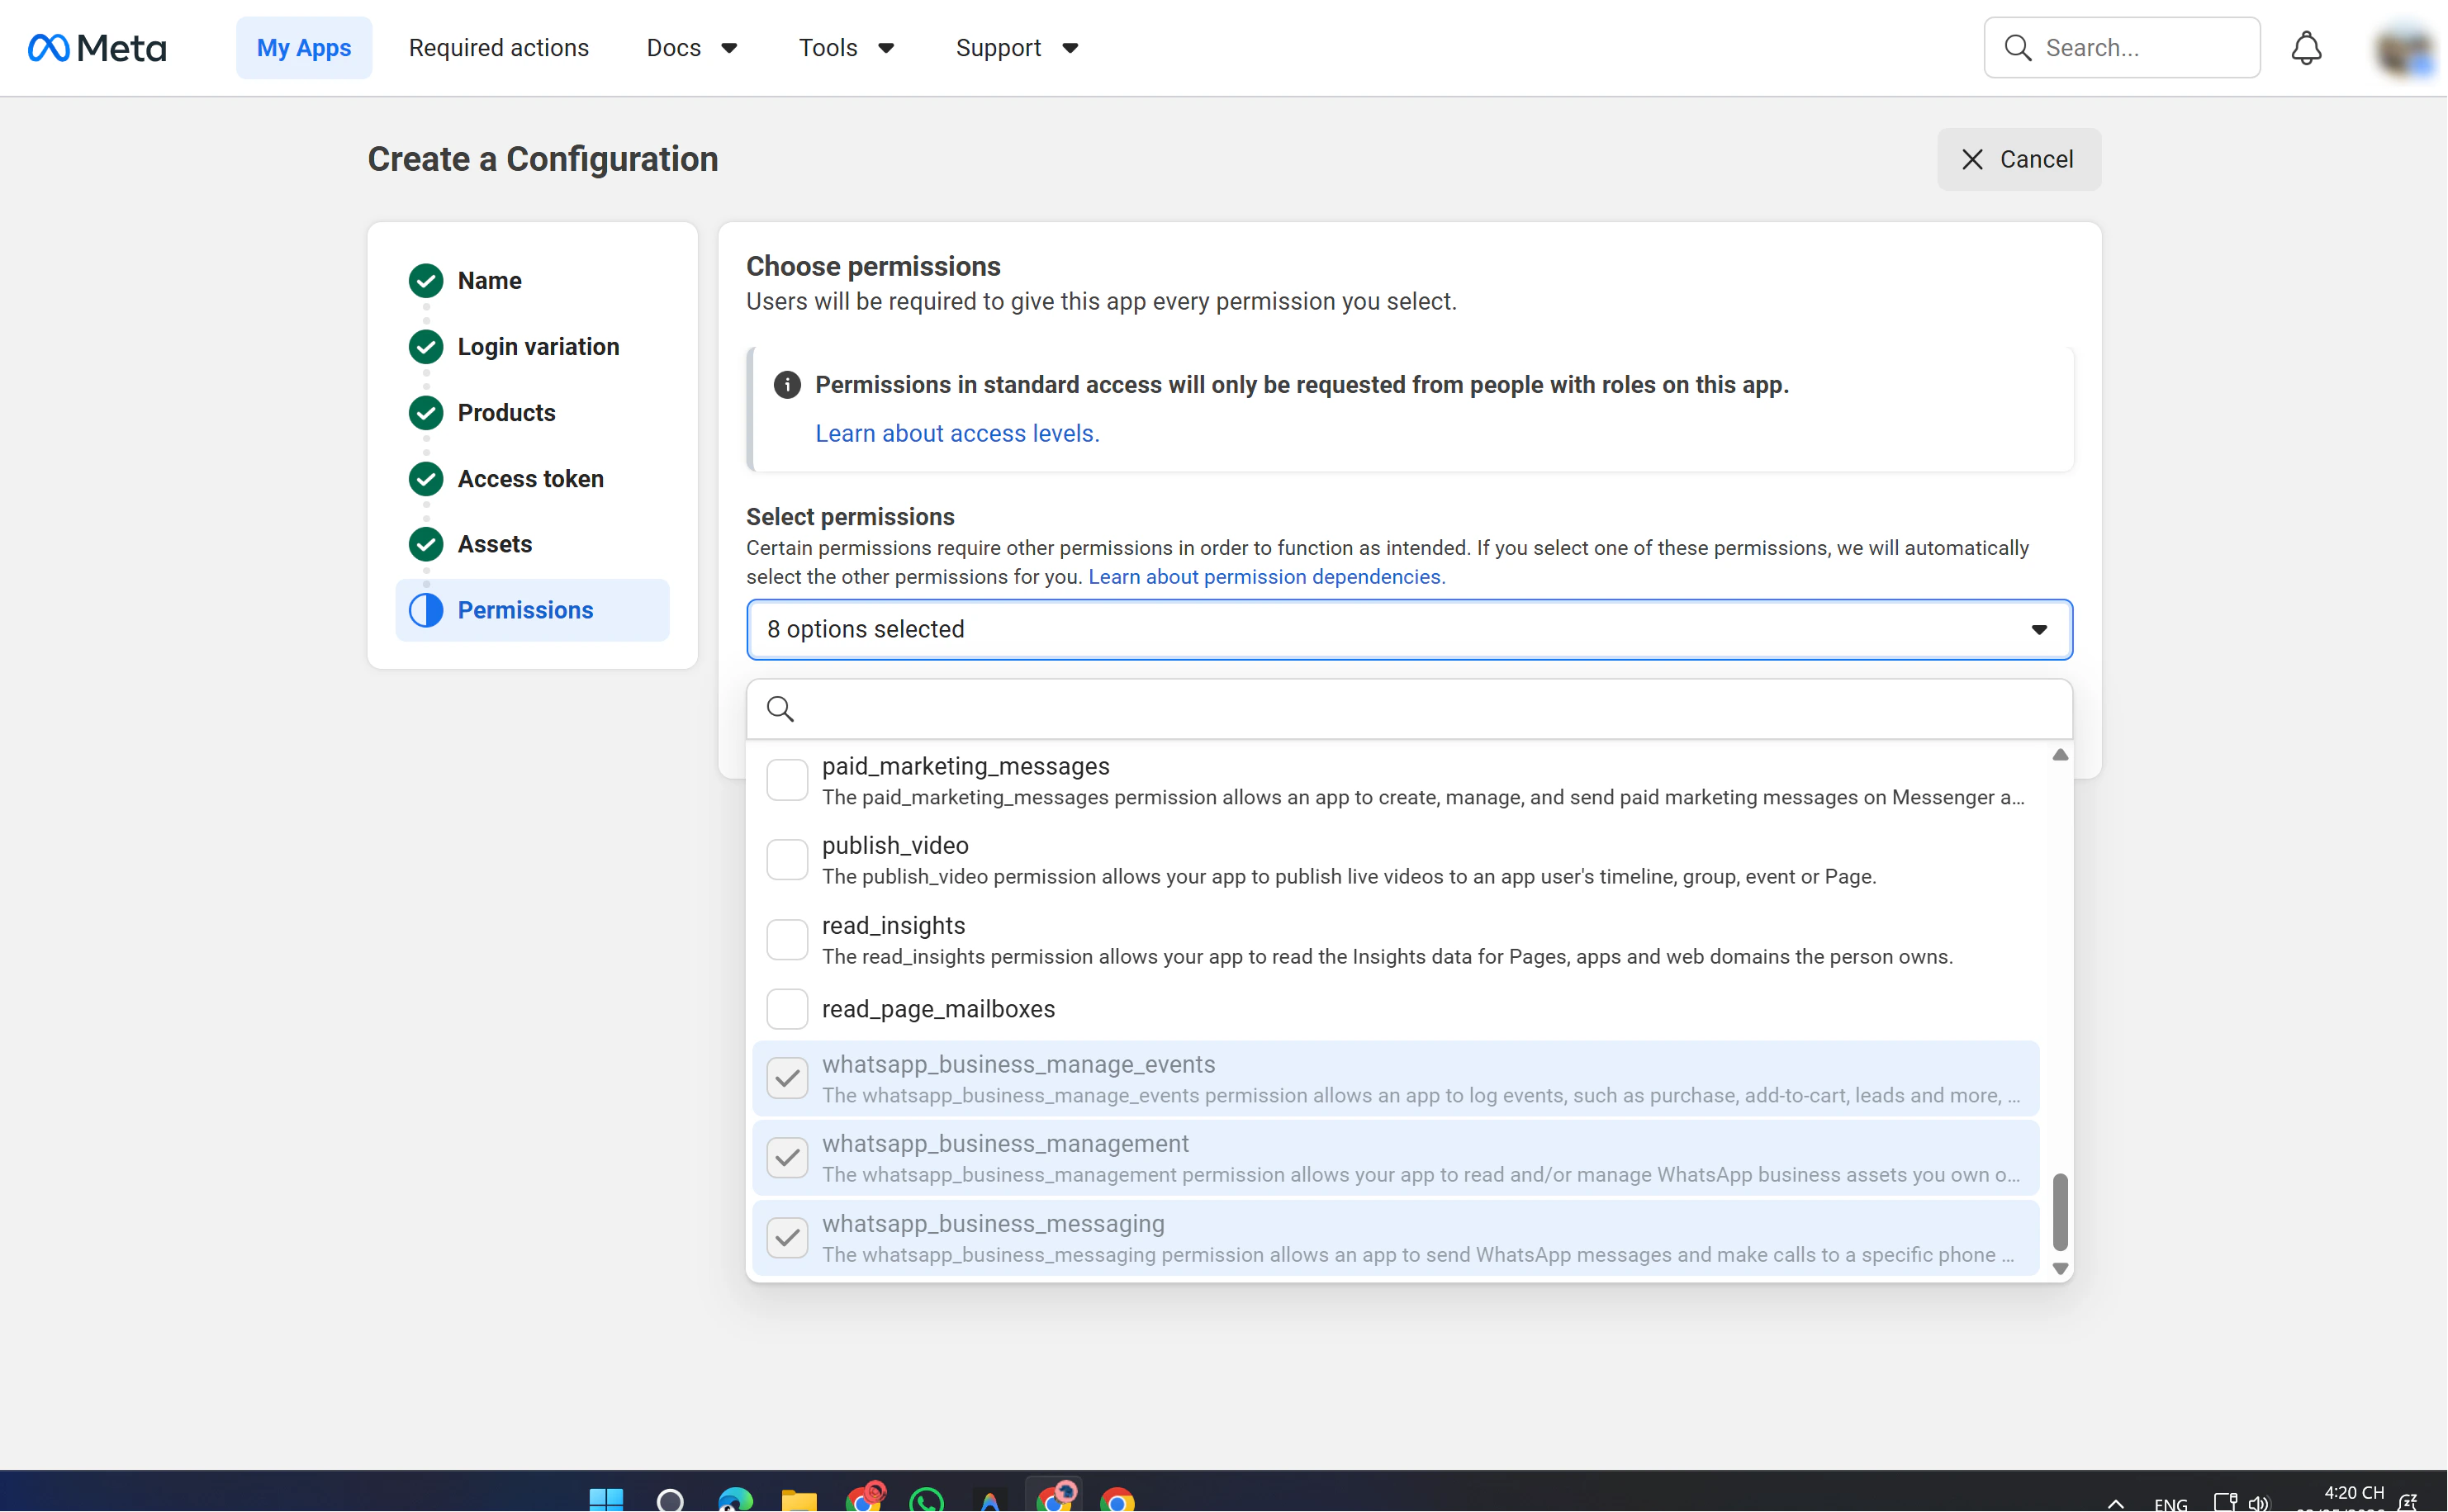
 Review the permissions. Ensure at least these 3 WhatsApp permissions are included:
| Permission | Purpose |
| --------------------------------- | ------------------------------------------------------------------ |
| `whatsapp_business_management` | Read and manage WhatsApp Business assets (phone numbers, profiles) |
| `whatsapp_business_messaging` | Send and receive WhatsApp messages and make calls |
| `whatsapp_business_manage_events` | Log events such as purchases, add-to-cart, and leads |
Review the permissions. Ensure at least these 3 WhatsApp permissions are included:
| Permission | Purpose |
| --------------------------------- | ------------------------------------------------------------------ |
| `whatsapp_business_management` | Read and manage WhatsApp Business assets (phone numbers, profiles) |
| `whatsapp_business_messaging` | Send and receive WhatsApp messages and make calls |
| `whatsapp_business_manage_events` | Log events such as purchases, add-to-cart, and leads |
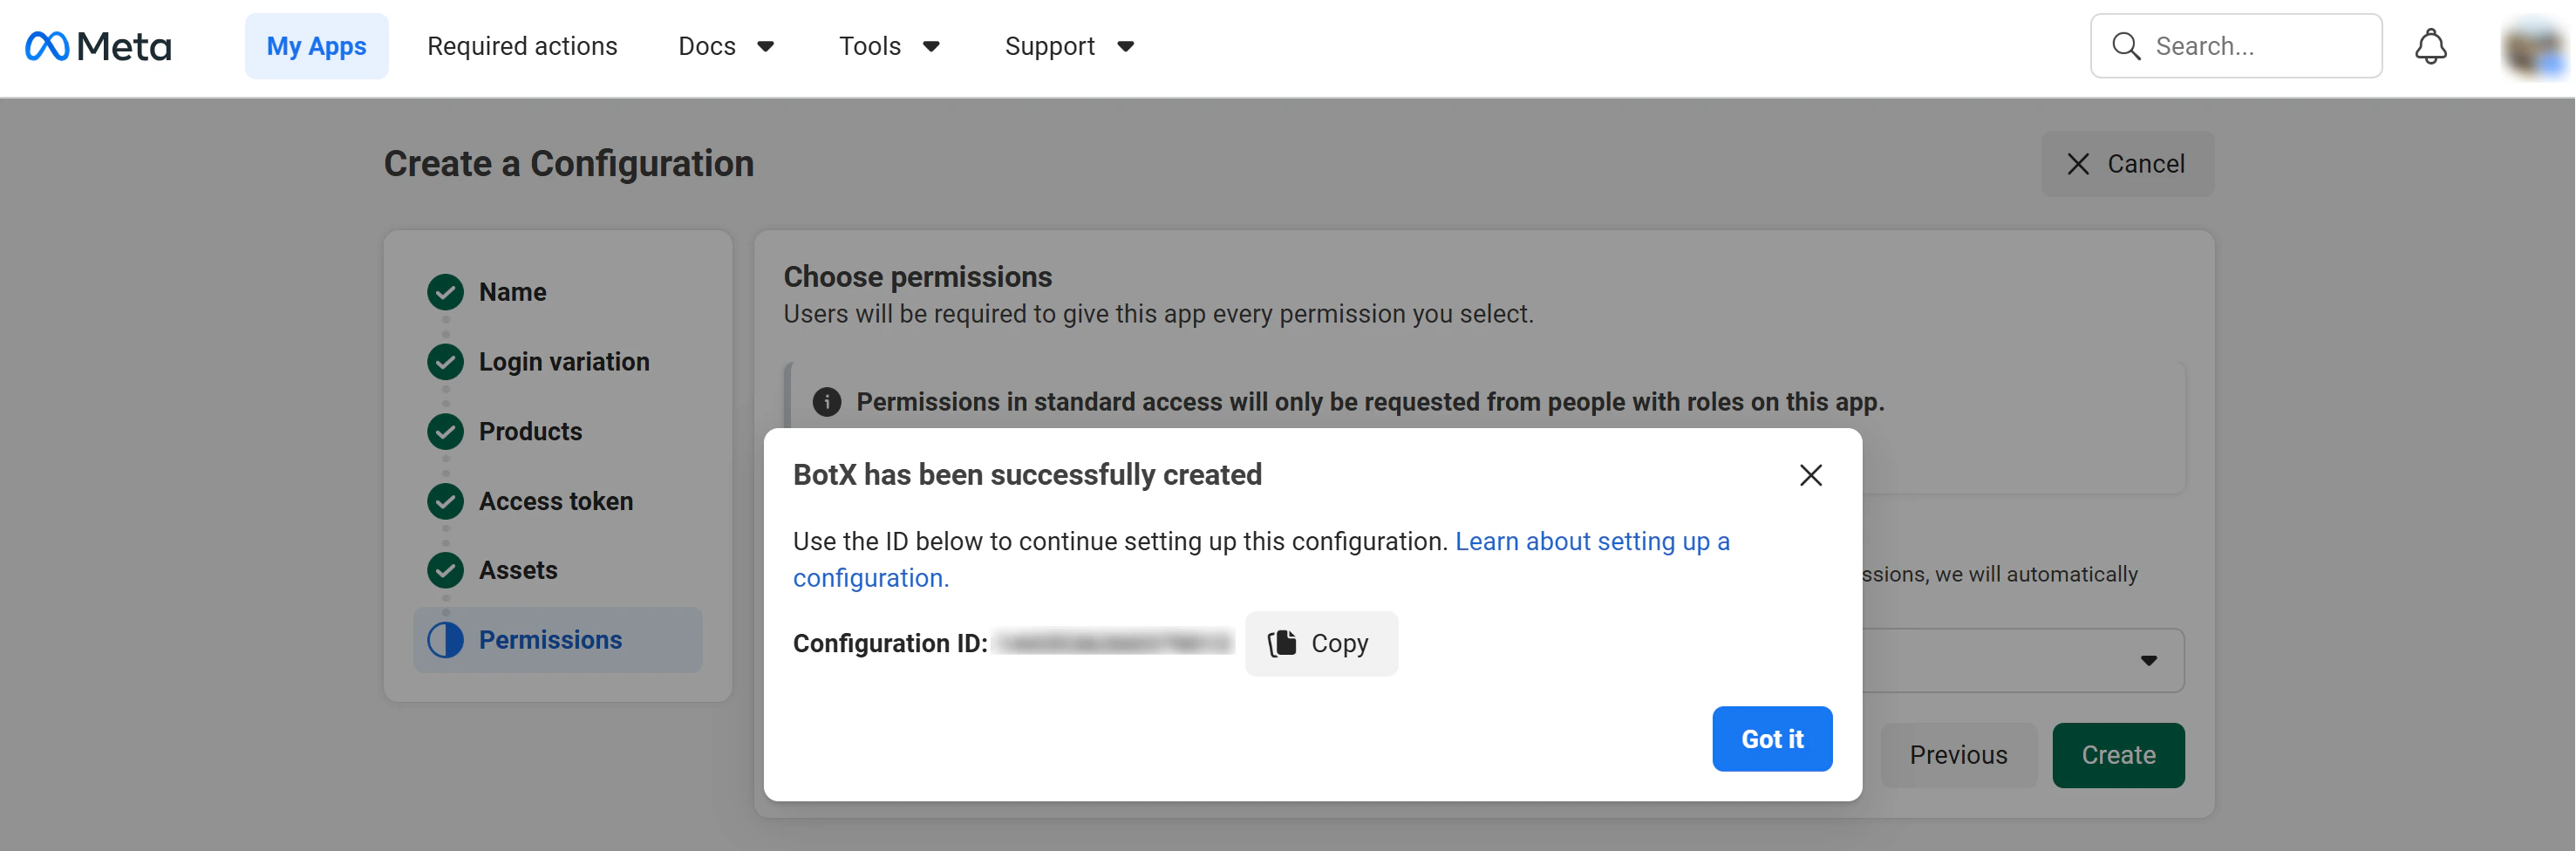
 Click **Create** to finalize the configuration.
A success dialog will appear. Copy the **Configuration ID** displayed, you will need it when filling in the credentials in Step 2.
Click **Create** to finalize the configuration.
A success dialog will appear. Copy the **Configuration ID** displayed, you will need it when filling in the credentials in Step 2.
 Before overriding the current callback URI, your app must be subscribed to receive messages for the WhatsApp Business Account. This prevents error (#100) during webhook configuration. Ensure the `messages` webhook field is subscribed in your app's **Webhooks** settings under the **WhatsApp** product section.
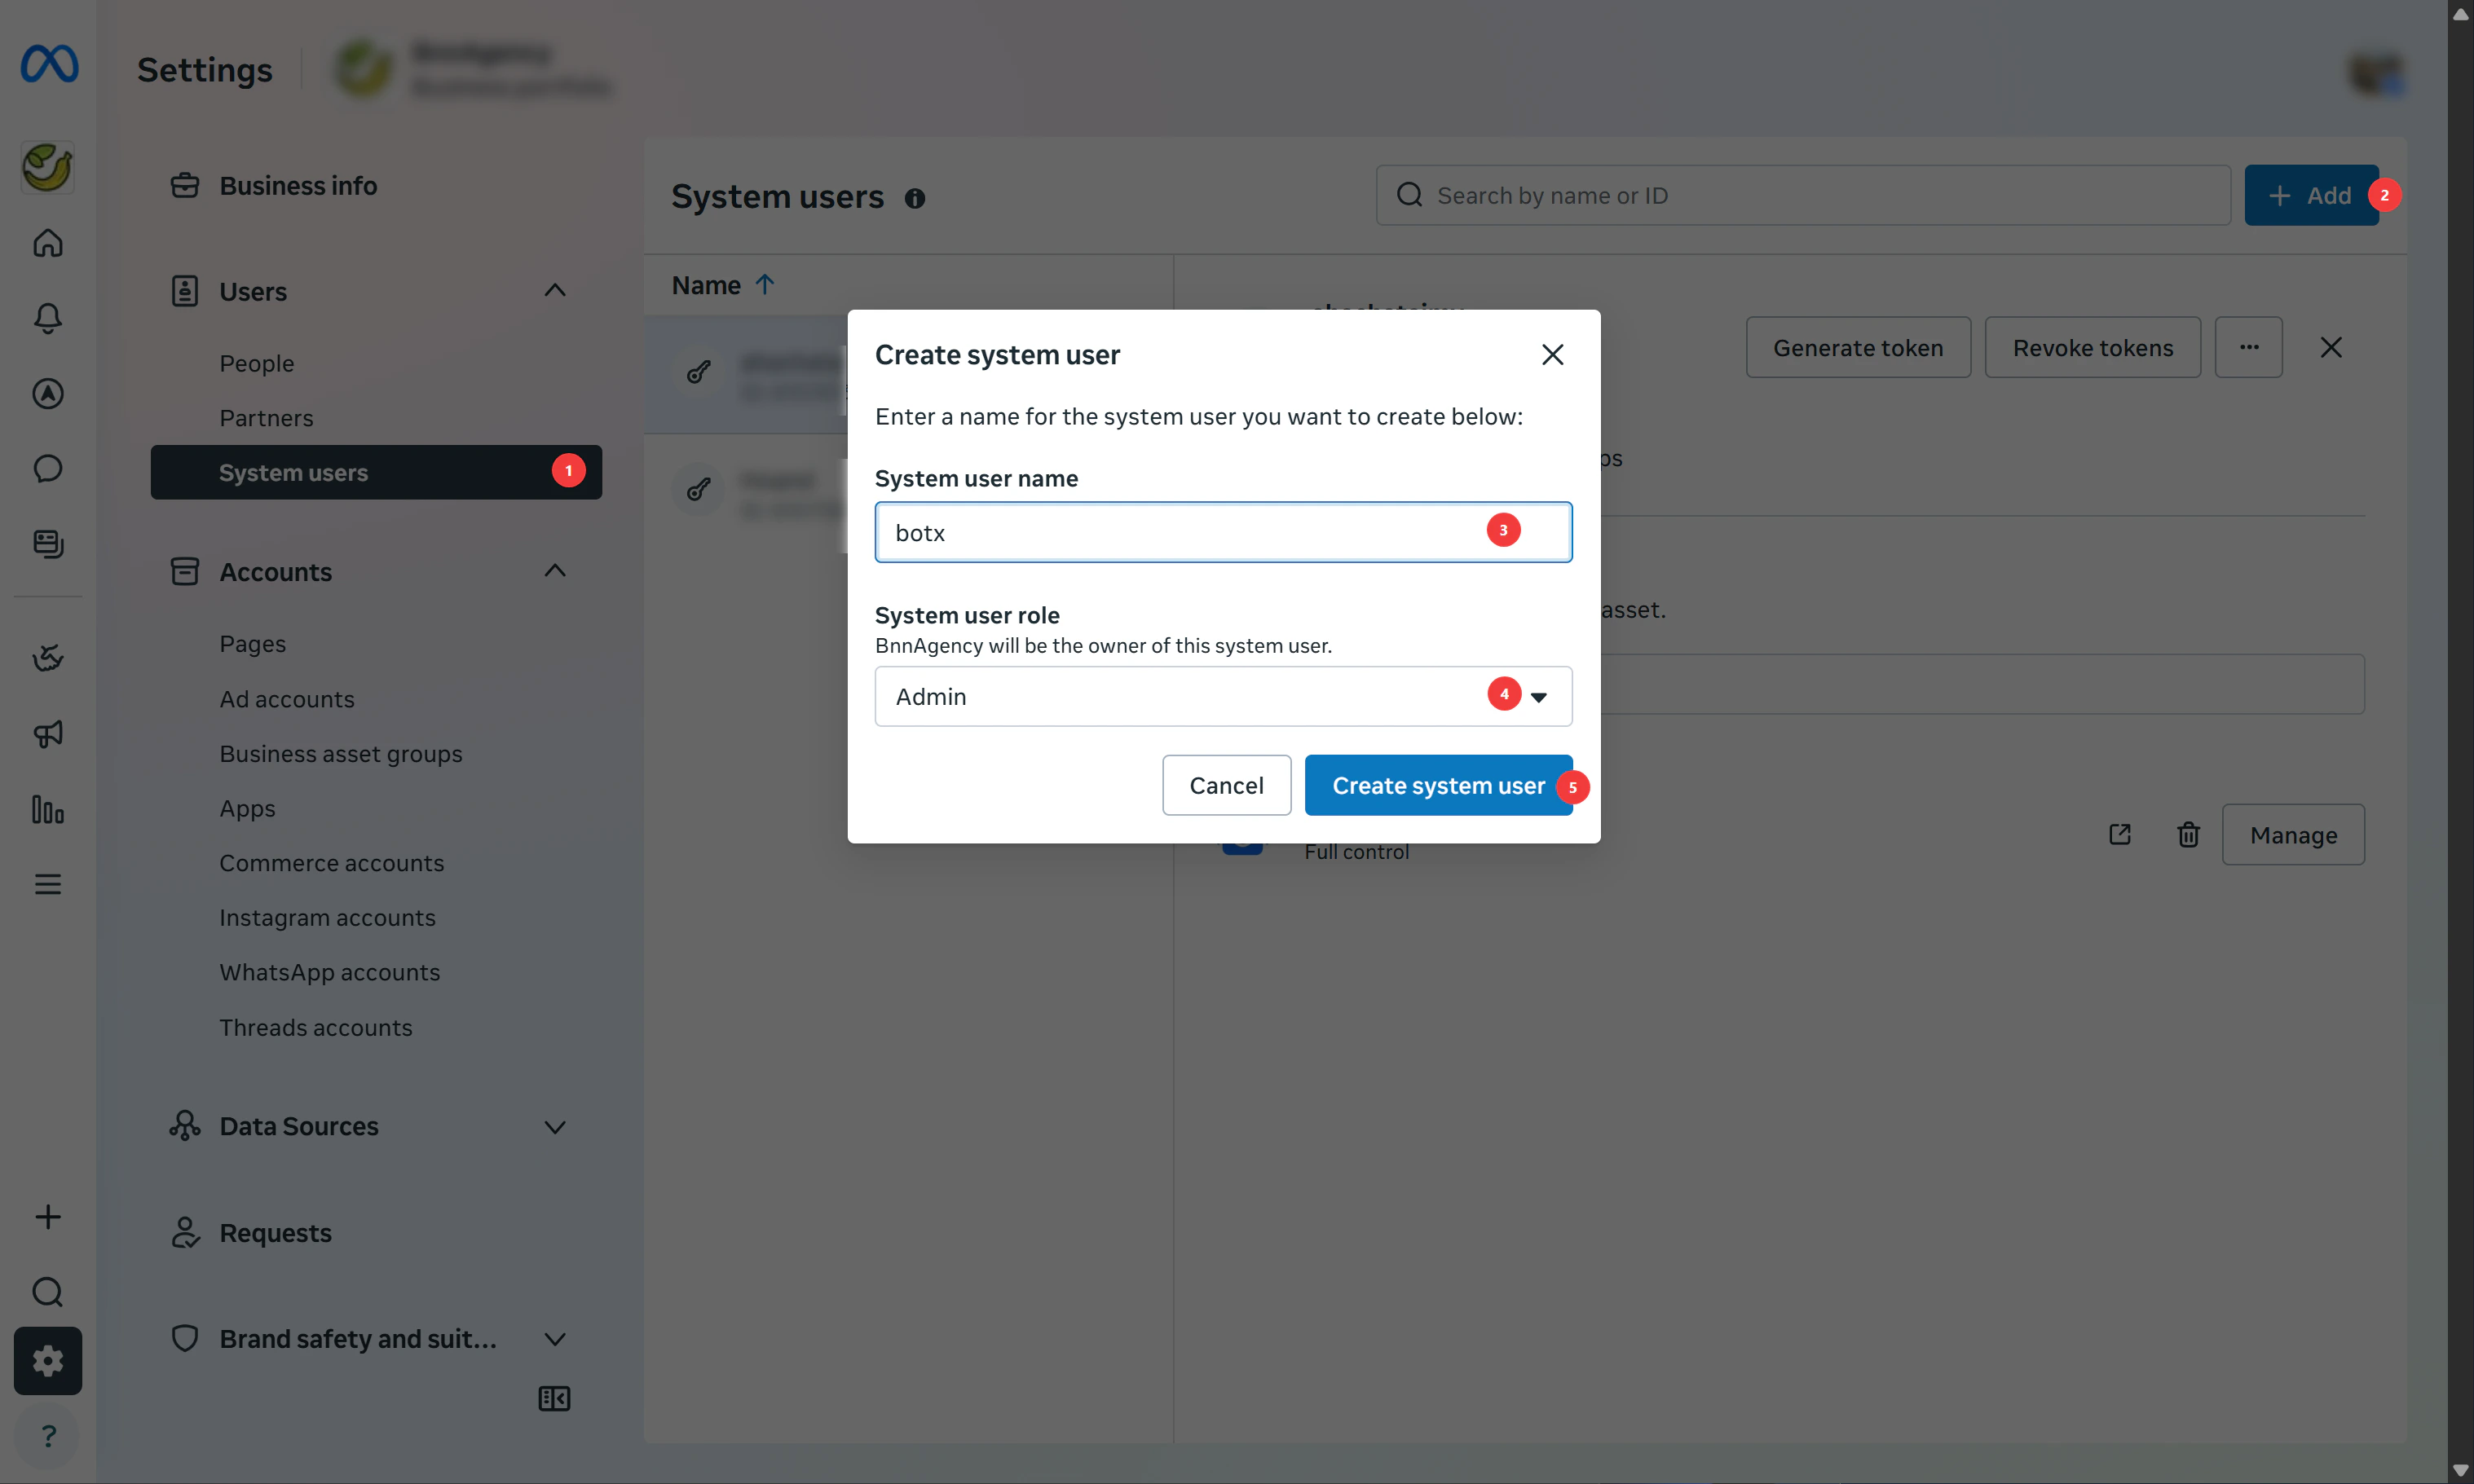
## Step 5: Obtain System User ID and Token
Go to [Meta Business Settings](https://business.facebook.com/settings/system-users) and navigate to **Users → System Users** in the left sidebar. If you don't have a System User yet, click **Add**, choose a name, and set the role to **Admin**.
Before overriding the current callback URI, your app must be subscribed to receive messages for the WhatsApp Business Account. This prevents error (#100) during webhook configuration. Ensure the `messages` webhook field is subscribed in your app's **Webhooks** settings under the **WhatsApp** product section.
## Step 5: Obtain System User ID and Token
Go to [Meta Business Settings](https://business.facebook.com/settings/system-users) and navigate to **Users → System Users** in the left sidebar. If you don't have a System User yet, click **Add**, choose a name, and set the role to **Admin**.
 Select your System User and click **Generate New Token**. Configure the following:
1. **Select App**: choose your Facebook App
2. **Token Expiration**: select **Never** to avoid disruptions
3. **Select Permissions**: check these 3 permissions:
| Permission | Purpose |
| ------------------------------ | ---------------------------------------- |
| `business_management` | Manage business assets and settings |
| `whatsapp_business_management` | Read and manage WhatsApp Business assets |
| `whatsapp_business_messaging` | Send and receive WhatsApp messages |
Select your System User and click **Generate New Token**. Configure the following:
1. **Select App**: choose your Facebook App
2. **Token Expiration**: select **Never** to avoid disruptions
3. **Select Permissions**: check these 3 permissions:
| Permission | Purpose |
| ------------------------------ | ---------------------------------------- |
| `business_management` | Manage business assets and settings |
| `whatsapp_business_management` | Read and manage WhatsApp Business assets |
| `whatsapp_business_messaging` | Send and receive WhatsApp messages |
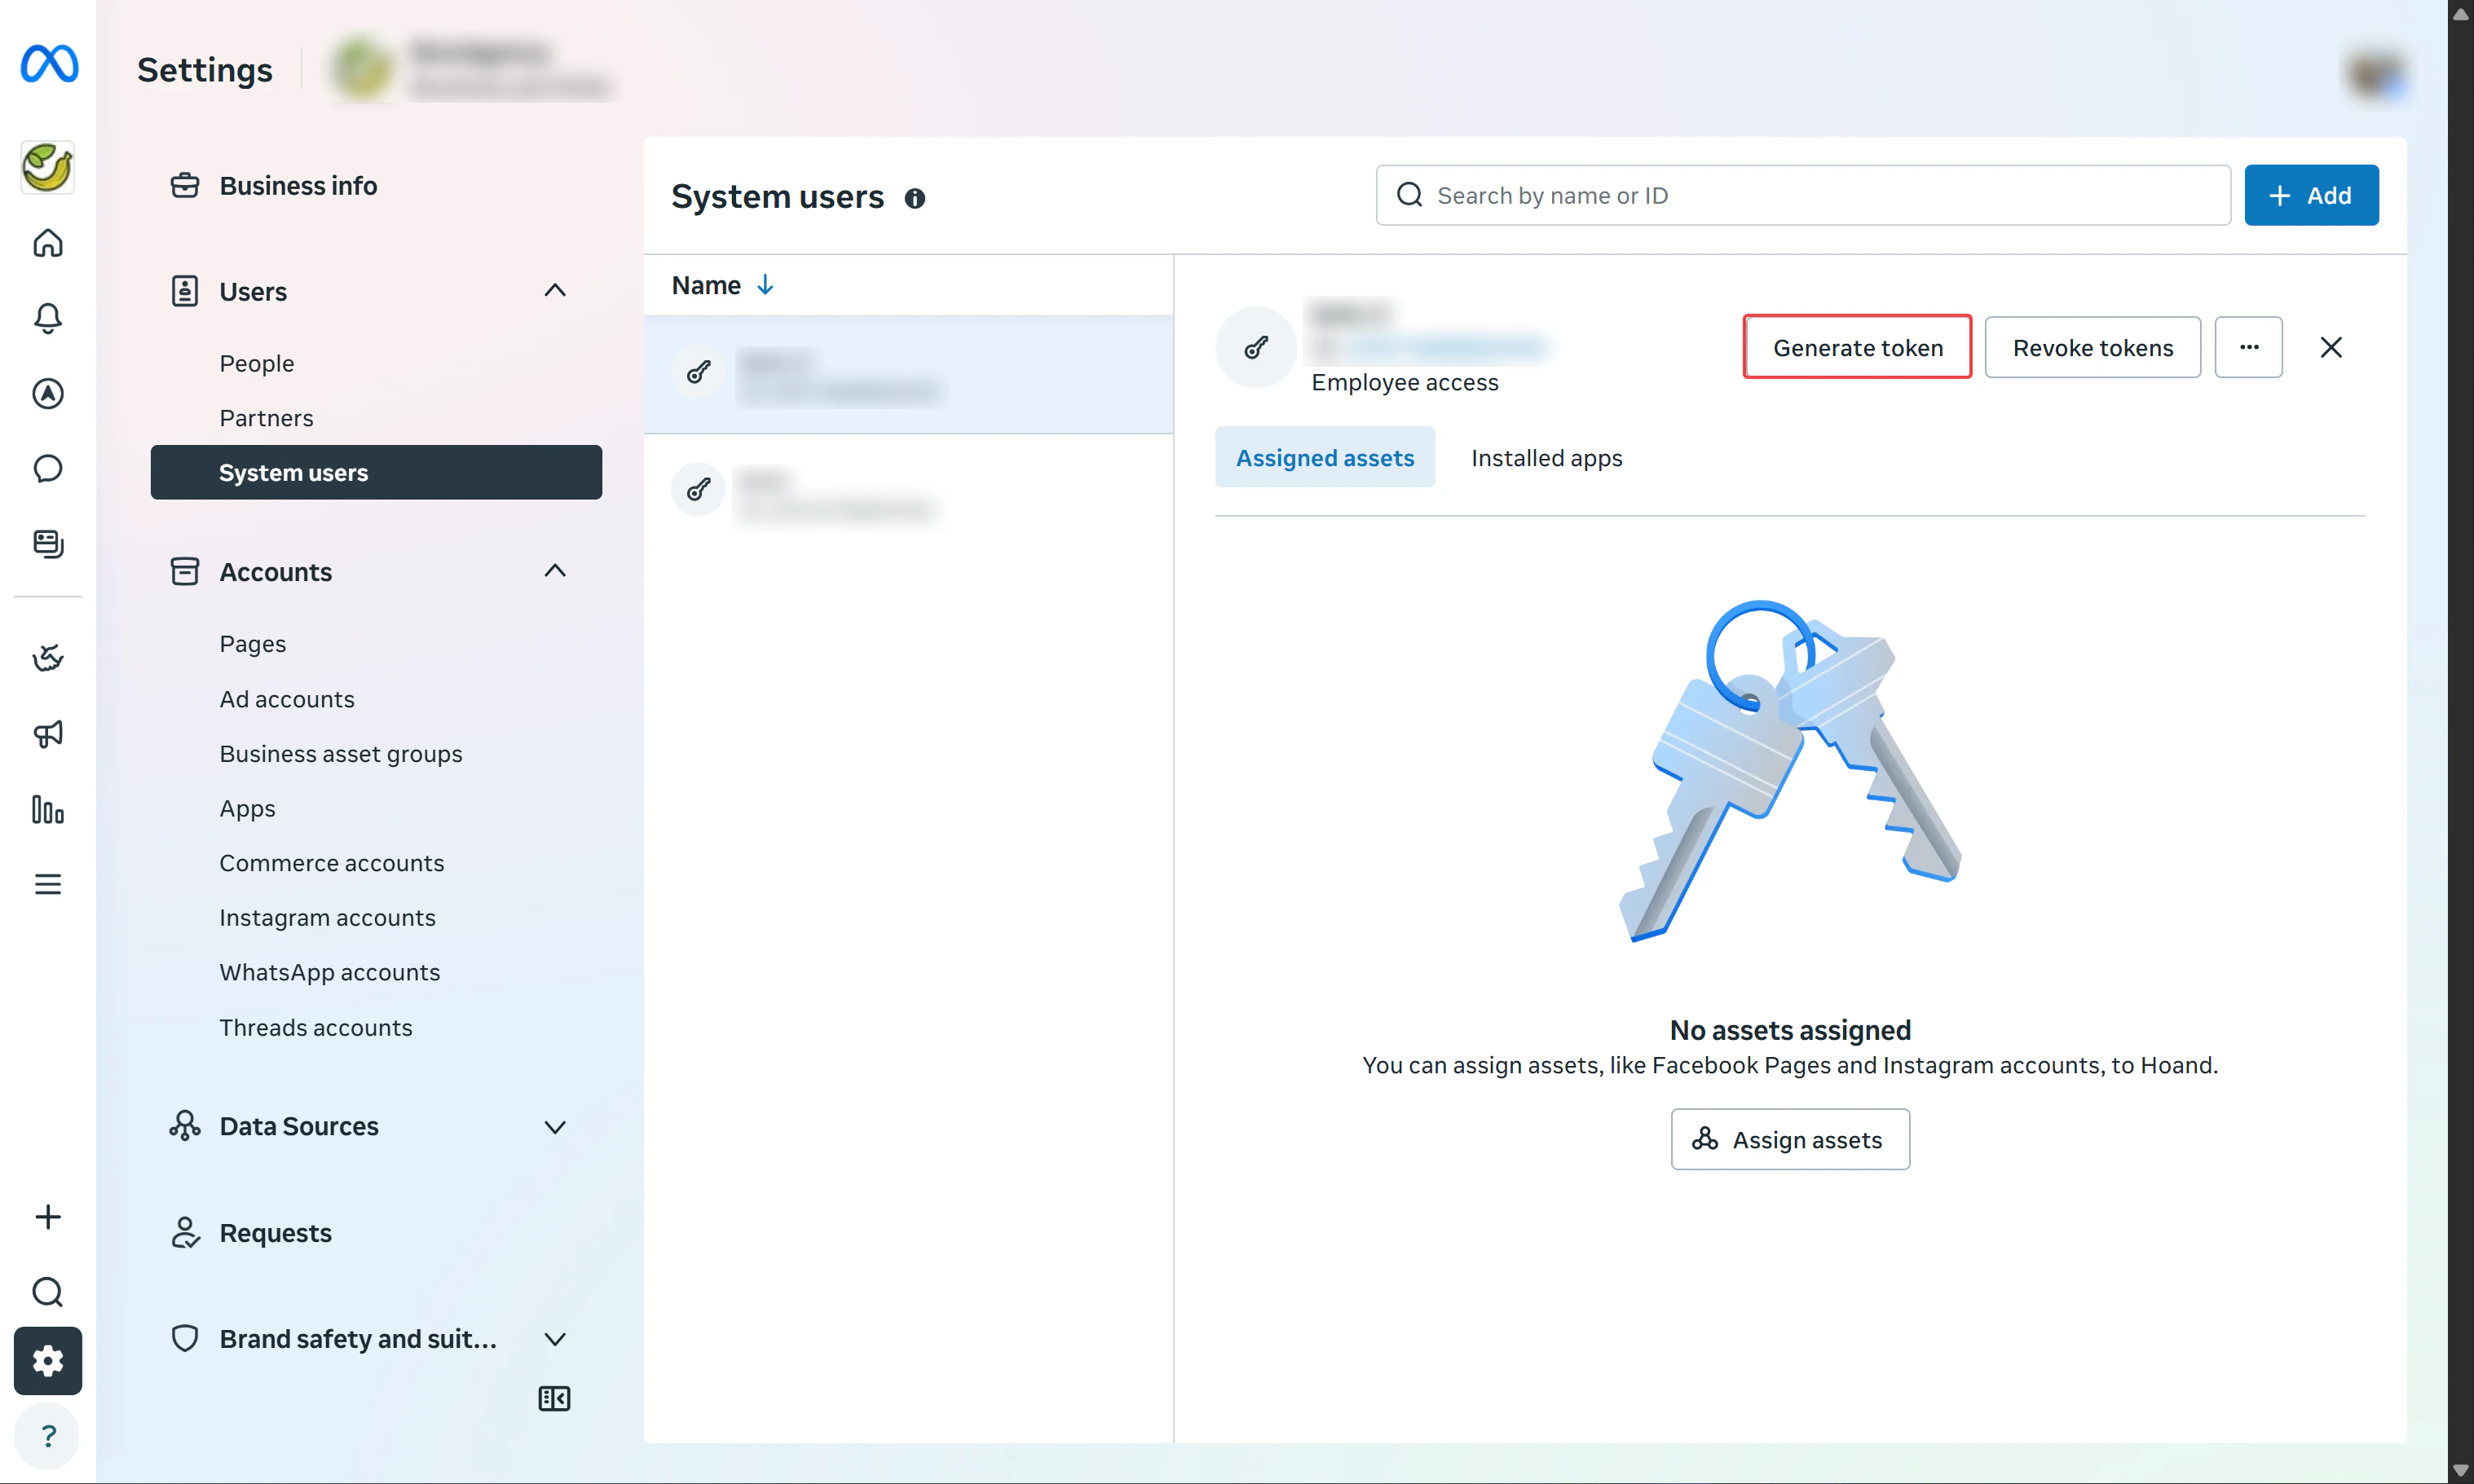
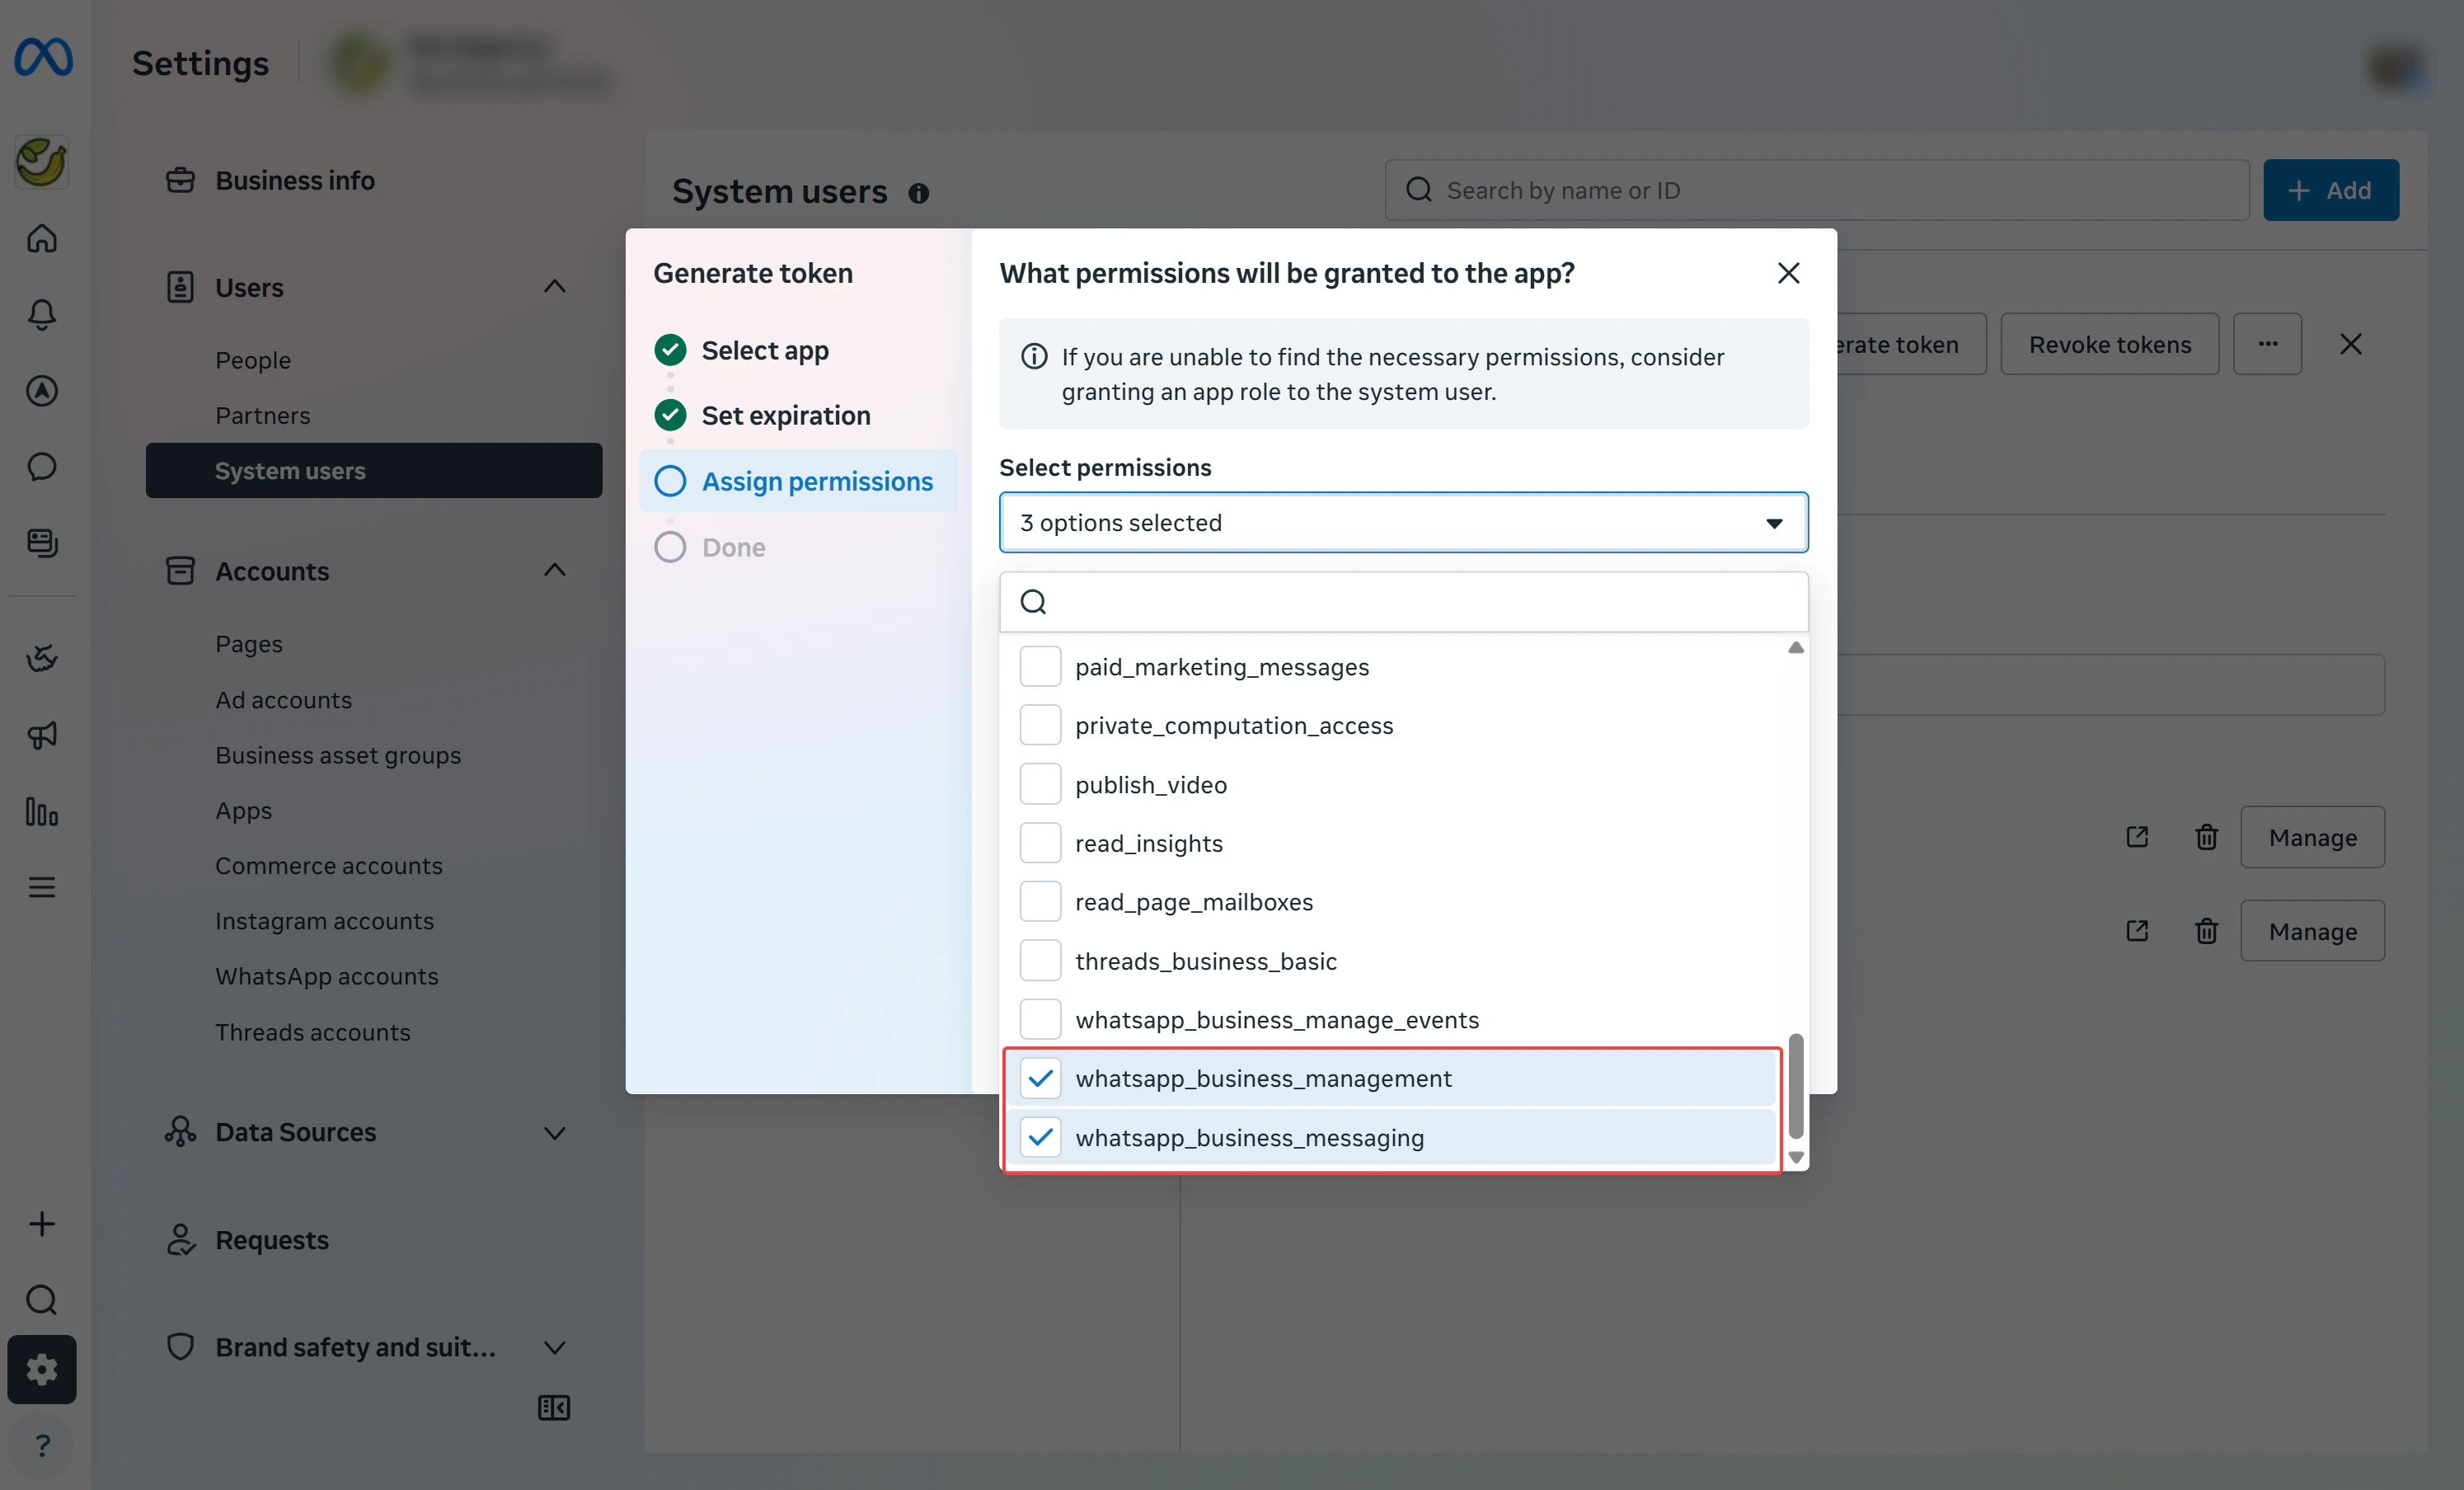 Click **Generate Token**. Copy the generated token, this is your **System User Token**.
Save the token immediately. You will not be able to view it again after closing the dialog.
Go to the [Meta Graph API Explorer](https://developers.facebook.com/tools/explorer/), paste your **System User Token** into the **Access Token** field, set the request to `GET /me`, and click **Submit**. Copy the `id` value from the response, this is your **System User ID**.
```json theme={null}
{
"name": "Your System User Name",
"id": "110835055179851"
}
```
## Step 6: Create a WhatsApp Channel
Once the Super Admin has configured the integration credentials, users can connect their WhatsApp Business accounts through the Embedded Signup flow.
Go to **Settings → Channel** and click **Add WhatsApp**.
Click **Generate Token**. Copy the generated token, this is your **System User Token**.
Save the token immediately. You will not be able to view it again after closing the dialog.
Go to the [Meta Graph API Explorer](https://developers.facebook.com/tools/explorer/), paste your **System User Token** into the **Access Token** field, set the request to `GET /me`, and click **Submit**. Copy the `id` value from the response, this is your **System User ID**.
```json theme={null}
{
"name": "Your System User Name",
"id": "110835055179851"
}
```
## Step 6: Create a WhatsApp Channel
Once the Super Admin has configured the integration credentials, users can connect their WhatsApp Business accounts through the Embedded Signup flow.
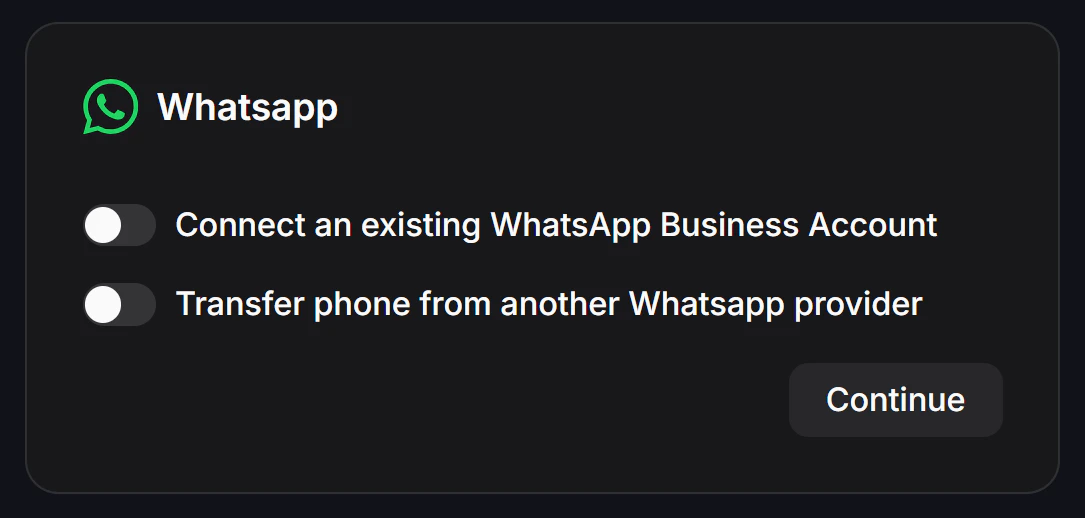
Go to **Settings → Channel** and click **Add WhatsApp**.
 Select the option that best fits your needs and click **Continue**:
* **Connect an existing WhatsApp Business Account**: use if you already have a Meta Business account set up
* **Transfer phone from another WhatsApp provider**: migrate your current number from a different BSP
* **Marketing Message Lite**: for a marketing messaging setup
Select the option that best fits your needs and click **Continue**:
* **Connect an existing WhatsApp Business Account**: use if you already have a Meta Business account set up
* **Transfer phone from another WhatsApp provider**: migrate your current number from a different BSP
* **Marketing Message Lite**: for a marketing messaging setup
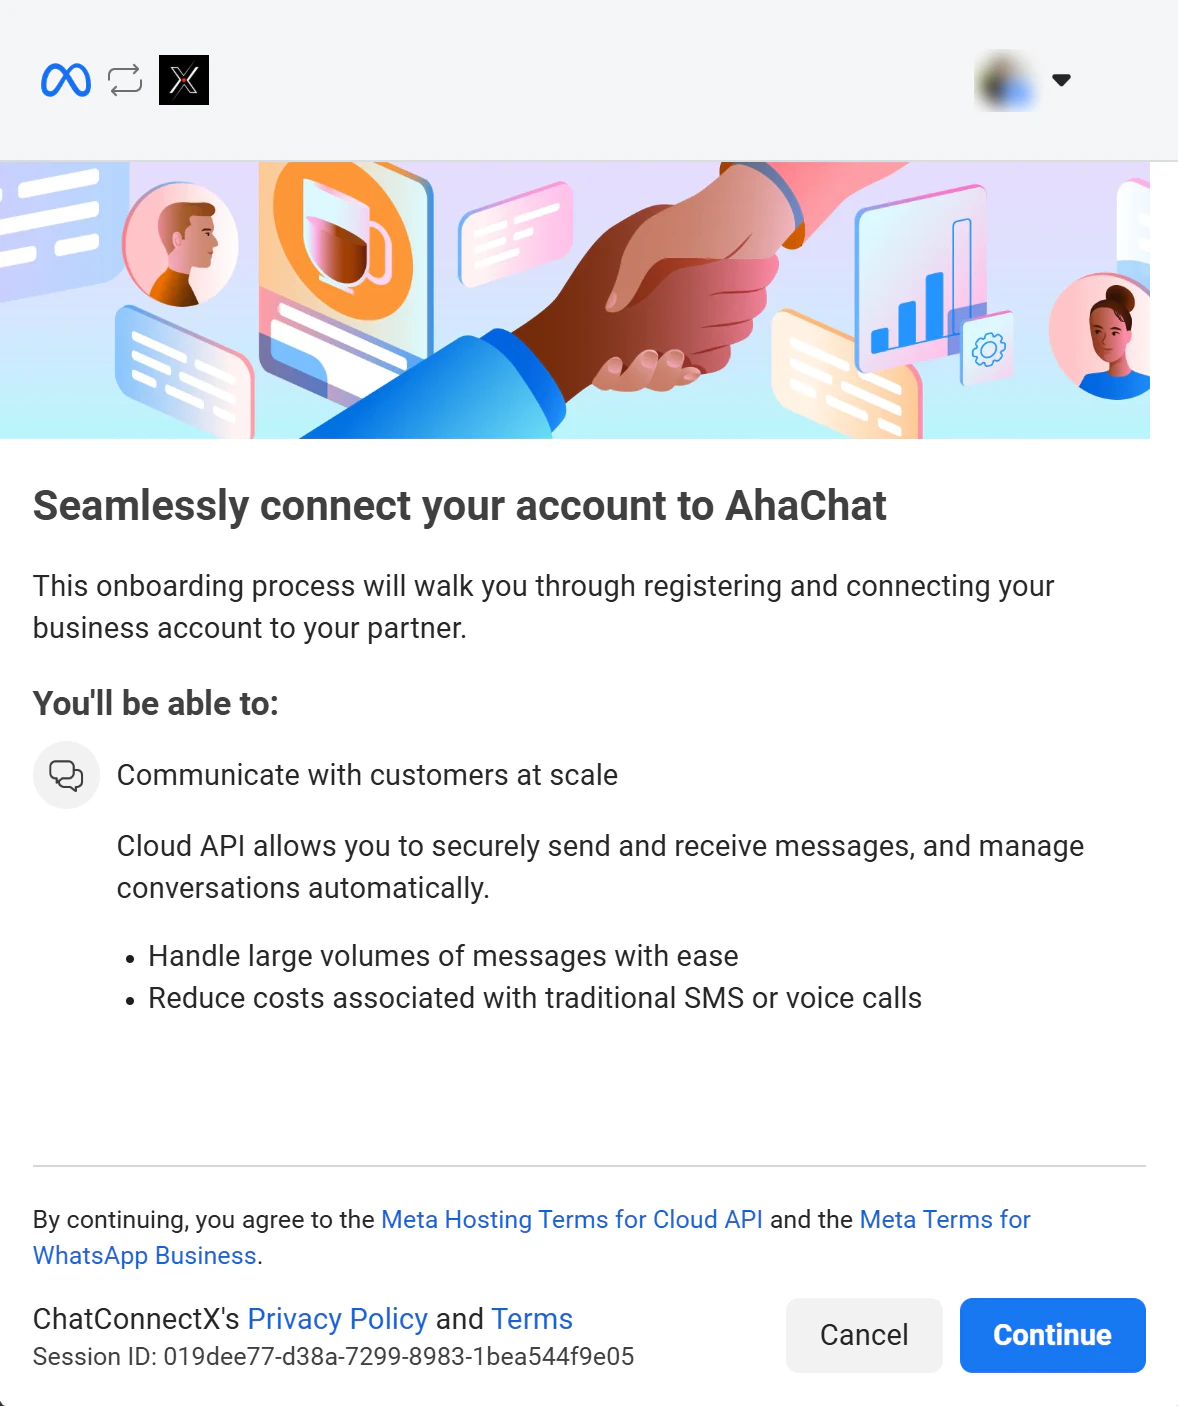
 Follow the Meta embedded signup flow to link your WhatsApp Business account. Review the permissions, accept the Meta Hosting Terms for Cloud API and the Meta Terms for WhatsApp Business, then click **Continue**.
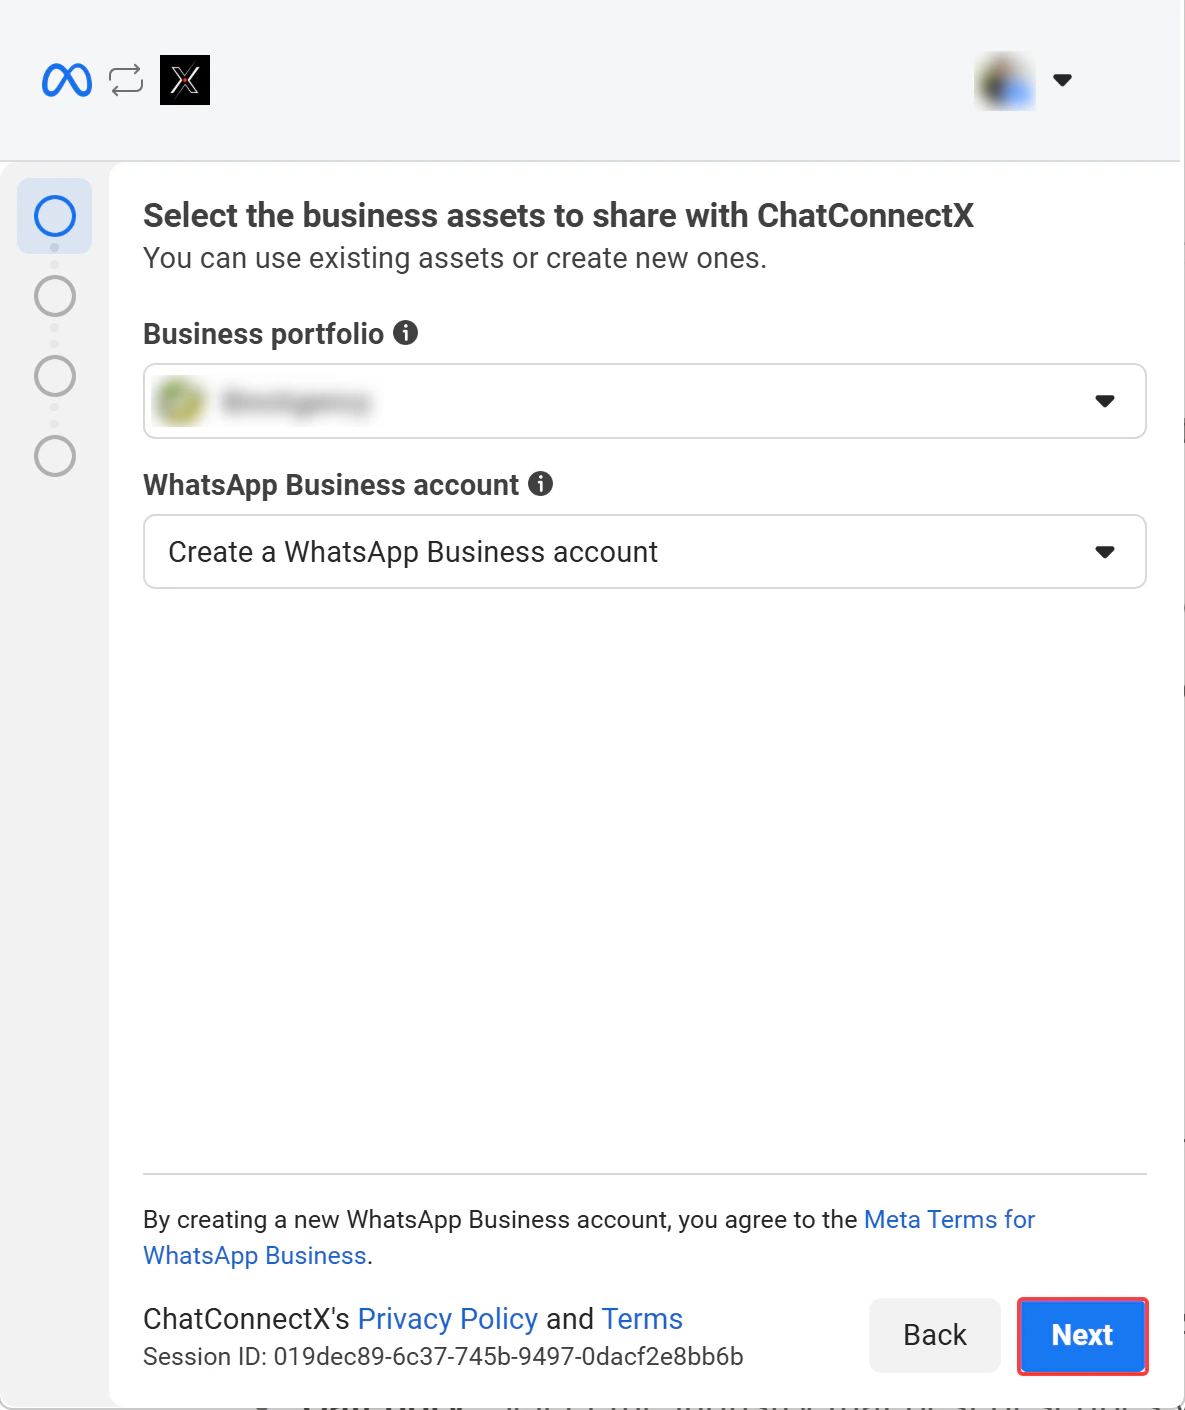
 Choose your **Business portfolio** and **WhatsApp Business account** (or create new ones), then click **Next**.
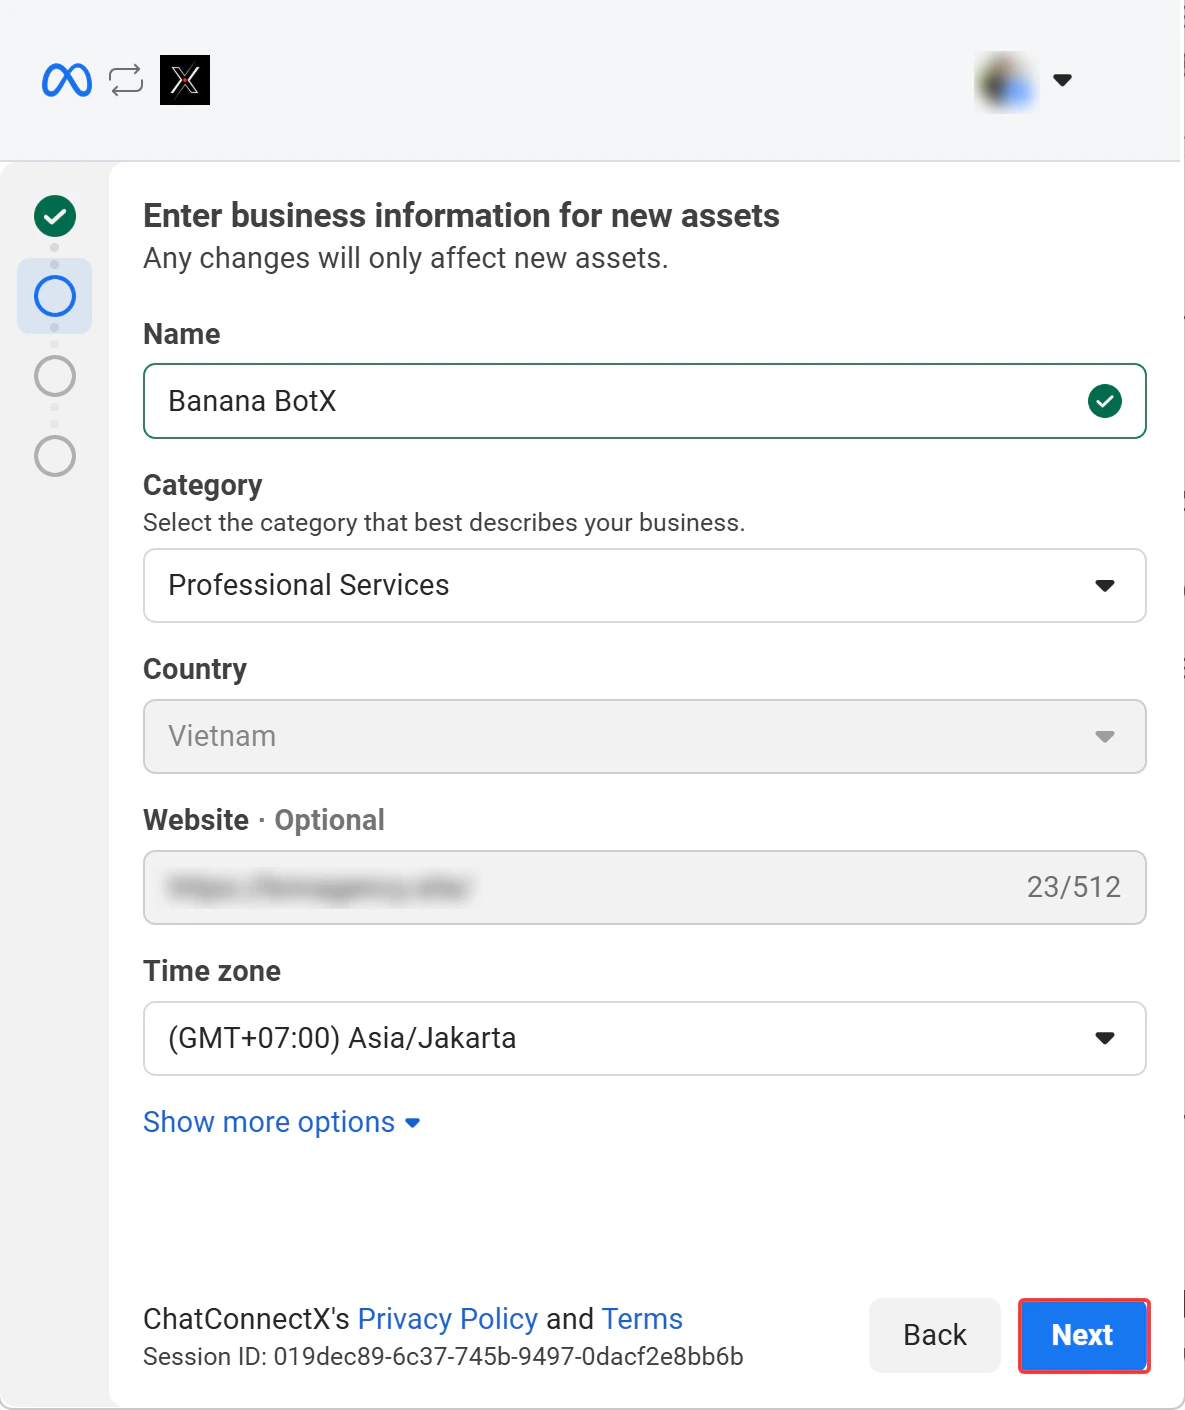
 Enter your business **Name**, **Category**, **Website**, and **Time zone**, then click **Next**.
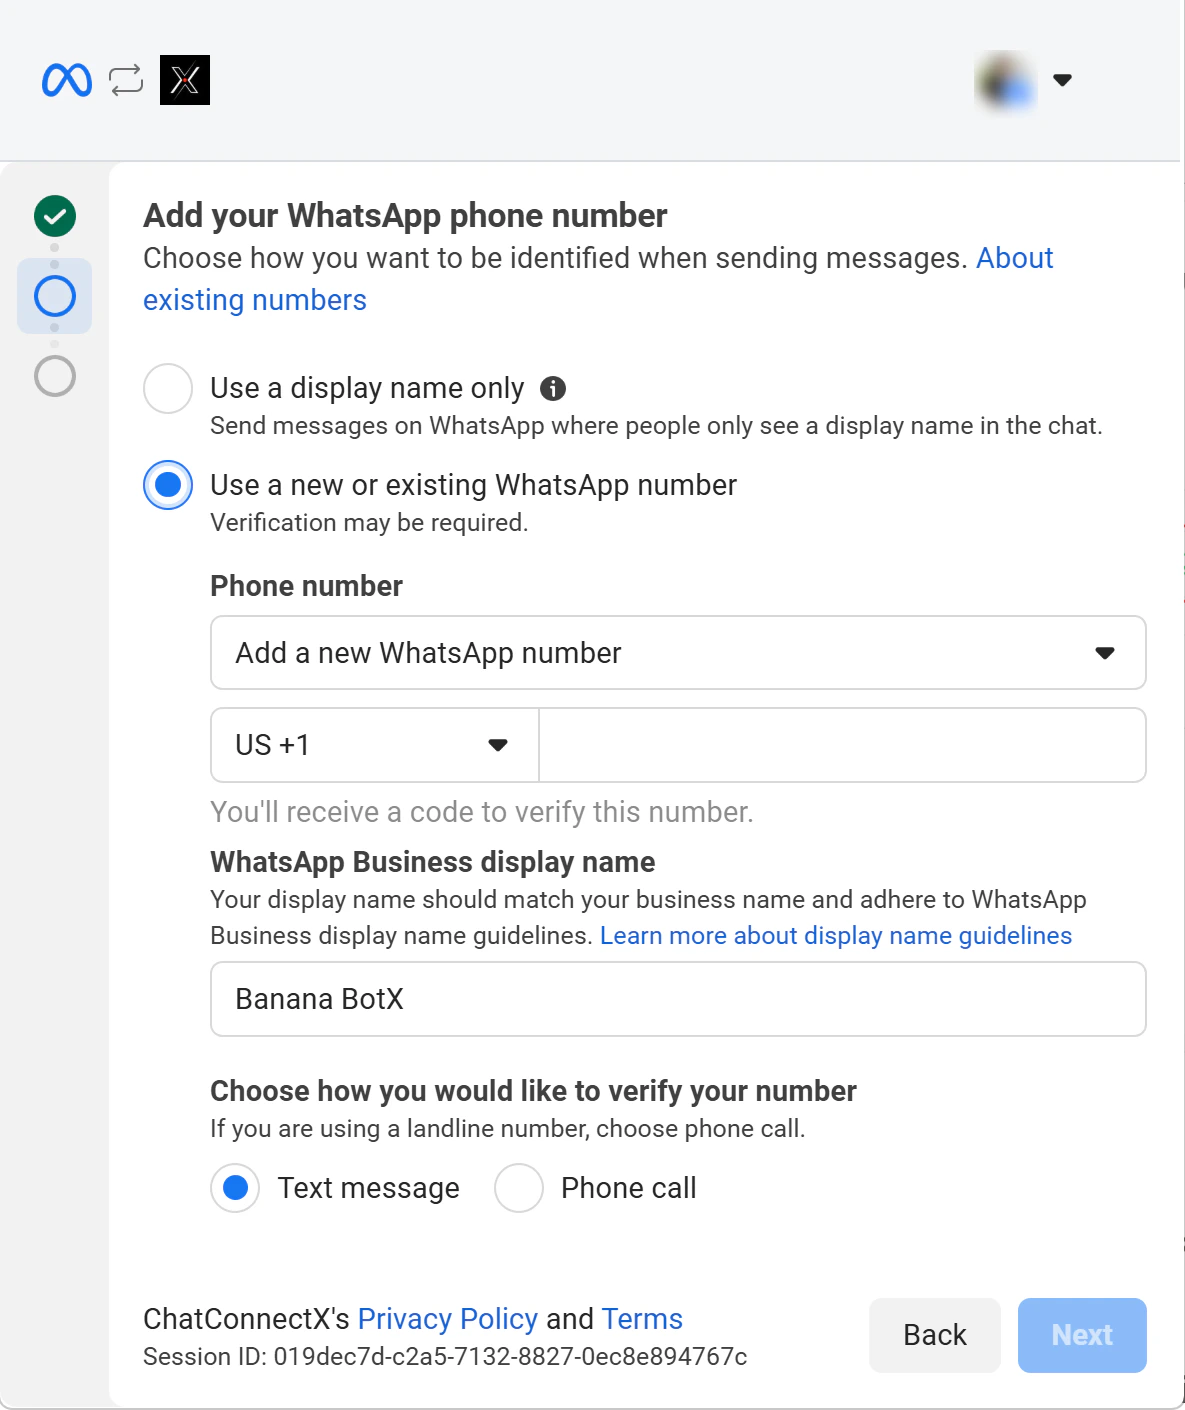
 Enter your **WhatsApp Business display name** and add a phone number. Complete verification via SMS or voice call, then click **Next**.
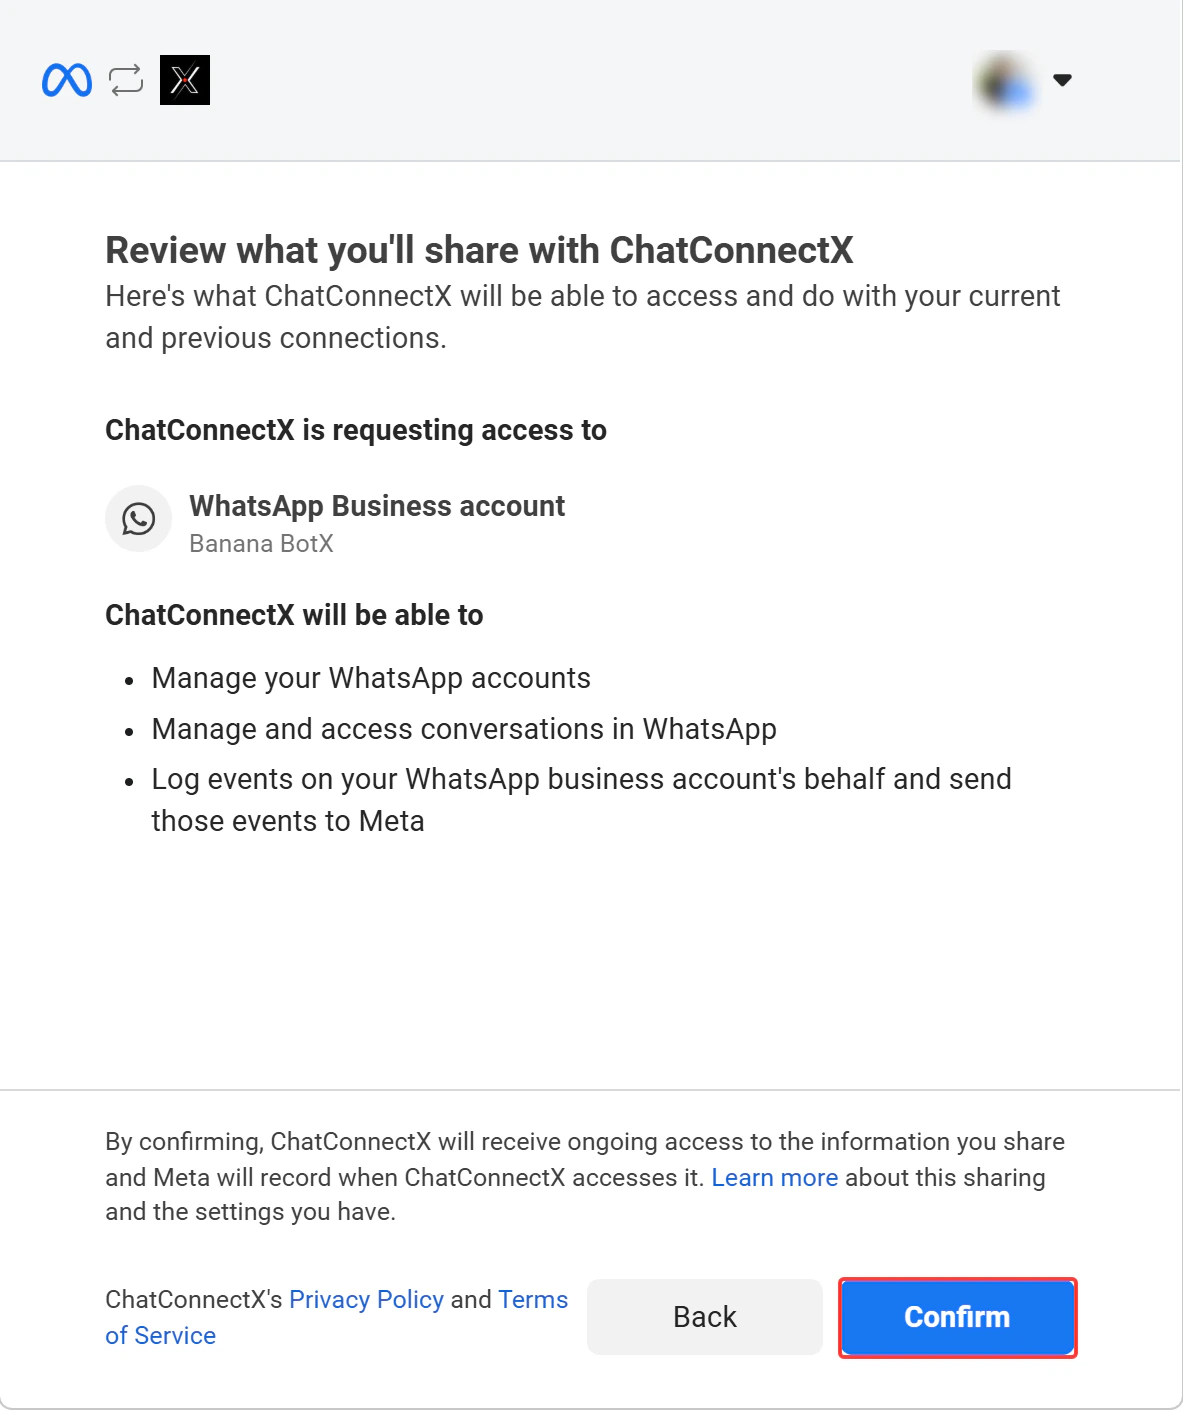
 Review the selected assets and access levels, then click **Confirm** to complete the integration.
 Your WhatsApp account is now connected. Click **Finish** on the Meta popup to be redirected to ChatbotX. Your new WhatsApp channel will appear in the inbox section.

 ## Commerce Policy Compliance
Meta will review your business to ensure it complies with WhatsApp's Commerce Policy and will reach out within 24 hours if there's an issue.
## Troubleshooting
This usually means the Super Admin configuration is incomplete.
**Checklist:**
* Confirm the Super Admin has entered all required credentials (App ID, App Secret, Configuration ID) at `/manage/integrations`
Your app must be subscribed to receive messages **before** overriding the callback URI.
**Fix:**
1. Go to your Facebook app in the [Meta Developer Portal](https://developers.facebook.com/apps/)
2. In the left sidebar, navigate to **WhatsApp → Configuration**
3. Under **Webhooks**, subscribe to the `messages` field for WhatsApp Business Account
4. Retry the Embedded Signup flow
**Checklist:**
* Ensure you are logged into a Facebook account with **admin access** to the Meta Business Portfolio
* Verify your app has the required permissions: `whatsapp_business_management`, `whatsapp_business_messaging`, `whatsapp_business_manage_events`
* Confirm the **App ID** and **App Secret** in the Super Admin panel match the values in **Settings → Basic** of the Meta Developer Portal
**What to do:**
* Ensure your business information is **accurate and complete** (legal name, website, address)
* Check that your business complies with [WhatsApp's Commerce Policy](https://www.whatsapp.com/legal/commerce-policy/)
* New accounts have a temporary message limit until verification is completed
* Verification typically takes **up to 1 business day**
**Steps to resolve:**
1. Open the rejected submission in the [Meta Developer Dashboard](https://developers.facebook.com/apps/)
2. Review the rejection reason and feedback provided by the review team
3. Use the **Messenger support icon** (bottom right corner) to contact the review team for clarification
4. Provide clear documentation of your use case, test credentials, and step-by-step instructions for the reviewer
5. Resubmit after addressing all feedback
1. **Check ChatbotX logs**: Look for error messages in both `rails` and `sidekiq` service logs
2. **Verify Facebook/WhatsApp accounts**: Confirm all prerequisites (business verification, permissions, billing) are met
3. **Contact Community Support**: Visit the [ChatbotX Community](https://discord.chatbotx.io) with specific error messages and screenshots
## Reference Documentation
For more technical details, refer to the official Meta documentation: [WhatsApp Embedded Signup - Meta for Developers](https://developers.facebook.com/docs/whatsapp/embedded-signup/).
## Commerce Policy Compliance
Meta will review your business to ensure it complies with WhatsApp's Commerce Policy and will reach out within 24 hours if there's an issue.
## Troubleshooting
This usually means the Super Admin configuration is incomplete.
**Checklist:**
* Confirm the Super Admin has entered all required credentials (App ID, App Secret, Configuration ID) at `/manage/integrations`
Your app must be subscribed to receive messages **before** overriding the callback URI.
**Fix:**
1. Go to your Facebook app in the [Meta Developer Portal](https://developers.facebook.com/apps/)
2. In the left sidebar, navigate to **WhatsApp → Configuration**
3. Under **Webhooks**, subscribe to the `messages` field for WhatsApp Business Account
4. Retry the Embedded Signup flow
**Checklist:**
* Ensure you are logged into a Facebook account with **admin access** to the Meta Business Portfolio
* Verify your app has the required permissions: `whatsapp_business_management`, `whatsapp_business_messaging`, `whatsapp_business_manage_events`
* Confirm the **App ID** and **App Secret** in the Super Admin panel match the values in **Settings → Basic** of the Meta Developer Portal
**What to do:**
* Ensure your business information is **accurate and complete** (legal name, website, address)
* Check that your business complies with [WhatsApp's Commerce Policy](https://www.whatsapp.com/legal/commerce-policy/)
* New accounts have a temporary message limit until verification is completed
* Verification typically takes **up to 1 business day**
**Steps to resolve:**
1. Open the rejected submission in the [Meta Developer Dashboard](https://developers.facebook.com/apps/)
2. Review the rejection reason and feedback provided by the review team
3. Use the **Messenger support icon** (bottom right corner) to contact the review team for clarification
4. Provide clear documentation of your use case, test credentials, and step-by-step instructions for the reviewer
5. Resubmit after addressing all feedback
1. **Check ChatbotX logs**: Look for error messages in both `rails` and `sidekiq` service logs
2. **Verify Facebook/WhatsApp accounts**: Confirm all prerequisites (business verification, permissions, billing) are met
3. **Contact Community Support**: Visit the [ChatbotX Community](https://discord.chatbotx.io) with specific error messages and screenshots
## Reference Documentation
For more technical details, refer to the official Meta documentation: [WhatsApp Embedded Signup - Meta for Developers](https://developers.facebook.com/docs/whatsapp/embedded-signup/).