> ## Documentation Index
> Fetch the complete documentation index at: https://chatbotx.io/docs/llms.txt
> Use this file to discover all available pages before exploring further.
# How to connect Whatsapp Business to ChatbotX
> Learn how to connect your Whatsapp Business to ChatbotX so you can automate Messenger messages.
WhatsApp is one of the most powerful communication channels for businesses to engage with customers in real-time. By integrating **WhatsApp Business** with **ChatbotX**, you can centralize your conversations, automate responses with AI Agents, and manage high volumes of customer inquiries seamlessly through the Meta Cloud API.
This integration allows you to:
* **Scale your support:** Handle hundreds of conversations simultaneously without missing a beat.
* **Boost Engagement:** Send rich media, templates, and interactive messages directly to your customers' favorite app.
* **Unified Inbox:** Manage WhatsApp alongside Messenger, Zalo, and Webchat in one organized dashboard.
Follow the steps below to connect your WhatsApp Business account and start building your automated customer experience.
## Step 1: Navigate to Channel Selection
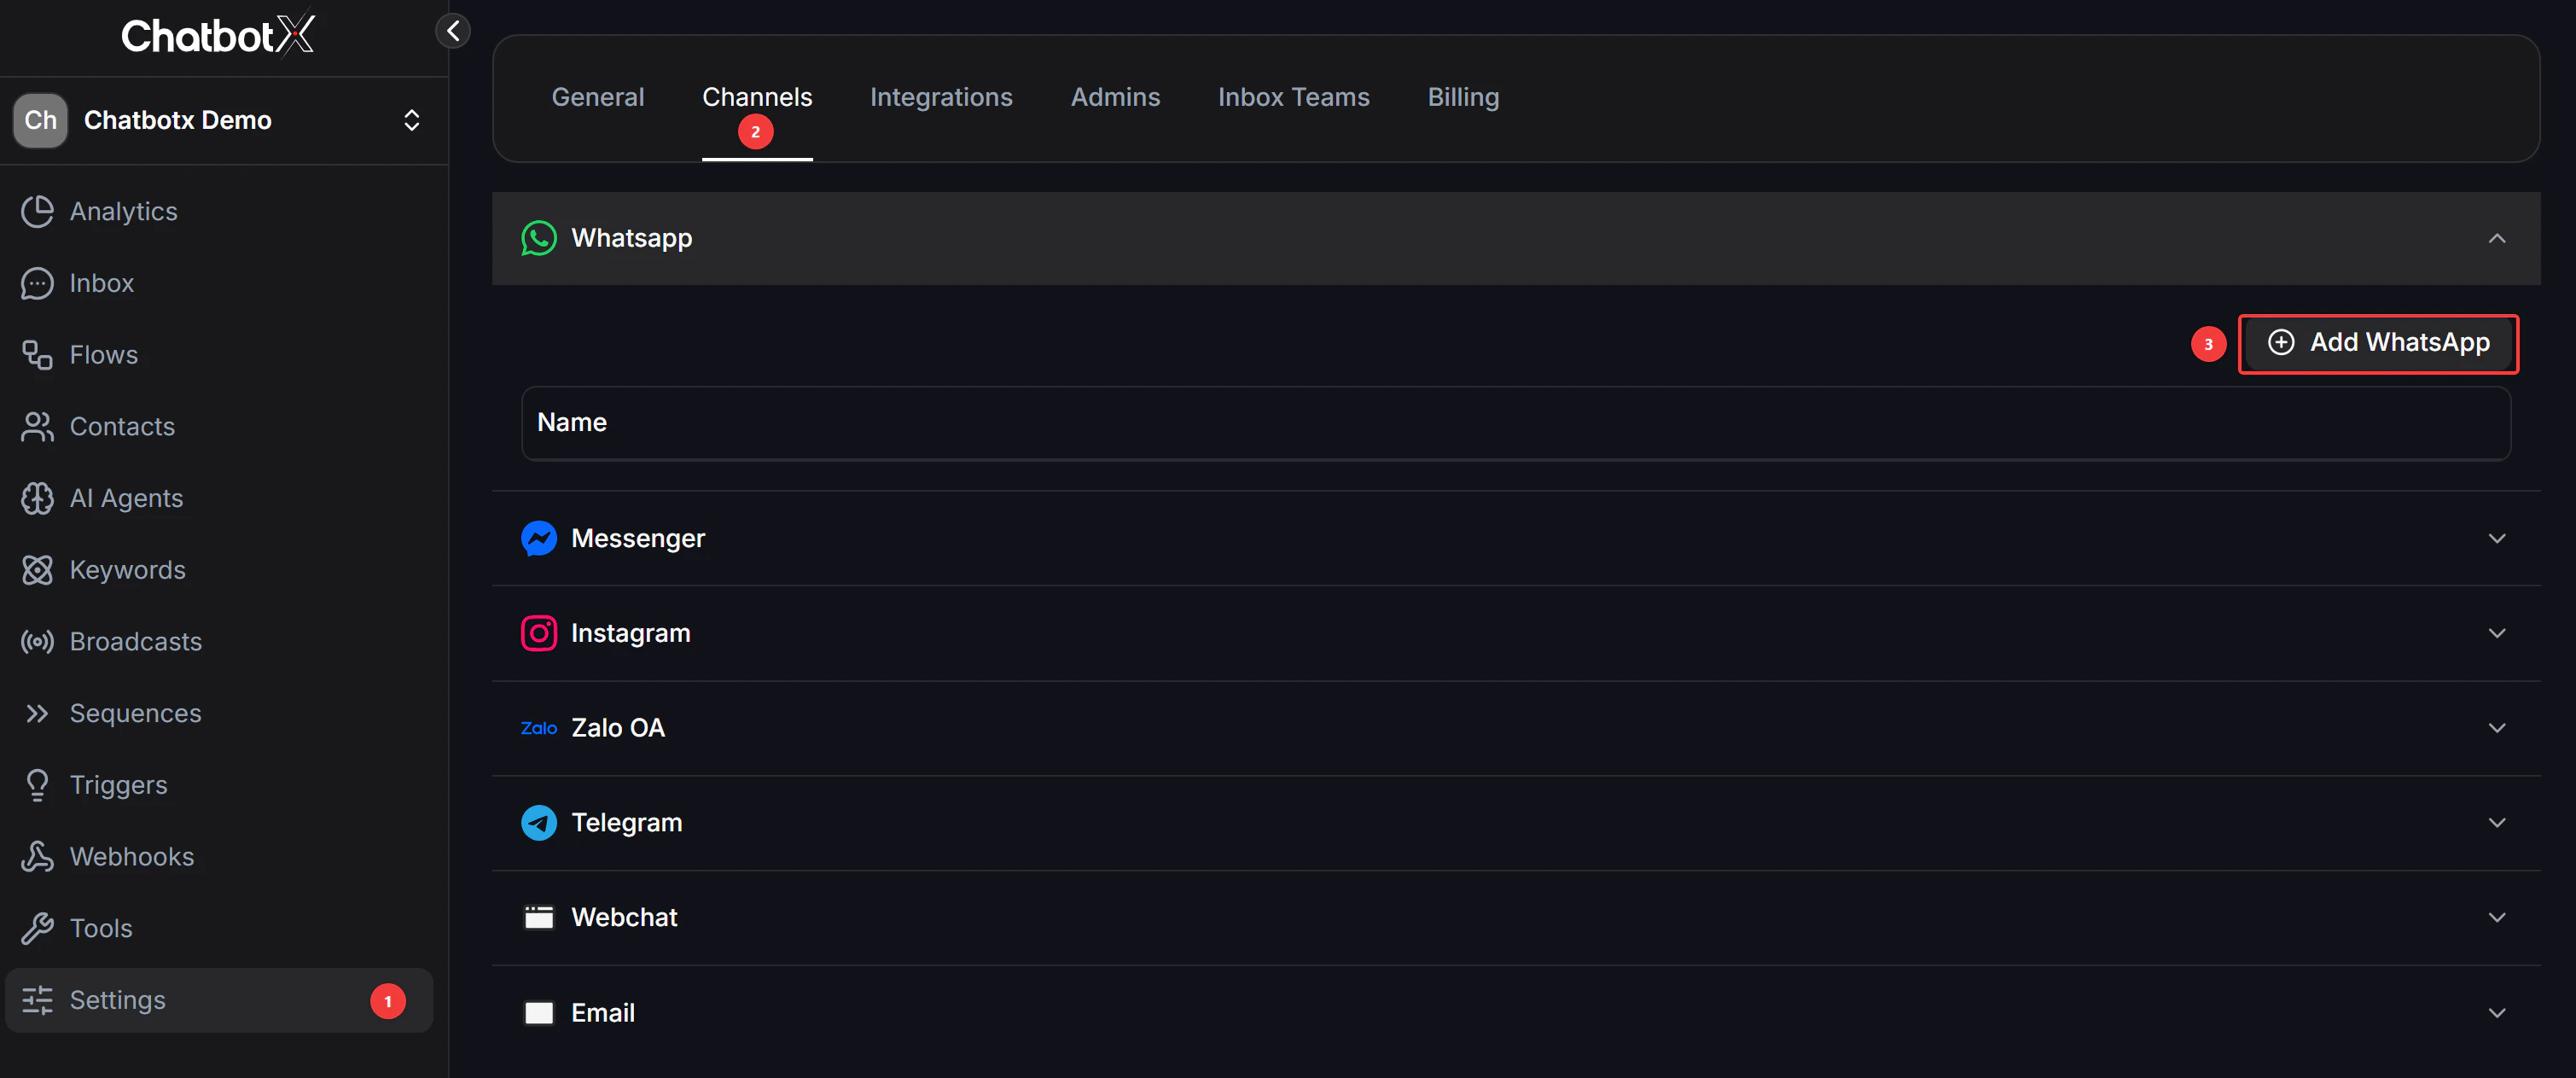
1. Go to Settings → Channel
2. Click on “Add WhatsApp”
 ## Step 2: Choose your WhatsApp Connection
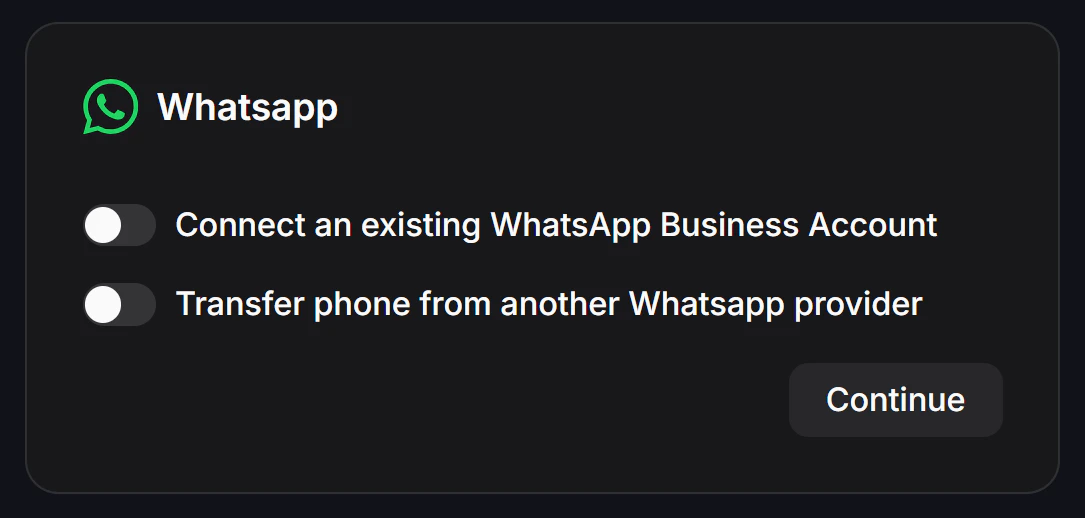
Please select the option that best fits your needs and click **Continue**:
* **Connect an existing WhatsApp Business Account:** Use this if you already have a Meta Business account set up.
* **Transfer phone from another WhatsApp provider:** Choose this to migrate your current number from a different BSP (Business Solution Provider).
* **Marketing Message Lite:** Select this for a marketing messaging setup.
## Step 2: Choose your WhatsApp Connection
Please select the option that best fits your needs and click **Continue**:
* **Connect an existing WhatsApp Business Account:** Use this if you already have a Meta Business account set up.
* **Transfer phone from another WhatsApp provider:** Choose this to migrate your current number from a different BSP (Business Solution Provider).
* **Marketing Message Lite:** Select this for a marketing messaging setup.
 ## Step 3: Connect your account
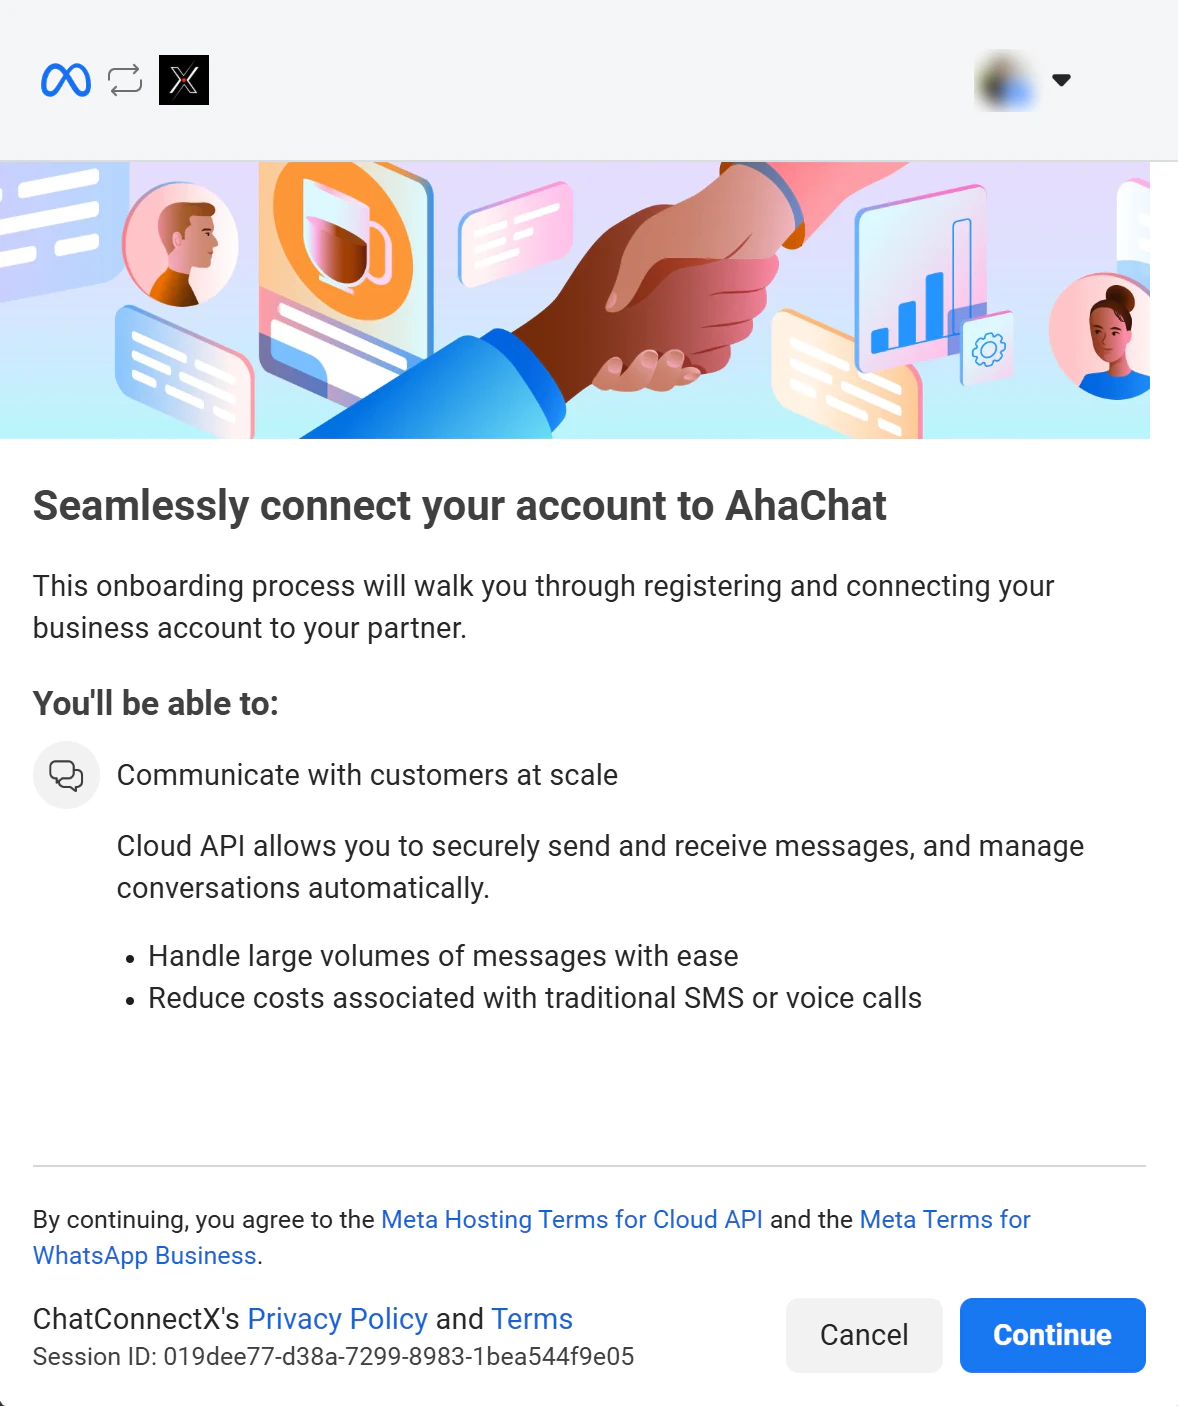
Follow the Meta embedded signup flow to link your WhatsApp Business account with the platform.
* **Review Permissions:** This process allows you to handle large message volumes and reduce costs using the **Cloud API**.
* **Accept Terms:** By clicking continue, you agree to the **Meta Hosting Terms for Cloud API** and the **Meta Terms for WhatsApp Business**.
* **Finalize:** Ensure you are logged into the correct Facebook profile (shown in the top right corner) and click **Continue**.
## Step 3: Connect your account
Follow the Meta embedded signup flow to link your WhatsApp Business account with the platform.
* **Review Permissions:** This process allows you to handle large message volumes and reduce costs using the **Cloud API**.
* **Accept Terms:** By clicking continue, you agree to the **Meta Hosting Terms for Cloud API** and the **Meta Terms for WhatsApp Business**.
* **Finalize:** Ensure you are logged into the correct Facebook profile (shown in the top right corner) and click **Continue**.
 ## Step 4: Select Business Assets
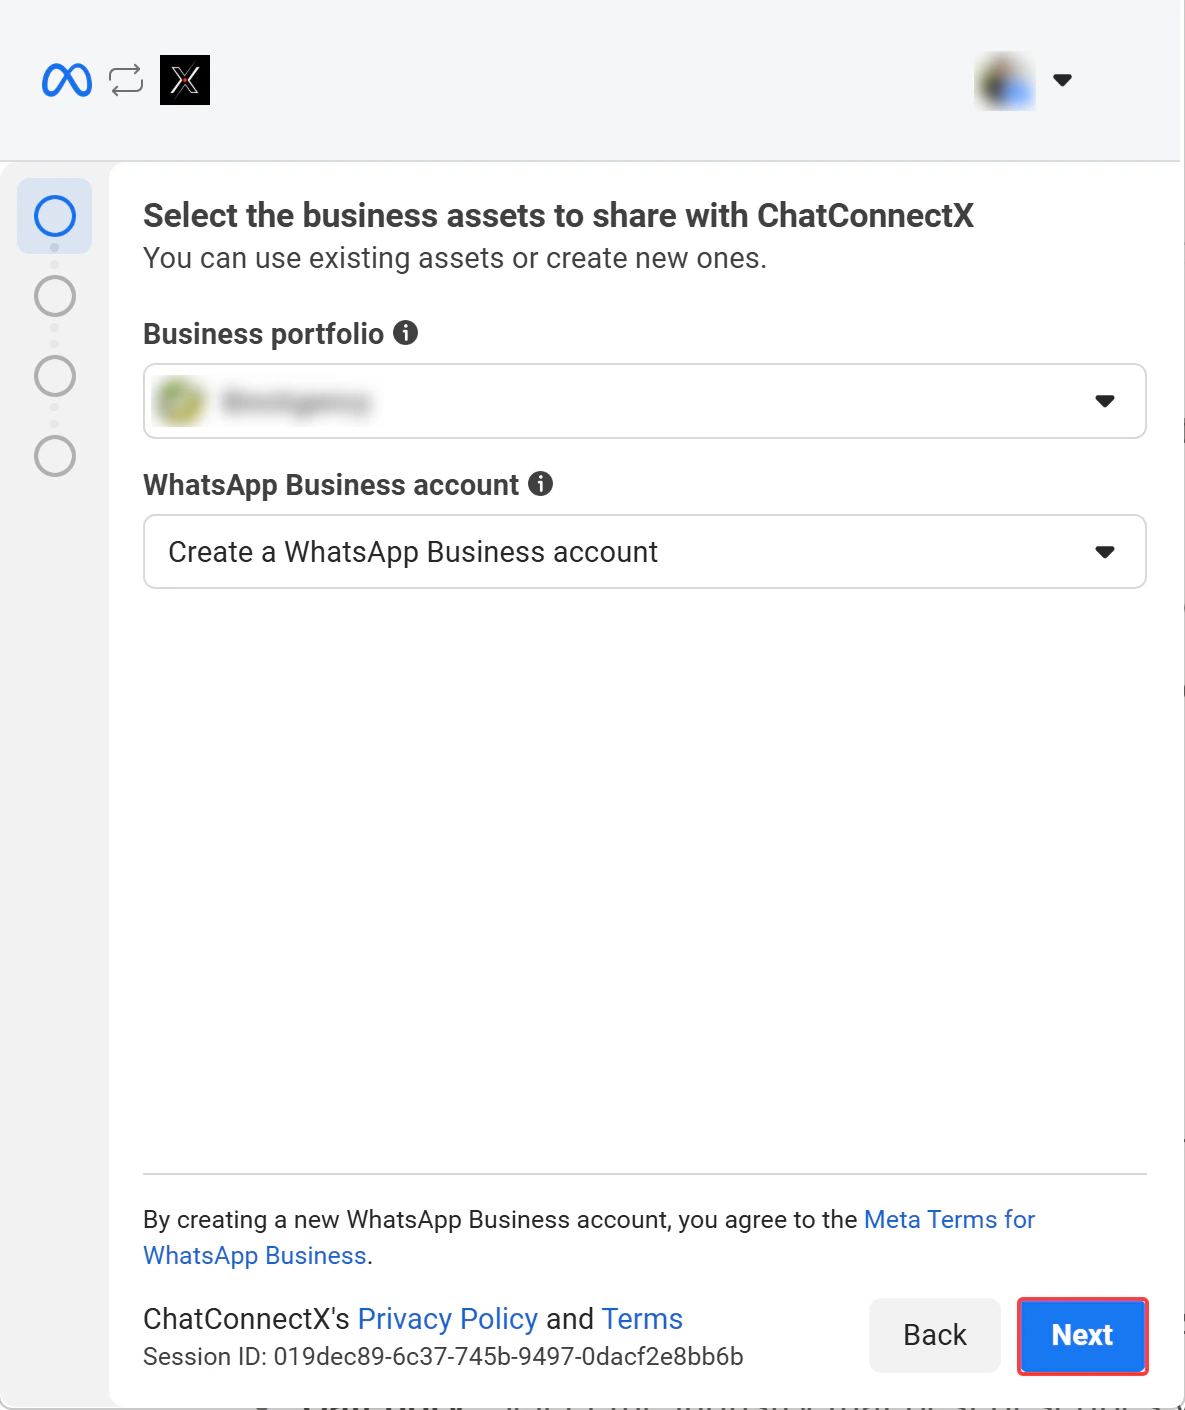
Choose the Meta business assets you want to connect to the platform. You can use existing assets or create new ones directly in this view.
* **Business portfolio:** Select the Meta Business Account that owns your WhatsApp assets.
* **WhatsApp Business account:** Choose a specific account or select **"Create a WhatsApp Business account"** to start fresh.
* Click **Next** to proceed to the asset details.
## Step 4: Select Business Assets
Choose the Meta business assets you want to connect to the platform. You can use existing assets or create new ones directly in this view.
* **Business portfolio:** Select the Meta Business Account that owns your WhatsApp assets.
* **WhatsApp Business account:** Choose a specific account or select **"Create a WhatsApp Business account"** to start fresh.
* Click **Next** to proceed to the asset details.
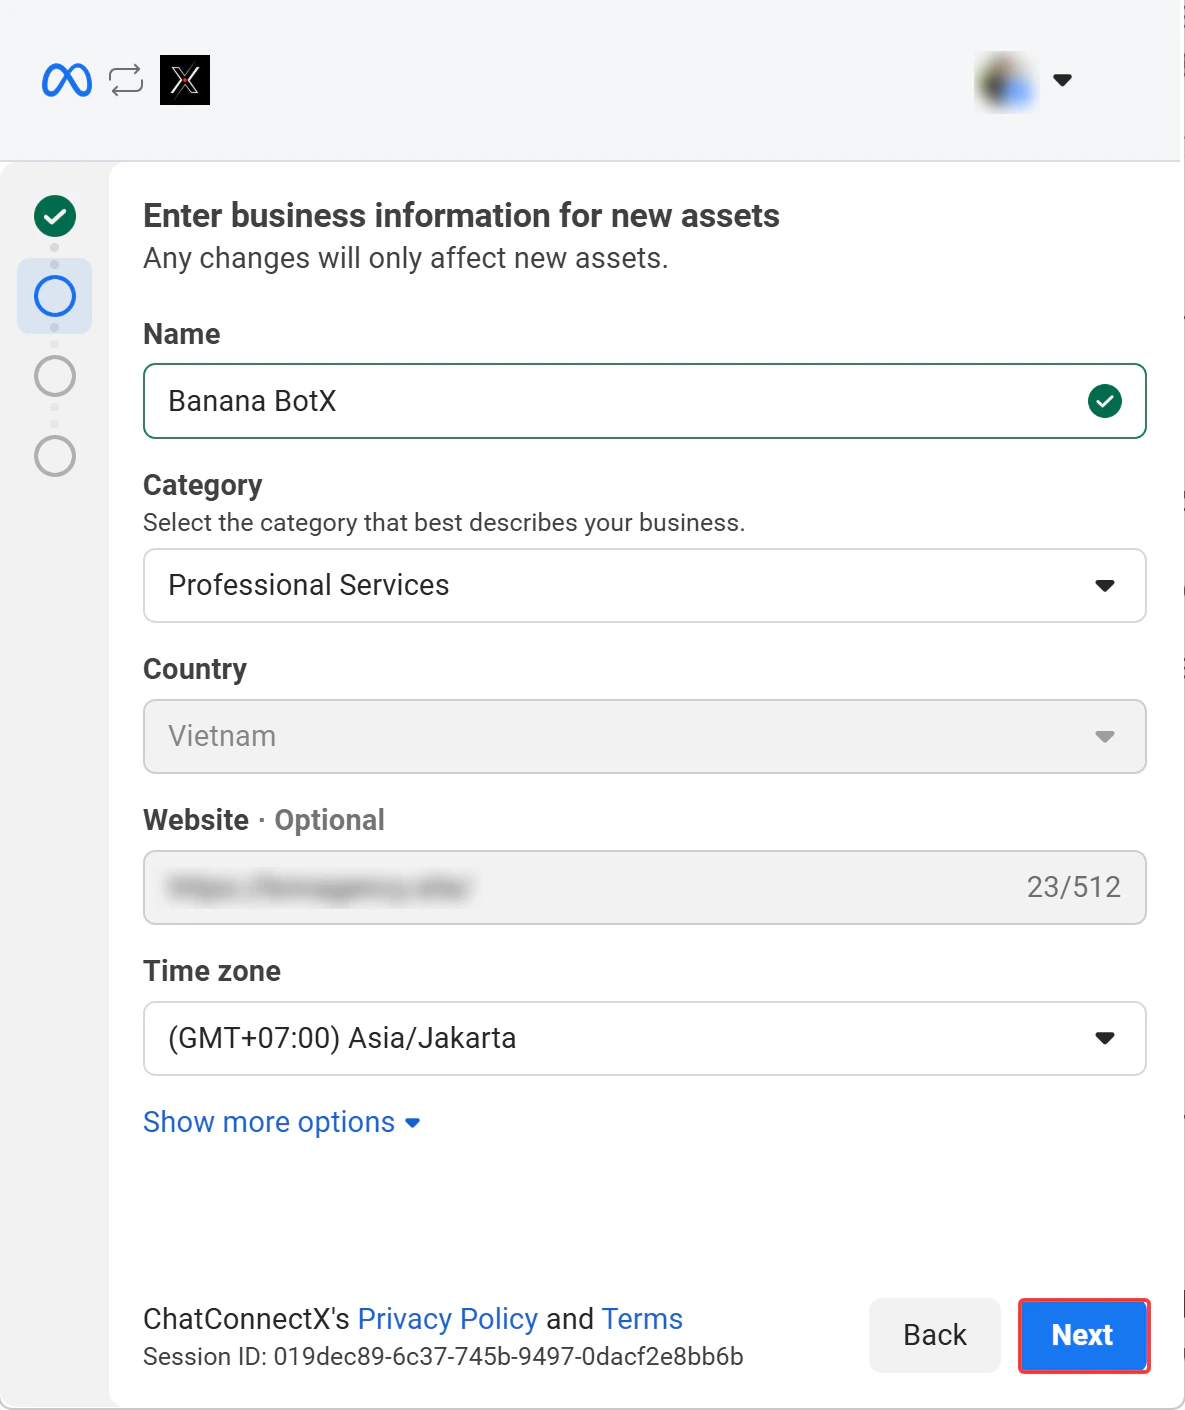
 ## Step 5: Fill Business Information
Enter the public details for your WhatsApp Business Profile. This information will be visible to your customers on WhatsApp.
* **Name:** Enter your official business name (e.g., Pizza Boss X).
* **Category:** Select the industry that best describes your business (e.g., Restaurant).
* **Website & Time zone:** Provide your business URL and ensure the time zone is set correctly for your region.
* Click **Next** to move to the final verification step.
## Step 5: Fill Business Information
Enter the public details for your WhatsApp Business Profile. This information will be visible to your customers on WhatsApp.
* **Name:** Enter your official business name (e.g., Pizza Boss X).
* **Category:** Select the industry that best describes your business (e.g., Restaurant).
* **Website & Time zone:** Provide your business URL and ensure the time zone is set correctly for your region.
* Click **Next** to move to the final verification step.
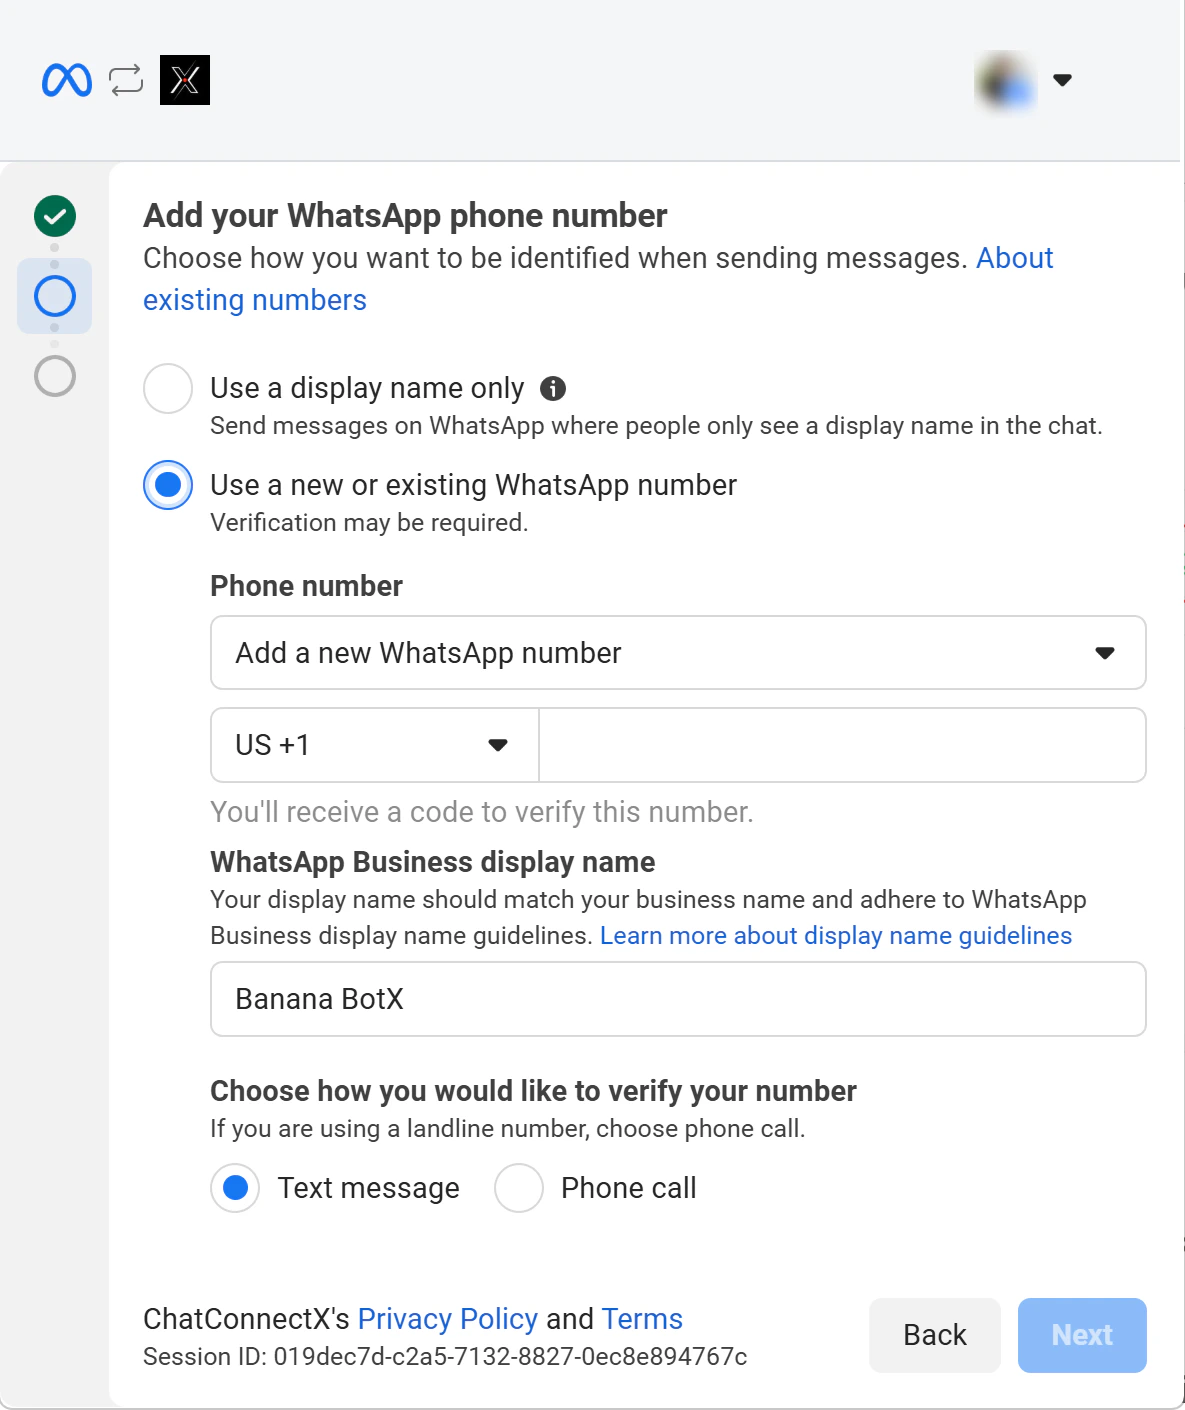
 ## Step 6: Add your WhatsApp phone number
Decide how you want your business to be identified and provide the phone number for verification.
* **Display Name:** Enter your **WhatsApp Business display name** (e.g., Pizza Boss X). Ensure it matches your business branding and adheres to WhatsApp’s guidelines.
* **Verification Note:** Meta will review your business and display name. This typically takes up to **1 business day**. During this review period, you can send a limited number of test messages.
* **Add Number:** Choose to **Add a new number** and complete the verification process via SMS or Voice call.
* Click **Next** to finalize the setup.
## Step 6: Add your WhatsApp phone number
Decide how you want your business to be identified and provide the phone number for verification.
* **Display Name:** Enter your **WhatsApp Business display name** (e.g., Pizza Boss X). Ensure it matches your business branding and adheres to WhatsApp’s guidelines.
* **Verification Note:** Meta will review your business and display name. This typically takes up to **1 business day**. During this review period, you can send a limited number of test messages.
* **Add Number:** Choose to **Add a new number** and complete the verification process via SMS or Voice call.
* Click **Next** to finalize the setup.
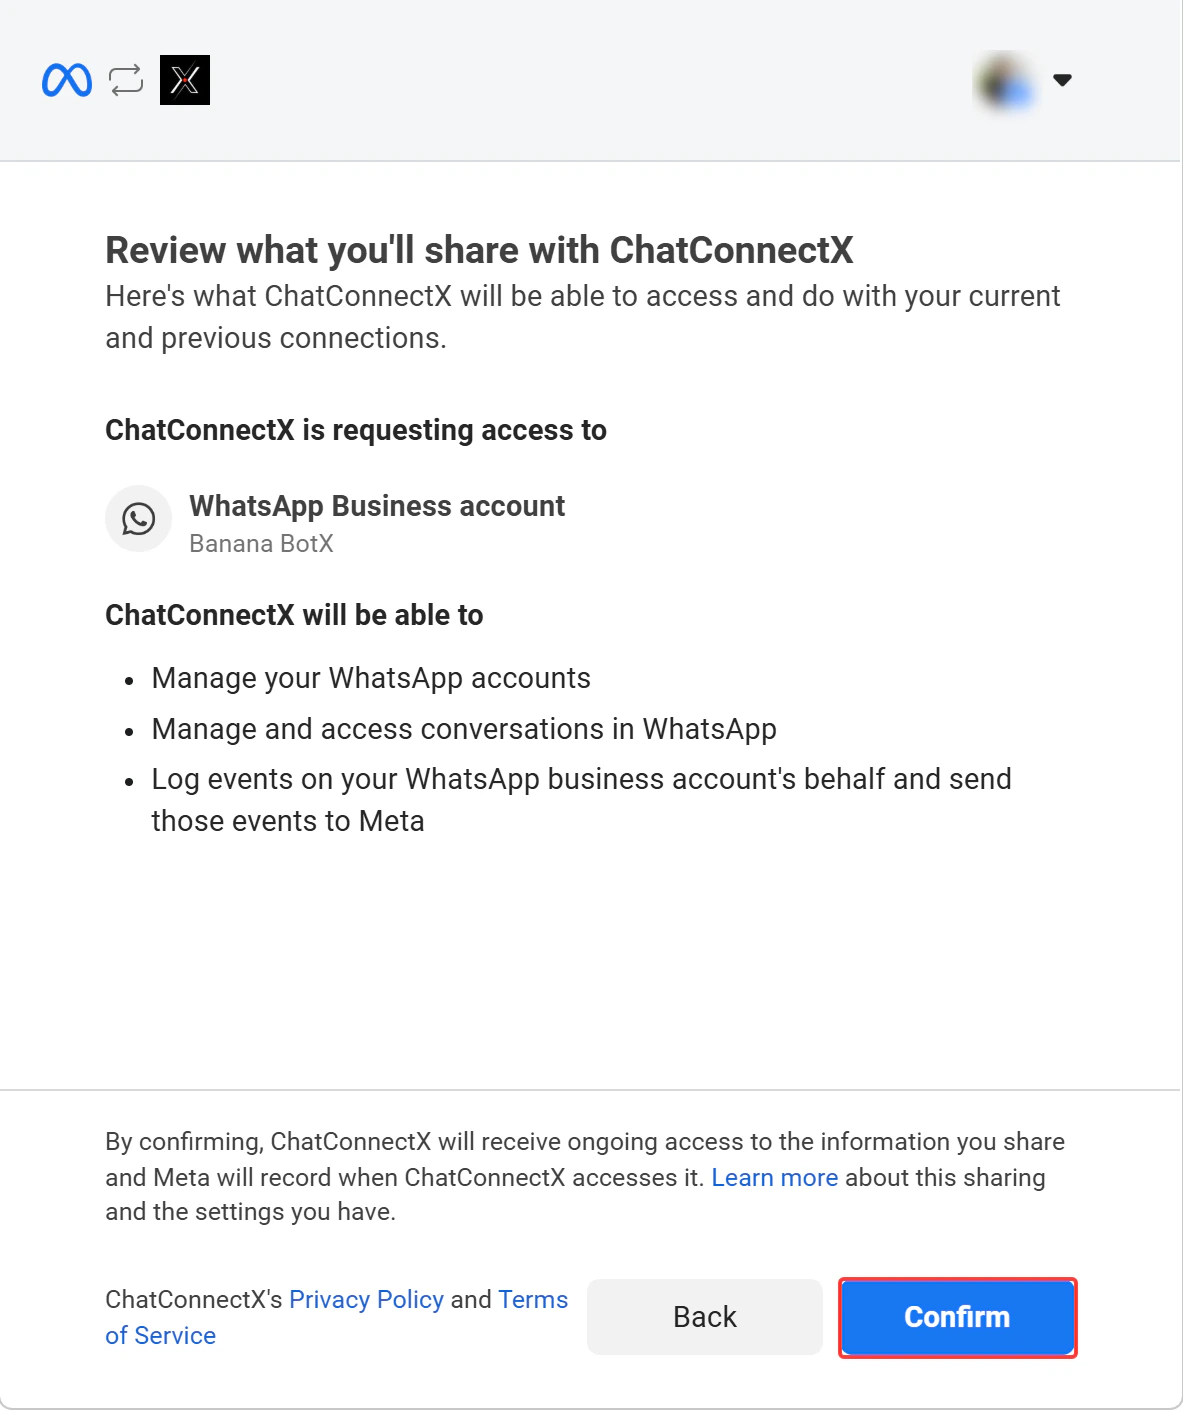
 ## Step 7: Review and Confirm Permissions
Before finalizing the connection, review the specific access permissions you are granting to the platform to ensure everything is set up correctly.
* **Verify Selected Assets:** Double-check that the correct **Business Portfolio** (e.g., Pizza Shop) and **WhatsApp Business account** (e.g., Pizza Boss X) are listed.
* **Understand Access Levels:** By confirming, you allow the platform to:
* Manage your business and WhatsApp accounts.
* Access and handle WhatsApp conversations.
* Log and send events to Meta on your behalf.
* **Finalize Connection:** Once you have reviewed the terms, click **Confirm** to complete the integration.
## Step 7: Review and Confirm Permissions
Before finalizing the connection, review the specific access permissions you are granting to the platform to ensure everything is set up correctly.
* **Verify Selected Assets:** Double-check that the correct **Business Portfolio** (e.g., Pizza Shop) and **WhatsApp Business account** (e.g., Pizza Boss X) are listed.
* **Understand Access Levels:** By confirming, you allow the platform to:
* Manage your business and WhatsApp accounts.
* Access and handle WhatsApp conversations.
* Log and send events to Meta on your behalf.
* **Finalize Connection:** Once you have reviewed the terms, click **Confirm** to complete the integration.
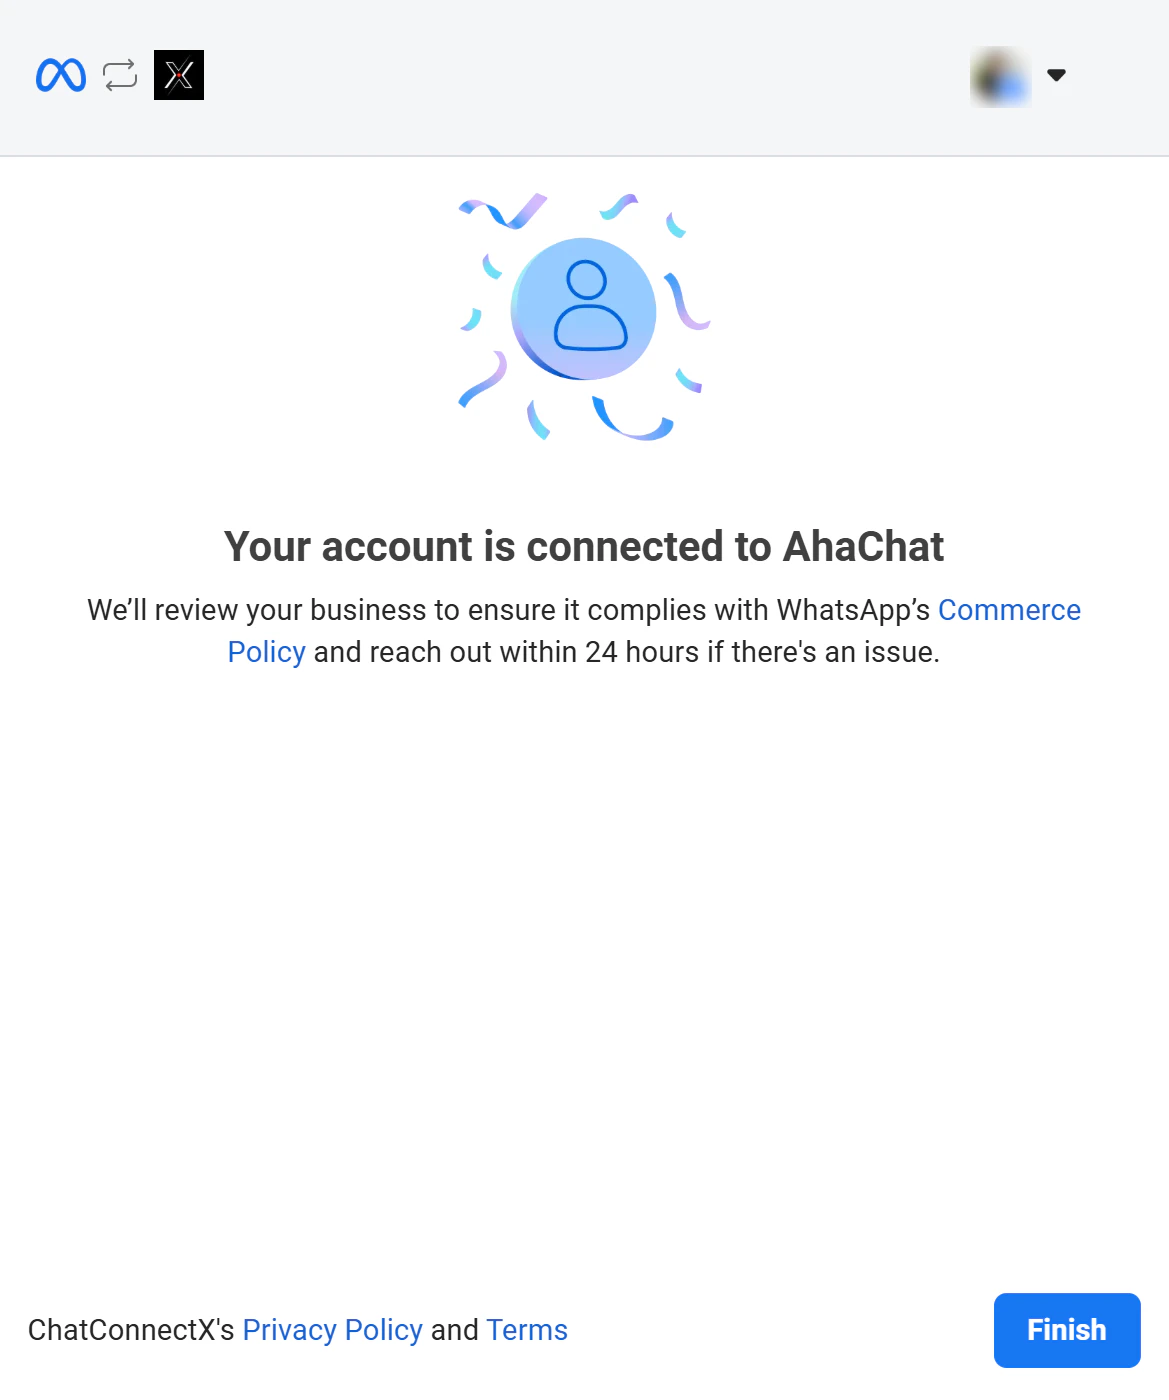
 ## Step 8: Complete Setup and Verify Connection
Congratulations! Your WhatsApp account is now connected. You can now start using the platform to communicate with your customers.
* **Account Connected:** You will see a success message confirming your account is linked to **ChatbotX**.
* **Initial Limits:** Note that new accounts have a temporary limit (e.g., 5 messages within a 24-hour period) while Meta completes the final review of your display name.
* **Finish Integration:** Click the **Finish** button on the Meta popup to be redirected back to your dashboard.
## Step 8: Complete Setup and Verify Connection
Congratulations! Your WhatsApp account is now connected. You can now start using the platform to communicate with your customers.
* **Account Connected:** You will see a success message confirming your account is linked to **ChatbotX**.
* **Initial Limits:** Note that new accounts have a temporary limit (e.g., 5 messages within a 24-hour period) while Meta completes the final review of your display name.
* **Finish Integration:** Click the **Finish** button on the Meta popup to be redirected back to your dashboard.
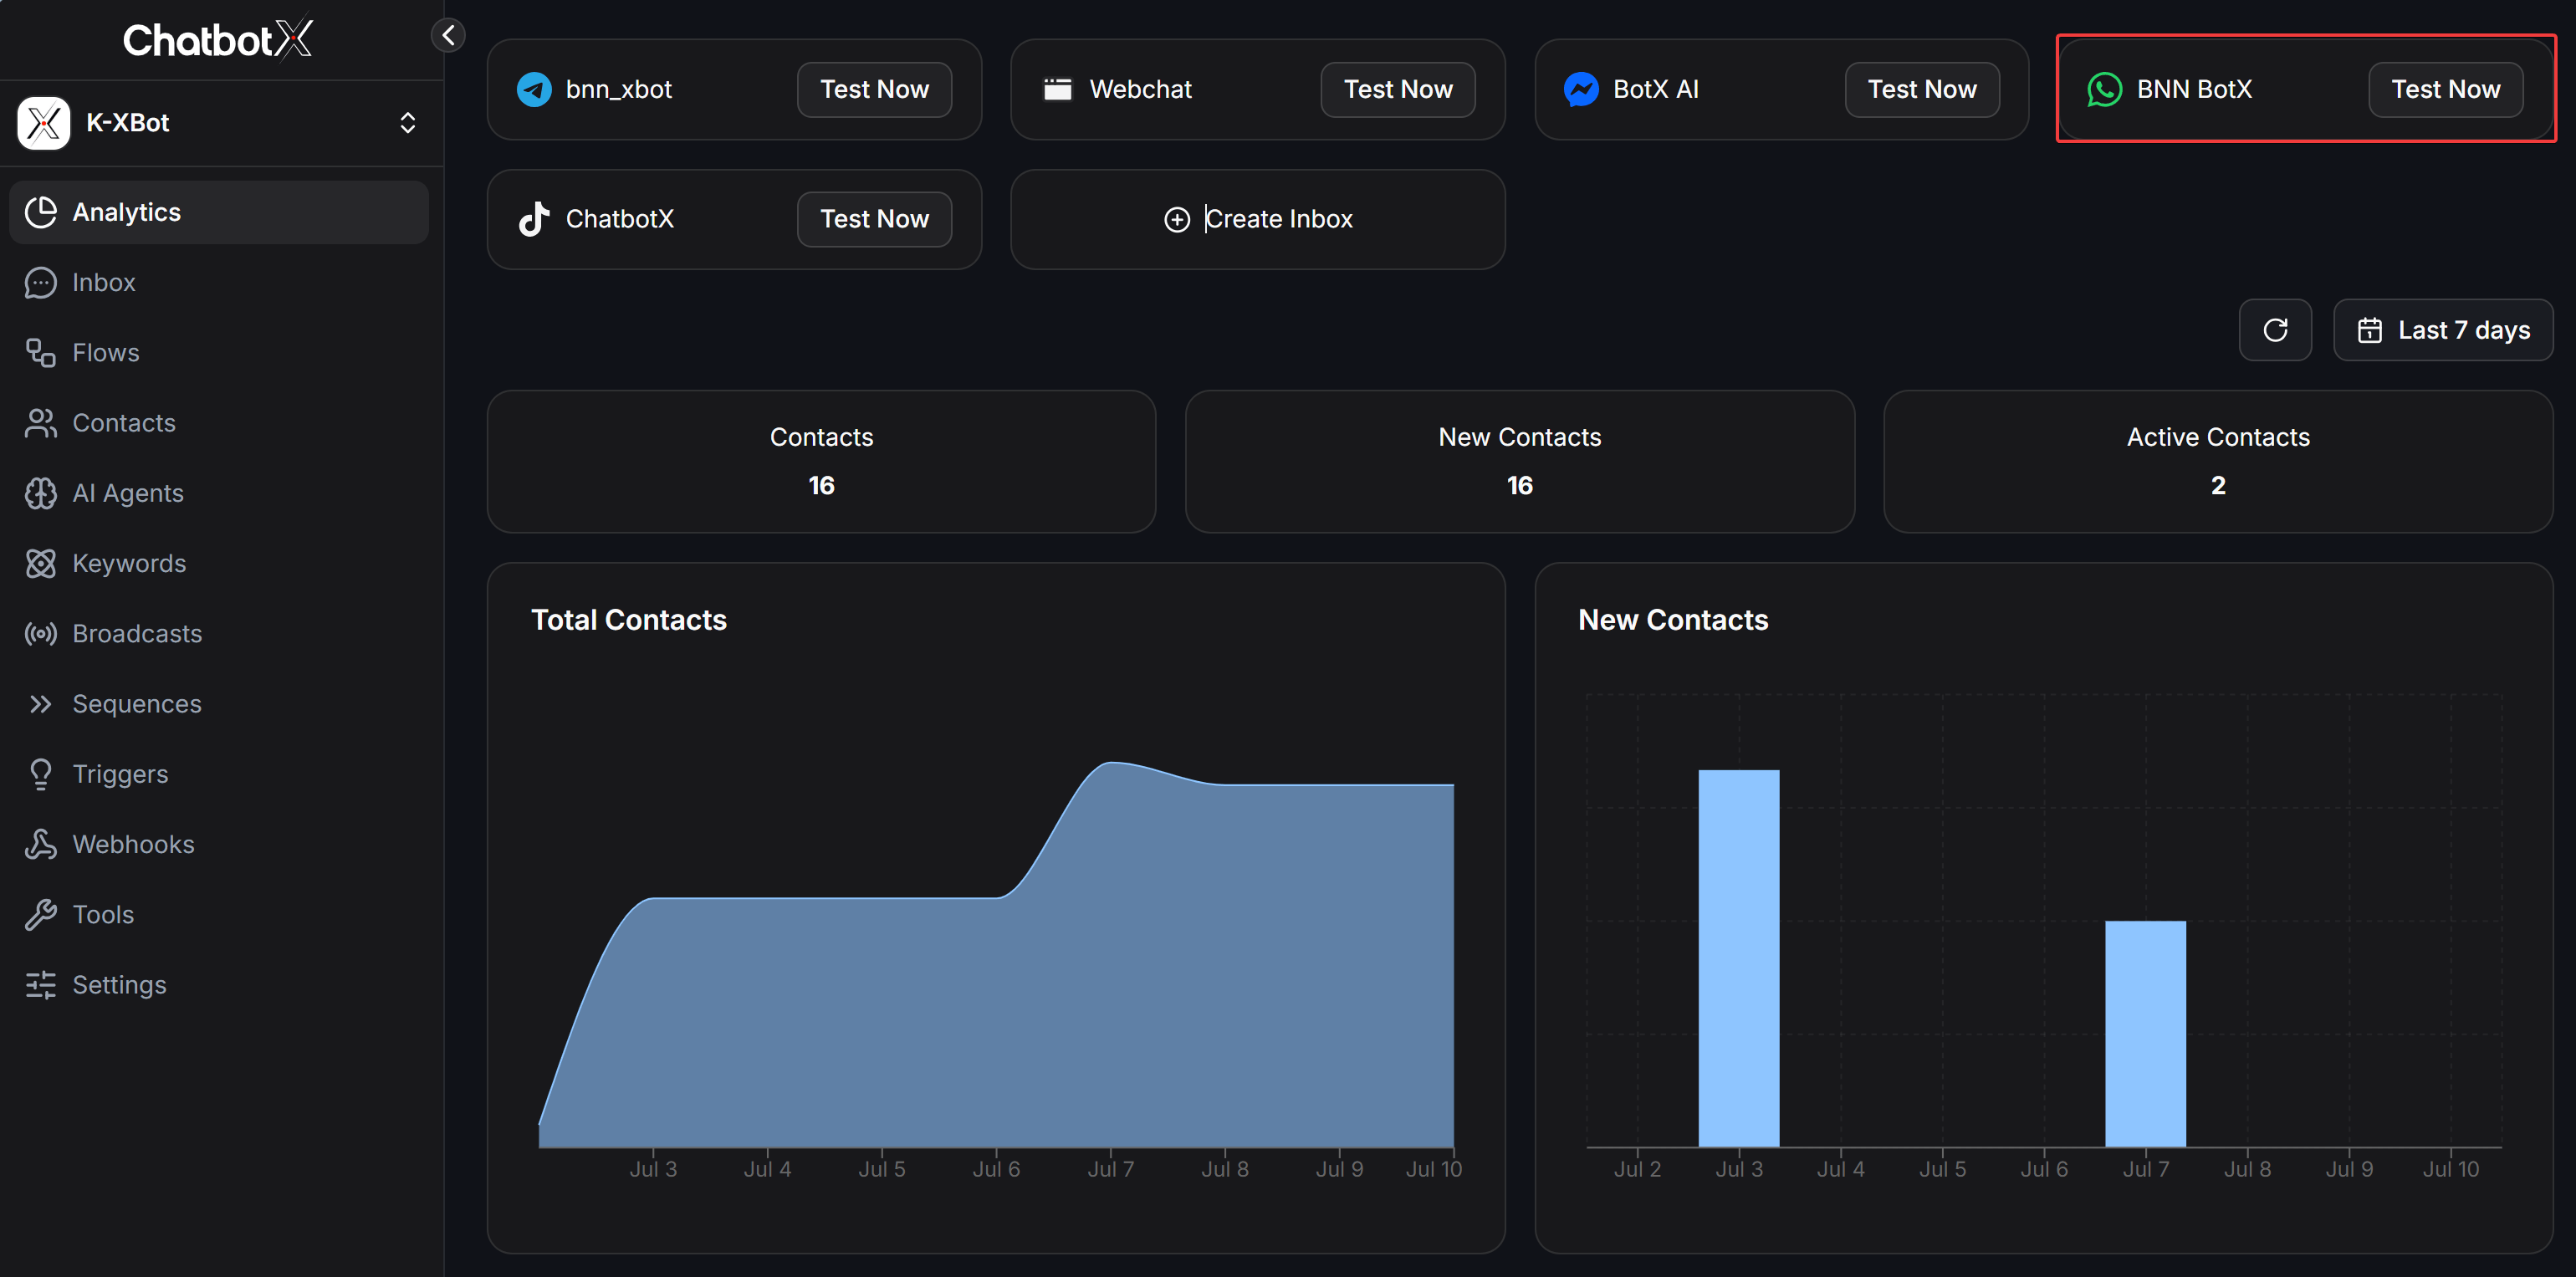
 * **Verify on Dashboard:** Once redirected to **ChatbotX**, you should see your new WhatsApp channel listed in the inbox section. You can click **Test Now** to send your first message.
 ## FAQ
**Yes, absolutely.** With the latest Meta Cloud API protocols released in early 2026, the migration process is now seamless.
**Keep Your Number**\
You can use the exact same phone number currently registered on the WhatsApp Business App to integrate with the ChatbotX Cloud API.
**Data Synchronization**\
The current system supports **synchronizing contacts and chat history** from your mobile app to the Cloud API during the integration process. This helps maintain continuous conversations with your customers without losing historical data.
This is a standard security and quality control mechanism implemented by Meta for newly connected accounts.
**Initial Restriction**\
You may experience a trial limit (typically **5–10 messages**) while Meta reviews and approves your business **Display Name**.\
This process usually takes **less than 24 hours**.
**Upgrading Your Limit**\
If your business is already **Meta Verified** (blue checkmark) on Facebook or Instagram, your messaging capacity will automatically upgrade to **Tier 1 (1,000 conversations per day)** immediately after connection.
Your messaging tier will continue to increase automatically to **Tier 2 and Tier 3** based on consistent high-quality messaging activity.
## FAQ
**Yes, absolutely.** With the latest Meta Cloud API protocols released in early 2026, the migration process is now seamless.
**Keep Your Number**\
You can use the exact same phone number currently registered on the WhatsApp Business App to integrate with the ChatbotX Cloud API.
**Data Synchronization**\
The current system supports **synchronizing contacts and chat history** from your mobile app to the Cloud API during the integration process. This helps maintain continuous conversations with your customers without losing historical data.
This is a standard security and quality control mechanism implemented by Meta for newly connected accounts.
**Initial Restriction**\
You may experience a trial limit (typically **5–10 messages**) while Meta reviews and approves your business **Display Name**.\
This process usually takes **less than 24 hours**.
**Upgrading Your Limit**\
If your business is already **Meta Verified** (blue checkmark) on Facebook or Instagram, your messaging capacity will automatically upgrade to **Tier 1 (1,000 conversations per day)** immediately after connection.
Your messaging tier will continue to increase automatically to **Tier 2 and Tier 3** based on consistent high-quality messaging activity.