> ## Documentation Index
> Fetch the complete documentation index at: https://chatbotx.io/docs/llms.txt
> Use this file to discover all available pages before exploring further.
# WhatsApp Template Messages
> Learn how to create, submit for approval, and use WhatsApp Template Messages in ChatbotX.
**WhatsApp Template Messages** are the only way to send messages to customers outside the 24-hour interaction window. To use them, all templates must be formatted according to Meta's guidelines and approved by Meta before they can be synchronized to ChatbotX.
## Classifying Message Templates
Meta categorizes message templates into 3 main categories:
* **Utility:** Send transactional updates directly related to a customer's action or transaction (e.g., order confirmations, shipping updates, appointment reminders...).
* **Marketing:** Send promotional offers, product introductions, discount codes (vouchers), birthday greetings, or interaction surveys.
* **Authentication:** Send OTPs (One-Time Passwords) or verification codes for account logins.
## Content Formatting Rules
To ensure your message templates are approved by Meta quickly, please follow these guidelines:
### 1. Rules for Variables (`{{1}}`, `{{2}}`...)
* **Provide Sample Values (Validation Values):** When creating templates with variables like `{{1}}`, `{{2}}`..., you must enter a realistic sample value for each variable (e.g., enter "John Doe" for `{{1}}`). If left blank, Meta will reject the template.
* **Do Not Place Variables Side-by-Side:** Never place two variables adjacent to each other without static text separating them (e.g., incorrect format: `Hello {{1}}{{2}},`).
* **Do Not Place Variables at the Start or End:** Avoid placing variables at the very beginning or the very end of your message.
* **Sequential Ordering:** Variables must start at `{{1}}` and increase sequentially (`{{2}}`, `{{3}}`...).
### 2. Limits on Characters and Emojis
* **Body Length:** The body text can be up to 1024 characters. However, keeping it short (under 550 characters) is recommended to improve readability.
* **Emoji Limits:** Do not over-use emojis. Keep the count below 10 emojis in each message template.
### 3. Sending Marketing Messages Safely
* **User Consent (Opt-in):** Only send proactive messages if the customer has explicitly agreed to receive communications from your business (e.g., checking a website checkbox, opting in during checkout...).
* **Include an Opt-out Button:** For marketing templates, we highly recommend adding a Quick Reply button such as **"Opt-out" (Stop / Unsubscribe)** at the bottom to reduce the likelihood of being reported as spam.
## How to Create and Submit Templates for Approval
The process to create and submit templates for review is performed as follows:
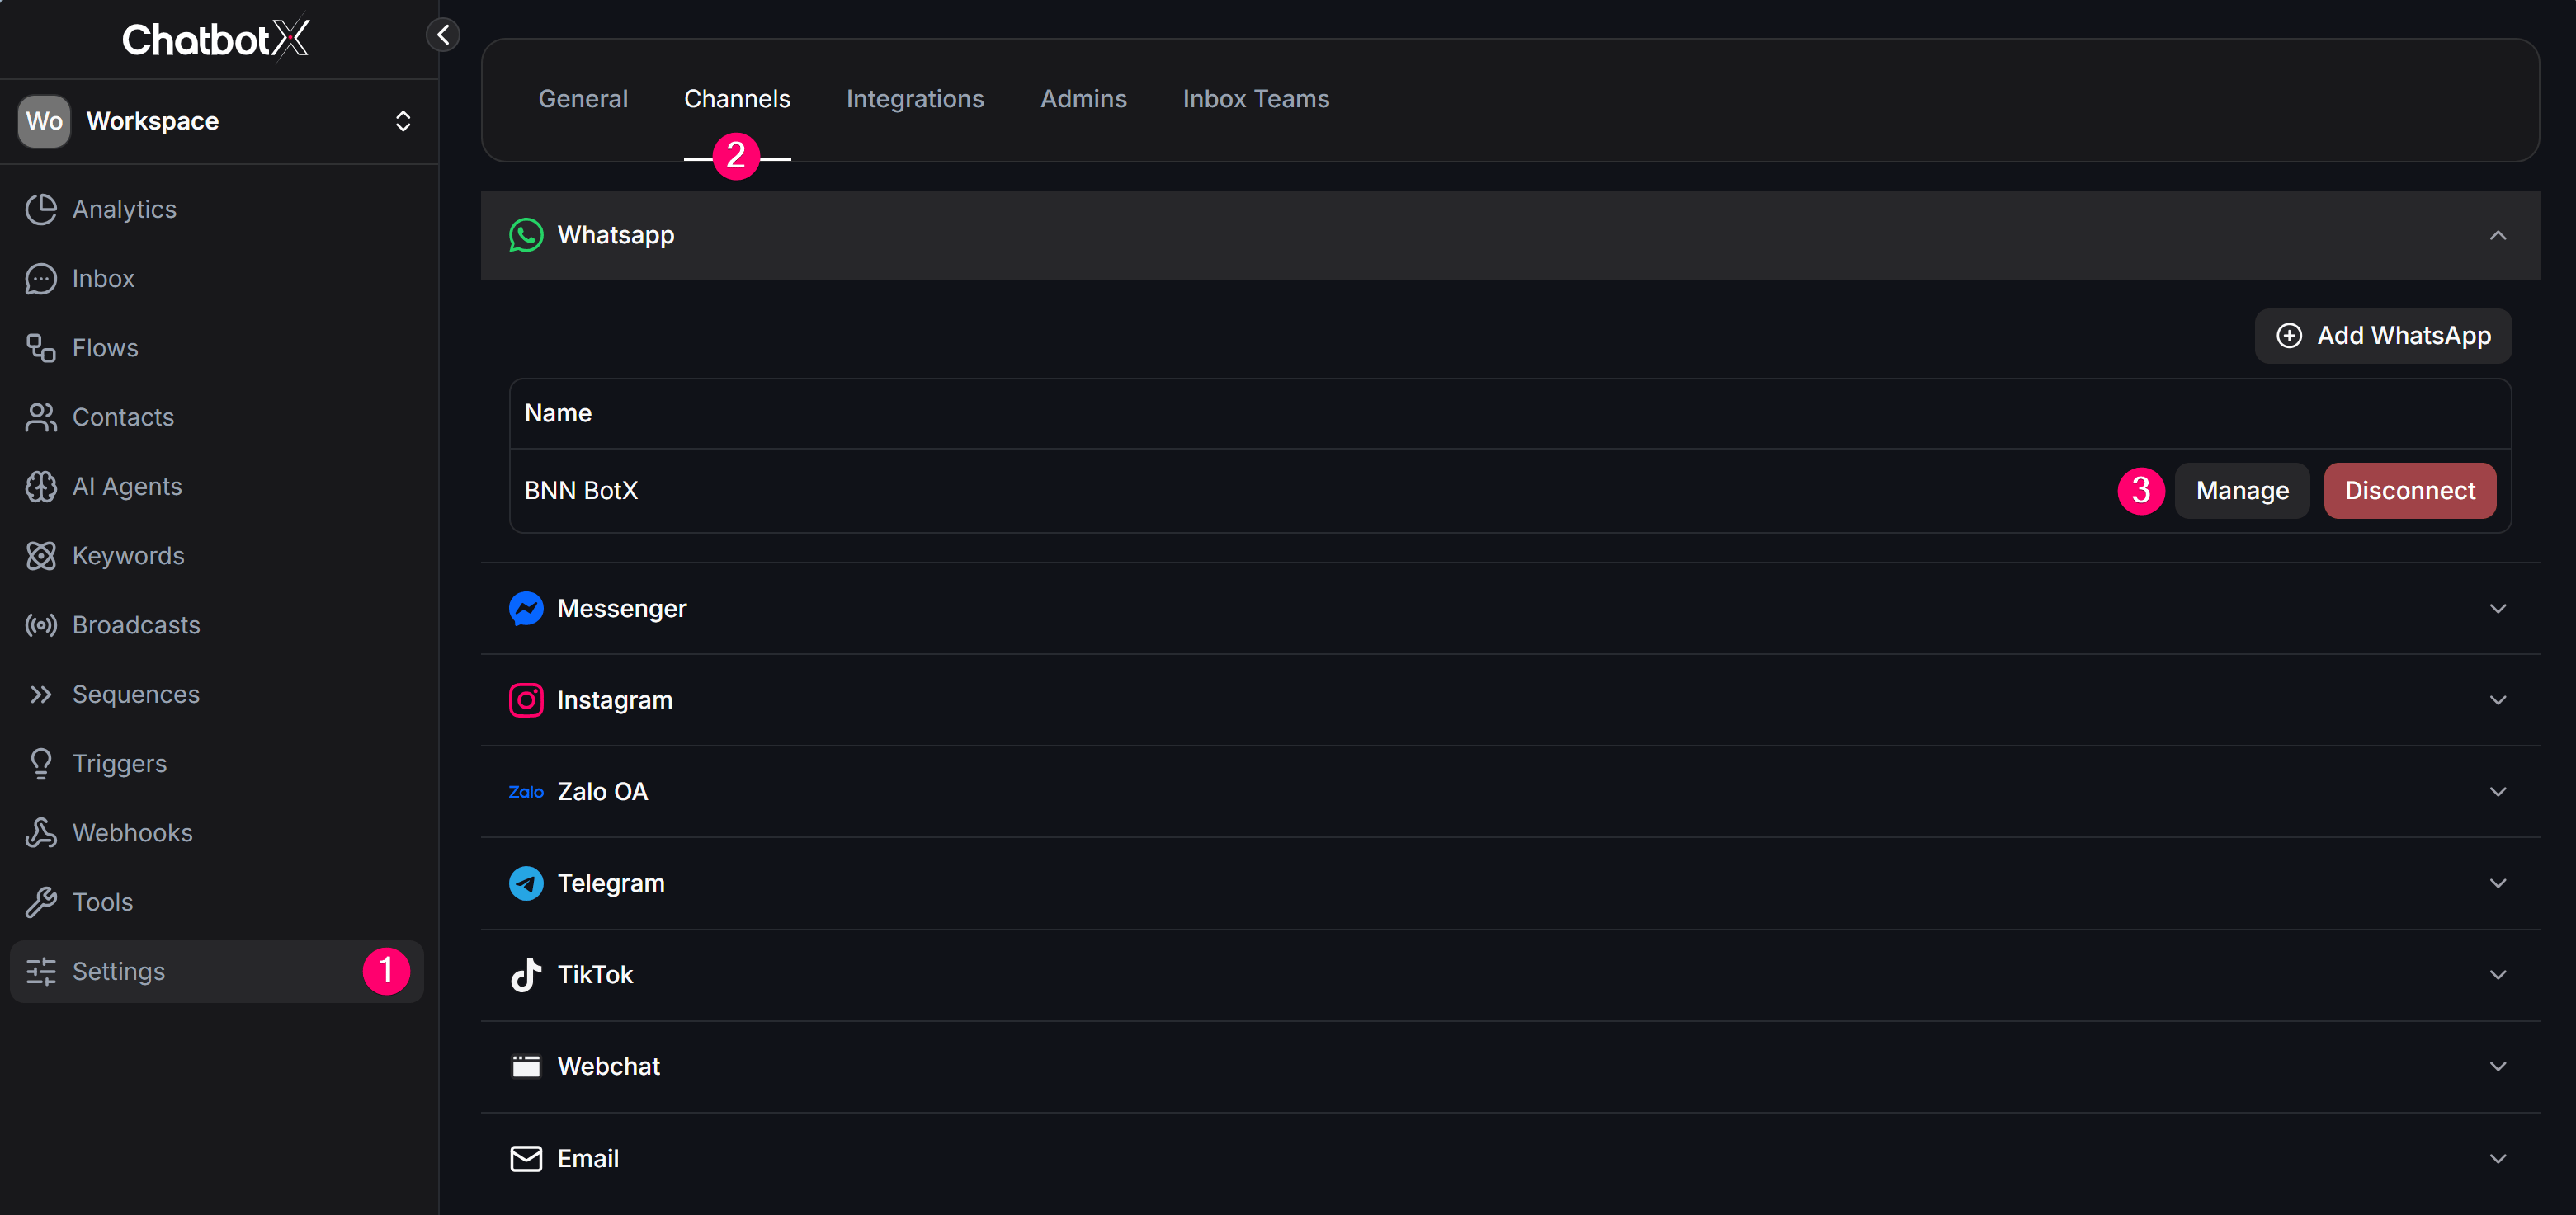
Go to **Settings** -> **Channels** tab -> select **WhatsApp** -> click **Manage** next to the WhatsApp number you want to configure.
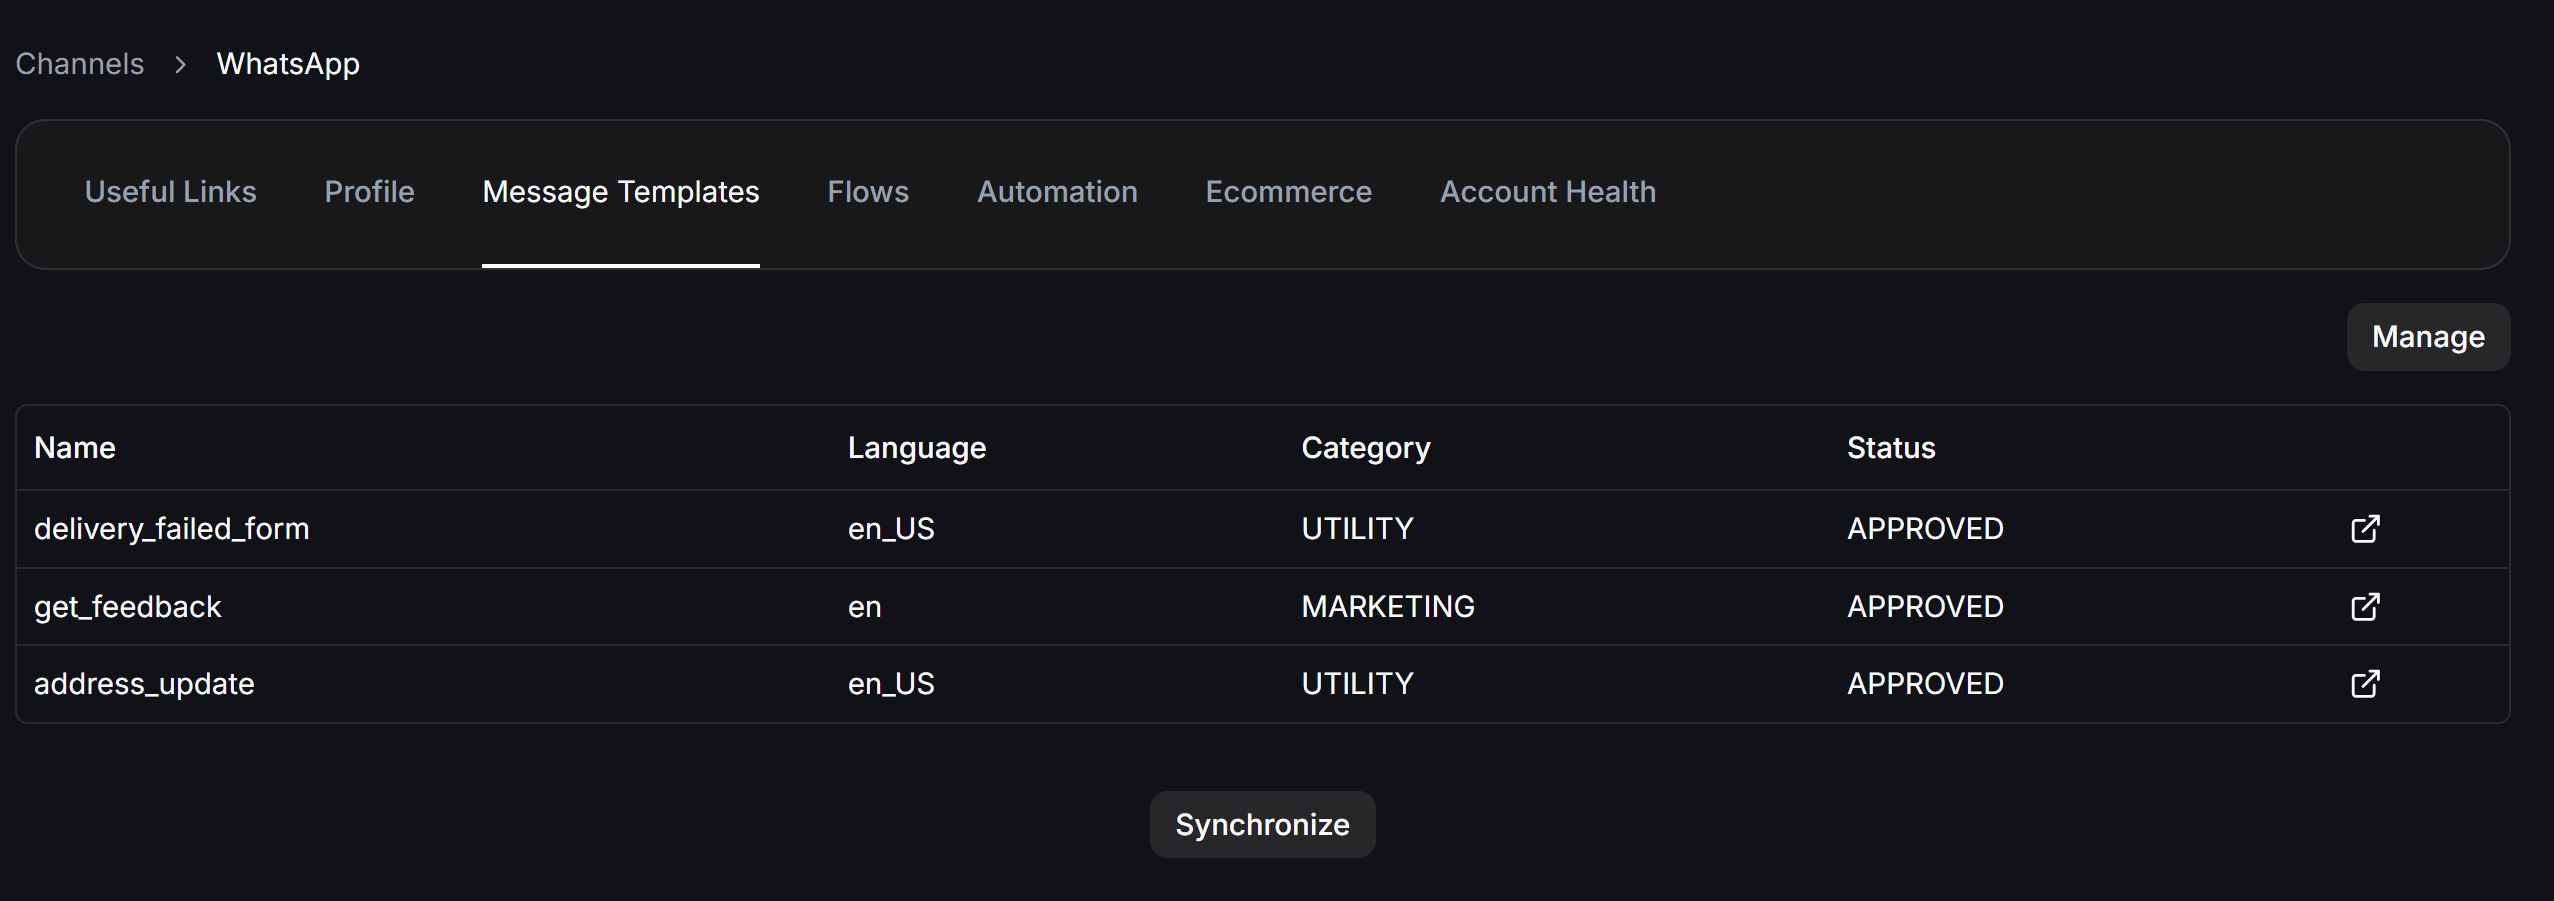
 Select the **Message Templates** tab from the top horizontal menu. Here, click **Synchronize** to sync templates from Meta to ChatbotX, or click **Manage** on the right side to redirect to the Meta Business Manager.
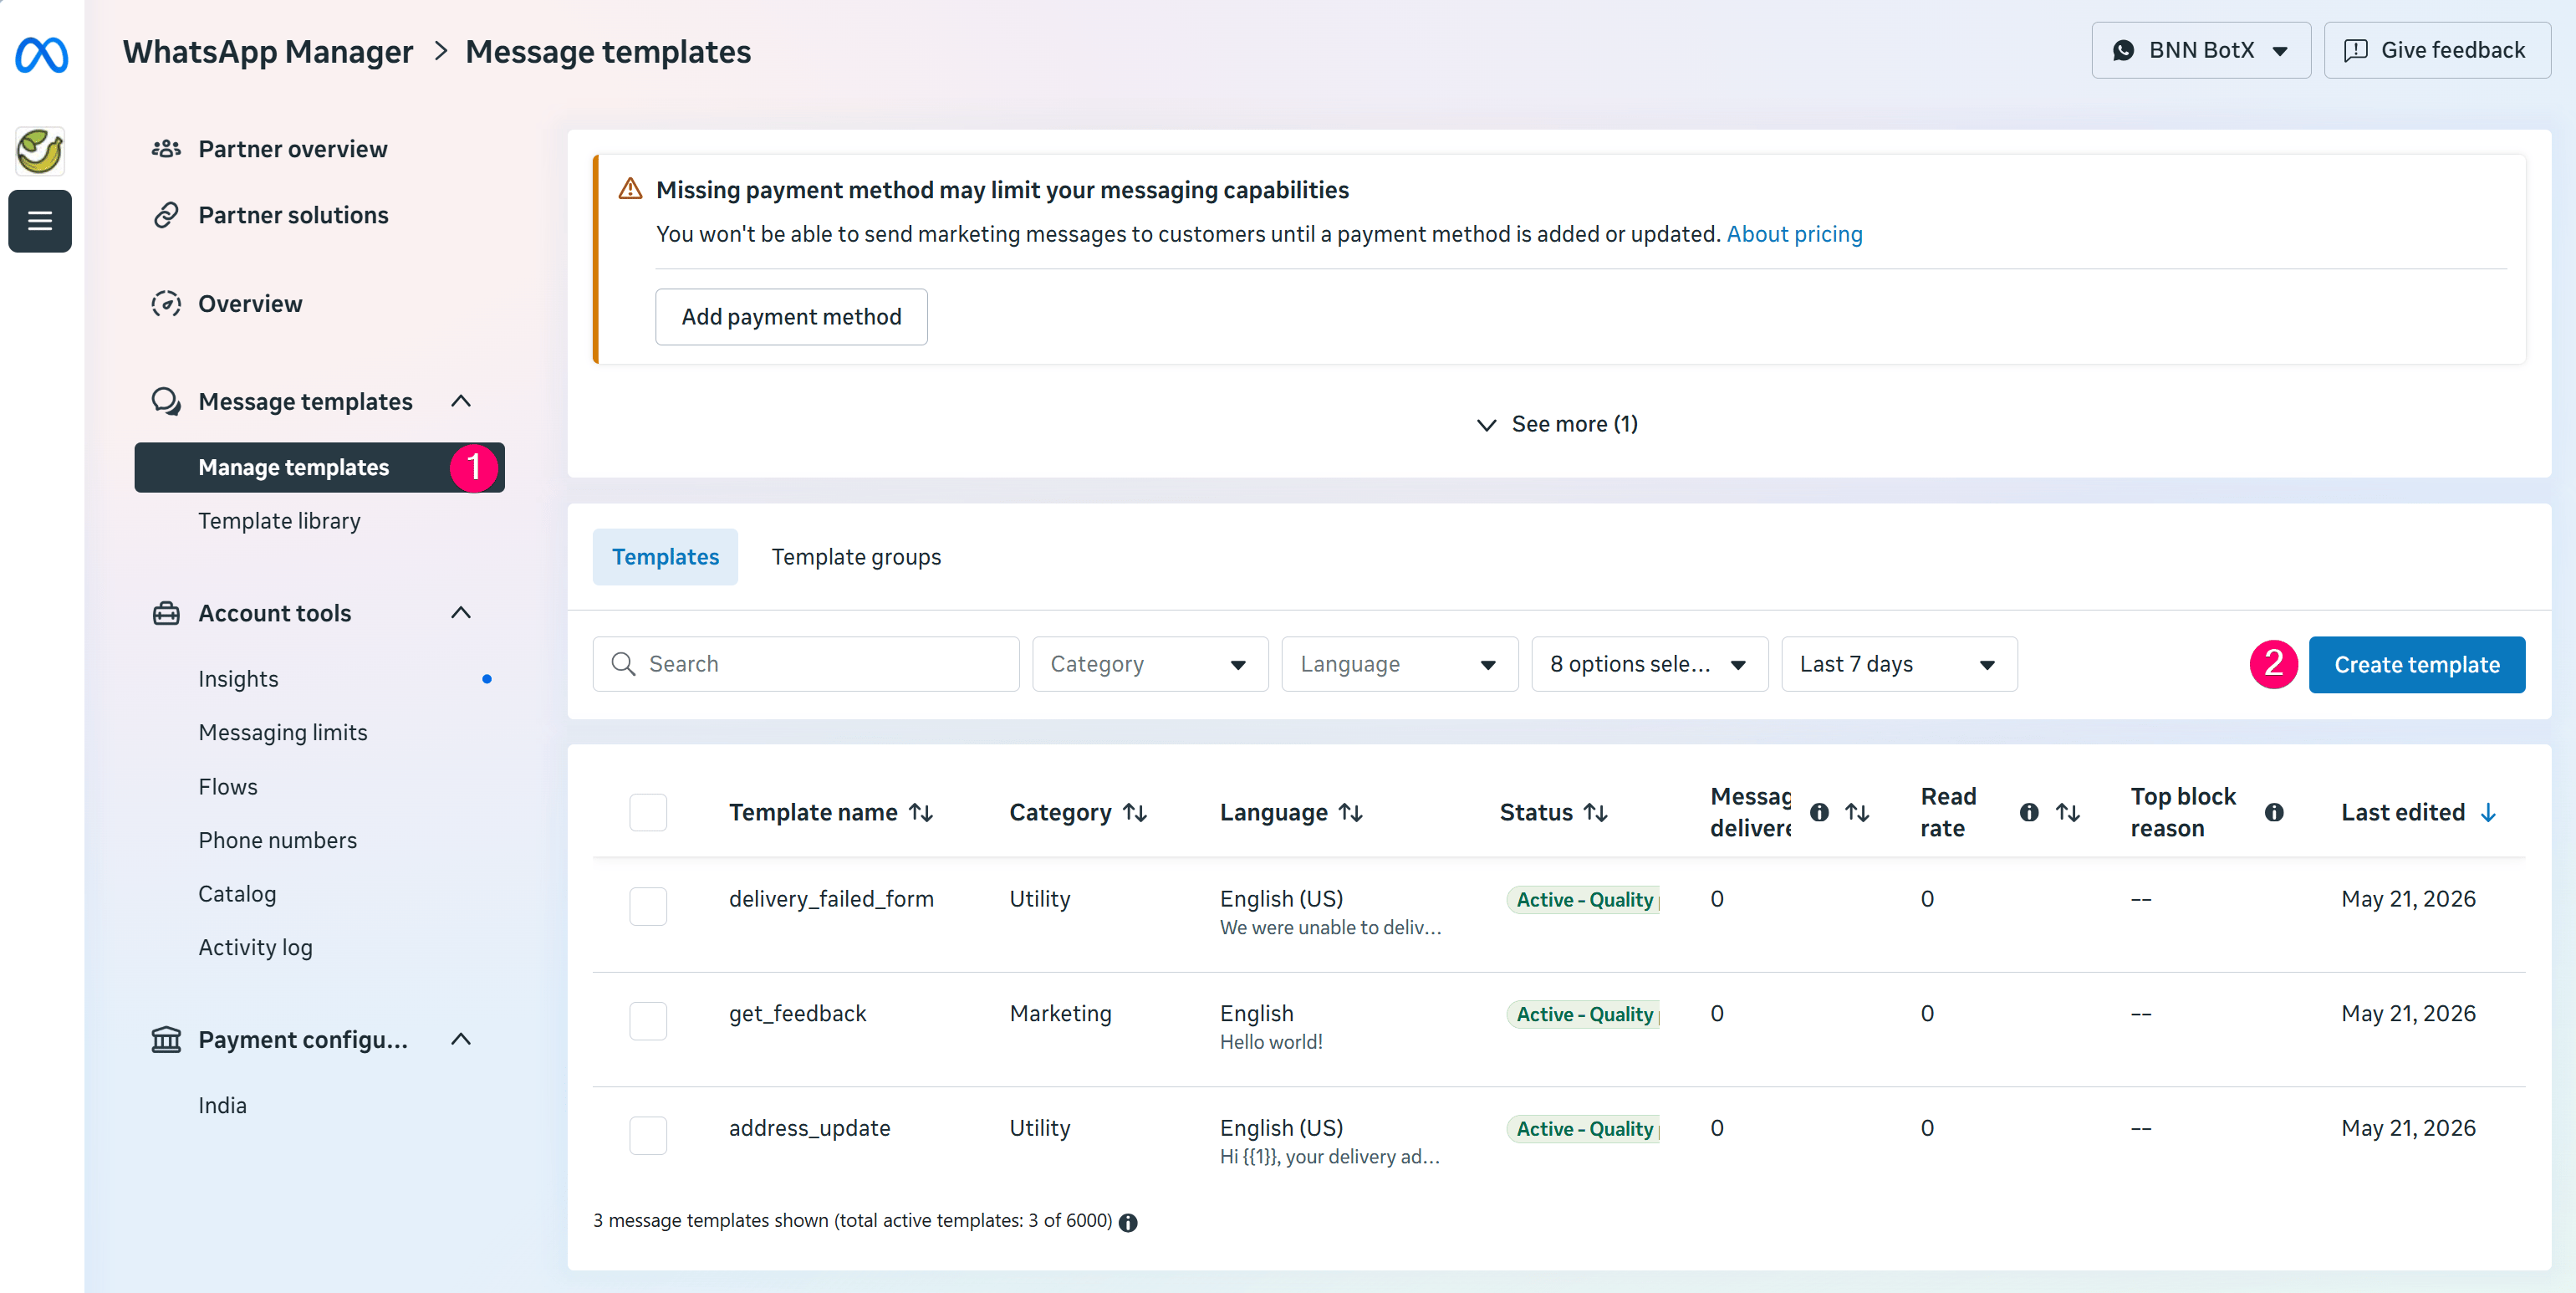
 On the Meta manager page, click **Create template** and fill in the details:
* **Category:** Select the appropriate category (Marketing, Utility, or Authentication).
* **Template Name:** Use only lowercase letters and underscores (e.g., `order_confirmation`). Do not use spaces, capital letters, or special characters.
* **Content:** Draft the body text (up to 1024 characters). Set up variables `{{1}}`, `{{2}}`... and fill in sample values (Validation).
* **Buttons:** Add Call to Action buttons (directing to a website or phone number) or Quick Reply buttons.
* *Note:* The website URL button must not use `wa.me` links.
Once completed, click **Submit** to send the template to Meta for review.
On the Meta manager page, click **Create template** and fill in the details:
* **Category:** Select the appropriate category (Marketing, Utility, or Authentication).
* **Template Name:** Use only lowercase letters and underscores (e.g., `order_confirmation`). Do not use spaces, capital letters, or special characters.
* **Content:** Draft the body text (up to 1024 characters). Set up variables `{{1}}`, `{{2}}`... and fill in sample values (Validation).
* **Buttons:** Add Call to Action buttons (directing to a website or phone number) or Quick Reply buttons.
* *Note:* The website URL button must not use `wa.me` links.
Once completed, click **Submit** to send the template to Meta for review.
 Once the template status changes to `APPROVED`, go back to the **Message Templates** tab on ChatbotX and click **Synchronize** to pull the template into the system.
## Ways to Send Templates on ChatbotX
After syncing the templates to ChatbotX, you can send them to customers using the following methods:
### 1. Send Bulk Campaigns (WhatsApp Broadcasts)
Use this when you want to proactively send bulk messages to a targeted contact list outside the 24-hour window.
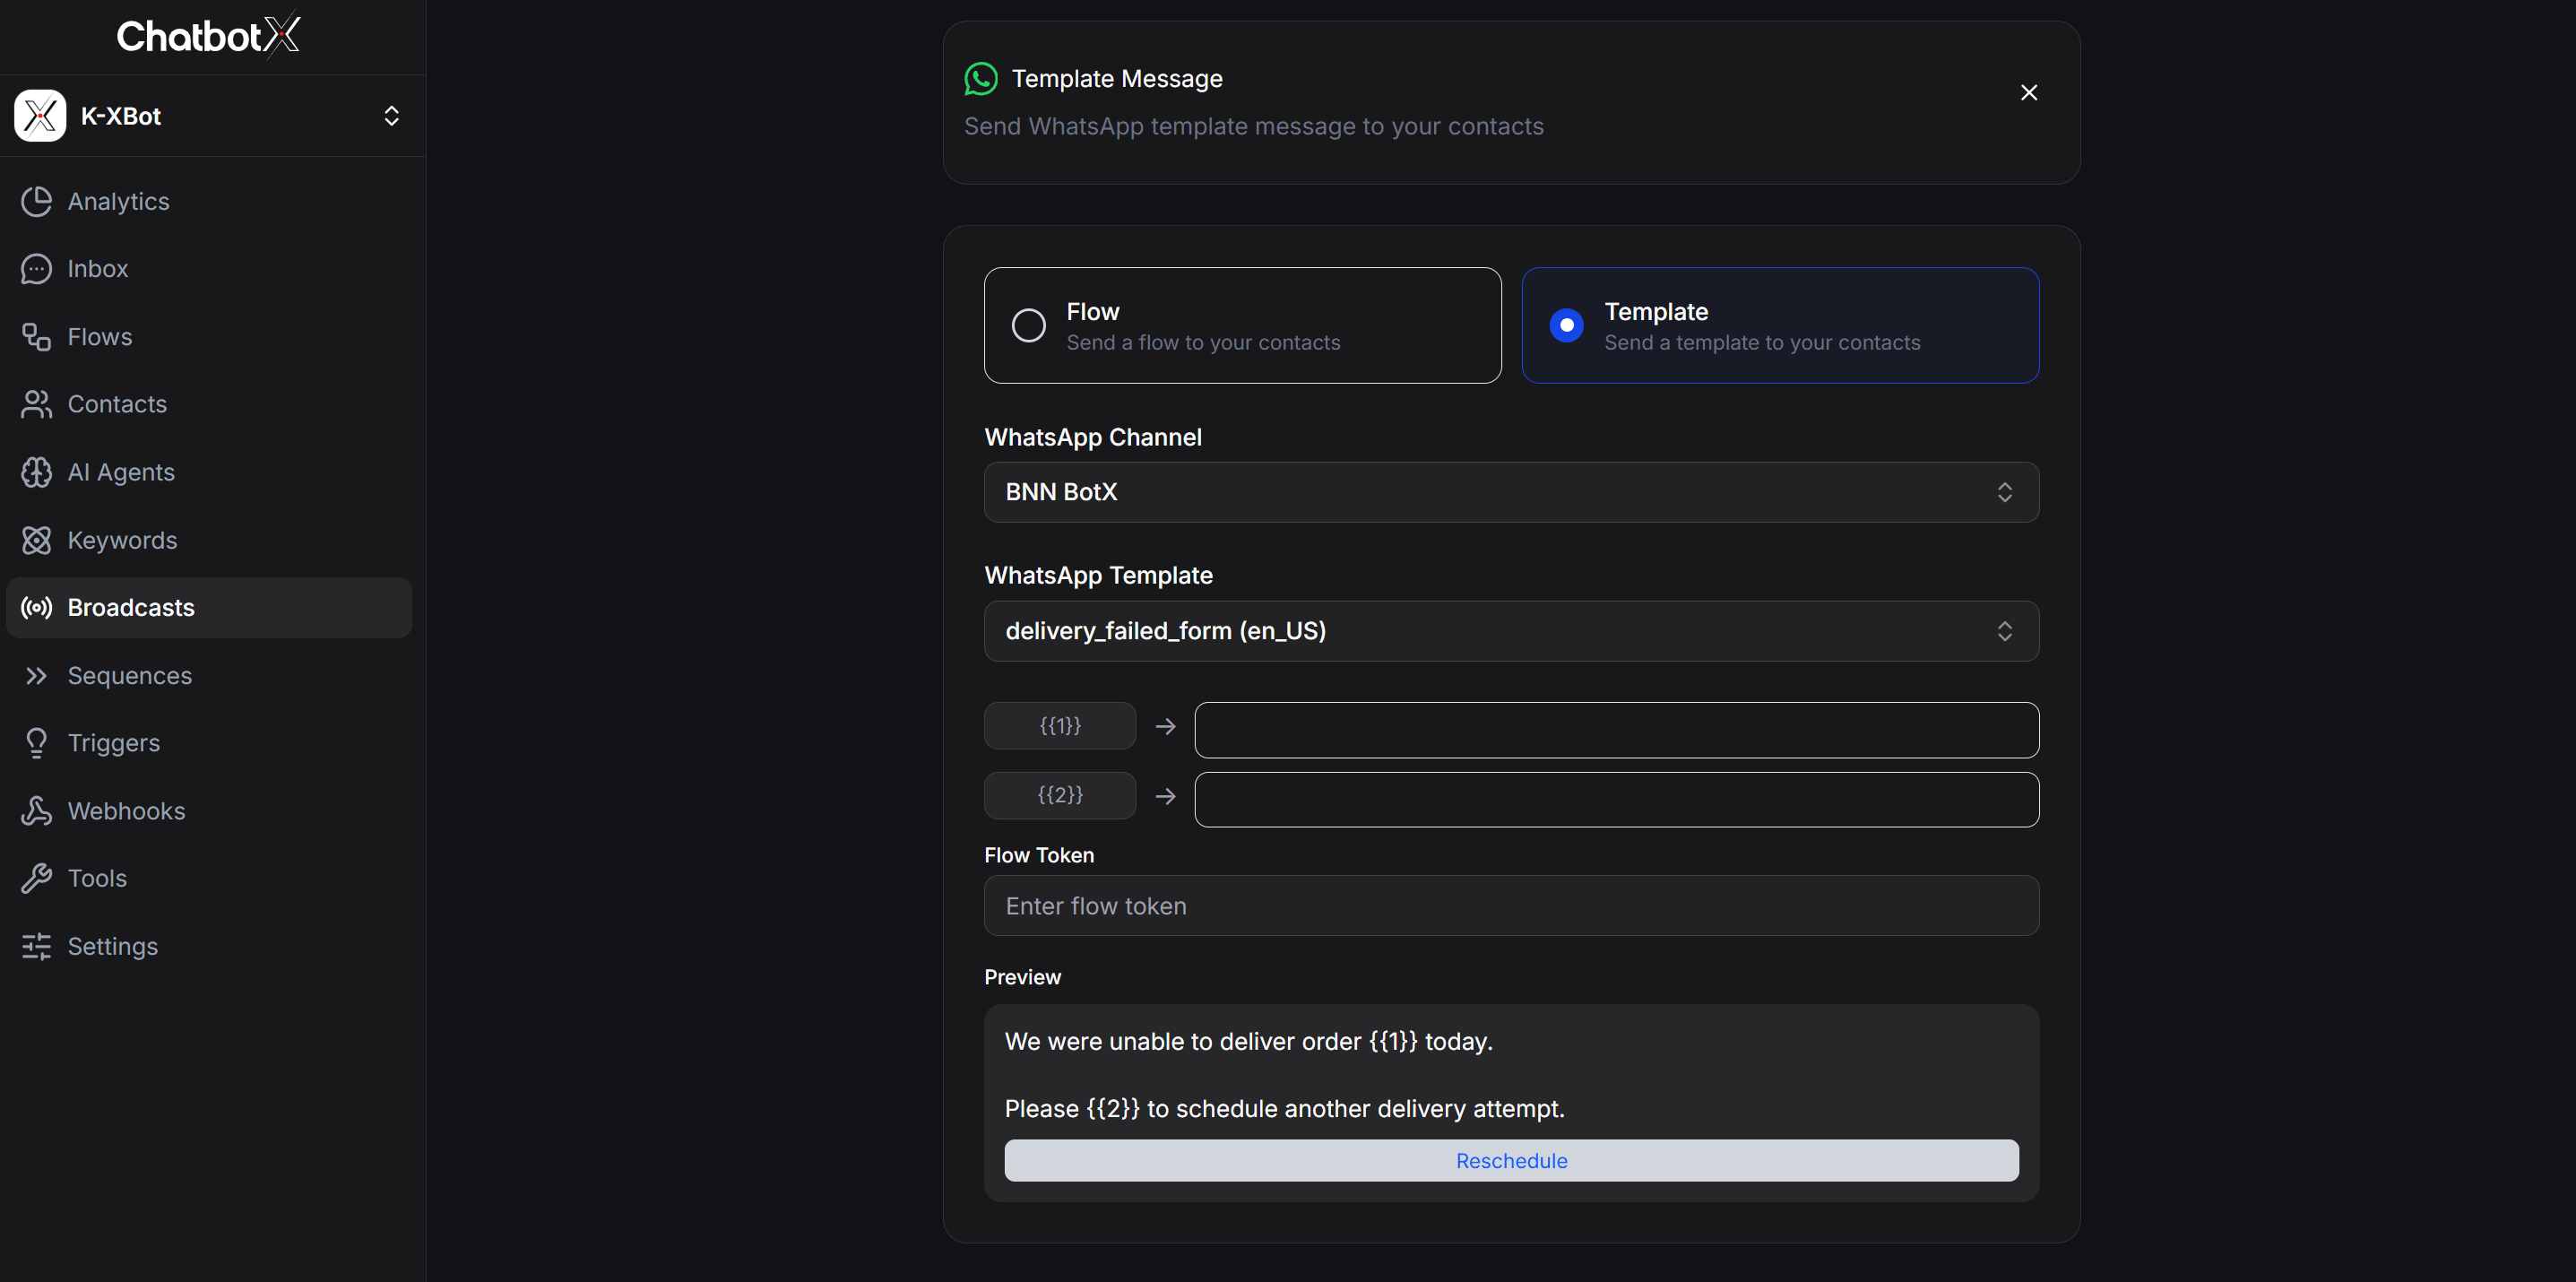
* **How-to:** Go to **Broadcasts** -> Click **+ Create Broadcast** -> select **WhatsApp** -> choose the **Template Message (Outside 24 hour)** option -> Select the approved template, map contact Custom Fields to variables like `{{1}}`, `{{2}}`... -> Schedule and send.
* *Detailed guide:* [**Bulk Campaigns (WhatsApp Broadcasts)**](/remarketing/whatsapp-broadcasts)
Once the template status changes to `APPROVED`, go back to the **Message Templates** tab on ChatbotX and click **Synchronize** to pull the template into the system.
## Ways to Send Templates on ChatbotX
After syncing the templates to ChatbotX, you can send them to customers using the following methods:
### 1. Send Bulk Campaigns (WhatsApp Broadcasts)
Use this when you want to proactively send bulk messages to a targeted contact list outside the 24-hour window.
* **How-to:** Go to **Broadcasts** -> Click **+ Create Broadcast** -> select **WhatsApp** -> choose the **Template Message (Outside 24 hour)** option -> Select the approved template, map contact Custom Fields to variables like `{{1}}`, `{{2}}`... -> Schedule and send.
* *Detailed guide:* [**Bulk Campaigns (WhatsApp Broadcasts)**](/remarketing/whatsapp-broadcasts)
 ### 2. Send Automatically via Sequences
Use this to nurture customers automatically on a scheduled timeline (e.g., automatically sending an appointment reminder 1 day after registration).
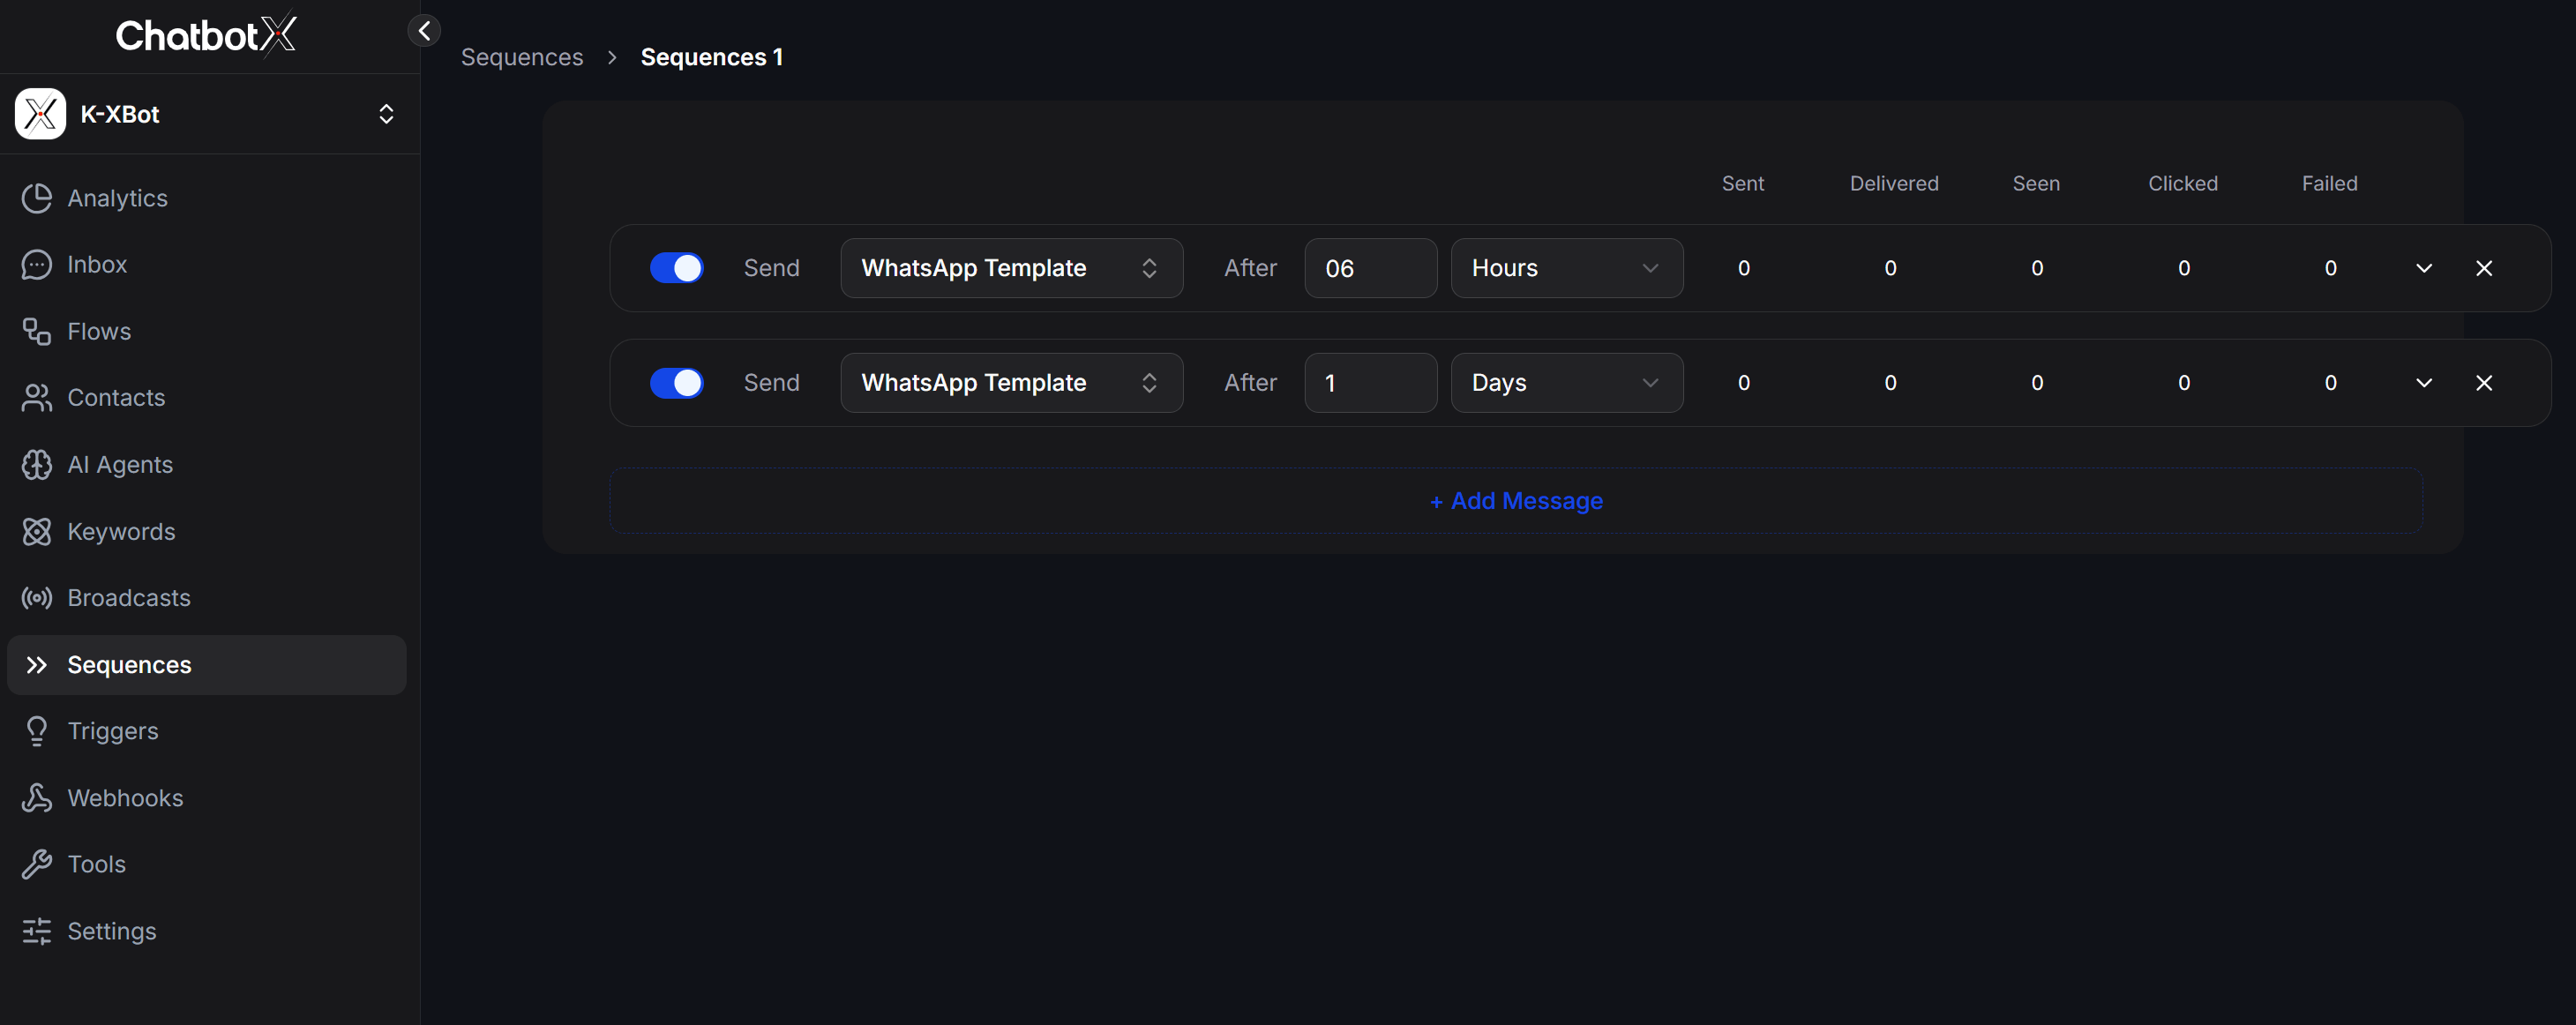
* **How-to:** Go to **Sequences** (under Remarketing) -> Click **+ Create Sequence** -> Select **WhatsApp** -> Add a message, choose the **Template** type -> Select your approved template and map variables.
* *Detailed guide:* [**Automated Campaigns (Sequences)**](/remarketing/sequences)
### 2. Send Automatically via Sequences
Use this to nurture customers automatically on a scheduled timeline (e.g., automatically sending an appointment reminder 1 day after registration).
* **How-to:** Go to **Sequences** (under Remarketing) -> Click **+ Create Sequence** -> Select **WhatsApp** -> Add a message, choose the **Template** type -> Select your approved template and map variables.
* *Detailed guide:* [**Automated Campaigns (Sequences)**](/remarketing/sequences)
 ### 3. Use Directly in Flows (Flow Builder)
Insert templates directly into auto-response kịch bản flows to notify customers when they meet certain conditions.
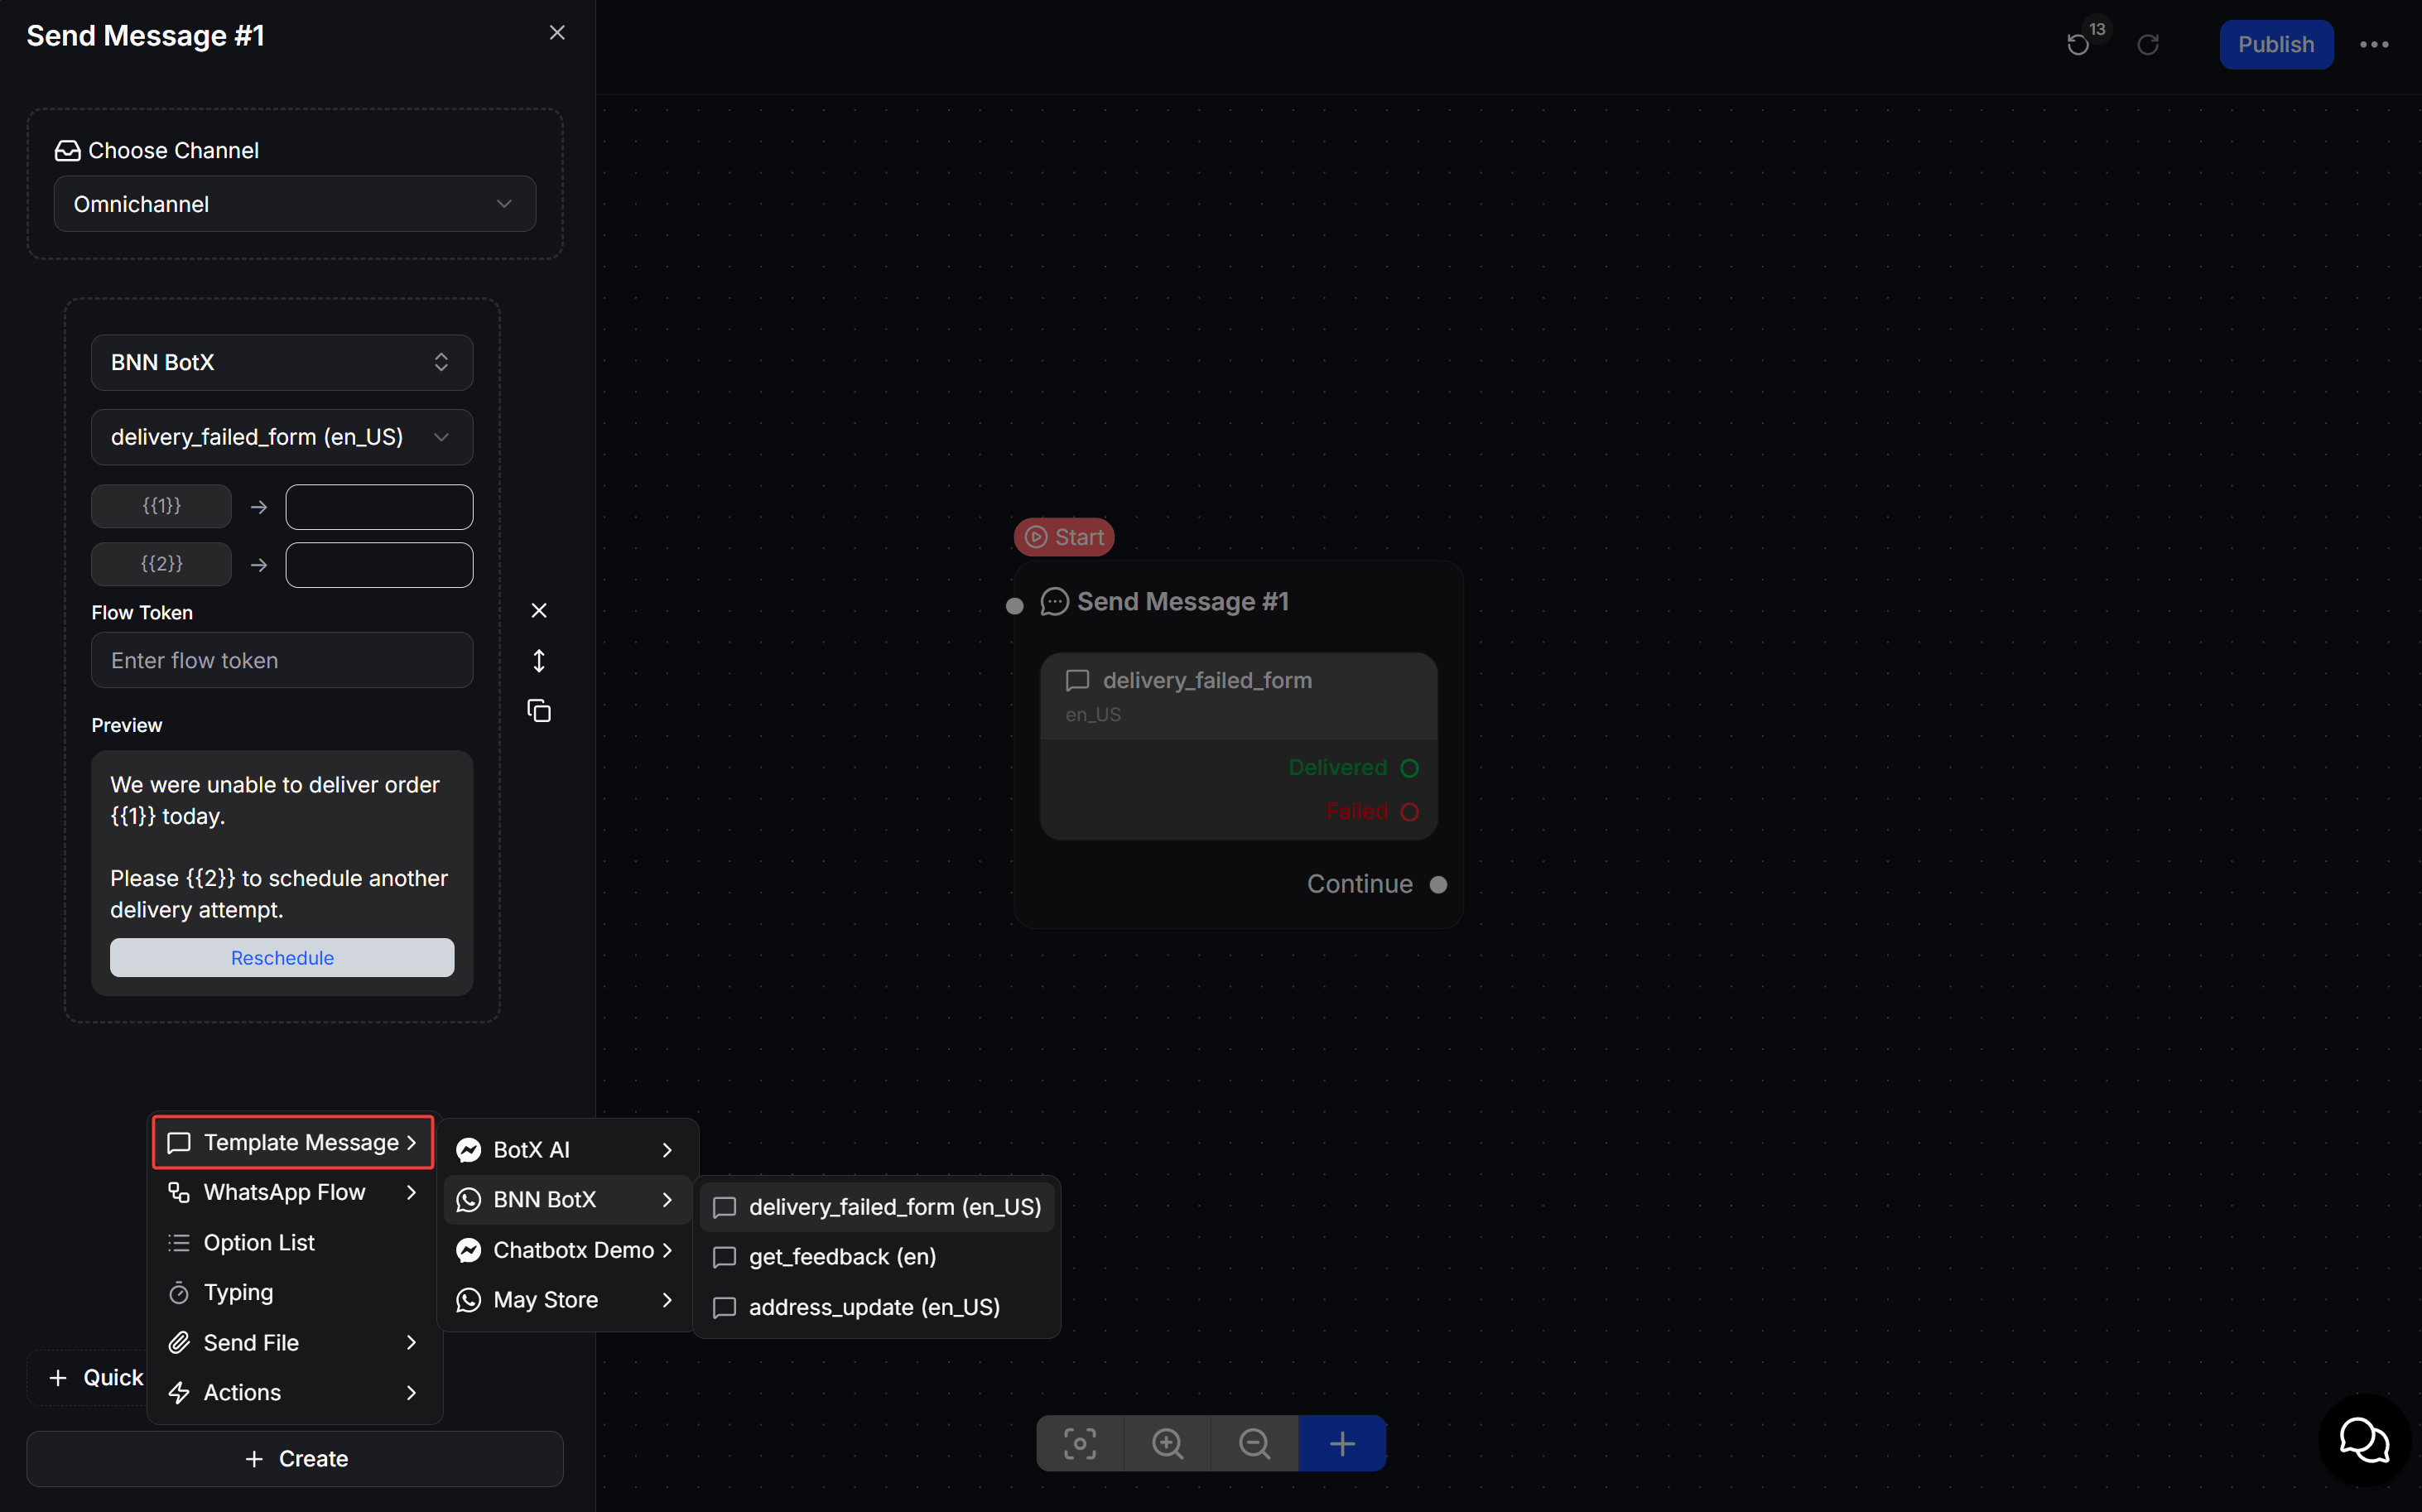
* **How-to:** In the Flow Builder editor, add an action block -> Select **Utility Message** (or WhatsApp Template) -> Select the sending WhatsApp number and the corresponding template.
### 3. Use Directly in Flows (Flow Builder)
Insert templates directly into auto-response kịch bản flows to notify customers when they meet certain conditions.
* **How-to:** In the Flow Builder editor, add an action block -> Select **Utility Message** (or WhatsApp Template) -> Select the sending WhatsApp number and the corresponding template.