> ## Documentation Index
> Fetch the complete documentation index at: https://chatbotx.io/docs/llms.txt
> Use this file to discover all available pages before exploring further.
# Import Contacts
> Learn how to import contacts from a CSV file into ChatbotX, map data to the correct fields, and add Tag or Custom Field values when needed.
**Import Contacts** lets you bring an existing customer list into ChatbotX using a CSV file. This is useful when you need to import many contacts at once, keep your customer data in one place, and prepare the list for filtering, tagging, or assignment afterward.
## When to use Import Contacts
Use **Import Contacts** when you already have a customer list from another system, an event registration file, a lead form export, or an internal sales list. Instead of creating contacts one by one, you can import the full list in a single step and map the data into the right fields inside ChatbotX.
## Create a contact manually with Create Contact
**Create Contact** is a better fit when you only need to add one contact instead of importing a full list. It is the fastest way to create a new profile while you are already working inside the system.
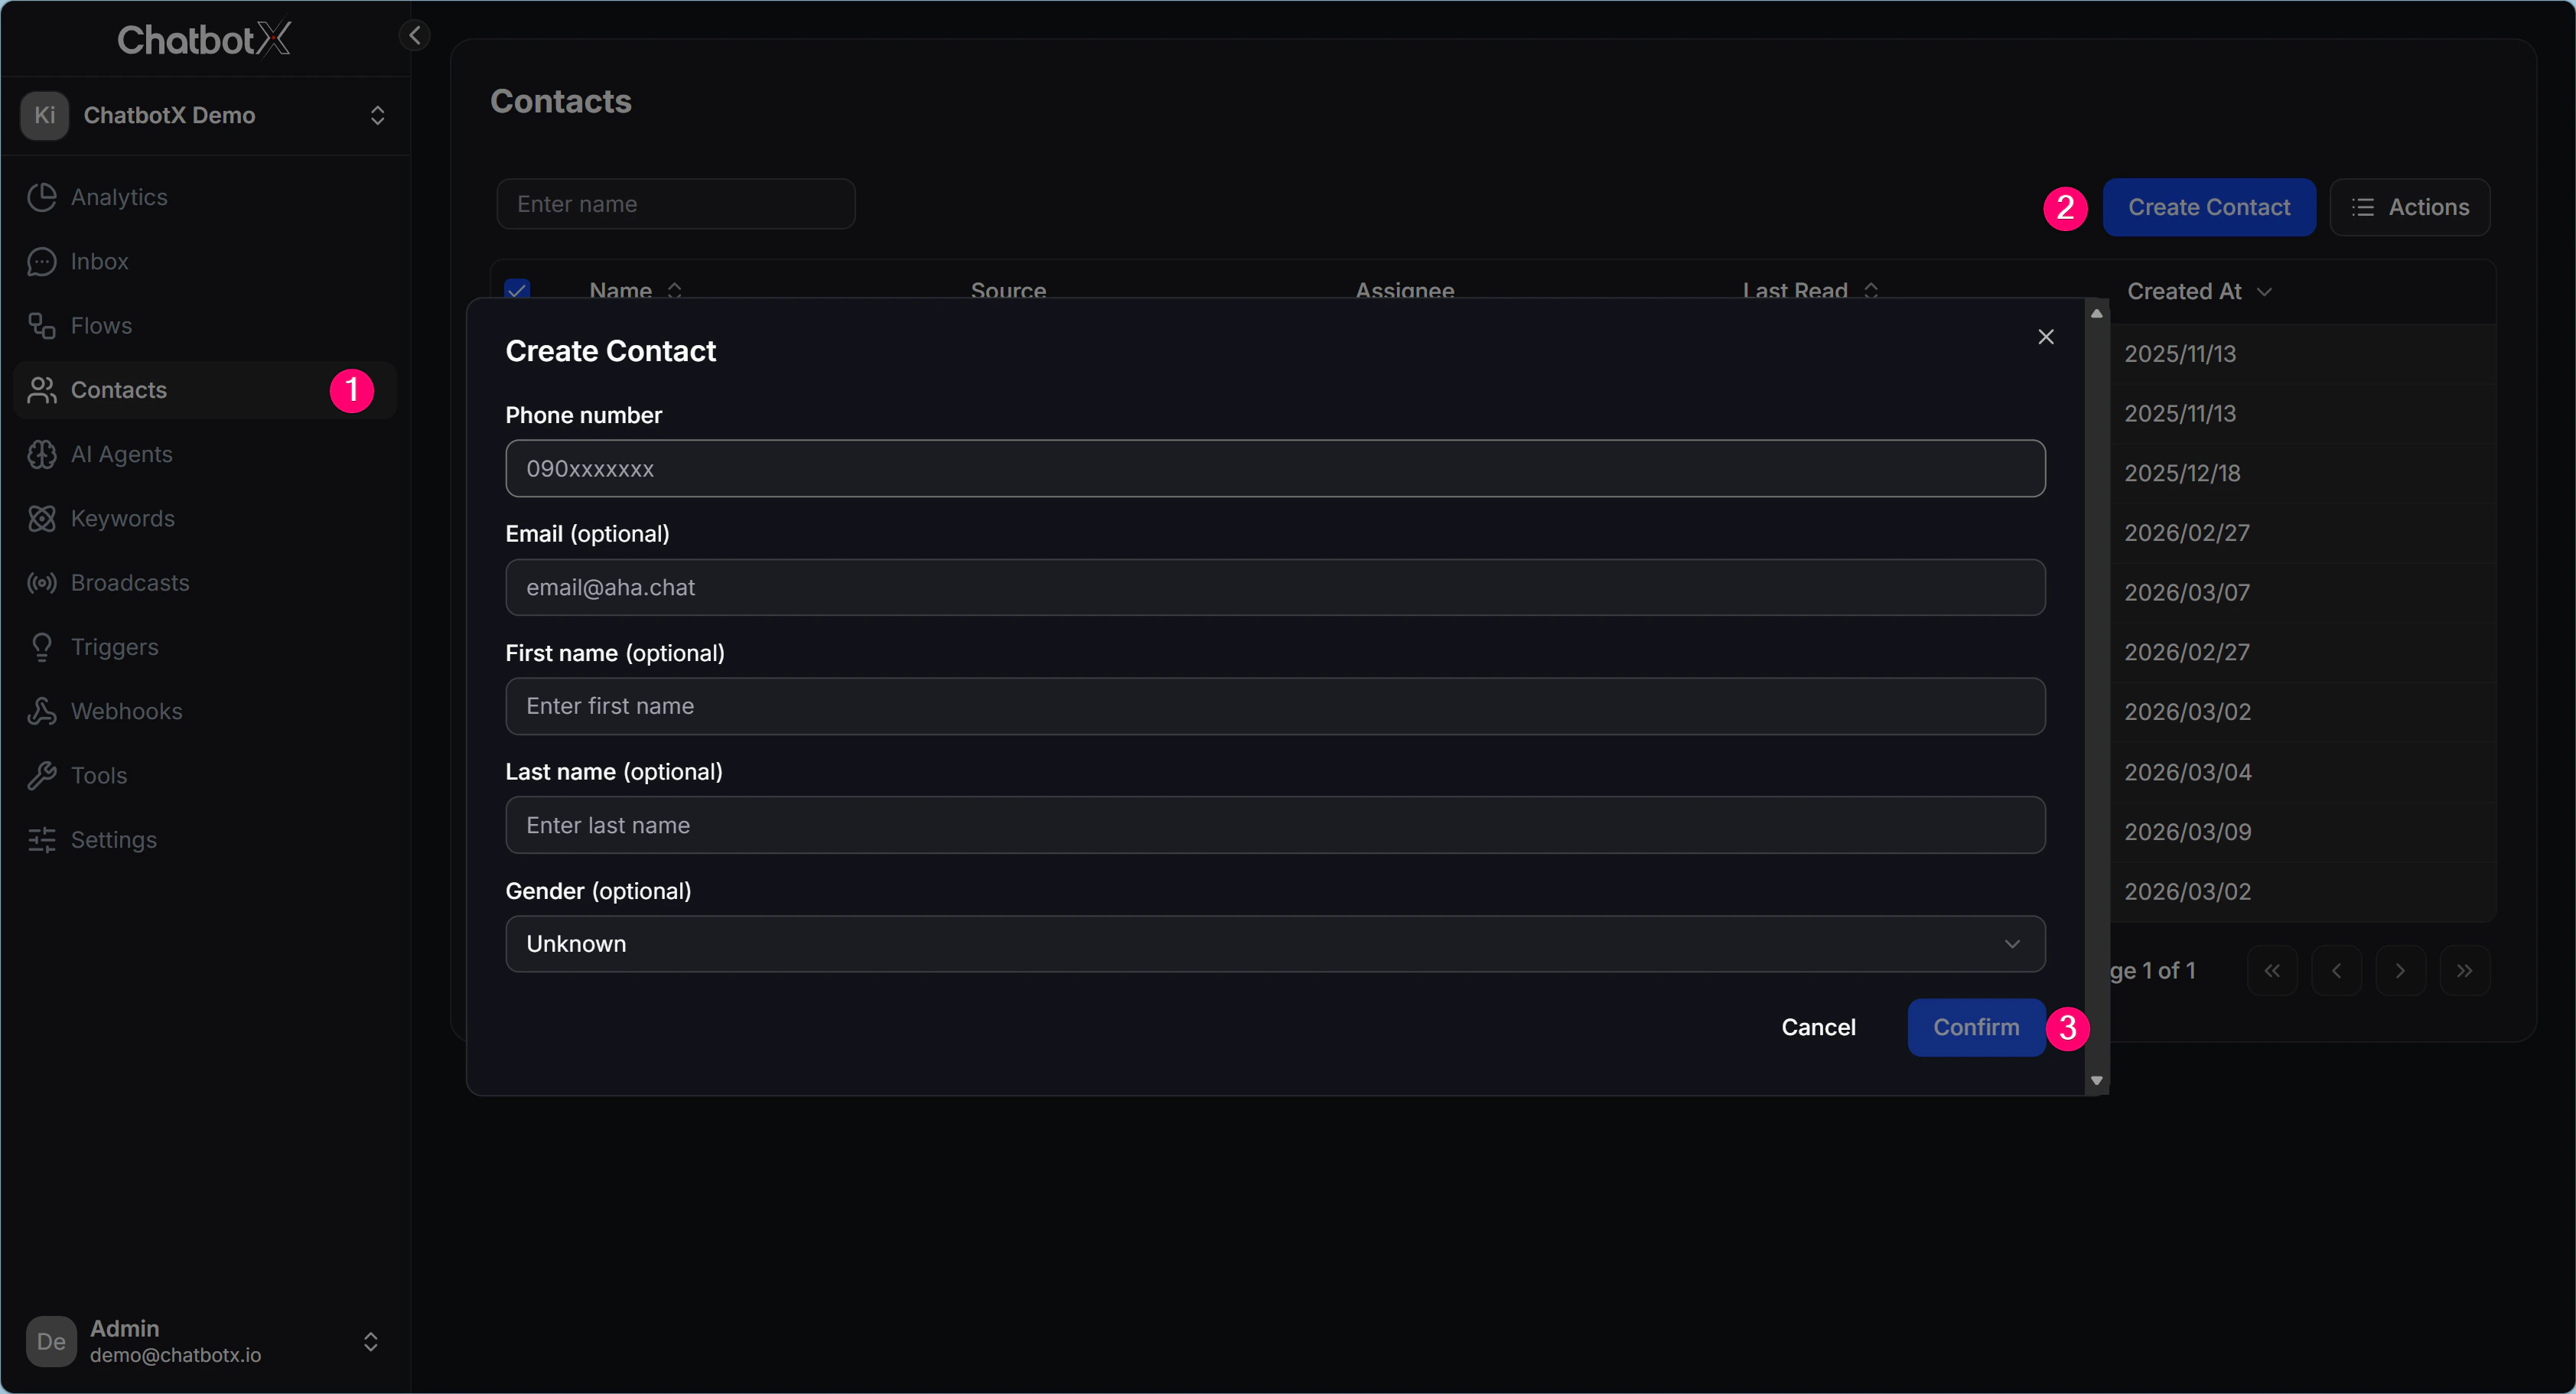
Go to **Contacts** from the left menu.
Click **Create Contact** in the top-right corner to open the new contact form.
Enter the required fields, then click **Confirm** to create the contact.
 ## Import contacts from a CSV file
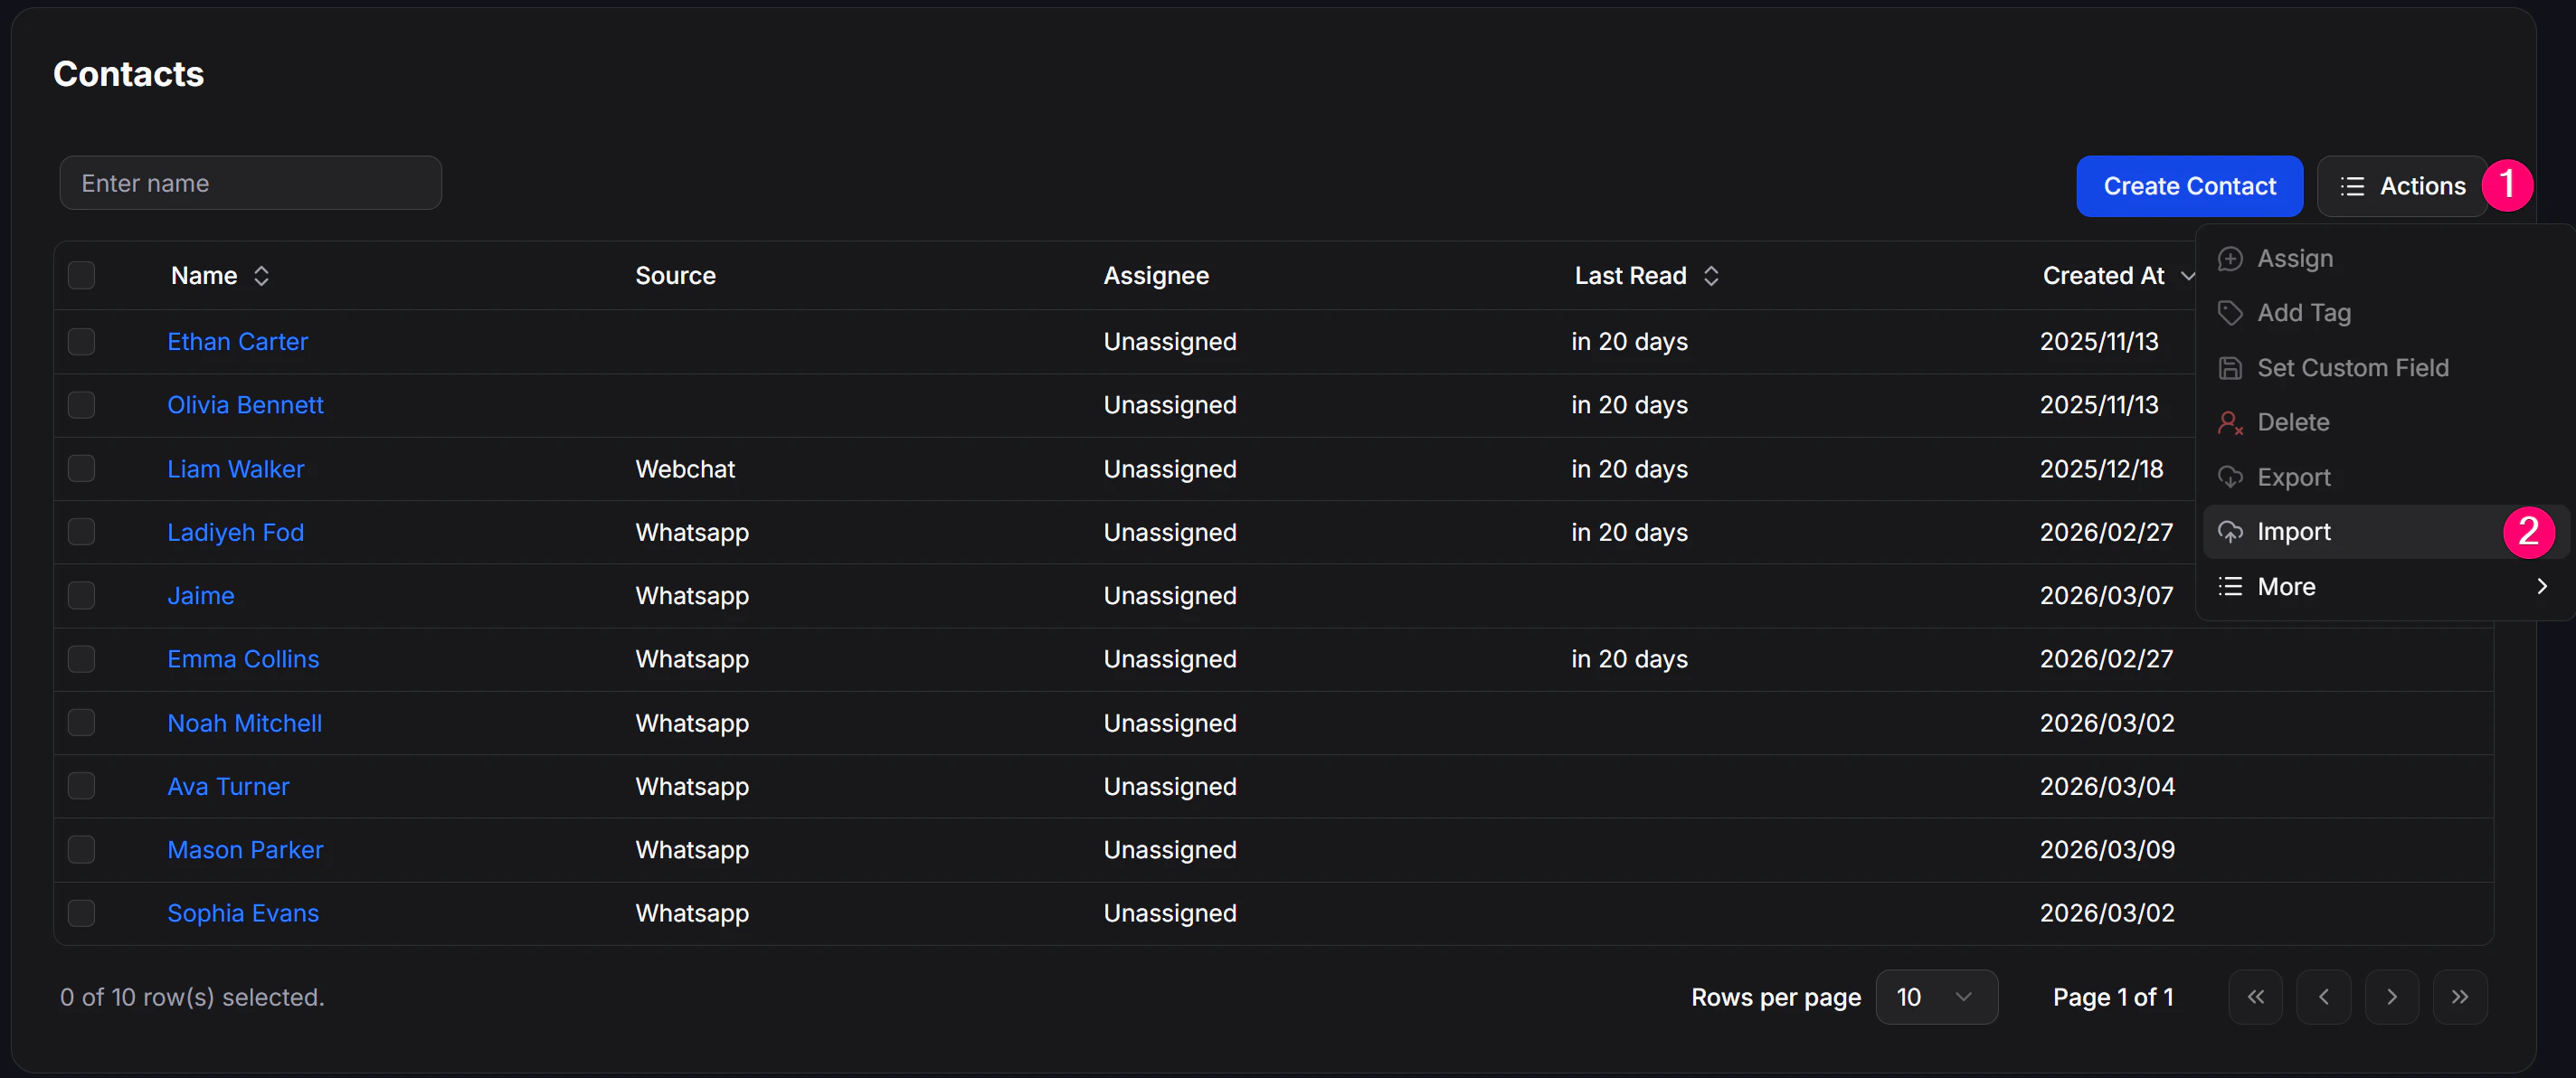
Go to **Contacts**, click **Actions**, then choose **Import**.
## Import contacts from a CSV file
Go to **Contacts**, click **Actions**, then choose **Import**.
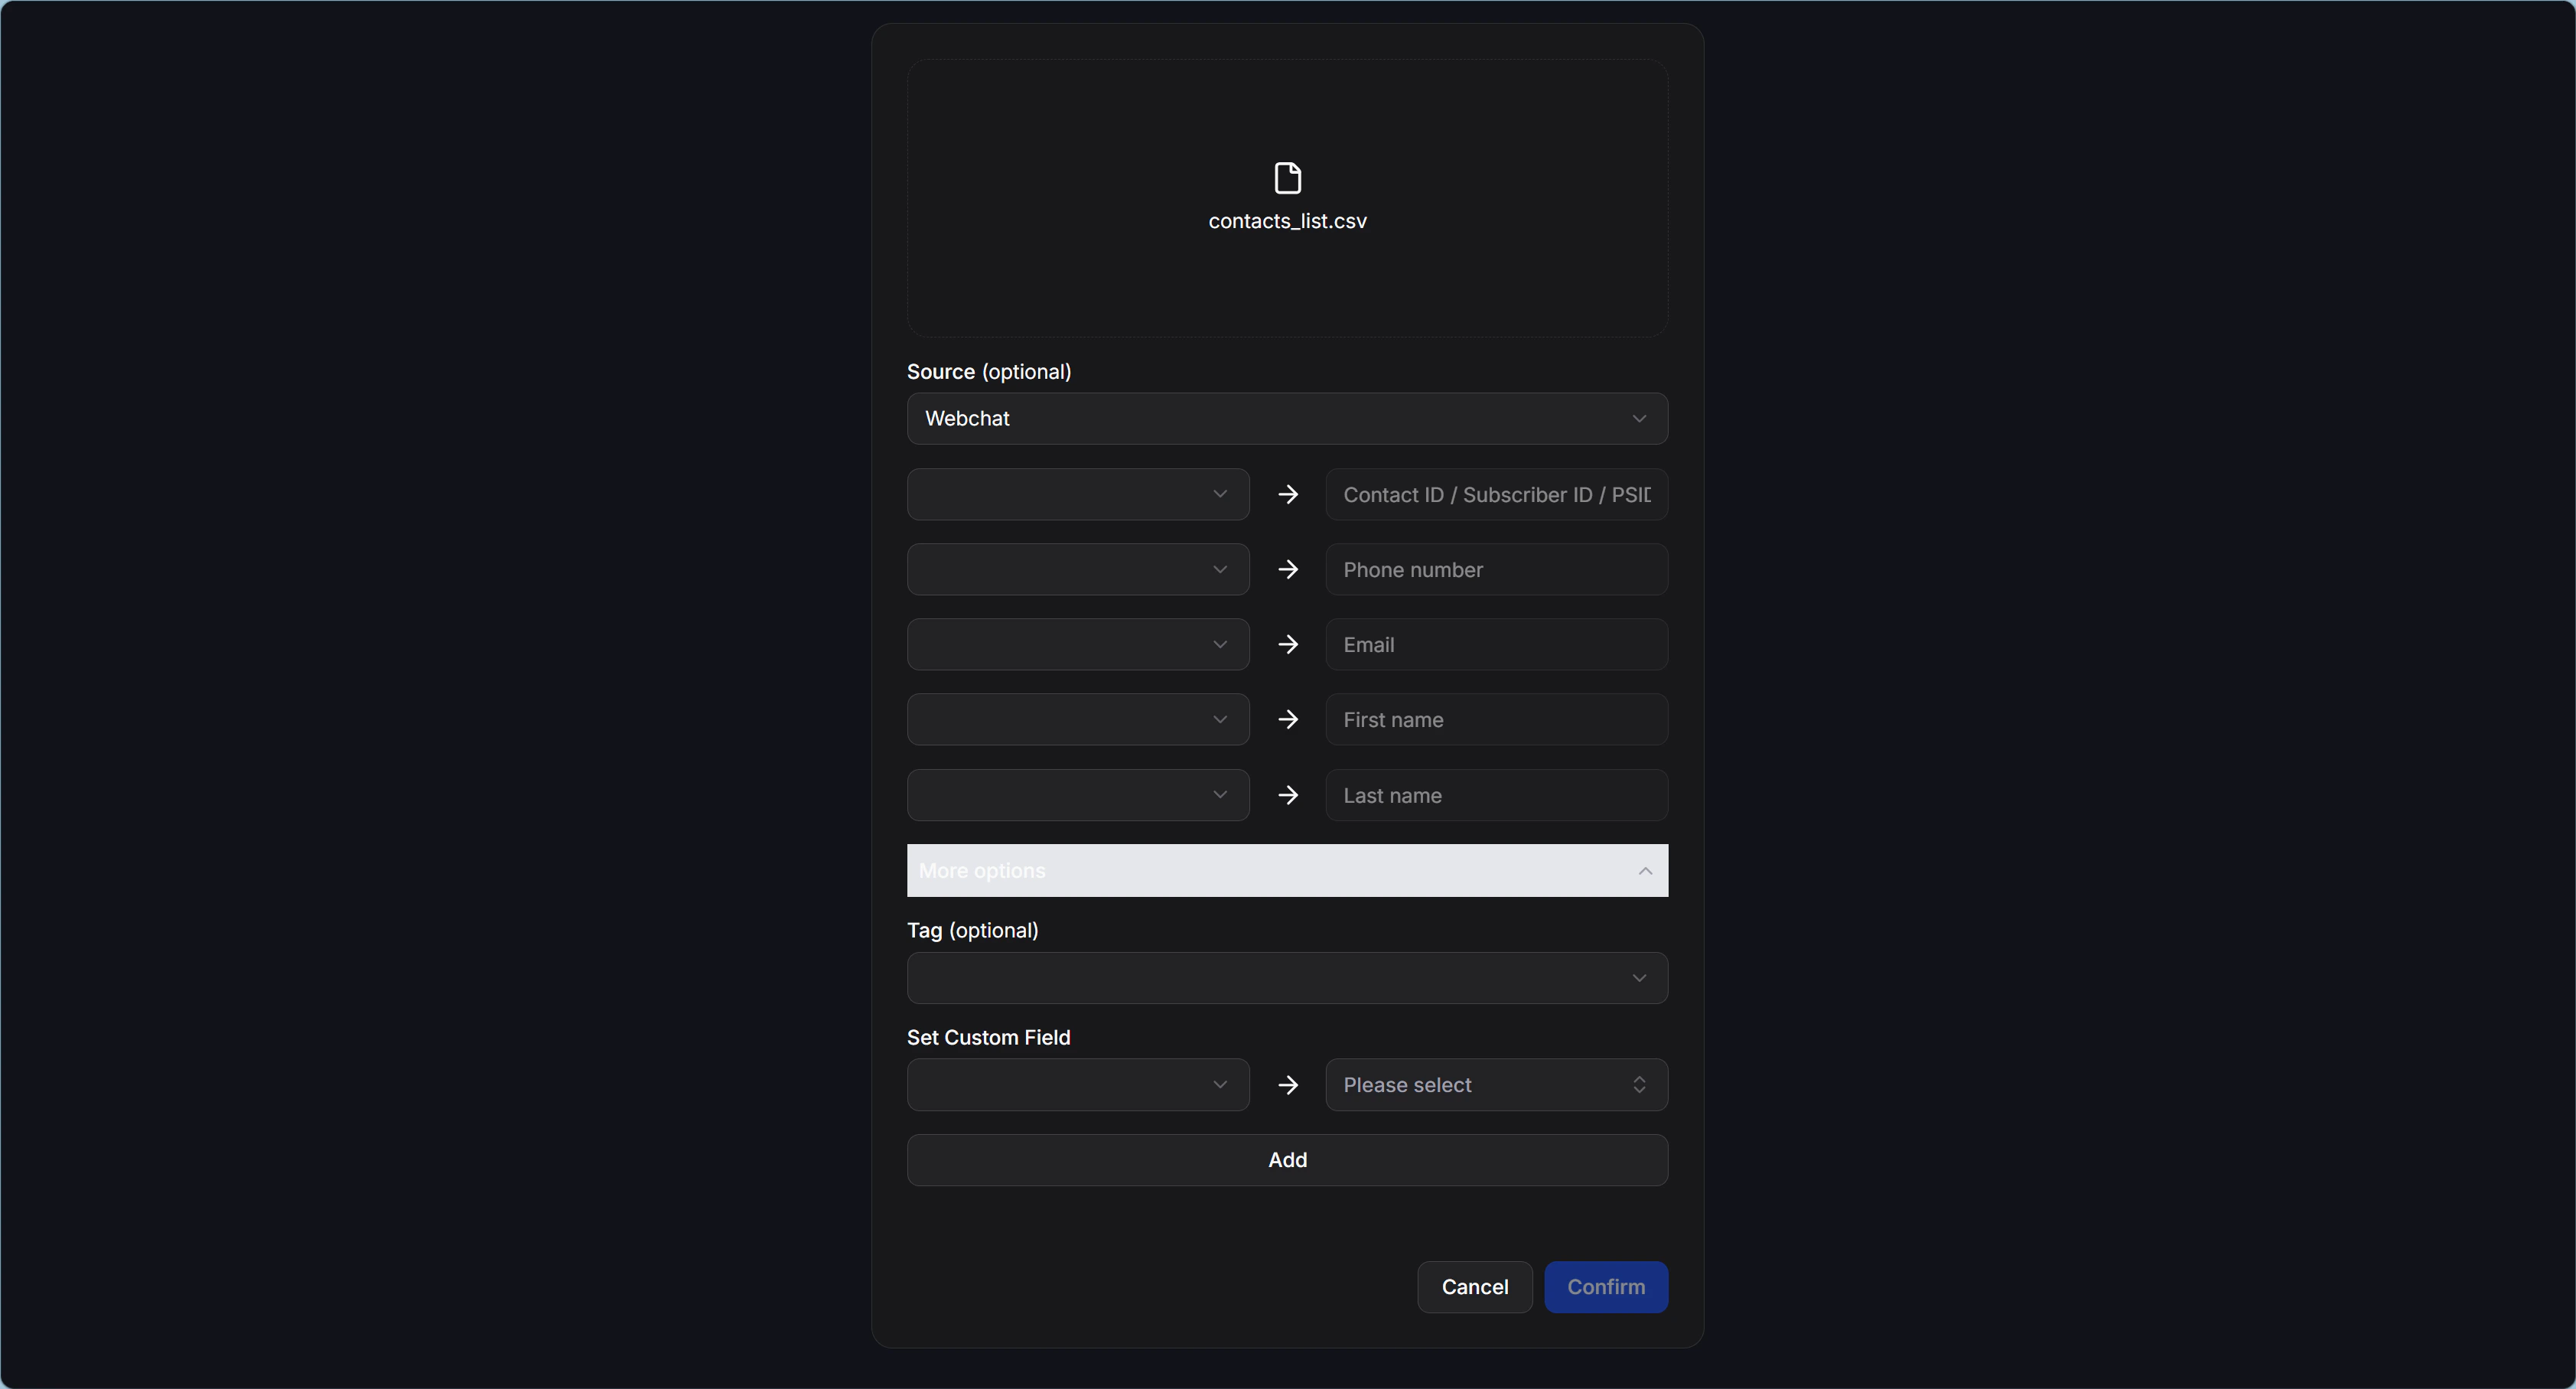
 Select the CSV file that contains your contact list. After upload, the file name will appear at the top of the import window.
In **Source (optional)**, choose a source for the imported list if you want to classify the data right away.
Select the CSV column on the left and map it to the matching field on the right. The current import screen supports standard fields such as `Contact ID / Subscriber ID / PSID`, `Phone number`, `Email`, `First name`, and `Last name`.
Open **More options** if you want to apply a `Tag` or map additional data into a `Custom Field`.
Review the mapping, then click **Confirm** to start the import. If you do not want to continue yet, click **Cancel**.
Select the CSV file that contains your contact list. After upload, the file name will appear at the top of the import window.
In **Source (optional)**, choose a source for the imported list if you want to classify the data right away.
Select the CSV column on the left and map it to the matching field on the right. The current import screen supports standard fields such as `Contact ID / Subscriber ID / PSID`, `Phone number`, `Email`, `First name`, and `Last name`.
Open **More options** if you want to apply a `Tag` or map additional data into a `Custom Field`.
Review the mapping, then click **Confirm** to start the import. If you do not want to continue yet, click **Cancel**.
 ## Fields shown on the import screen
The current import screen includes these main areas:
| Item | Purpose |
| ------------------- | ----------------------------------------------------------- |
| File upload area | Shows the CSV file currently selected for import |
| `Source (optional)` | Assigns a source to the imported contact group |
| Left column | Lets you choose data columns from the CSV file |
| Right column | Lets you choose the ChatbotX field that will store the data |
| `More options` | Opens extra settings for `Tag` and `Set Custom Field` |
| `Confirm` | Starts the import |
| `Cancel` | Closes the import window without saving changes |
## More options
The **More options** section is useful when you want to enrich the whole list during import.
### Tag (optional)
The **Tag (optional)** field lets you apply the same `Tag` to every contact in the import file. This is useful when you want to label a group quickly by campaign, data source, or import batch.
### Set Custom Field
The **Set Custom Field** section lets you map more CSV data into existing `Custom Field` entries in ChatbotX. Choose the data column on the left, the matching `Custom Field` on the right, then click **Add** to include that mapping in the import list.
If you do not have the right field yet for storing custom contact data, create it first in [Custom Fields](/docs/automation/custom-fields).
## Prepare the file before importing
Before starting the import, it helps to review the CSV file so mapping is faster and cleaner:
* Use clear column names so they are easy to identify during mapping.
* Make sure key columns such as phone number, email, or name are separated correctly.
* Review the data first so you do not import records you no longer need.
* Prepare the needed `Tag` or `Custom Field` values in advance if you want to group the data immediately.
## Check after the import
After the import finishes, open **Contacts** again and inspect a few sample records to make sure the data was saved into the correct fields. From there, you can use [Filter Contacts](/docs/contacts/filter-contacts) to review the imported group quickly, or use [Bulk Actions](/docs/contacts/bulk-actions) if you need `Assign`, `Add Tag`, `Set Custom Field`, or `Export`.
## Example use case
For example, your sales team may have a file named `contacts_list.csv` containing leads collected at an offline event. You can import that file into ChatbotX, map columns such as phone number, email, and name, then apply a campaign `Tag` and add a `Custom Field` so the team can keep filtering, segmenting, and tracking those contacts in one place.
## Fields shown on the import screen
The current import screen includes these main areas:
| Item | Purpose |
| ------------------- | ----------------------------------------------------------- |
| File upload area | Shows the CSV file currently selected for import |
| `Source (optional)` | Assigns a source to the imported contact group |
| Left column | Lets you choose data columns from the CSV file |
| Right column | Lets you choose the ChatbotX field that will store the data |
| `More options` | Opens extra settings for `Tag` and `Set Custom Field` |
| `Confirm` | Starts the import |
| `Cancel` | Closes the import window without saving changes |
## More options
The **More options** section is useful when you want to enrich the whole list during import.
### Tag (optional)
The **Tag (optional)** field lets you apply the same `Tag` to every contact in the import file. This is useful when you want to label a group quickly by campaign, data source, or import batch.
### Set Custom Field
The **Set Custom Field** section lets you map more CSV data into existing `Custom Field` entries in ChatbotX. Choose the data column on the left, the matching `Custom Field` on the right, then click **Add** to include that mapping in the import list.
If you do not have the right field yet for storing custom contact data, create it first in [Custom Fields](/docs/automation/custom-fields).
## Prepare the file before importing
Before starting the import, it helps to review the CSV file so mapping is faster and cleaner:
* Use clear column names so they are easy to identify during mapping.
* Make sure key columns such as phone number, email, or name are separated correctly.
* Review the data first so you do not import records you no longer need.
* Prepare the needed `Tag` or `Custom Field` values in advance if you want to group the data immediately.
## Check after the import
After the import finishes, open **Contacts** again and inspect a few sample records to make sure the data was saved into the correct fields. From there, you can use [Filter Contacts](/docs/contacts/filter-contacts) to review the imported group quickly, or use [Bulk Actions](/docs/contacts/bulk-actions) if you need `Assign`, `Add Tag`, `Set Custom Field`, or `Export`.
## Example use case
For example, your sales team may have a file named `contacts_list.csv` containing leads collected at an offline event. You can import that file into ChatbotX, map columns such as phone number, email, and name, then apply a campaign `Tag` and add a `Custom Field` so the team can keep filtering, segmenting, and tracking those contacts in one place.