> ## Documentation Index
> Fetch the complete documentation index at: https://chatbotx.io/docs/llms.txt
> Use this file to discover all available pages before exploring further.
# Manual Contact Actions in Inbox
> Learn how to manually manage contact attributes, custom fields, internal notes, coupons, tags, and automated sequences directly from the Inbox.
In the ChatbotX **Inbox**, in addition to replying directly to customer messages, human agents can actively manage contact profiles and perform real-time manual actions using the contact drawer on the right sidebar.
This panel enables you to quickly understand customer context, update personal details, assign tags, write internal team notes, and adjust automated marketing flows right in the middle of a live conversation.
## Edit Contact Details and System Fields
The top section of the profile drawer displays the customer's avatar, unique identifier (**Contact ID**), and essential system fields associated with their messaging channel (WhatsApp, Messenger, Instagram, etc.):
* **Contact Info**: Shows the phone number or social handle associated with the customer.
* **System Attributes**: Includes **Language**, **Gender**, **Timezone**, **Email**, **First name**, **Last name**, and **Phone number**.
* **Inline Editing**: Click **Click to edit** next to any field to enter new data or modify existing details, then click the checkmark icon to save changes instantly.
## Manage Custom Fields
Custom fields allow you to track business-specific information collected from conversations, such as delivery addresses, account numbers, company names, or customer preferences.
### Add and Update Custom Fields
To add or update fields for a contact:
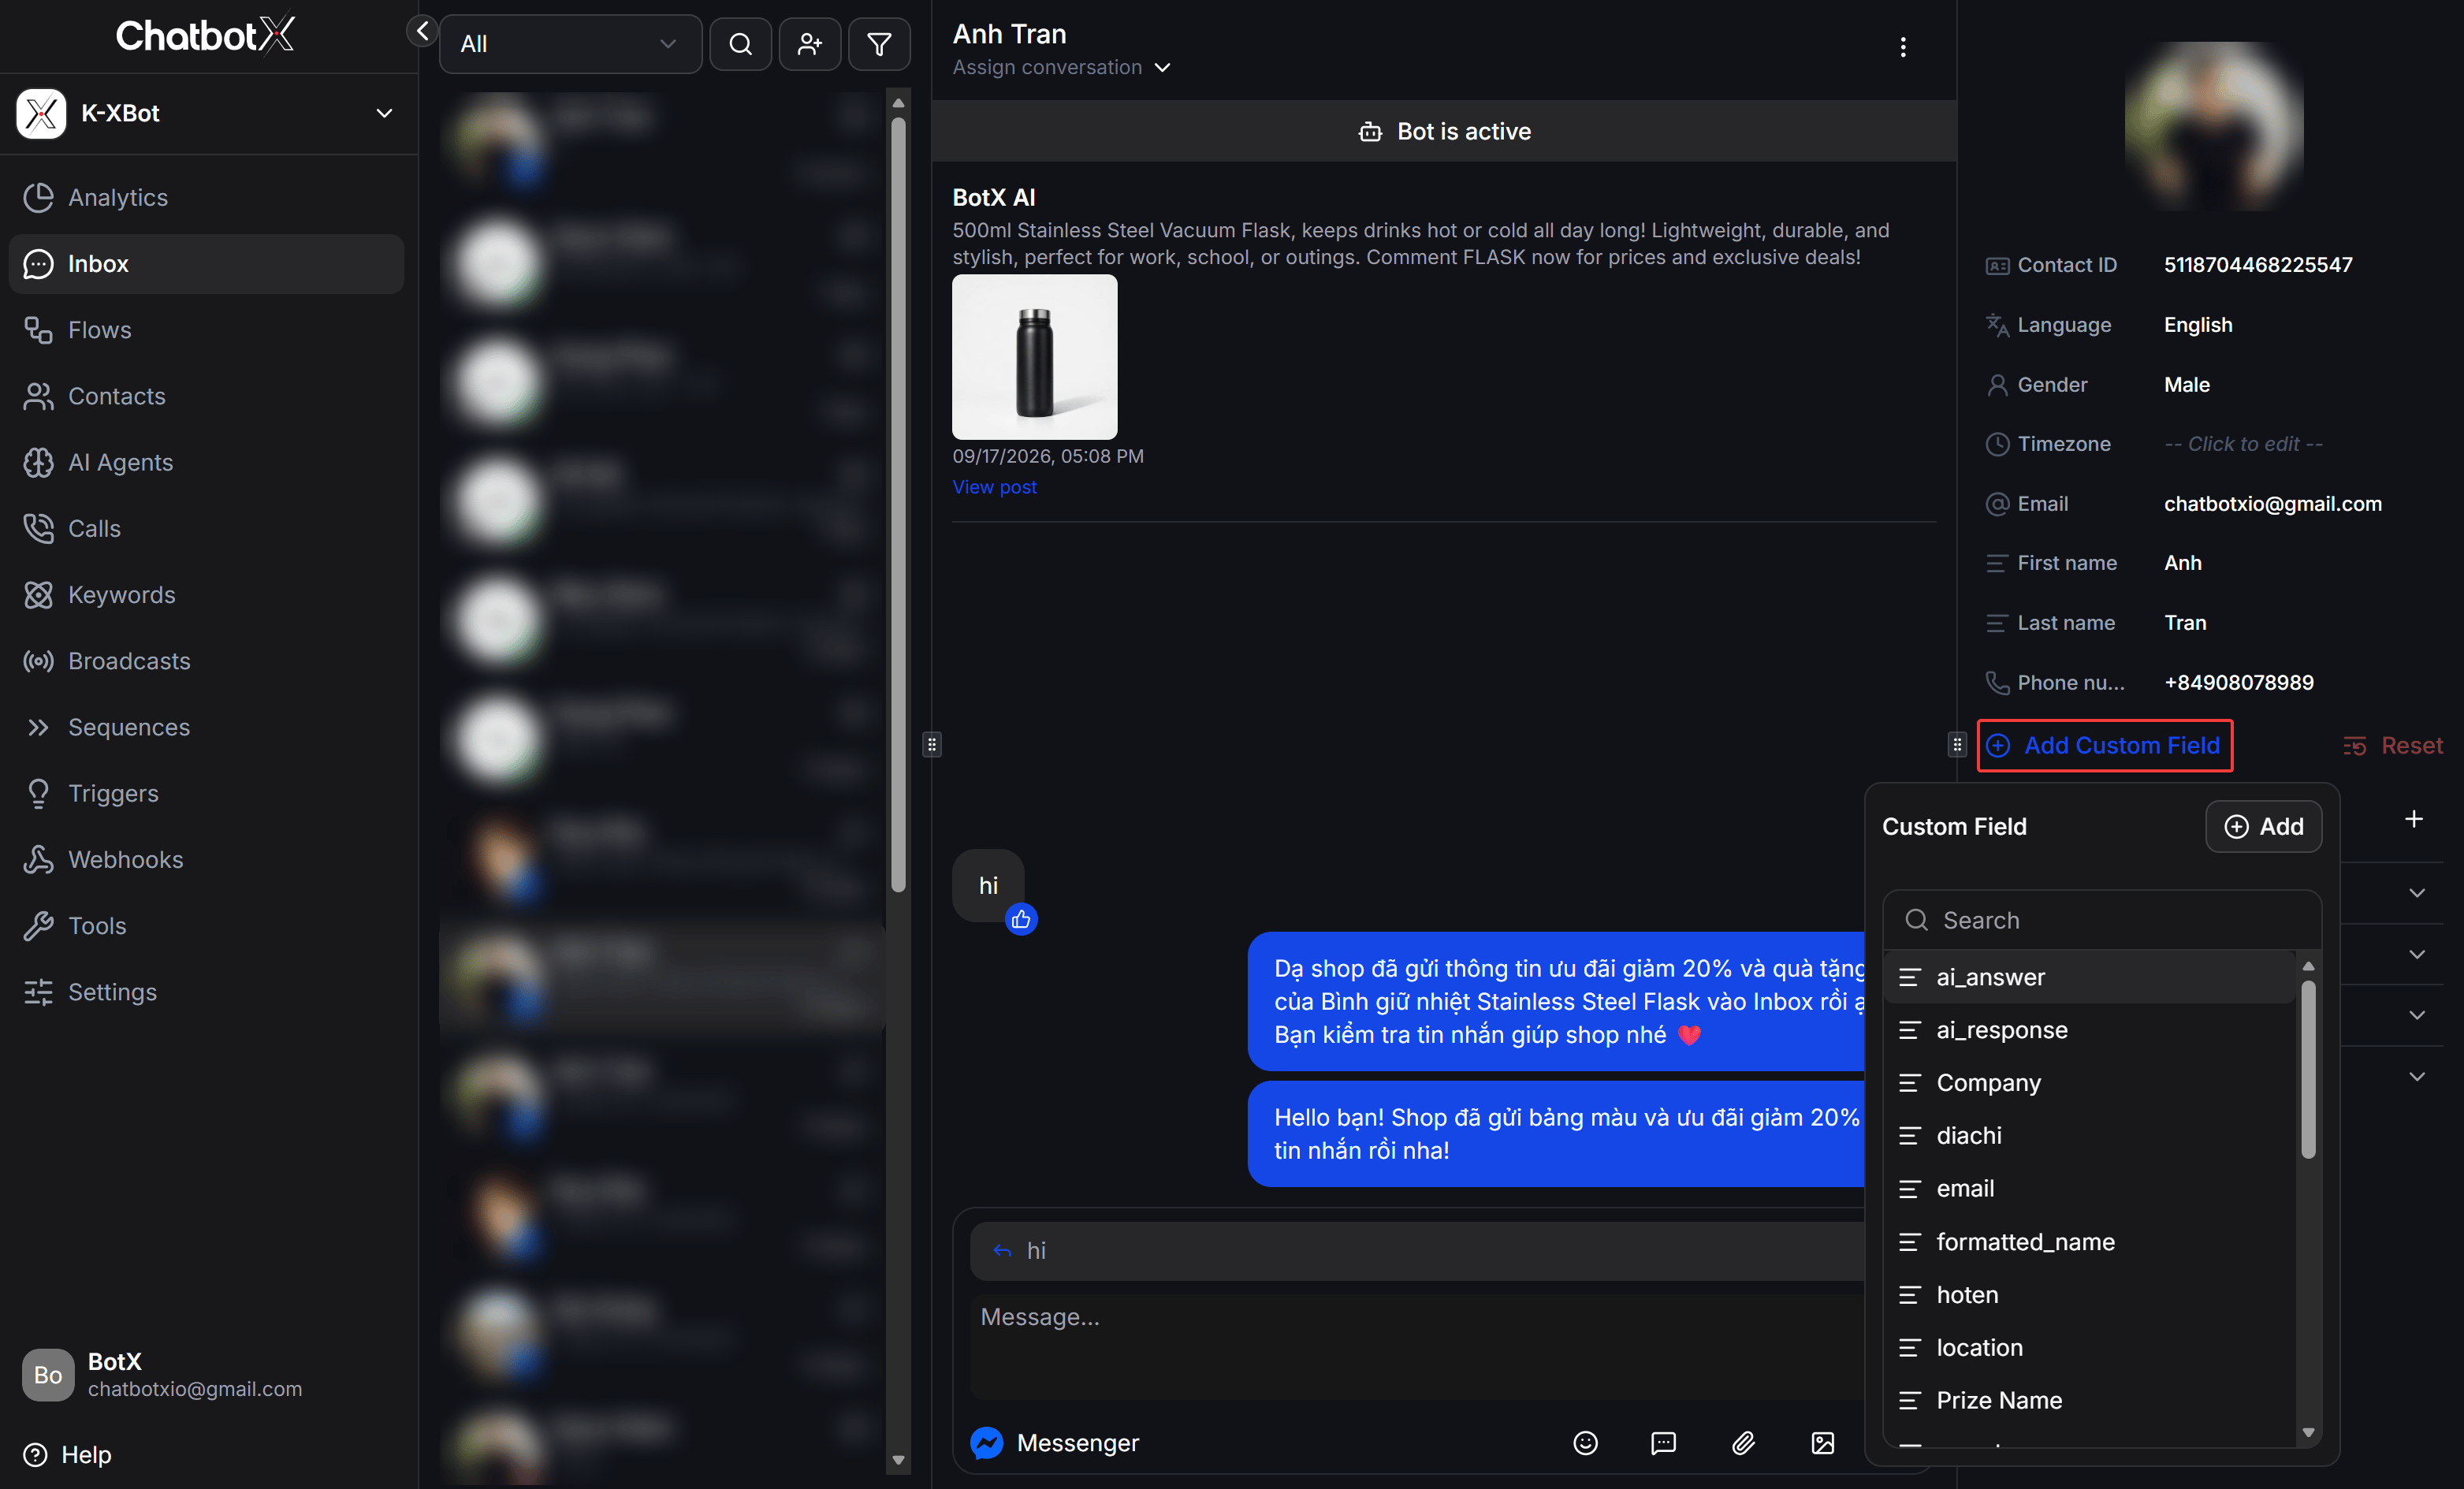
1. Click **+ Add Custom Field** below the existing fields list.
2. A popover listing all available bot custom fields will open, complete with a **Search** bar.
3. Search for and select the desired field from the list or type in the search bar.
4. Once added to the drawer, click on the field to enter or update its value.
 ### Clear All Custom Fields
If you need to wipe all stored custom field values for a specific contact (for instance, to restart a test flow or let a customer start an onboarding questionnaire from scratch):
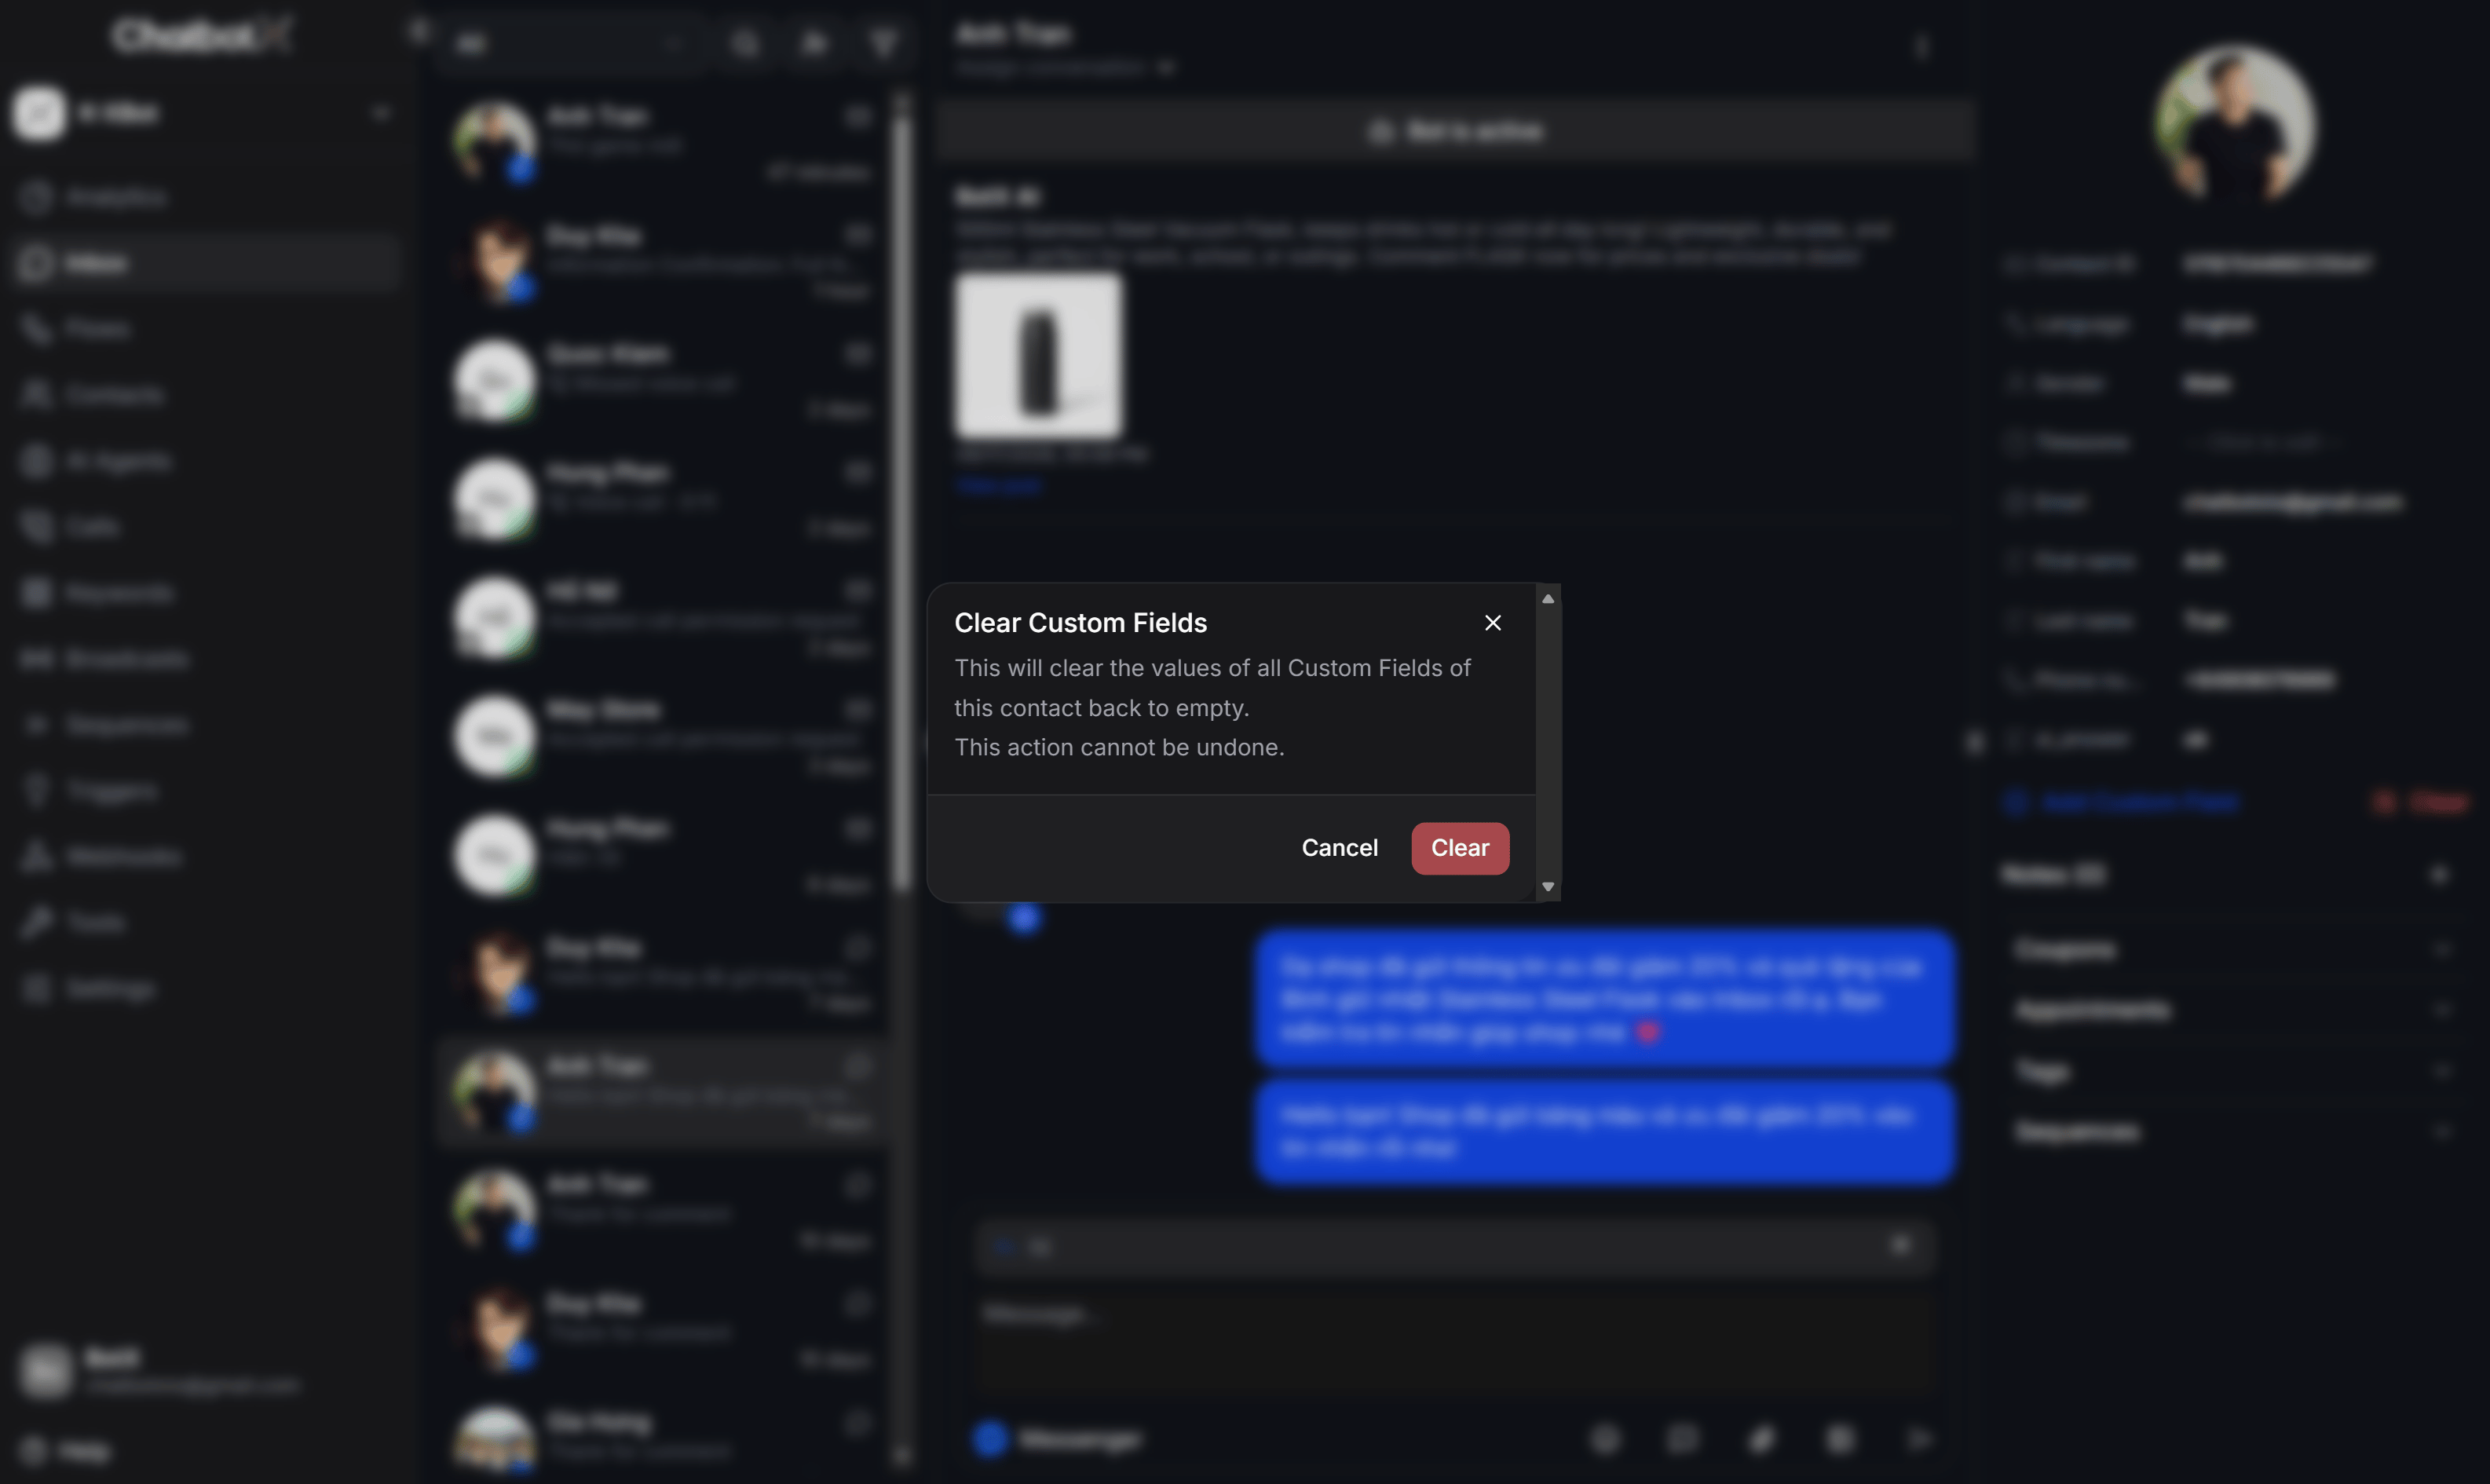
1. Click the red **Clear** button located next to **+ Add Custom Field**.
2. A confirmation modal will appear with the warning: *"This will clear the values of all Custom Fields of this contact back to empty. This action cannot be undone."*
3. Click **Clear** to confirm and clear all values, or click **Cancel** to abort.
### Clear All Custom Fields
If you need to wipe all stored custom field values for a specific contact (for instance, to restart a test flow or let a customer start an onboarding questionnaire from scratch):
1. Click the red **Clear** button located next to **+ Add Custom Field**.
2. A confirmation modal will appear with the warning: *"This will clear the values of all Custom Fields of this contact back to empty. This action cannot be undone."*
3. Click **Clear** to confirm and clear all values, or click **Cancel** to abort.
 ## Create and Manage Internal Notes
Internal notes are designed for private team collaboration. Notes are visible only to team members inside the ChatbotX workspace and are completely hidden from the customer.
### Adding a Note
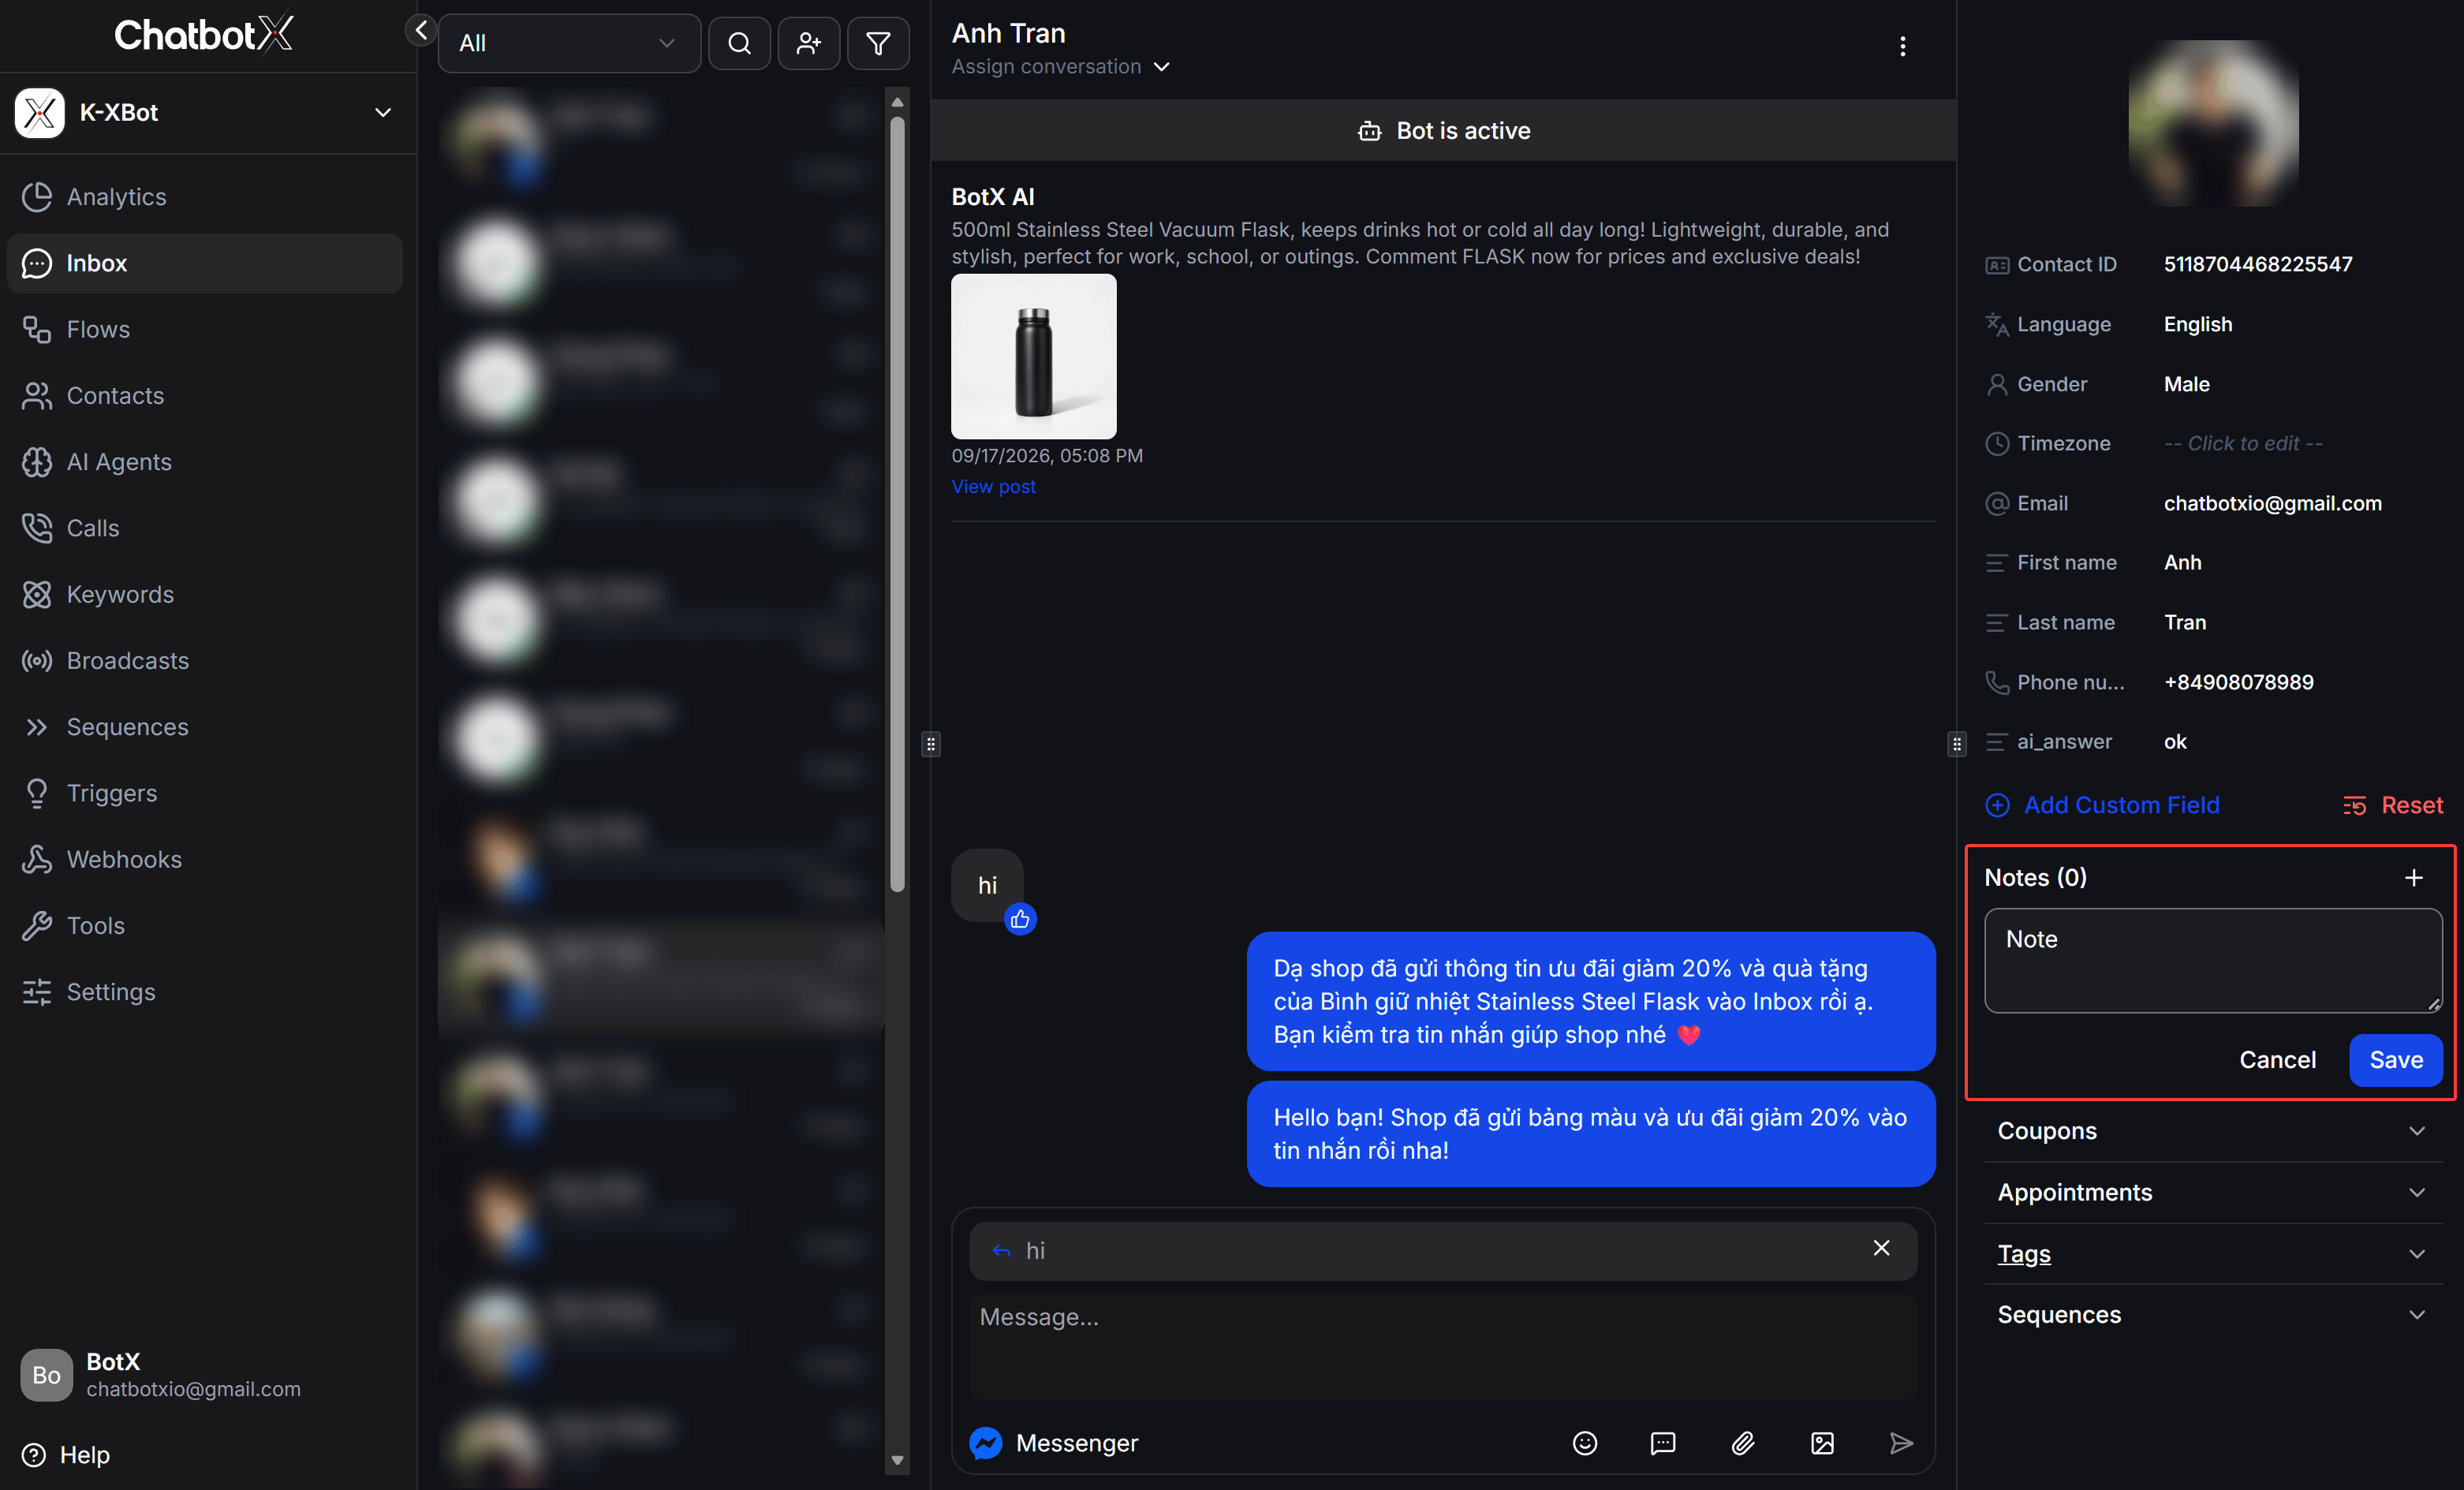
1. Locate the **Notes** accordion on the right sidebar and click the plus icon (**+**).
2. An editable note area will expand. Type any important customer notes or handoff details (such as order preferences, pricing agreements, or special requests like *Buy \$199*).
3. Click **Save** to persist the note, or click **Cancel** to dismiss.
## Create and Manage Internal Notes
Internal notes are designed for private team collaboration. Notes are visible only to team members inside the ChatbotX workspace and are completely hidden from the customer.
### Adding a Note
1. Locate the **Notes** accordion on the right sidebar and click the plus icon (**+**).
2. An editable note area will expand. Type any important customer notes or handoff details (such as order preferences, pricing agreements, or special requests like *Buy \$199*).
3. Click **Save** to persist the note, or click **Cancel** to dismiss.
 Once saved, the note counter updates next to the section title (for example, `Notes (1)`). You can review all chronological notes and delete obsolete ones when tasks are resolved.
## Review Customer Coupons
If your business uses the ChatbotX Coupons tool for promotions and loyalty campaigns:
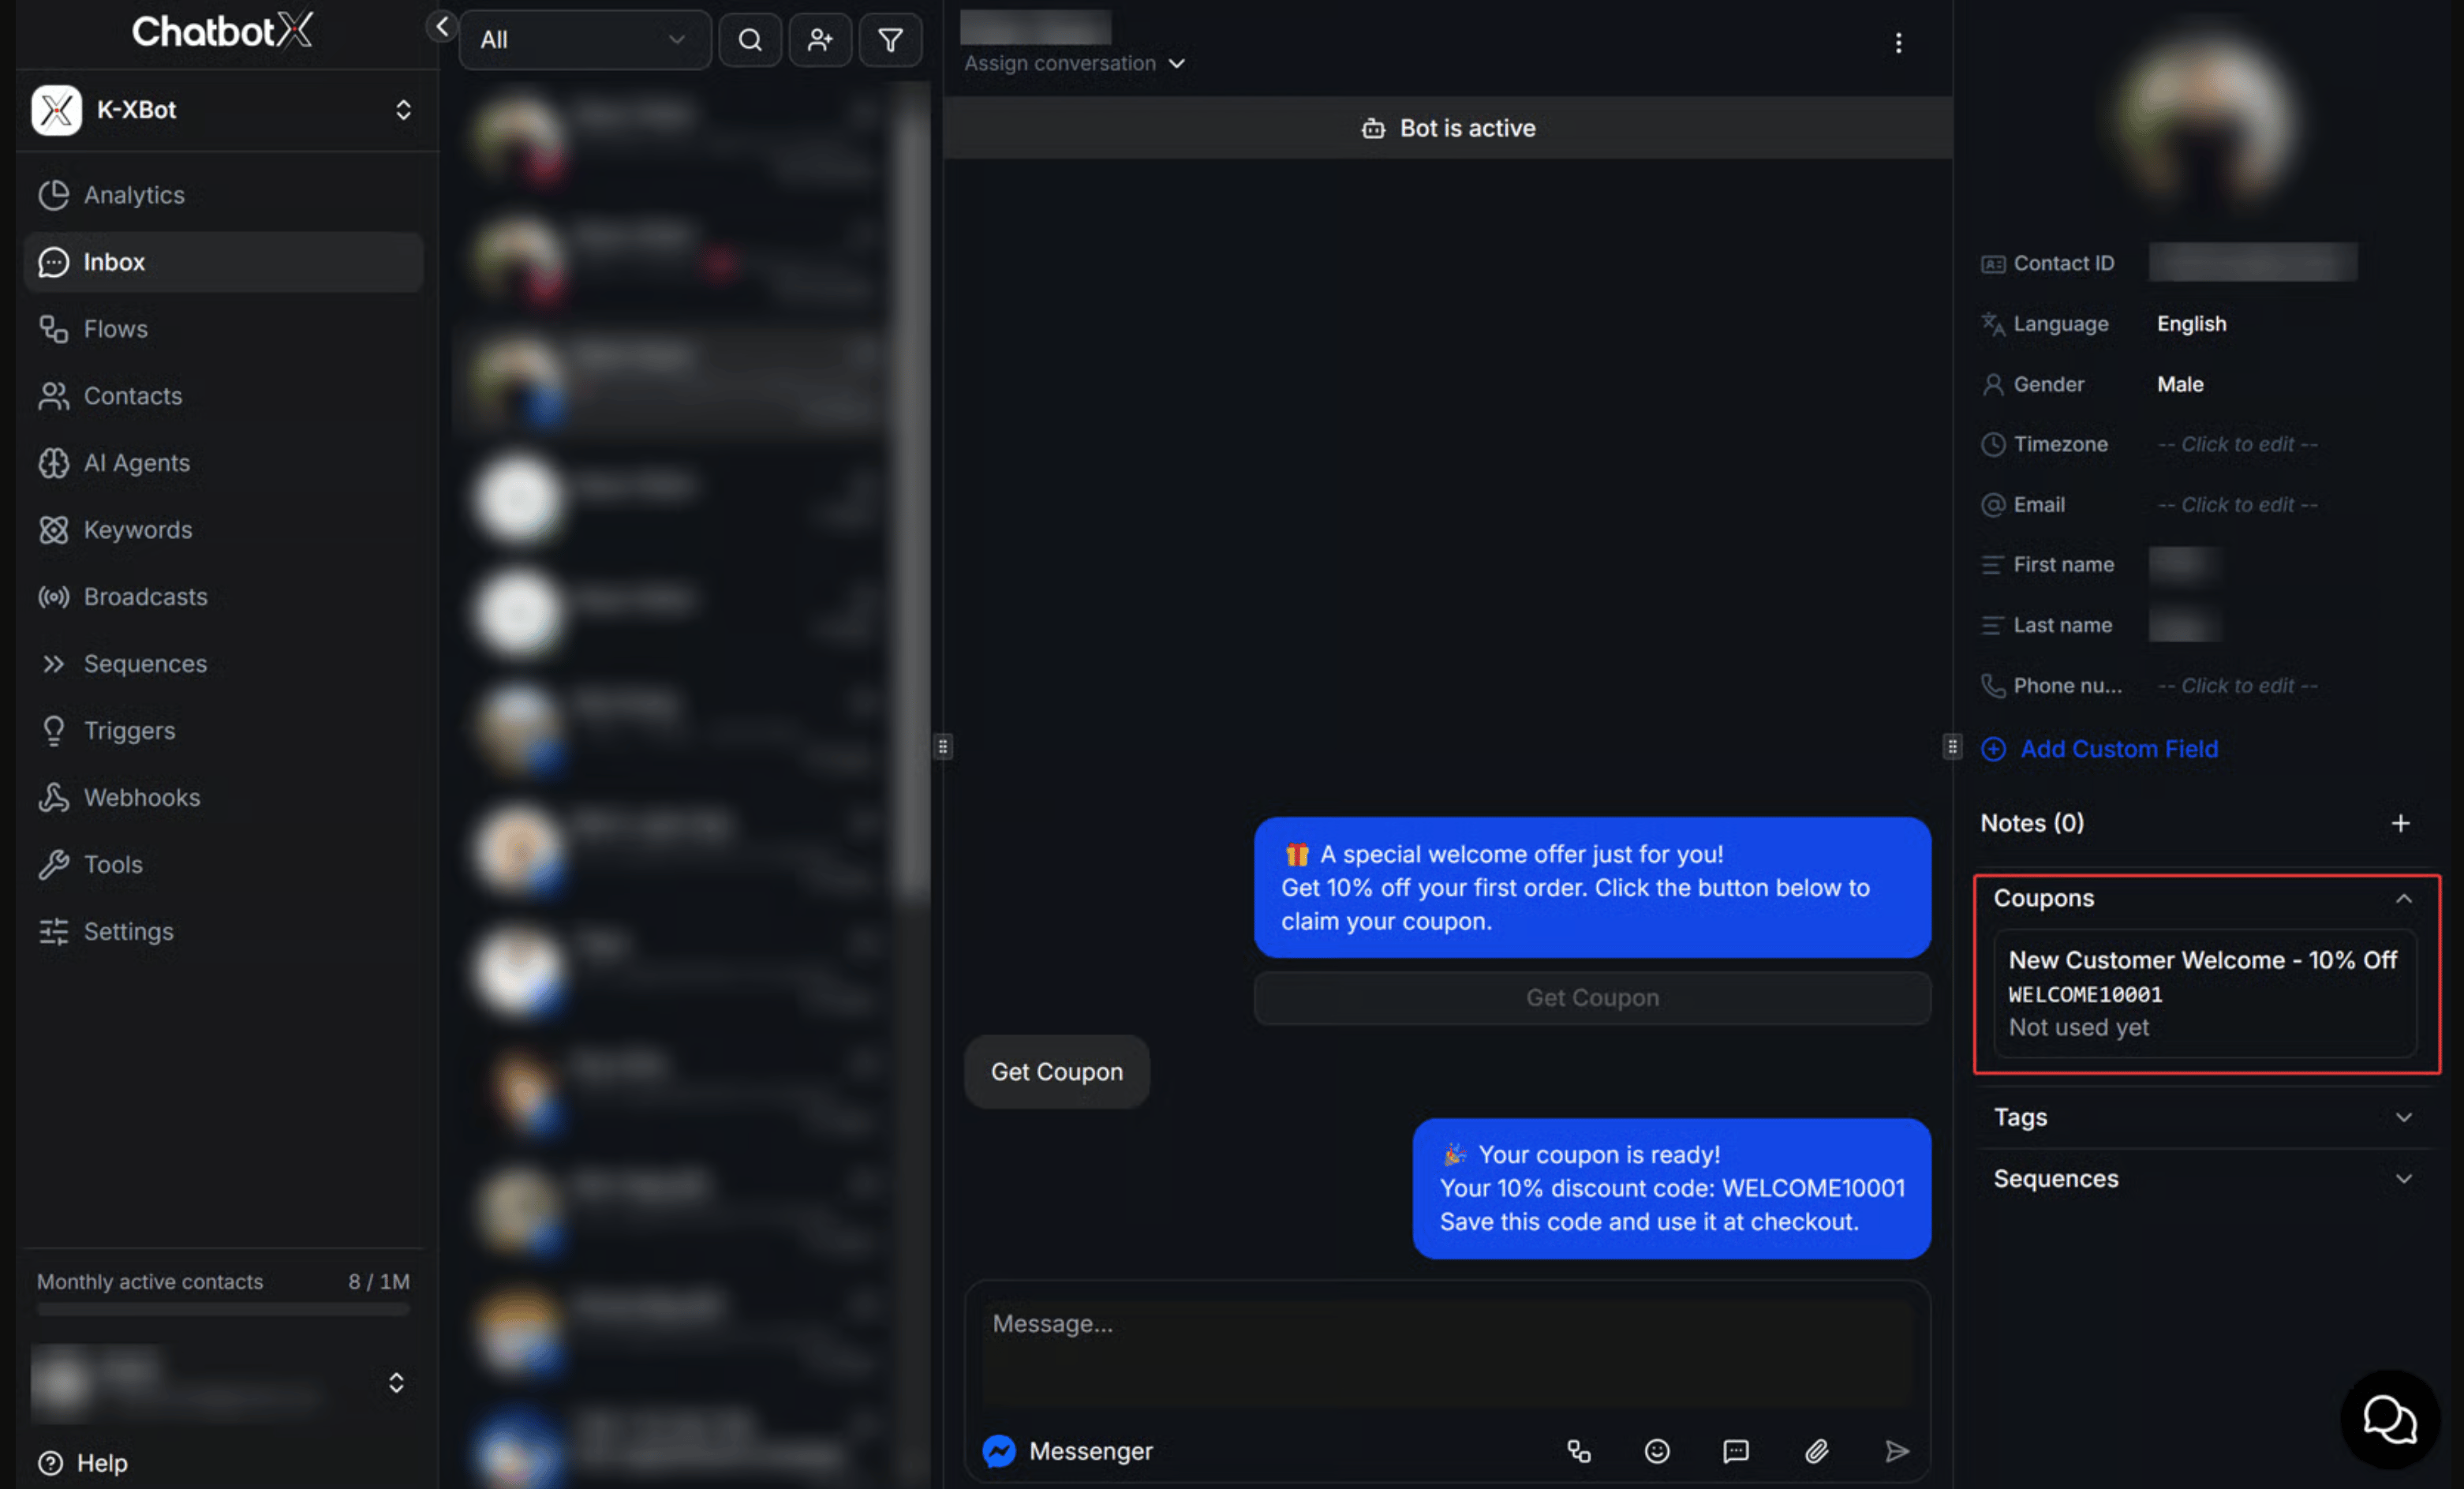
* The **Coupons** section lists all discount vouchers and promo codes issued to this contact through automated flows or broadcasts.
* Each coupon card displays:
* Campaign name (for example, *New Customer Welcome - 10% Off*).
* Discount voucher code (for example, *WELCOME10001*).
* Usage status: **Not used yet** or already redeemed.
* Agents can quickly cross-check voucher validity during live sales support and checkout inquiries.
Once saved, the note counter updates next to the section title (for example, `Notes (1)`). You can review all chronological notes and delete obsolete ones when tasks are resolved.
## Review Customer Coupons
If your business uses the ChatbotX Coupons tool for promotions and loyalty campaigns:
* The **Coupons** section lists all discount vouchers and promo codes issued to this contact through automated flows or broadcasts.
* Each coupon card displays:
* Campaign name (for example, *New Customer Welcome - 10% Off*).
* Discount voucher code (for example, *WELCOME10001*).
* Usage status: **Not used yet** or already redeemed.
* Agents can quickly cross-check voucher validity during live sales support and checkout inquiries.
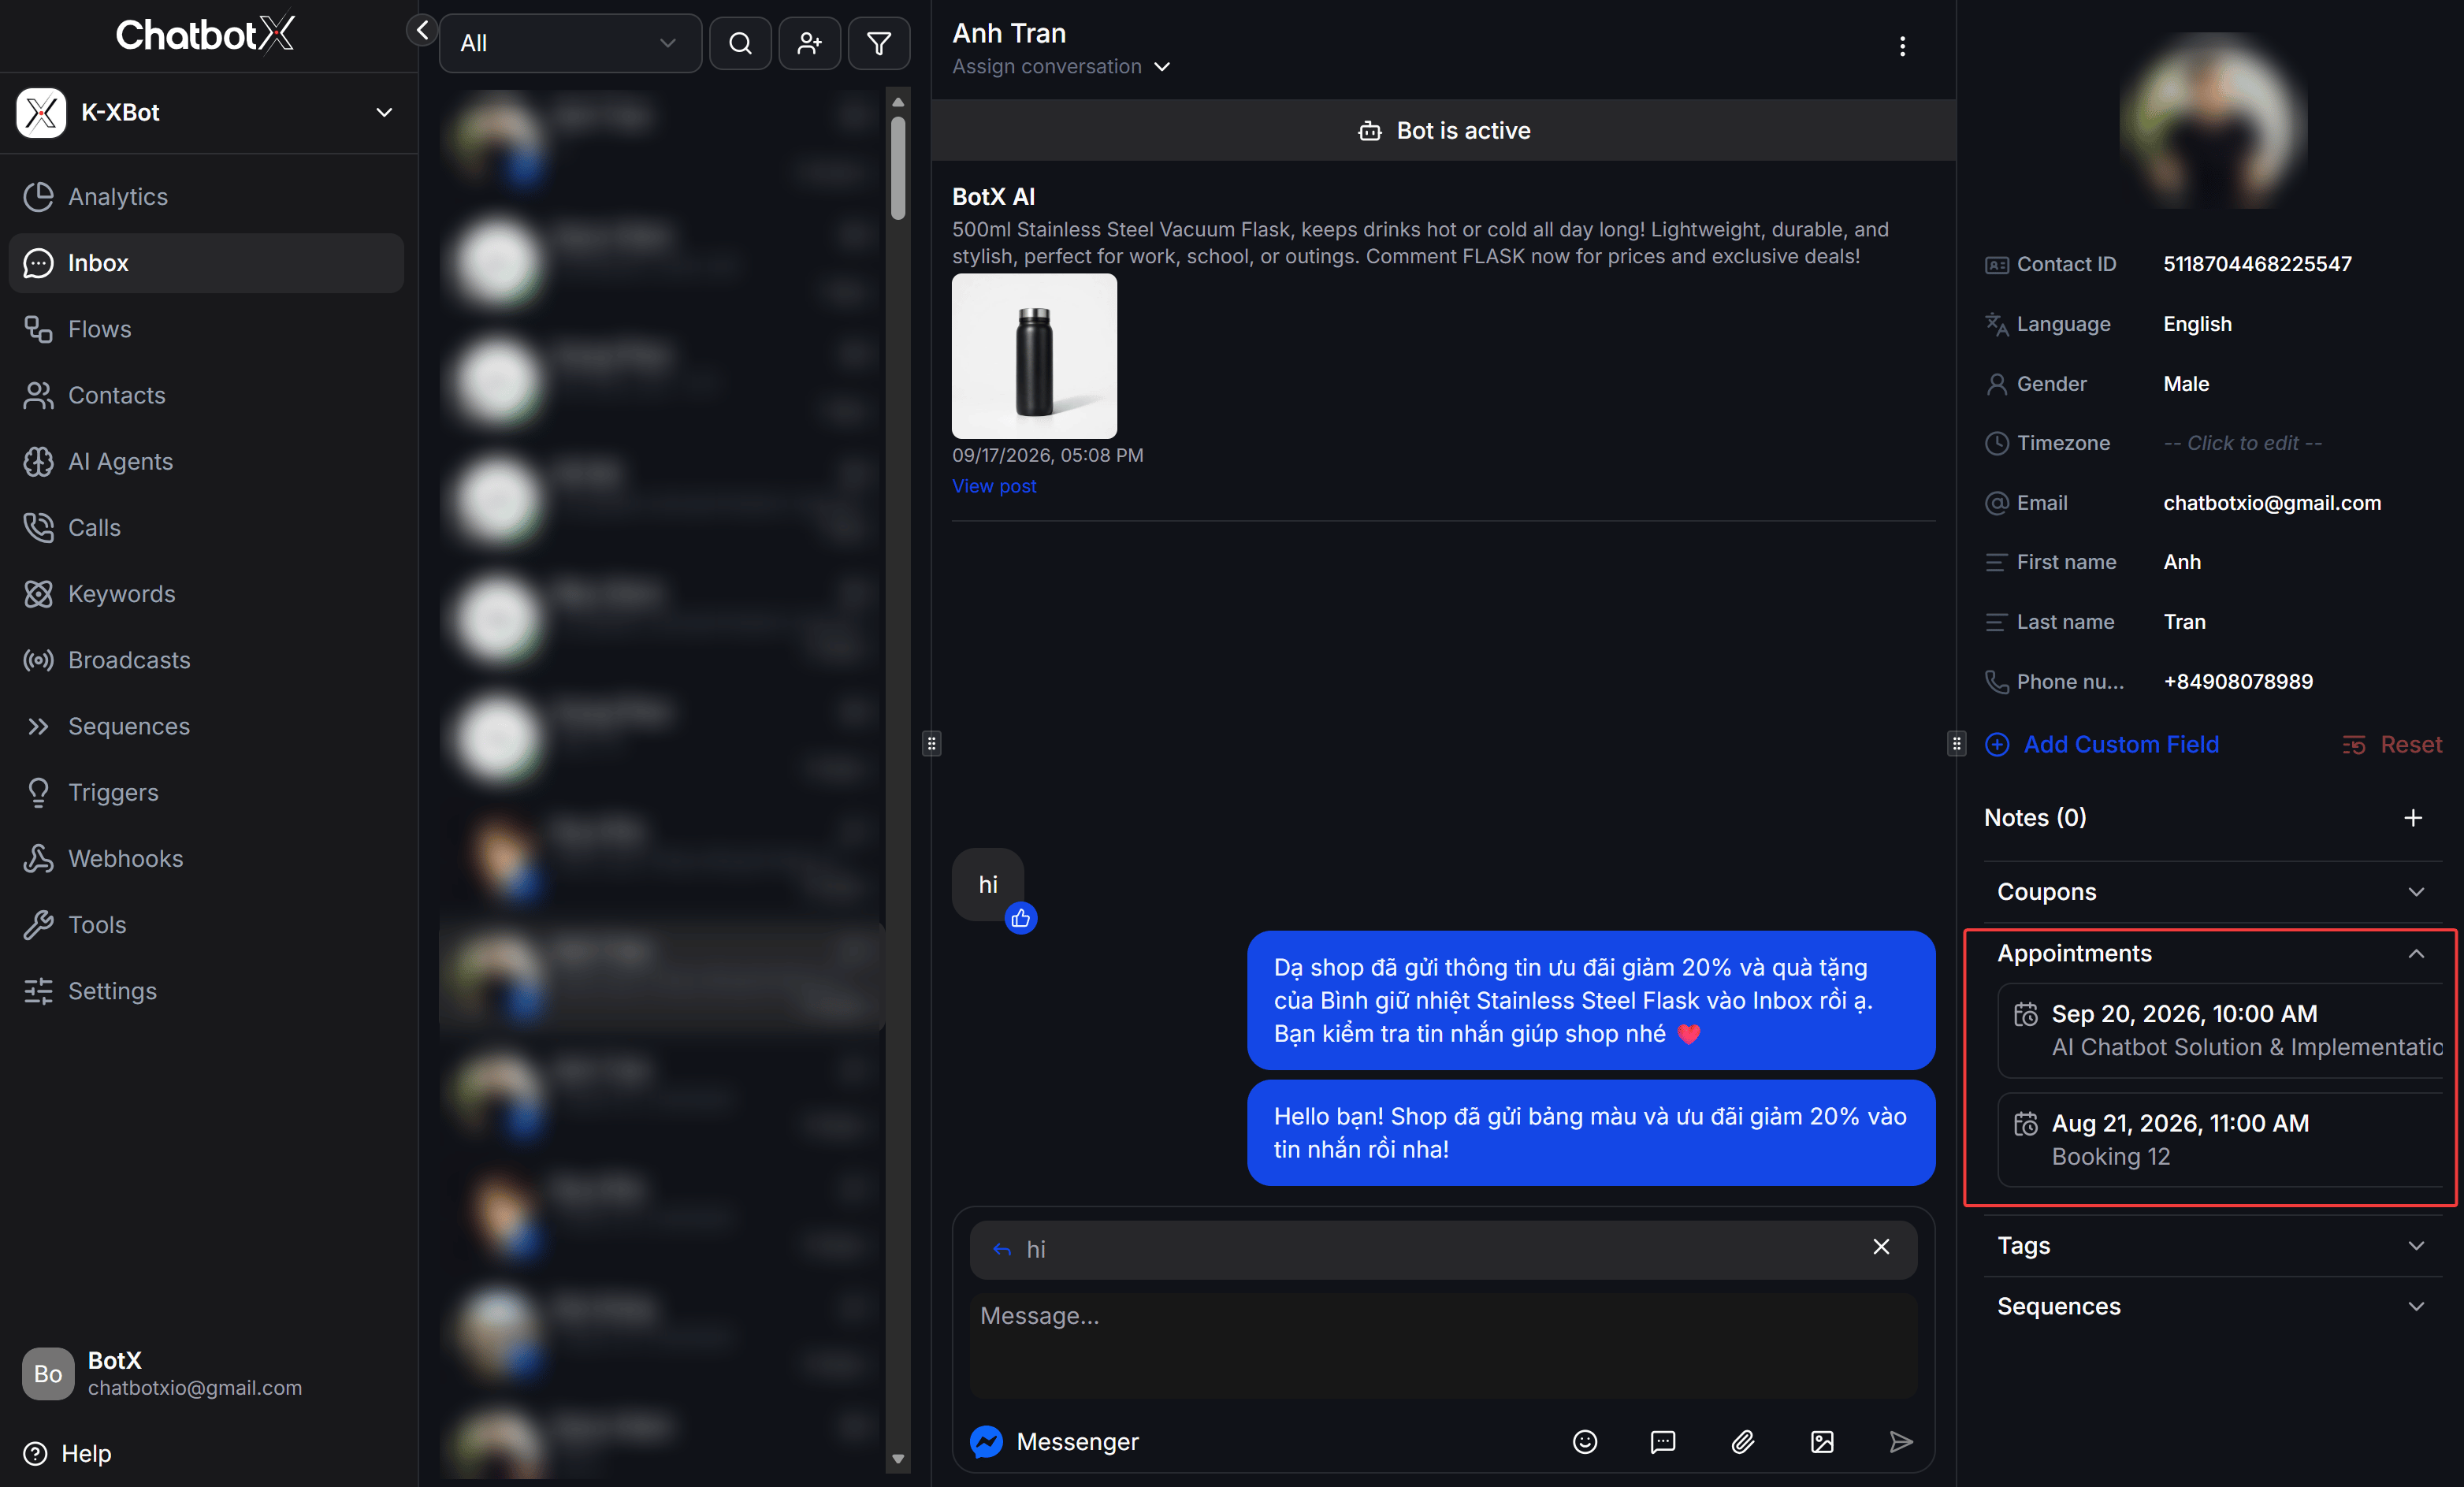
 ## Track Appointments
When using the built-in **Appointment Scheduling** tool:
* The **Appointments** section allows agents to track upcoming bookings and past appointments associated with this customer directly within the contact profile drawer.
* The appointment cards clearly present:
* The scheduled date and time (for example, *Sep 20, 2026, 10:00 AM* or *Aug 21, 2026, 11:00 AM*).
* The service or meeting title (for example, *AI Chatbot Solution & Implementation*, *Booking 12*).
* Agents can click on an appointment to review details, confirm attendance, or assist customers with rescheduling without leaving the inbox.
## Track Appointments
When using the built-in **Appointment Scheduling** tool:
* The **Appointments** section allows agents to track upcoming bookings and past appointments associated with this customer directly within the contact profile drawer.
* The appointment cards clearly present:
* The scheduled date and time (for example, *Sep 20, 2026, 10:00 AM* or *Aug 21, 2026, 11:00 AM*).
* The service or meeting title (for example, *AI Chatbot Solution & Implementation*, *Booking 12*).
* Agents can click on an appointment to review details, confirm attendance, or assist customers with rescheduling without leaving the inbox.
 ## Assign and Manage Tags
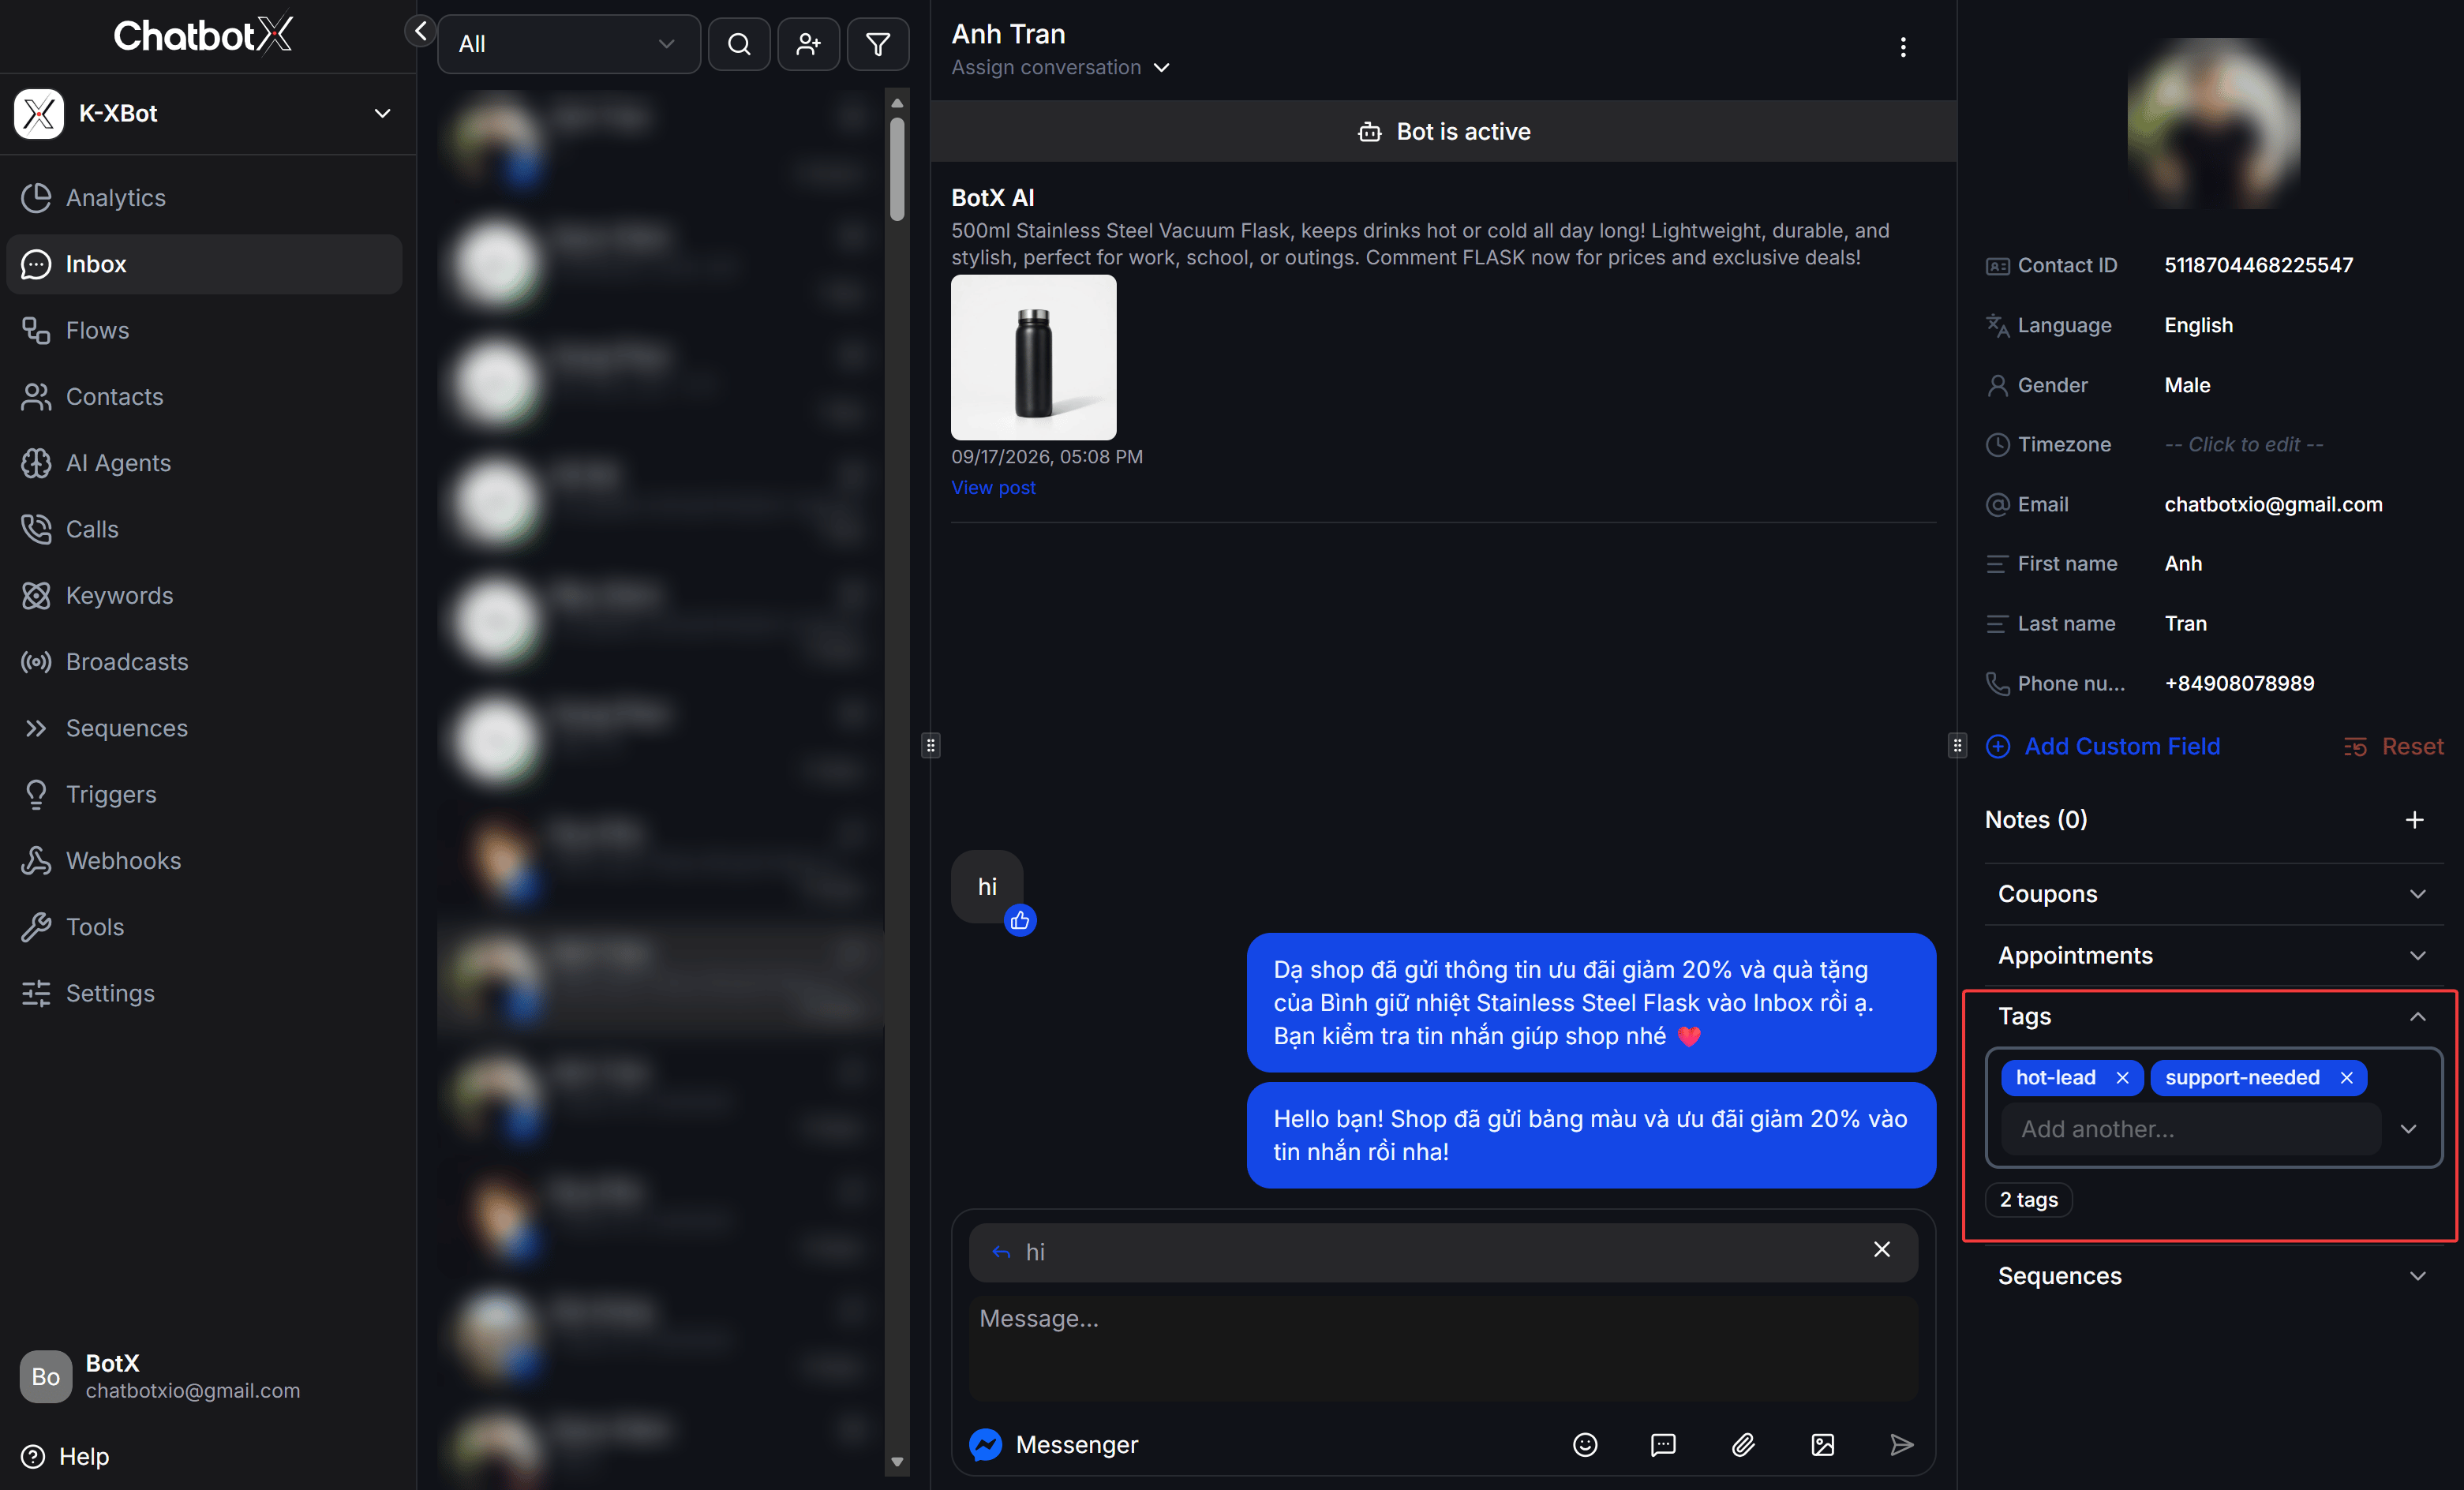
Tags are the most versatile way to categorize contacts by funnel stage, purchasing interest, or support urgency.
### Adding Tags Manually
1. Click the **Tags** accordion to expand the contact's current tags.
2. Click the **Add another...** dropdown input field.
3. Select an existing tag from the dropdown or type to filter (for example, `hot-lead`, `support-needed`).
4. The tag will be applied immediately, and the total counter will update (for example, `2 tags`).
### Removing Tags
* To remove a tag that is no longer relevant, click the small remove icon (**x**) on the tag badge.
## Assign and Manage Tags
Tags are the most versatile way to categorize contacts by funnel stage, purchasing interest, or support urgency.
### Adding Tags Manually
1. Click the **Tags** accordion to expand the contact's current tags.
2. Click the **Add another...** dropdown input field.
3. Select an existing tag from the dropdown or type to filter (for example, `hot-lead`, `support-needed`).
4. The tag will be applied immediately, and the total counter will update (for example, `2 tags`).
### Removing Tags
* To remove a tag that is no longer relevant, click the small remove icon (**x**) on the tag badge.
 ## Manage Sequences
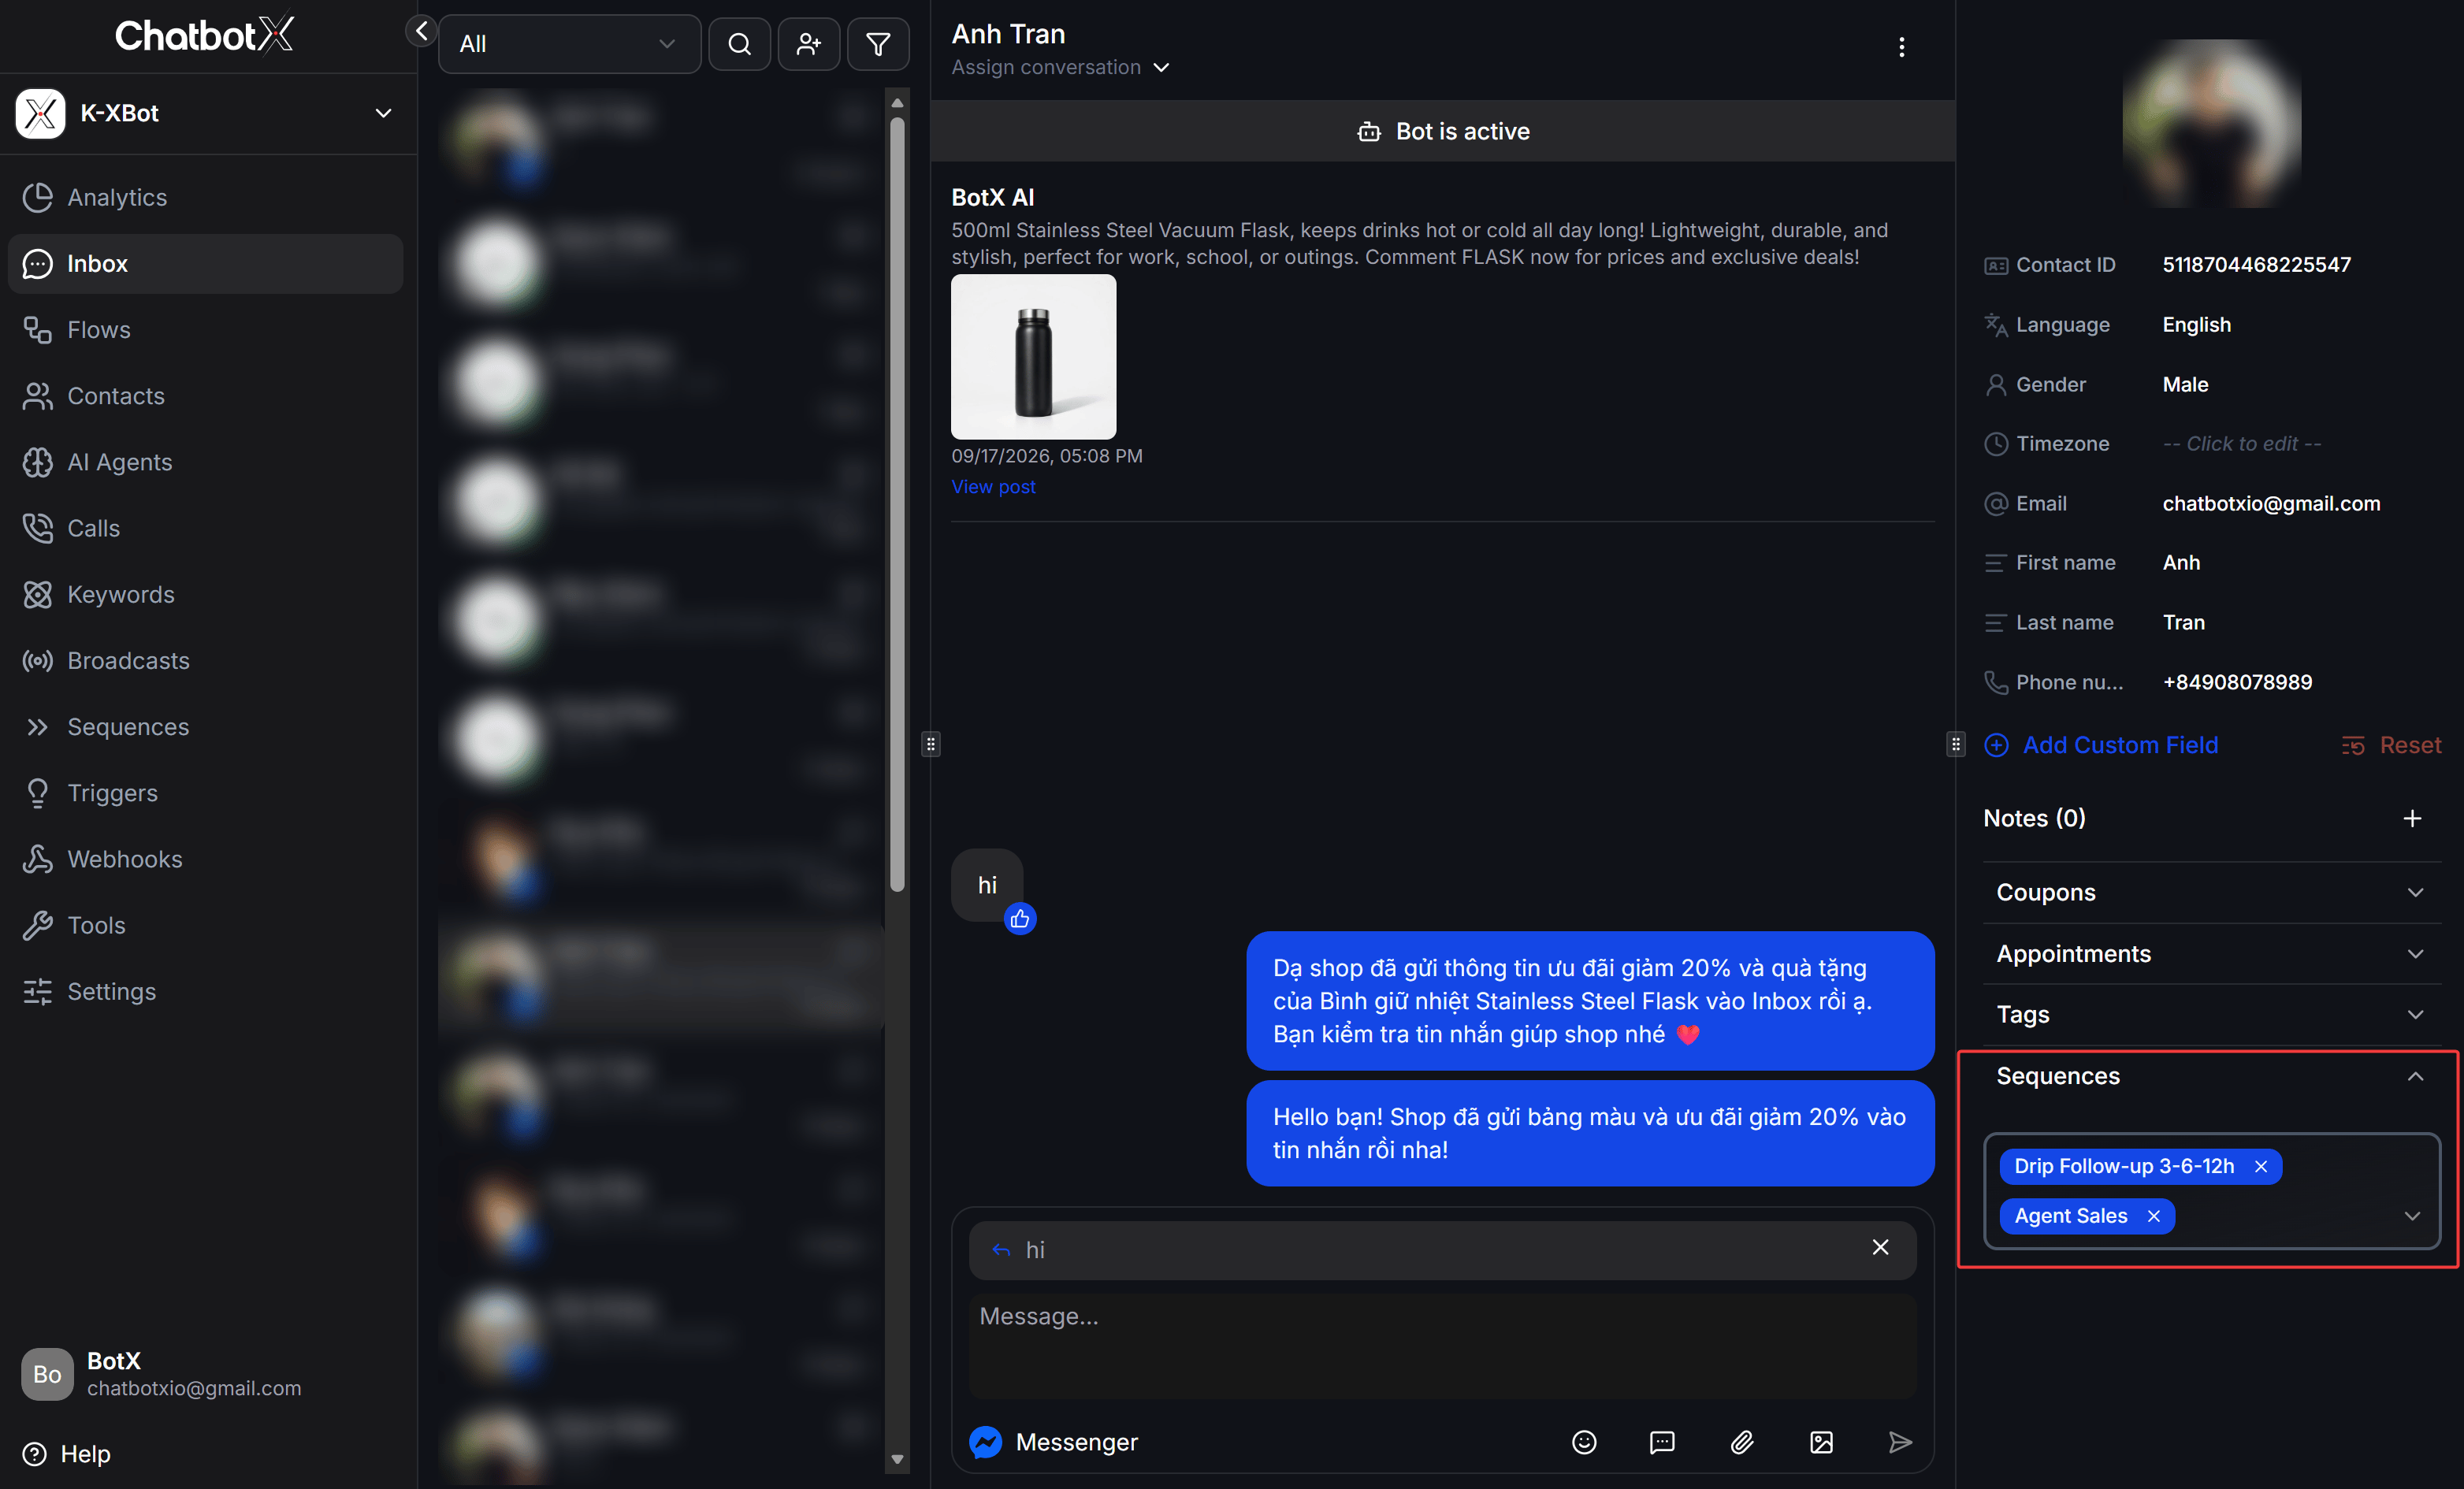
Sequences are automated drip campaigns that send timed messages across days or hours (such as onboarding sequences, re-engagement drip messages, or cart abandonment reminders).
### Viewing and Enrolling in Sequences
* The **Sequences** section displays all active drip campaigns the contact is enrolled in (for example, `Drip Follow-up 3-6-12h`, `Agent Sales`).
* To enroll the customer in a new sequence, select the sequence from the dropdown menu.
### Unsubscribing from a Sequence
When a human agent steps in to resolve an issue directly, continuing to send scheduled promotional drip messages can be counterproductive:
* Click the remove icon (**x**) on an active sequence badge to immediately unsubscribe the contact from that campaign.
## Manage Sequences
Sequences are automated drip campaigns that send timed messages across days or hours (such as onboarding sequences, re-engagement drip messages, or cart abandonment reminders).
### Viewing and Enrolling in Sequences
* The **Sequences** section displays all active drip campaigns the contact is enrolled in (for example, `Drip Follow-up 3-6-12h`, `Agent Sales`).
* To enroll the customer in a new sequence, select the sequence from the dropdown menu.
### Unsubscribing from a Sequence
When a human agent steps in to resolve an issue directly, continuing to send scheduled promotional drip messages can be counterproductive:
* Click the remove icon (**x**) on an active sequence badge to immediately unsubscribe the contact from that campaign.
 ## Quick Conversation Controls
In addition to the right sidebar profile, top header controls above the conversation thread provide instant actions:
* **Bot Status**: The **Bot is active** banner indicates that automated chatbot flows are responding. Click to pause automation when an agent takes full control of the discussion.
* **Conversation Assignment (Assign conversation)**: Click the assignment menu to assign the chat to yourself (**Assigned to me**) or route it to a specific teammate.
* **Three-Dot Action Menu**: Access administrative options including **Mark as follow-up**, **Archive**, **Block Contact**, or **Delete Contact**.
This documentation is built and hosted on [Mintlify](https://mintlify.com), a developer documentation platform.
## Quick Conversation Controls
In addition to the right sidebar profile, top header controls above the conversation thread provide instant actions:
* **Bot Status**: The **Bot is active** banner indicates that automated chatbot flows are responding. Click to pause automation when an agent takes full control of the discussion.
* **Conversation Assignment (Assign conversation)**: Click the assignment menu to assign the chat to yourself (**Assigned to me**) or route it to a specific teammate.
* **Three-Dot Action Menu**: Access administrative options including **Mark as follow-up**, **Archive**, **Block Contact**, or **Delete Contact**.
This documentation is built and hosted on [Mintlify](https://mintlify.com), a developer documentation platform.