> ## Documentation Index
> Fetch the complete documentation index at: https://chatbotx.io/docs/llms.txt
> Use this file to discover all available pages before exploring further.
# ActiveCampaign Integration
> Connect ActiveCampaign with ChatbotX to create or update contacts, apply Tags, and add them to a List or Automation from a Flow.
The **ActiveCampaign** integration sends contact information from ChatbotX to ActiveCampaign directly within a Flow. You can create or update contacts, add customers to lists, apply Tags, and enroll customers in an Automation.
For example, after a customer provides an email address for a consultation, ChatbotX creates the contact in ActiveCampaign, applies the `NEW` Tag, and enrolls the customer in a relevant email nurture series.
## Prepare your API URL and API Key
You need the **API URL** and **API Key** from your ActiveCampaign account before connecting. These credentials allow ChatbotX to send contact data to the correct account.
Sign in to the ActiveCampaign account that you want to connect to ChatbotX.
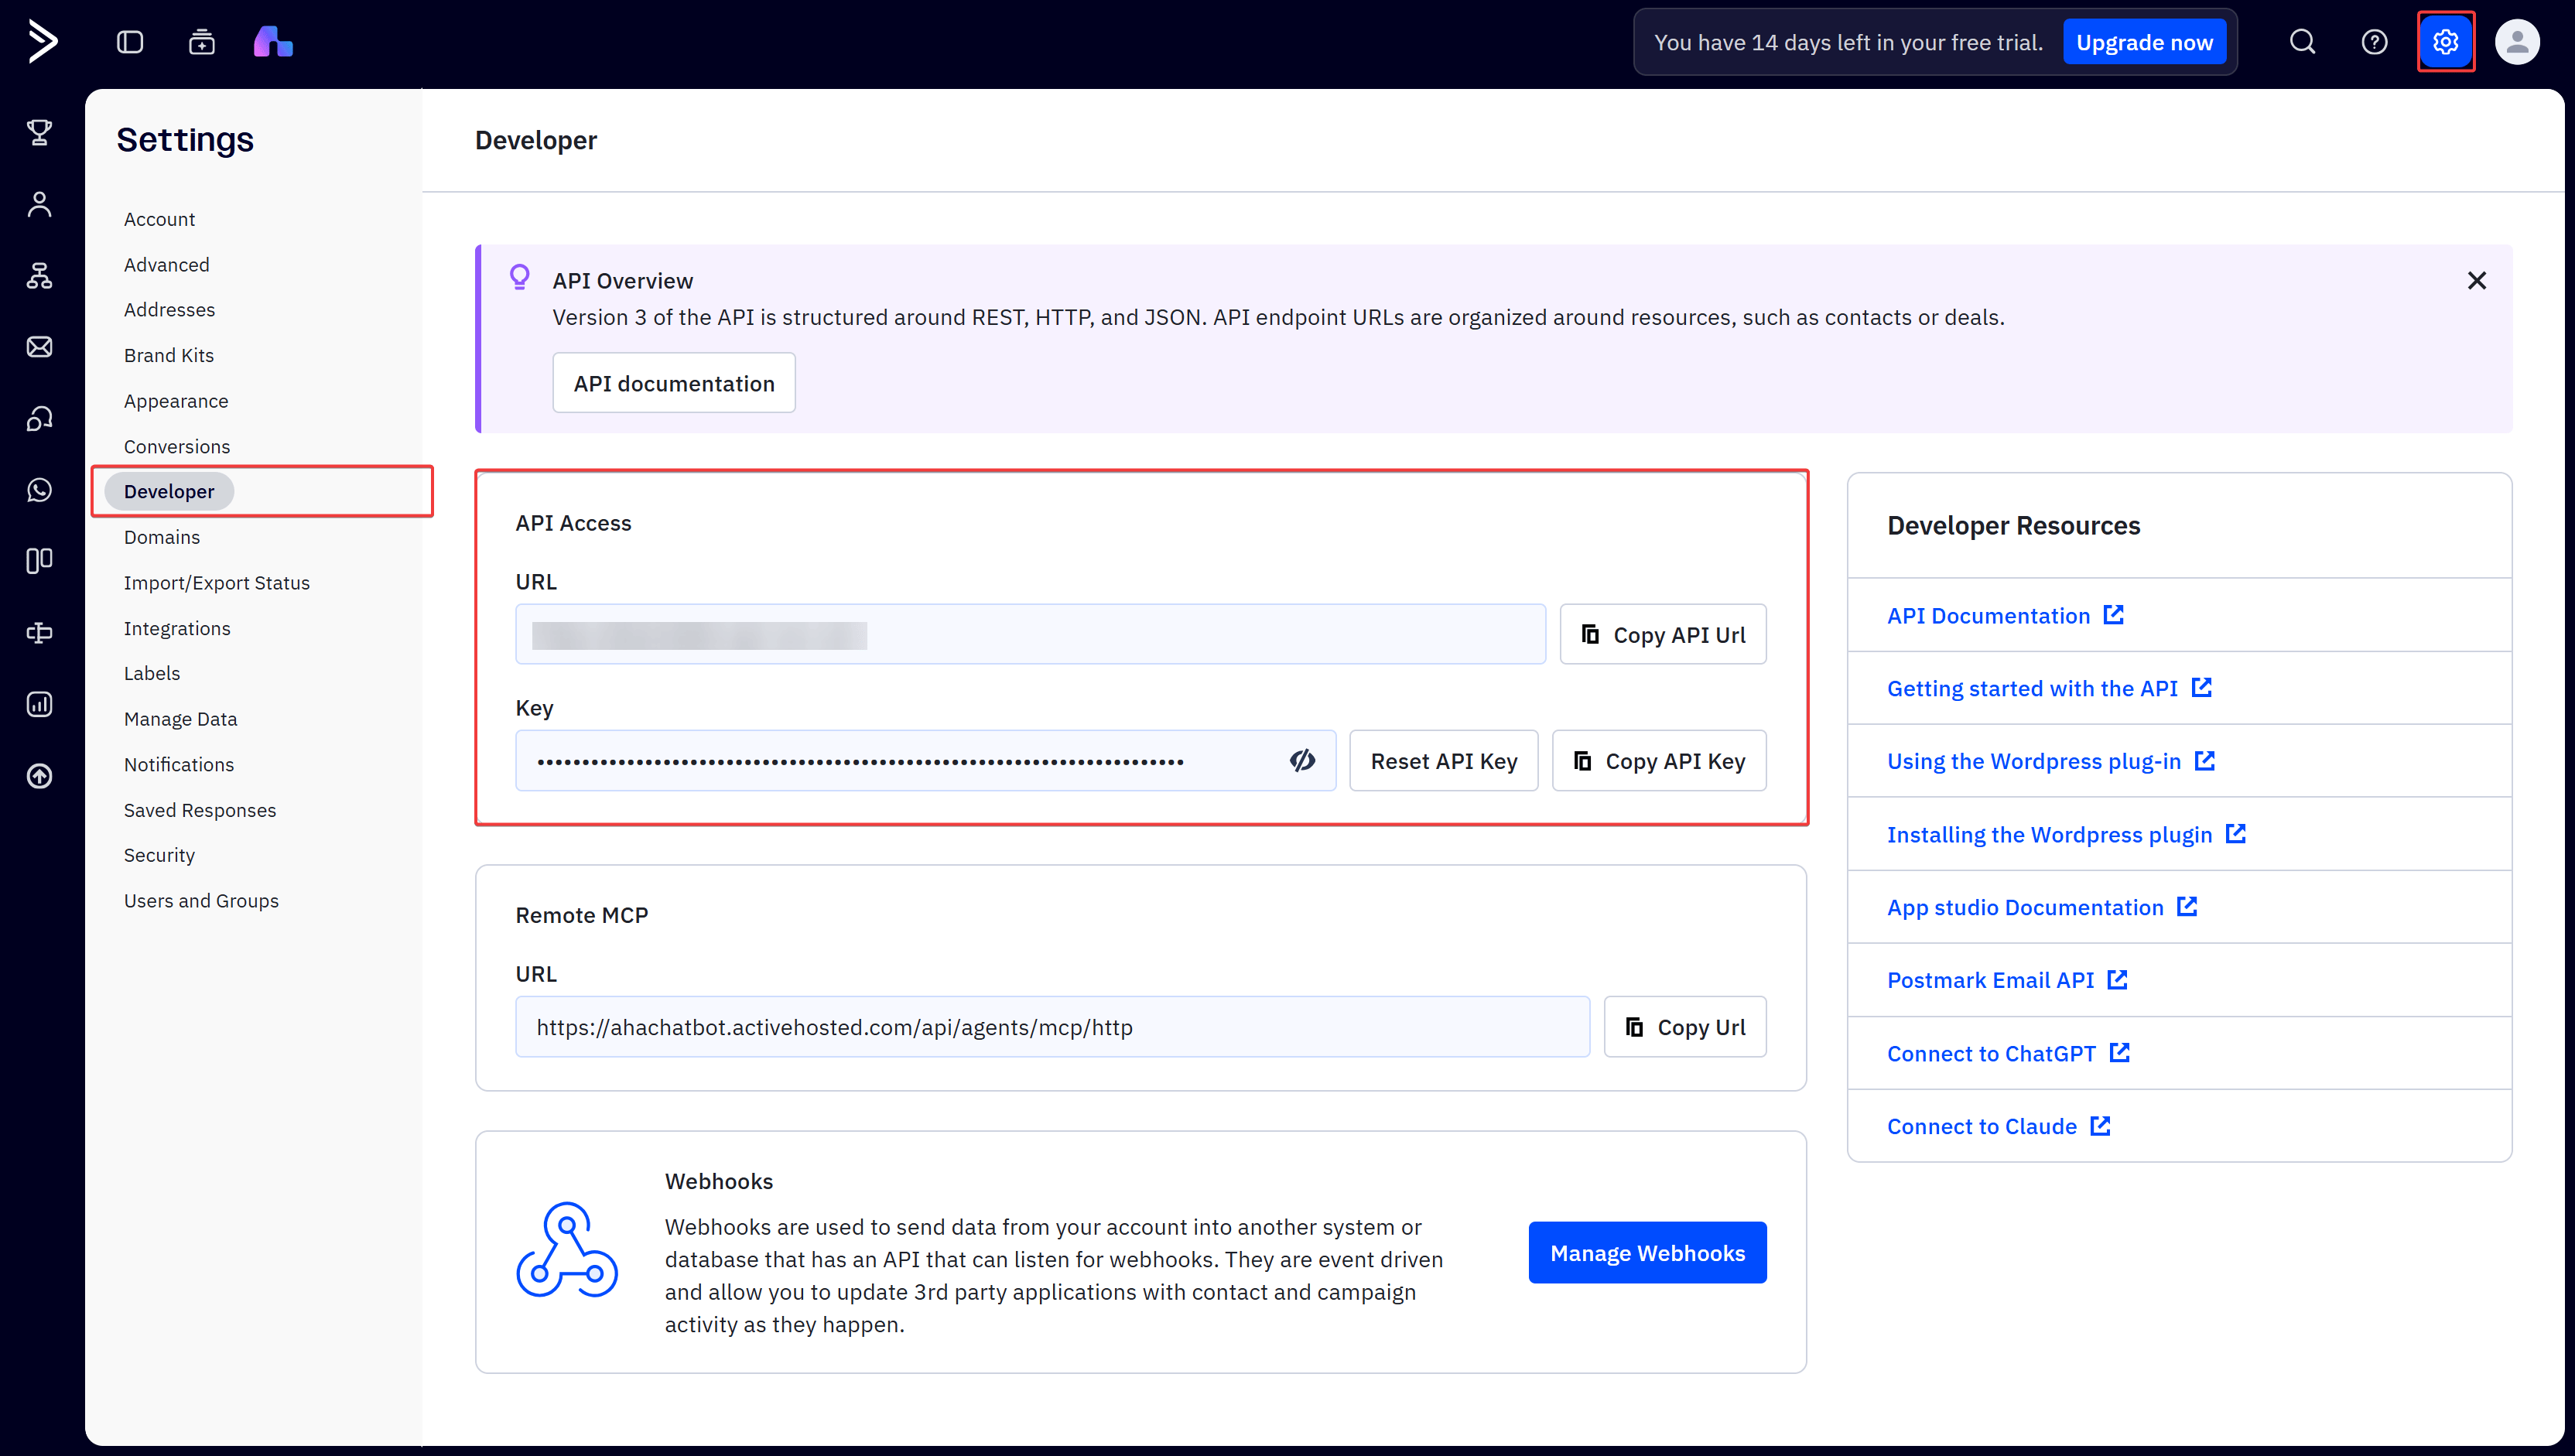
Select **Settings** in the lower-left corner, then select **Developer** from the account settings menu.
Copy both the **API URL** and **API Key** from the API Access section. You will enter these values in ChatbotX during the next procedure.
See [Getting started with the API](https://help.activecampaign.com/hc/en-us/articles/207317590-Getting-started-with-the-API) in the official ActiveCampaign documentation.
 Your API Key allows other applications to access your ActiveCampaign data. Do not share it in messages, public screenshots, or customer-facing documents.
Each ActiveCampaign user has a separate API URL and API Key. If the user who provided the credentials is deleted or the key is reset, update the connection in ChatbotX.
## Connect ActiveCampaign to ChatbotX
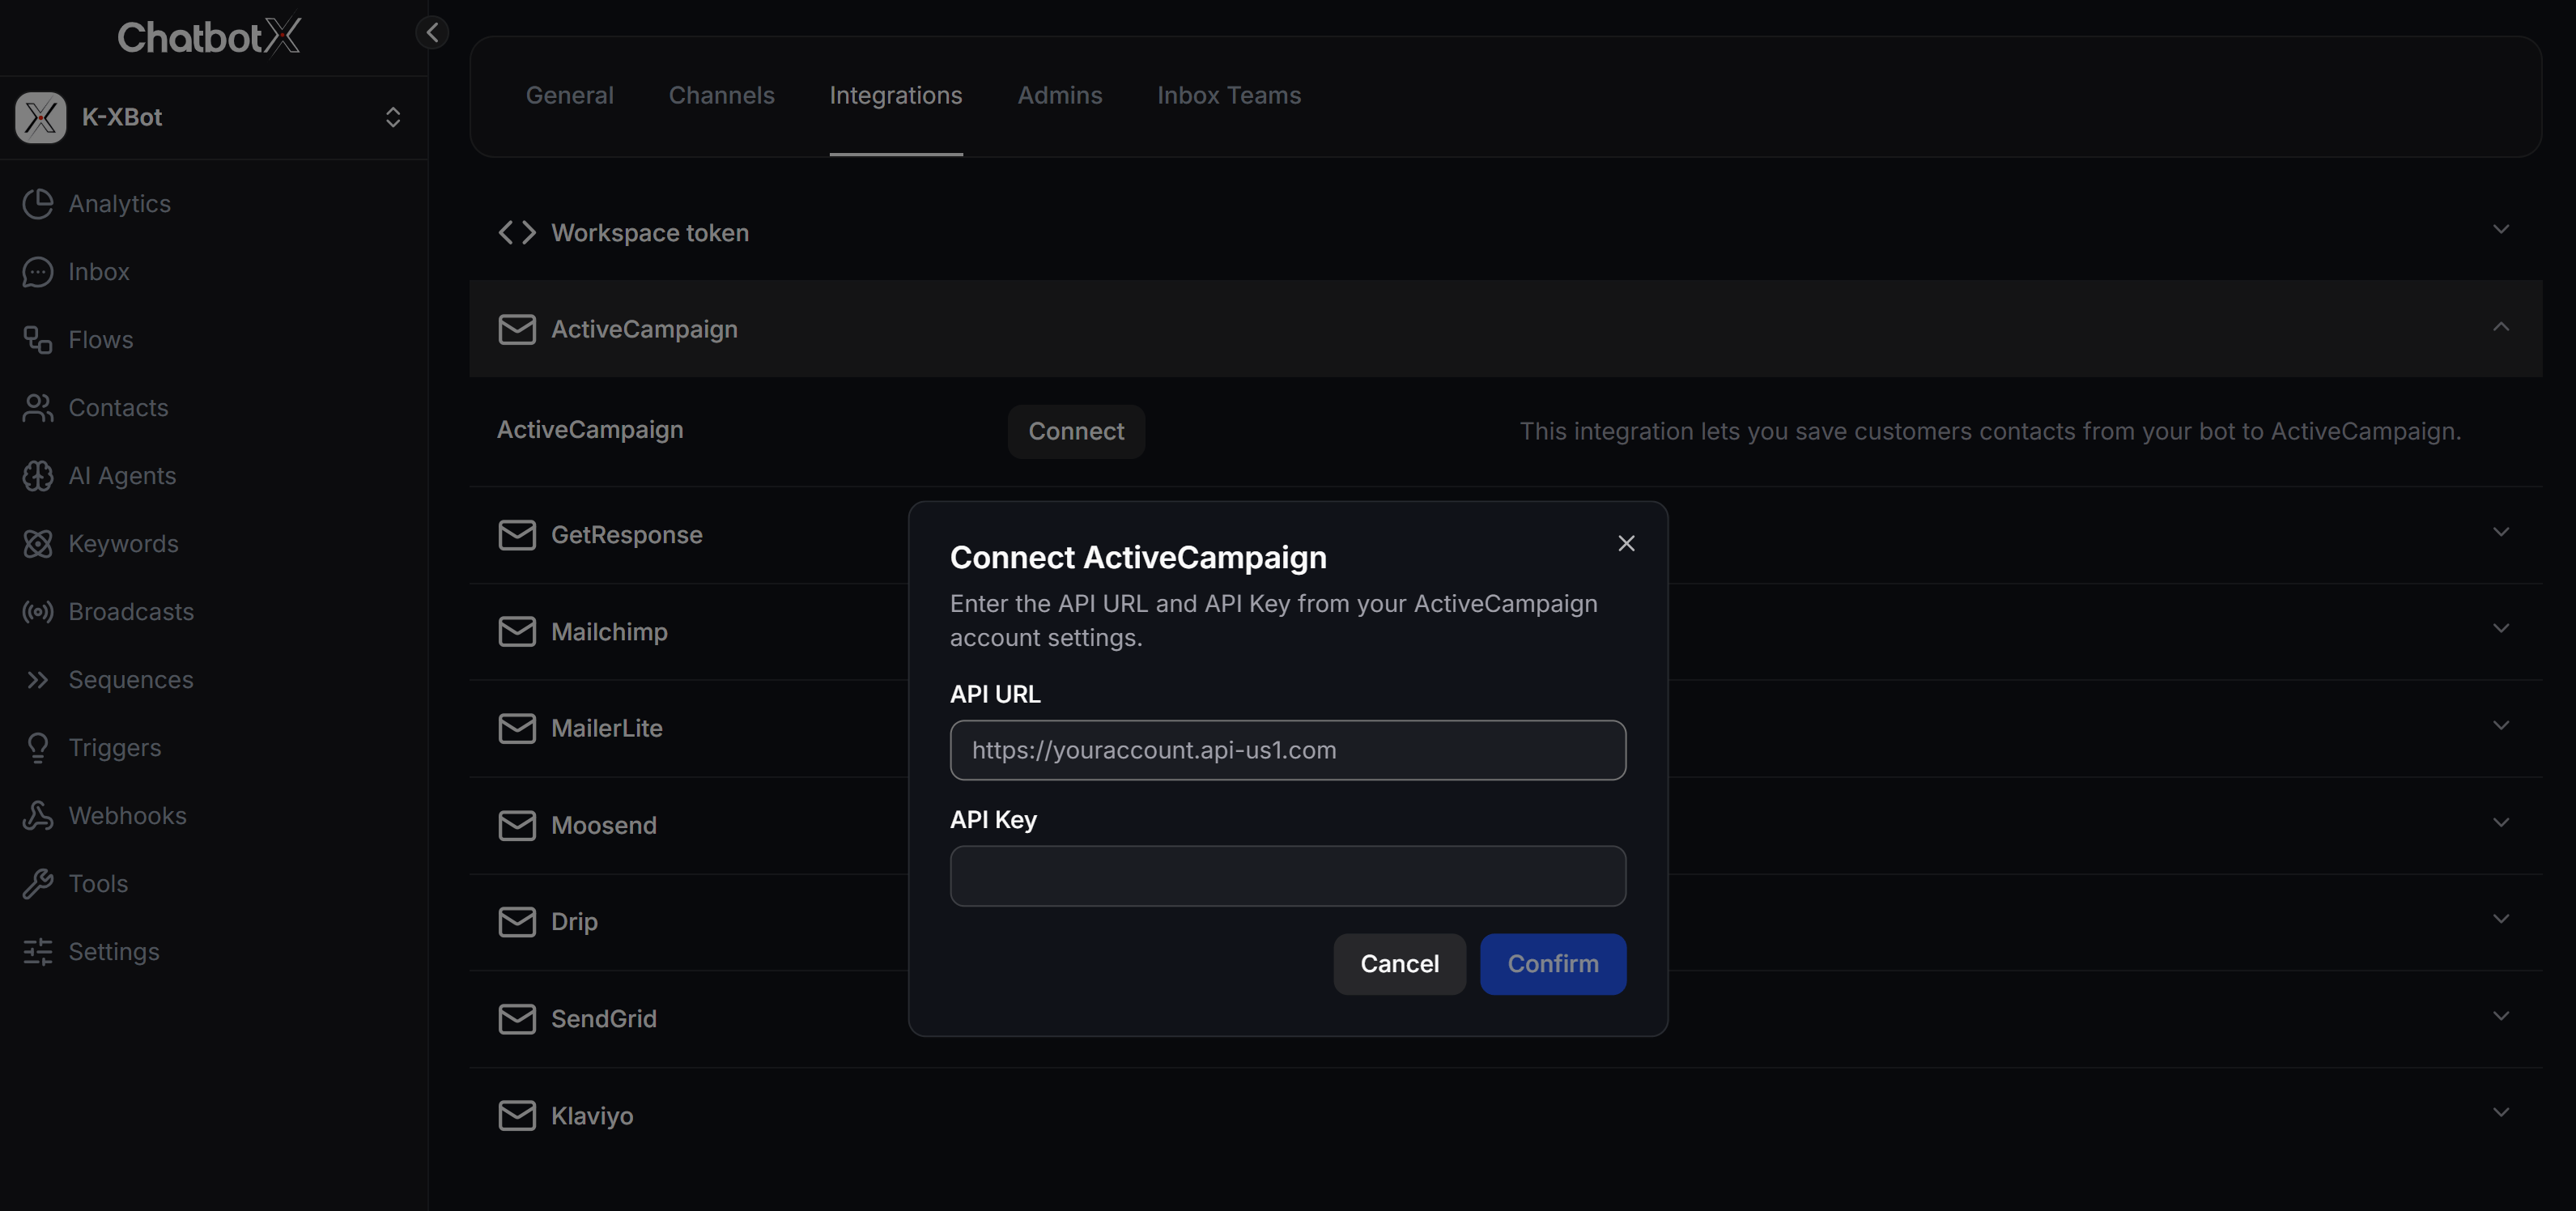
In your ChatbotX workspace, select **Settings** from the left menu.
Select the **Integrations** tab, then open **ActiveCampaign**.
Click **Connect** to open the **Connect ActiveCampaign** window.
Paste the address into **API URL** and the key into **API Key**. The API URL usually follows the format `https://youraccount.api-us1.com`.
Click **Confirm**. When the credentials are valid, ChatbotX saves the connection for use in your Flows.
Your API Key allows other applications to access your ActiveCampaign data. Do not share it in messages, public screenshots, or customer-facing documents.
Each ActiveCampaign user has a separate API URL and API Key. If the user who provided the credentials is deleted or the key is reset, update the connection in ChatbotX.
## Connect ActiveCampaign to ChatbotX
In your ChatbotX workspace, select **Settings** from the left menu.
Select the **Integrations** tab, then open **ActiveCampaign**.
Click **Connect** to open the **Connect ActiveCampaign** window.
Paste the address into **API URL** and the key into **API Key**. The API URL usually follows the format `https://youraccount.api-us1.com`.
Click **Confirm**. When the credentials are valid, ChatbotX saves the connection for use in your Flows.
 ## Add ActiveCampaign to a Flow
After connecting your account, add the ActiveCampaign action to a Send Message node or another suitable position in your Flow.
Select **Flows**, then open the Flow that you want to use for contact synchronization.
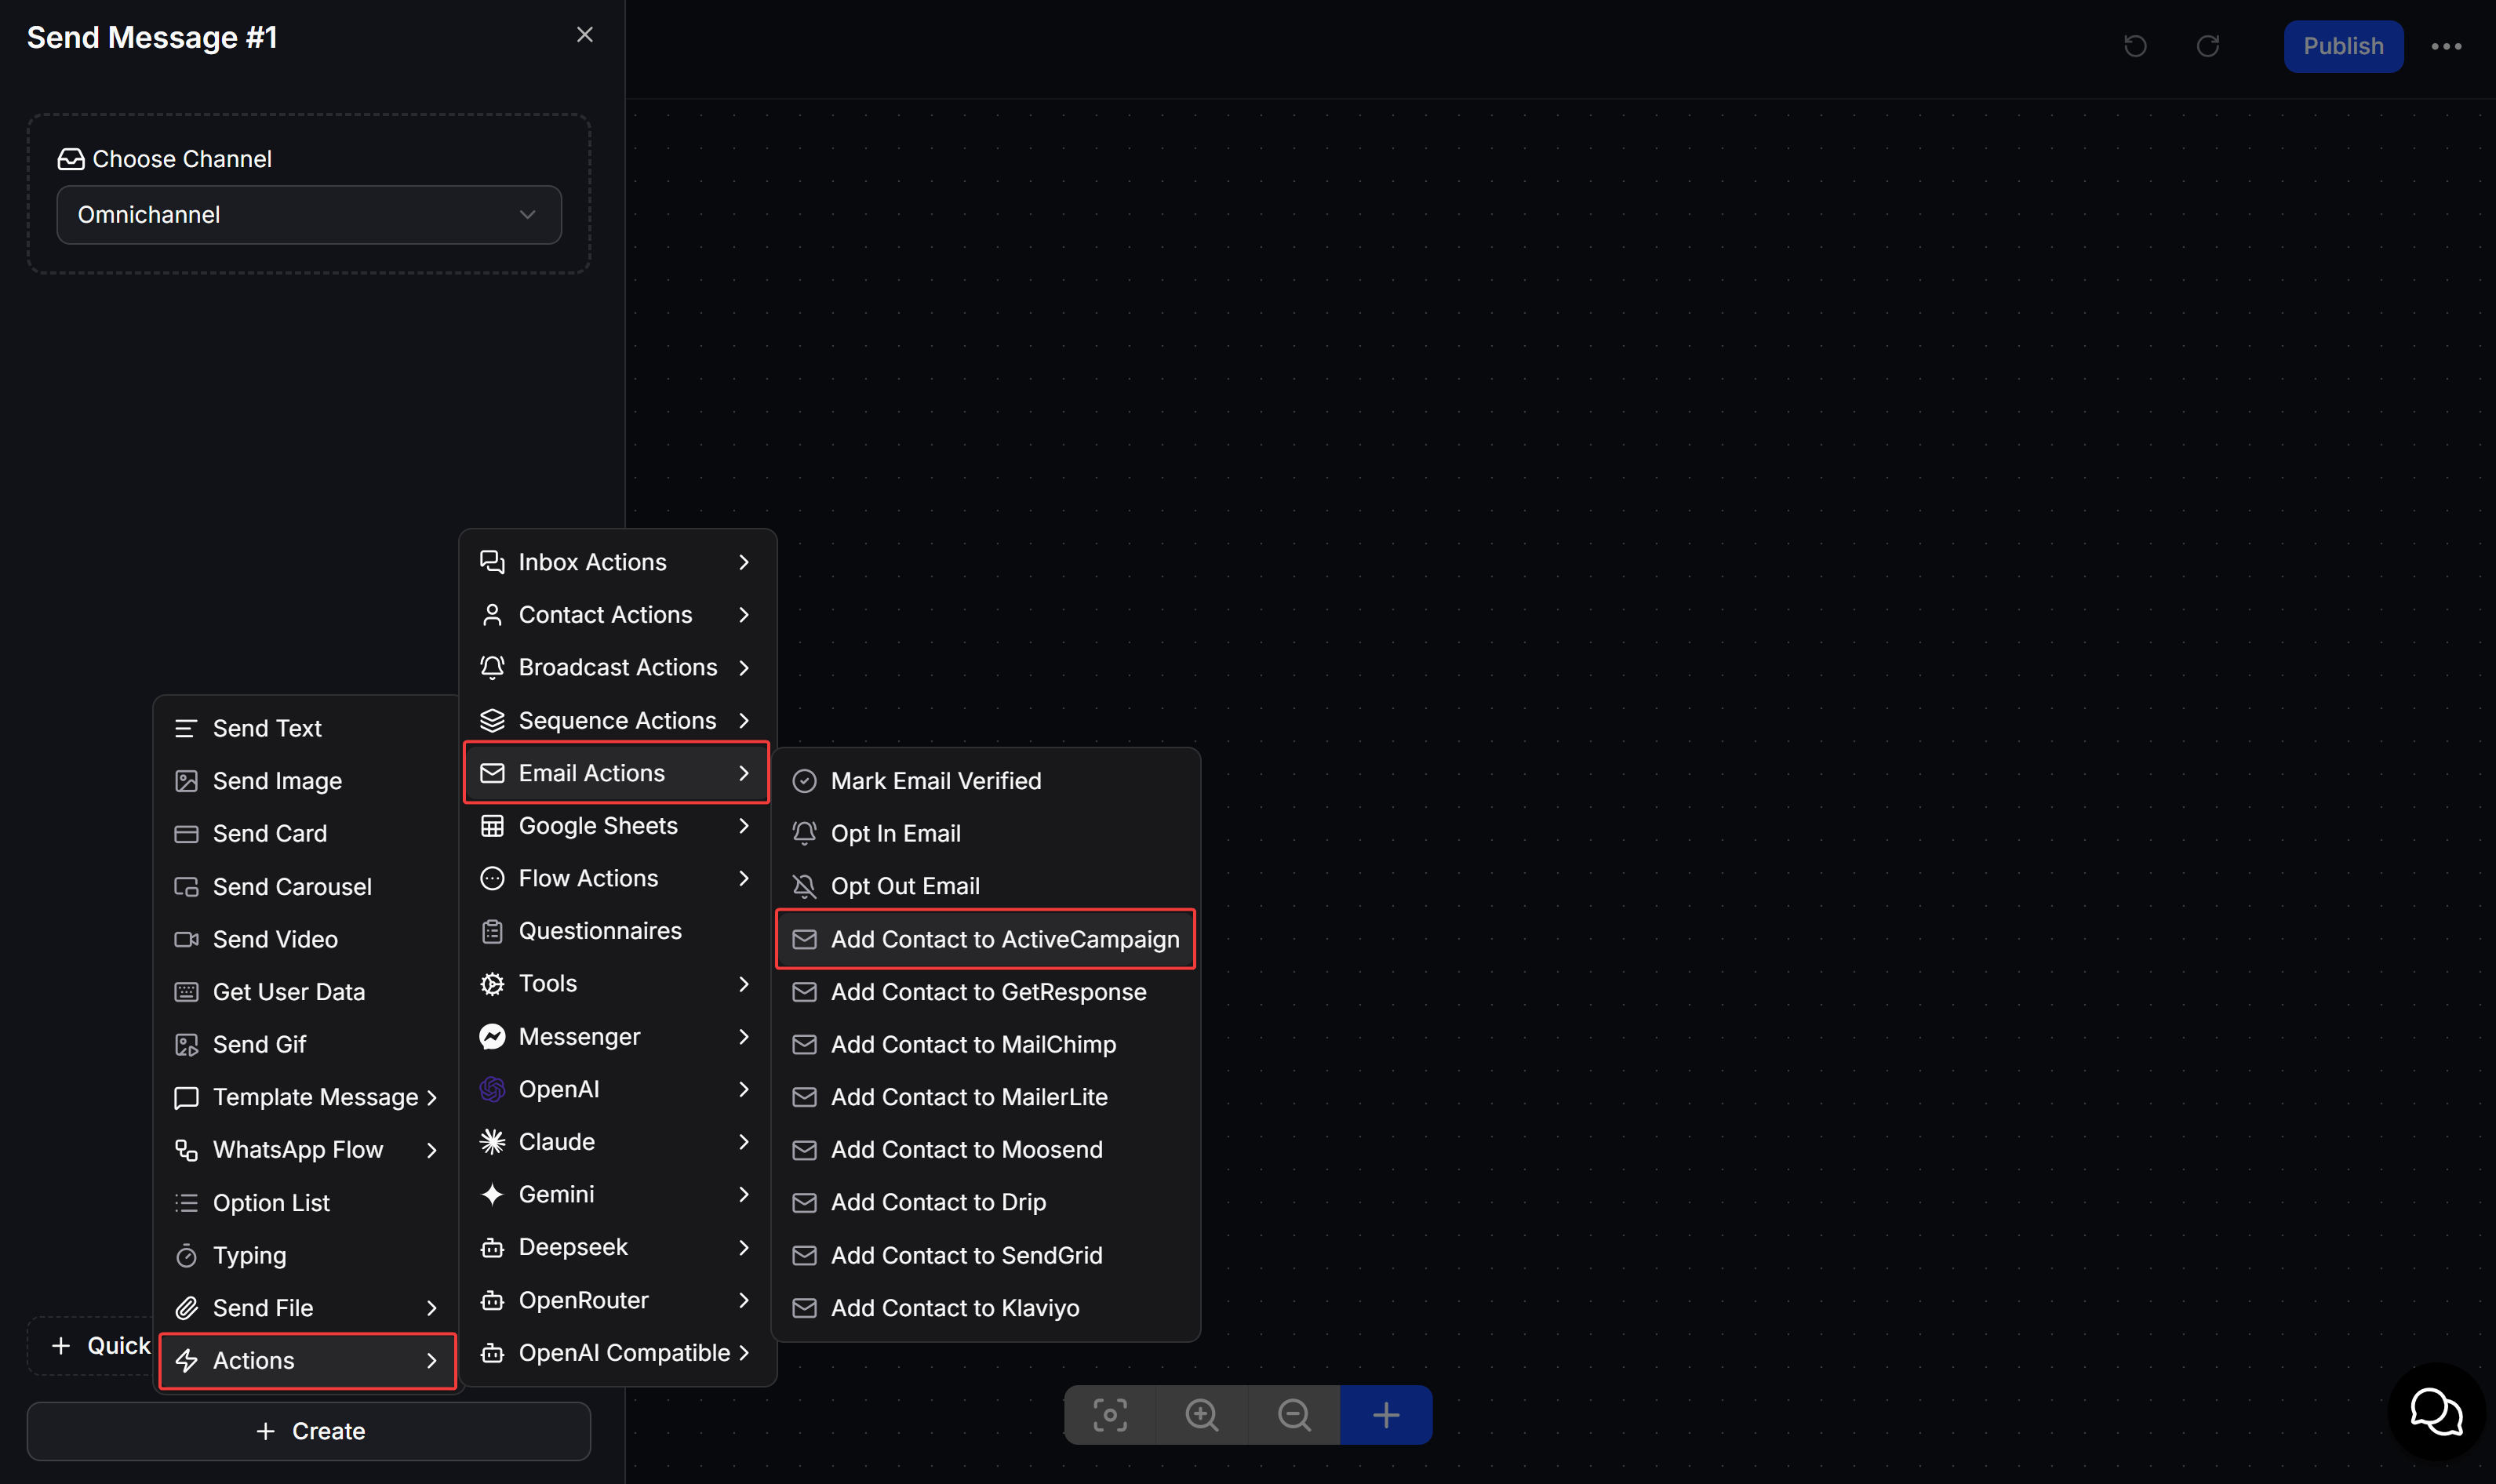
In a Send Message node, click **+ Create**, then select **Actions**.
Open **Email Actions** and select **Add Contact to ActiveCampaign**.
## Add ActiveCampaign to a Flow
After connecting your account, add the ActiveCampaign action to a Send Message node or another suitable position in your Flow.
Select **Flows**, then open the Flow that you want to use for contact synchronization.
In a Send Message node, click **+ Create**, then select **Actions**.
Open **Email Actions** and select **Add Contact to ActiveCampaign**.
 Click **Edit** on the new action to select an operation and map contact data.
## Create or update a contact
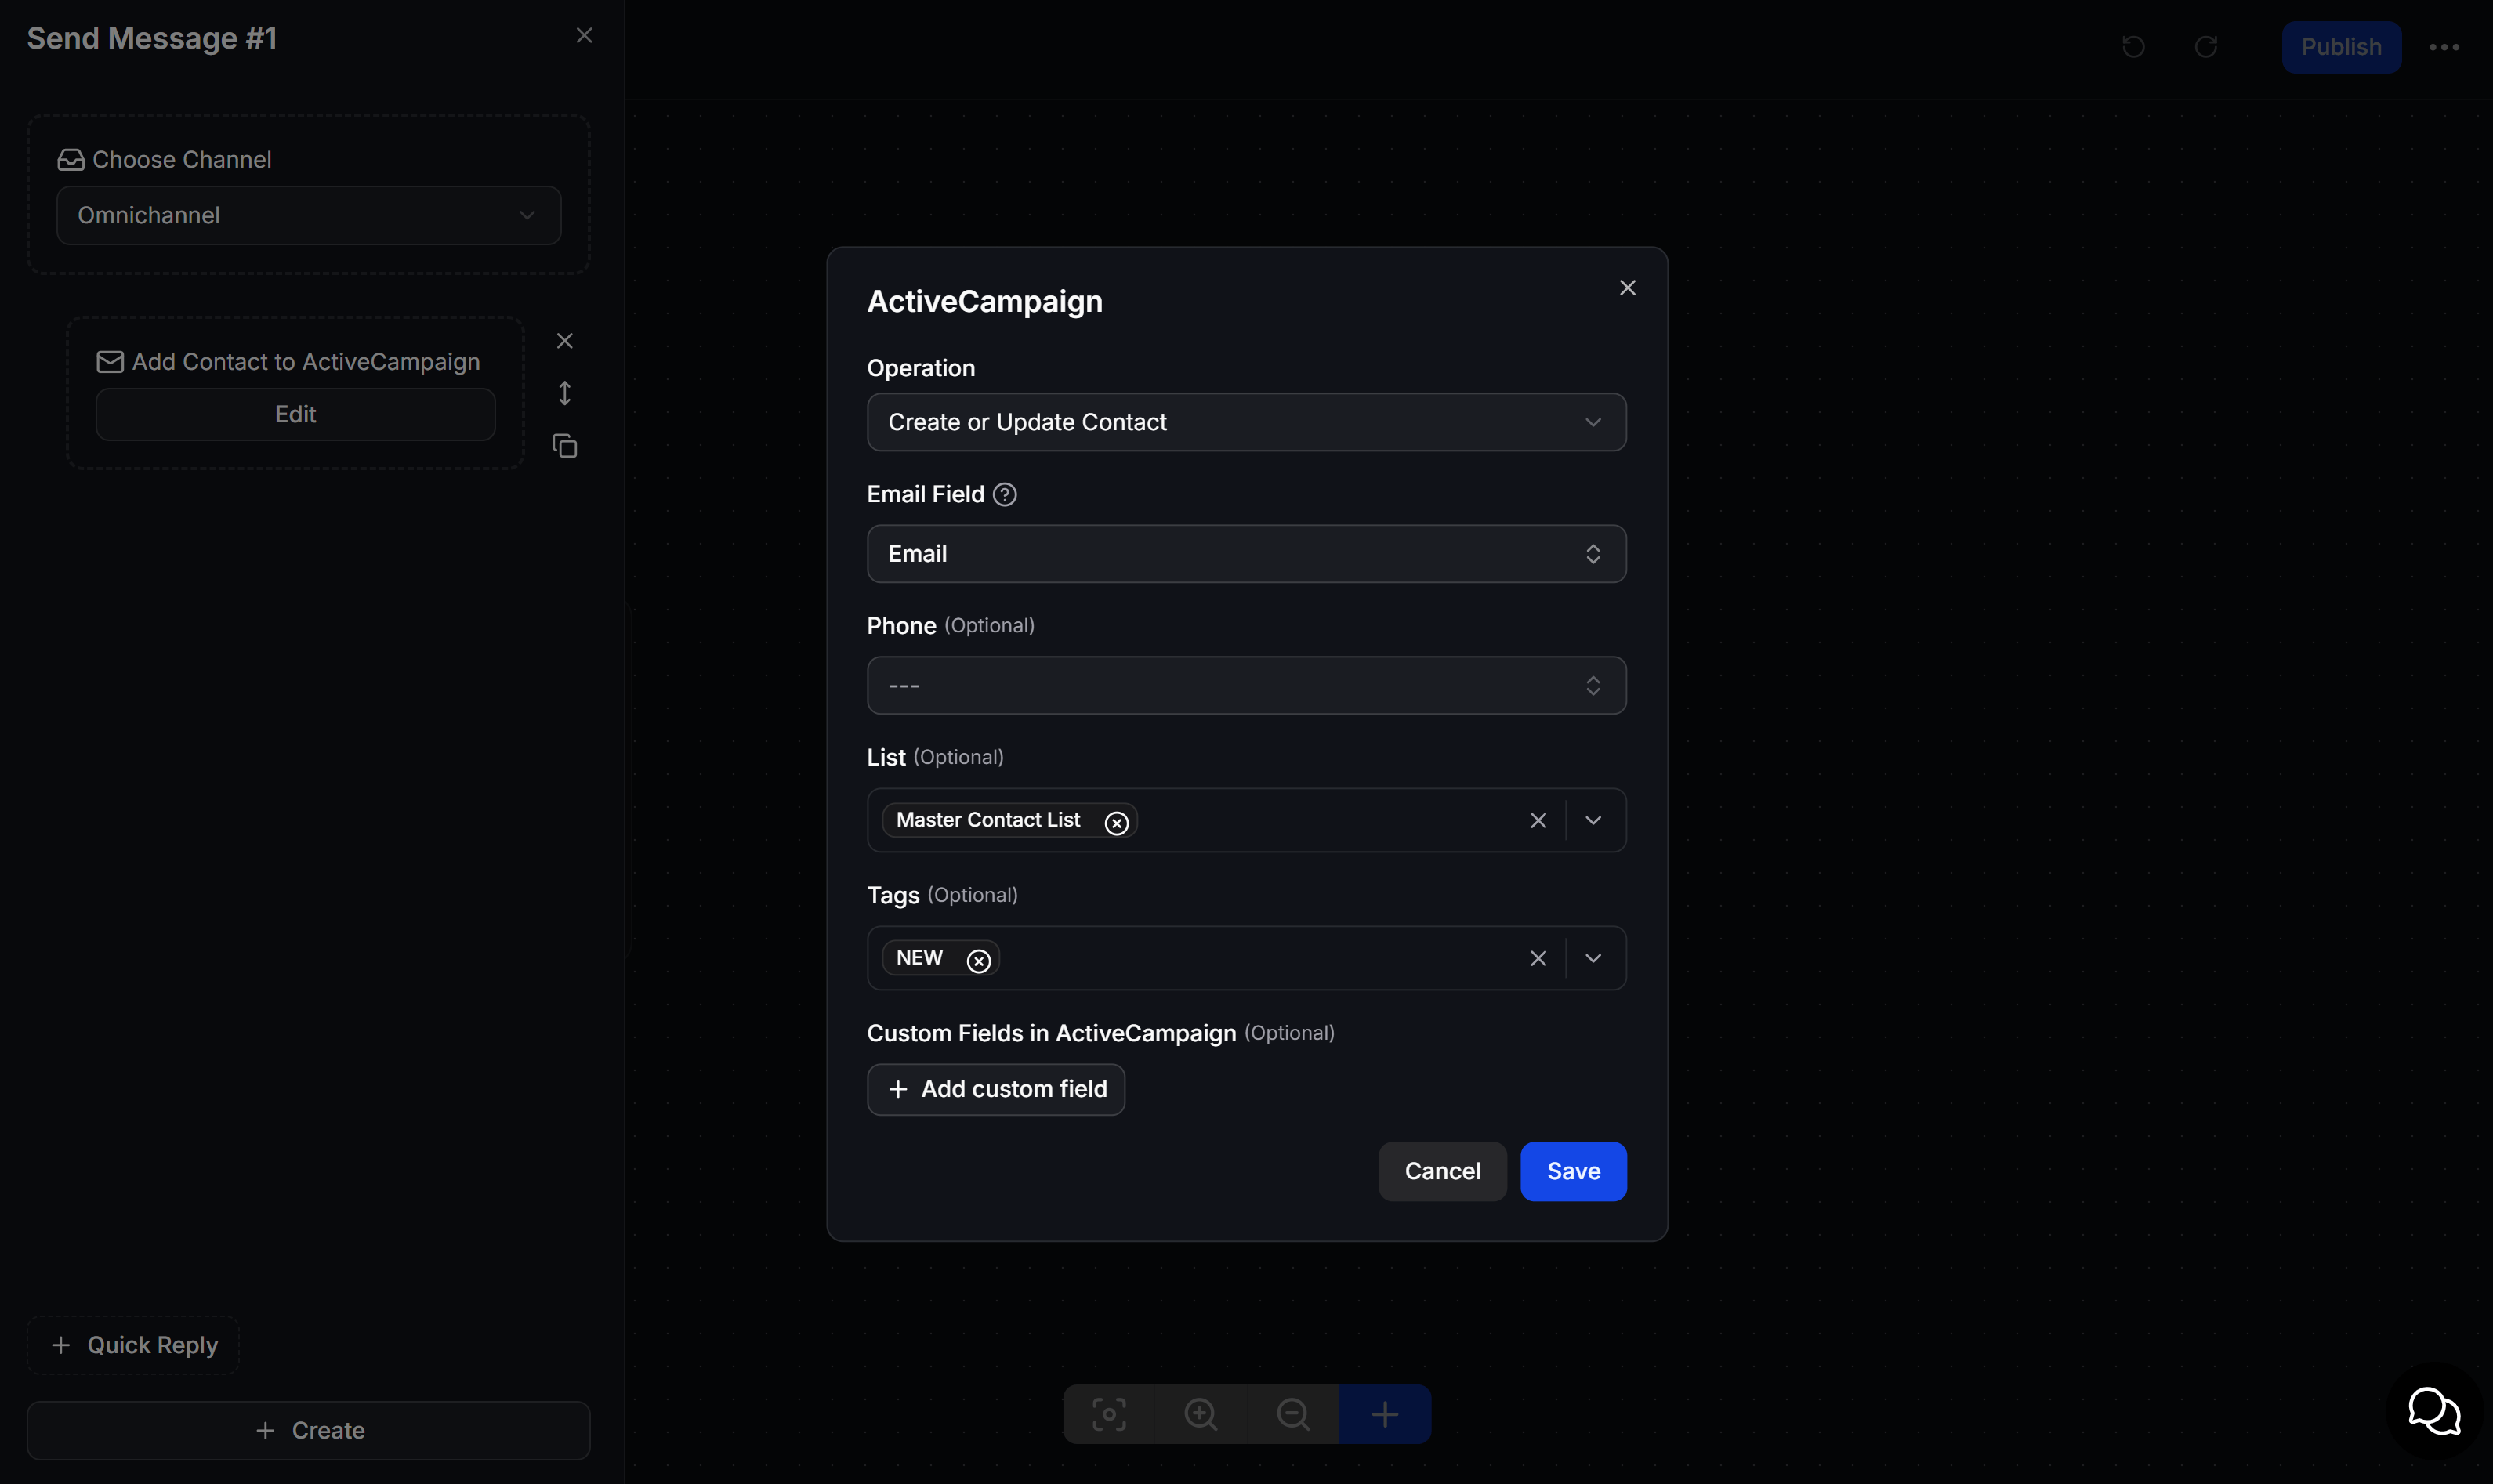
Select the **Create or Update Contact** operation to send customer data from ChatbotX to ActiveCampaign. If the email address already exists, ActiveCampaign updates the contact instead of creating a duplicate record.
| Field | Configuration |
| ----------------------------------- | --------------------------------------------------------------------------------------------------------------------------- |
| **Email Field** | Select the ChatbotX field that stores the customer's email address. ActiveCampaign uses this value to identify the contact. |
| **Phone** | Select the phone number field if you also want to synchronize this information. |
| **List** | Select one or more ActiveCampaign lists that the contact should join. |
| **Tags** | Select the ActiveCampaign Tags to apply, such as `NEW` or `Fashion Lead`. |
| **Custom Fields in ActiveCampaign** | Click **+ Add custom field** to map a ChatbotX Custom Field to its corresponding ActiveCampaign field. |
Click **Save** to save the action.
Click **Edit** on the new action to select an operation and map contact data.
## Create or update a contact
Select the **Create or Update Contact** operation to send customer data from ChatbotX to ActiveCampaign. If the email address already exists, ActiveCampaign updates the contact instead of creating a duplicate record.
| Field | Configuration |
| ----------------------------------- | --------------------------------------------------------------------------------------------------------------------------- |
| **Email Field** | Select the ChatbotX field that stores the customer's email address. ActiveCampaign uses this value to identify the contact. |
| **Phone** | Select the phone number field if you also want to synchronize this information. |
| **List** | Select one or more ActiveCampaign lists that the contact should join. |
| **Tags** | Select the ActiveCampaign Tags to apply, such as `NEW` or `Fashion Lead`. |
| **Custom Fields in ActiveCampaign** | Click **+ Add custom field** to map a ChatbotX Custom Field to its corresponding ActiveCampaign field. |
Click **Save** to save the action.
 Collect the customer's email address with Get User Data before this action runs. ChatbotX cannot create the correct ActiveCampaign contact if the email field is empty or invalid.
## Add a contact to an Automation
Select the **Add Contact to Automation** operation to enroll a contact with an email address in an ActiveCampaign automation.
In **Operation**, select **Add Contact to Automation**.
In **Email Field**, select the ChatbotX field that contains the customer's email address.
In **Automation**, select the ActiveCampaign automation that the customer should join, then click **Save**.
Collect the customer's email address with Get User Data before this action runs. ChatbotX cannot create the correct ActiveCampaign contact if the email field is empty or invalid.
## Add a contact to an Automation
Select the **Add Contact to Automation** operation to enroll a contact with an email address in an ActiveCampaign automation.
In **Operation**, select **Add Contact to Automation**.
In **Email Field**, select the ChatbotX field that contains the customer's email address.
In **Automation**, select the ActiveCampaign automation that the customer should join, then click **Save**.
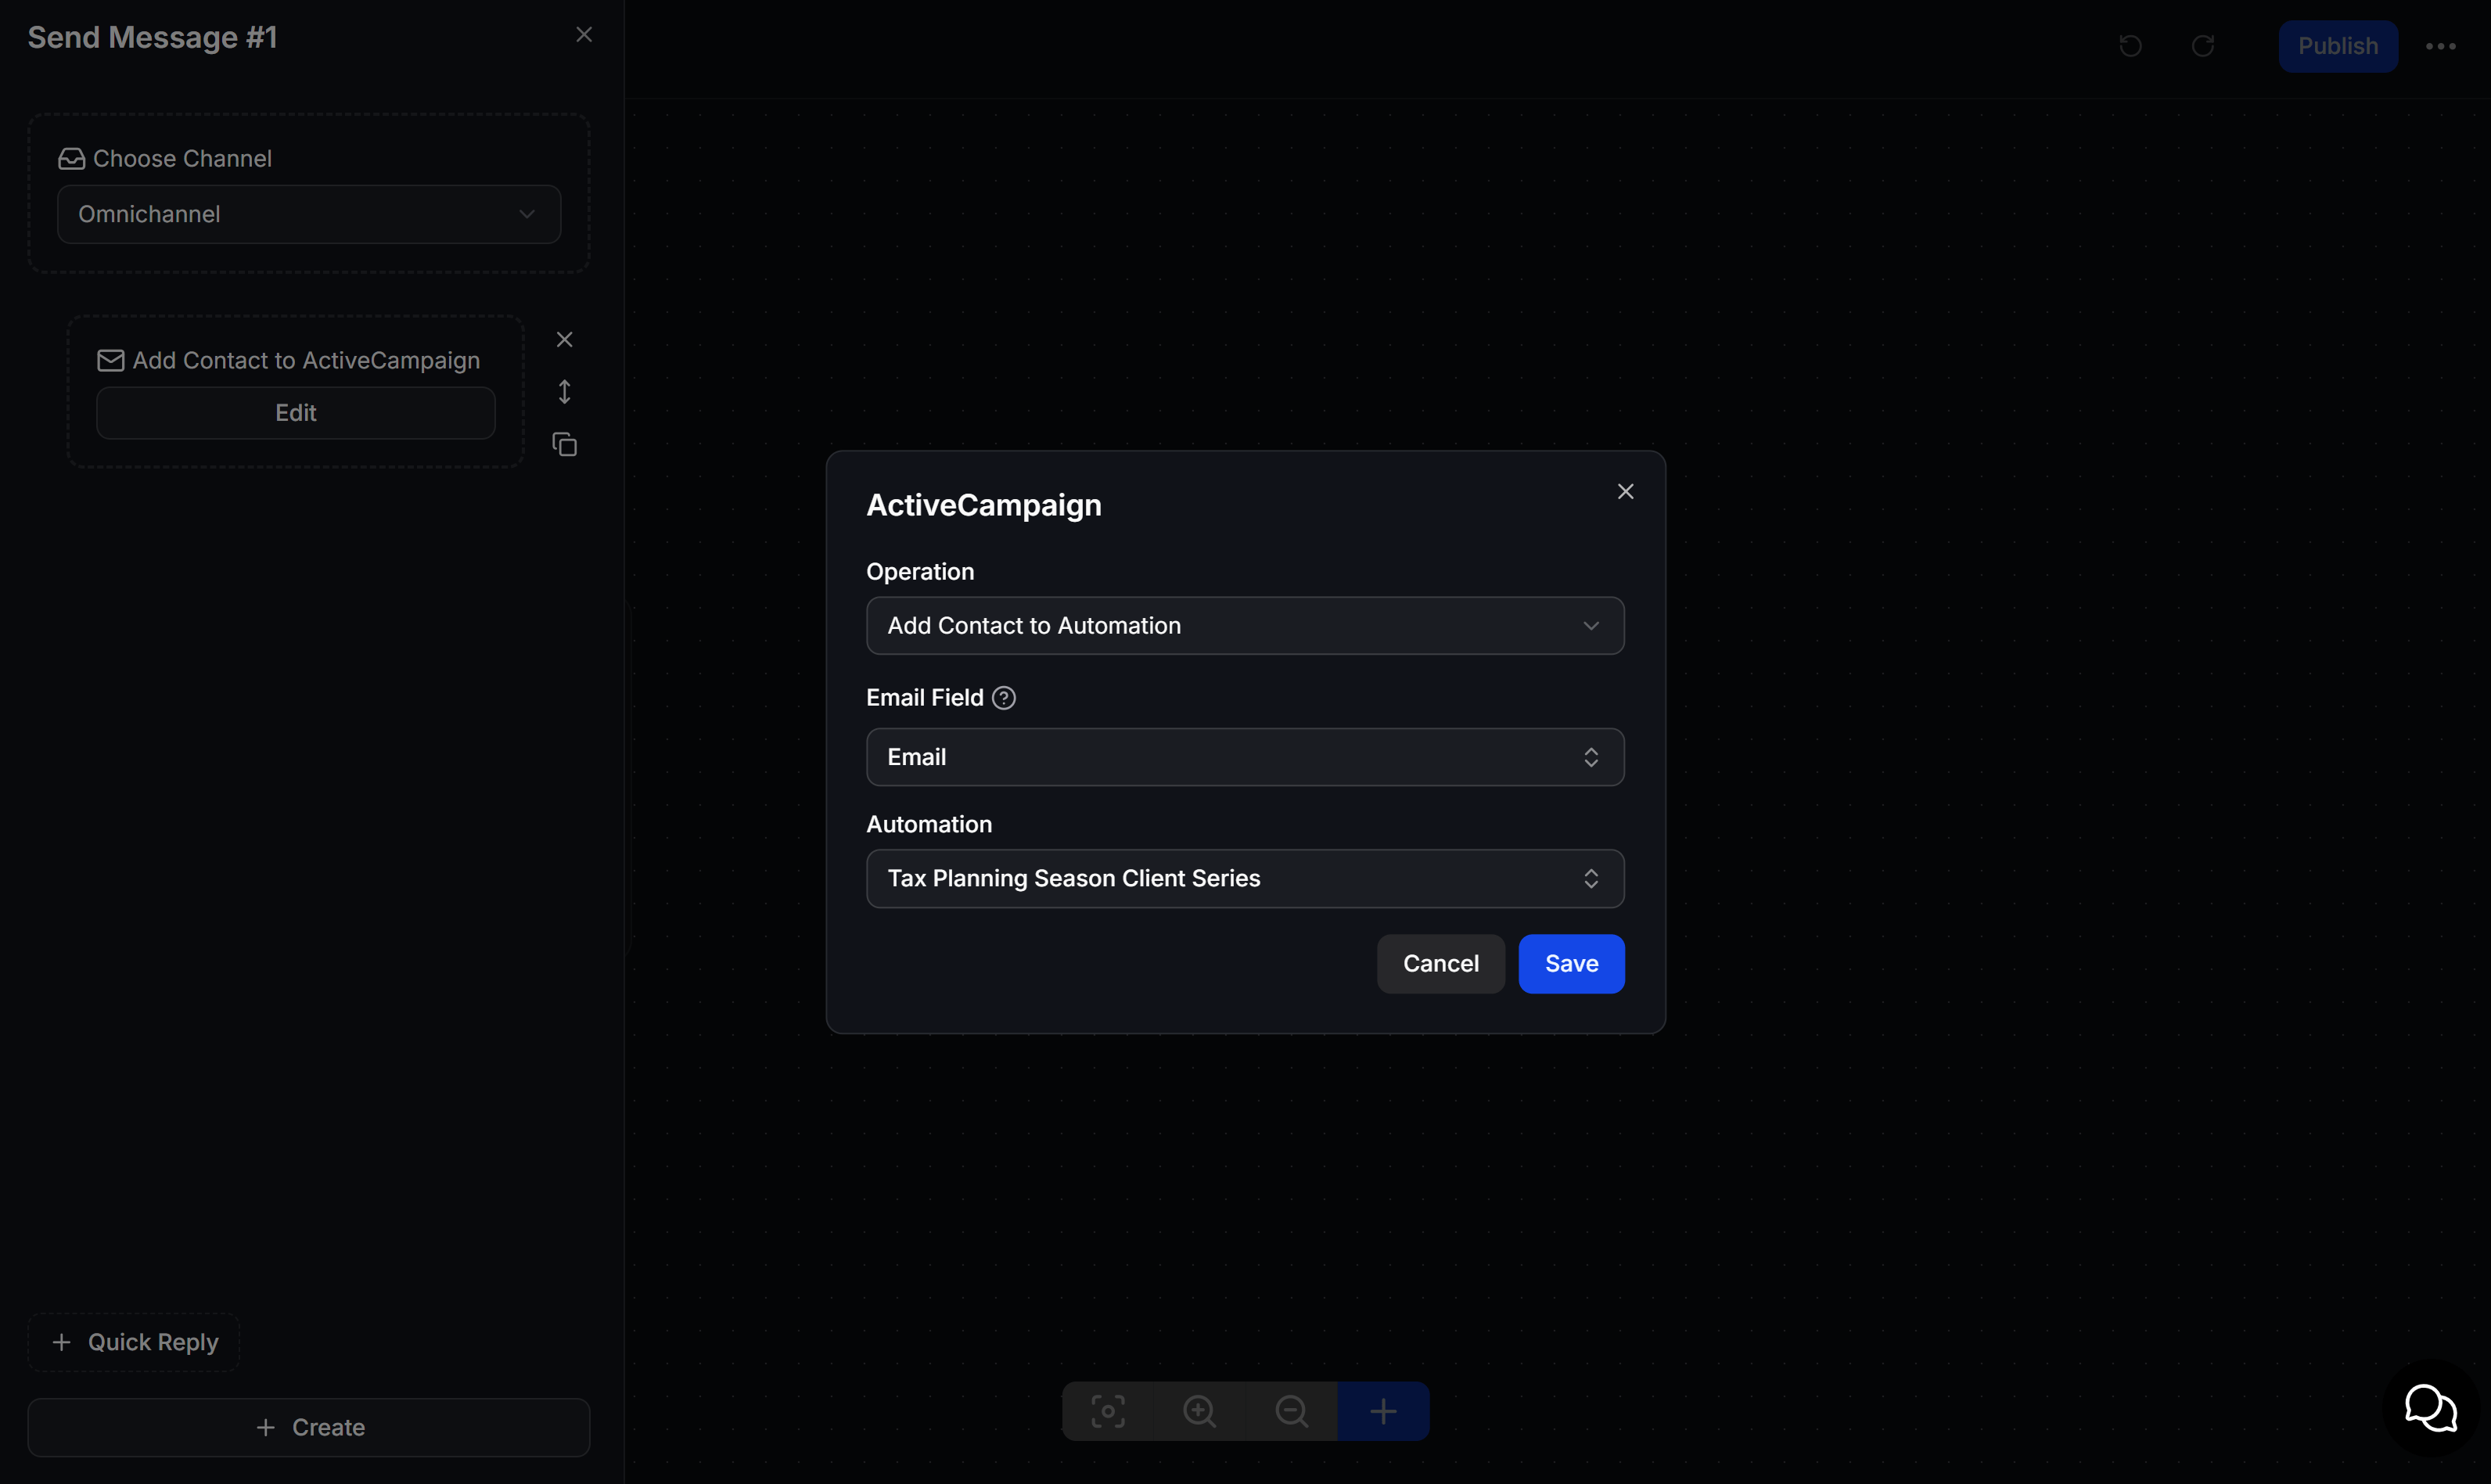 For example, a customer asks to receive new collection announcements by email. After the customer enters an email address, the Flow creates or updates the contact and enrolls them in an Automation that introduces the new products.
## Test the integration
Before publishing the Flow, test it with an email address that you can verify.
* Open **Contacts** in ActiveCampaign and confirm that the contact was created or updated.
* Check that ActiveCampaign received the correct Lists, Tags, and Custom Fields.
* If you use **Add Contact to Automation**, confirm that the contact appears in the selected Automation.
* If the connection fails, copy the API URL and API Key again from **Settings > Developer**, then reconnect the integration.
Resetting the API Key in ActiveCampaign stops the current connection from working. After resetting the key, update it in ChatbotX.
For example, a customer asks to receive new collection announcements by email. After the customer enters an email address, the Flow creates or updates the contact and enrolls them in an Automation that introduces the new products.
## Test the integration
Before publishing the Flow, test it with an email address that you can verify.
* Open **Contacts** in ActiveCampaign and confirm that the contact was created or updated.
* Check that ActiveCampaign received the correct Lists, Tags, and Custom Fields.
* If you use **Add Contact to Automation**, confirm that the contact appears in the selected Automation.
* If the connection fails, copy the API URL and API Key again from **Settings > Developer**, then reconnect the integration.
Resetting the API Key in ActiveCampaign stops the current connection from working. After resetting the key, update it in ChatbotX.