> ## Documentation Index
> Fetch the complete documentation index at: https://chatbotx.io/docs/llms.txt
> Use this file to discover all available pages before exploring further.
# Google Sheets Integration
> Connect your Google Sheets account to ChatbotX to automatically send contact data, lookup row information, update, and clear rows in your chatbot flows.
Google Sheets integration helps you automatically sync and manage conversational data directly on Google spreadsheets. You can use this feature to store customer information from forms, lookup product information, or update order statuses in real-time.
## Connecting ChatbotX with Google Sheets
To get started, you need to grant ChatbotX access to your Google account.
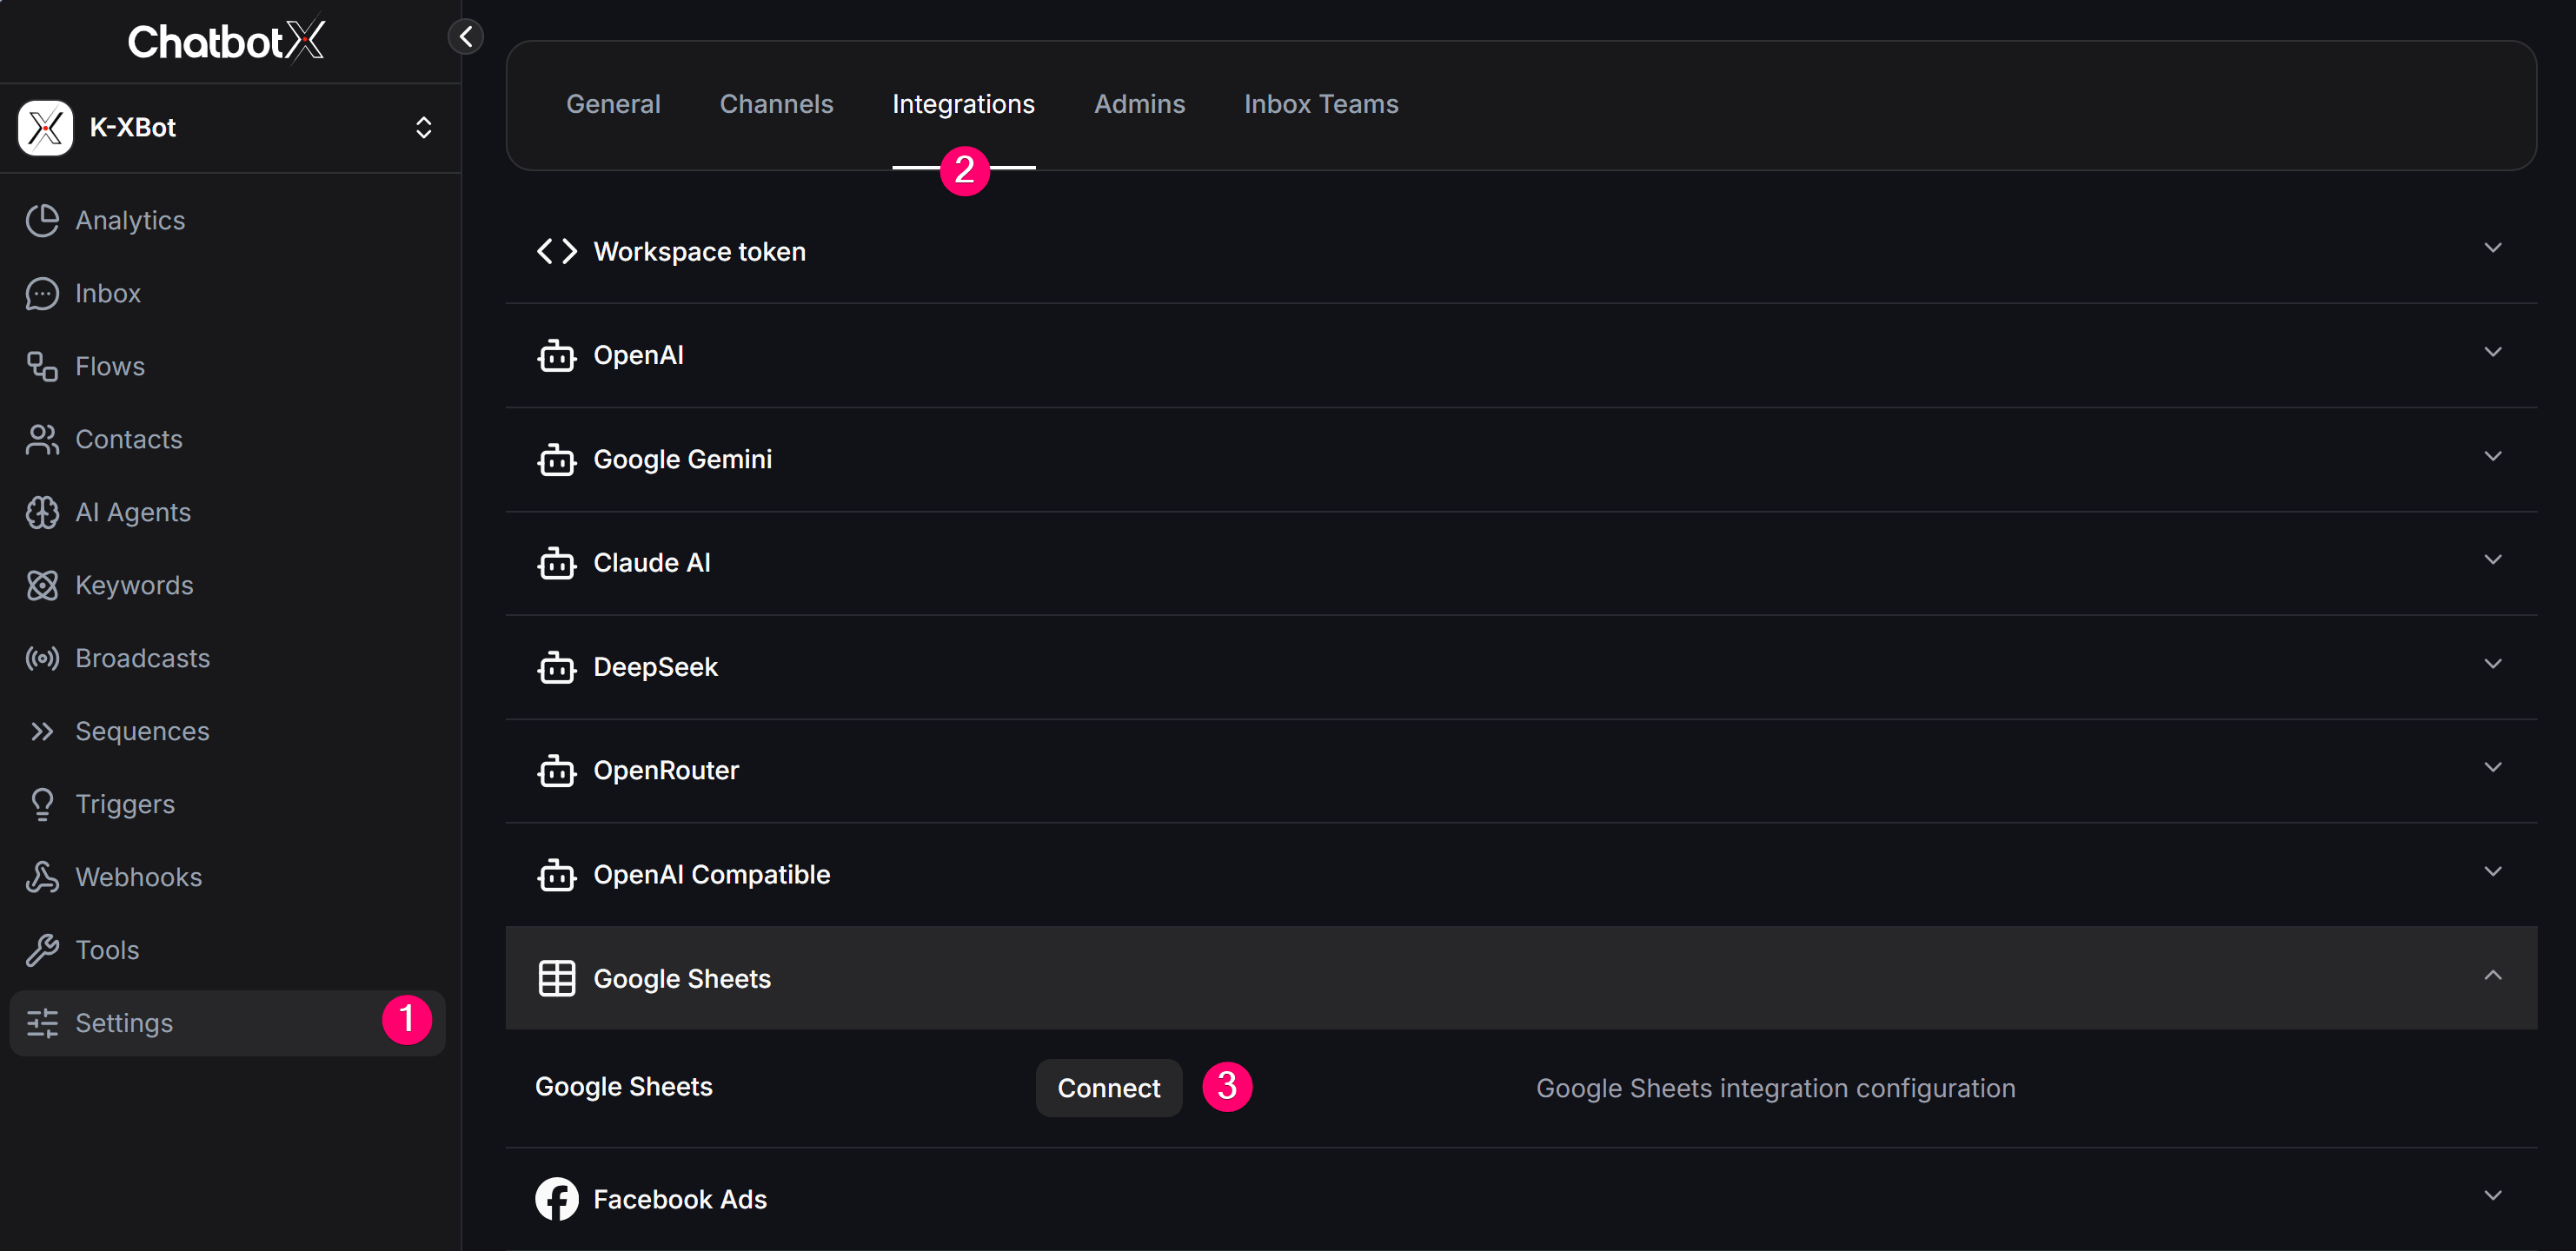
From the left sidebar menu of the workspace, select **Settings** (gear icon).
Click the **Integrations** tab on the top navigation bar of the settings page.
Find the **Google Sheets** app in the integrations list and click the **Connect** button. A new browser window will open, asking you to log in to your Google account and grant the necessary permissions to ChatbotX. Once successfully confirmed, the status will change to **Connected**.
 You can disconnect your Google Sheets account from ChatbotX at any time by clicking the disconnect button on this settings page.
## Setting up your Google Sheet
Before using any Google Sheets actions in your flows, you need to prepare your Google sheet with headers first.
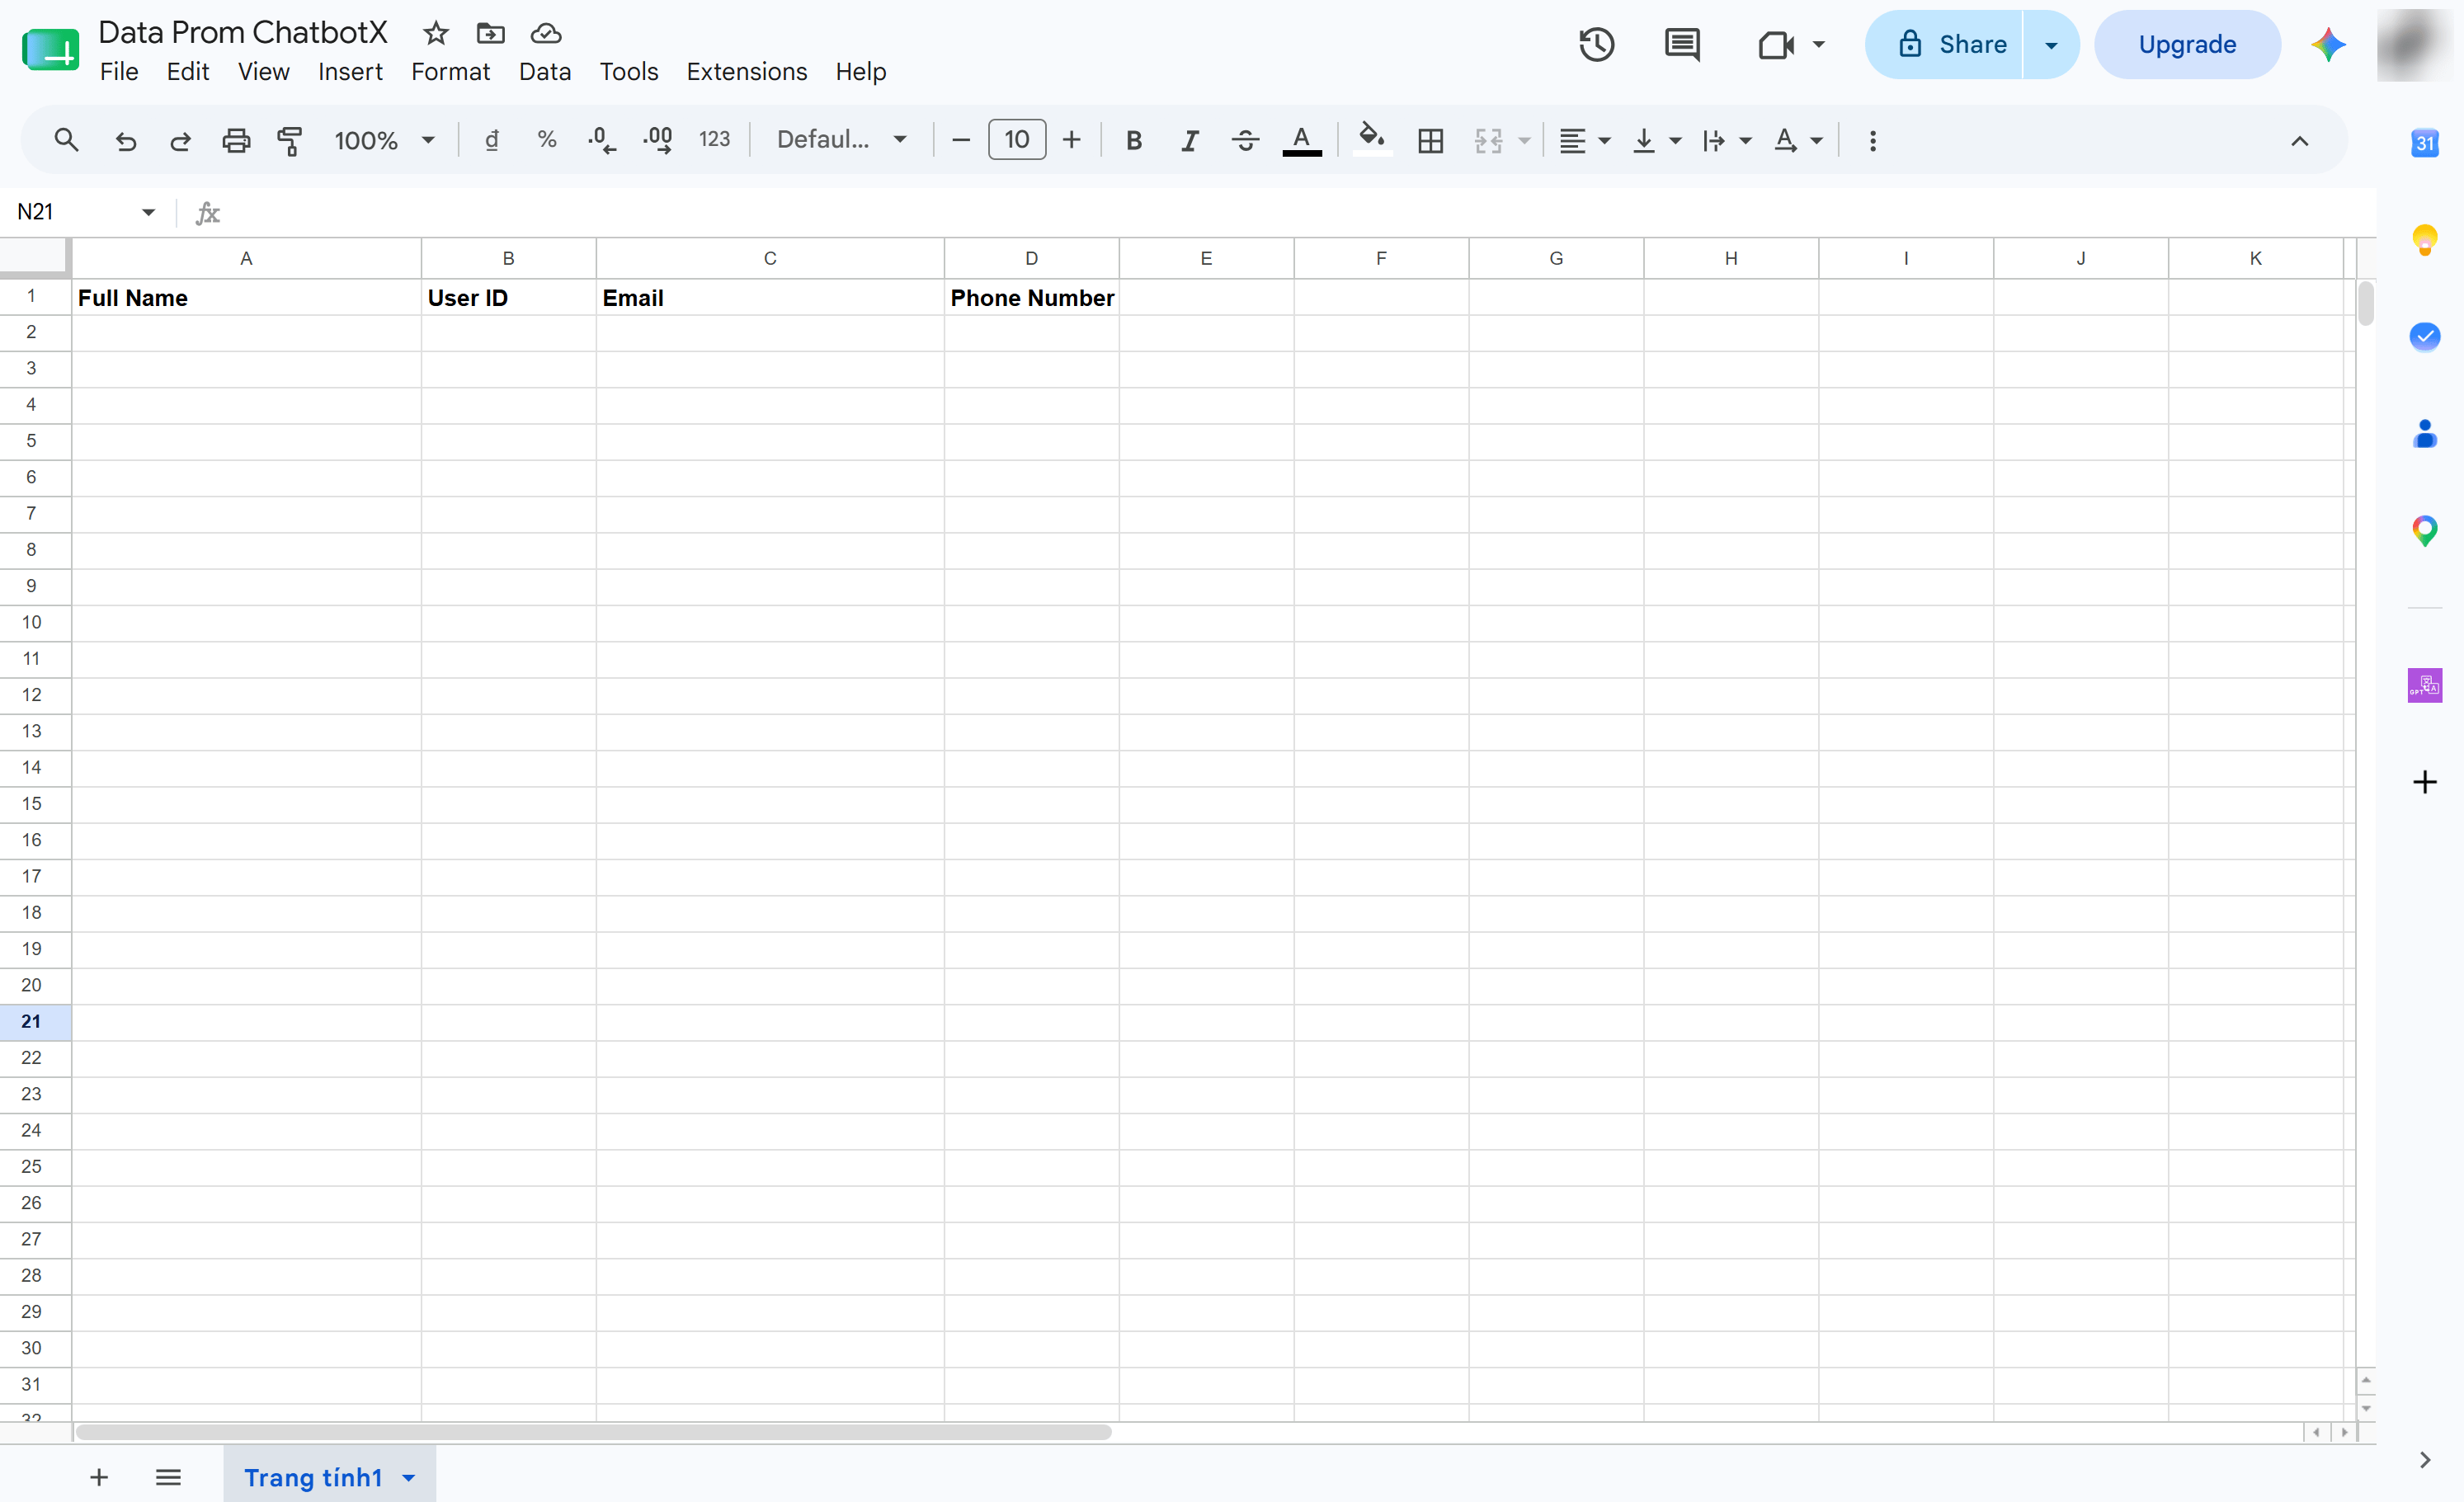
For example: You want to collect customer information including Full Name, User ID, Email, and Phone Number, then export this data to Google Sheets.
Create a new Google Sheets spreadsheet on your Google Drive (e.g., name it: "Subscriber Data").
In the first row (Row 1) of the spreadsheet, write the names of the column headers representing the data you want to store. Each column is a separate data field:
* Column A: Full Name
* Column B: User ID
* Column C: Email
* Column D: Phone Number
You can disconnect your Google Sheets account from ChatbotX at any time by clicking the disconnect button on this settings page.
## Setting up your Google Sheet
Before using any Google Sheets actions in your flows, you need to prepare your Google sheet with headers first.
For example: You want to collect customer information including Full Name, User ID, Email, and Phone Number, then export this data to Google Sheets.
Create a new Google Sheets spreadsheet on your Google Drive (e.g., name it: "Subscriber Data").
In the first row (Row 1) of the spreadsheet, write the names of the column headers representing the data you want to store. Each column is a separate data field:
* Column A: Full Name
* Column B: User ID
* Column C: Email
* Column D: Phone Number
 **Critical Warning:** The Google Sheets integration on ChatbotX operates based on the **Spreadsheet Name** and **Worksheet Name** instead of hidden IDs. If you change either the spreadsheet name or the worksheet name (e.g., from Sheet1 to List) on Google Drive, the connection will break. When this happens, you must go back to the Flow Builder and reconfigure the corresponding Google Sheets action.
## Finding Google Sheets actions in Flow Builder
You can only use Google Sheets features inside conversation flows.
From the left menu, select **Flows** and open the flow you want to edit (or create a new flow by clicking **+ Create Flow**).
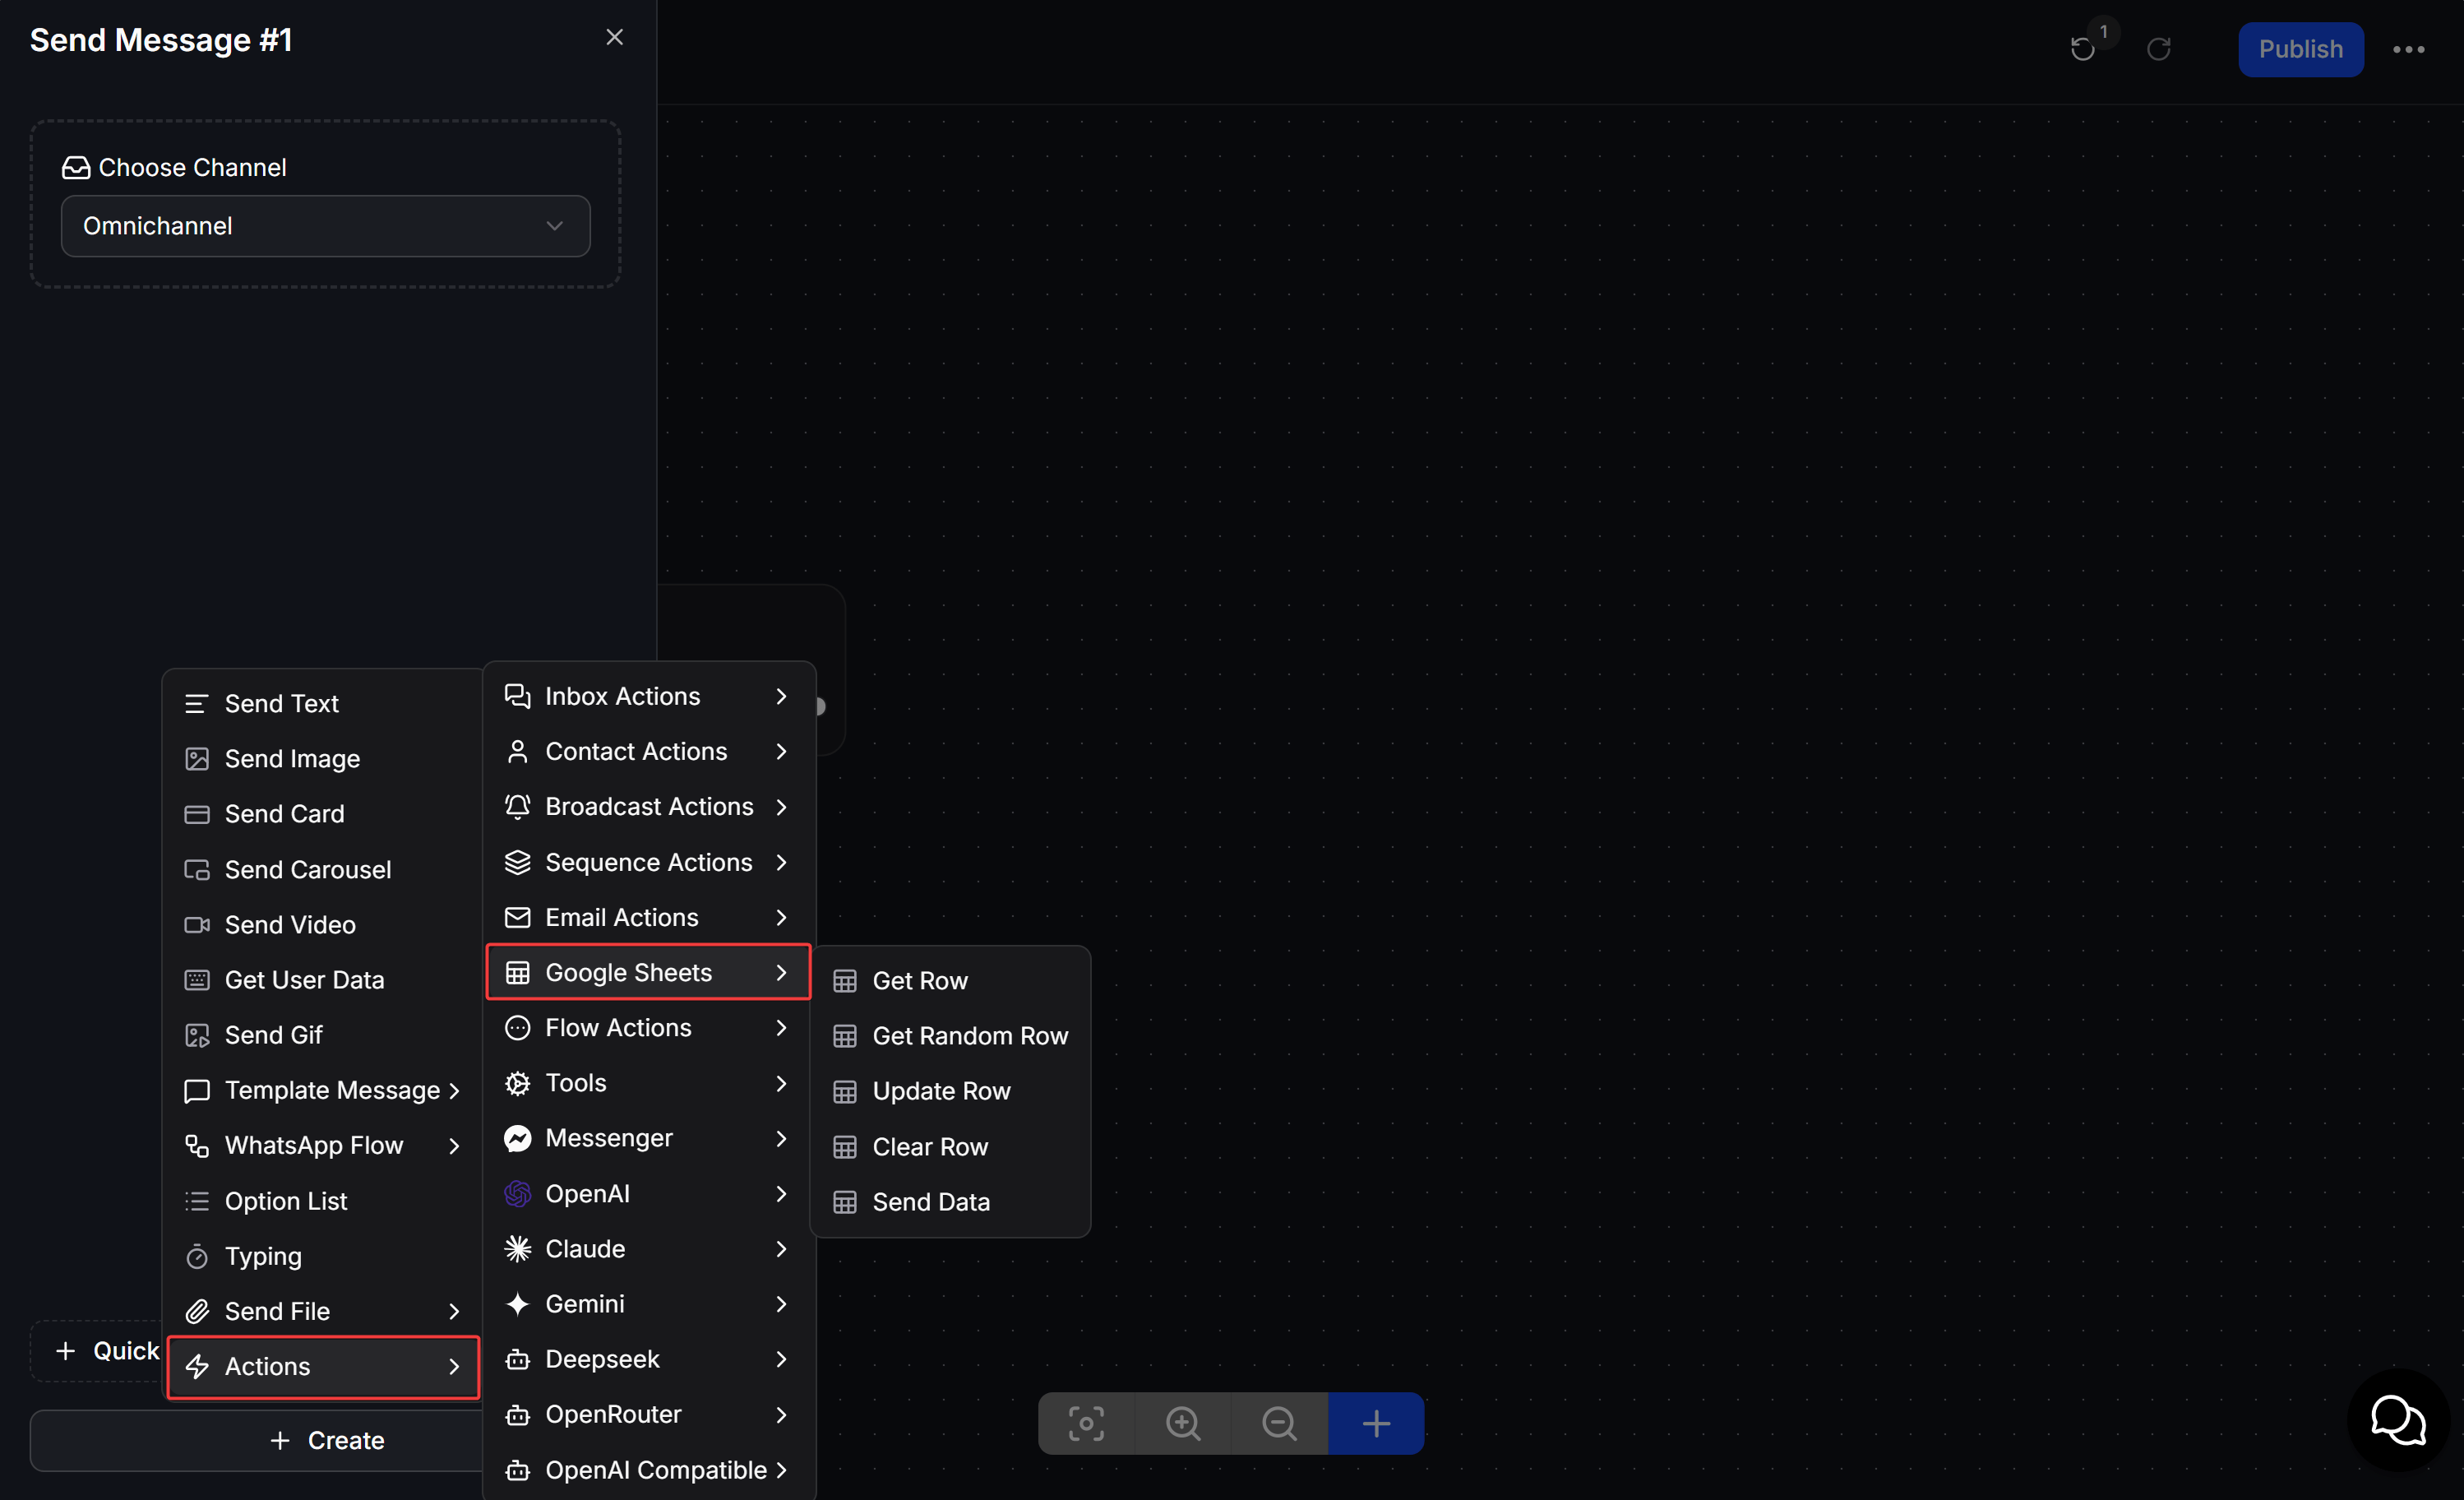
Click on any message block, and select **Actions** from the block options menu.
In the list of available actions, click **Google Sheets** to open the spreadsheet actions menu.
**Critical Warning:** The Google Sheets integration on ChatbotX operates based on the **Spreadsheet Name** and **Worksheet Name** instead of hidden IDs. If you change either the spreadsheet name or the worksheet name (e.g., from Sheet1 to List) on Google Drive, the connection will break. When this happens, you must go back to the Flow Builder and reconfigure the corresponding Google Sheets action.
## Finding Google Sheets actions in Flow Builder
You can only use Google Sheets features inside conversation flows.
From the left menu, select **Flows** and open the flow you want to edit (or create a new flow by clicking **+ Create Flow**).
Click on any message block, and select **Actions** from the block options menu.
In the list of available actions, click **Google Sheets** to open the spreadsheet actions menu.
 ## Detailed guide on the 5 Google Sheets actions
Depending on your operational needs, you can choose one of the following 5 actions to configure in your flows:
### 1. Send Data
This action helps you insert a new row containing the customer's contact information at the end of the Google Sheets spreadsheet.
* **How to configure:** Select the **Send Data** action -> Select the Spreadsheet Name and Worksheet Name -> Map the collected fields from ChatbotX (such as Custom Fields, full name, phone number, etc.) to the correct column headers of Google Sheets.
* **Use case:** When customers message and fill out a registration or order form. Once they complete the form, the bot automatically records their details in the last row of the spreadsheet for sales representatives to follow up.
## Detailed guide on the 5 Google Sheets actions
Depending on your operational needs, you can choose one of the following 5 actions to configure in your flows:
### 1. Send Data
This action helps you insert a new row containing the customer's contact information at the end of the Google Sheets spreadsheet.
* **How to configure:** Select the **Send Data** action -> Select the Spreadsheet Name and Worksheet Name -> Map the collected fields from ChatbotX (such as Custom Fields, full name, phone number, etc.) to the correct column headers of Google Sheets.
* **Use case:** When customers message and fill out a registration or order form. Once they complete the form, the bot automatically records their details in the last row of the spreadsheet for sales representatives to follow up.
 ### 2. Get Row
Look up data from a specific row in the spreadsheet and save the values from that row into Custom Fields on ChatbotX to display to customers or process further.
* **How to configure:** Select **Get Row** -> Select the spreadsheet and worksheet -> Select the lookup column (Lookup Column) -> Set the matching condition (e.g., lookup column must equal the value of a specific Custom Field or Bot Field) -> Map the remaining columns of the spreadsheet to the corresponding Custom Fields to store the data.
* **Real-world example:** You run a mobile Food Truck that frequently changes locations.
1. You create a spreadsheet with 2 columns: `Current Location` and `Current Address`. You set the `Current Location` value statically to "FoodTruck1".
2. Whenever you move to a new location, you simply open your phone and update the new address in the `Current Address` column of the Google Sheet.
3. On ChatbotX, you create a static Bot Field named `Current Location` with the value "FoodTruck1".
4. In your flow, when customers ask for your location, the **Get Row** action will search the spreadsheet for the row where `Current Location` equals "FoodTruck1", fetch the corresponding address to save into the Custom Field `Current Address`, and send it to the customer. You don't need to edit your flow every time you change locations.
### 2. Get Row
Look up data from a specific row in the spreadsheet and save the values from that row into Custom Fields on ChatbotX to display to customers or process further.
* **How to configure:** Select **Get Row** -> Select the spreadsheet and worksheet -> Select the lookup column (Lookup Column) -> Set the matching condition (e.g., lookup column must equal the value of a specific Custom Field or Bot Field) -> Map the remaining columns of the spreadsheet to the corresponding Custom Fields to store the data.
* **Real-world example:** You run a mobile Food Truck that frequently changes locations.
1. You create a spreadsheet with 2 columns: `Current Location` and `Current Address`. You set the `Current Location` value statically to "FoodTruck1".
2. Whenever you move to a new location, you simply open your phone and update the new address in the `Current Address` column of the Google Sheet.
3. On ChatbotX, you create a static Bot Field named `Current Location` with the value "FoodTruck1".
4. In your flow, when customers ask for your location, the **Get Row** action will search the spreadsheet for the row where `Current Location` equals "FoodTruck1", fetch the corresponding address to save into the Custom Field `Current Address`, and send it to the customer. You don't need to edit your flow every time you change locations.
 ### 3. Get Random Row
Automatically select a random row of data in the spreadsheet that meets the lookup condition, and save the content of that row to the customer's Custom Field.
* **How to configure:** Select **Get Random Row** -> Select the spreadsheet and worksheet -> Set the lookup column and lookup value range (Lookup Value) to limit the rows eligible for random selection -> Map the randomly selected column data to a Custom Field.
* **Real-world example:** Setting up a lucky draw game or random trivia/quiz.
1. You create a spreadsheet containing a list of prizes or random questions.
2. In the flow, when customers click a "Spin" or "Play Game" button, the bot uses the **Get Random Row** action to pick a random prize or question row from the sheet, saves it to a Custom Field, and immediately displays the result to the customer.
### 3. Get Random Row
Automatically select a random row of data in the spreadsheet that meets the lookup condition, and save the content of that row to the customer's Custom Field.
* **How to configure:** Select **Get Random Row** -> Select the spreadsheet and worksheet -> Set the lookup column and lookup value range (Lookup Value) to limit the rows eligible for random selection -> Map the randomly selected column data to a Custom Field.
* **Real-world example:** Setting up a lucky draw game or random trivia/quiz.
1. You create a spreadsheet containing a list of prizes or random questions.
2. In the flow, when customers click a "Spin" or "Play Game" button, the bot uses the **Get Random Row** action to pick a random prize or question row from the sheet, saves it to a Custom Field, and immediately displays the result to the customer.
 ### 4. Update Row
Search for an existing row in the spreadsheet and update it with the latest information, instead of creating a new row.
* **How to configure:** Select **Update Row** -> Select the spreadsheet and worksheet -> Select a unique and constant lookup column (e.g., `User ID` or the customer's `Phone Number`) so the bot finds the exact row -> Choose the new Custom Fields to update and overwrite the spreadsheet columns.
* **Real-world example:** Initially, customers only register their name and User ID. In a subsequent flow, they fill in their Email and Phone Number to receive a lead magnet. The **Update Row** action looks up the row where `User ID` matches the customer and fills in the new Email and Phone Number in their respective columns, keeping the spreadsheet clean and free of duplicates.
### 4. Update Row
Search for an existing row in the spreadsheet and update it with the latest information, instead of creating a new row.
* **How to configure:** Select **Update Row** -> Select the spreadsheet and worksheet -> Select a unique and constant lookup column (e.g., `User ID` or the customer's `Phone Number`) so the bot finds the exact row -> Choose the new Custom Fields to update and overwrite the spreadsheet columns.
* **Real-world example:** Initially, customers only register their name and User ID. In a subsequent flow, they fill in their Email and Phone Number to receive a lead magnet. The **Update Row** action looks up the row where `User ID` matches the customer and fills in the new Email and Phone Number in their respective columns, keeping the spreadsheet clean and free of duplicates.
 ### 5. Clear Row
Clear all content of a matching row in the spreadsheet, but keep the empty row in place so it does not alter the row index or disrupt the structure of other rows.
* **How to configure:** Select **Clear Row** -> Select the spreadsheet and worksheet -> Select the unique lookup column (such as `User ID`) to identify the exact row to clear.
* **Real-world example:** When a customer clicks the unsubscribe button (Unsubscribe) or requests to delete their personal data from your system, the bot uses the **Clear Row** action to automatically clear their information from the corresponding Google Sheets row.
### 5. Clear Row
Clear all content of a matching row in the spreadsheet, but keep the empty row in place so it does not alter the row index or disrupt the structure of other rows.
* **How to configure:** Select **Clear Row** -> Select the spreadsheet and worksheet -> Select the unique lookup column (such as `User ID`) to identify the exact row to clear.
* **Real-world example:** When a customer clicks the unsubscribe button (Unsubscribe) or requests to delete their personal data from your system, the bot uses the **Clear Row** action to automatically clear their information from the corresponding Google Sheets row.
