> ## Documentation Index
> Fetch the complete documentation index at: https://chatbotx.io/docs/llms.txt
> Use this file to discover all available pages before exploring further.
# Mailchimp Integration
> Connect Mailchimp with ChatbotX to add contacts to an Audience, configure Double Opt-In, apply Tags, and sync Custom Fields from a Flow.
The **Mailchimp** integration adds contacts from ChatbotX to an Audience directly within a Flow. You can select the email field, enable Double Opt-In, apply Tags, and synchronize information with Mailchimp Custom Fields.
For example, after a customer signs up for an offer, ChatbotX adds the email address to an Audience, applies Tags for classification, and sends the customer's name, phone number, or birthday to Mailchimp.
## Prepare your API Key
You need to generate an **API Key** in Mailchimp before connecting. This key allows ChatbotX to access your Audience and send contact data to your account.
Sign in to the Mailchimp account that you want to connect to ChatbotX.
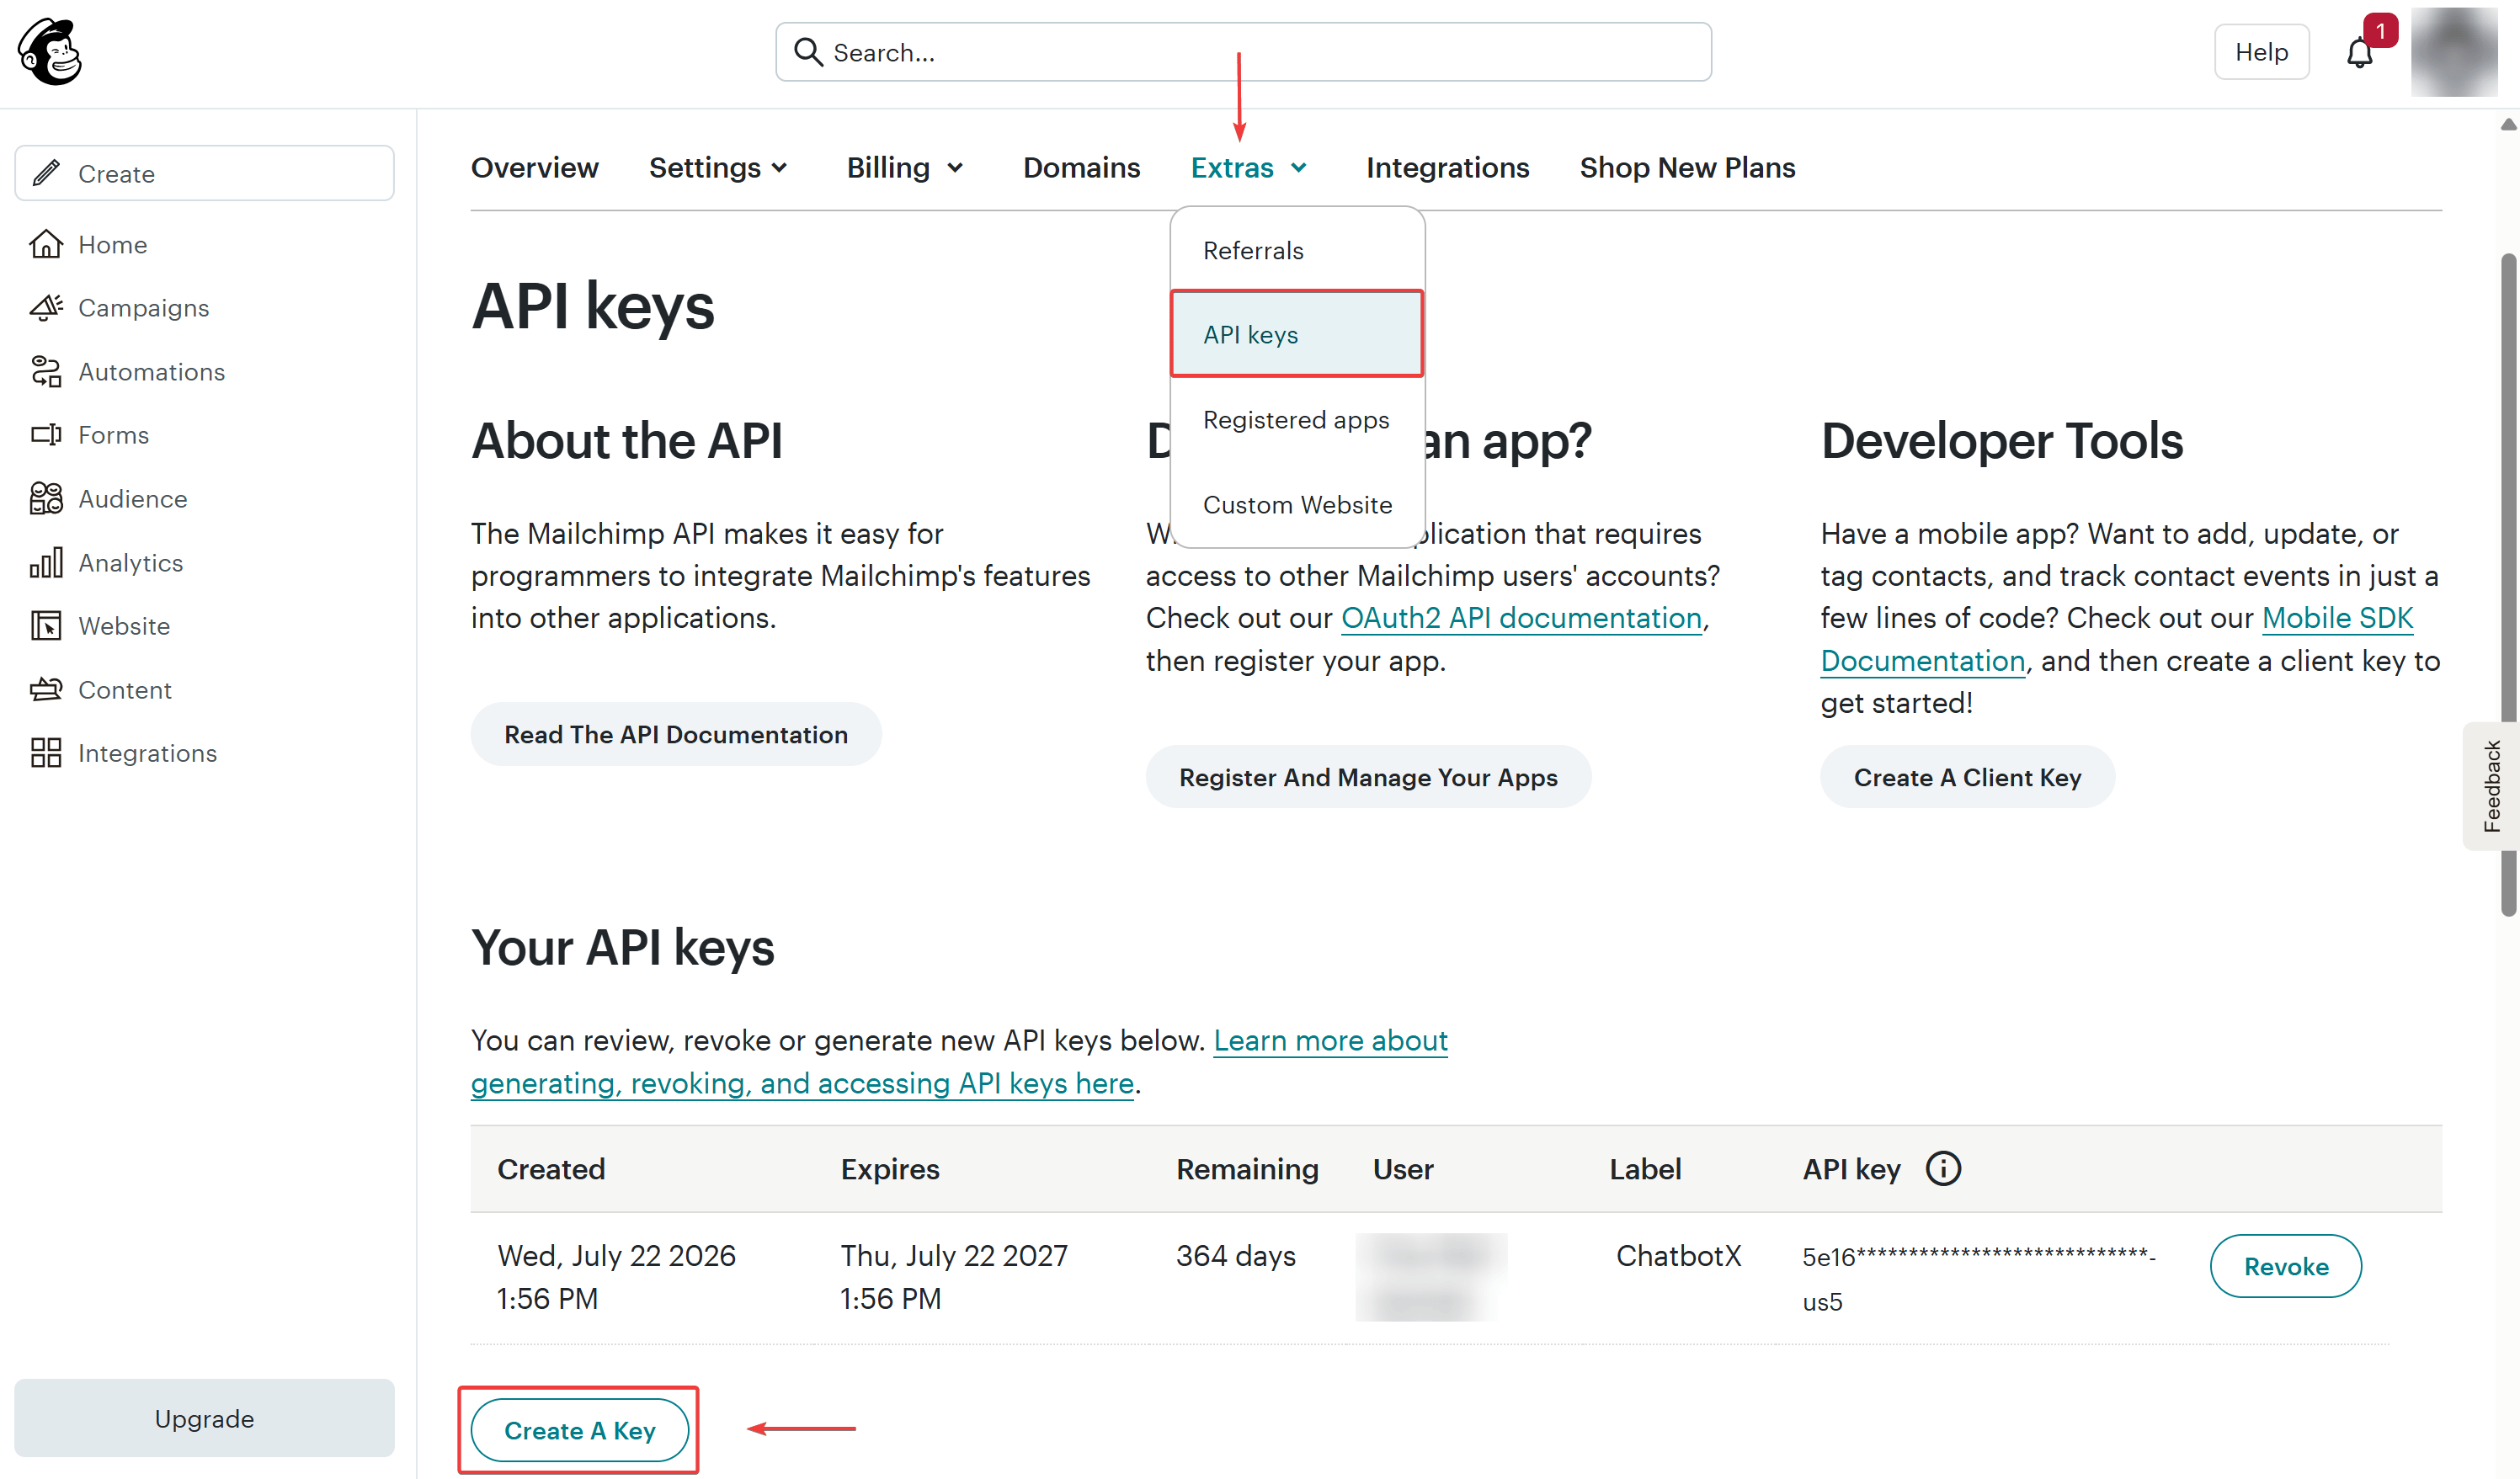
Select your profile icon, open **Profile**, then select **Extras > API keys**.
In **Your API keys**, click **Create A Key**. Enter a name that helps you identify the key, such as `ChatbotX`, then click **Generate Key**.
Click **Copy Key to Clipboard** and store the key securely. Mailchimp displays the complete key only immediately after generation.
See [About API Keys](https://mailchimp.com/help/about-api-keys/) in the official Mailchimp documentation.
 Do not share the API Key in emails, messages, public screenshots, or customer-facing documents. If the key is exposed, revoke it and generate a new one.
## Connect Mailchimp to ChatbotX
In your ChatbotX workspace, select **Settings** from the left menu.
Select the **Integrations** tab, then open **Mailchimp**.
Click **Connect** to open the **Connect Mailchimp** window.
Paste the generated key into **API Key**, then click **Confirm**.
Do not share the API Key in emails, messages, public screenshots, or customer-facing documents. If the key is exposed, revoke it and generate a new one.
## Connect Mailchimp to ChatbotX
In your ChatbotX workspace, select **Settings** from the left menu.
Select the **Integrations** tab, then open **Mailchimp**.
Click **Connect** to open the **Connect Mailchimp** window.
Paste the generated key into **API Key**, then click **Confirm**.
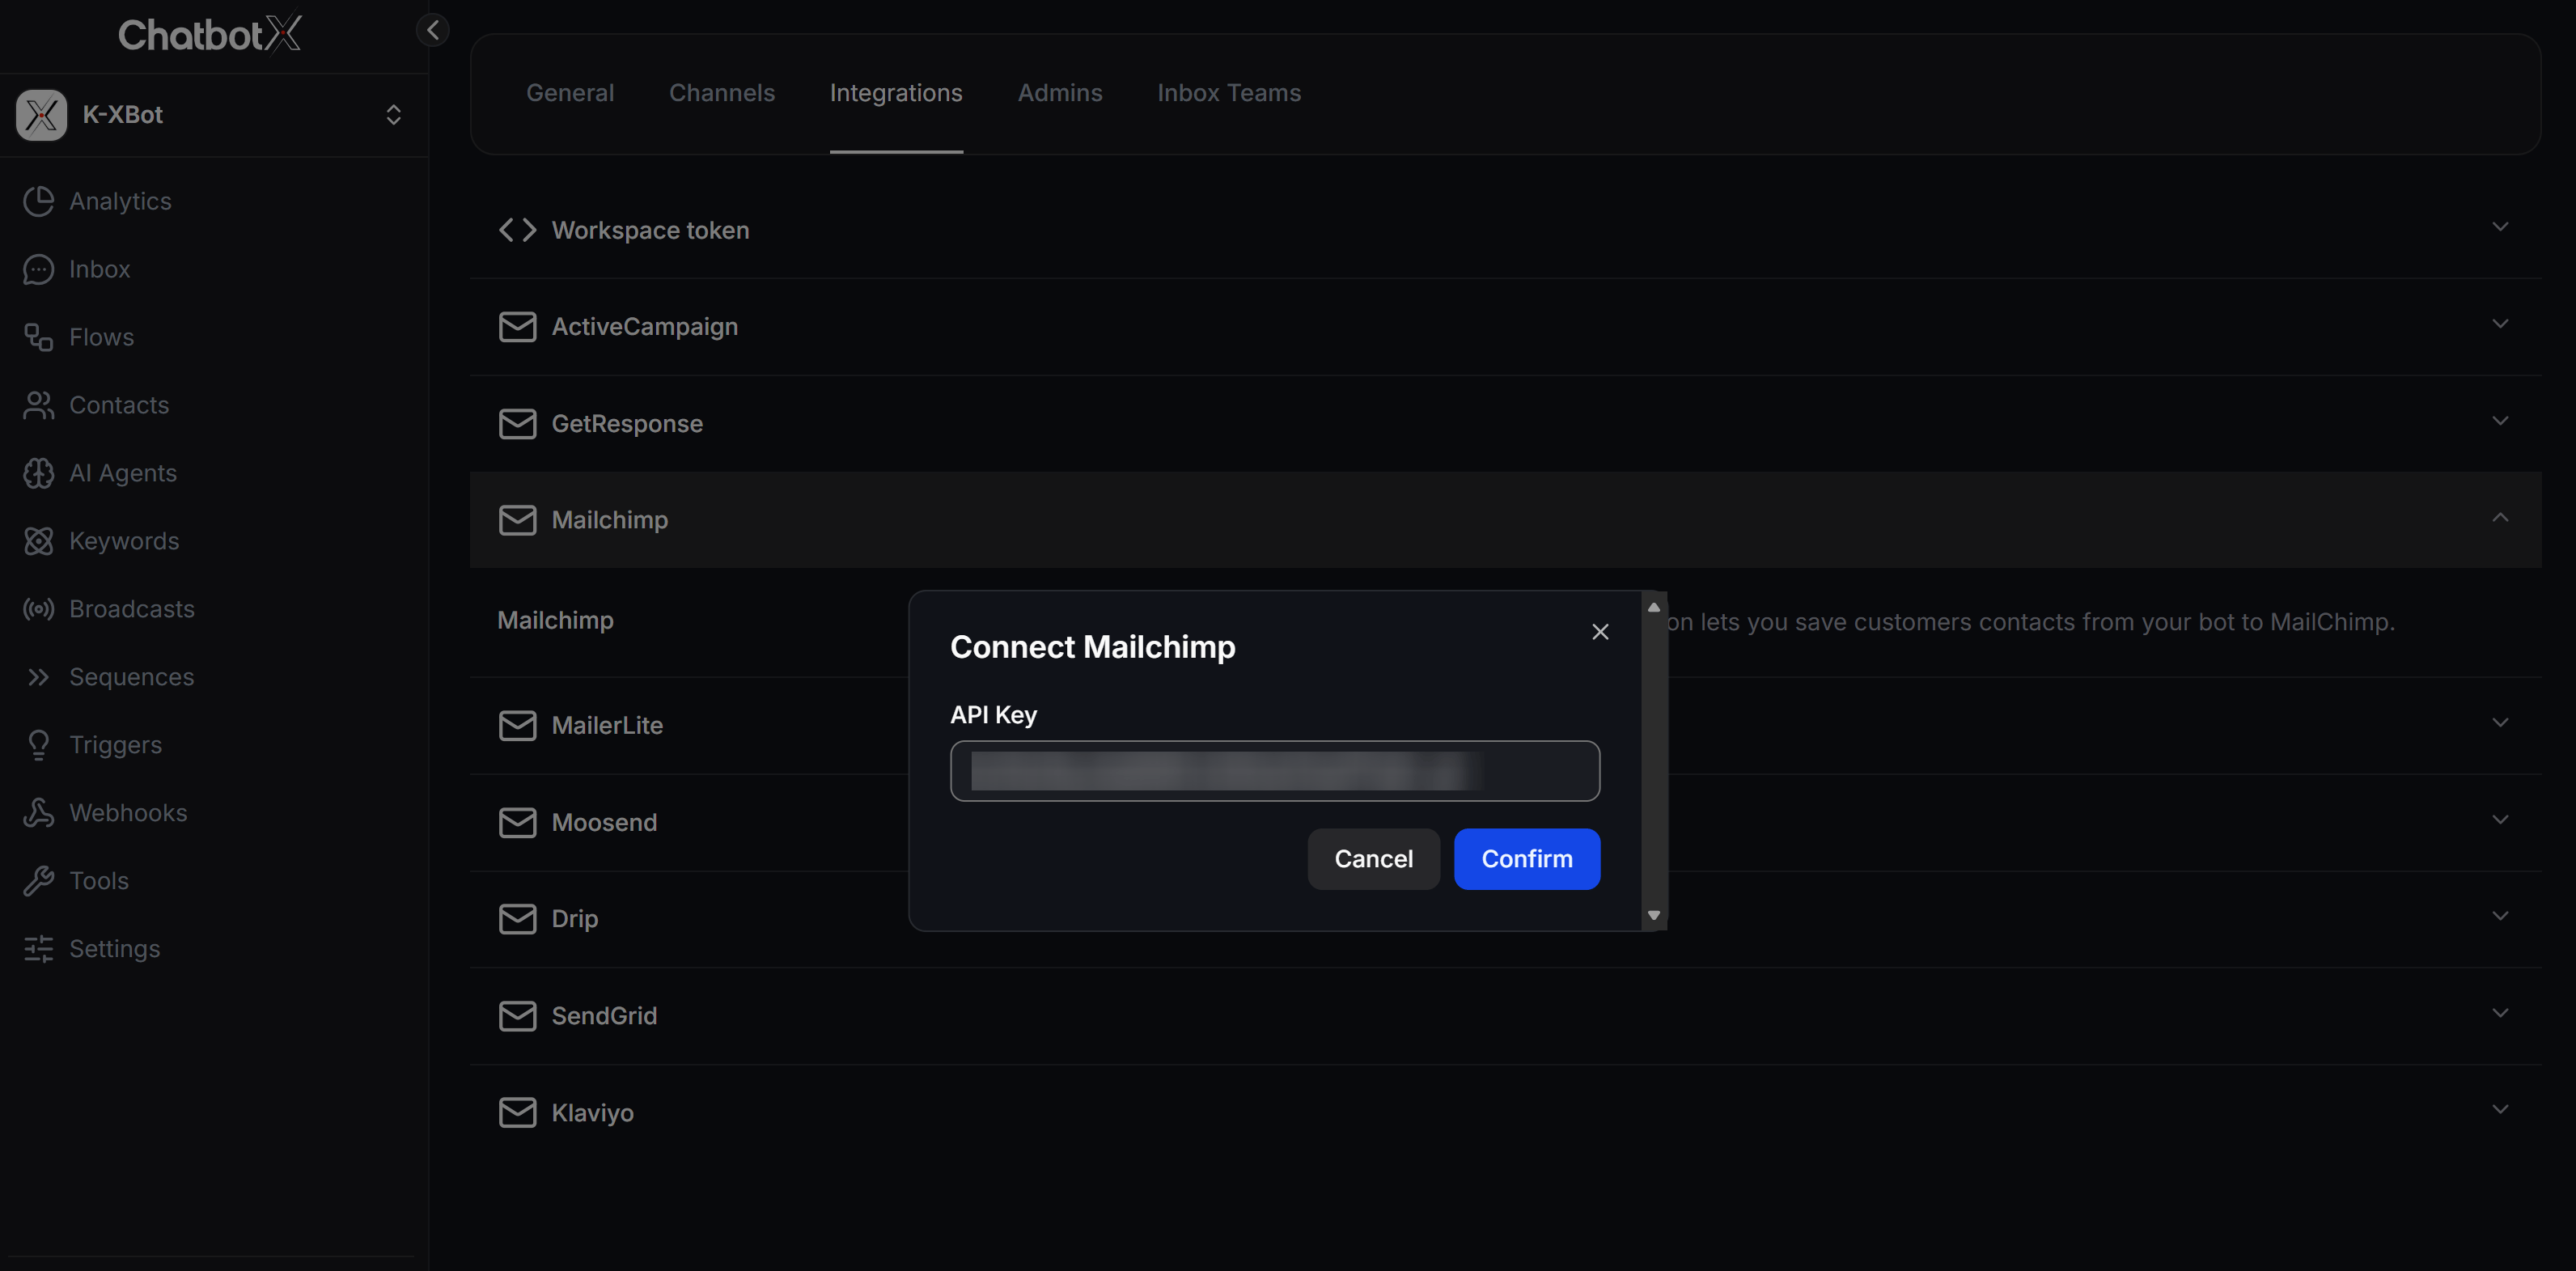 When the key is valid, ChatbotX saves the connection and loads the Audiences, Tags, and Custom Fields from your Mailchimp account for use in Flows.
## Add Mailchimp to a Flow
Place the Mailchimp action after collecting the email address and any other data that you want to synchronize. This ensures the action has the required information before sending the contact to Mailchimp.
Select **Flows**, then open the Flow that you want to use for collecting contacts.
In a Send Message node, click **+ Create**, then select **Actions**.
Open **Email Actions** and select **Add Contact to MailChimp**.
When the key is valid, ChatbotX saves the connection and loads the Audiences, Tags, and Custom Fields from your Mailchimp account for use in Flows.
## Add Mailchimp to a Flow
Place the Mailchimp action after collecting the email address and any other data that you want to synchronize. This ensures the action has the required information before sending the contact to Mailchimp.
Select **Flows**, then open the Flow that you want to use for collecting contacts.
In a Send Message node, click **+ Create**, then select **Actions**.
Open **Email Actions** and select **Add Contact to MailChimp**.
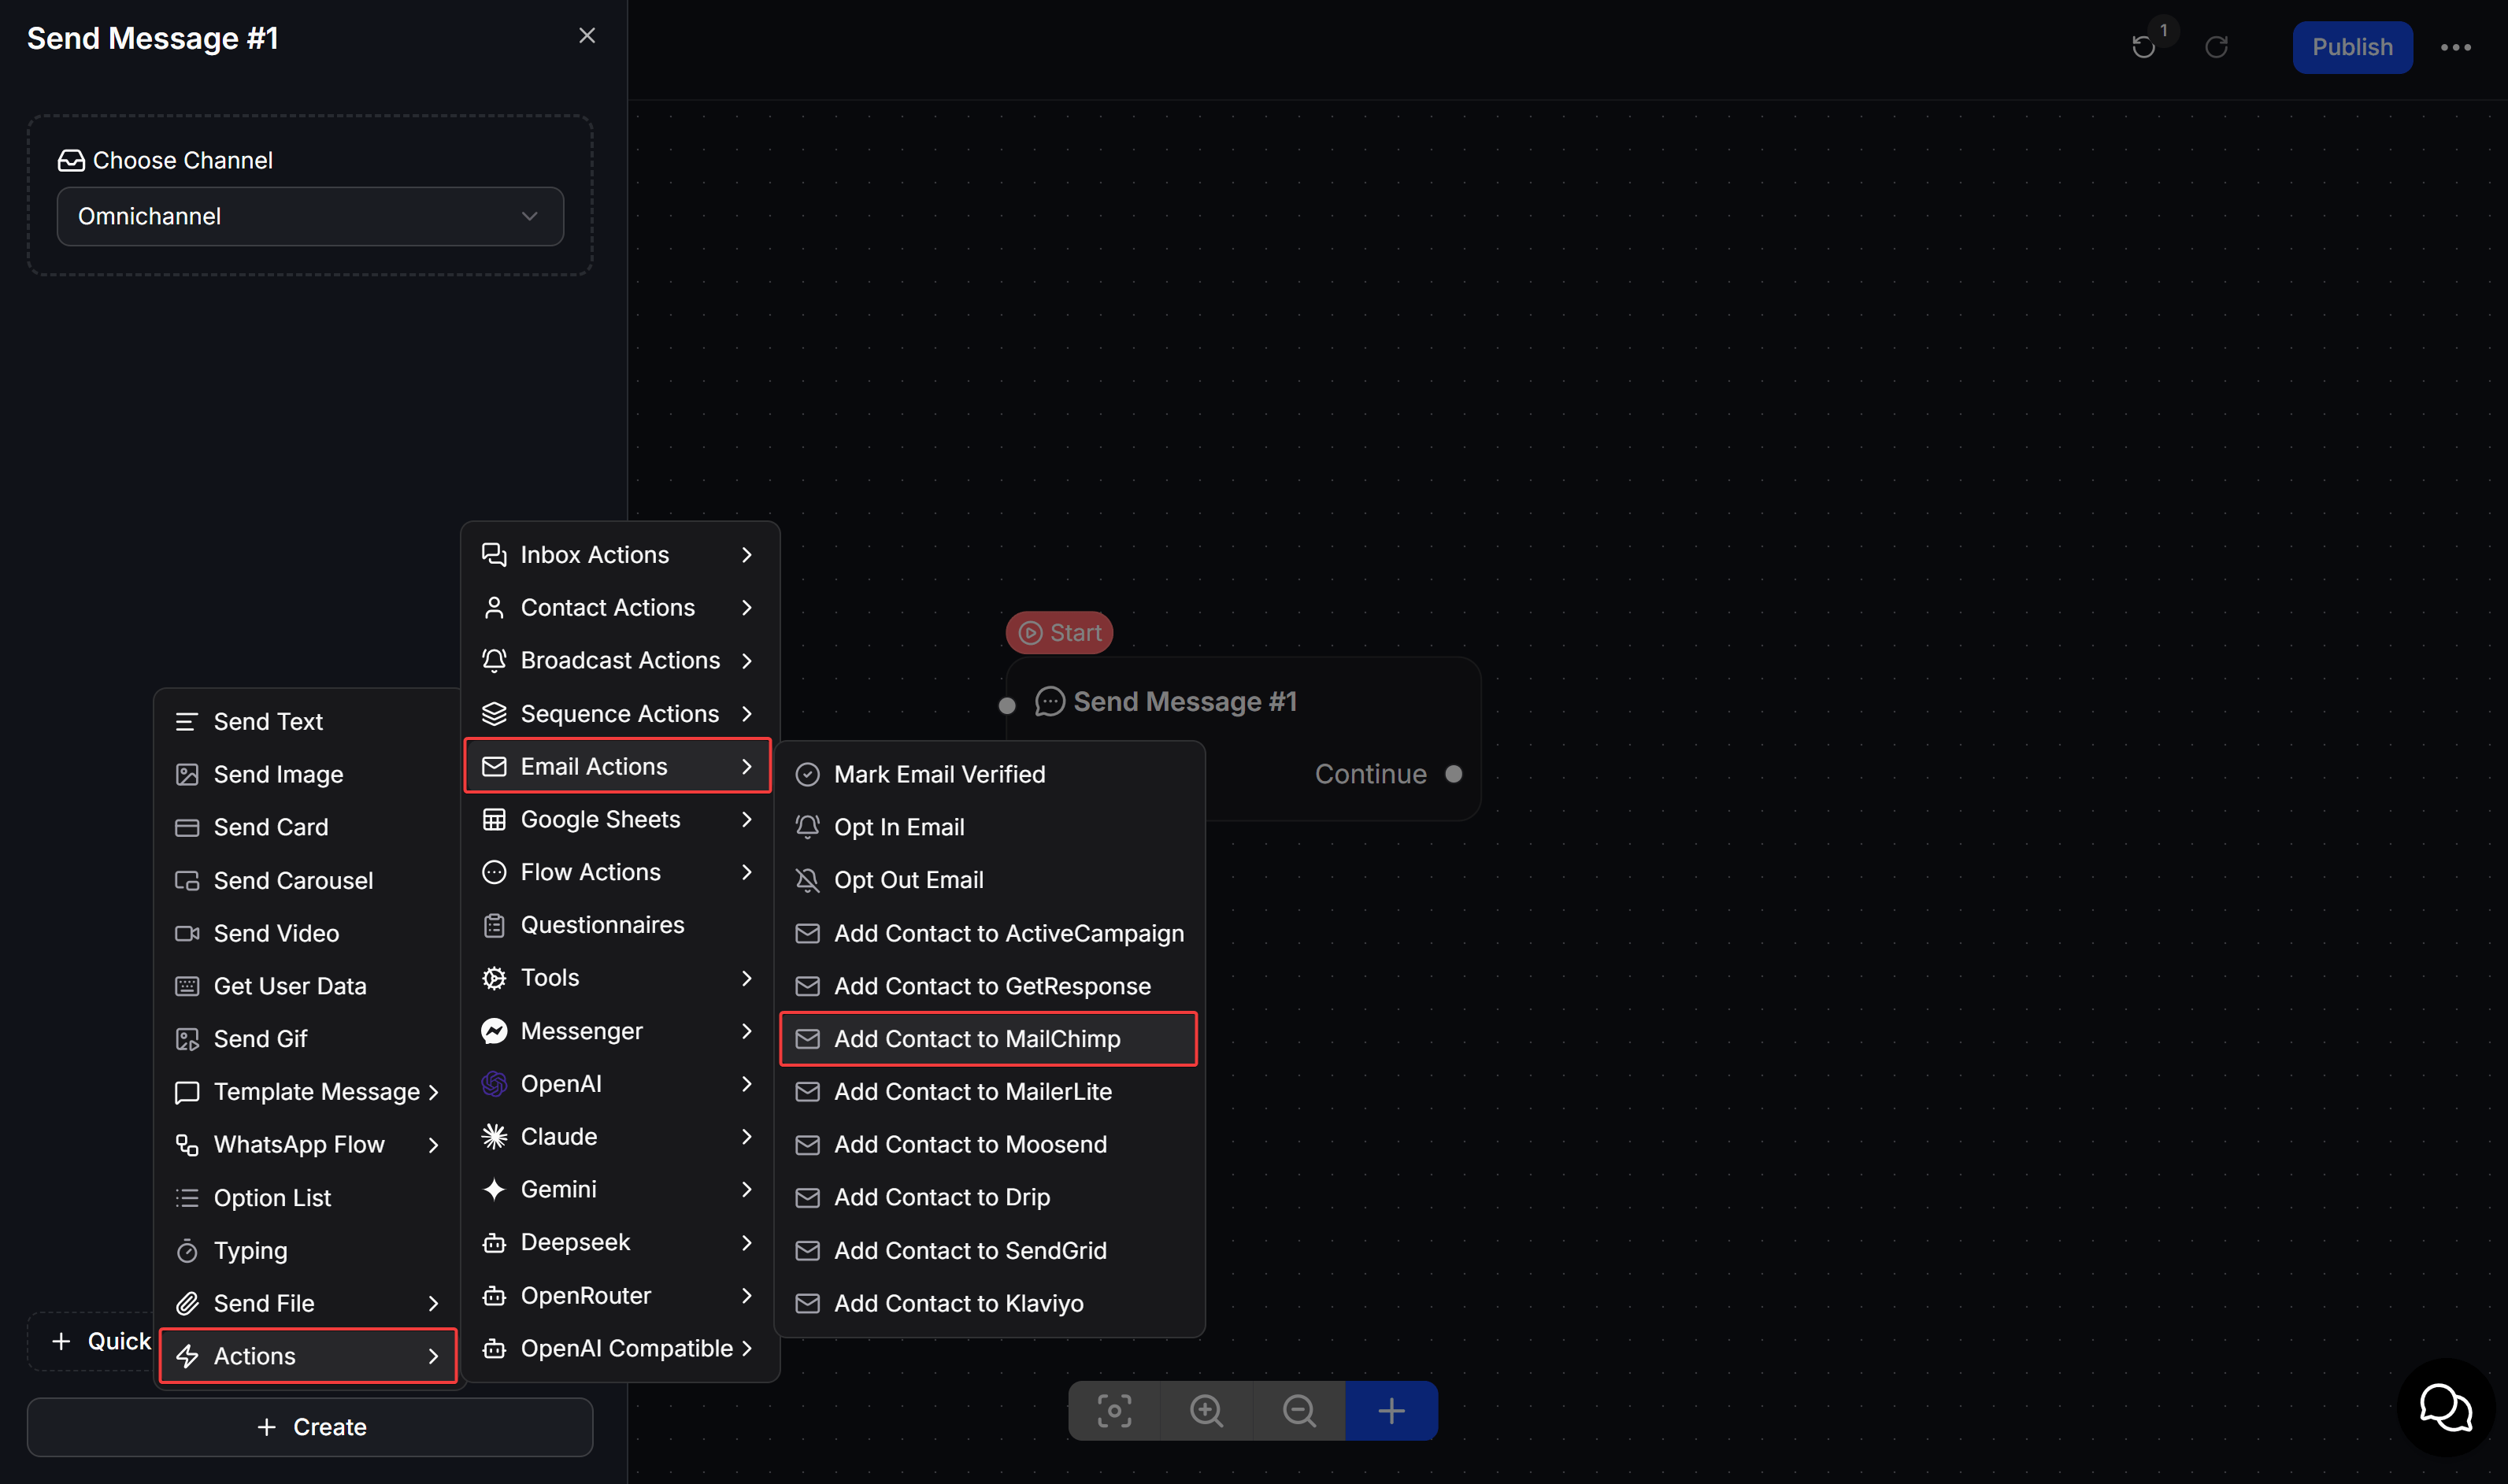 Click **Edit** on the new action to select an Audience and map the contact data.
## Configure Add Contact to MailChimp
Configure the fields in the **Add Contact to MailChimp** window, then click **Save**.
| Field | Configuration |
| ------------------------------ | ------------------------------------------------------------------------------------------------------------------------------------------------------------------------------------------------------------- |
| **Audience** | Select the Mailchimp Audience that will receive the contact. |
| **Email field** | Select the ChatbotX field that stores the customer's email address. Mailchimp uses the email address to identify the contact in the Audience. |
| **Double Opt-In** | Enable this option to let Mailchimp send a confirmation email before subscribing the contact. Disable it only when your process has already collected valid consent and you want to add the contact directly. |
| **Tags** | Select one or more Tags to apply to the contact. This field is optional. |
| **Custom Fields in MailChimp** | Select a ChatbotX field on the left and map it to the corresponding Mailchimp field on the right. This field is optional. |
Click **Edit** on the new action to select an Audience and map the contact data.
## Configure Add Contact to MailChimp
Configure the fields in the **Add Contact to MailChimp** window, then click **Save**.
| Field | Configuration |
| ------------------------------ | ------------------------------------------------------------------------------------------------------------------------------------------------------------------------------------------------------------- |
| **Audience** | Select the Mailchimp Audience that will receive the contact. |
| **Email field** | Select the ChatbotX field that stores the customer's email address. Mailchimp uses the email address to identify the contact in the Audience. |
| **Double Opt-In** | Enable this option to let Mailchimp send a confirmation email before subscribing the contact. Disable it only when your process has already collected valid consent and you want to add the contact directly. |
| **Tags** | Select one or more Tags to apply to the contact. This field is optional. |
| **Custom Fields in MailChimp** | Select a ChatbotX field on the left and map it to the corresponding Mailchimp field on the right. This field is optional. |
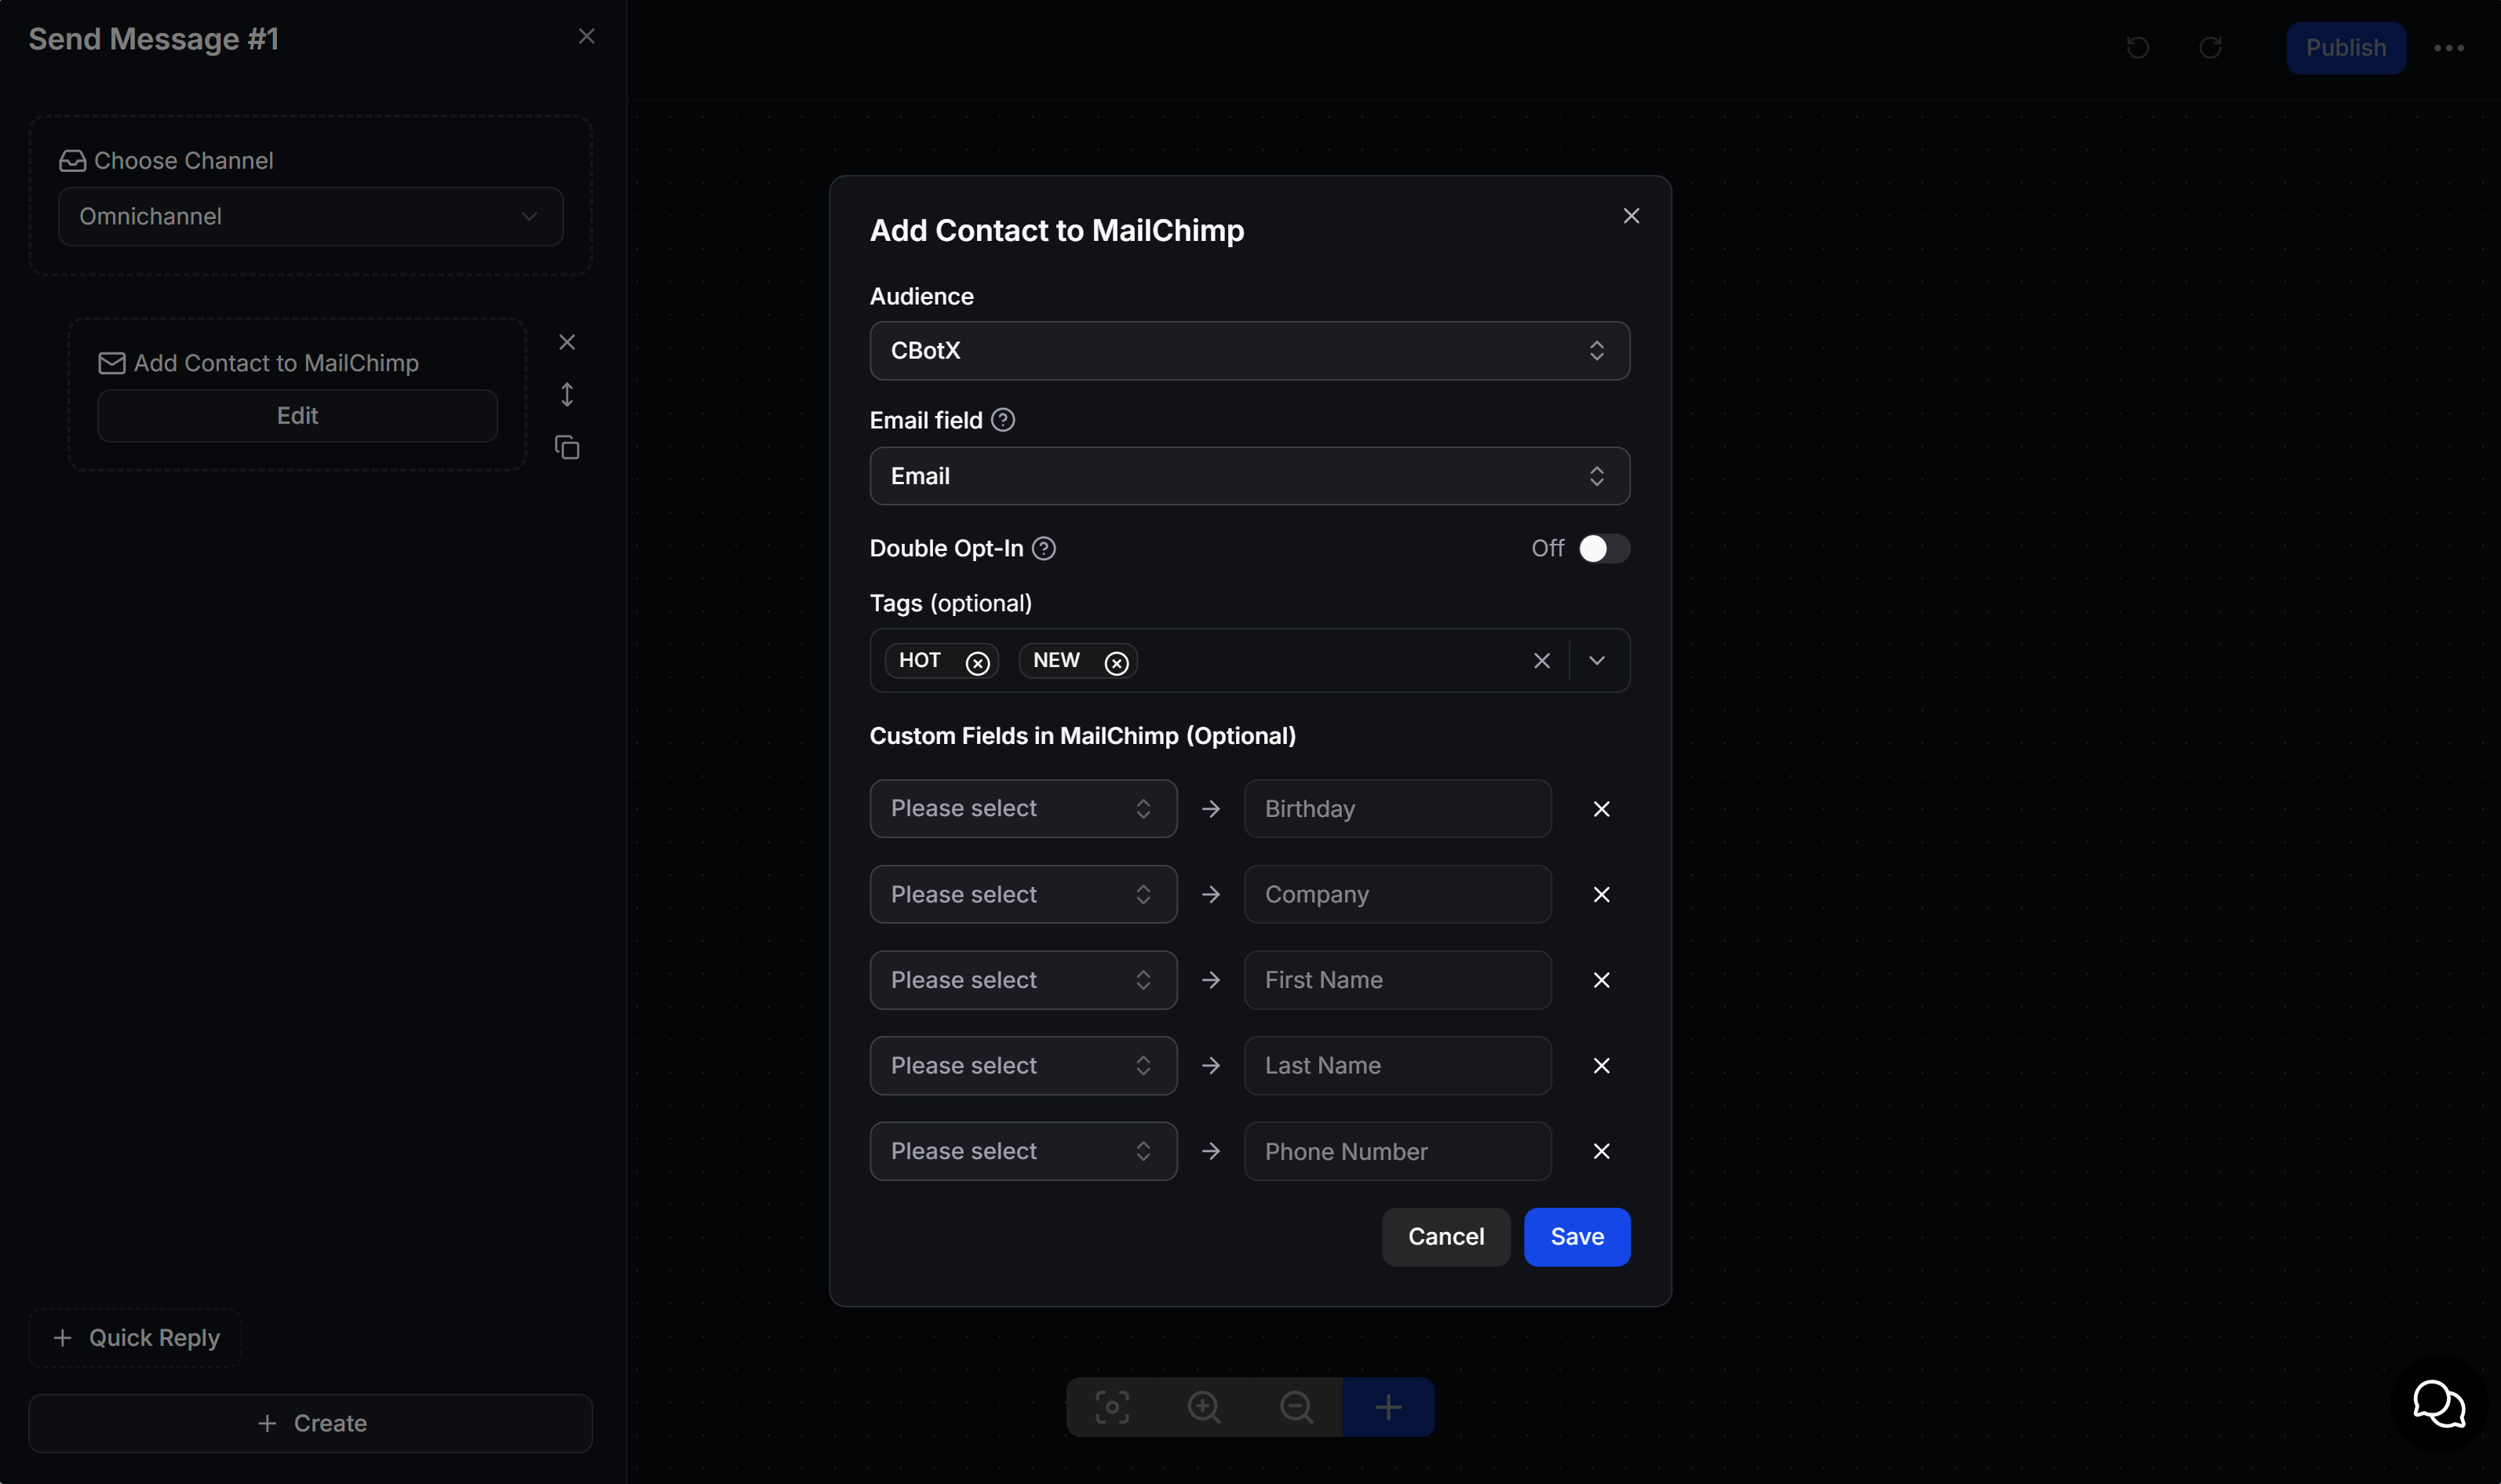 Custom Fields must already exist in the selected Audience before you map them. Mailchimp also refers to these as Audience fields or Merge fields.
## Map Custom Fields
Mapping allows Mailchimp to receive more data than the email address for campaign personalization or contact segmentation.
| Mailchimp field | Suitable ChatbotX data |
| ---------------- | --------------------------------------------------- |
| **Birthday** | A Custom Field that stores the customer's birthday. |
| **Company** | A Custom Field that stores the company name. |
| **First Name** | The field that stores the customer's first name. |
| **Last Name** | The field that stores the customer's last name. |
| **Phone Number** | The field that stores the phone number. |
Select the correct data type for each field. If an Audience requires a Merge field and the Flow does not send a valid value, Mailchimp may reject the contact.
## Example: collect subscribers for an offer
A fashion store wants to collect customers interested in a new collection and send discount codes through Mailchimp.
Use Get User Data to request an email address, name, and phone number, then save the responses to their corresponding fields.
Run **Add Contact to MailChimp**, then select the Audience that should receive the contact and the **Email** field.
Apply Tags that match the customer group, then map the name and phone number to Mailchimp Custom Fields.
## Test the integration
Before publishing the Flow, test it with an email address that you can verify.
* Open the selected Audience in Mailchimp and confirm that the contact appears.
* Check that Mailchimp received the correct Tags and Custom Fields.
* If Double Opt-In is enabled, check the inbox and complete the confirmation email.
* If an Audience or Tag does not appear, check the connection and reopen the action.
* If the API Key has been revoked, generate a new key and reconnect it in ChatbotX.
Add customers to email marketing only after collecting appropriate consent. Double Opt-In verifies the email address and the subscription request before Mailchimp marks the contact as subscribed.
Custom Fields must already exist in the selected Audience before you map them. Mailchimp also refers to these as Audience fields or Merge fields.
## Map Custom Fields
Mapping allows Mailchimp to receive more data than the email address for campaign personalization or contact segmentation.
| Mailchimp field | Suitable ChatbotX data |
| ---------------- | --------------------------------------------------- |
| **Birthday** | A Custom Field that stores the customer's birthday. |
| **Company** | A Custom Field that stores the company name. |
| **First Name** | The field that stores the customer's first name. |
| **Last Name** | The field that stores the customer's last name. |
| **Phone Number** | The field that stores the phone number. |
Select the correct data type for each field. If an Audience requires a Merge field and the Flow does not send a valid value, Mailchimp may reject the contact.
## Example: collect subscribers for an offer
A fashion store wants to collect customers interested in a new collection and send discount codes through Mailchimp.
Use Get User Data to request an email address, name, and phone number, then save the responses to their corresponding fields.
Run **Add Contact to MailChimp**, then select the Audience that should receive the contact and the **Email** field.
Apply Tags that match the customer group, then map the name and phone number to Mailchimp Custom Fields.
## Test the integration
Before publishing the Flow, test it with an email address that you can verify.
* Open the selected Audience in Mailchimp and confirm that the contact appears.
* Check that Mailchimp received the correct Tags and Custom Fields.
* If Double Opt-In is enabled, check the inbox and complete the confirmation email.
* If an Audience or Tag does not appear, check the connection and reopen the action.
* If the API Key has been revoked, generate a new key and reconnect it in ChatbotX.
Add customers to email marketing only after collecting appropriate consent. Double Opt-In verifies the email address and the subscription request before Mailchimp marks the contact as subscribed.