> ## Documentation Index
> Fetch the complete documentation index at: https://chatbotx.io/docs/llms.txt
> Use this file to discover all available pages before exploring further.
# Make Integration
> Connect ChatbotX with Make to receive events, send Flow data, and automate Actions for contacts.
The **Make** integration connects ChatbotX with external apps and automated processes. You can send customer data from a Flow to Make, update contacts, or send another Flow without manual work.
For example, after a customer completes a consultation form in ChatbotX, Make can add the information to your CRM and send a confirmation Flow.
## How the integration works
In Make, a **scenario** is an automated process made of connected modules. The ChatbotX integration uses the **ChatConnectX** app with three main components:
| Component | Function |
| -------------- | -------------------------------------------------------------------------- |
| **Trigger** | Starts a scenario when Make receives an event or data from ChatbotX. |
| **Action** | Performs a task in ChatbotX, such as updating a contact or sending a Flow. |
| **Connection** | Authenticates Make with a ChatbotX workspace using a Workspace token. |
The usual setup order is: install ChatConnectX, create a Connection, choose a Trigger, add an Action, and test the scenario.
## Install ChatConnectX and connect your workspace
### Install the ChatConnectX app
The **Connect** button in ChatbotX opens the **ChatConnectX** installation page in Make. You create and manage scenarios directly in Make.
In ChatbotX, select **Settings** from the left menu and open **Integrations**. Find **Make**, then select **Connect** to open **ChatConnectX** in Make.
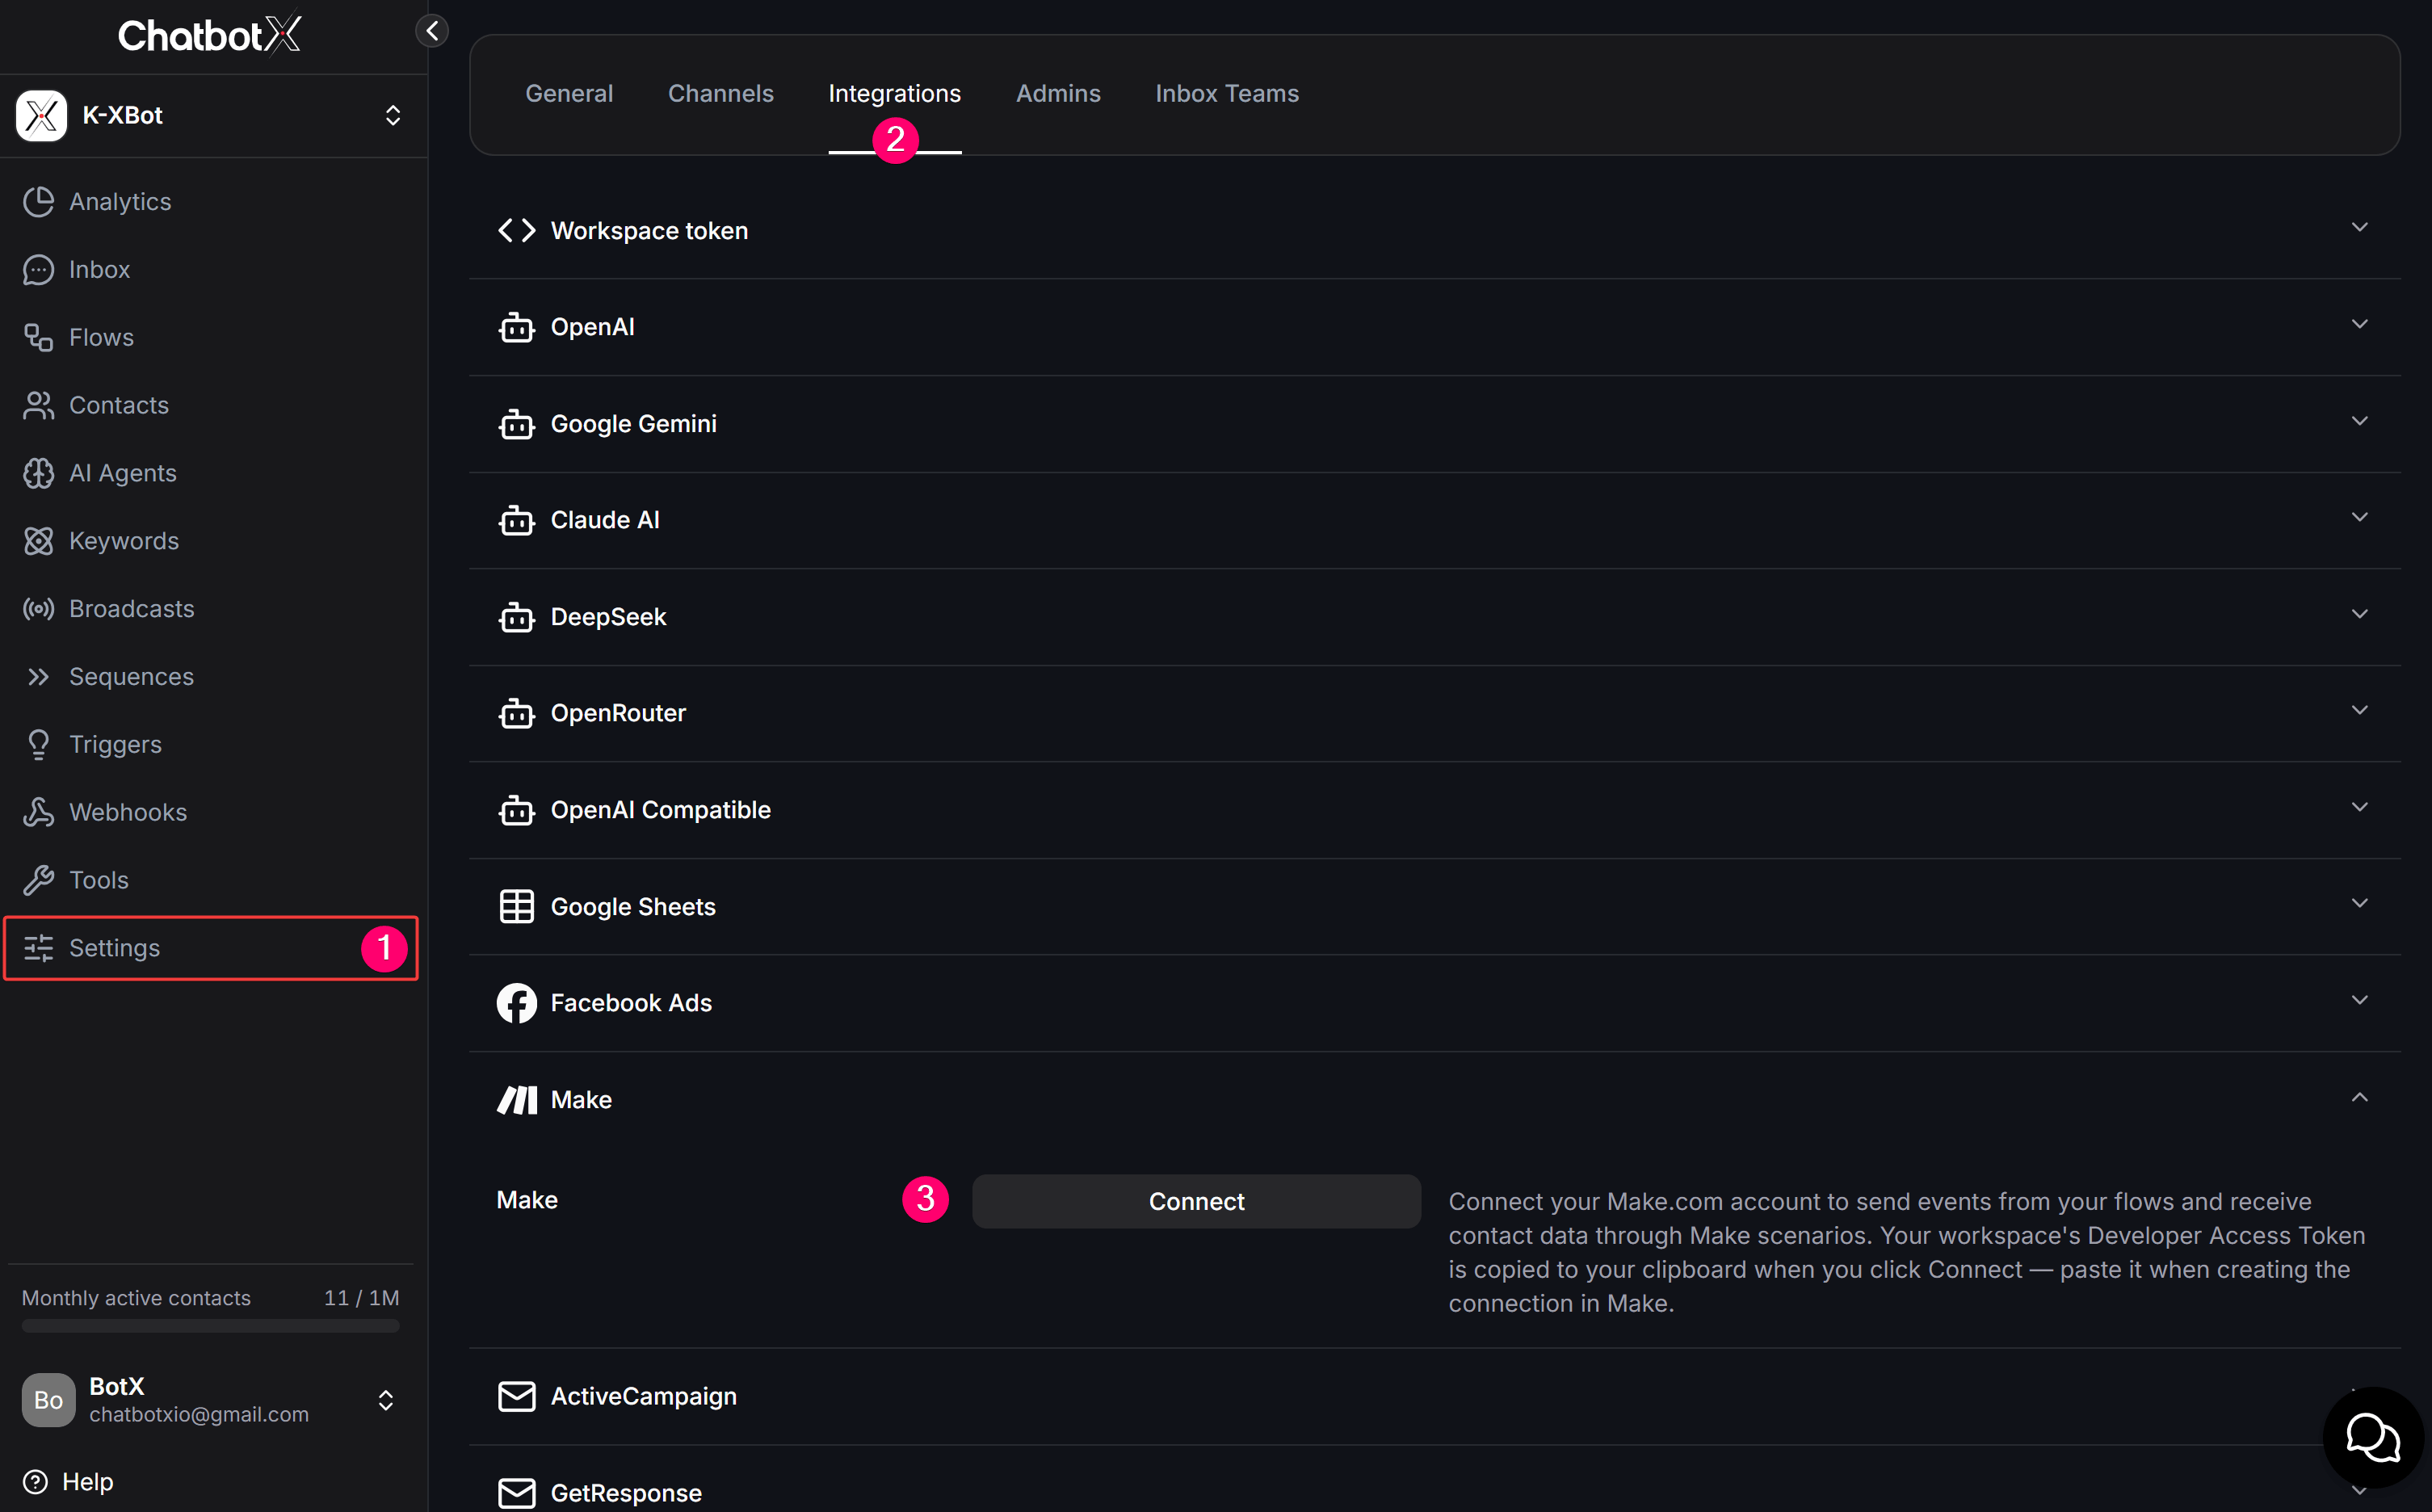 On the ChatConnectX page, select **Install**.
 Select the organization where you want to install the app. Your Make account needs the **Admin**, **Owner**, or **App Developer** role. Select **Install** to finish.
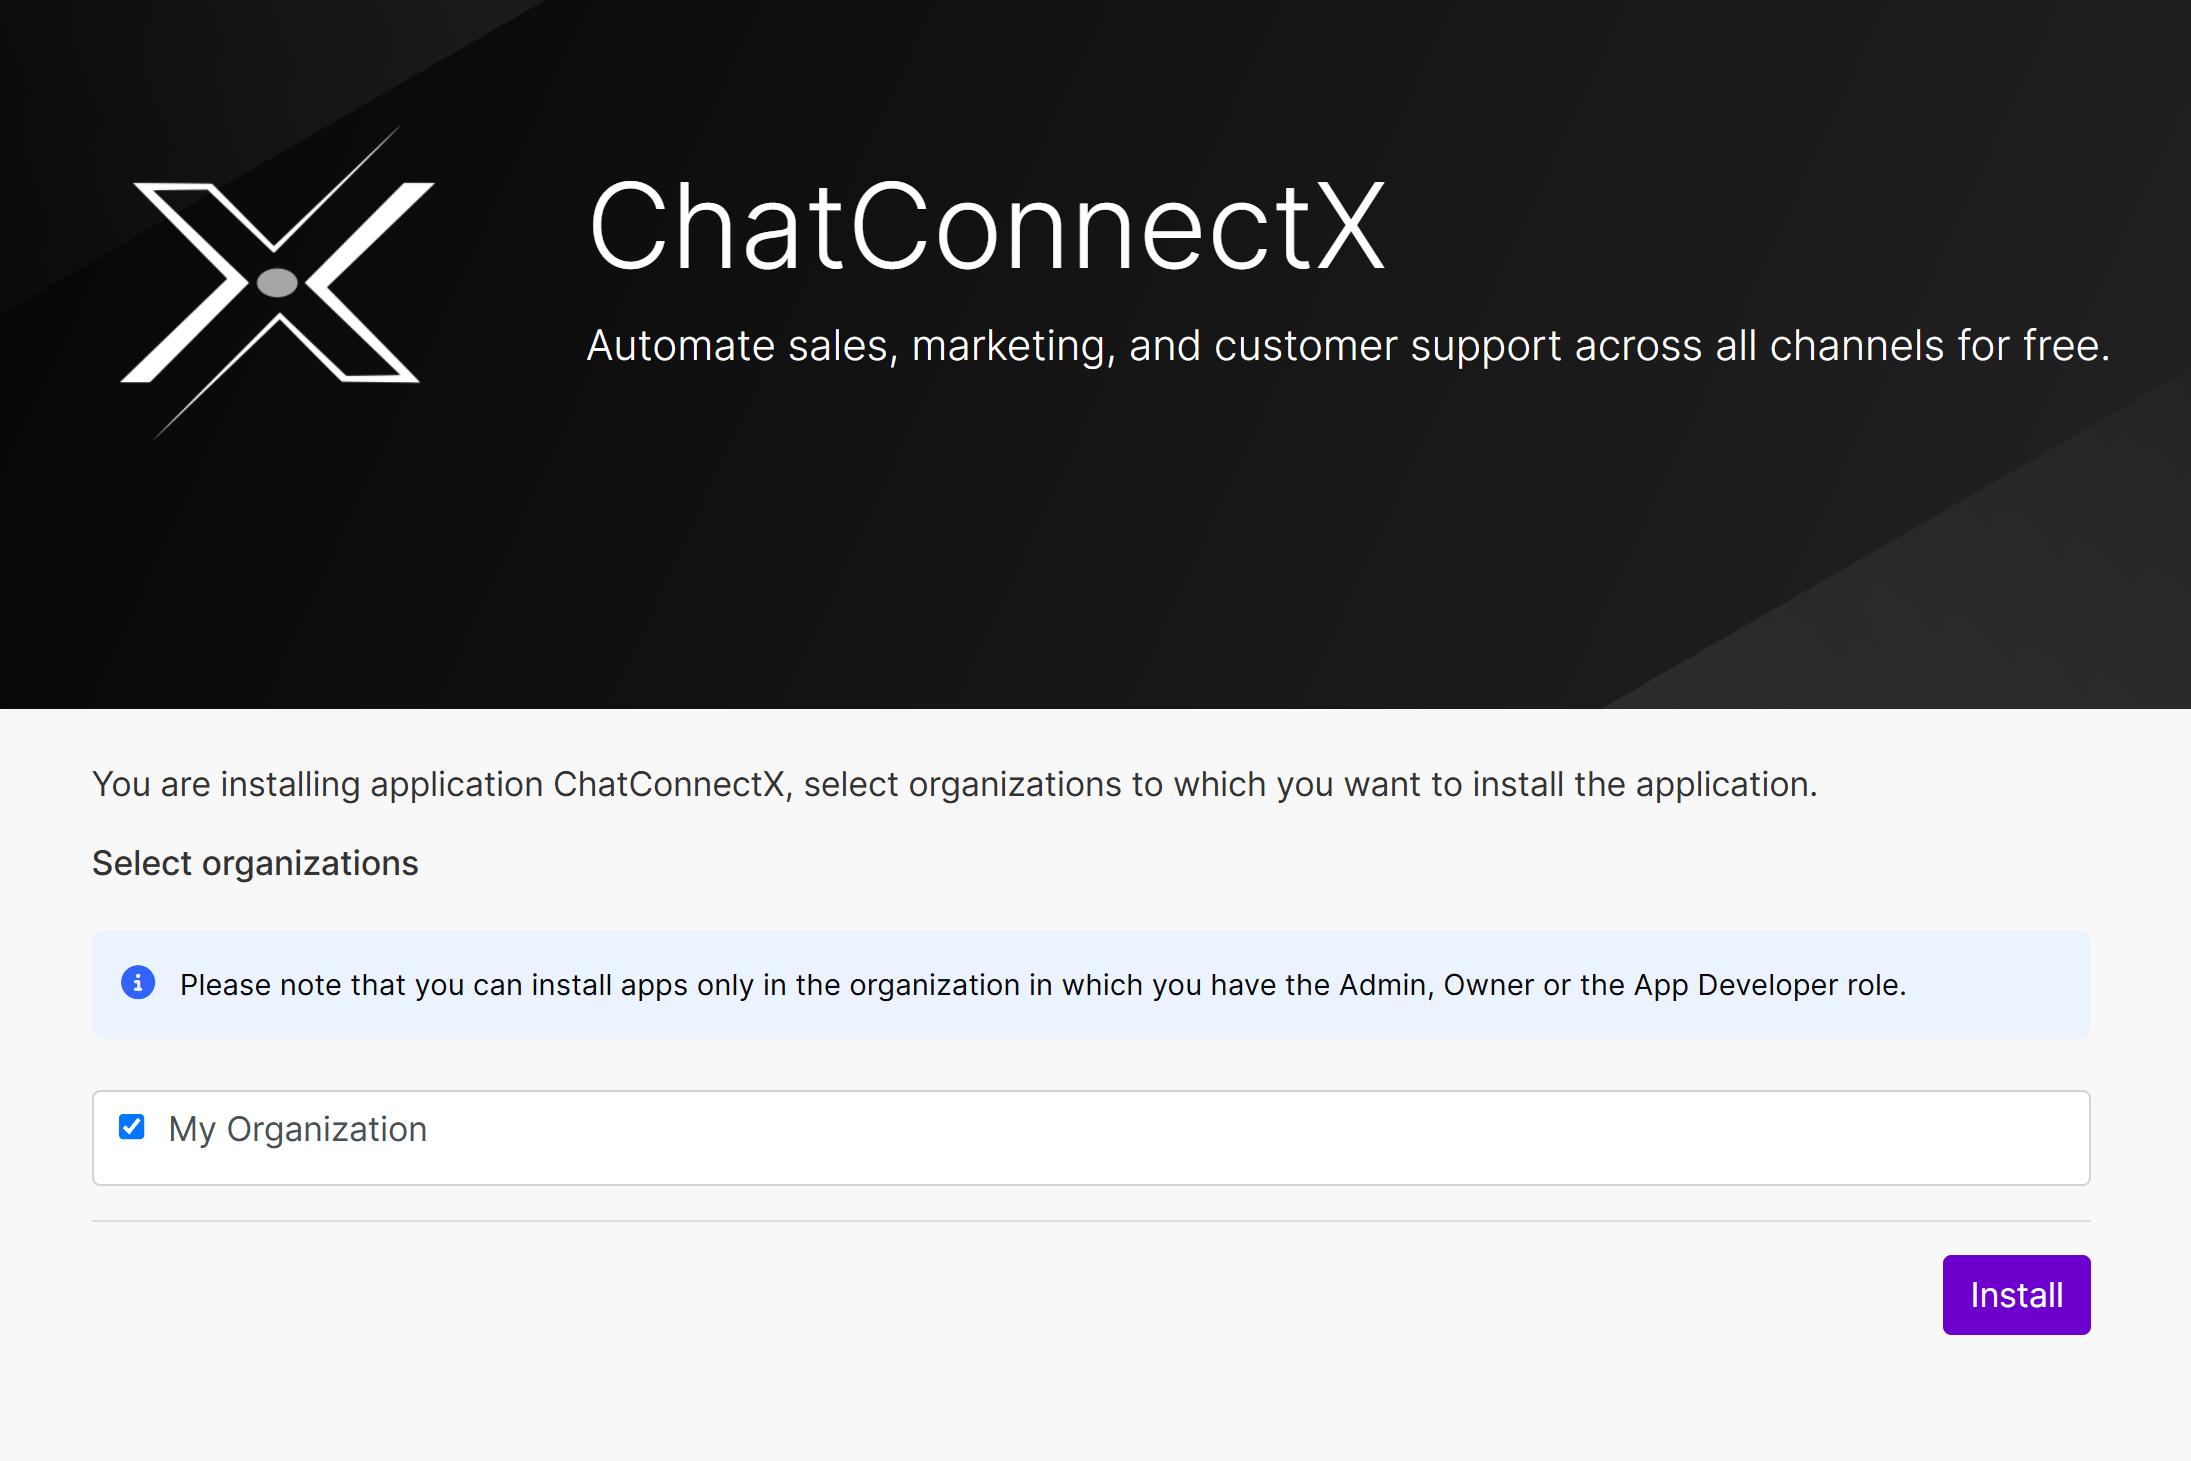 **Connect** only opens the ChatConnectX app in Make. You install the app, create scenarios, and enable scenarios in Make.
### Create a Connection
A Connection gives Make access to the correct ChatbotX workspace. Create it once, then reuse it in other ChatConnectX modules.
In a ChatConnectX module, select **Add** next to **Connection**.
Enter a recognizable name in **Connection name**, such as `ChatbotX Production`.
In ChatbotX, open **Settings > Integrations > Workspace token** and copy the token. Paste it into **Workspace token** in Make.
**Connect** only opens the ChatConnectX app in Make. You install the app, create scenarios, and enable scenarios in Make.
### Create a Connection
A Connection gives Make access to the correct ChatbotX workspace. Create it once, then reuse it in other ChatConnectX modules.
In a ChatConnectX module, select **Add** next to **Connection**.
Enter a recognizable name in **Connection name**, such as `ChatbotX Production`.
In ChatbotX, open **Settings > Integrations > Workspace token** and copy the token. Paste it into **Workspace token** in Make.
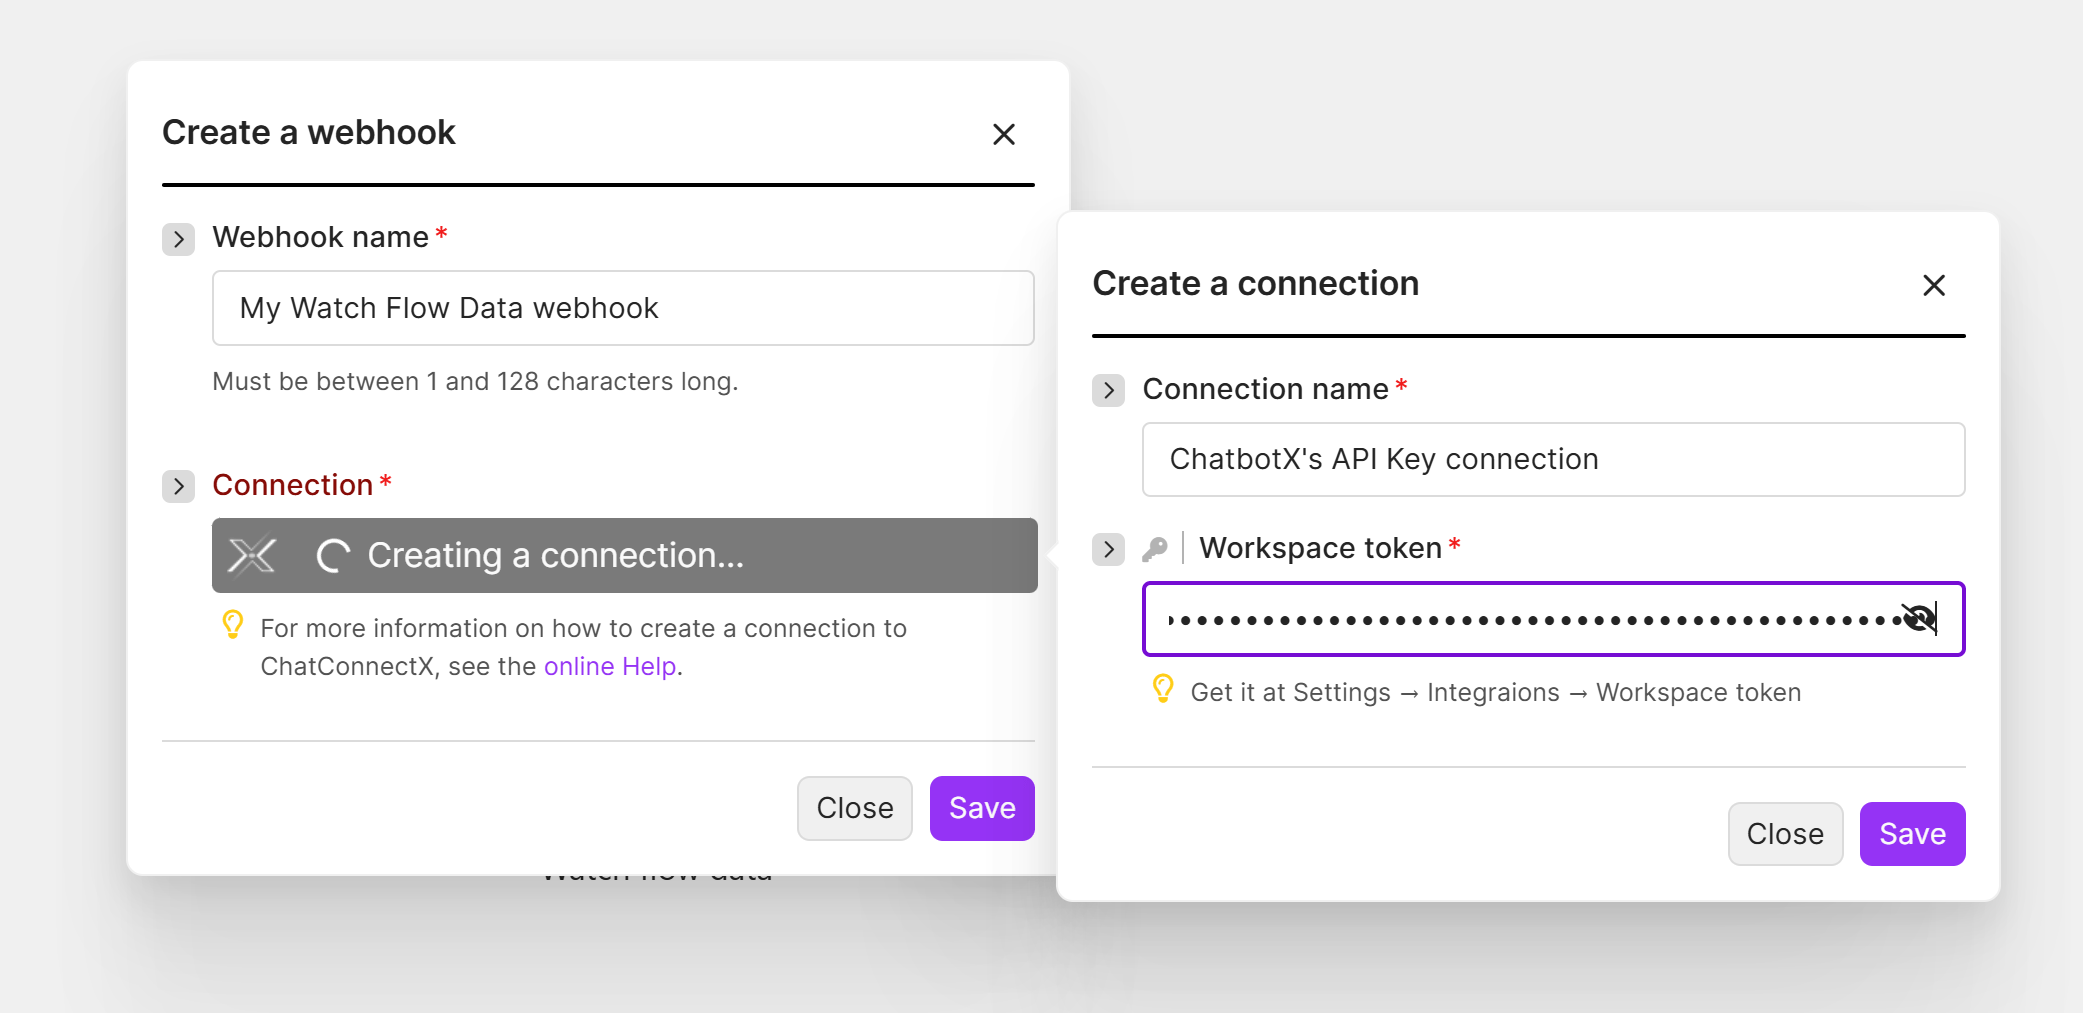 Select **Save**, then select the new Connection in the module.
A Workspace token provides access to workspace data. Do not include it in screenshots, emails, or public documentation. Stop using a token if it has been exposed.
## ChatConnectX Triggers
ChatConnectX provides two Triggers that can start a scenario:
Use this Trigger with ChatbotX [**Webhooks**](/docs/triggers/webhooks) to start a scenario when Make receives a subscribed event.
Use this Trigger when an **Actions > Triggers > Make** block in a Flow sends data to Make.
### Receive data from a Make block in a Flow
When a Flow uses an **Actions > Triggers > Make** block, select **Watch flow data** as the scenario Trigger. The event names on both platforms must match.
#### Create a Make block in a ChatbotX Flow
In ChatbotX, open the Flow that should send data to Make and select the appropriate message node.
Select **Create**, then choose **Actions > Triggers > Make** to add the block to the message node.
Select **Save**, then select the new Connection in the module.
A Workspace token provides access to workspace data. Do not include it in screenshots, emails, or public documentation. Stop using a token if it has been exposed.
## ChatConnectX Triggers
ChatConnectX provides two Triggers that can start a scenario:
Use this Trigger with ChatbotX [**Webhooks**](/docs/triggers/webhooks) to start a scenario when Make receives a subscribed event.
Use this Trigger when an **Actions > Triggers > Make** block in a Flow sends data to Make.
### Receive data from a Make block in a Flow
When a Flow uses an **Actions > Triggers > Make** block, select **Watch flow data** as the scenario Trigger. The event names on both platforms must match.
#### Create a Make block in a ChatbotX Flow
In ChatbotX, open the Flow that should send data to Make and select the appropriate message node.
Select **Create**, then choose **Actions > Triggers > Make** to add the block to the message node.
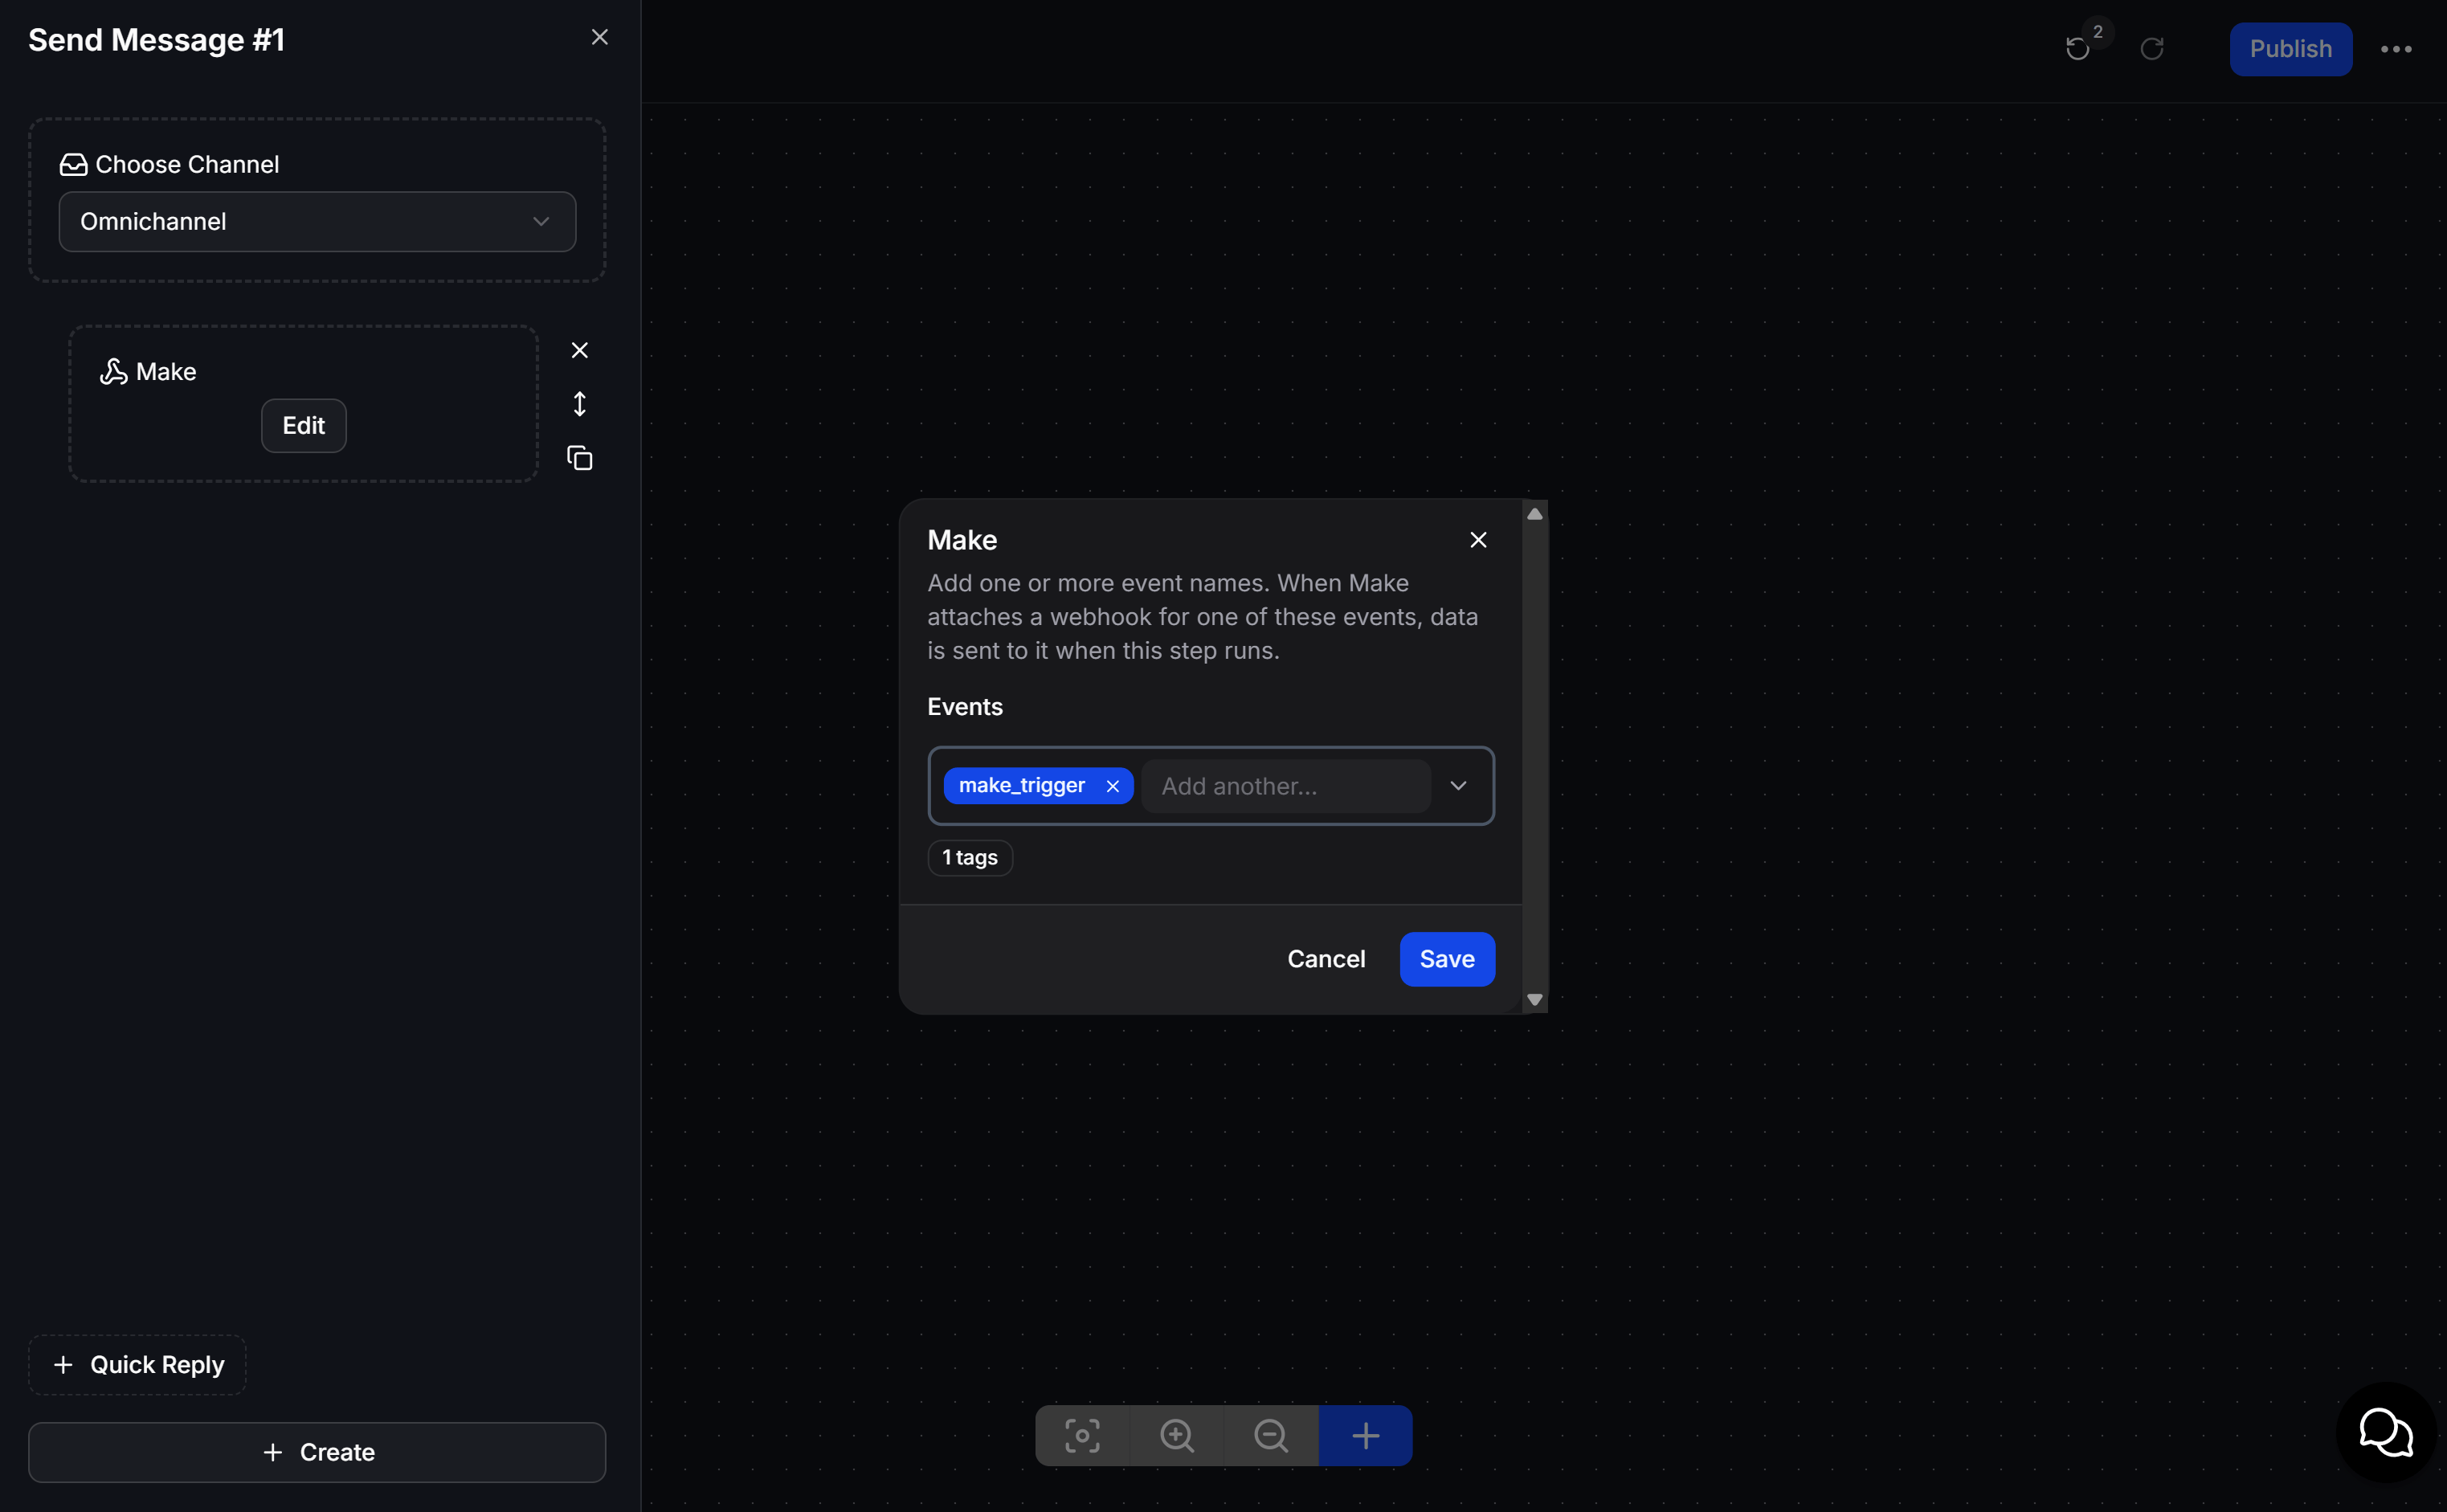
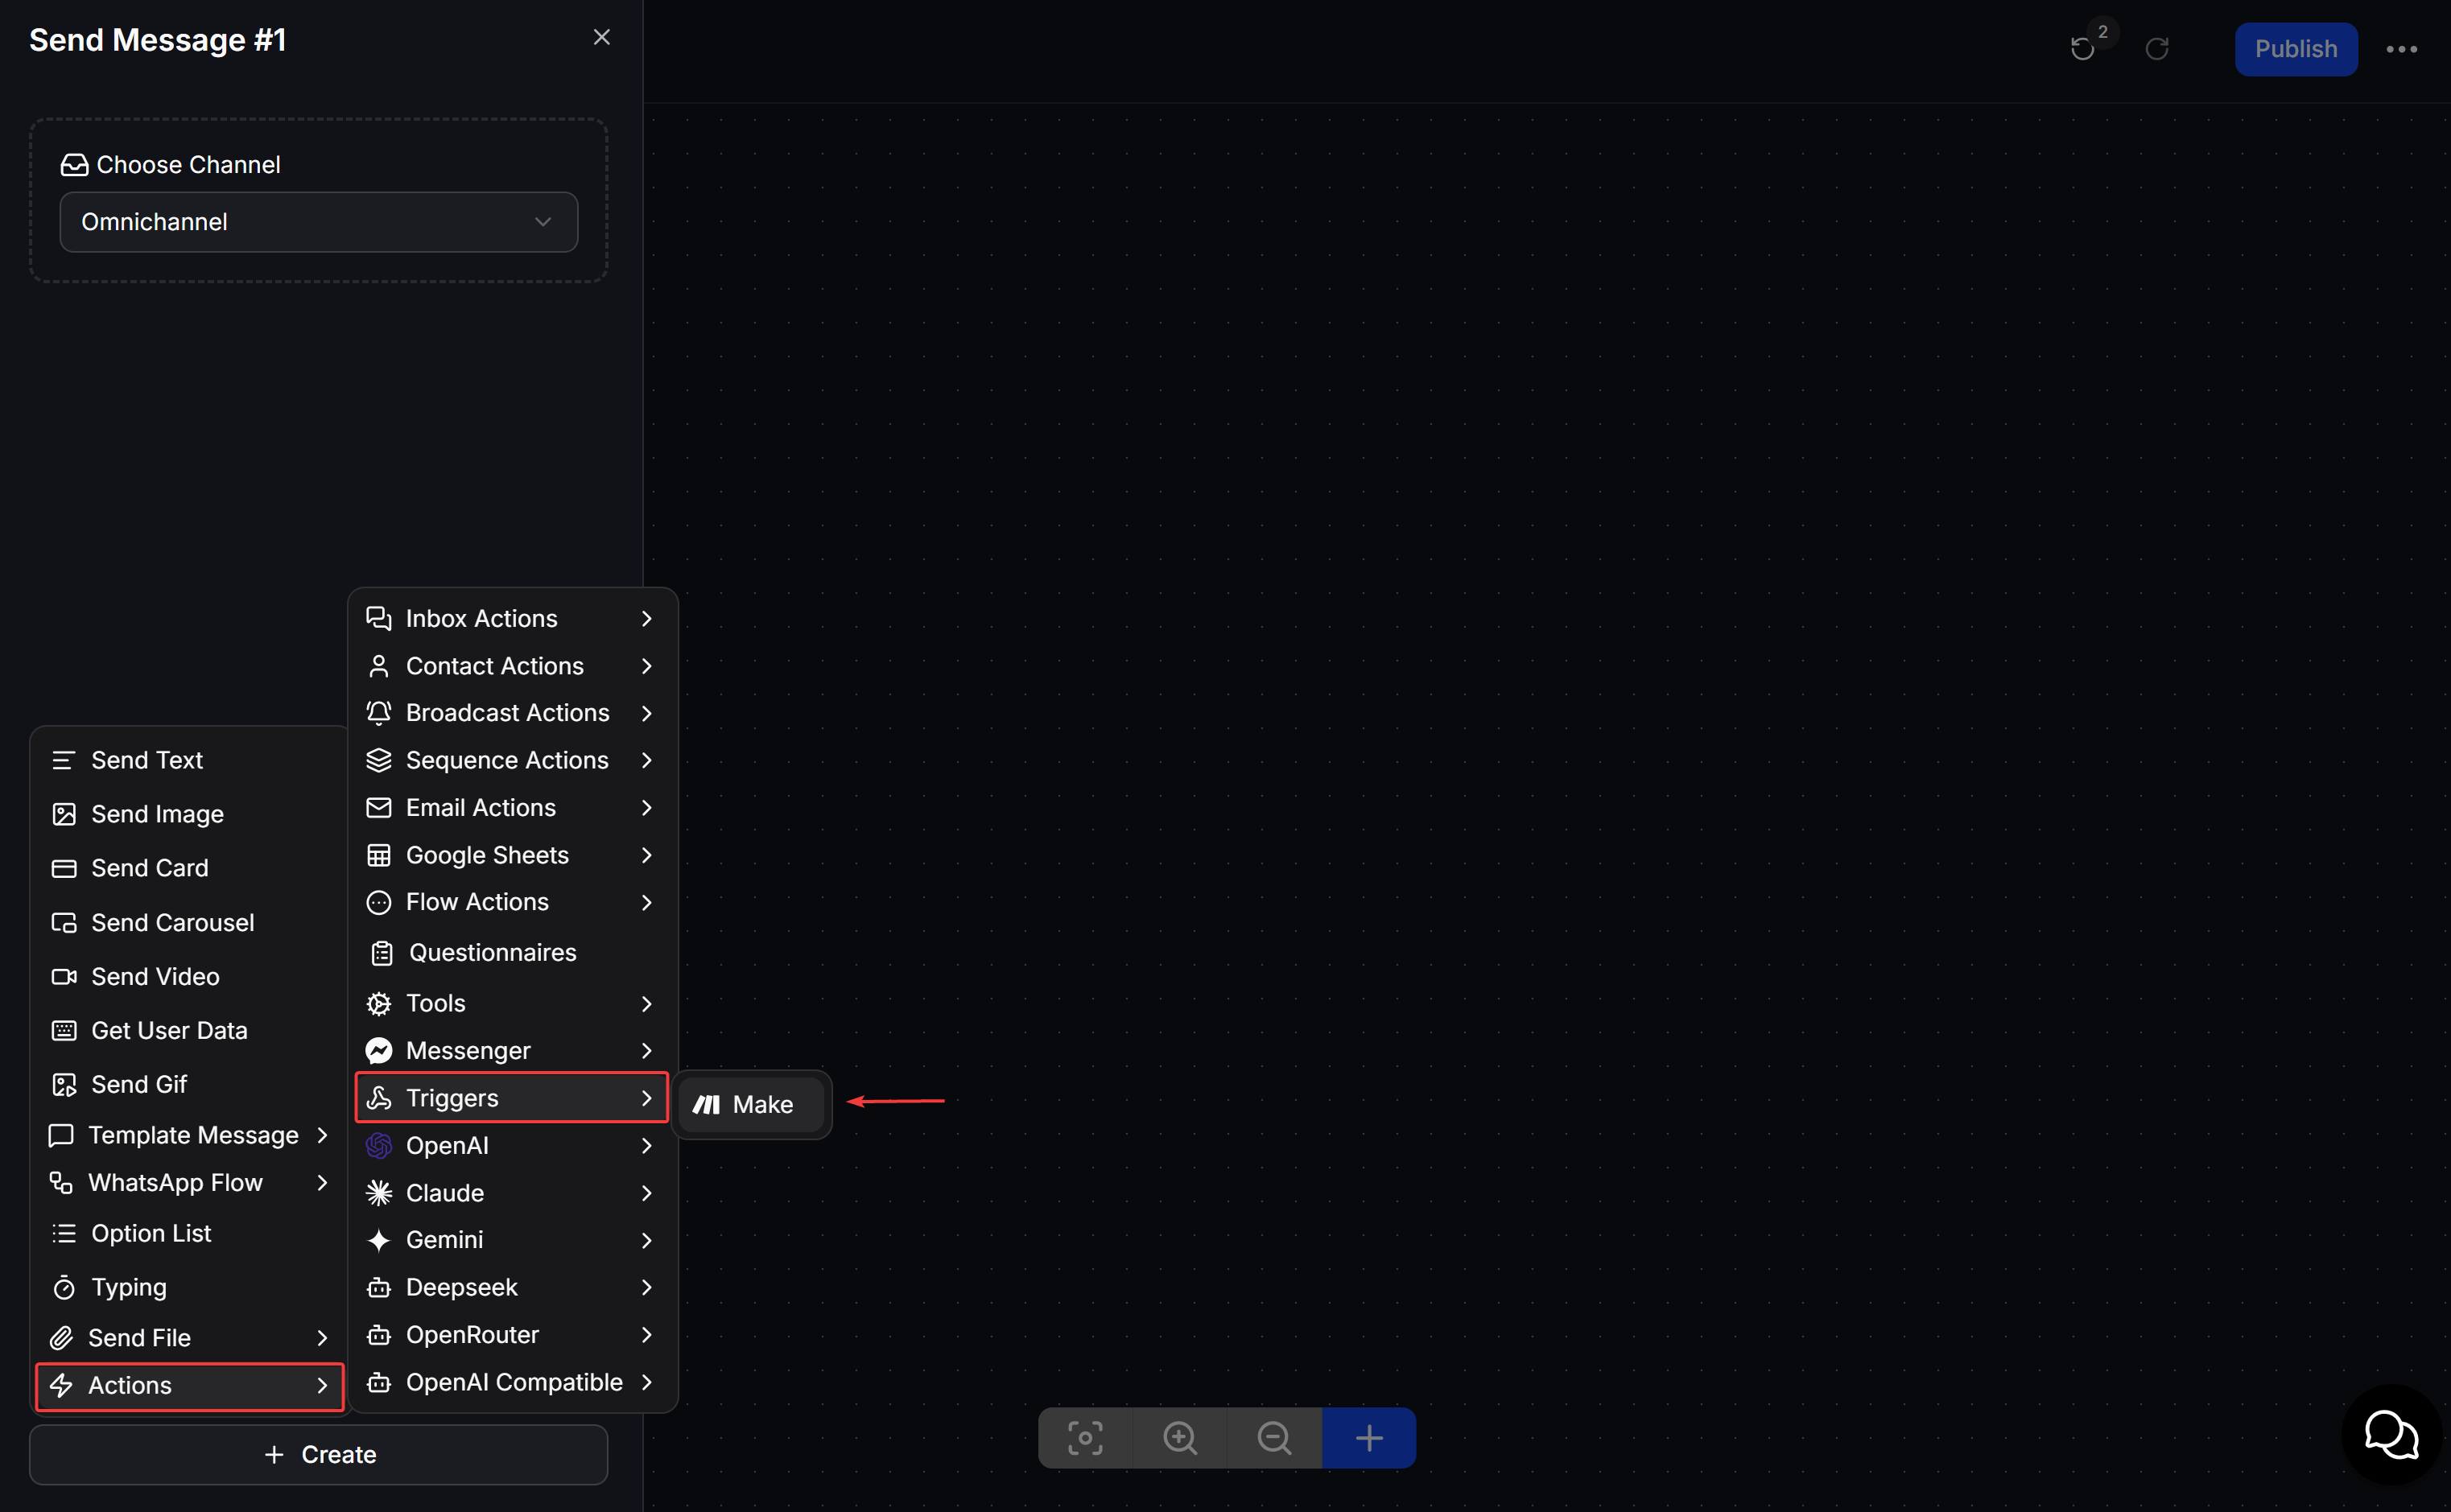 Select **Edit** on the **Make** block. In **Events**, enter an event name such as `make_trigger`, then select **Save**.
 #### Set up Watch flow data in Make
In Make, select **Scenarios**, then create a **New scenario**.
In the first module, search for and select **ChatConnectX**.
#### Set up Watch flow data in Make
In Make, select **Scenarios**, then create a **New scenario**.
In the first module, search for and select **ChatConnectX**.
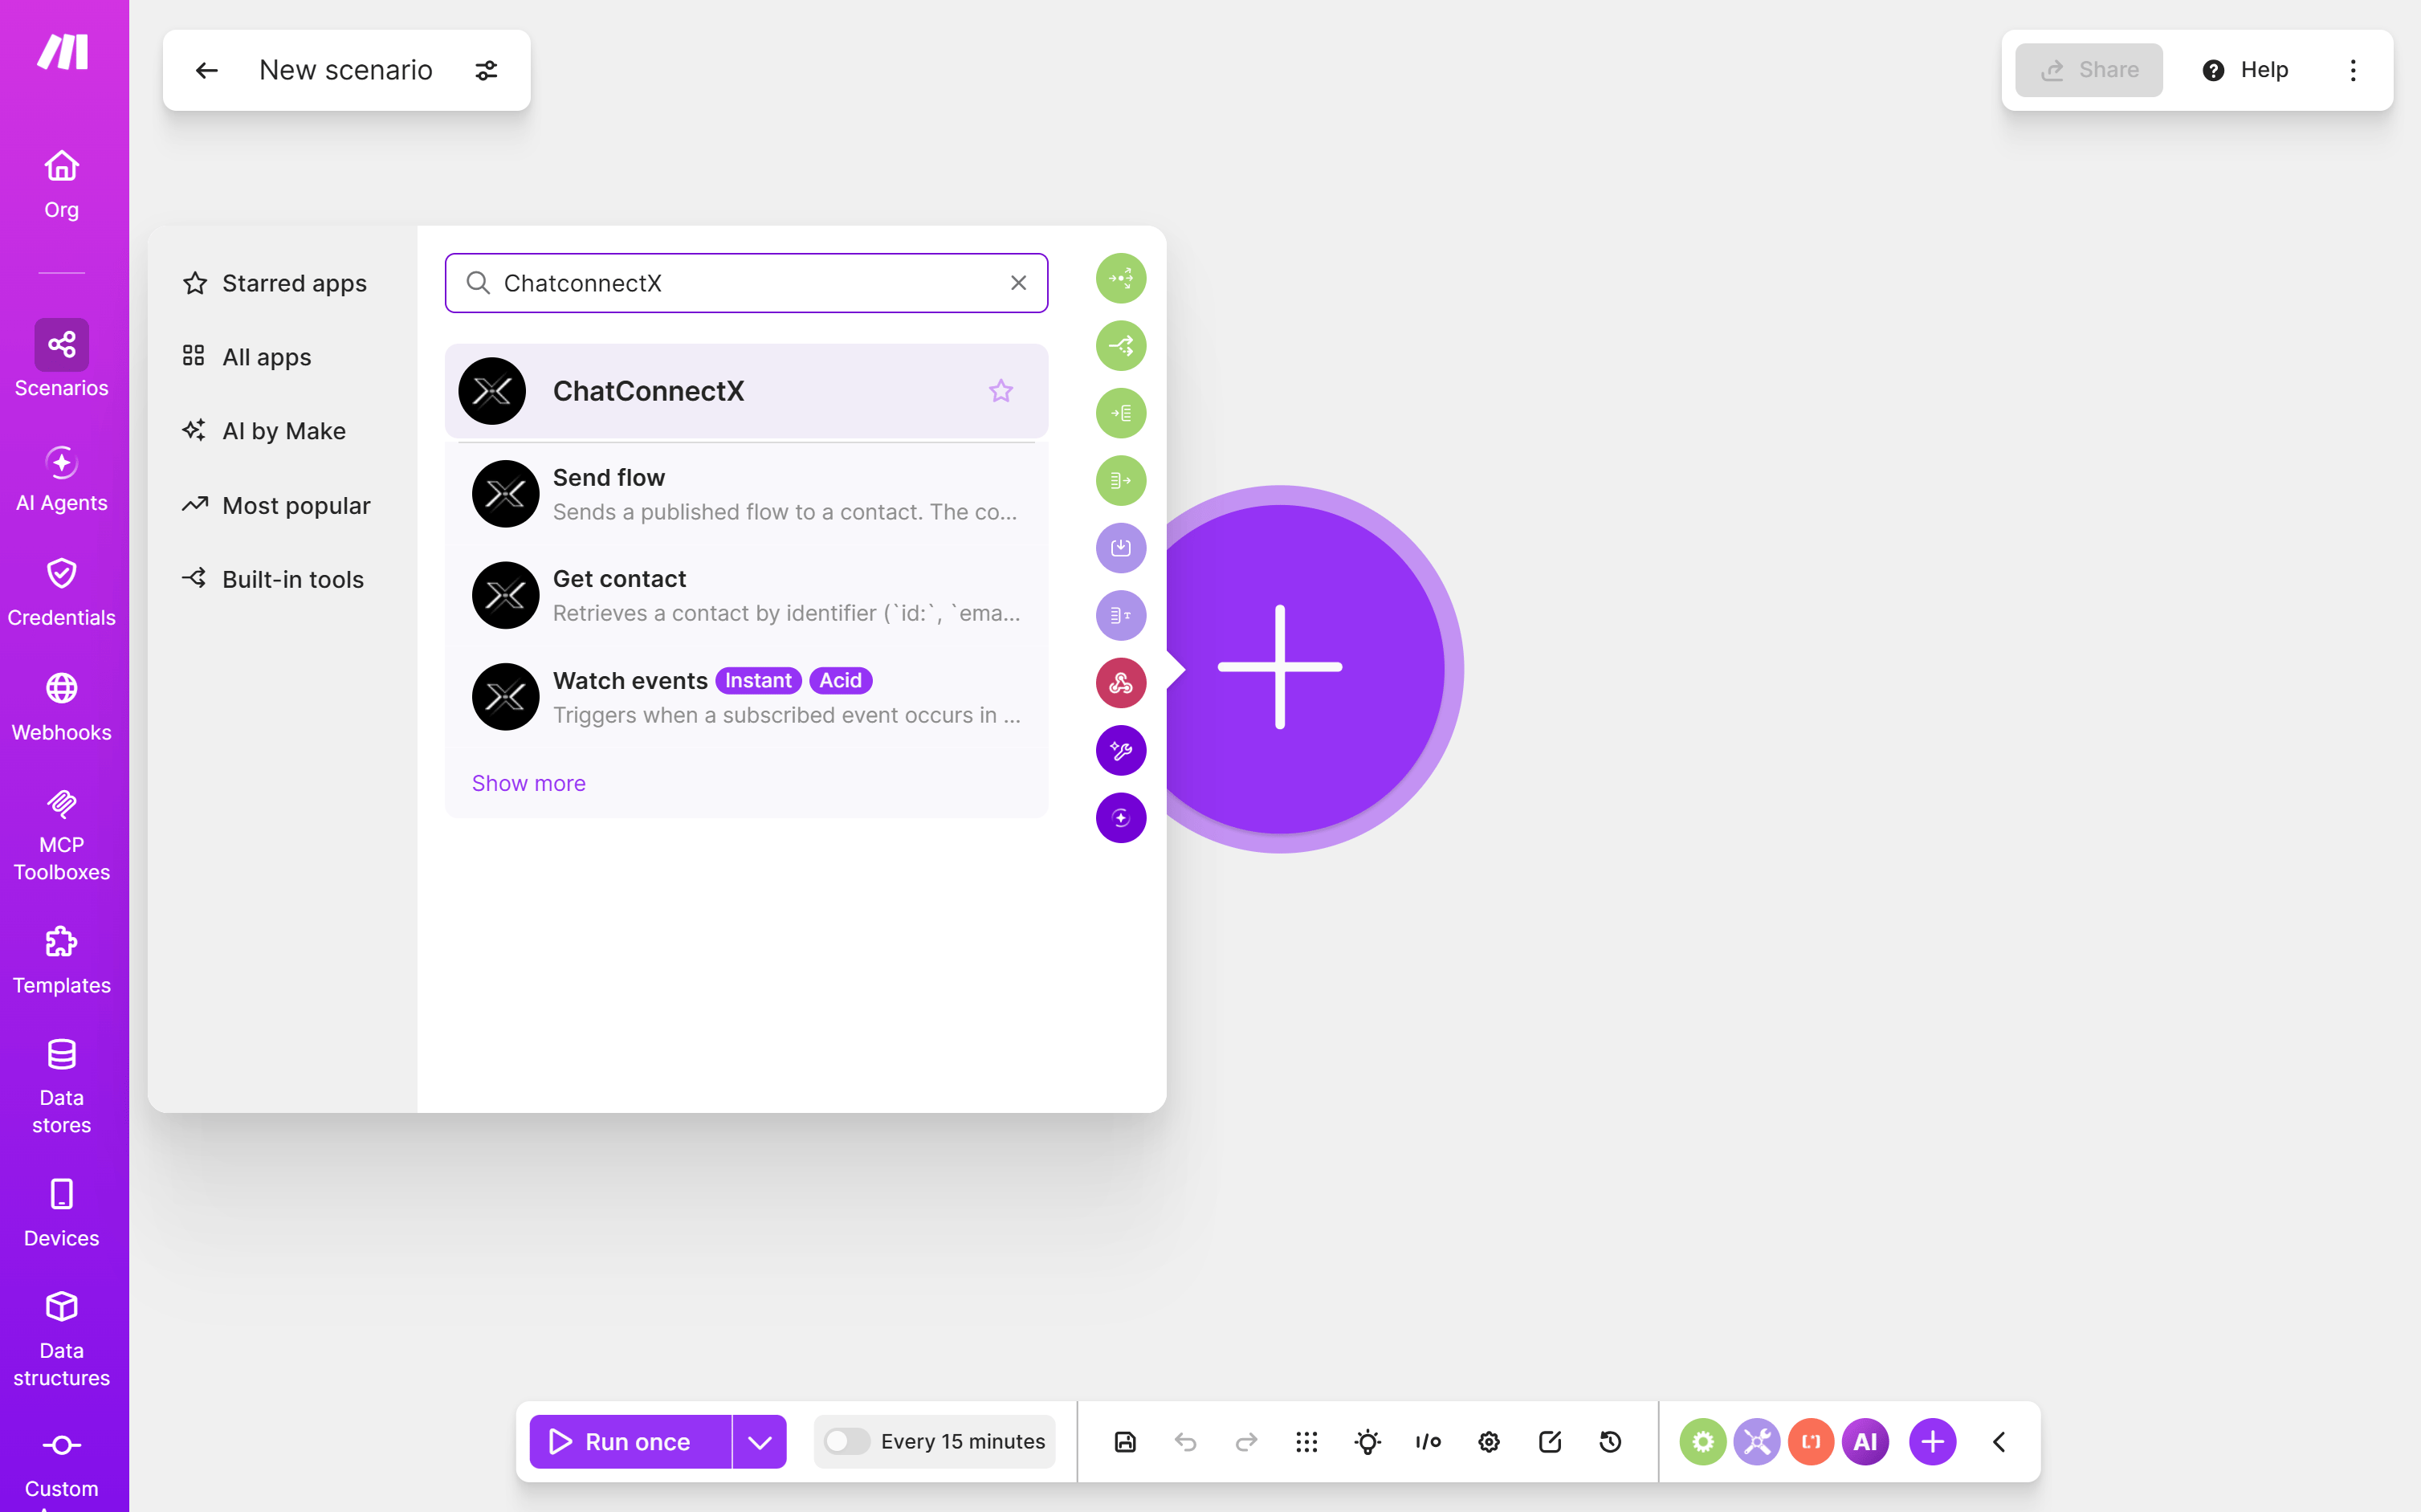 Select **Watch flow data** so Make can receive data sent from the ChatbotX Flow.
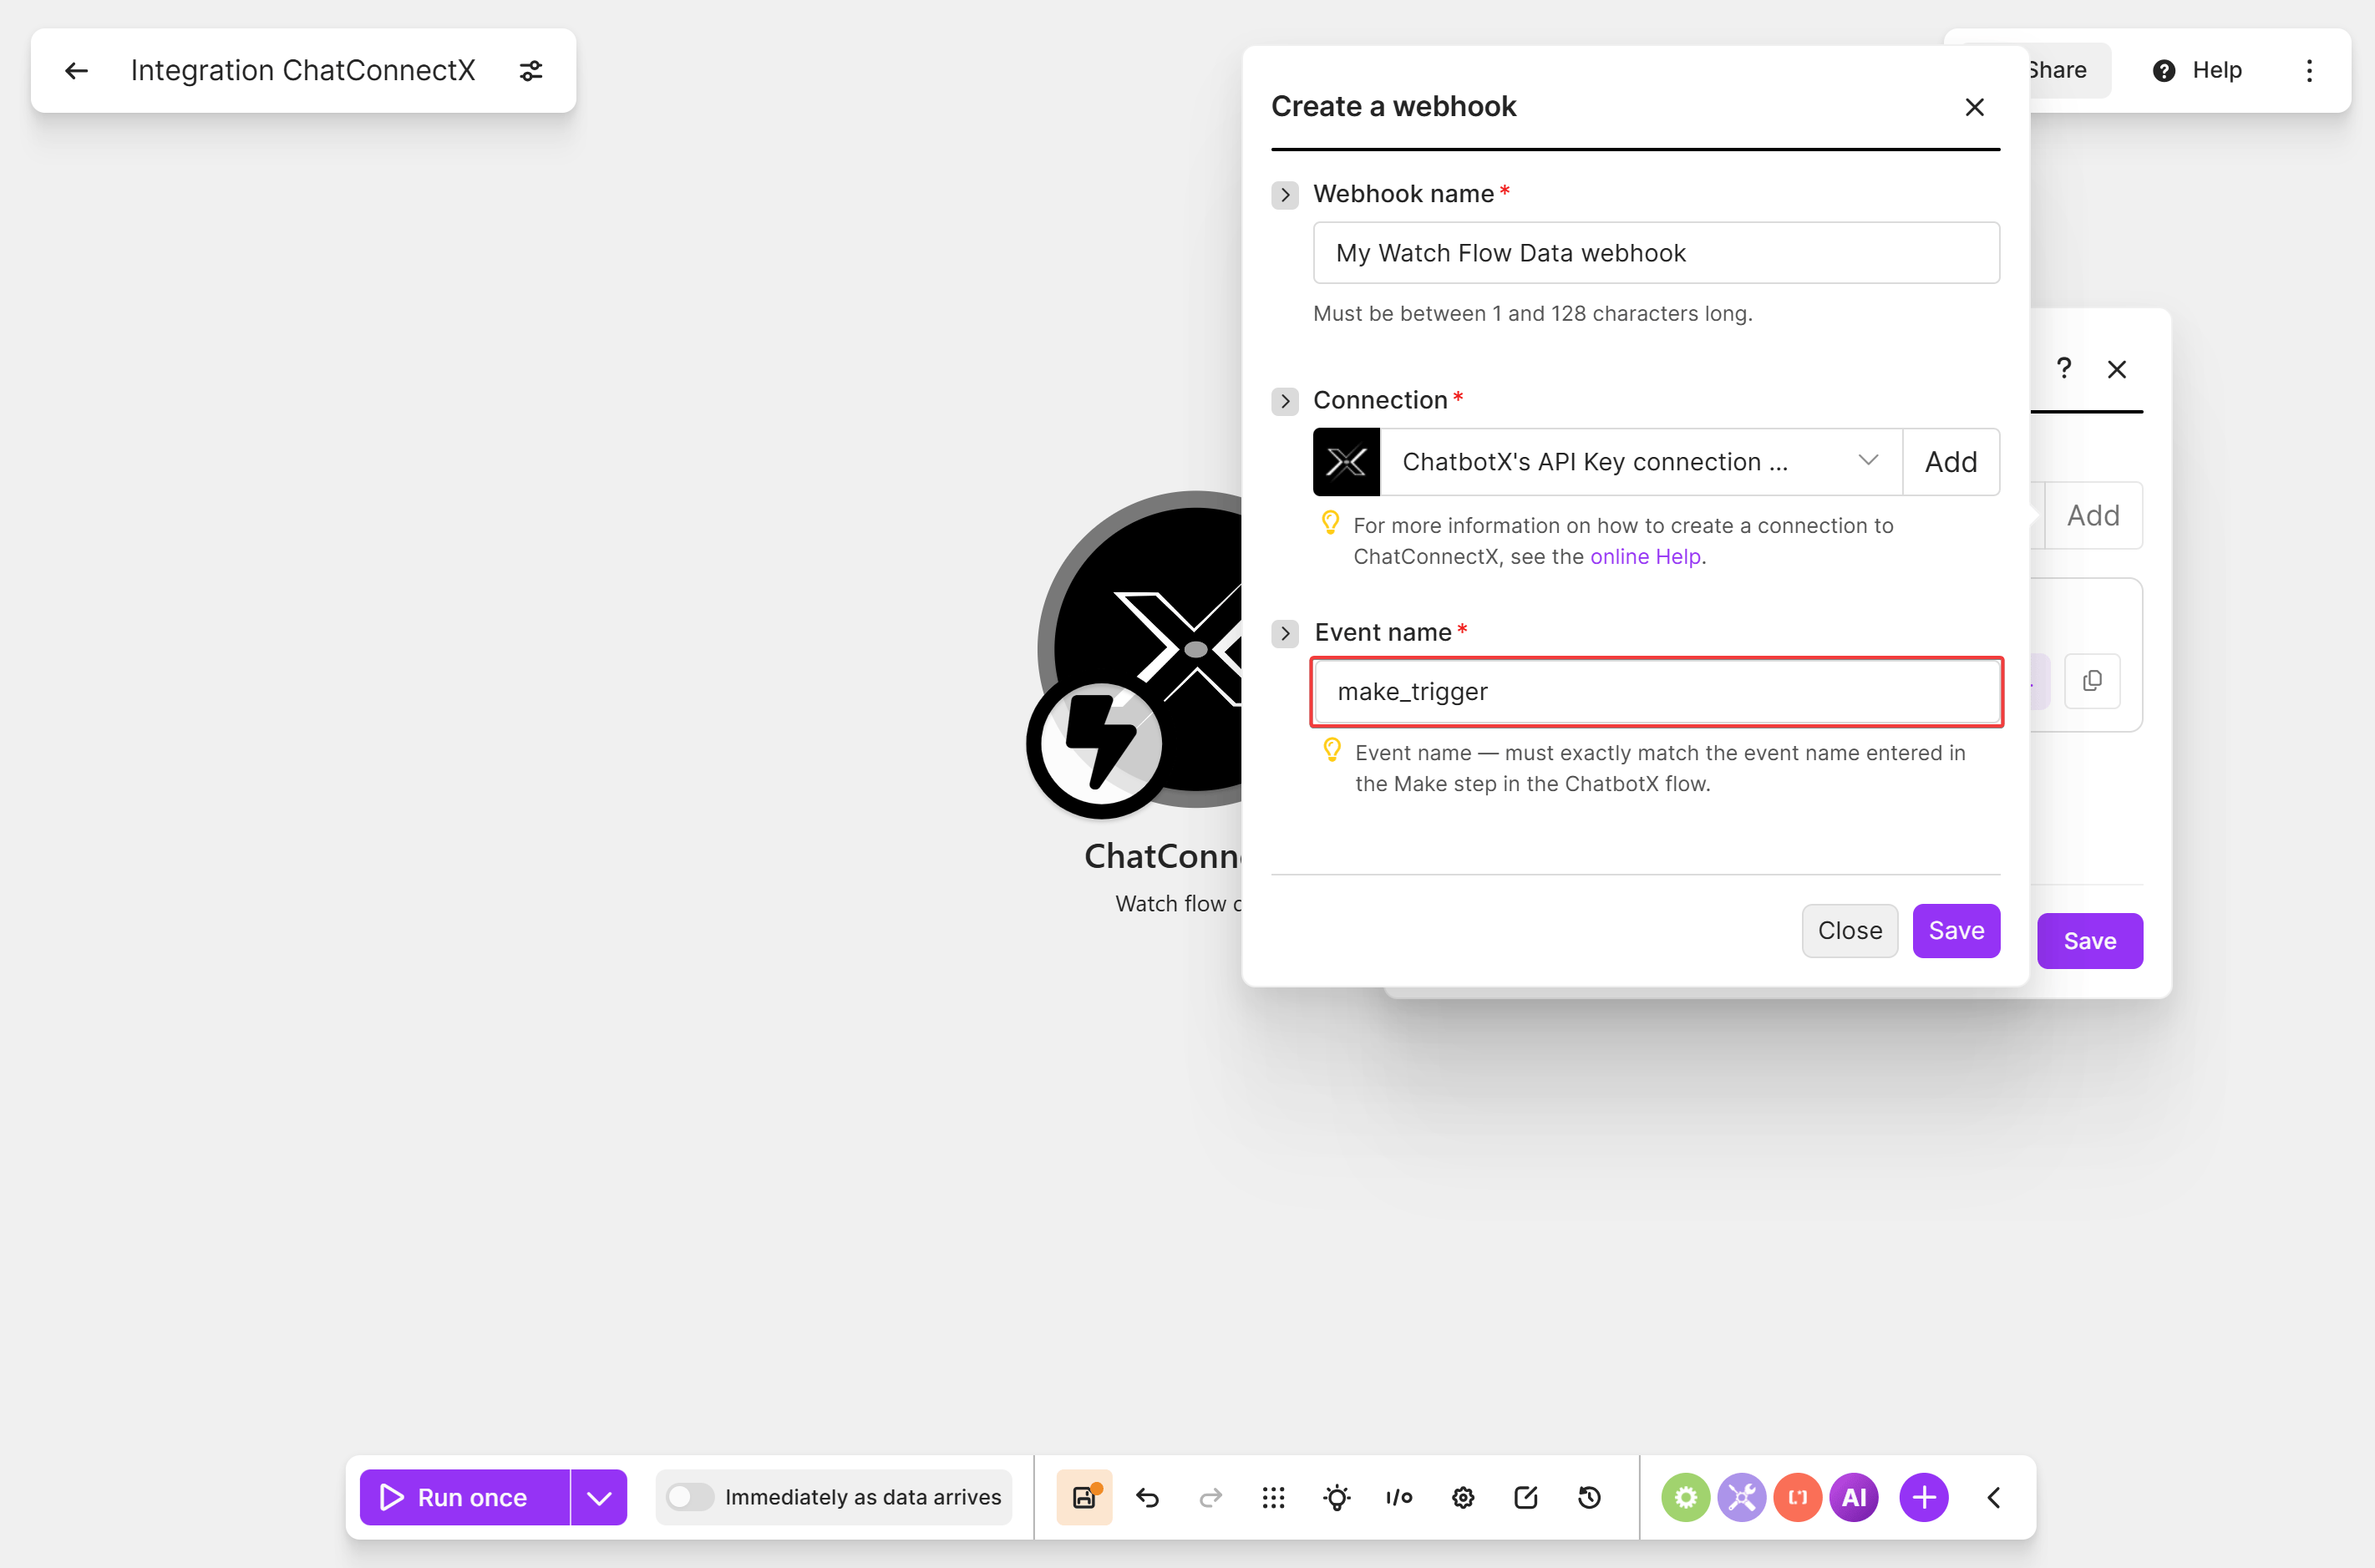
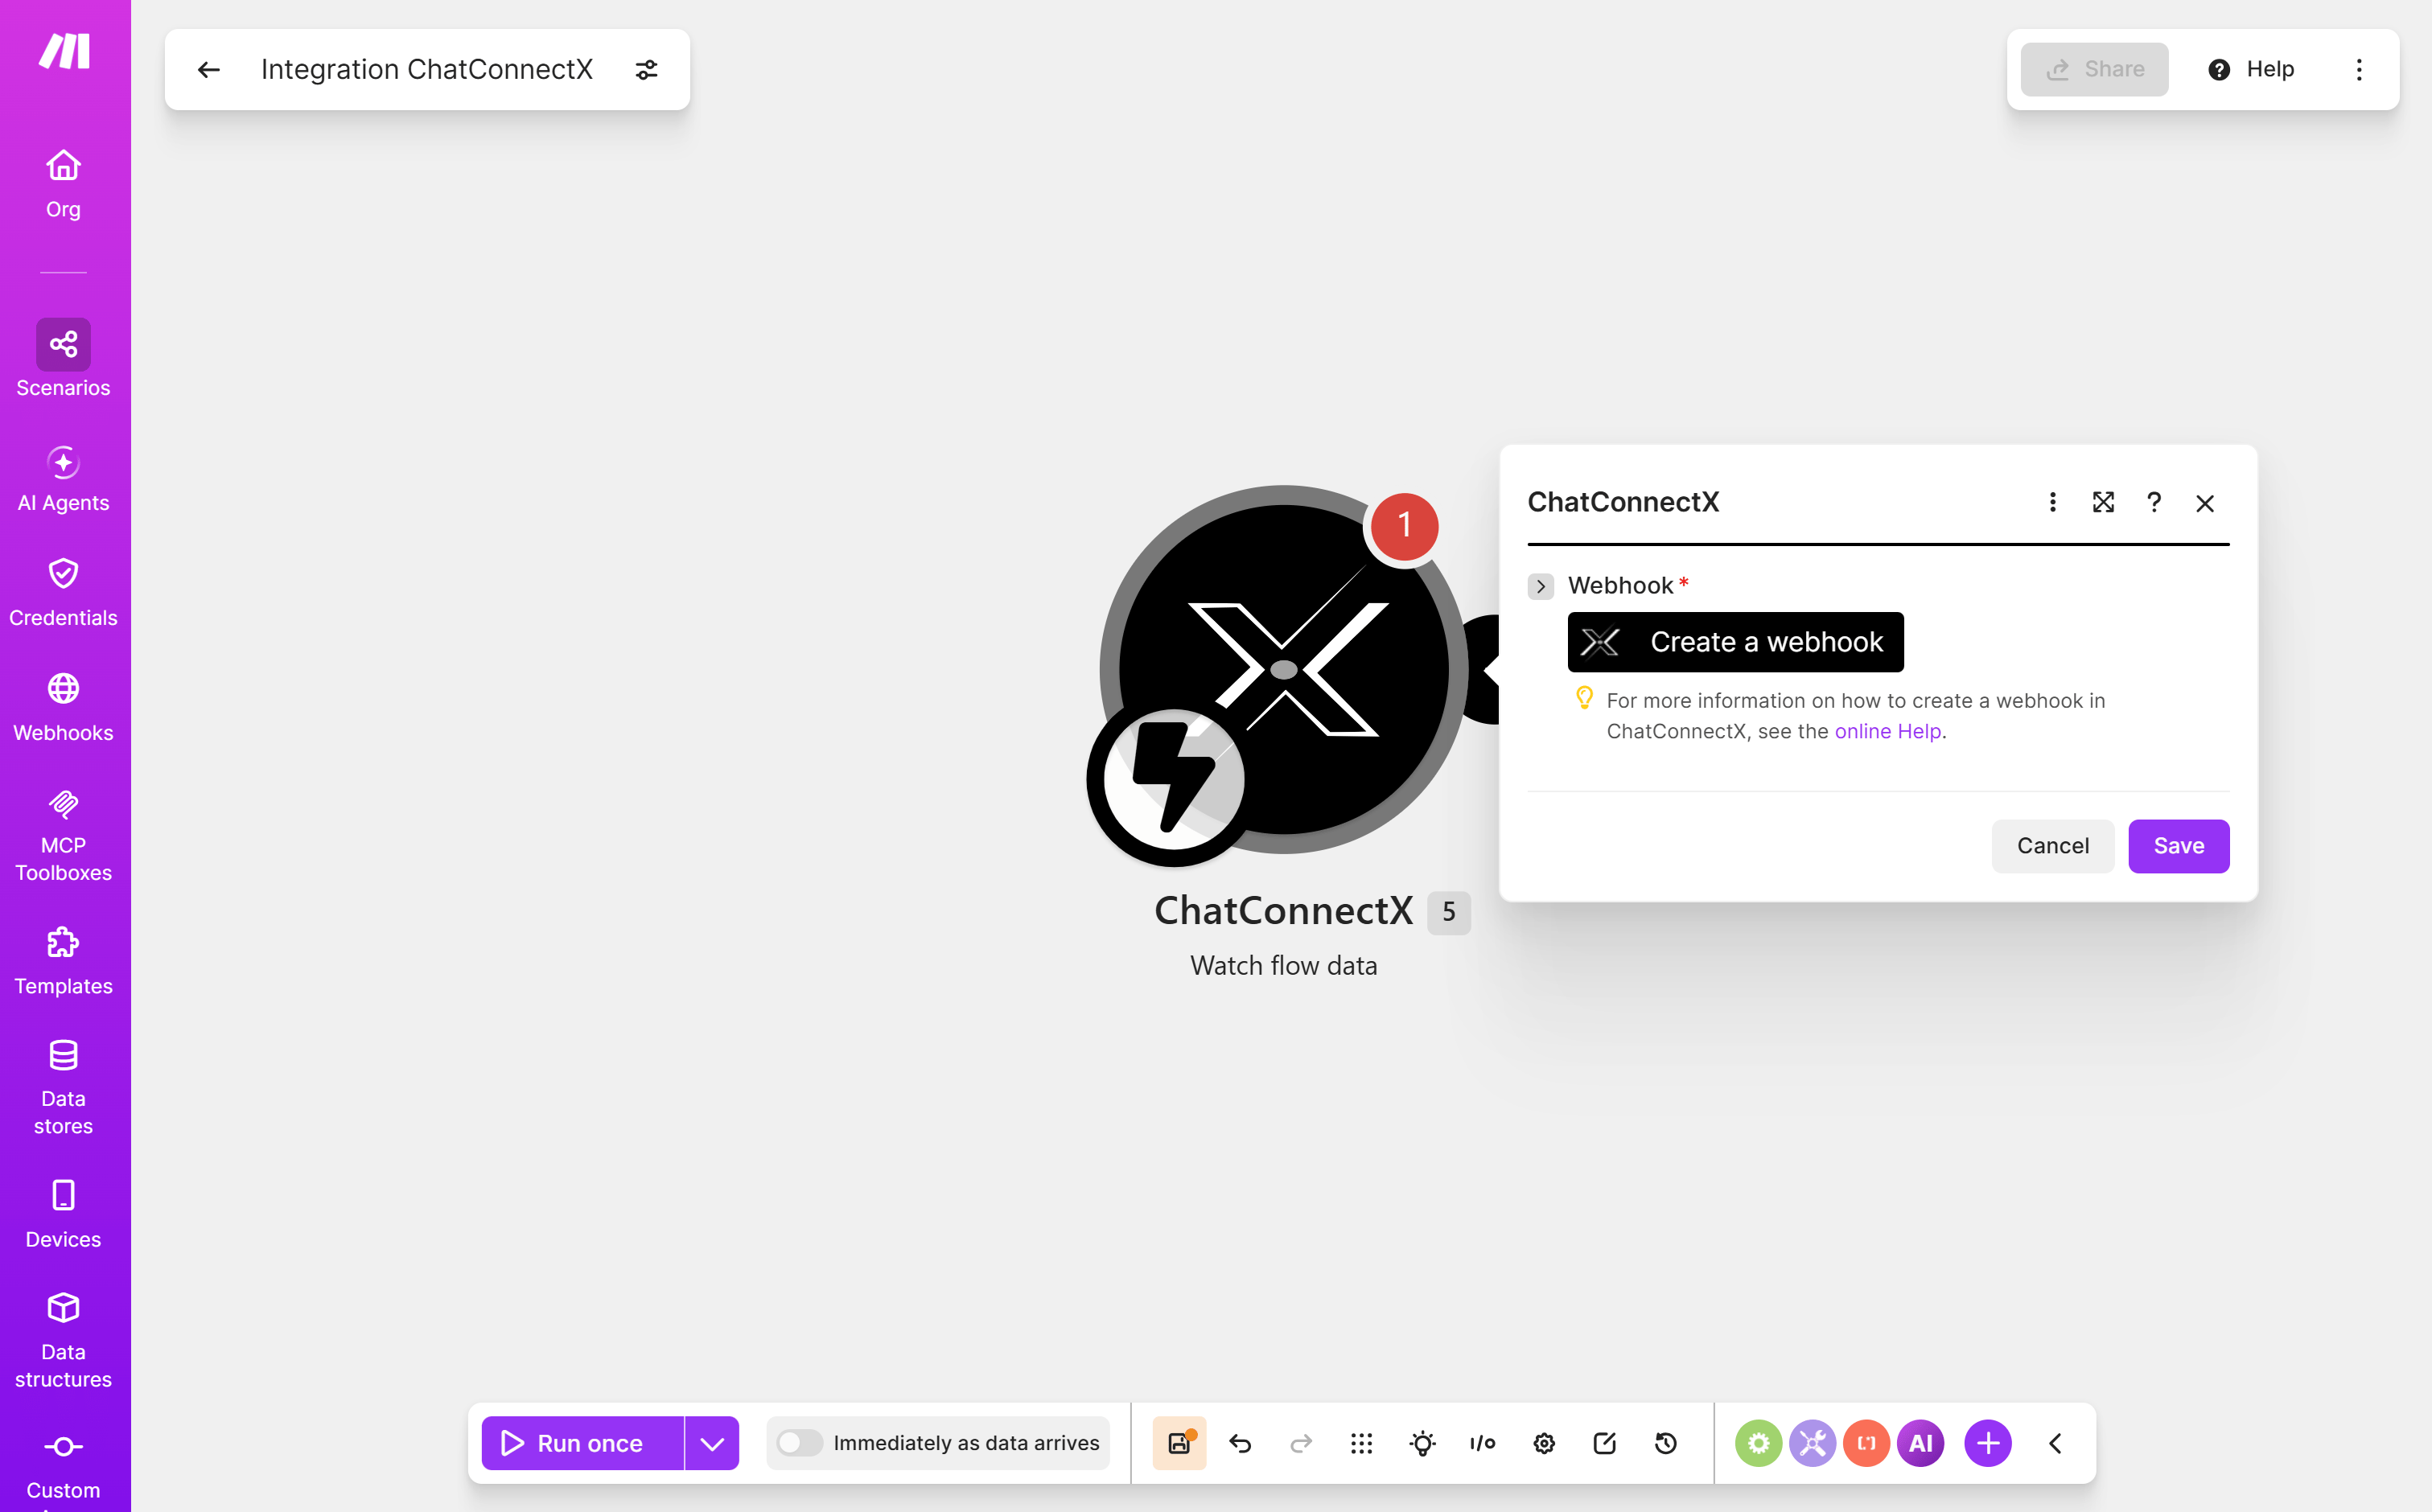 Select **Create a webhook**, enter a webhook name, and choose the existing Connection. If no Connection exists, select **Add** and enter the Workspace token.
In **Event name**, enter the exact name used in **Events** on the **Make** block, such as `make_trigger`, then select **Save**.
Select **Create a webhook**, enter a webhook name, and choose the existing Connection. If no Connection exists, select **Add** and enter the Workspace token.
In **Event name**, enter the exact name used in **Events** on the **Make** block, such as `make_trigger`, then select **Save**.
 Select **Run once** so Make starts waiting for sample data.
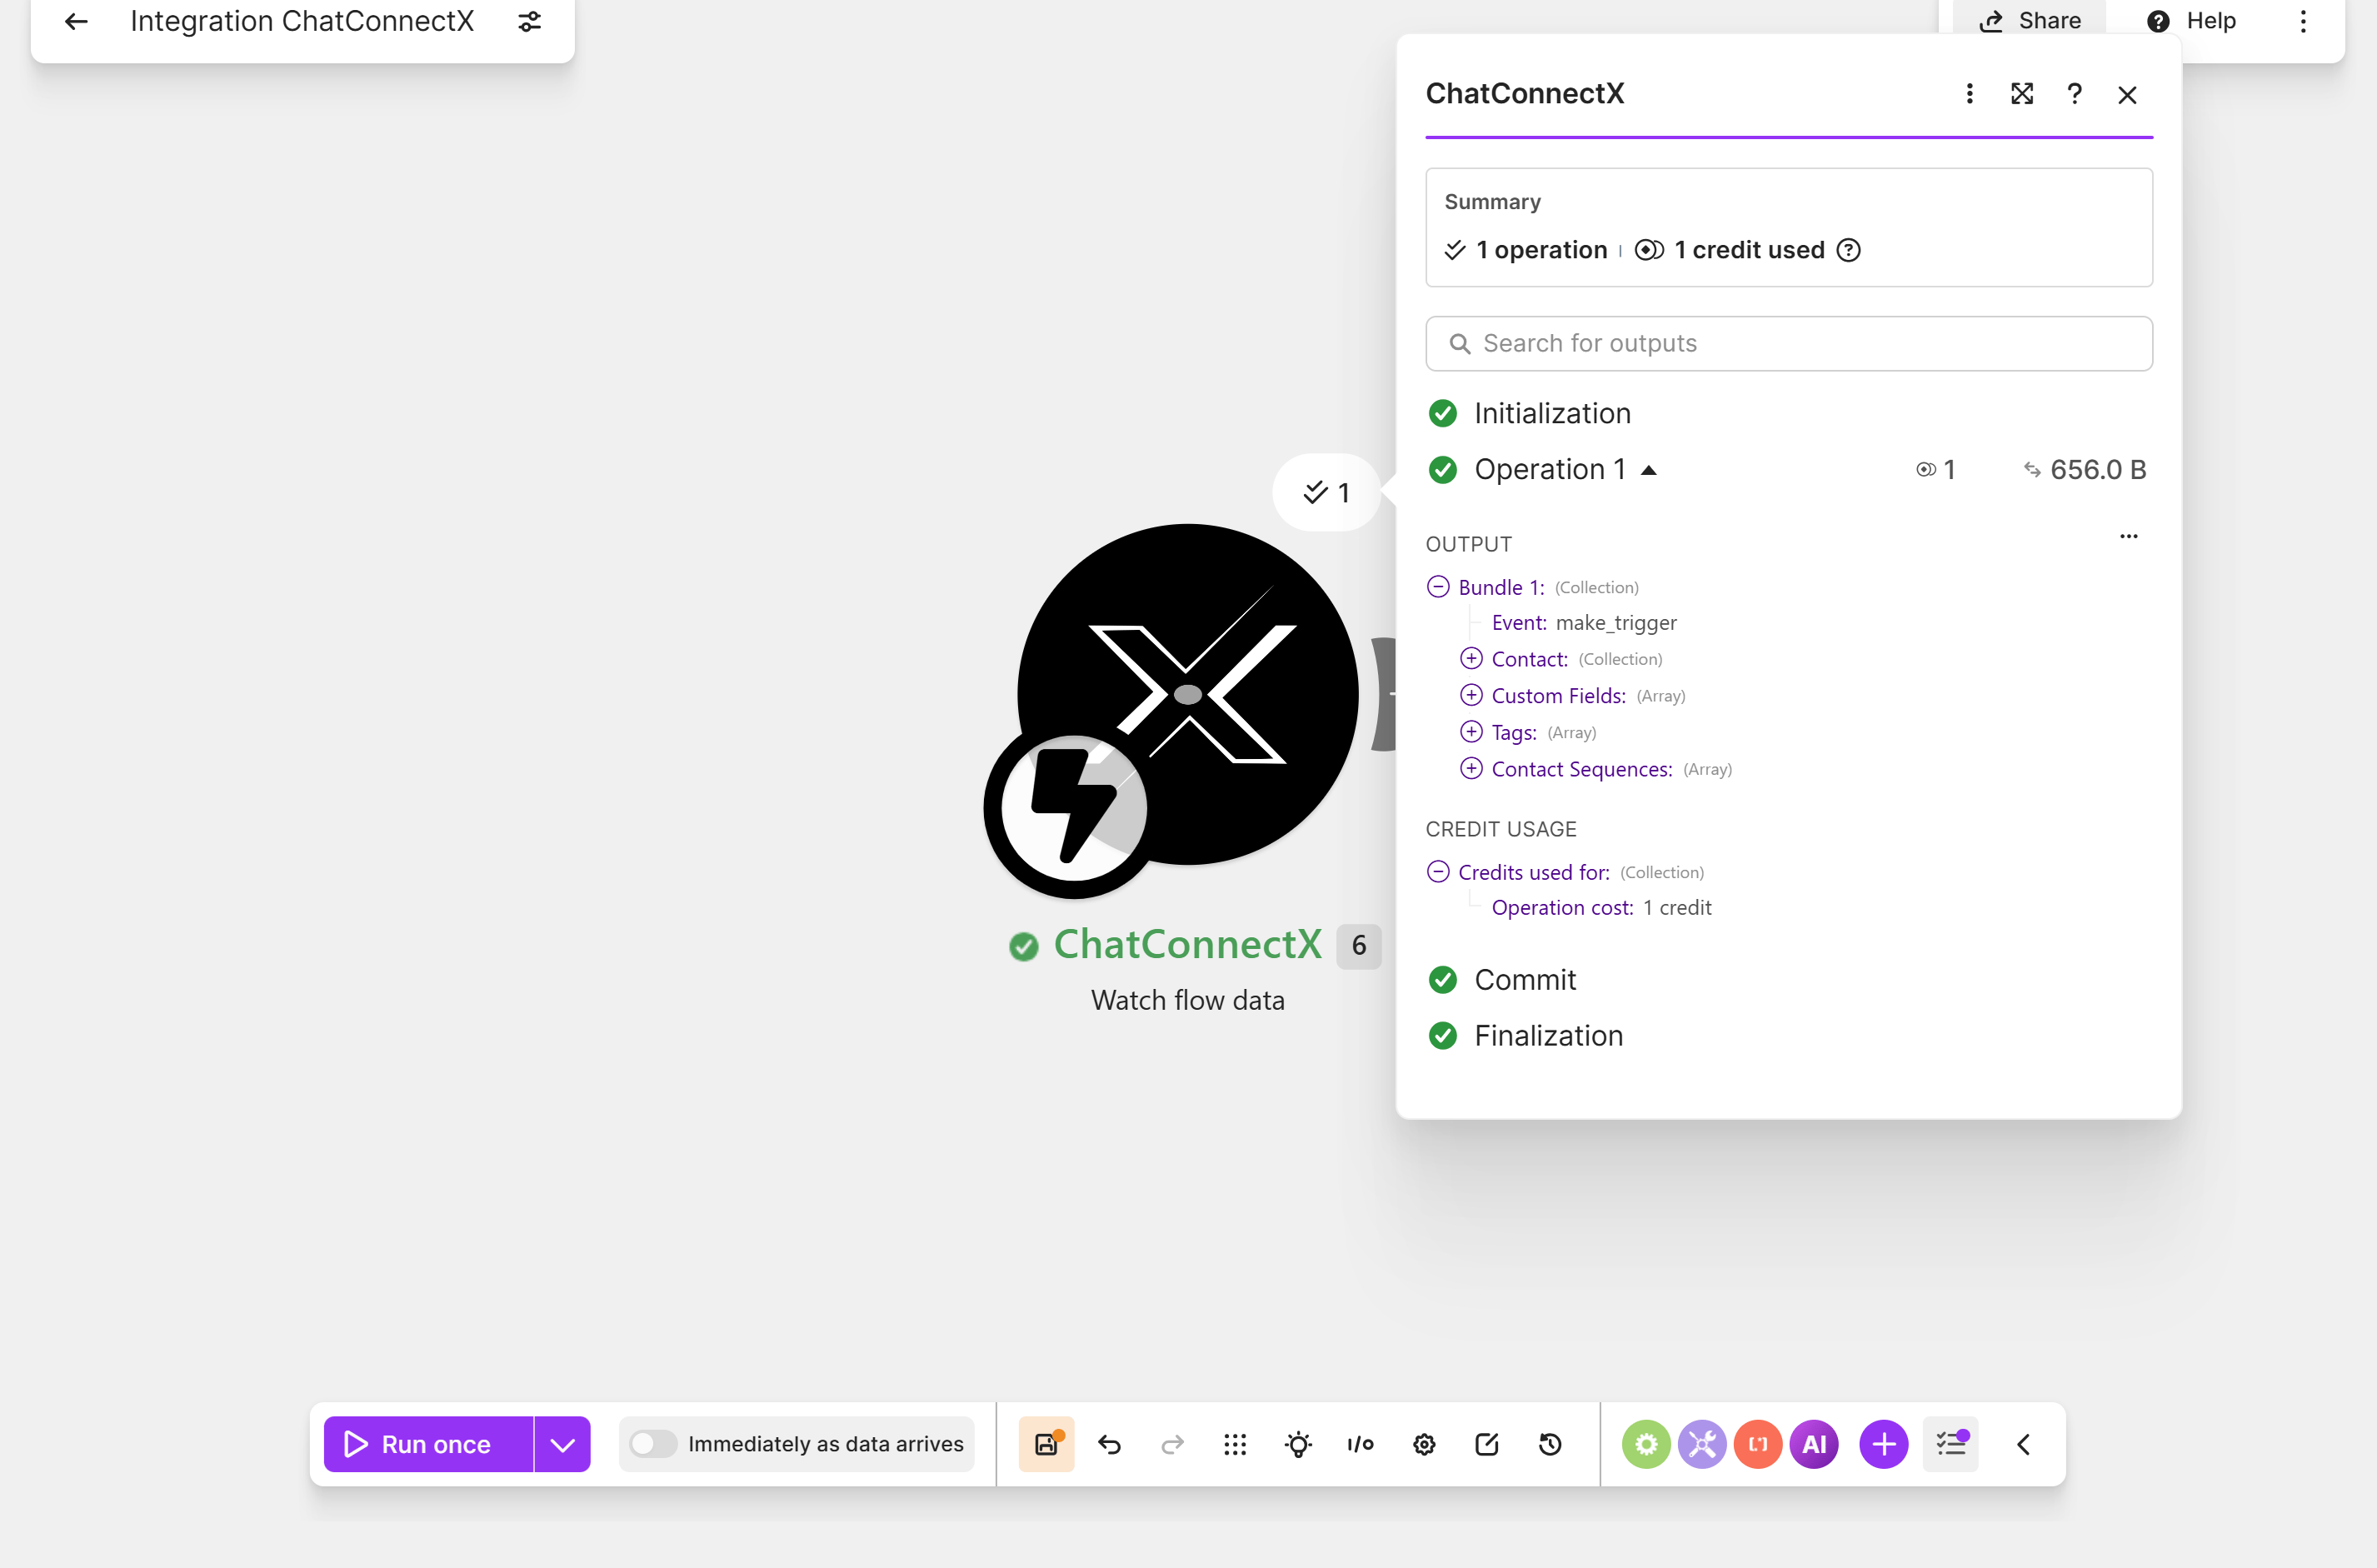
Run the Flow that contains the **Actions > Triggers > Make** block. When the data arrives, Make displays the result in **Operation 1**.
The webhook **Event name** must exactly match the name in **Events** on the **Make** block. If the names differ, Make does not receive data from the Flow.
The sample output can include `Event`, `Contact`, `Custom Fields`, `Tags`, and `Contact Sequences`. Use these fields to map data into the next module.
Select **Run once** so Make starts waiting for sample data.
Run the Flow that contains the **Actions > Triggers > Make** block. When the data arrives, Make displays the result in **Operation 1**.
The webhook **Event name** must exactly match the name in **Events** on the **Make** block. If the names differ, Make does not receive data from the Flow.
The sample output can include `Event`, `Contact`, `Custom Fields`, `Tags`, and `Contact Sequences`. Use these fields to map data into the next module.
 ## Perform Actions in ChatbotX
An Action is a module that runs after a Trigger. It receives data from previous modules and performs a task in your ChatbotX workspace.
In the Make scenario, select the **+** after the Trigger module.
Search for **ChatConnectX**, then select the appropriate Action.
## Perform Actions in ChatbotX
An Action is a module that runs after a Trigger. It receives data from previous modules and performs a task in your ChatbotX workspace.
In the Make scenario, select the **+** after the Trigger module.
Search for **ChatConnectX**, then select the appropriate Action.
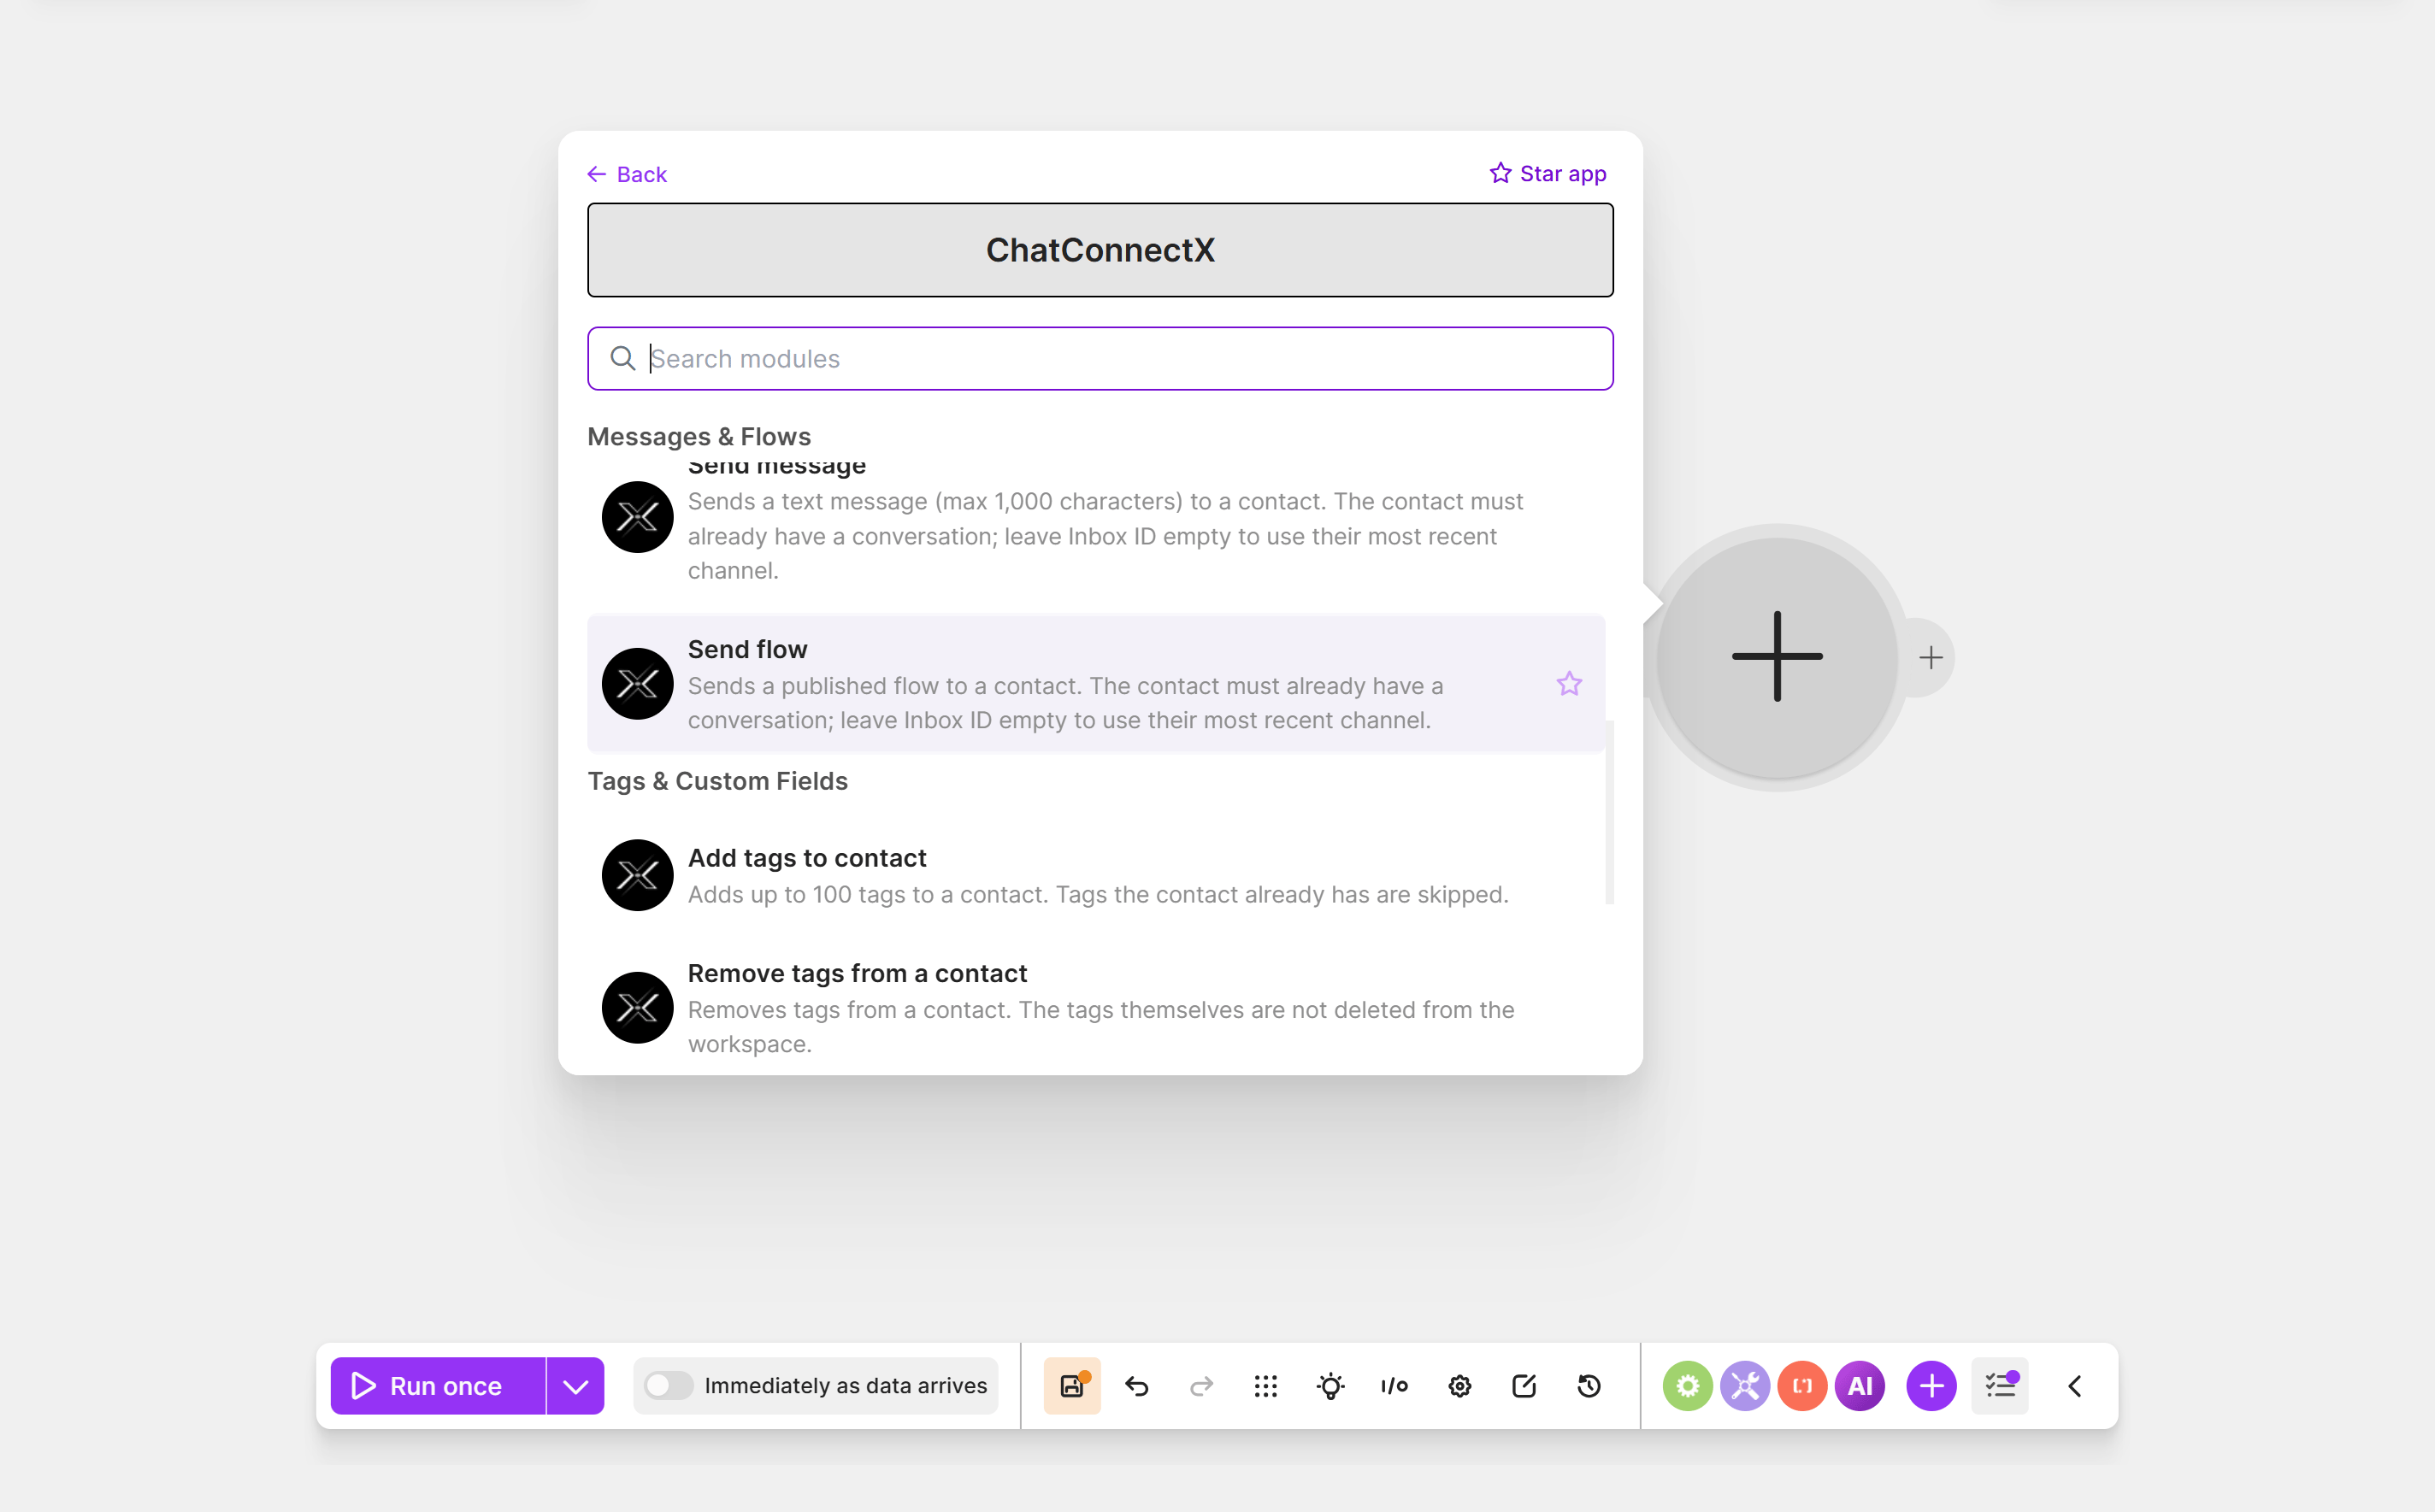 Choose the Connection, complete the required fields, and map data from the previous module. Select **Save** when finished.
### Manage contacts
| Action | Function |
| --------------------------------- | ----------------------------------------------------------------------------------------- |
| **Create contact** | Creates a new contact in the workspace. |
| **Update or create contact** | Updates an existing contact or creates one if it does not exist. |
| **Get contact** | Retrieves a contact by `id`, `email`, or `phone`, including Tags and Custom Field values. |
| **List contacts** | Lists contacts and optionally filters them by name, email, or phone number. |
| **Find contacts by custom field** | Finds contacts whose Custom Field exactly matches a value. |
| **Delete a contact** | Permanently deletes a contact by `id`, `email`, or `phone`. |
### Update Tags and Custom Fields
| Action | Function |
| --------------------------------- | ------------------------------------------------------------------------------ |
| **Add tags to contact** | Adds up to 100 Tags. Tags already assigned to the contact are skipped. |
| **Remove tags from a contact** | Removes Tags from a contact without deleting them from the workspace. |
| **Set custom fields to contact** | Sets up to 20 Custom Field values for a contact. |
| **Delete a contact custom field** | Clears a Custom Field value from a contact while keeping the field definition. |
### Send content and perform advanced tasks
| Action | Function |
| -------------------- | ------------------------------------------------------------------------------------------ |
| **Send message** | Sends a text message of up to 1,000 characters to a contact with an existing conversation. |
| **Send flow** | Sends a published Flow to a contact. |
| **Make an API call** | Performs a custom task through the ChatbotX API using the current Connection. |
**Delete a contact** permanently deletes the contact and cannot be undone. Check the contact identifier before running the scenario with live data.
## Example: Send a Flow with Make
Suppose Make receives customer information from an external form. Use **Send flow** to send a confirmation or consultation Flow through the contact's most recently used channel.
Add a new ChatConnectX module and select **Send flow**.
Choose the Connection, complete the required fields, and map data from the previous module. Select **Save** when finished.
### Manage contacts
| Action | Function |
| --------------------------------- | ----------------------------------------------------------------------------------------- |
| **Create contact** | Creates a new contact in the workspace. |
| **Update or create contact** | Updates an existing contact or creates one if it does not exist. |
| **Get contact** | Retrieves a contact by `id`, `email`, or `phone`, including Tags and Custom Field values. |
| **List contacts** | Lists contacts and optionally filters them by name, email, or phone number. |
| **Find contacts by custom field** | Finds contacts whose Custom Field exactly matches a value. |
| **Delete a contact** | Permanently deletes a contact by `id`, `email`, or `phone`. |
### Update Tags and Custom Fields
| Action | Function |
| --------------------------------- | ------------------------------------------------------------------------------ |
| **Add tags to contact** | Adds up to 100 Tags. Tags already assigned to the contact are skipped. |
| **Remove tags from a contact** | Removes Tags from a contact without deleting them from the workspace. |
| **Set custom fields to contact** | Sets up to 20 Custom Field values for a contact. |
| **Delete a contact custom field** | Clears a Custom Field value from a contact while keeping the field definition. |
### Send content and perform advanced tasks
| Action | Function |
| -------------------- | ------------------------------------------------------------------------------------------ |
| **Send message** | Sends a text message of up to 1,000 characters to a contact with an existing conversation. |
| **Send flow** | Sends a published Flow to a contact. |
| **Make an API call** | Performs a custom task through the ChatbotX API using the current Connection. |
**Delete a contact** permanently deletes the contact and cannot be undone. Check the contact identifier before running the scenario with live data.
## Example: Send a Flow with Make
Suppose Make receives customer information from an external form. Use **Send flow** to send a confirmation or consultation Flow through the contact's most recently used channel.
Add a new ChatConnectX module and select **Send flow**.
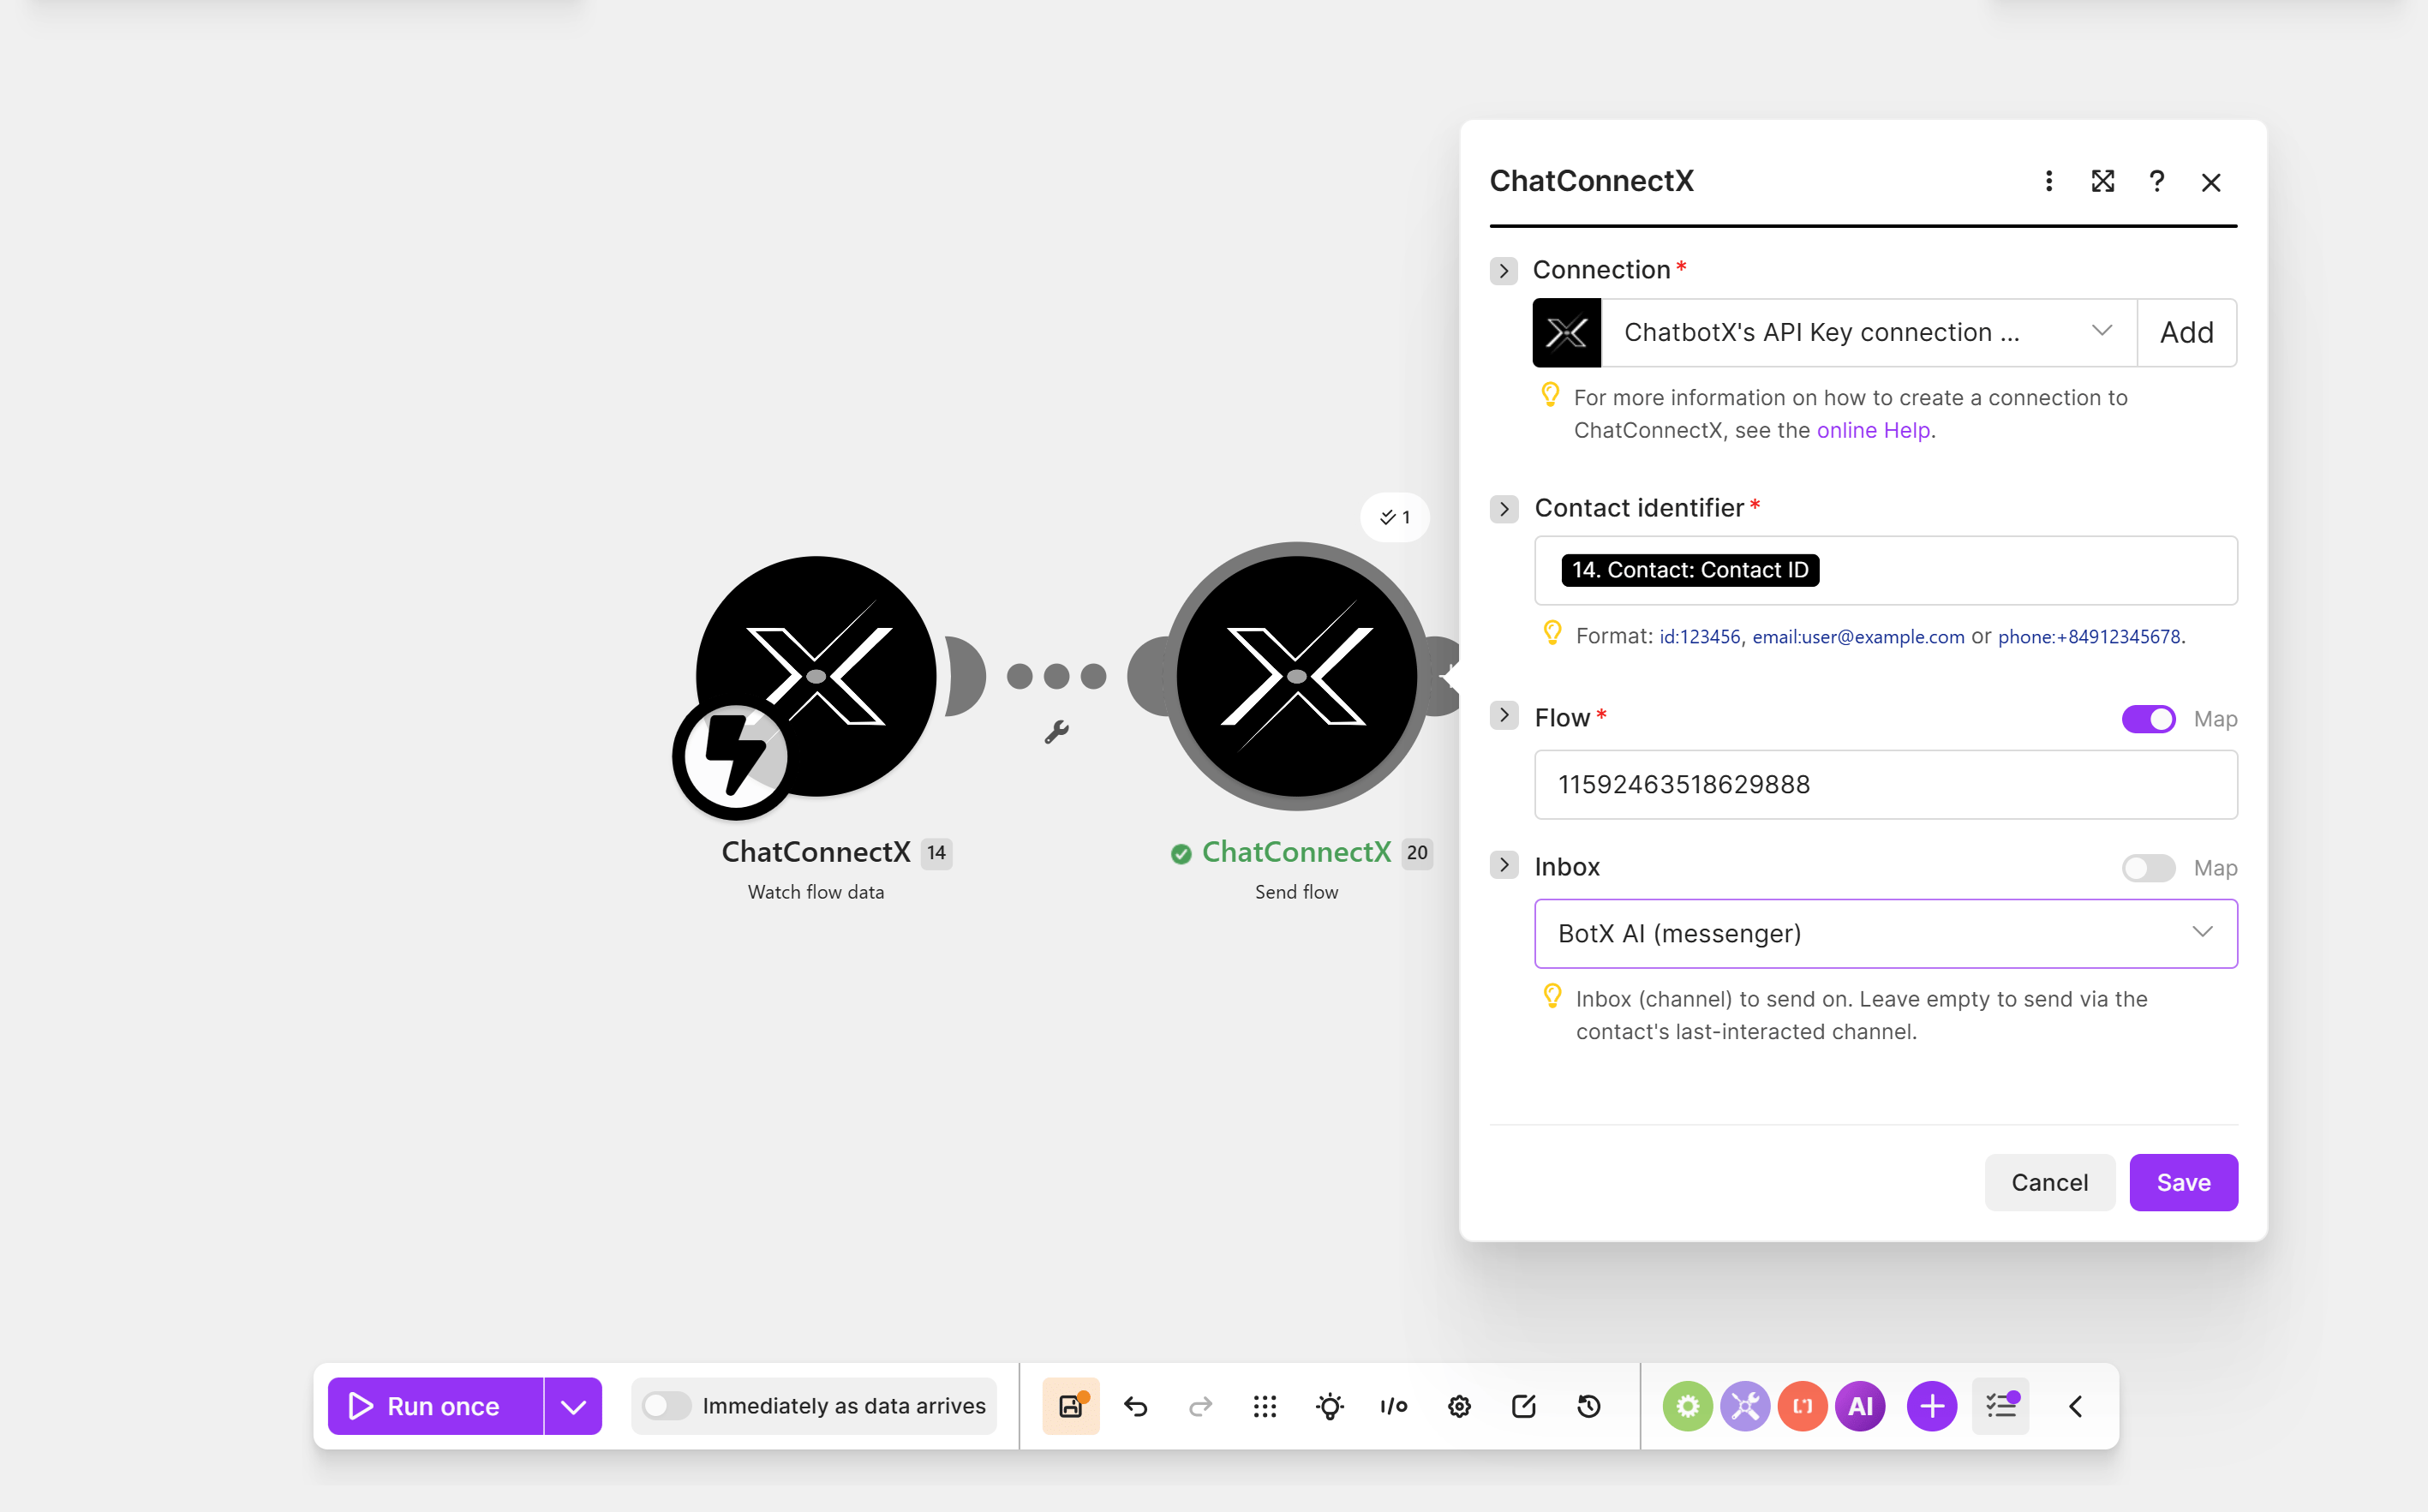 Select the existing Connection. If no Connection exists, select **Add** to create one.
Enter or map the contact identifier. You can use the `Contact ID` from the Trigger. Make also accepts `id:123456`, `email:user@example.com`, or `phone:+84912345678`.
Enter the ID of a published Flow. Enable **Map** if the Flow ID comes from a previous module.
Choose an **Inbox** to send through a specific channel. Leave it empty to use the contact's most recently used channel.
Select **Save**, then select **Run once** to test the scenario.
The contact must already have a conversation before receiving a Flow. If **Inbox** is empty, ChatbotX uses the contact's most recently used channel.
## Test the scenario before enabling it
Select **Run once** in Make, then run the Flow or data source that should activate the Trigger.
Open **Operation 1** and confirm that the required fields contain the correct data.
Confirm that the Action succeeds and the contact receives the correct content or data update.
After a successful test, enable the scenario schedule so Make can process future runs automatically.
If the scenario does not run, check the Connection, the data in the Operation, and the scenario's enabled status.
Select the existing Connection. If no Connection exists, select **Add** to create one.
Enter or map the contact identifier. You can use the `Contact ID` from the Trigger. Make also accepts `id:123456`, `email:user@example.com`, or `phone:+84912345678`.
Enter the ID of a published Flow. Enable **Map** if the Flow ID comes from a previous module.
Choose an **Inbox** to send through a specific channel. Leave it empty to use the contact's most recently used channel.
Select **Save**, then select **Run once** to test the scenario.
The contact must already have a conversation before receiving a Flow. If **Inbox** is empty, ChatbotX uses the contact's most recently used channel.
## Test the scenario before enabling it
Select **Run once** in Make, then run the Flow or data source that should activate the Trigger.
Open **Operation 1** and confirm that the required fields contain the correct data.
Confirm that the Action succeeds and the contact receives the correct content or data update.
After a successful test, enable the scenario schedule so Make can process future runs automatically.
If the scenario does not run, check the Connection, the data in the Operation, and the scenario's enabled status.