> ## Documentation Index
> Fetch the complete documentation index at: https://chatbotx.io/docs/llms.txt
> Use this file to discover all available pages before exploring further.
# SendGrid Integration
> Connect SendGrid with ChatbotX to create or update a Marketing Contact and add it to a selected list from a Flow.
The **SendGrid** integration creates or updates Marketing Contacts from ChatbotX directly within a Flow. The action uses the email address to identify the contact and can add the contact to a List while syncing the phone number and Custom Fields.
For example, after a customer signs up for product updates, ChatbotX sends their email address, phone number, and product interests to SendGrid for segmentation and personalized email campaigns.
## Prepare your API Key
Create a SendGrid **API Key** with permission to read and write Marketing data. Grant only the permissions ChatbotX needs to access Lists, Contacts, and Custom Fields.
Sign in to the Twilio SendGrid account that you want to connect to ChatbotX.
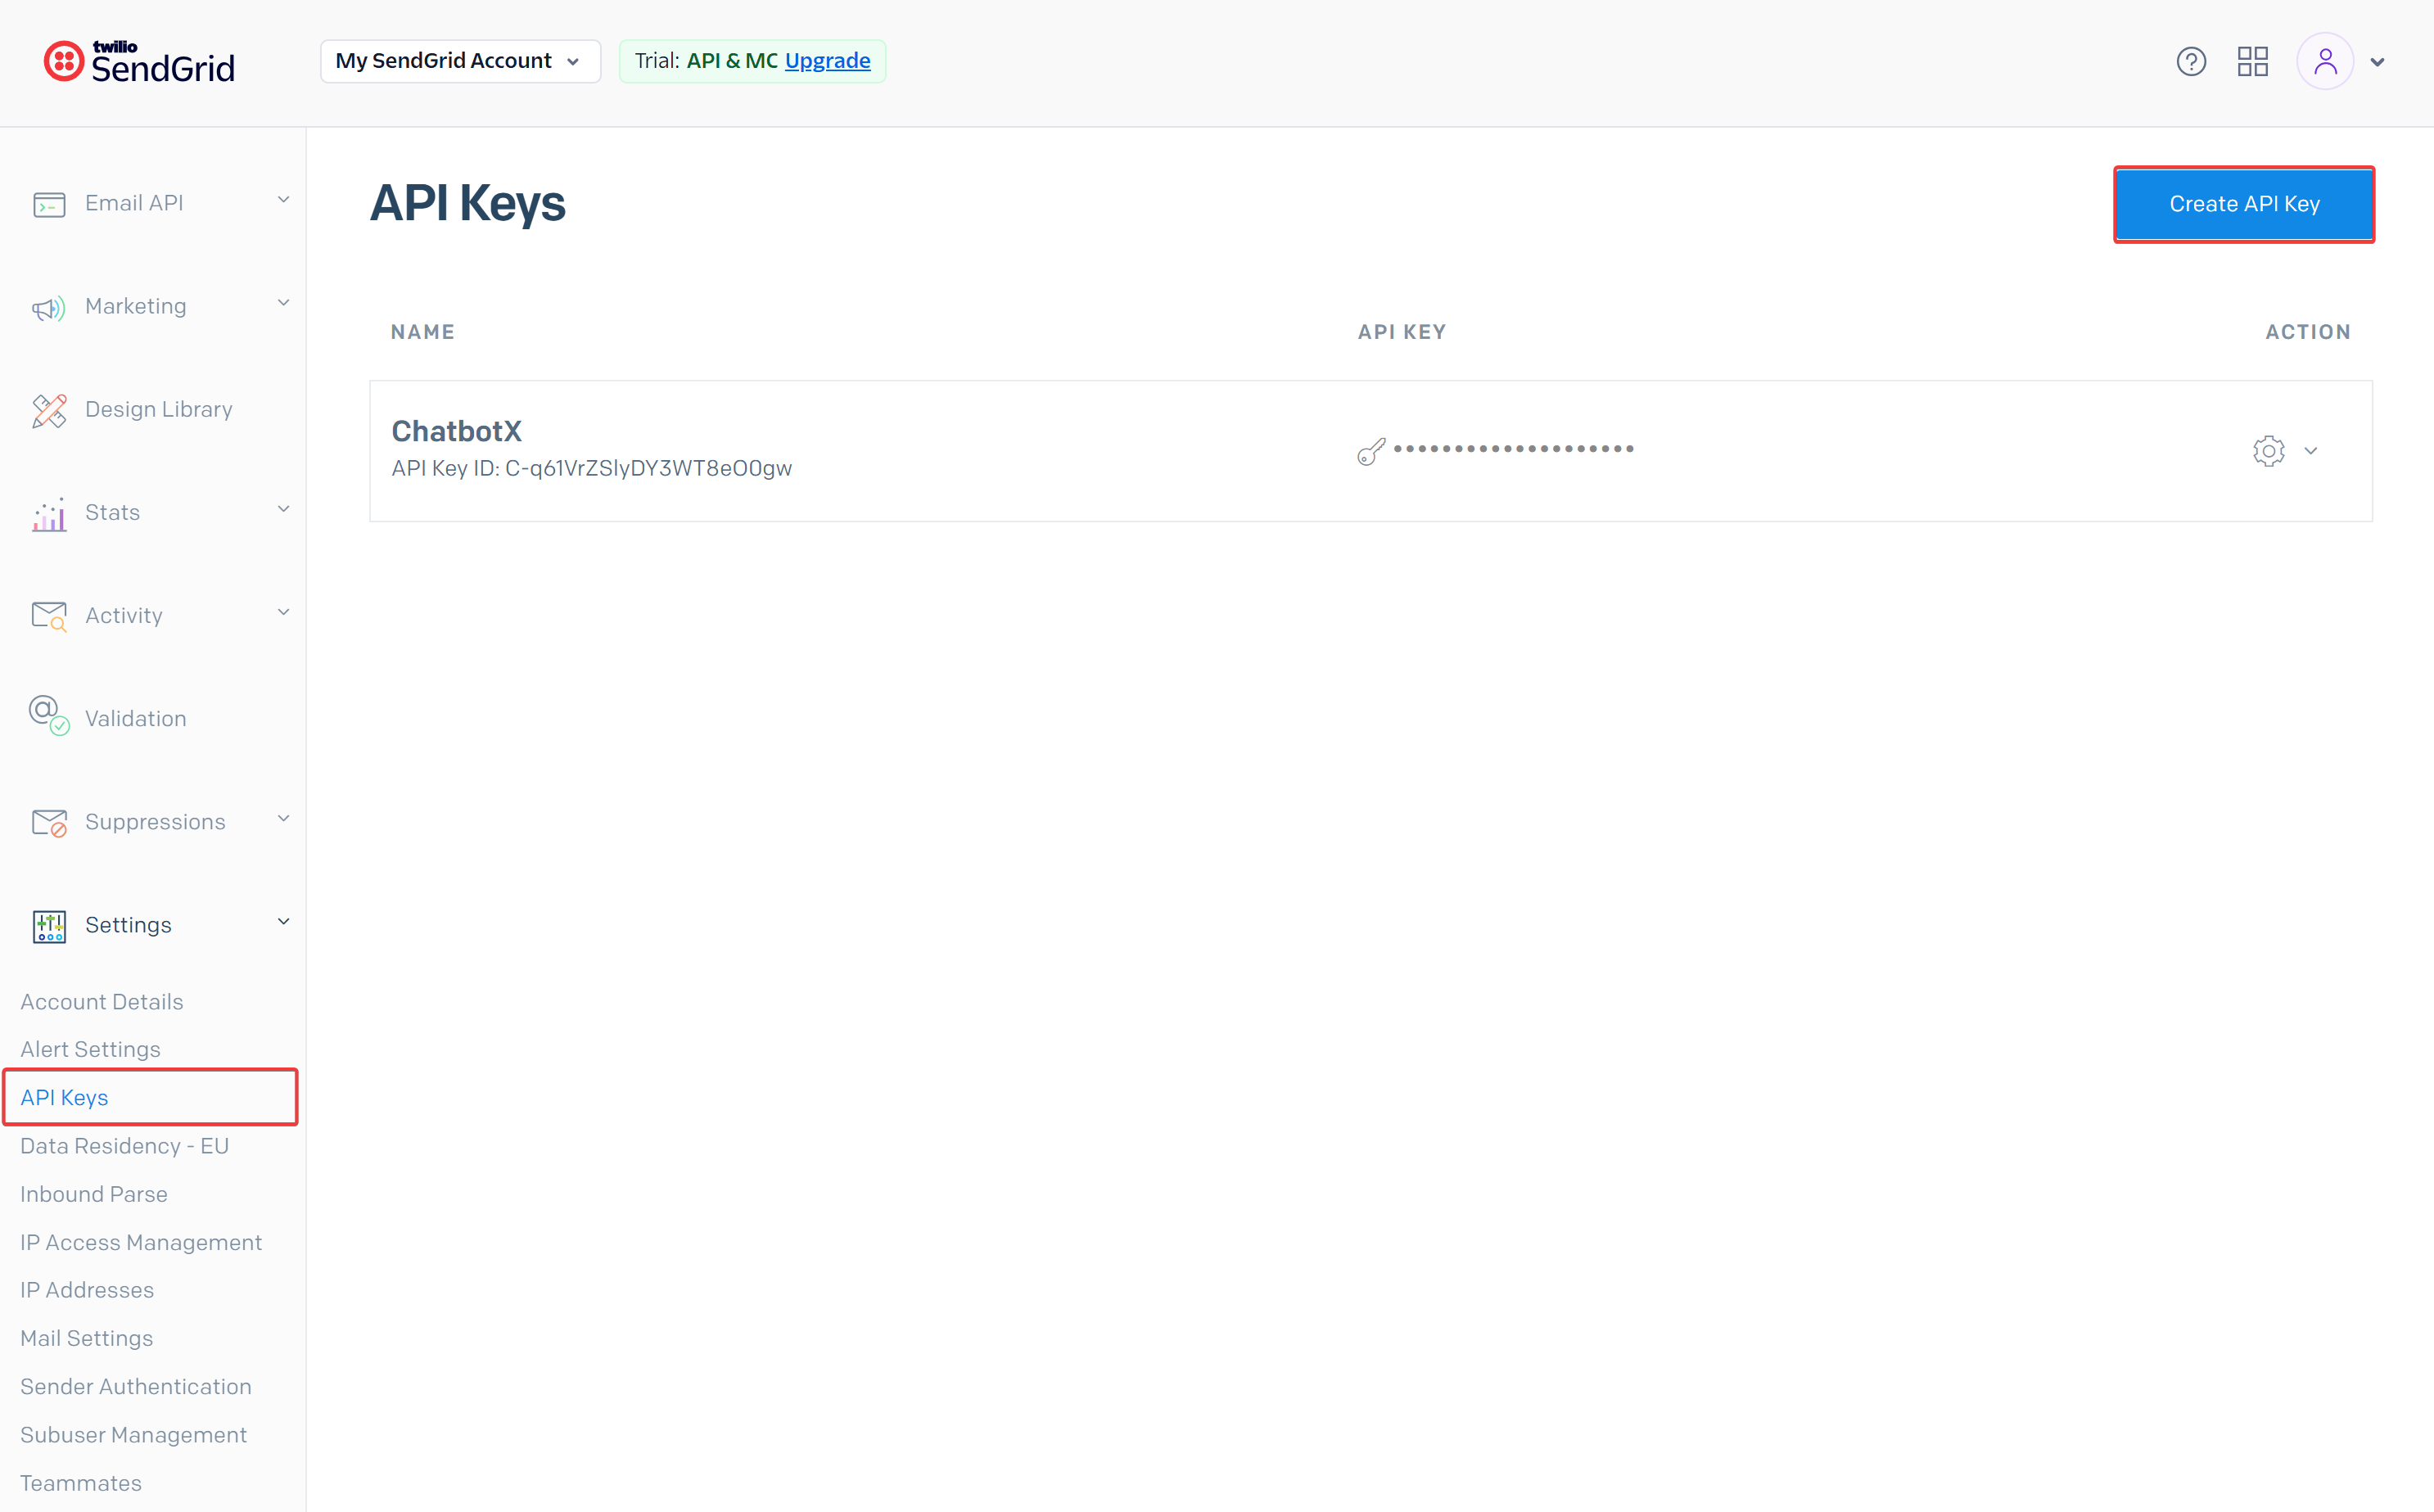
From the left menu, select **Settings > API Keys**.
Select **Create API Key**, enter a name that identifies the key, and select **Custom Access**.
Set **Marketing** to **Full Access** so the key can read and write Marketing Contacts, Lists, and Custom Fields.
Select **Create & View**, then copy the key and store it securely. SendGrid displays the complete API Key only once.
See the official [API Keys](https://www.twilio.com/docs/sendgrid/ui/account-and-settings/api-keys) guide.
 Do not share the API Key in emails, messages, public screenshots, or customer-facing documents. If the key is exposed, delete it, create a new key, and update the connection in ChatbotX.
## Connect SendGrid to ChatbotX
In your ChatbotX workspace, select **Settings** from the left menu.
Select the **Integrations** tab, then open **SendGrid**.
Select **Connect** to open the **Connect SendGrid** window.
Paste the key into the **API Key** field, then select **Confirm**.
Do not share the API Key in emails, messages, public screenshots, or customer-facing documents. If the key is exposed, delete it, create a new key, and update the connection in ChatbotX.
## Connect SendGrid to ChatbotX
In your ChatbotX workspace, select **Settings** from the left menu.
Select the **Integrations** tab, then open **SendGrid**.
Select **Connect** to open the **Connect SendGrid** window.
Paste the key into the **API Key** field, then select **Confirm**.
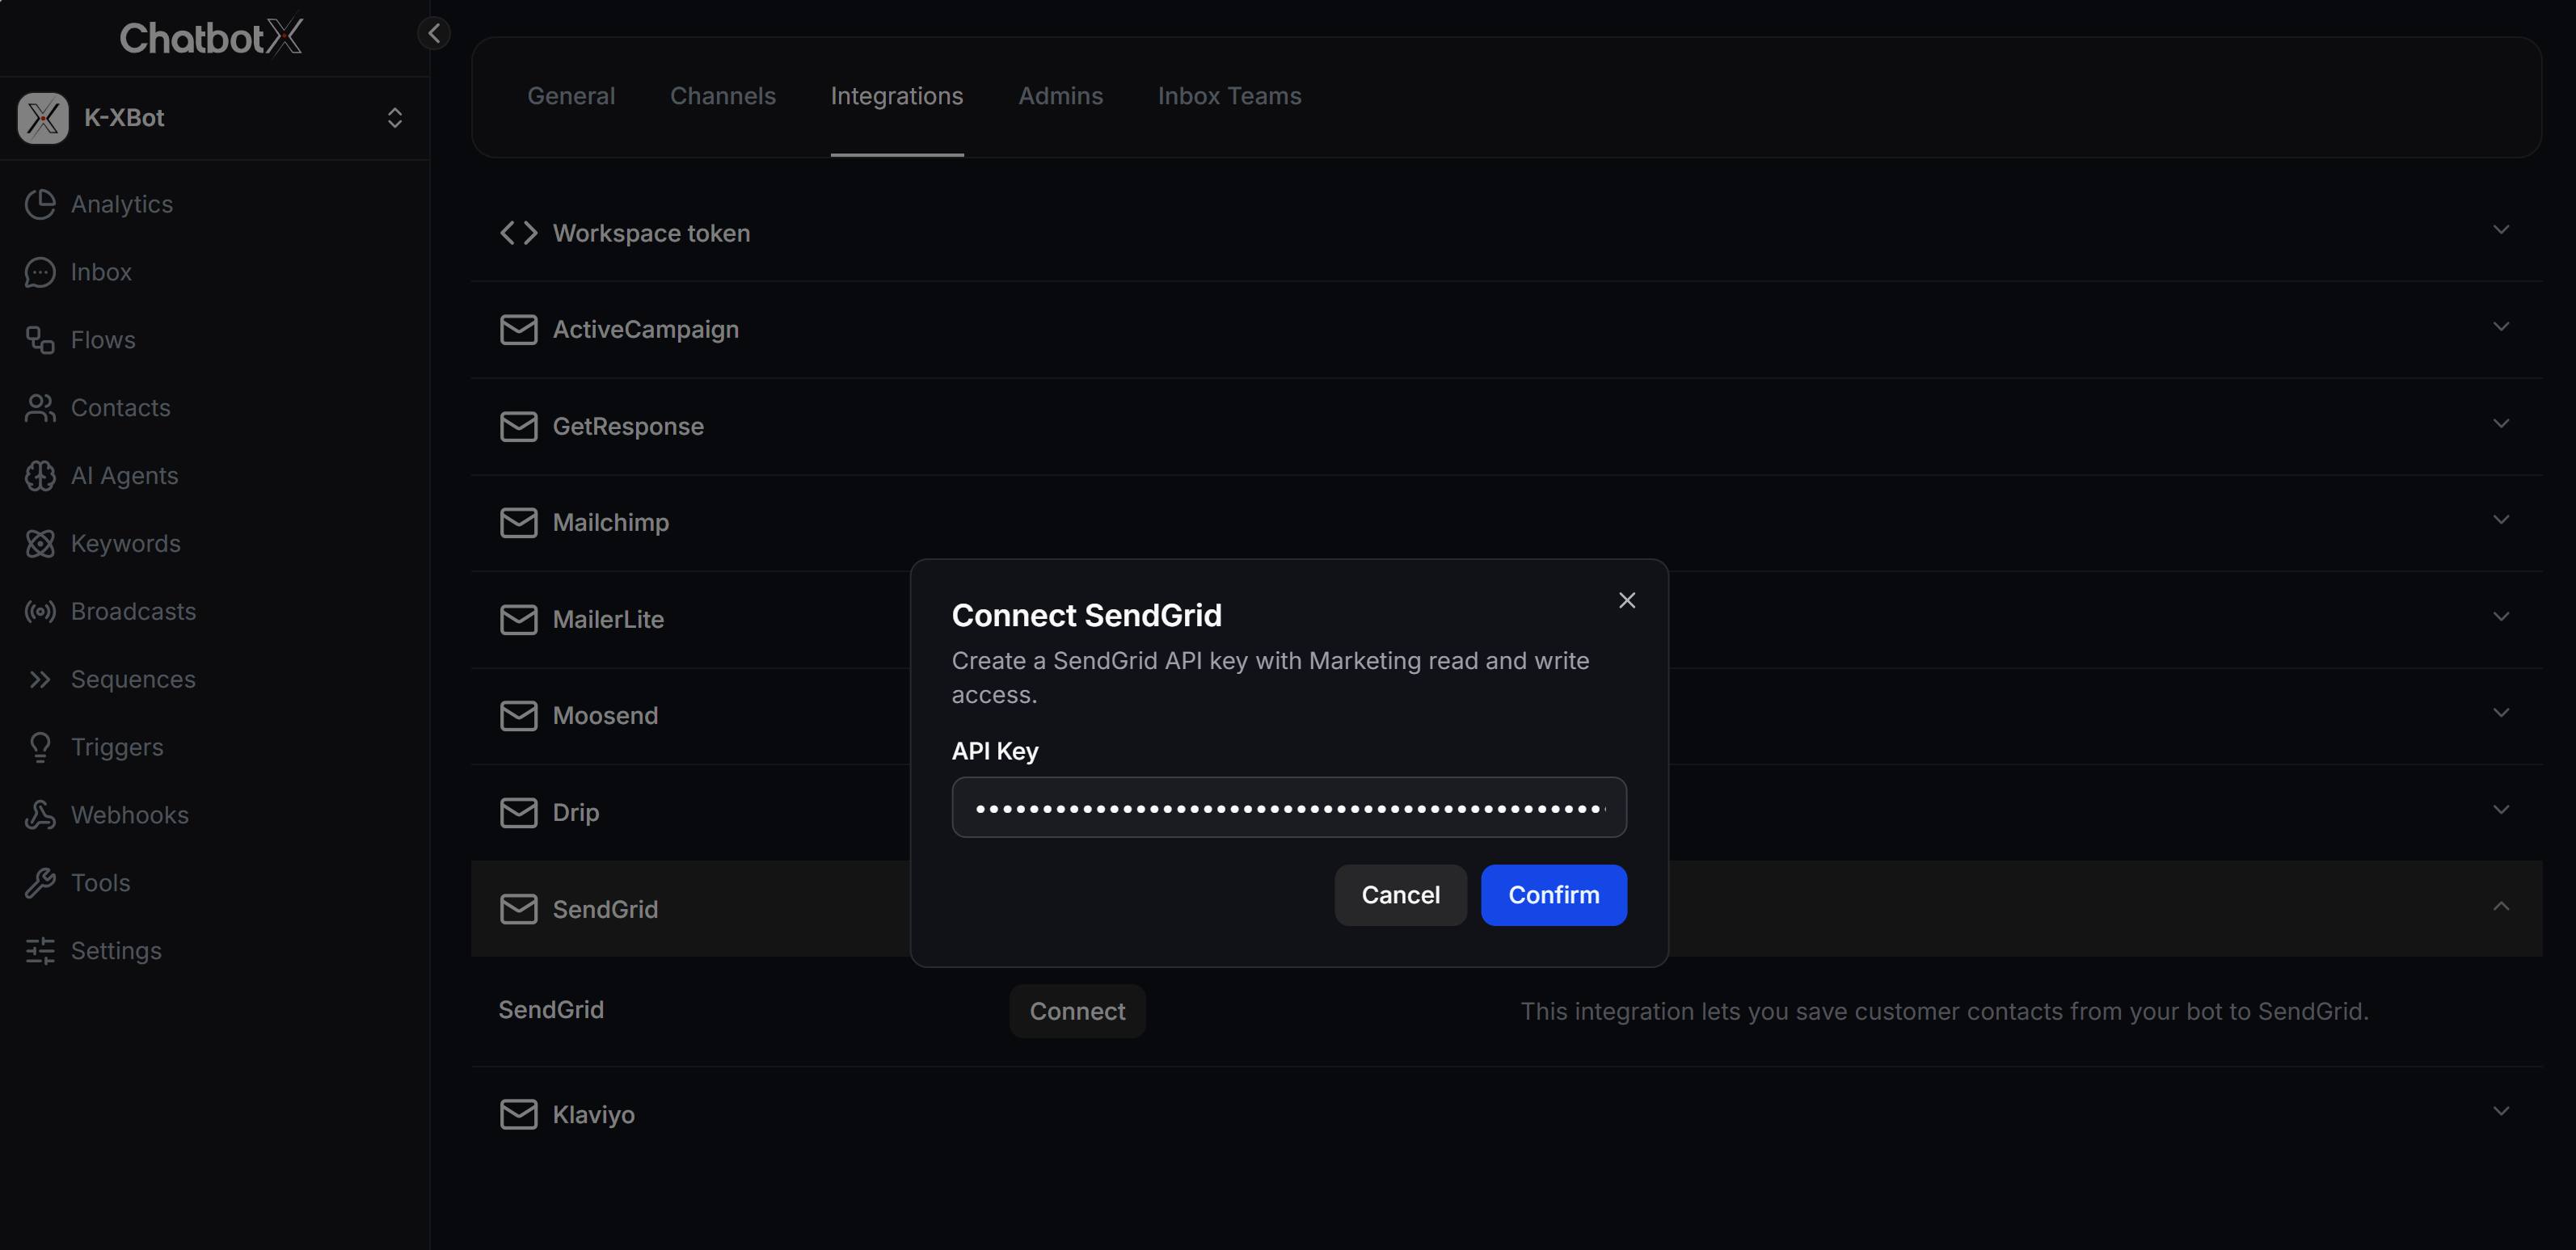 After the key is verified and has the required Marketing permissions, ChatbotX saves the connection and loads SendGrid Lists and Custom Fields for use in Flows.
## Add SendGrid to a Flow
Place the SendGrid action after collecting the email address and other data that you want to sync. The email address must be valid so SendGrid can identify the Marketing Contact.
Select **Flows**, then open the Flow that you want to use to collect contacts.
In the Send Message node, select **+ Create**, then select **Actions**.
Open **Email Actions** and select **Add Contact to SendGrid**.
After the key is verified and has the required Marketing permissions, ChatbotX saves the connection and loads SendGrid Lists and Custom Fields for use in Flows.
## Add SendGrid to a Flow
Place the SendGrid action after collecting the email address and other data that you want to sync. The email address must be valid so SendGrid can identify the Marketing Contact.
Select **Flows**, then open the Flow that you want to use to collect contacts.
In the Send Message node, select **+ Create**, then select **Actions**.
Open **Email Actions** and select **Add Contact to SendGrid**.
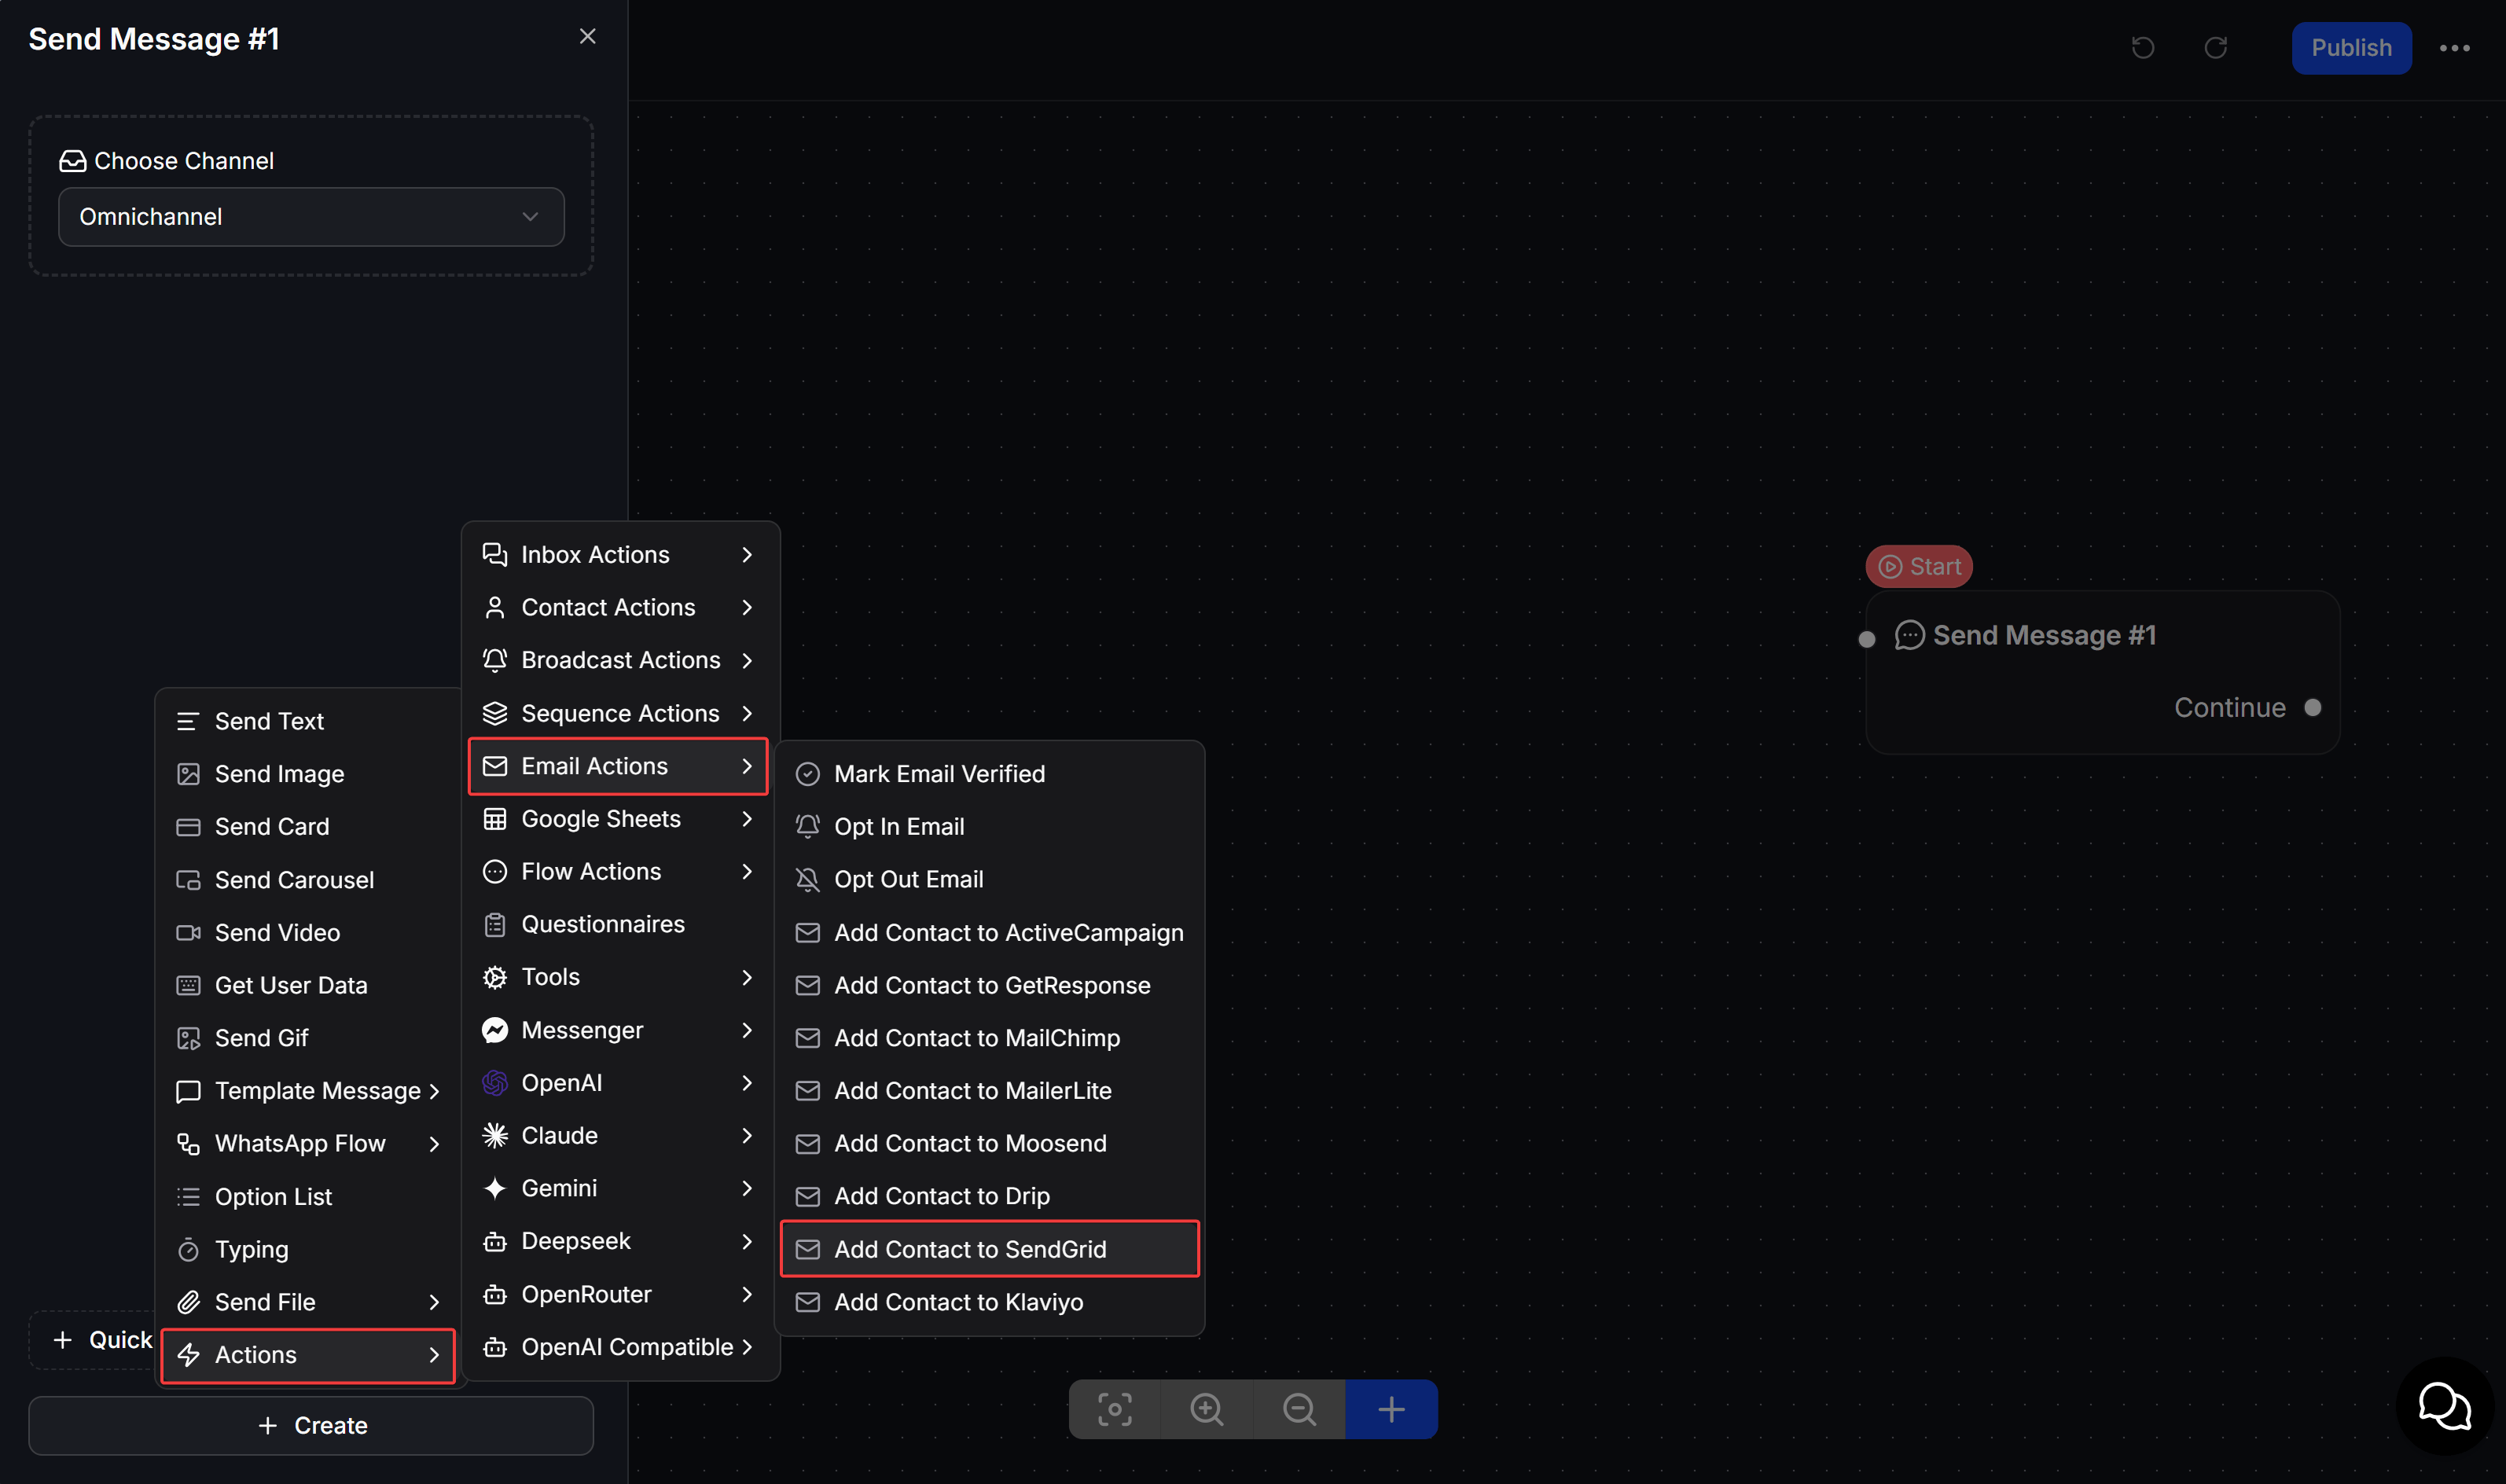 Select **Edit** on the action to choose a List and sync contact data.
## Configure Add Contact to SendGrid
Configure the fields in the **SendGrid** window, then select **Save**.
| Field | Configuration |
| ----------------------------- | ------------------------------------------------------------------------------------------------------------------------------------------------------------------------------ |
| **List** | Select the List that receives the Marketing Contact. If you leave this field empty, SendGrid still creates or updates the contact in **All Contacts**. This field is optional. |
| **Email field** | Select the ChatbotX field that stores the customer's email address. SendGrid uses the email address to create a new contact or update an existing contact. |
| **Phone field** | Select the phone number field to sync with SendGrid. This field is optional. |
| **Custom Fields in SendGrid** | Select a ChatbotX field on the left and its corresponding SendGrid Custom Field on the right. Select **+ Add custom field** to add another sync row. |
Select **Edit** on the action to choose a List and sync contact data.
## Configure Add Contact to SendGrid
Configure the fields in the **SendGrid** window, then select **Save**.
| Field | Configuration |
| ----------------------------- | ------------------------------------------------------------------------------------------------------------------------------------------------------------------------------ |
| **List** | Select the List that receives the Marketing Contact. If you leave this field empty, SendGrid still creates or updates the contact in **All Contacts**. This field is optional. |
| **Email field** | Select the ChatbotX field that stores the customer's email address. SendGrid uses the email address to create a new contact or update an existing contact. |
| **Phone field** | Select the phone number field to sync with SendGrid. This field is optional. |
| **Custom Fields in SendGrid** | Select a ChatbotX field on the left and its corresponding SendGrid Custom Field on the right. Select **+ Add custom field** to add another sync row. |
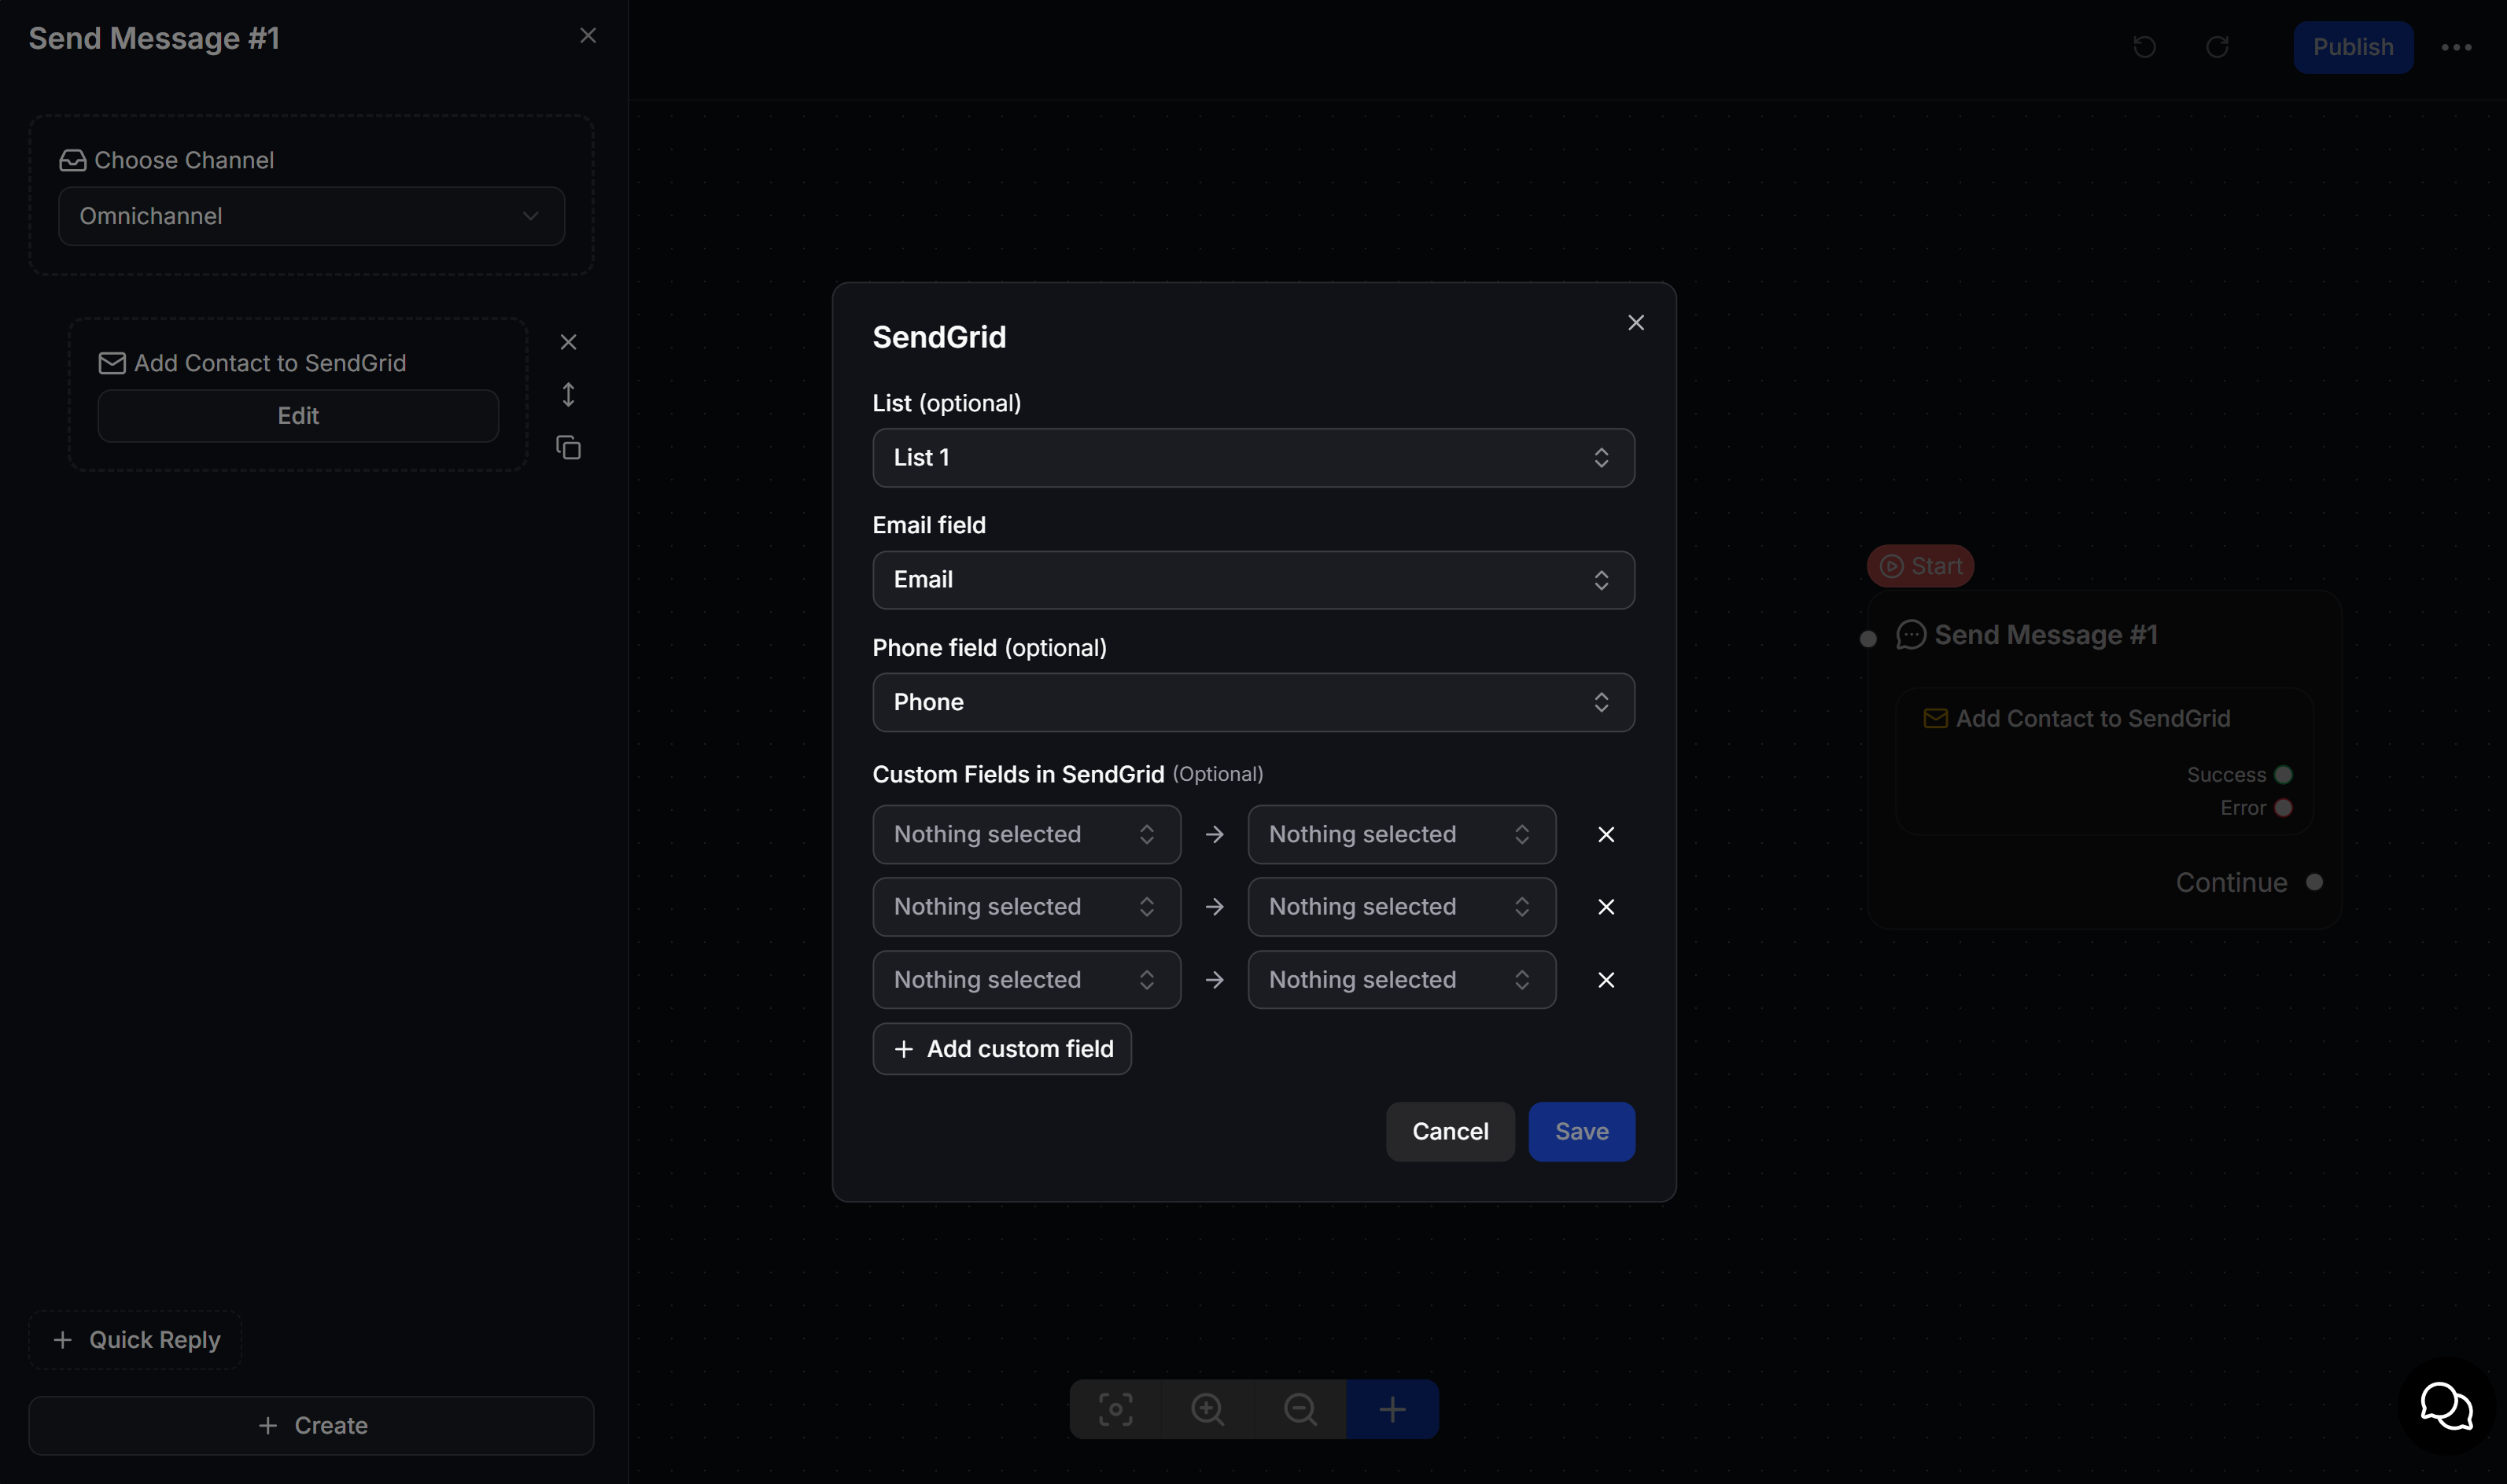 The action provides two outcomes that you can connect to the next nodes in the Flow:
* **Success**: SendGrid accepted and queued the request to create or update the contact.
* **Error**: SendGrid rejected the request because the email address, API Key, permissions, or synced data is invalid.
Connect each outcome to a different node to send a confirmation or handle the error.
SendGrid processes contact creation and updates asynchronously. A contact might not appear immediately in **Marketing > Contacts** even after the Flow follows the **Success** branch.
## Sync Custom Fields
Custom Fields store additional data for contact segmentation and email personalization.
Before configuring the action, create the required Custom Fields in **Marketing > Contacts** in SendGrid. Then select a ChatbotX field with a compatible data type for each SendGrid Custom Field.
For example:
| SendGrid data | Recommended ChatbotX data |
| ---------------- | --------------------------------------------------------------------------- |
| Product interest | A Custom Field that stores the type of product the customer wants. |
| Location | A Custom Field that stores the customer's province, city, or delivery area. |
| Birthday | A Custom Field that stores the customer's birthday in the required format. |
## Example: Collect customers for product updates
A fashion retailer wants to add chatbot subscribers to a List for new collection announcements.
Use Get User Data to ask for the customer's email address, phone number, and product interest.
Run **Add Contact to SendGrid**, then select the destination List and the **Email** field.
Select the **Phone** field and sync the product interest to its corresponding Custom Field.
Connect **Success** to a confirmation message. Connect **Error** to a branch that asks the customer to check their information or transfers the conversation to a team member.
## Test the integration
Before you Publish the Flow, test it with an email address that you can access.
* Open **Marketing > Contacts** in SendGrid and wait for the contact to appear.
* Confirm that the contact belongs to the correct List if you selected one.
* Confirm that the email address, phone number, and Custom Fields contain the correct data.
* Confirm that the Flow follows the **Success** branch for a valid email address.
* Enter an invalid email address to test the **Error** branch.
* If Lists or Custom Fields do not appear, review the API Key's Marketing permissions and reconnect the integration.
Add contacts to email marketing campaigns only after they agree to receive messages. Creating a Marketing Contact does not confirm consent or replace your unsubscribe process.
The action provides two outcomes that you can connect to the next nodes in the Flow:
* **Success**: SendGrid accepted and queued the request to create or update the contact.
* **Error**: SendGrid rejected the request because the email address, API Key, permissions, or synced data is invalid.
Connect each outcome to a different node to send a confirmation or handle the error.
SendGrid processes contact creation and updates asynchronously. A contact might not appear immediately in **Marketing > Contacts** even after the Flow follows the **Success** branch.
## Sync Custom Fields
Custom Fields store additional data for contact segmentation and email personalization.
Before configuring the action, create the required Custom Fields in **Marketing > Contacts** in SendGrid. Then select a ChatbotX field with a compatible data type for each SendGrid Custom Field.
For example:
| SendGrid data | Recommended ChatbotX data |
| ---------------- | --------------------------------------------------------------------------- |
| Product interest | A Custom Field that stores the type of product the customer wants. |
| Location | A Custom Field that stores the customer's province, city, or delivery area. |
| Birthday | A Custom Field that stores the customer's birthday in the required format. |
## Example: Collect customers for product updates
A fashion retailer wants to add chatbot subscribers to a List for new collection announcements.
Use Get User Data to ask for the customer's email address, phone number, and product interest.
Run **Add Contact to SendGrid**, then select the destination List and the **Email** field.
Select the **Phone** field and sync the product interest to its corresponding Custom Field.
Connect **Success** to a confirmation message. Connect **Error** to a branch that asks the customer to check their information or transfers the conversation to a team member.
## Test the integration
Before you Publish the Flow, test it with an email address that you can access.
* Open **Marketing > Contacts** in SendGrid and wait for the contact to appear.
* Confirm that the contact belongs to the correct List if you selected one.
* Confirm that the email address, phone number, and Custom Fields contain the correct data.
* Confirm that the Flow follows the **Success** branch for a valid email address.
* Enter an invalid email address to test the **Error** branch.
* If Lists or Custom Fields do not appear, review the API Key's Marketing permissions and reconnect the integration.
Add contacts to email marketing campaigns only after they agree to receive messages. Creating a Marketing Contact does not confirm consent or replace your unsubscribe process.