> ## Documentation Index
> Fetch the complete documentation index at: https://chatbotx.io/docs/llms.txt
> Use this file to discover all available pages before exploring further.
# Omnichannel Broadcasts
> Overview of Broadcasts in ChatbotX to send bulk messages to multiple channels simultaneously to optimize remarketing and customer care campaigns.
**Broadcasts** is a bulk messaging feature that helps you send the same content to multiple contacts at the same time across various channels. Instead of messaging each person manually, you only need to set up the content once and send it with just a few clicks.
This feature is ideal when you want to run remarketing campaigns, send periodic newsletters, update product information, or send important notifications to your target customer segment. To send automated message sequences over time instead of a one-off broadcast, refer to the **Sequences** article.
## Broadcasts List Interface
The **Broadcasts** page is the central hub for managing all your bulk messaging campaigns. Here, you can view the performance metrics of each sent or scheduled campaign.
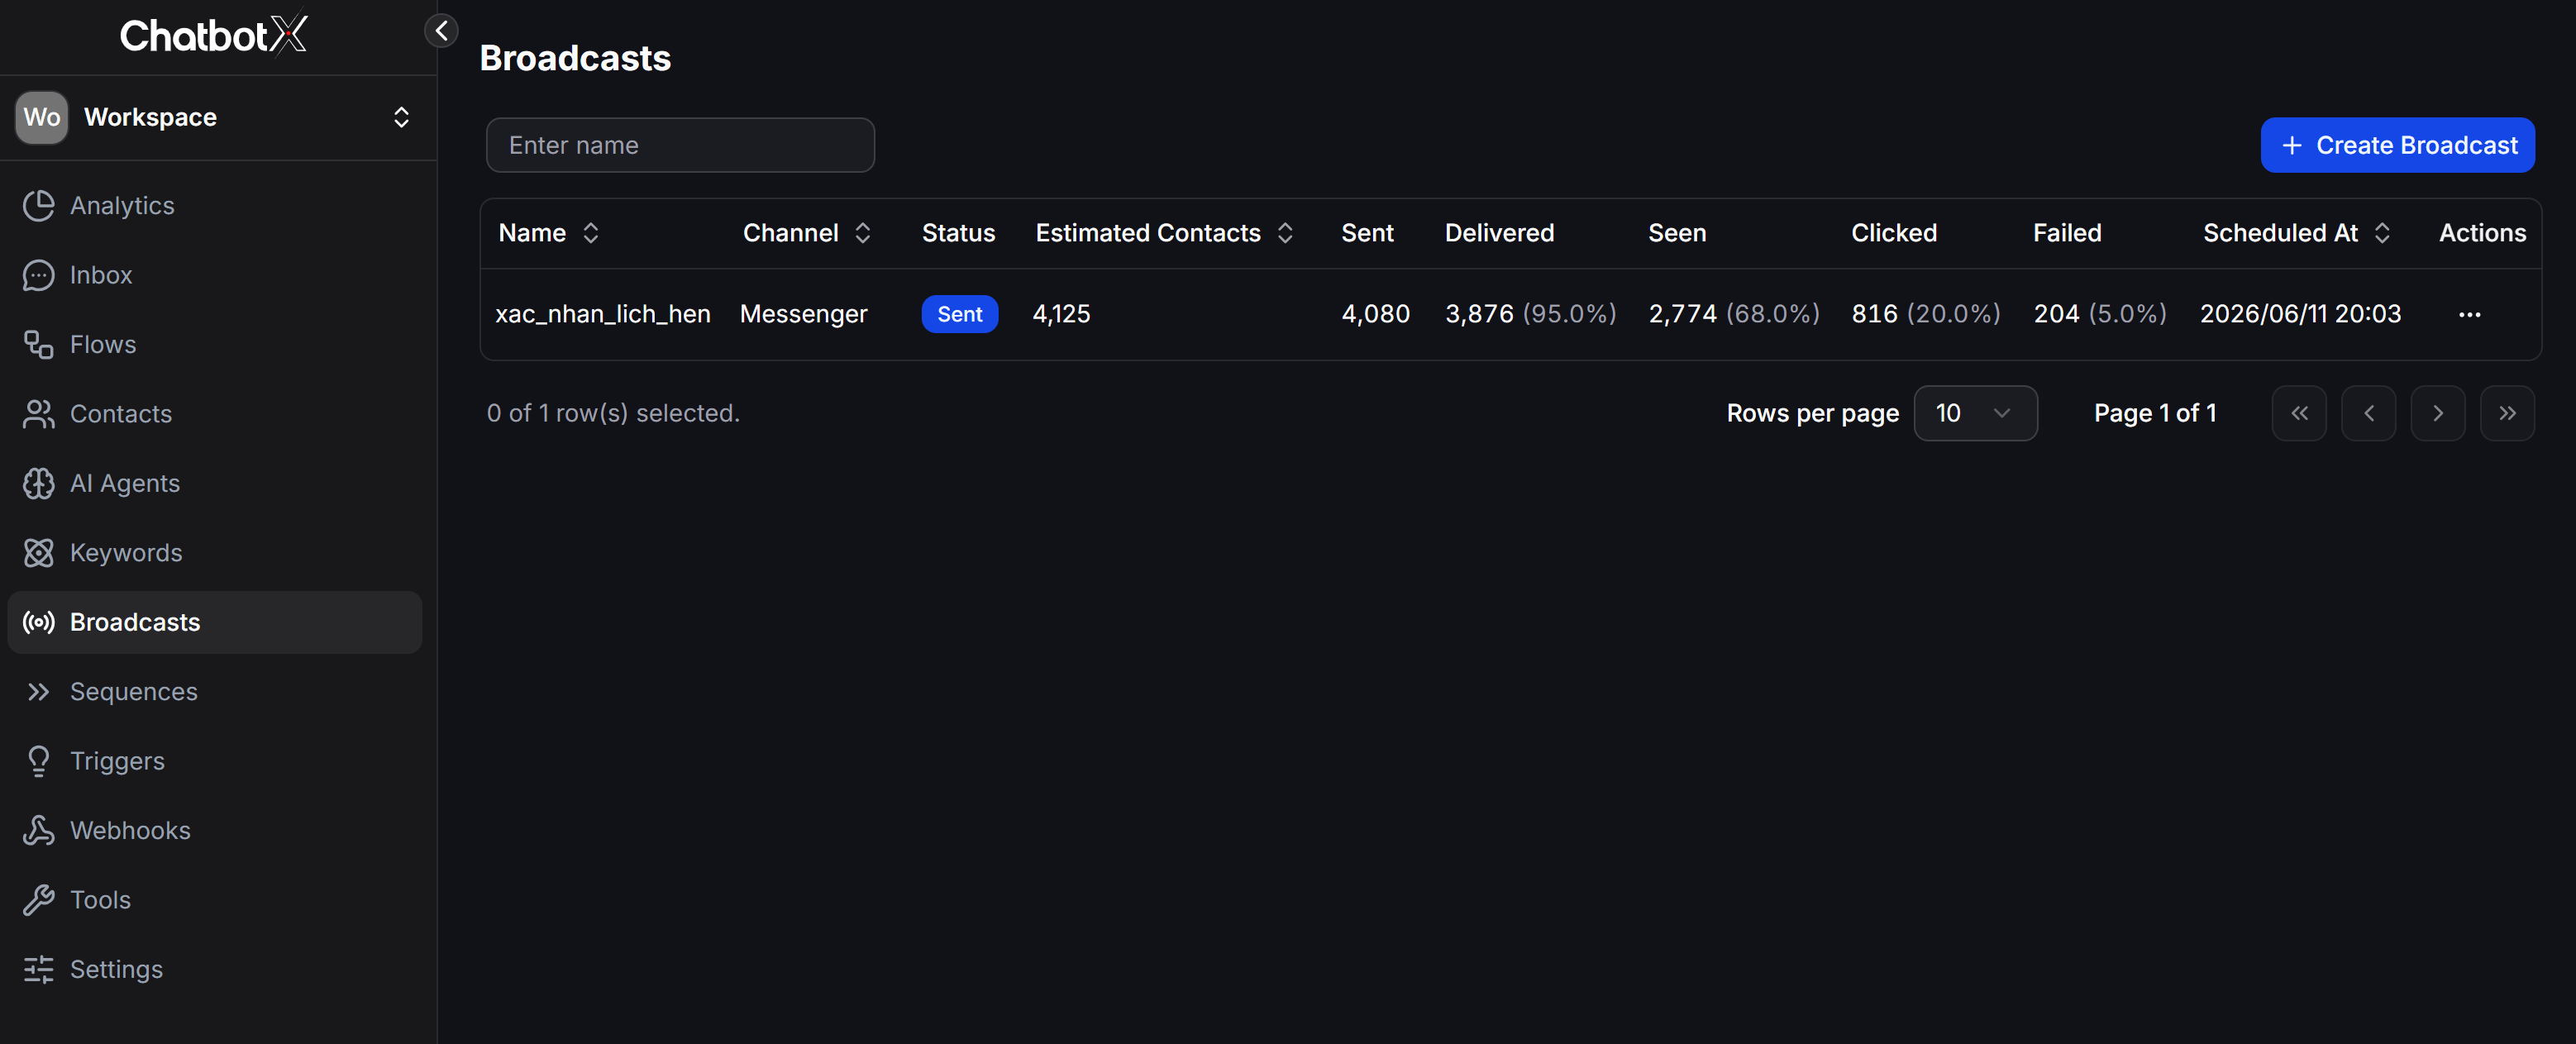 The list table displays performance measurement metrics, including:
| Column | Meaning |
| -------------------- | ------------------------------------------------------------------------------ |
| `Name` | Name of the Broadcast campaign for quick identification |
| `Channel` | Messaging channel (Messenger, WhatsApp, Zalo OA...) |
| `Status` | Message status: `Sent` (sent), `Scheduled` (scheduled), `Sending` (sending)... |
| `Estimated Contacts` | Estimated number of contacts to receive the message |
| `Sent` | Actual number of messages sent out |
| `Delivered` | Number and percentage of messages successfully delivered to customer devices |
| `Seen` | Number and percentage of customers who opened and viewed the message |
| `Clicked` | Number and percentage of customers who clicked links or buttons in the message |
| `Failed` | Number and percentage of failed messages |
| `Scheduled At` | Date and time the message was sent or is scheduled to send |
| `Actions` | Operations such as duplicating, editing, or deleting the campaign |
You can search for a campaign quickly using the **Enter name** input box at the top left of the list.
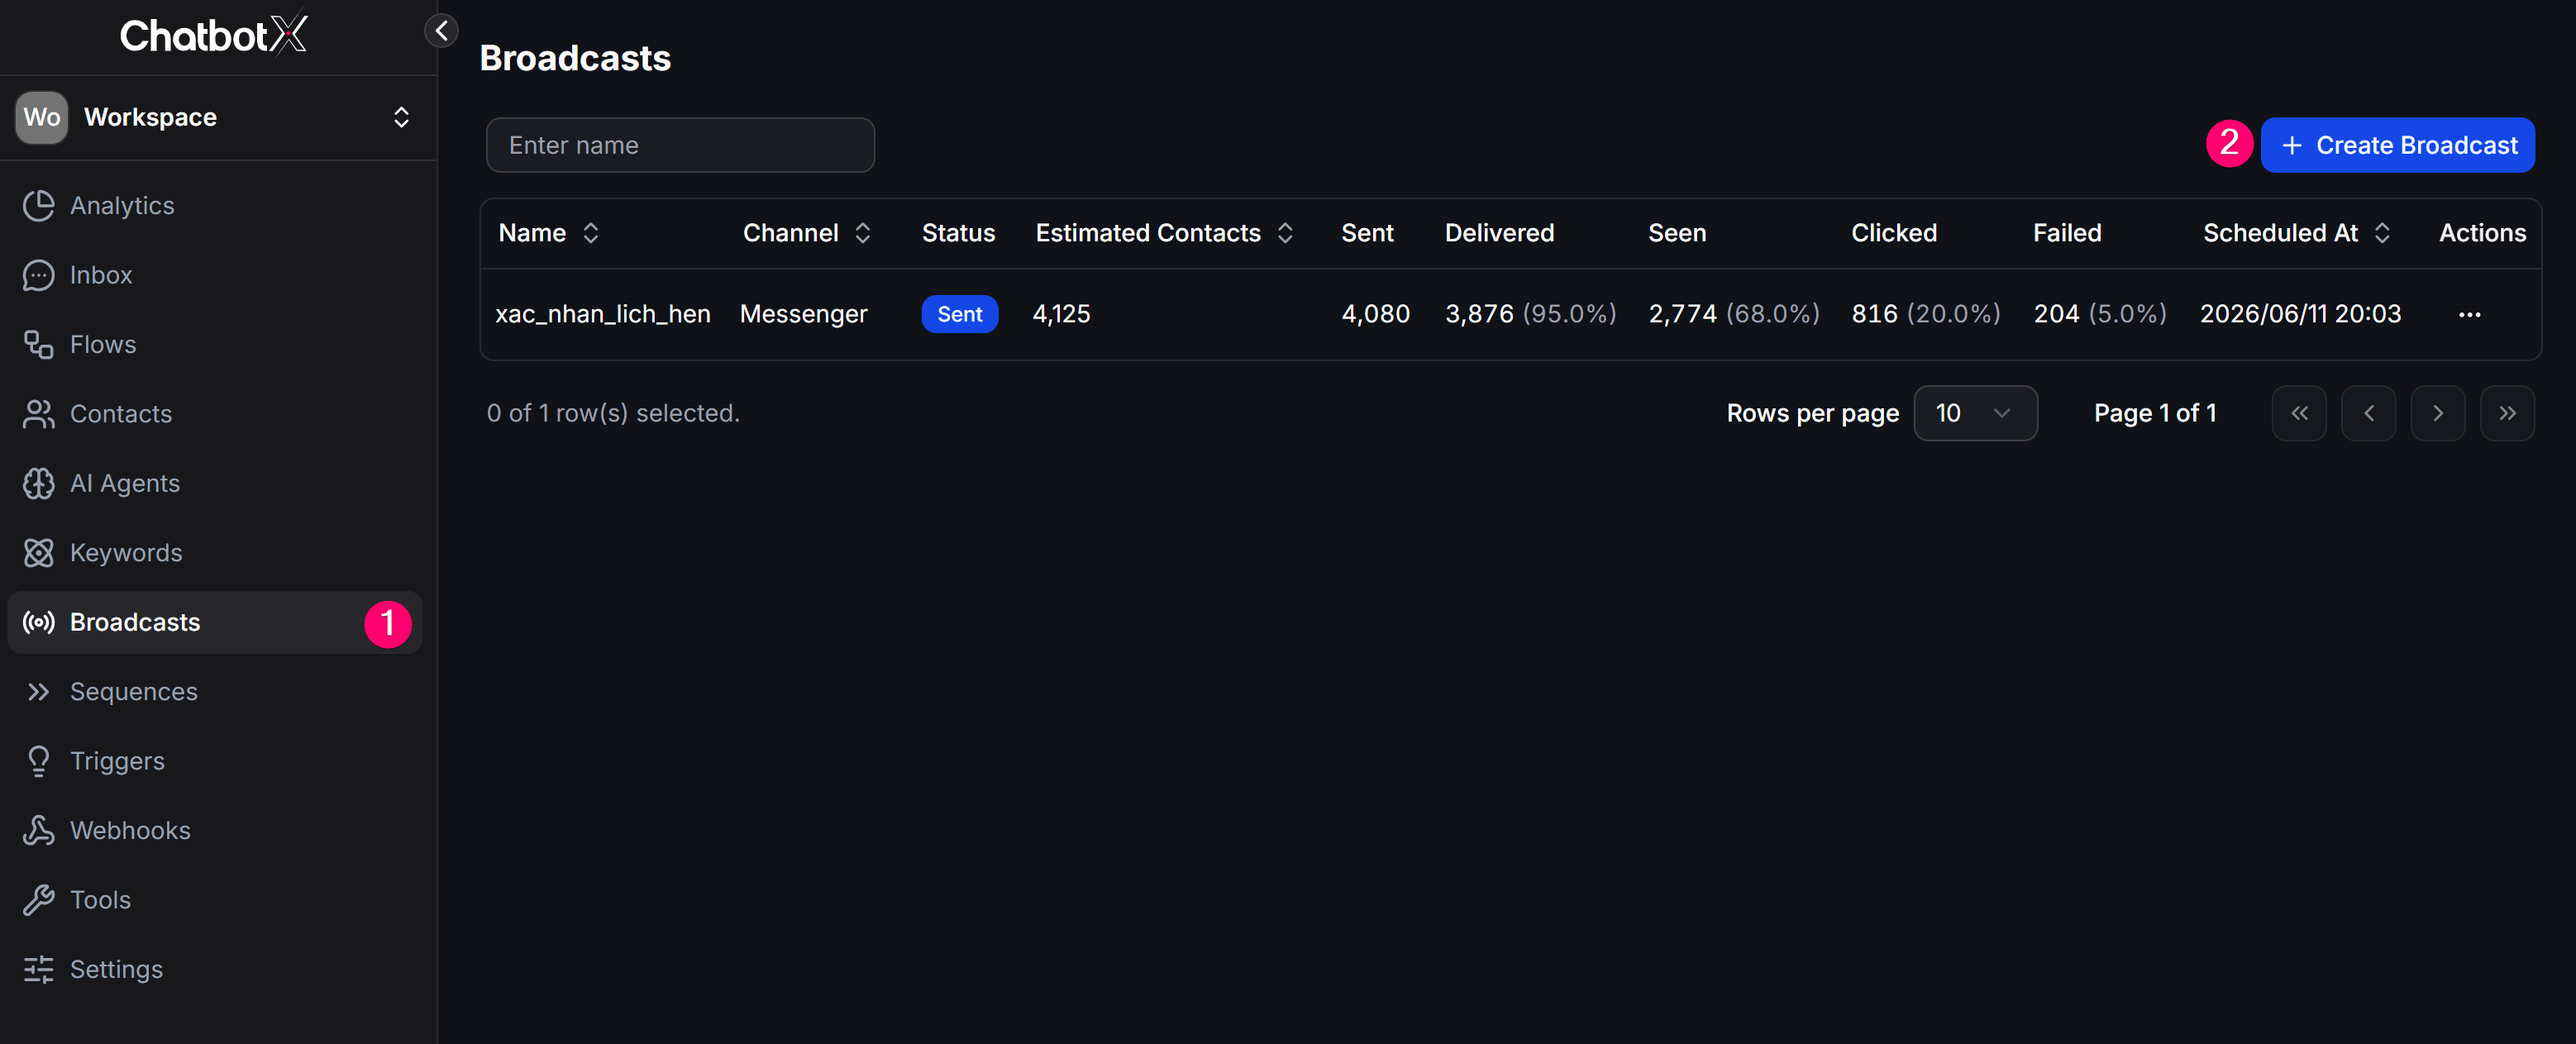
## Basic Guide to Creating a Broadcast
The basic process of creating a bulk messaging campaign in ChatbotX involves the following steps:
From the left menu, select **Broadcasts**, then click the **+ Create Broadcast** button in the top right corner of the screen.
The list table displays performance measurement metrics, including:
| Column | Meaning |
| -------------------- | ------------------------------------------------------------------------------ |
| `Name` | Name of the Broadcast campaign for quick identification |
| `Channel` | Messaging channel (Messenger, WhatsApp, Zalo OA...) |
| `Status` | Message status: `Sent` (sent), `Scheduled` (scheduled), `Sending` (sending)... |
| `Estimated Contacts` | Estimated number of contacts to receive the message |
| `Sent` | Actual number of messages sent out |
| `Delivered` | Number and percentage of messages successfully delivered to customer devices |
| `Seen` | Number and percentage of customers who opened and viewed the message |
| `Clicked` | Number and percentage of customers who clicked links or buttons in the message |
| `Failed` | Number and percentage of failed messages |
| `Scheduled At` | Date and time the message was sent or is scheduled to send |
| `Actions` | Operations such as duplicating, editing, or deleting the campaign |
You can search for a campaign quickly using the **Enter name** input box at the top left of the list.
## Basic Guide to Creating a Broadcast
The basic process of creating a bulk messaging campaign in ChatbotX involves the following steps:
From the left menu, select **Broadcasts**, then click the **+ Create Broadcast** button in the top right corner of the screen.
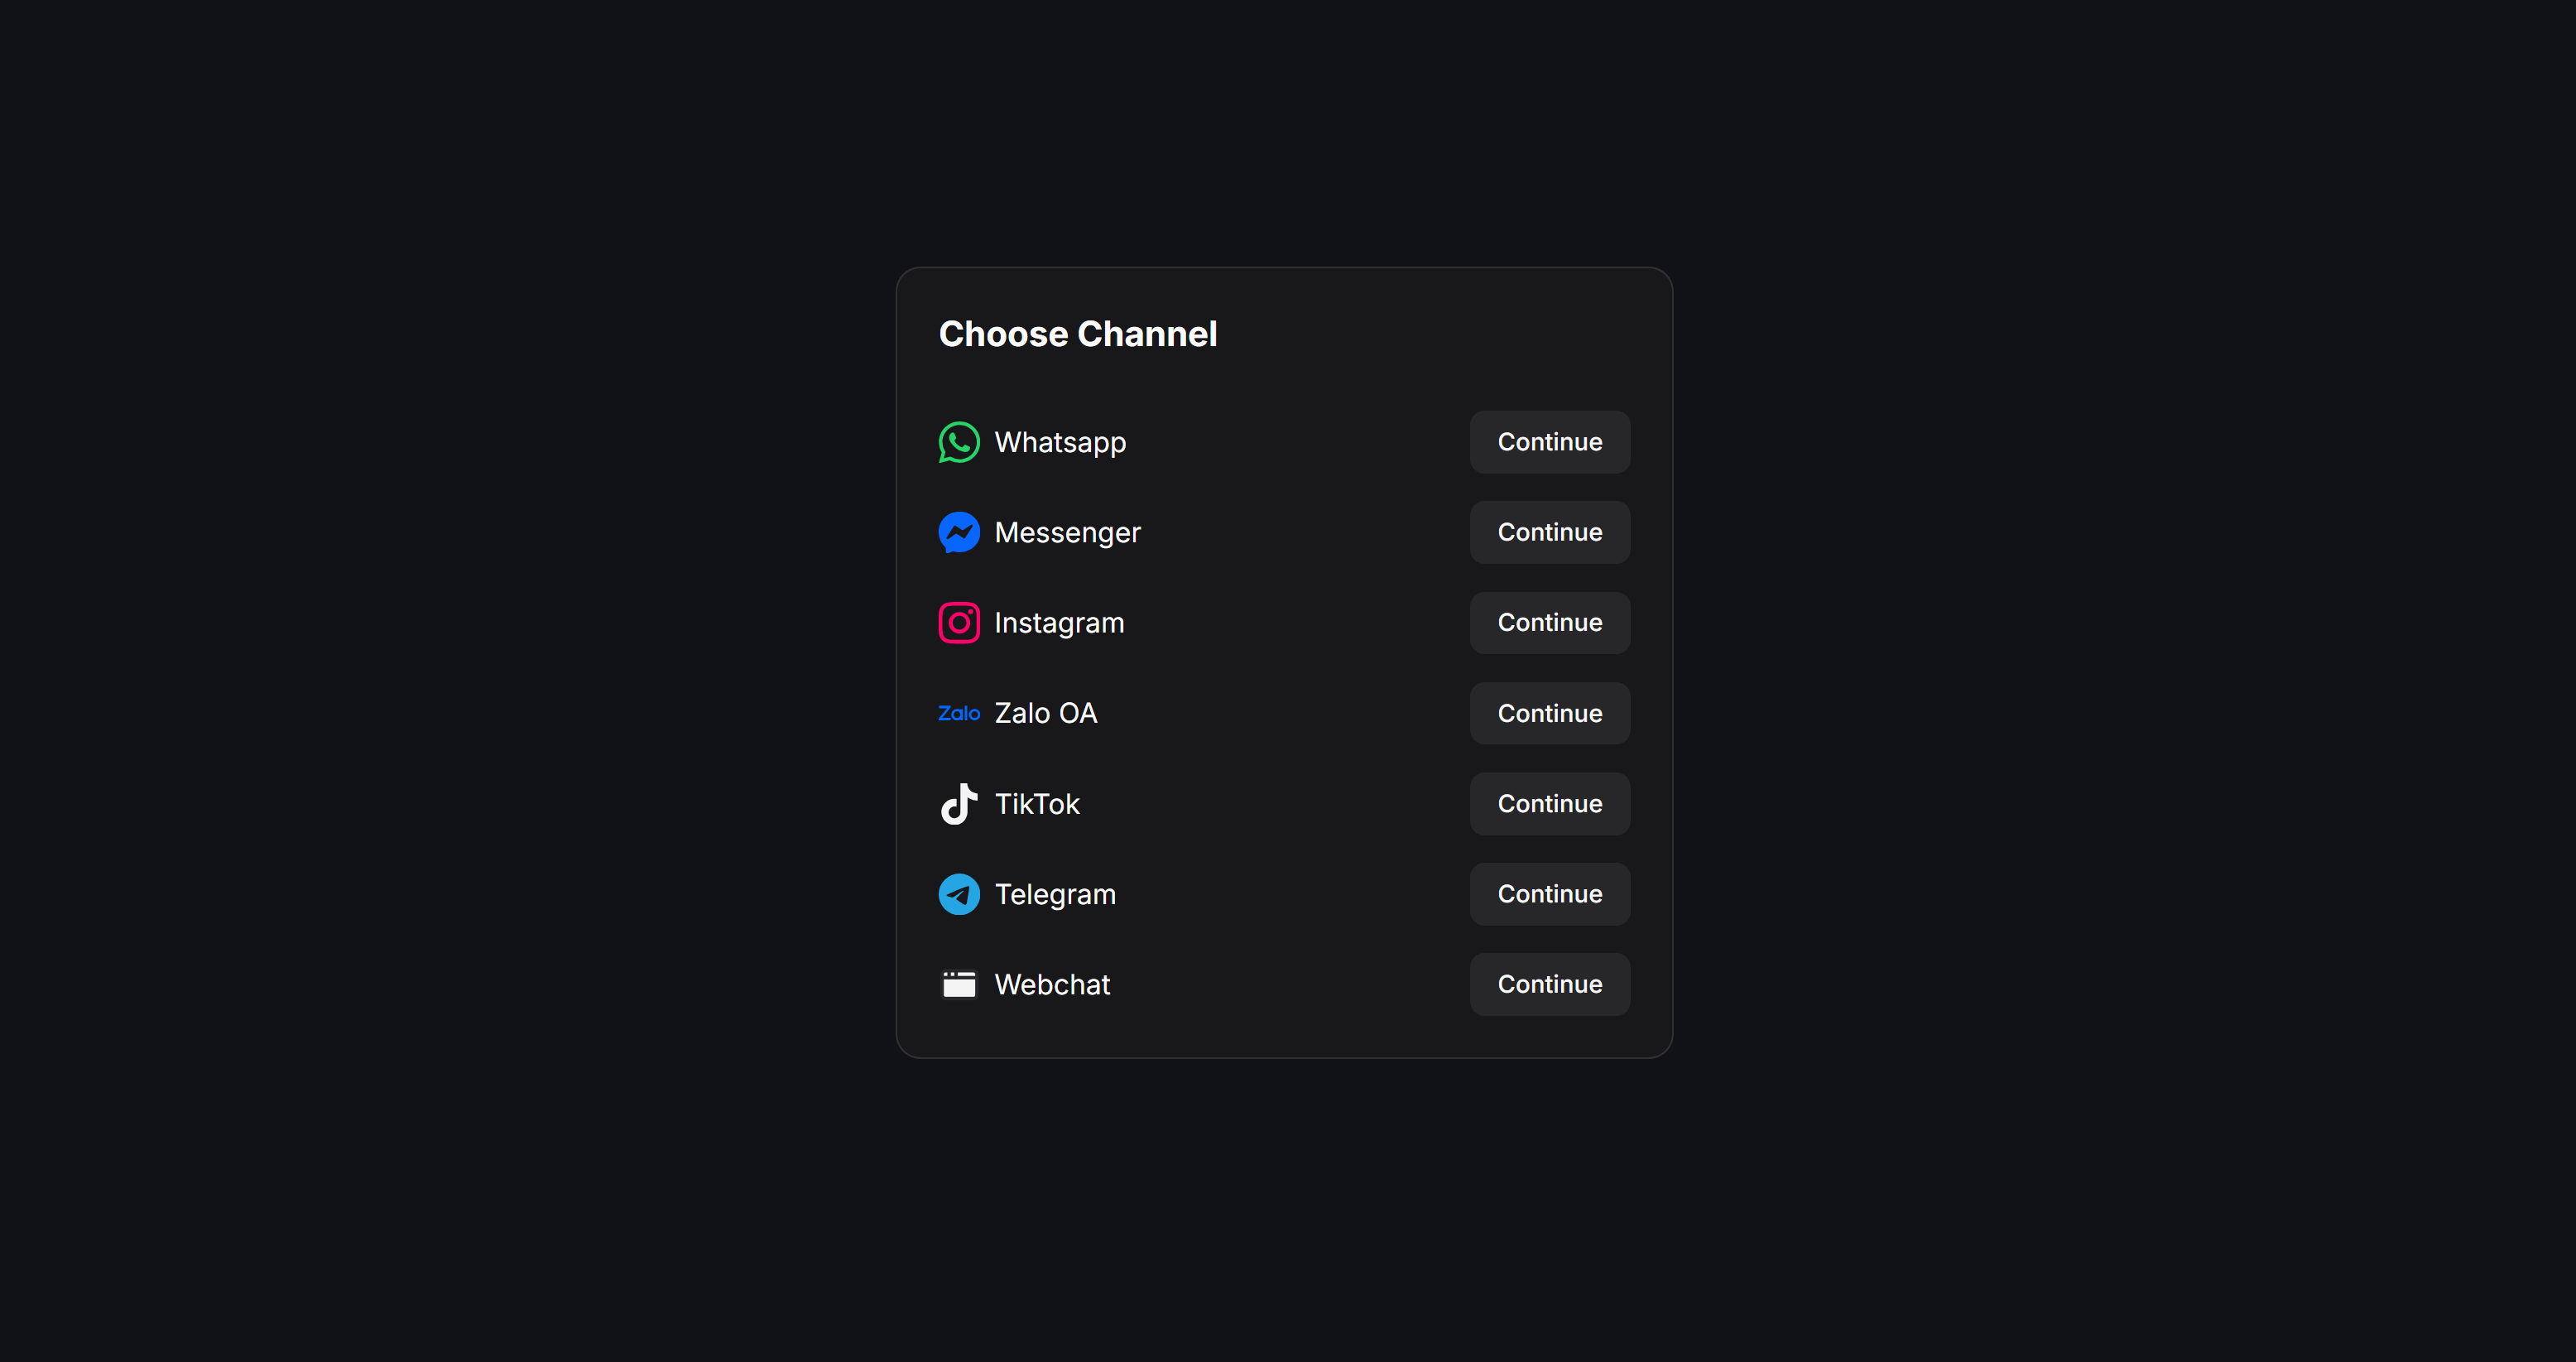
 The system will redirect you to the **Choose Channel** screen. Here, select 1 channel to send your message:
* **Omnichannel**: Send an automated script to all contacts across all connected channels.
* **Messenger**: Send messages via Facebook Messenger.
* **WhatsApp**: Send messages via WhatsApp Business.
* **Instagram**: Send messages via Instagram Direct.
* **Zalo OA**: Send messages to users following your Zalo Official Account.
* **TikTok**: Send messages via TikTok Business.
* **Telegram**: Send messages via Telegram Bot.
* **Email**: Send bulk emails (requires contacts to have opted in to receive emails).
After choosing the channel, click **Continue** to proceed.
The system will redirect you to the **Choose Channel** screen. Here, select 1 channel to send your message:
* **Omnichannel**: Send an automated script to all contacts across all connected channels.
* **Messenger**: Send messages via Facebook Messenger.
* **WhatsApp**: Send messages via WhatsApp Business.
* **Instagram**: Send messages via Instagram Direct.
* **Zalo OA**: Send messages to users following your Zalo Official Account.
* **TikTok**: Send messages via TikTok Business.
* **Telegram**: Send messages via Telegram Bot.
* **Email**: Send bulk emails (requires contacts to have opted in to receive emails).
After choosing the channel, click **Continue** to proceed.
 ## Configure Schedule and Contact Filter
When configuring the details of the message content, all channels share two common settings for sending time and receiver targets:
## Configure Schedule and Contact Filter
When configuring the details of the message content, all channels share two common settings for sending time and receiver targets:
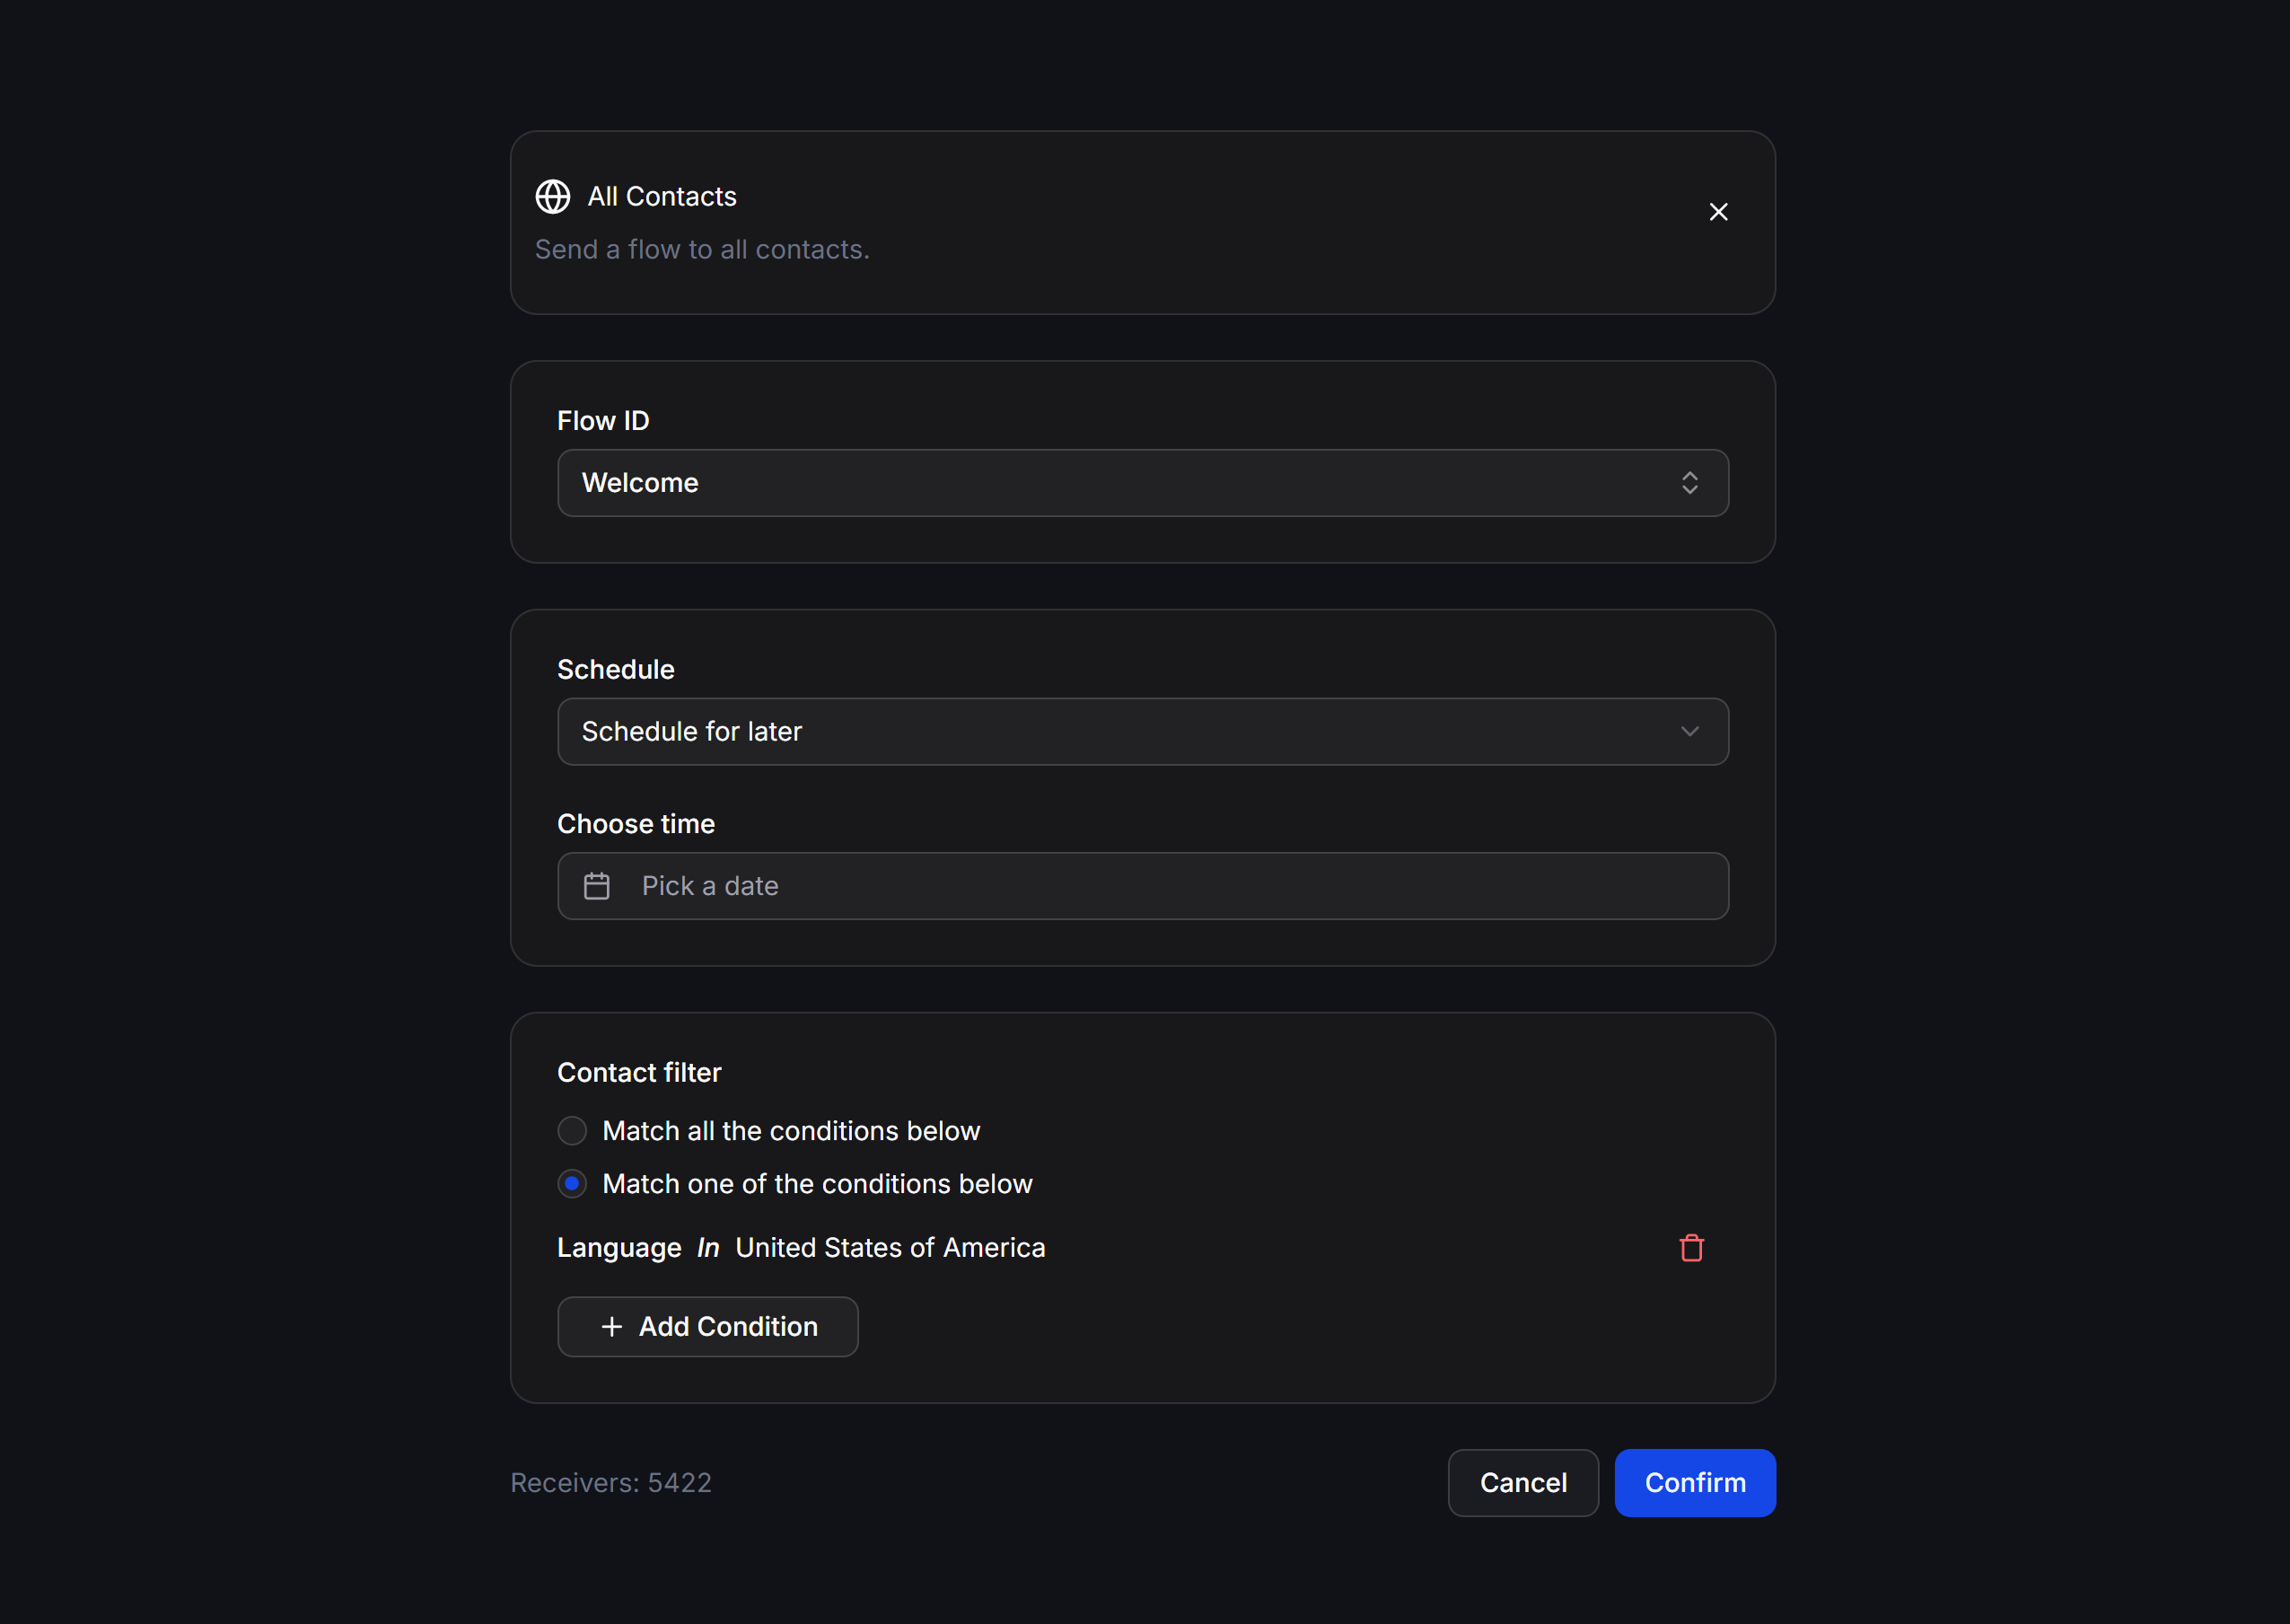 ### Schedule - Sending Time
You can decide when to run the messaging campaign using these options:
* **Now**: The system will send the messages immediately after you confirm the campaign.
* **Schedule for later**: Schedule for later by selecting a specific date, time, and timezone. This feature allows you to prepare content in advance and send it during golden hours with high open rates.
### Contact Filter - Receiver Target Filters
Filters help you target the exact group of customers you want to message, avoiding generic spam that could harm your channel's reputation.
* **Match all the conditions below**: Customers must match all added conditions (AND logic - filters a specific, deep audience).
* **Match one of the conditions below**: Customers only need to match one of the added conditions (OR logic - expands the receiver list).
* **+ Add Condition**: Click to add a new filter condition based on attributes such as Tag, Custom Field, Active Channel, or interaction time.
The system will automatically calculate and display the number of customers matching the filters in the **Receivers** section at the bottom of the screen. Always check this number before clicking the confirm button.
## Operating Tips for High Effectiveness
* Name campaigns with a consistent syntax for easy tracking in the list table, for example: `[Channel] - [Goal] - [Send Date]` (e.g., `Zalo - Maintenance Notice - 1806`).
* Filter your customer segment thoroughly using the **Contact filter** to ensure the sent content matches their needs, which increases the open rate (`Seen`) and reduces user spam reports.
* For scheduled campaigns, double-check the linked chatbot script (**Flow ID**) to ensure that all buttons and content within the script still function correctly before the scheduled sending time.
### Schedule - Sending Time
You can decide when to run the messaging campaign using these options:
* **Now**: The system will send the messages immediately after you confirm the campaign.
* **Schedule for later**: Schedule for later by selecting a specific date, time, and timezone. This feature allows you to prepare content in advance and send it during golden hours with high open rates.
### Contact Filter - Receiver Target Filters
Filters help you target the exact group of customers you want to message, avoiding generic spam that could harm your channel's reputation.
* **Match all the conditions below**: Customers must match all added conditions (AND logic - filters a specific, deep audience).
* **Match one of the conditions below**: Customers only need to match one of the added conditions (OR logic - expands the receiver list).
* **+ Add Condition**: Click to add a new filter condition based on attributes such as Tag, Custom Field, Active Channel, or interaction time.
The system will automatically calculate and display the number of customers matching the filters in the **Receivers** section at the bottom of the screen. Always check this number before clicking the confirm button.
## Operating Tips for High Effectiveness
* Name campaigns with a consistent syntax for easy tracking in the list table, for example: `[Channel] - [Goal] - [Send Date]` (e.g., `Zalo - Maintenance Notice - 1806`).
* Filter your customer segment thoroughly using the **Contact filter** to ensure the sent content matches their needs, which increases the open rate (`Seen`) and reduces user spam reports.
* For scheduled campaigns, double-check the linked chatbot script (**Flow ID**) to ensure that all buttons and content within the script still function correctly before the scheduled sending time.