> ## Documentation Index
> Fetch the complete documentation index at: https://chatbotx.io/docs/llms.txt
> Use this file to discover all available pages before exploring further.
# Send Bulk Broadcasts across Multiple Pages
> Comprehensive guide to connect multiple Fanpages, scan past contacts, and launch bulk broadcasts across multiple Messenger pages in ChatbotX.
**Send Bulk Broadcast** allows you to initiate promotional or customer care campaigns across multiple Facebook Messenger Pages simultaneously. Instead of manually creating separate campaigns for each Fanpage, ChatbotX enables you to bundle pages into a single broadcast, customize template messages per page, and schedule delivery to all your target contacts seamlessly.
This feature is ideal for multi-location businesses, brands with regional fanpages, or teams managing multiple brand assets who want to save time and ensure brand messages launch in unison.
The complete workflow consists of 3 stages:
1. **Channel Setup:** Connect multiple Facebook Pages via bulk integration.
2. **Contact Preparation:** Automatically scan and sync past conversation contacts.
3. **Launch Broadcast:** Create a broadcast, select multiple pages, map message templates, and schedule delivery.
## Stage 1: Connect Multiple Facebook Pages in Bulk
Before launching a broadcast, ensure your Facebook Pages are connected to ChatbotX.
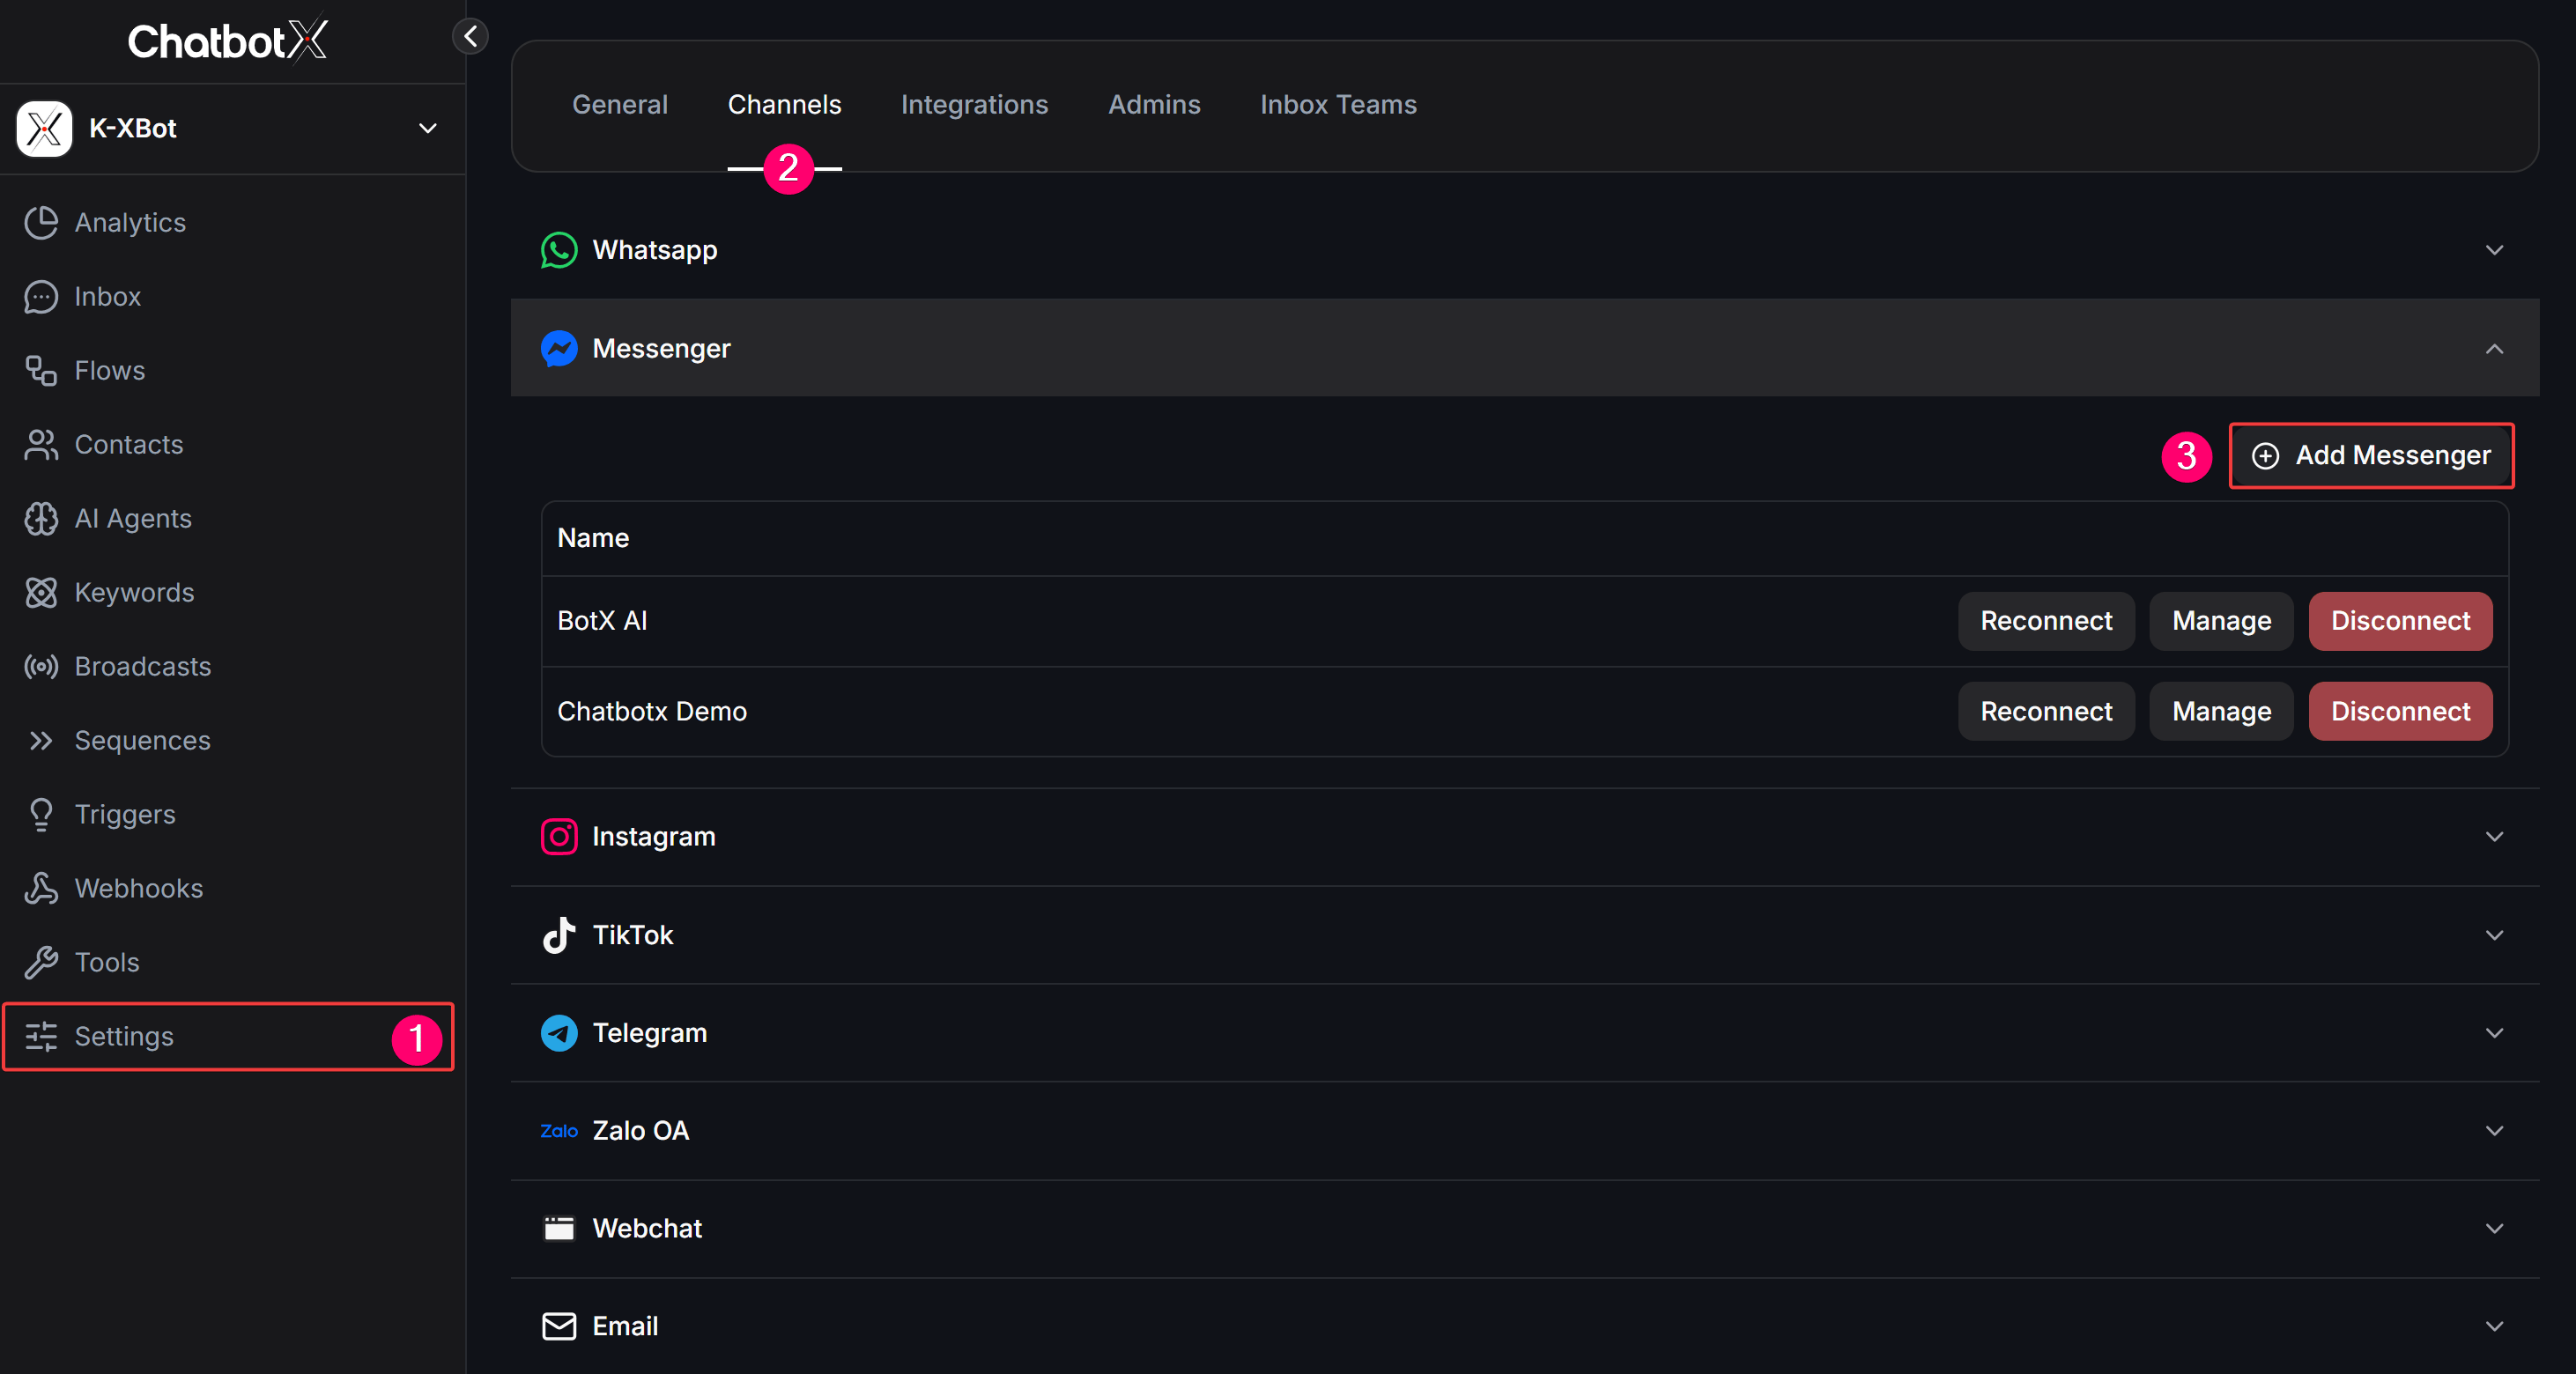
From the left sidebar navigation, click **Settings** (1) > switch to the **Channels** tab (2) > locate **Messenger** and click **+ Add Messenger** (3).
 You will be redirected to the Meta Facebook authorization dialog. Log in with your administrative account, review your pages, and click **Continue** to grant full message management permissions to ChatbotX.
In the **Connect Messenger** dialog, select the pages you want to integrate or check **Select all** to connect all pages at once.
You will be redirected to the Meta Facebook authorization dialog. Log in with your administrative account, review your pages, and click **Continue** to grant full message management permissions to ChatbotX.
In the **Connect Messenger** dialog, select the pages you want to integrate or check **Select all** to connect all pages at once.
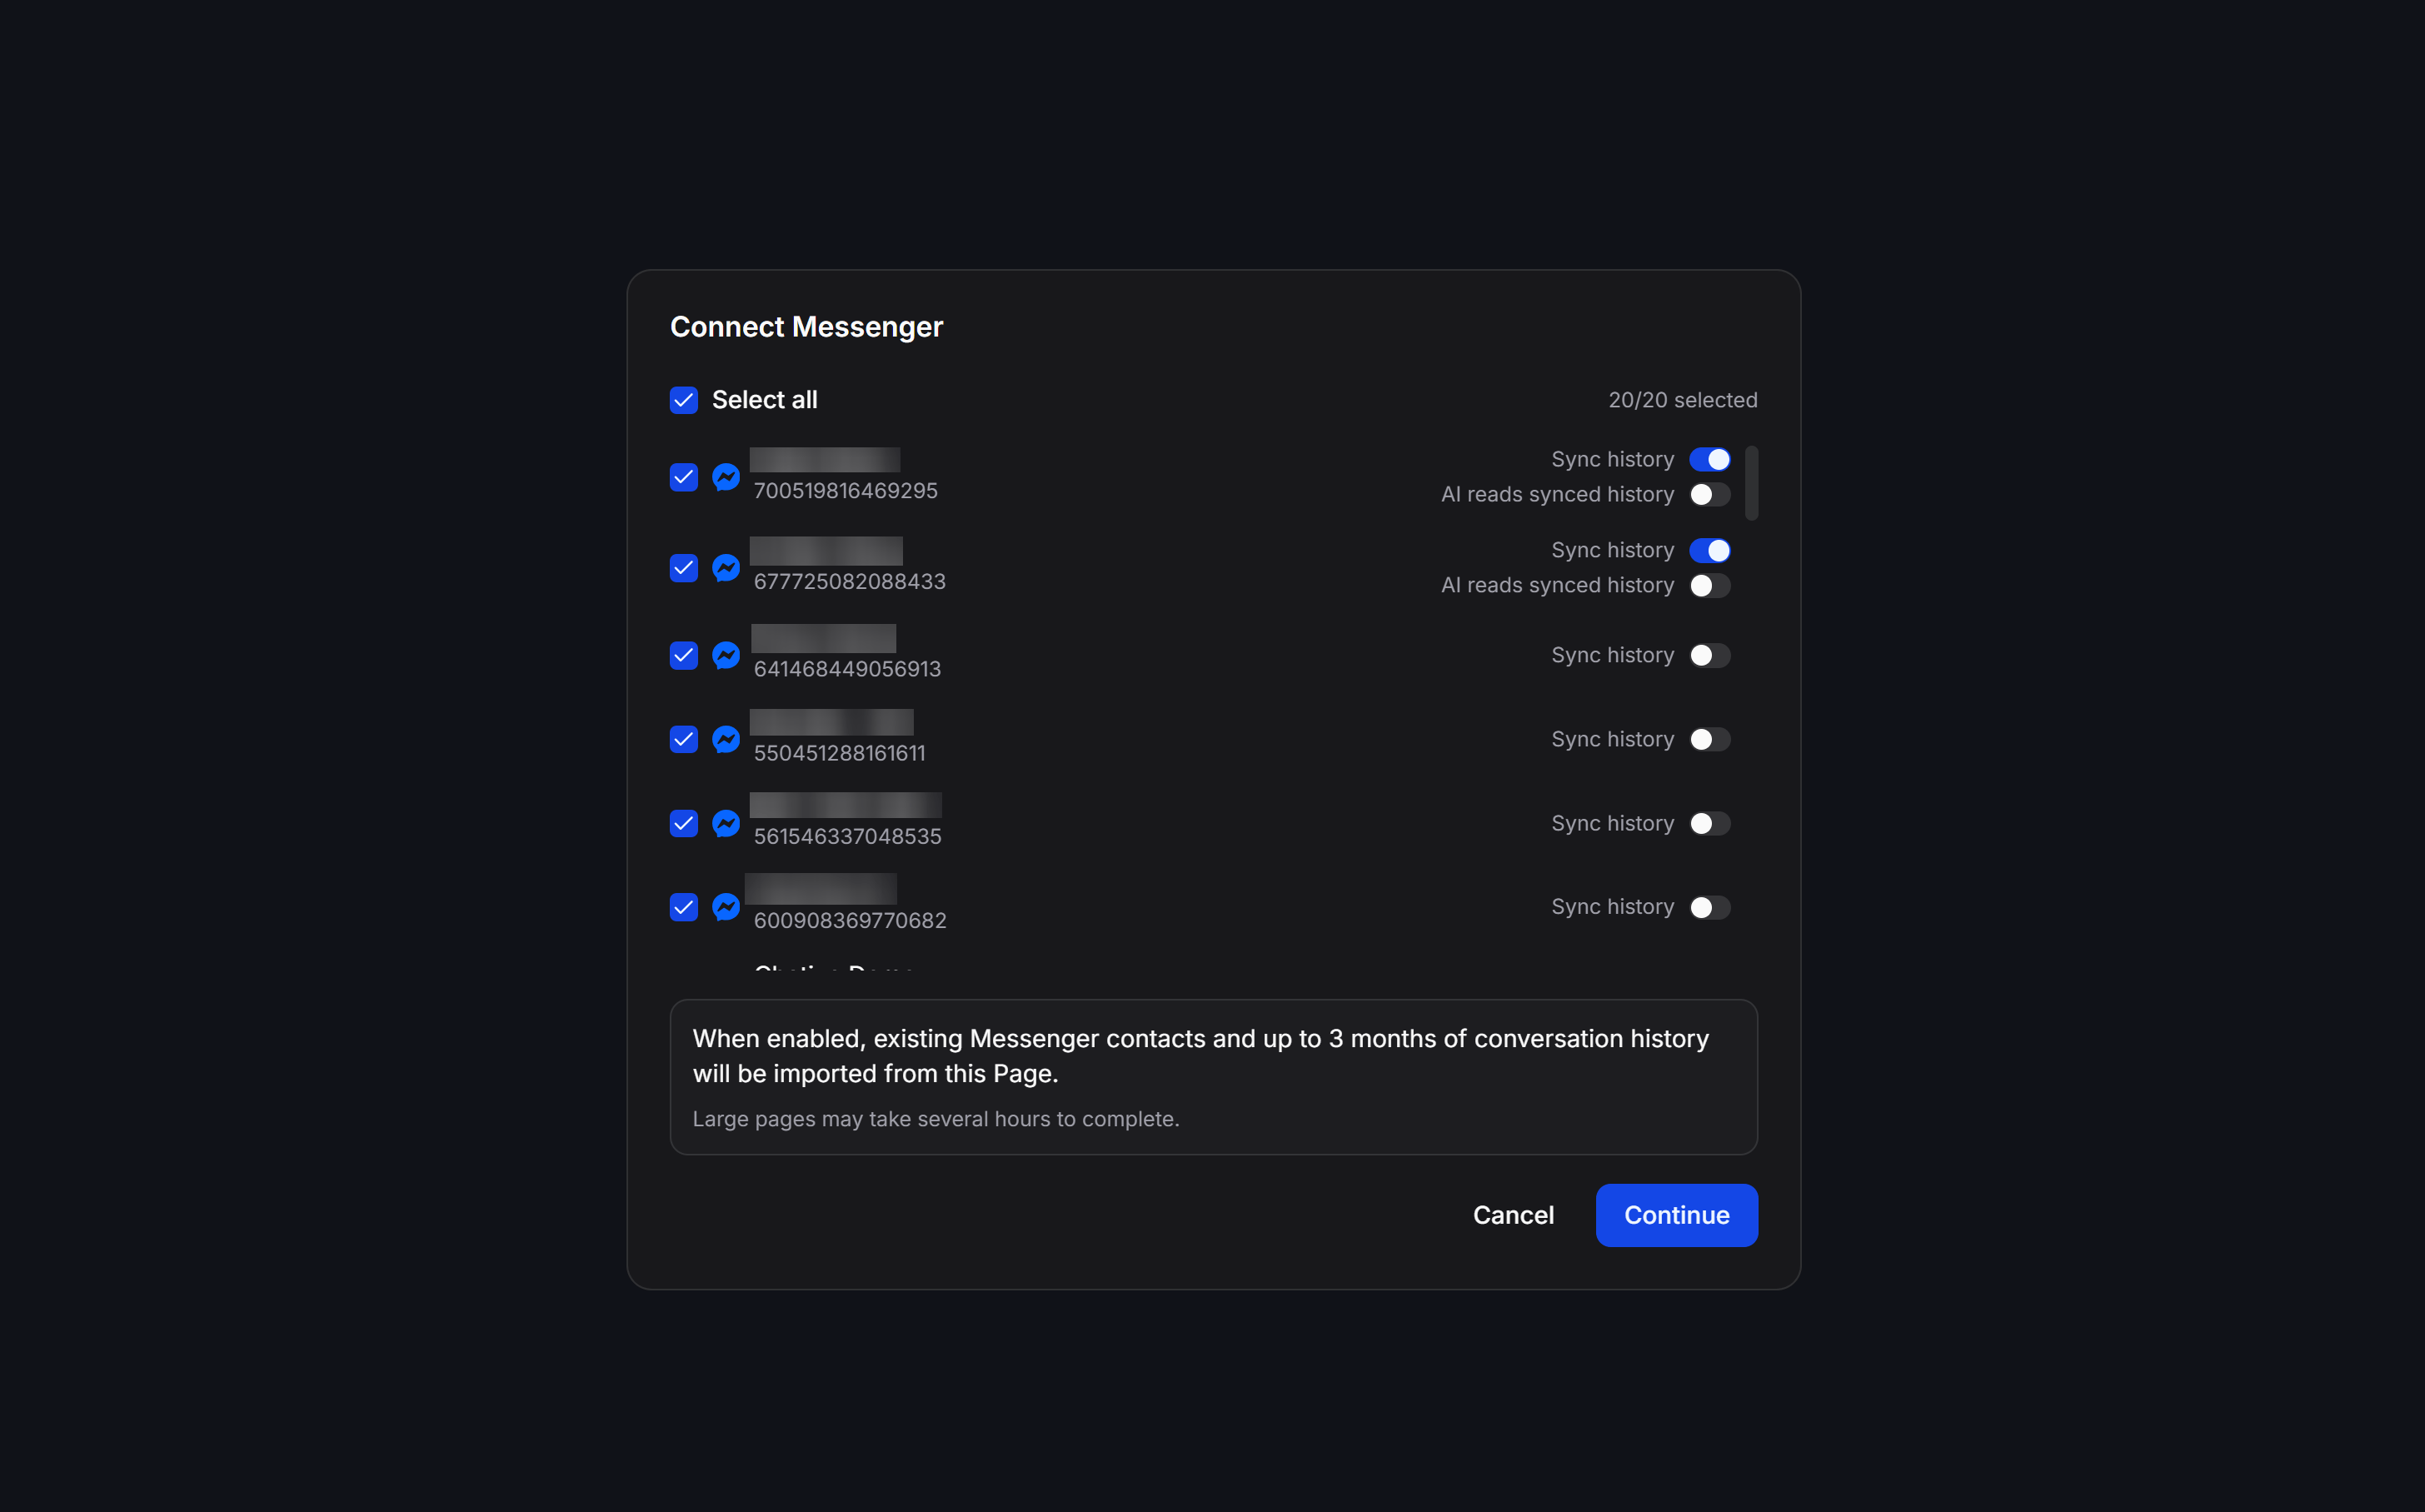 Next to each page, optionally enable **Sync history** to import contacts and up to 3 months of chat history. Click **Continue** to finalize the bulk connection.
## Stage 2: Scan and Sync Past Contacts from Pages
If your Fanpages have existing customer conversations prior to joining ChatbotX, use **Automatic Customer Scan** to bring them into your Contacts list.
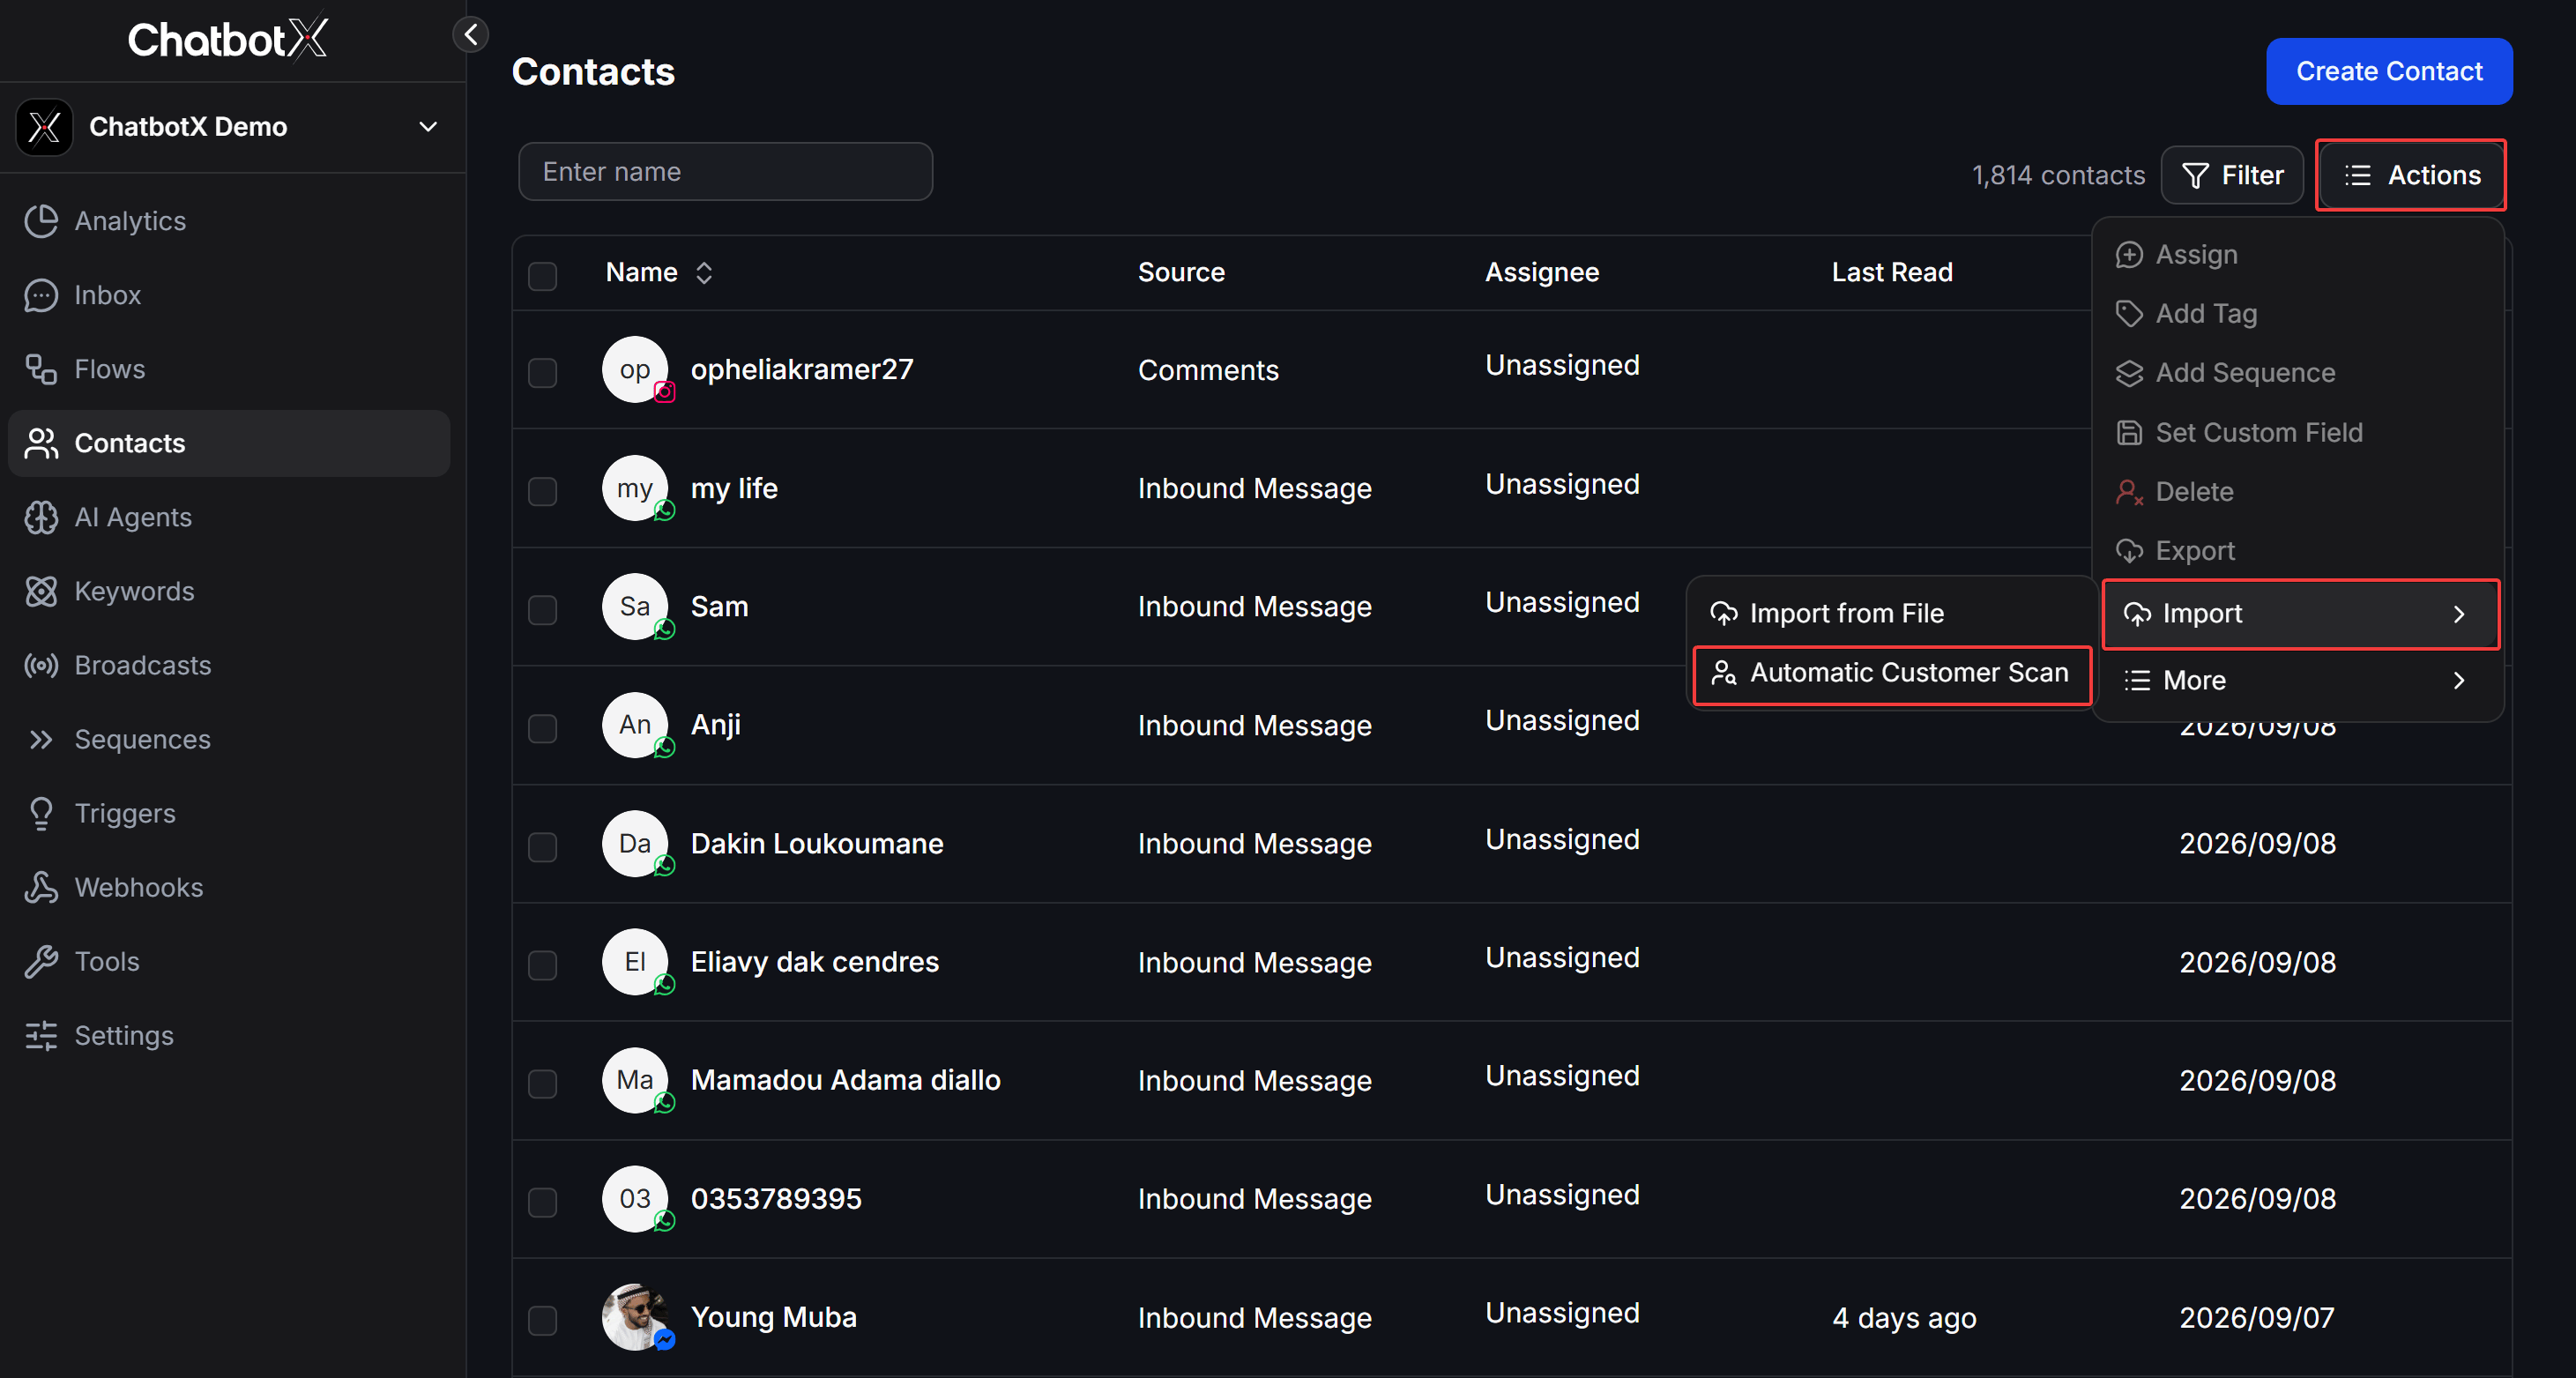
Go to **Contacts** on the left menu, click **Actions** in the top right, hover over **Import**, and select **Automatic Customer Scan**.
Next to each page, optionally enable **Sync history** to import contacts and up to 3 months of chat history. Click **Continue** to finalize the bulk connection.
## Stage 2: Scan and Sync Past Contacts from Pages
If your Fanpages have existing customer conversations prior to joining ChatbotX, use **Automatic Customer Scan** to bring them into your Contacts list.
Go to **Contacts** on the left menu, click **Actions** in the top right, hover over **Import**, and select **Automatic Customer Scan**.
 Choose the Fanpage under **Inbox** and specify the starting date under **Scan Inbox from Time** (e.g., from Jan 1, 2026 to present).
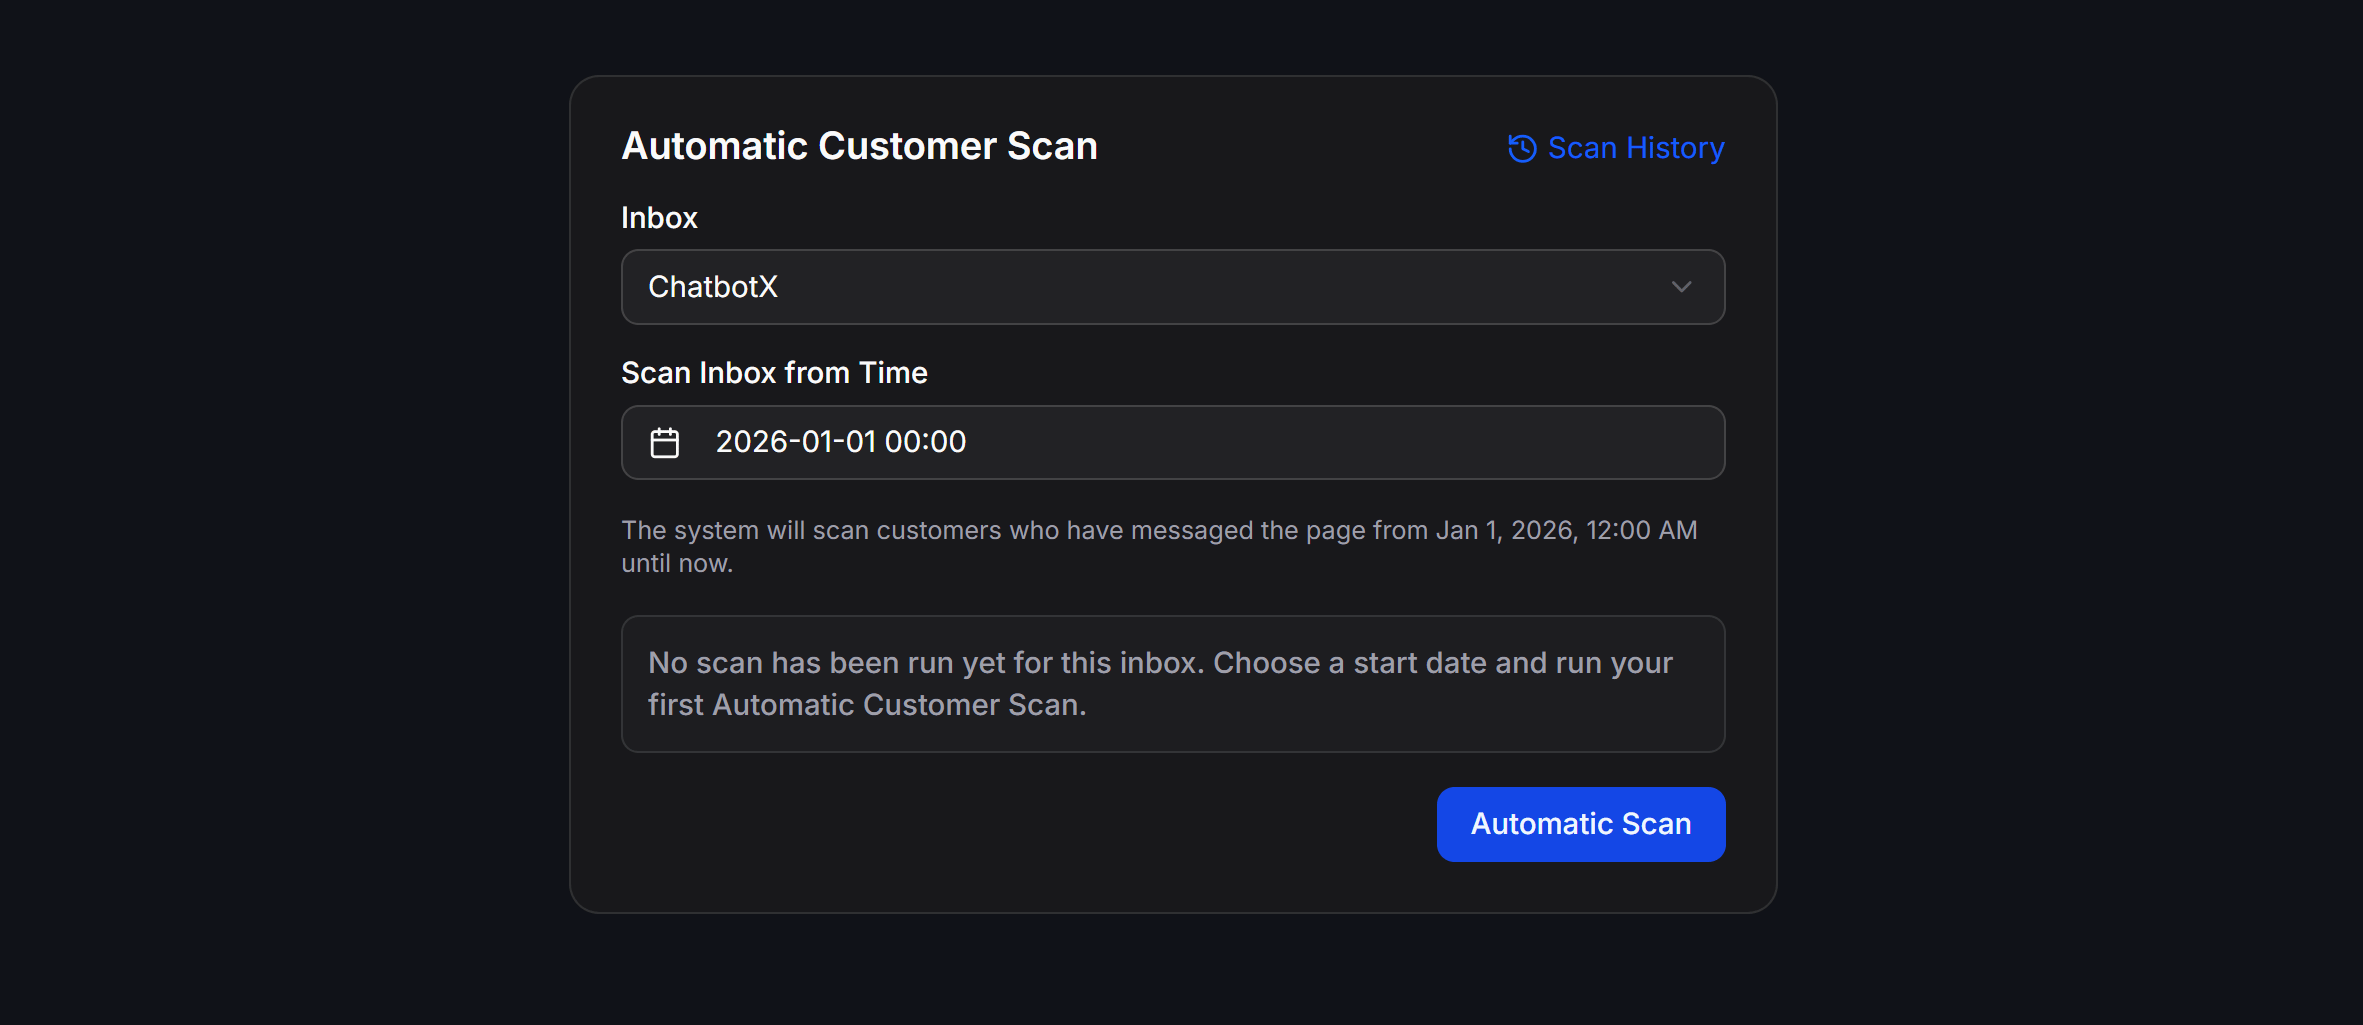 Click the **Automatic Scan** button to launch the scan. The system runs in the background, analyzing past conversations and importing contacts into ChatbotX. You can repeat this process for any other pages you plan to target in your bulk broadcast.
## Stage 3: Configure and Send a Multi-Page Broadcast
Once your pages and contacts are ready, create the bulk broadcast using the following steps:
From the left menu, navigate to **Broadcasts** and click the **+ Create Broadcast** button in the top right corner.
Click the **Automatic Scan** button to launch the scan. The system runs in the background, analyzing past conversations and importing contacts into ChatbotX. You can repeat this process for any other pages you plan to target in your bulk broadcast.
## Stage 3: Configure and Send a Multi-Page Broadcast
Once your pages and contacts are ready, create the bulk broadcast using the following steps:
From the left menu, navigate to **Broadcasts** and click the **+ Create Broadcast** button in the top right corner.
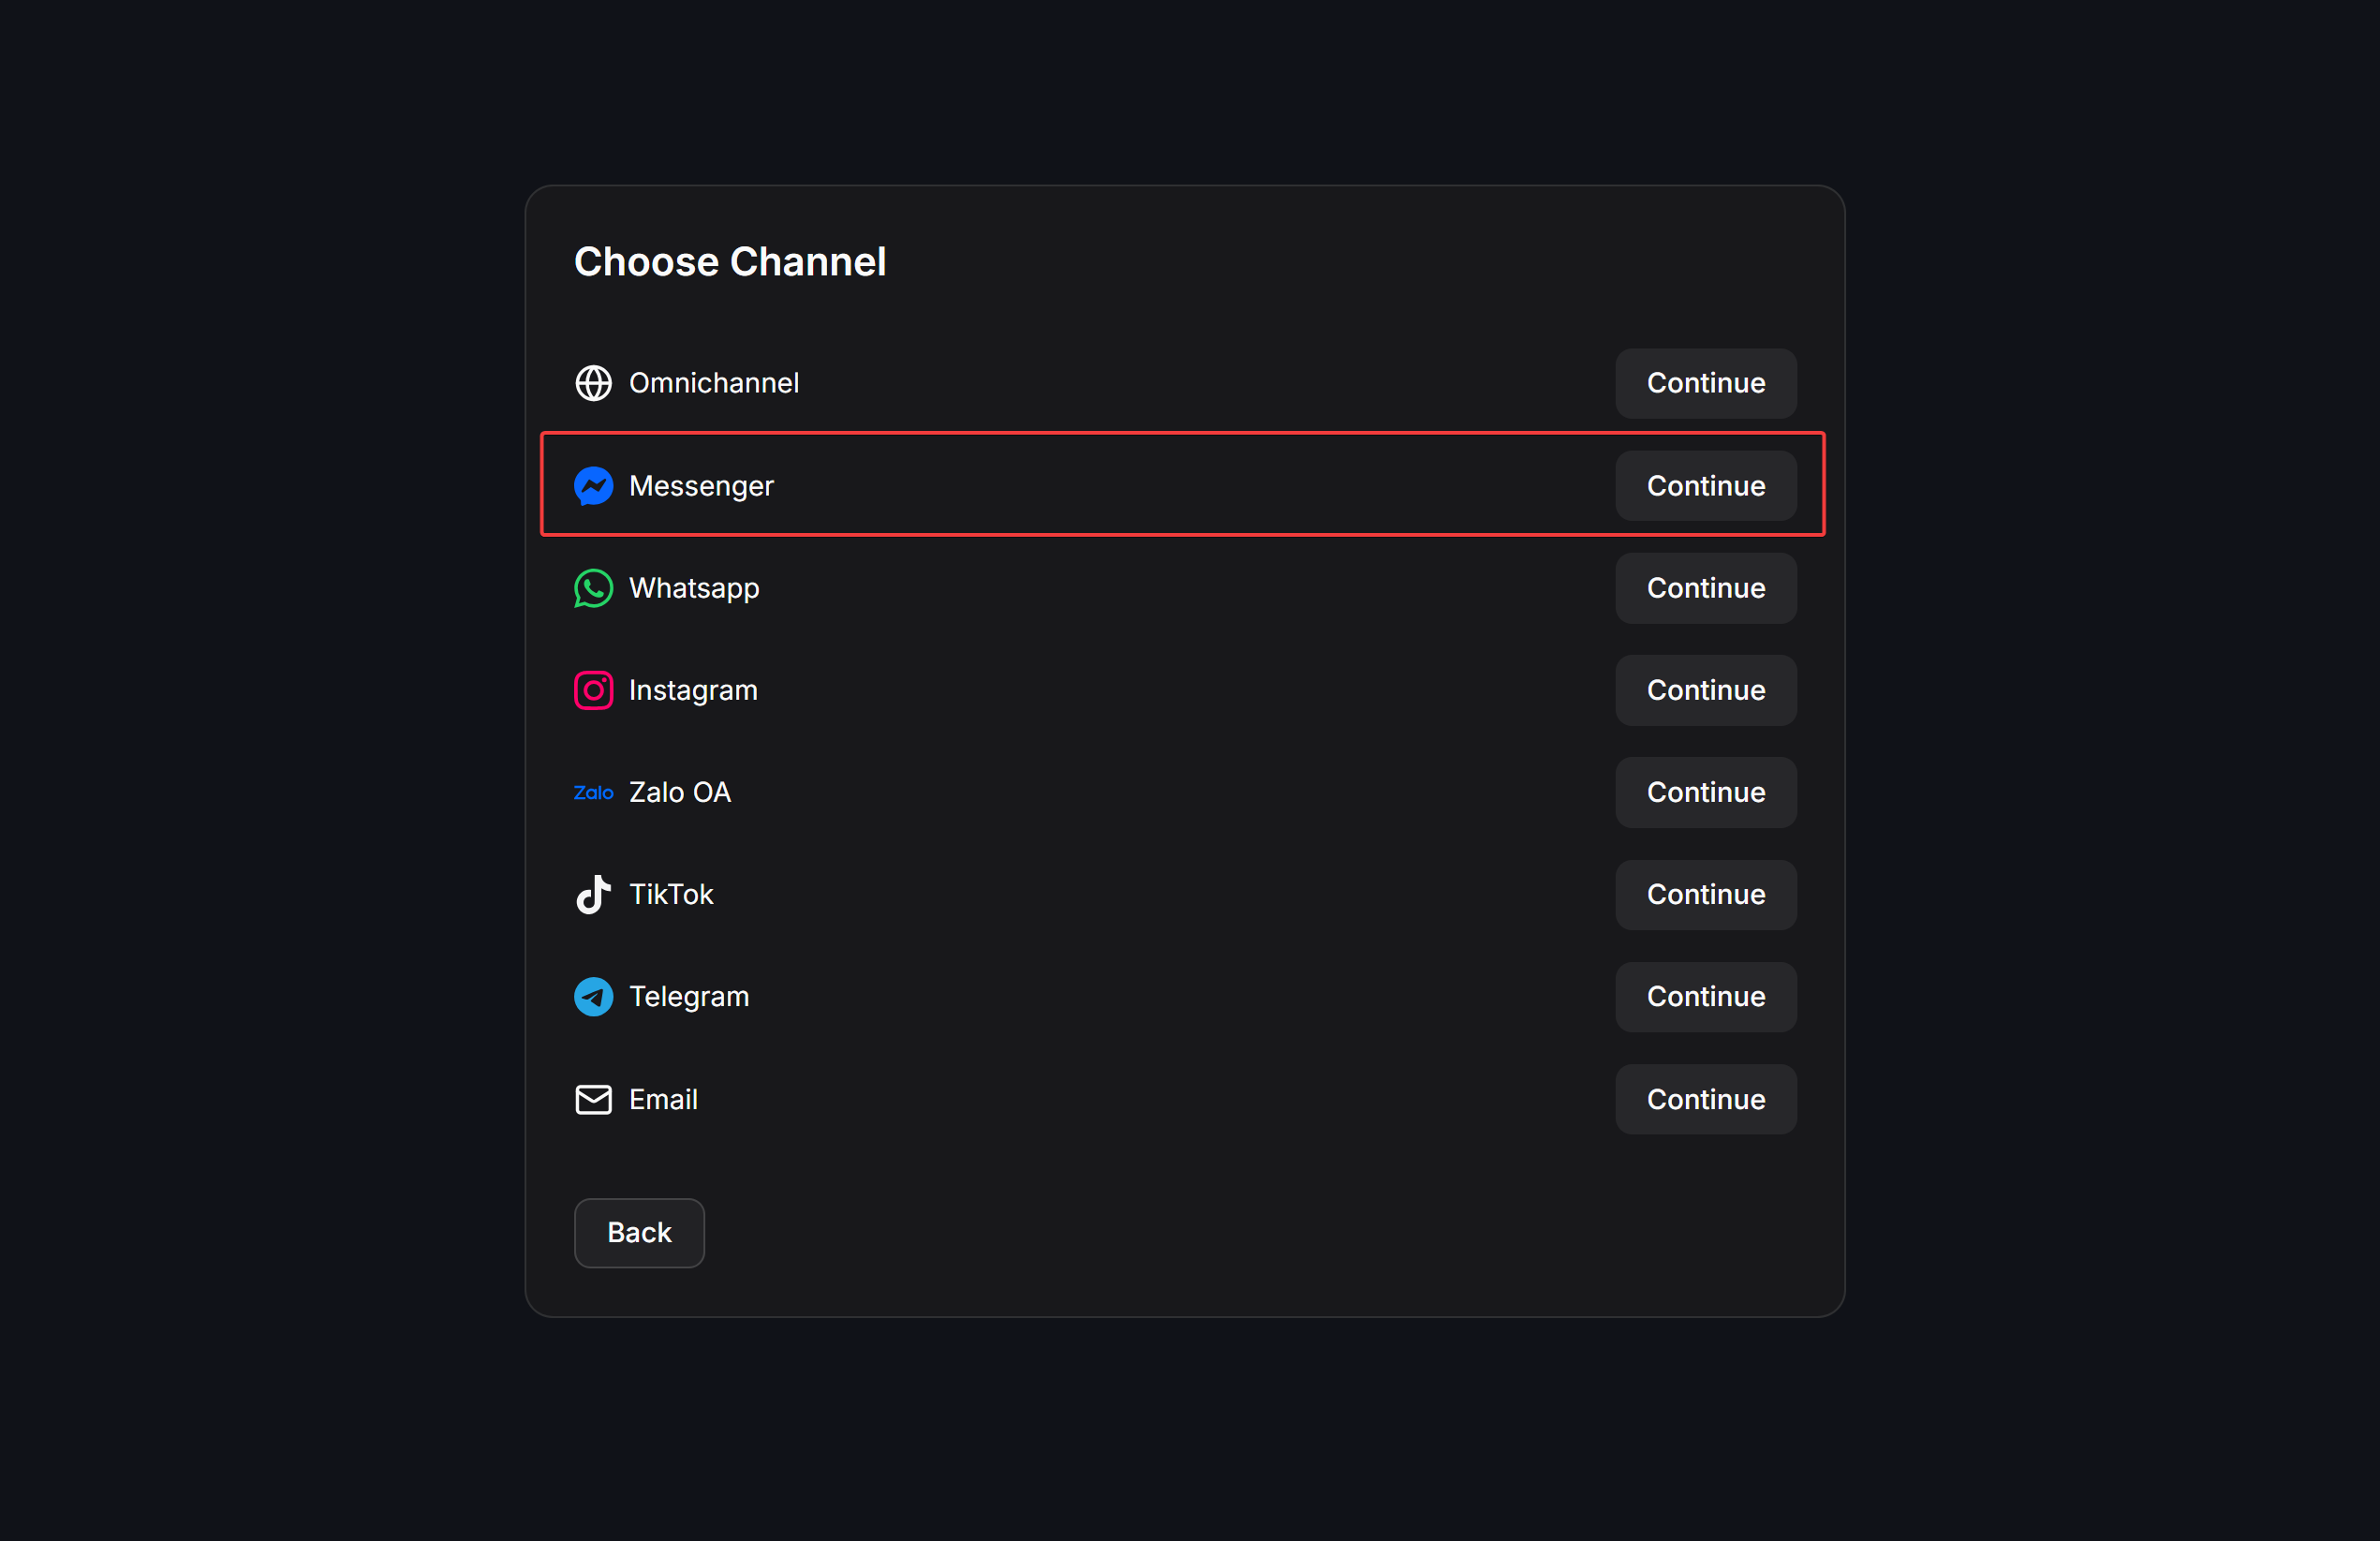
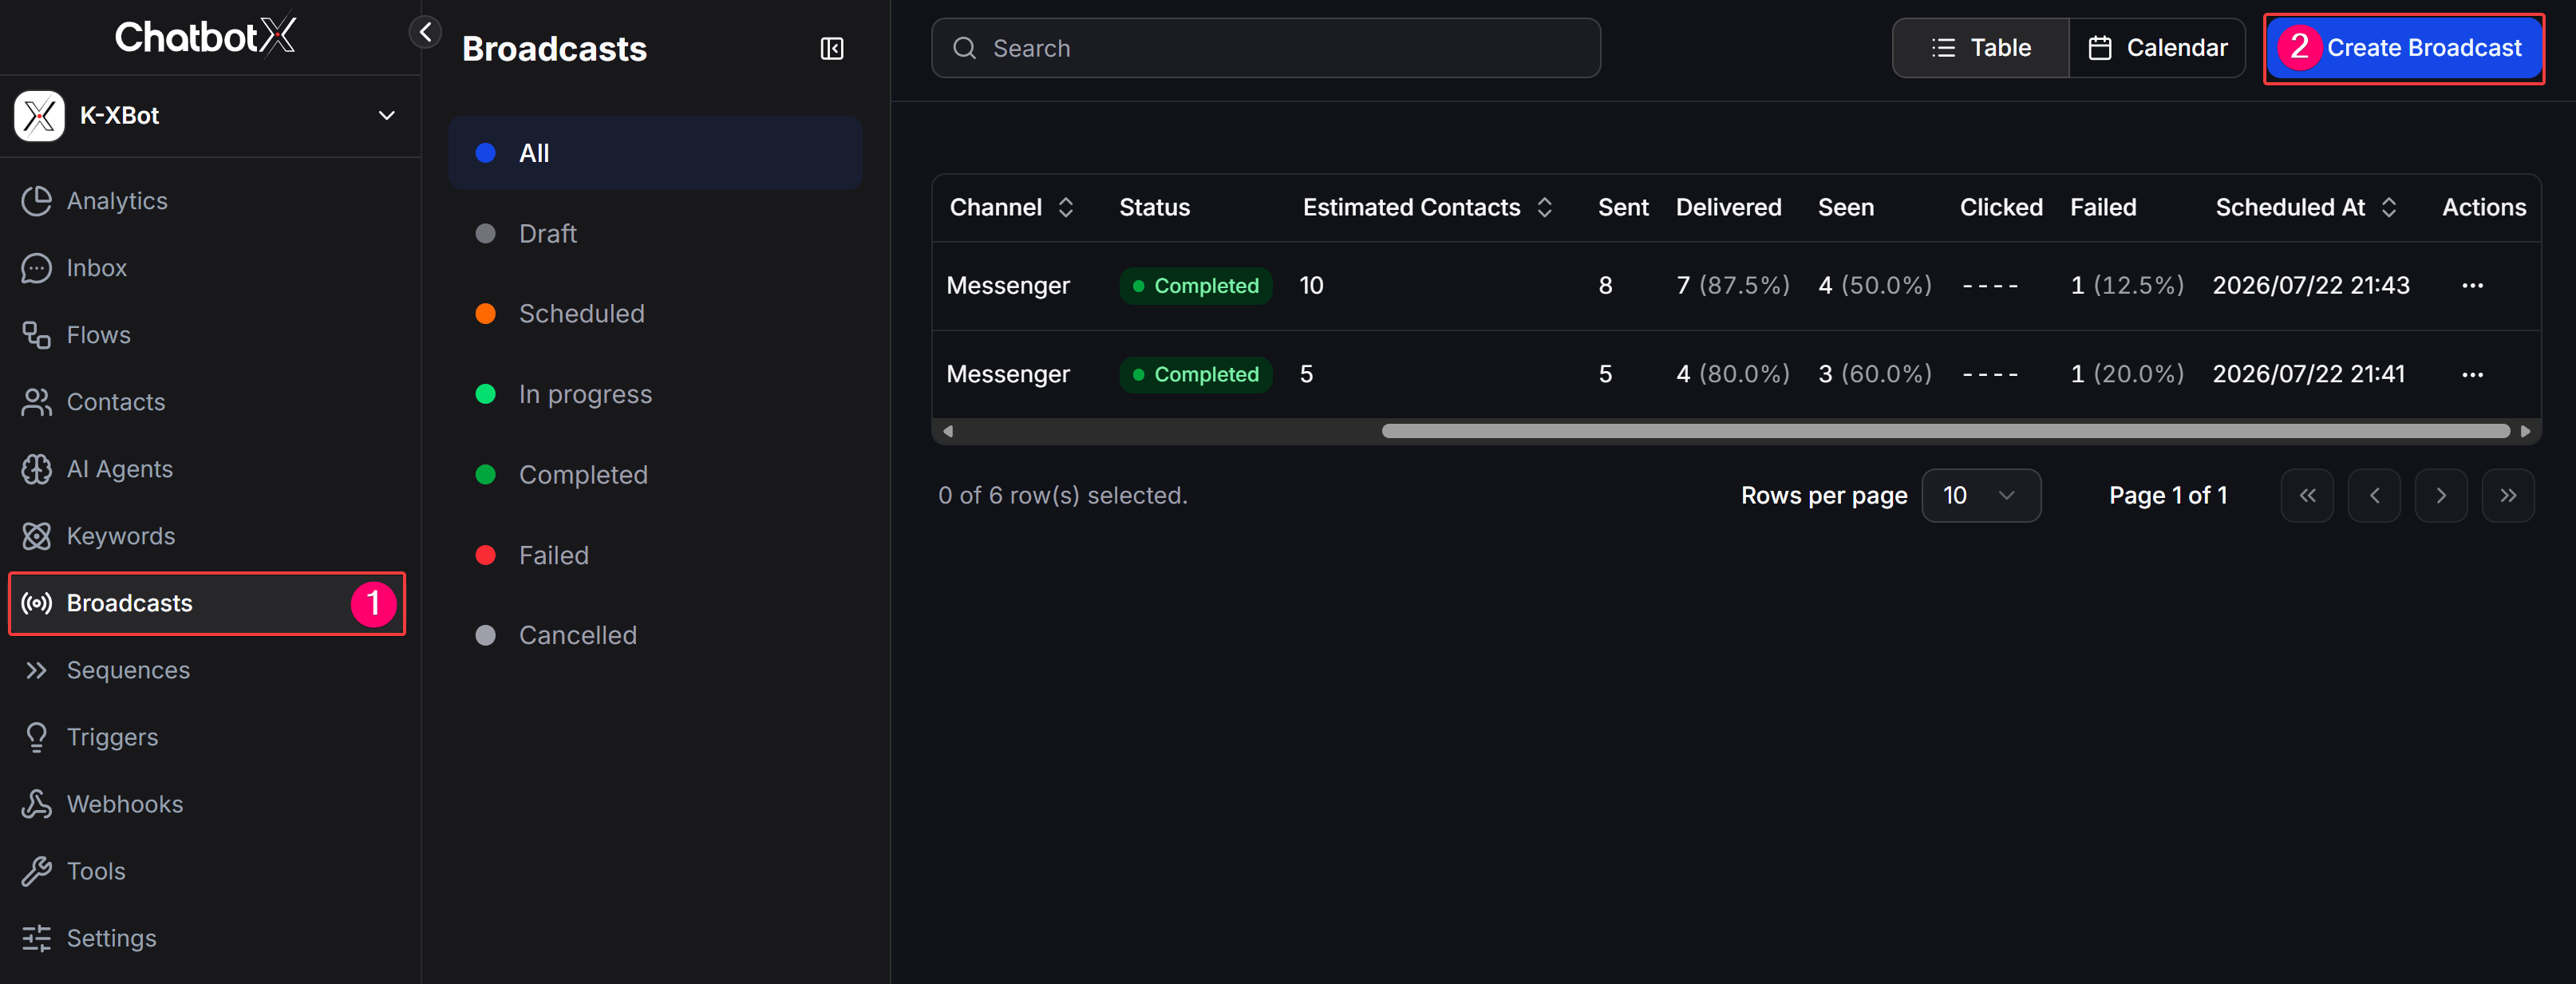 On the **Choose Channel** screen, select **Messenger** and click **Continue**.
 On the **Choose Subaction** screen, select **Template Message** and click **Continue**. This allows sending pre-approved Meta Utility Messages beyond the 24-hour standard messaging window.
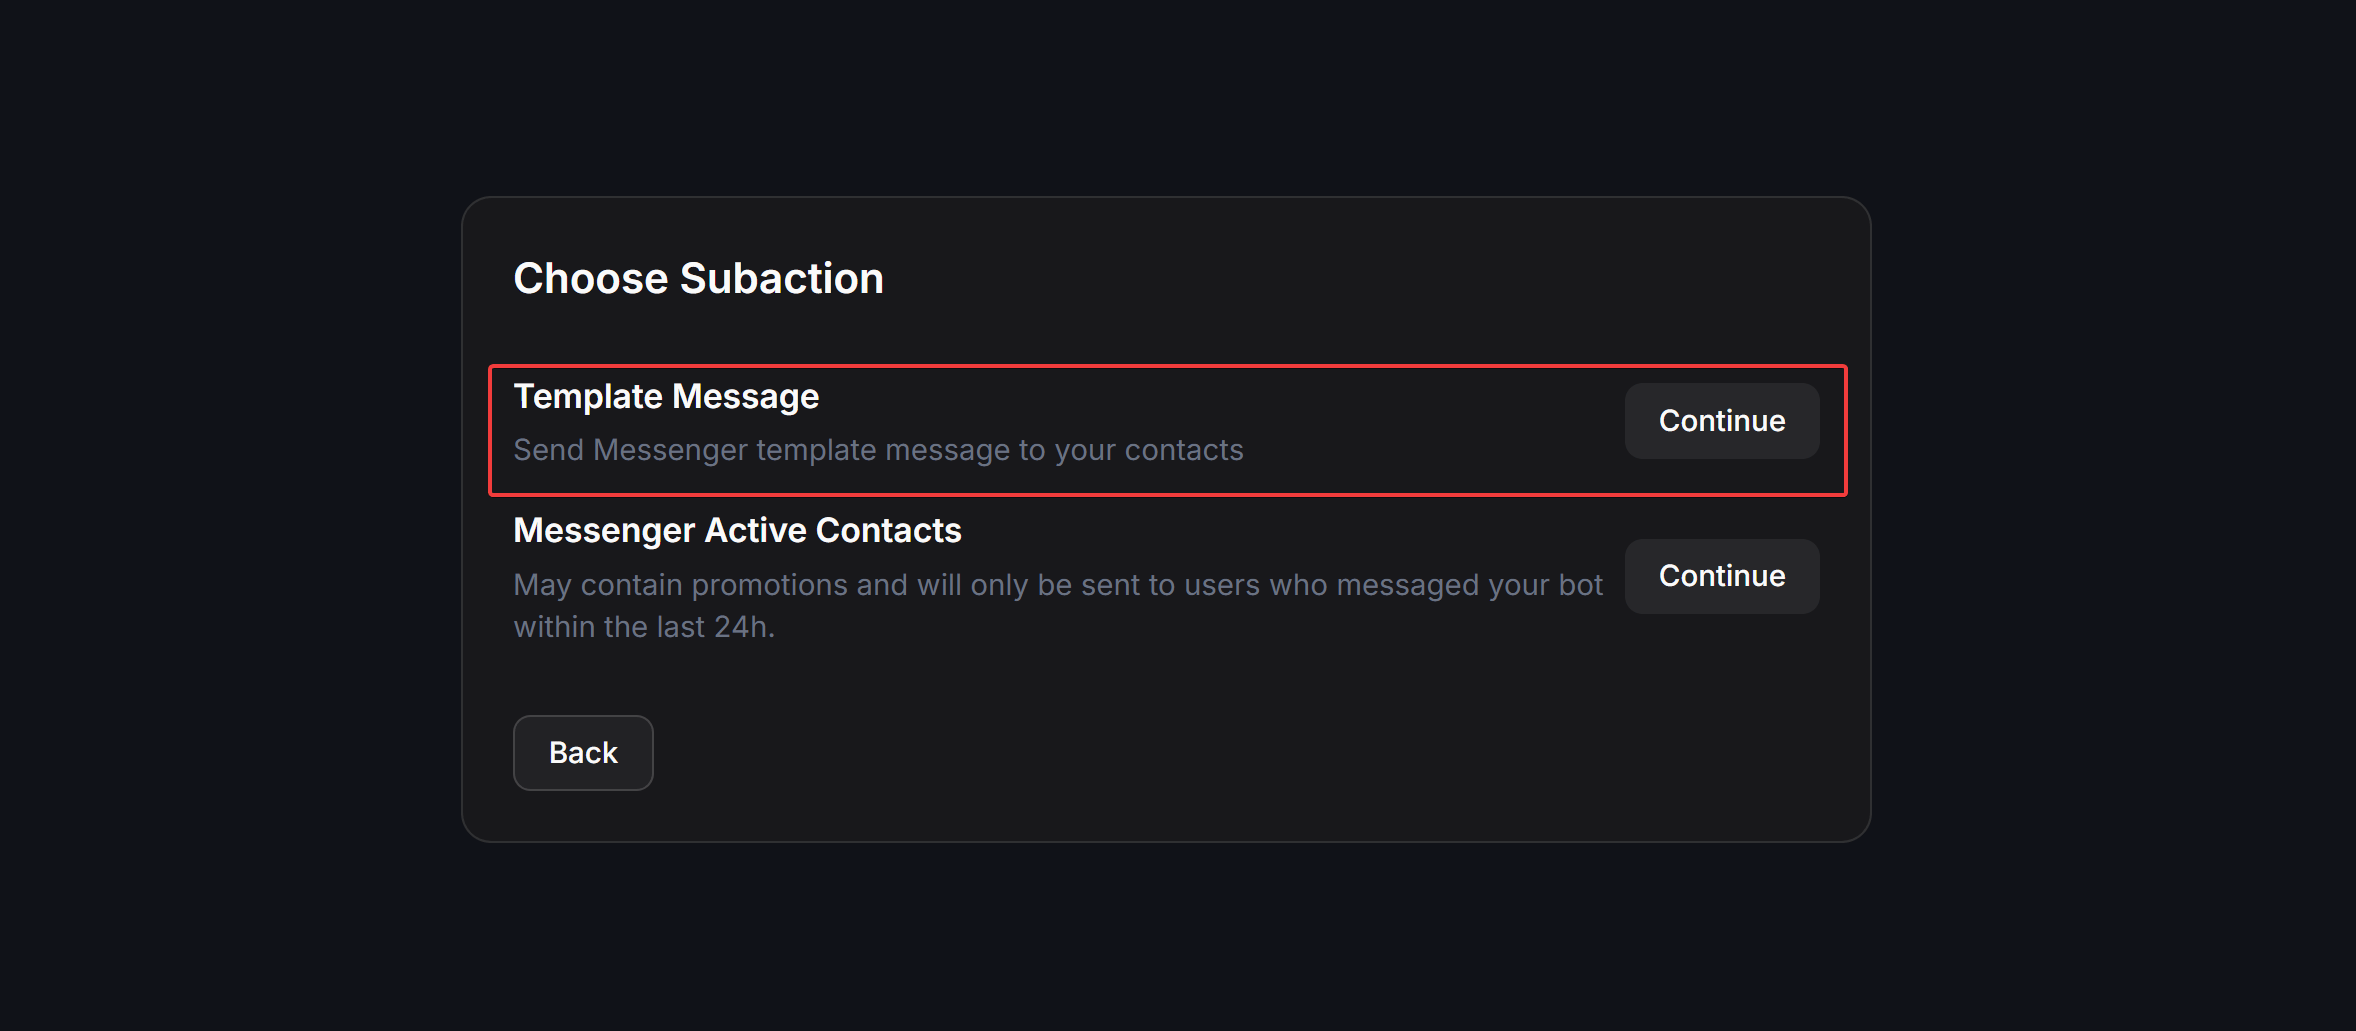 > **Note:** If you choose **Messenger Active Contacts**, messages can only be sent as flows to contacts who interacted within the last 24 hours.
In the broadcast builder, select the **Template** tab ("Send a template to your contacts").
Under **Messenger Pages**, click the dropdown and select the pages you want to include in this campaign. You can search by name or check **(Select All)** to include all available pages.
> **Note:** If you choose **Messenger Active Contacts**, messages can only be sent as flows to contacts who interacted within the last 24 hours.
In the broadcast builder, select the **Template** tab ("Send a template to your contacts").
Under **Messenger Pages**, click the dropdown and select the pages you want to include in this campaign. You can search by name or check **(Select All)** to include all available pages.
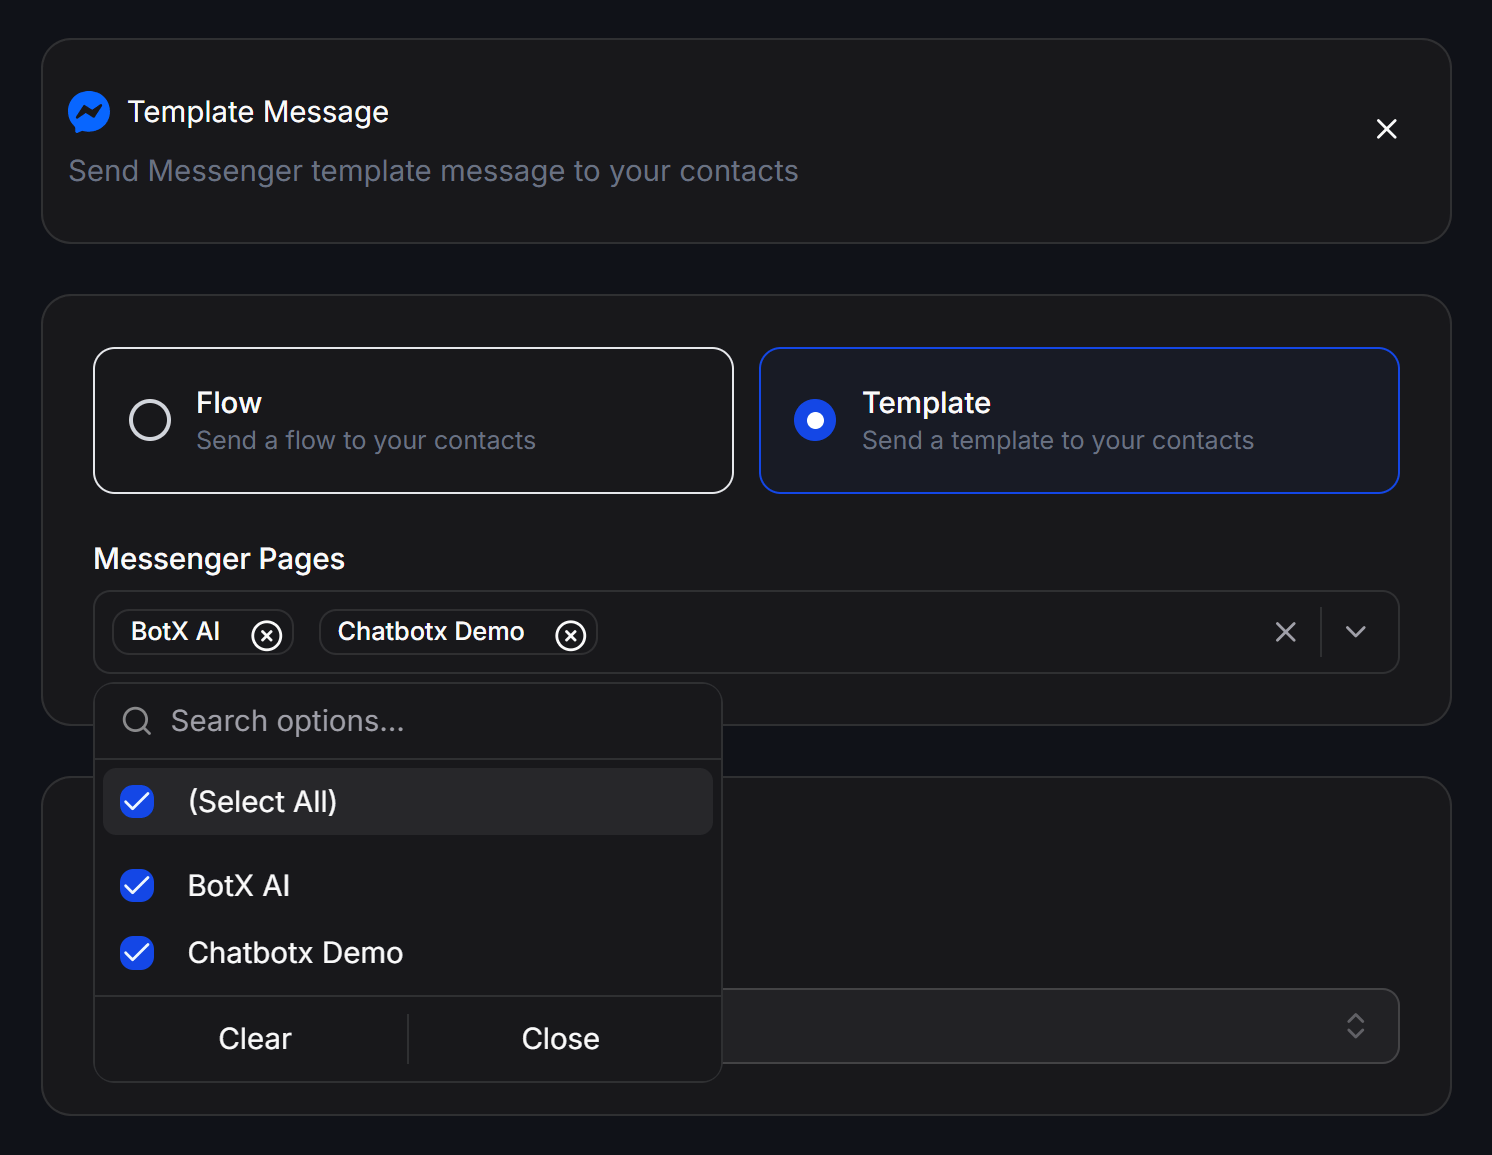 When multiple pages are selected, the system provides separate configuration blocks for each page:
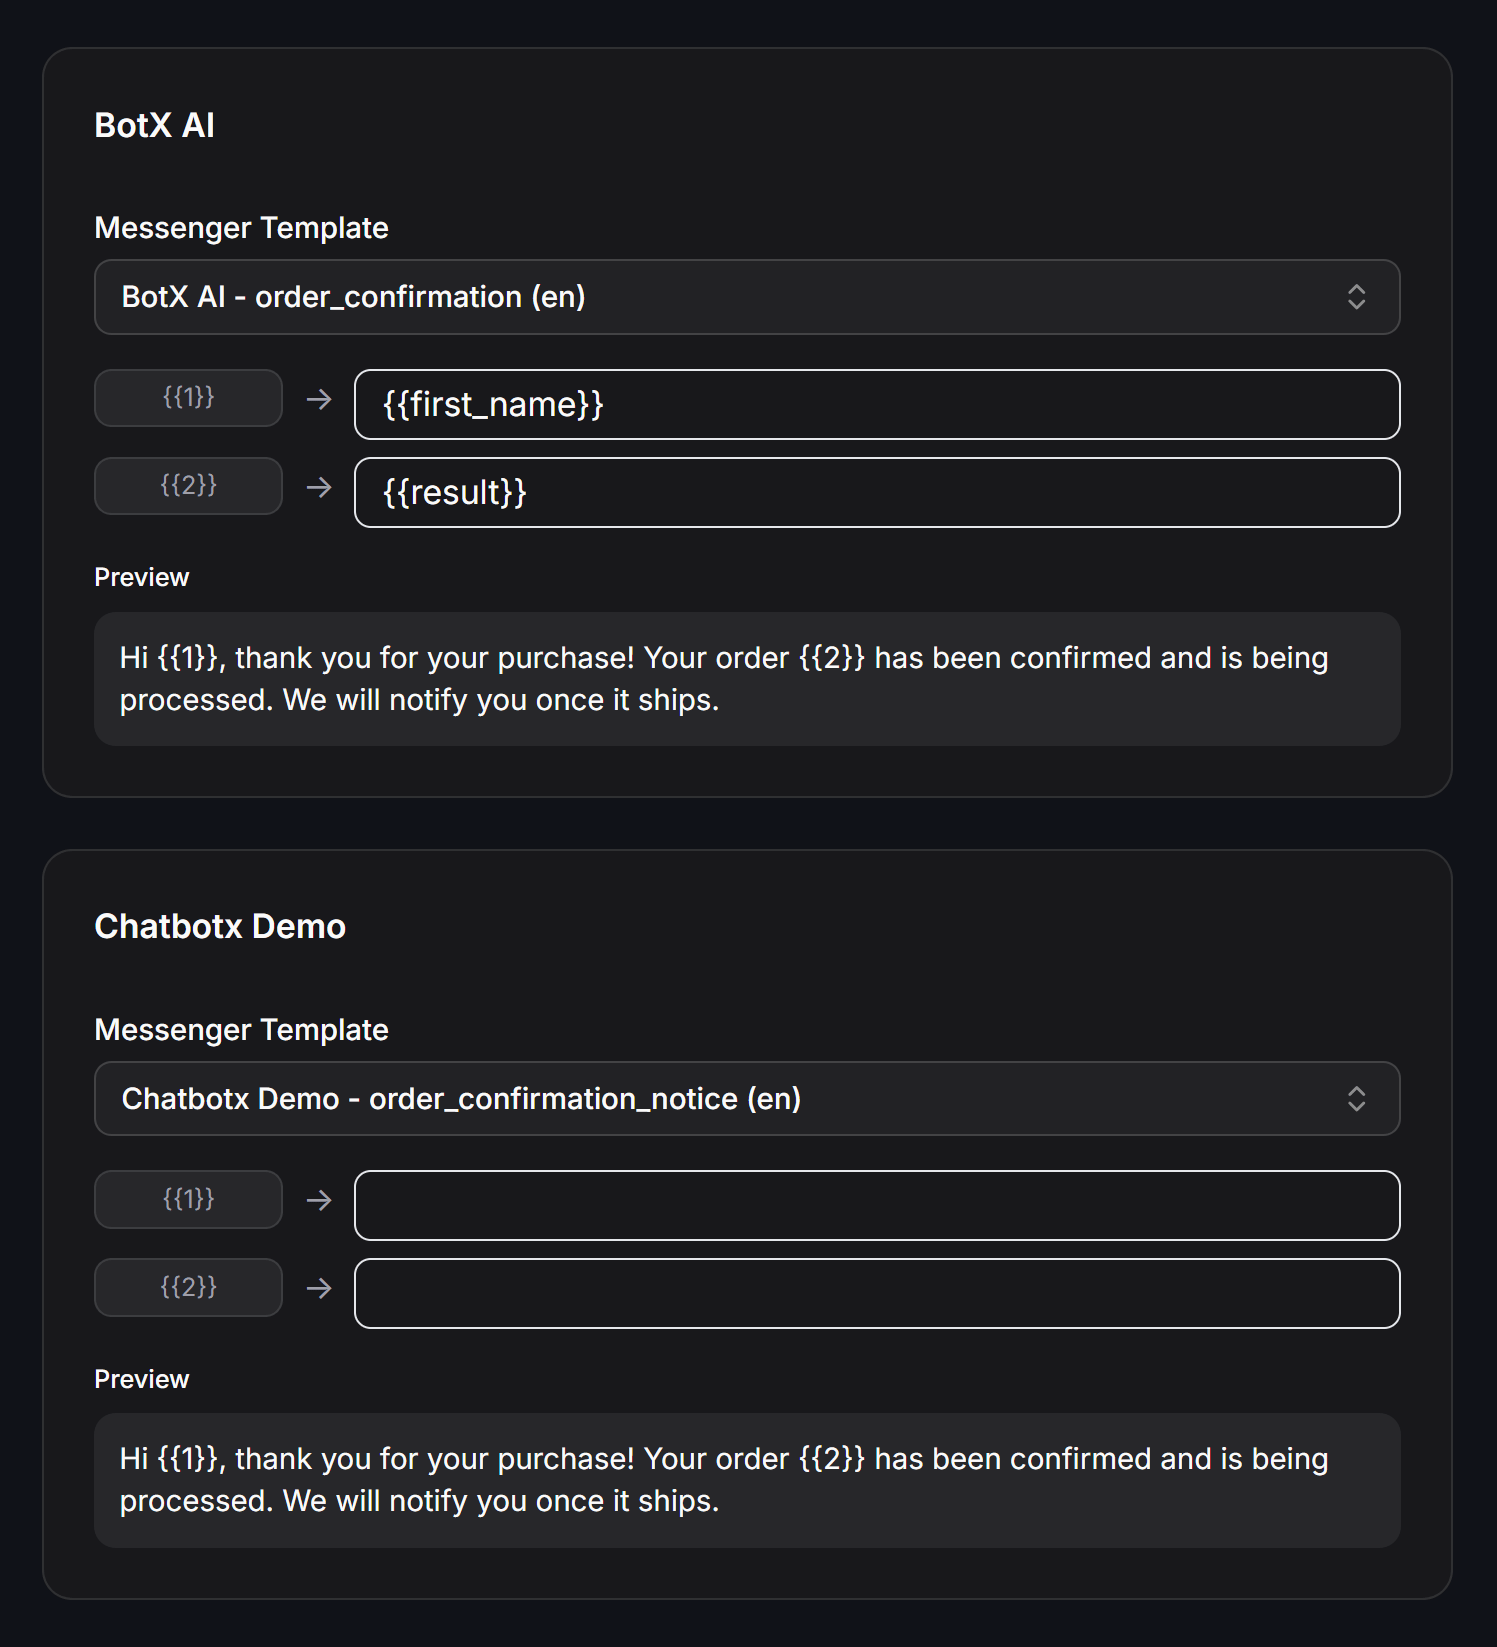 For each page:
* **Messenger Template:** Select the approved utility template for that specific page (e.g., `order_confirmation`).
* **Variable Mapping:** Map dynamic variables to contact attributes:
* `{{1}}`: Select client name attribute (e.g., `{{first_name}}`).
* `{{2}}`: Select details attribute (e.g., `{{result}}` or order number).
* **Preview:** Verify the message format and sample values before dispatching.
Scroll down to configure timing and recipient filters:
For each page:
* **Messenger Template:** Select the approved utility template for that specific page (e.g., `order_confirmation`).
* **Variable Mapping:** Map dynamic variables to contact attributes:
* `{{1}}`: Select client name attribute (e.g., `{{first_name}}`).
* `{{2}}`: Select details attribute (e.g., `{{result}}` or order number).
* **Preview:** Verify the message format and sample values before dispatching.
Scroll down to configure timing and recipient filters:
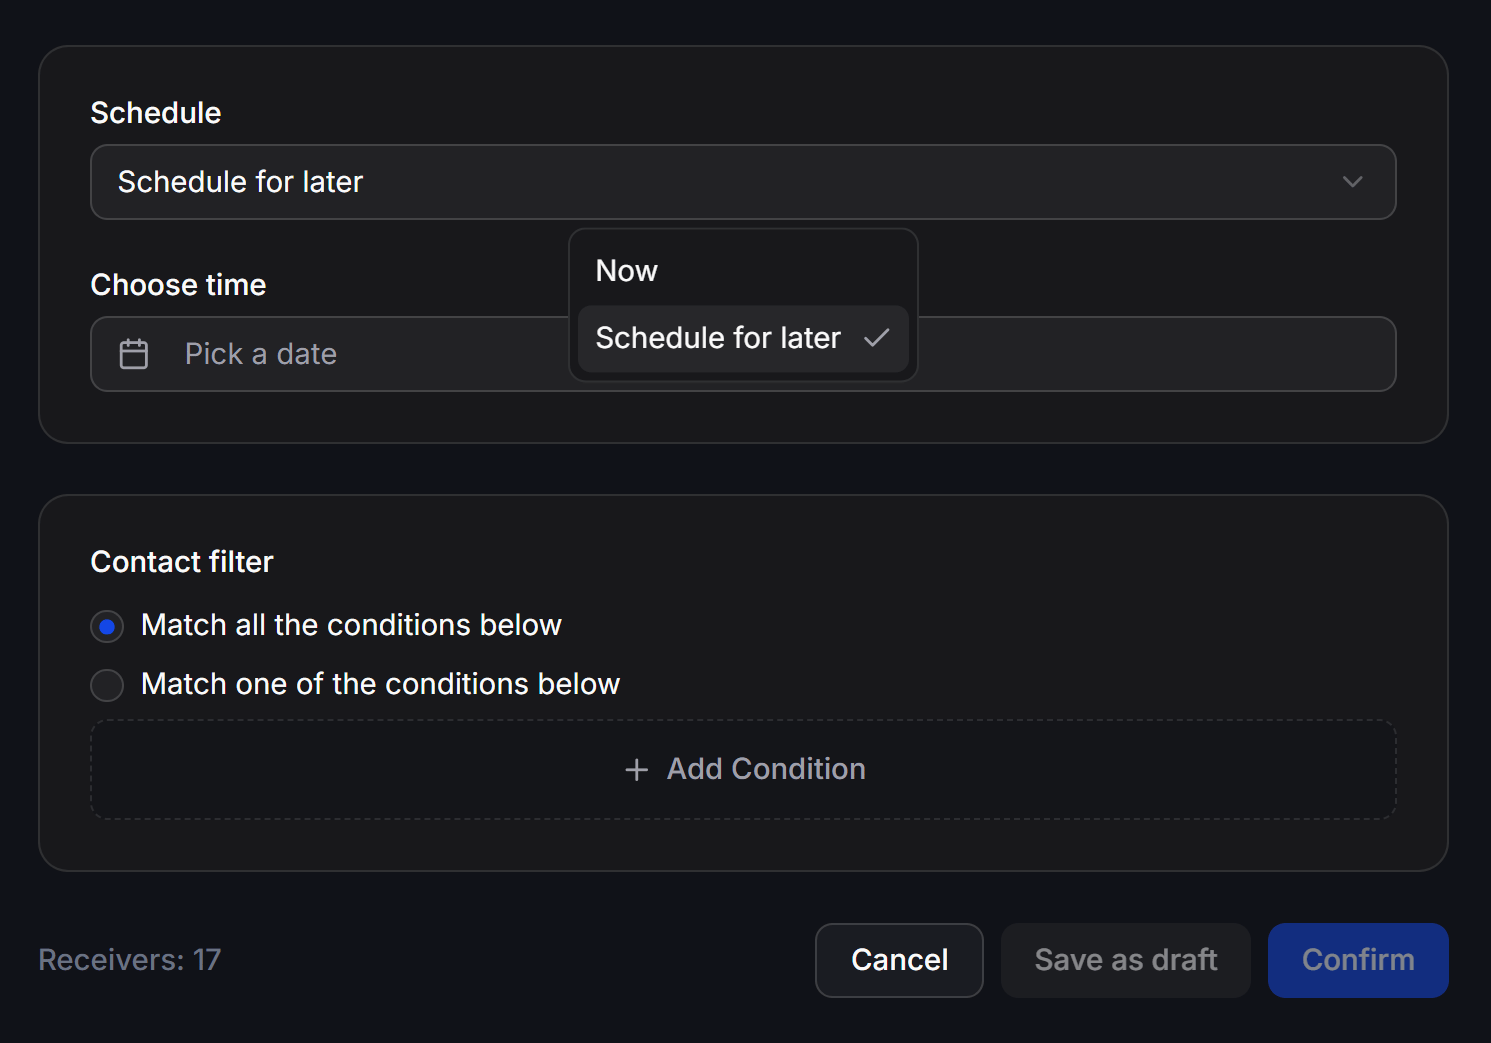 * **Schedule:**
* Select **Now** to send immediately.
* Select **Schedule for later** to specify a future date and time via **Pick a date**.
* **Contact filter:** Narrow down recipients with filtering rules:
* **Match all the conditions below:** Contacts must satisfy every condition.
* **Match one of the conditions below:** Contacts must satisfy at least one condition.
* Click **+ Add Condition** to filter by Tag, Custom Field, etc.
* **Receivers:** Check the total number of qualified recipients across all selected pages.
* Click **Save as draft** to preserve settings and edit later.
* Click **Confirm** to schedule or send the broadcast campaign immediately.
## Monitor and Manage Broadcasts
Once confirmed, your campaign appears in the **Broadcasts** list. You can monitor progress with the following statuses:
| Status | Meaning |
| ------------- | ---------------------------------------------------------------------------- |
| **Draft** | The campaign is saved as a draft and has not sent any messages. |
| **Scheduled** | The campaign is queued and will execute automatically at the scheduled time. |
| **Sending** | Messages are actively being delivered across the selected Fanpages. |
| **Completed** | All broadcast messages have been successfully dispatched. |
When dispatching broadcasts across multiple Fanpages, the system automatically respects each page's Meta rate limits and distributes traffic safely.
* **Schedule:**
* Select **Now** to send immediately.
* Select **Schedule for later** to specify a future date and time via **Pick a date**.
* **Contact filter:** Narrow down recipients with filtering rules:
* **Match all the conditions below:** Contacts must satisfy every condition.
* **Match one of the conditions below:** Contacts must satisfy at least one condition.
* Click **+ Add Condition** to filter by Tag, Custom Field, etc.
* **Receivers:** Check the total number of qualified recipients across all selected pages.
* Click **Save as draft** to preserve settings and edit later.
* Click **Confirm** to schedule or send the broadcast campaign immediately.
## Monitor and Manage Broadcasts
Once confirmed, your campaign appears in the **Broadcasts** list. You can monitor progress with the following statuses:
| Status | Meaning |
| ------------- | ---------------------------------------------------------------------------- |
| **Draft** | The campaign is saved as a draft and has not sent any messages. |
| **Scheduled** | The campaign is queued and will execute automatically at the scheduled time. |
| **Sending** | Messages are actively being delivered across the selected Fanpages. |
| **Completed** | All broadcast messages have been successfully dispatched. |
When dispatching broadcasts across multiple Fanpages, the system automatically respects each page's Meta rate limits and distributes traffic safely.