> ## Documentation Index
> Fetch the complete documentation index at: https://chatbotx.io/docs/llms.txt
> Use this file to discover all available pages before exploring further.
# Create and manage Appointment Scheduling
> Create Appointment Scheduling in ChatbotX to manage calendars, accept bookings, send reminders, and check available times in conversations.
**Appointment Scheduling** lets you create appointment calendars and allow customers to choose a suitable time. Use it for consultations, product demos, customer support, or online meetings.
Each calendar can have its own working hours, timezone, location, notifications, and booking limits. Customers can also book, cancel, or check available times directly in a conversation.
## Open Appointment Scheduling
Select **Tools** from the left menu.
Click the **Appointment Scheduling** card to open the appointment management page.
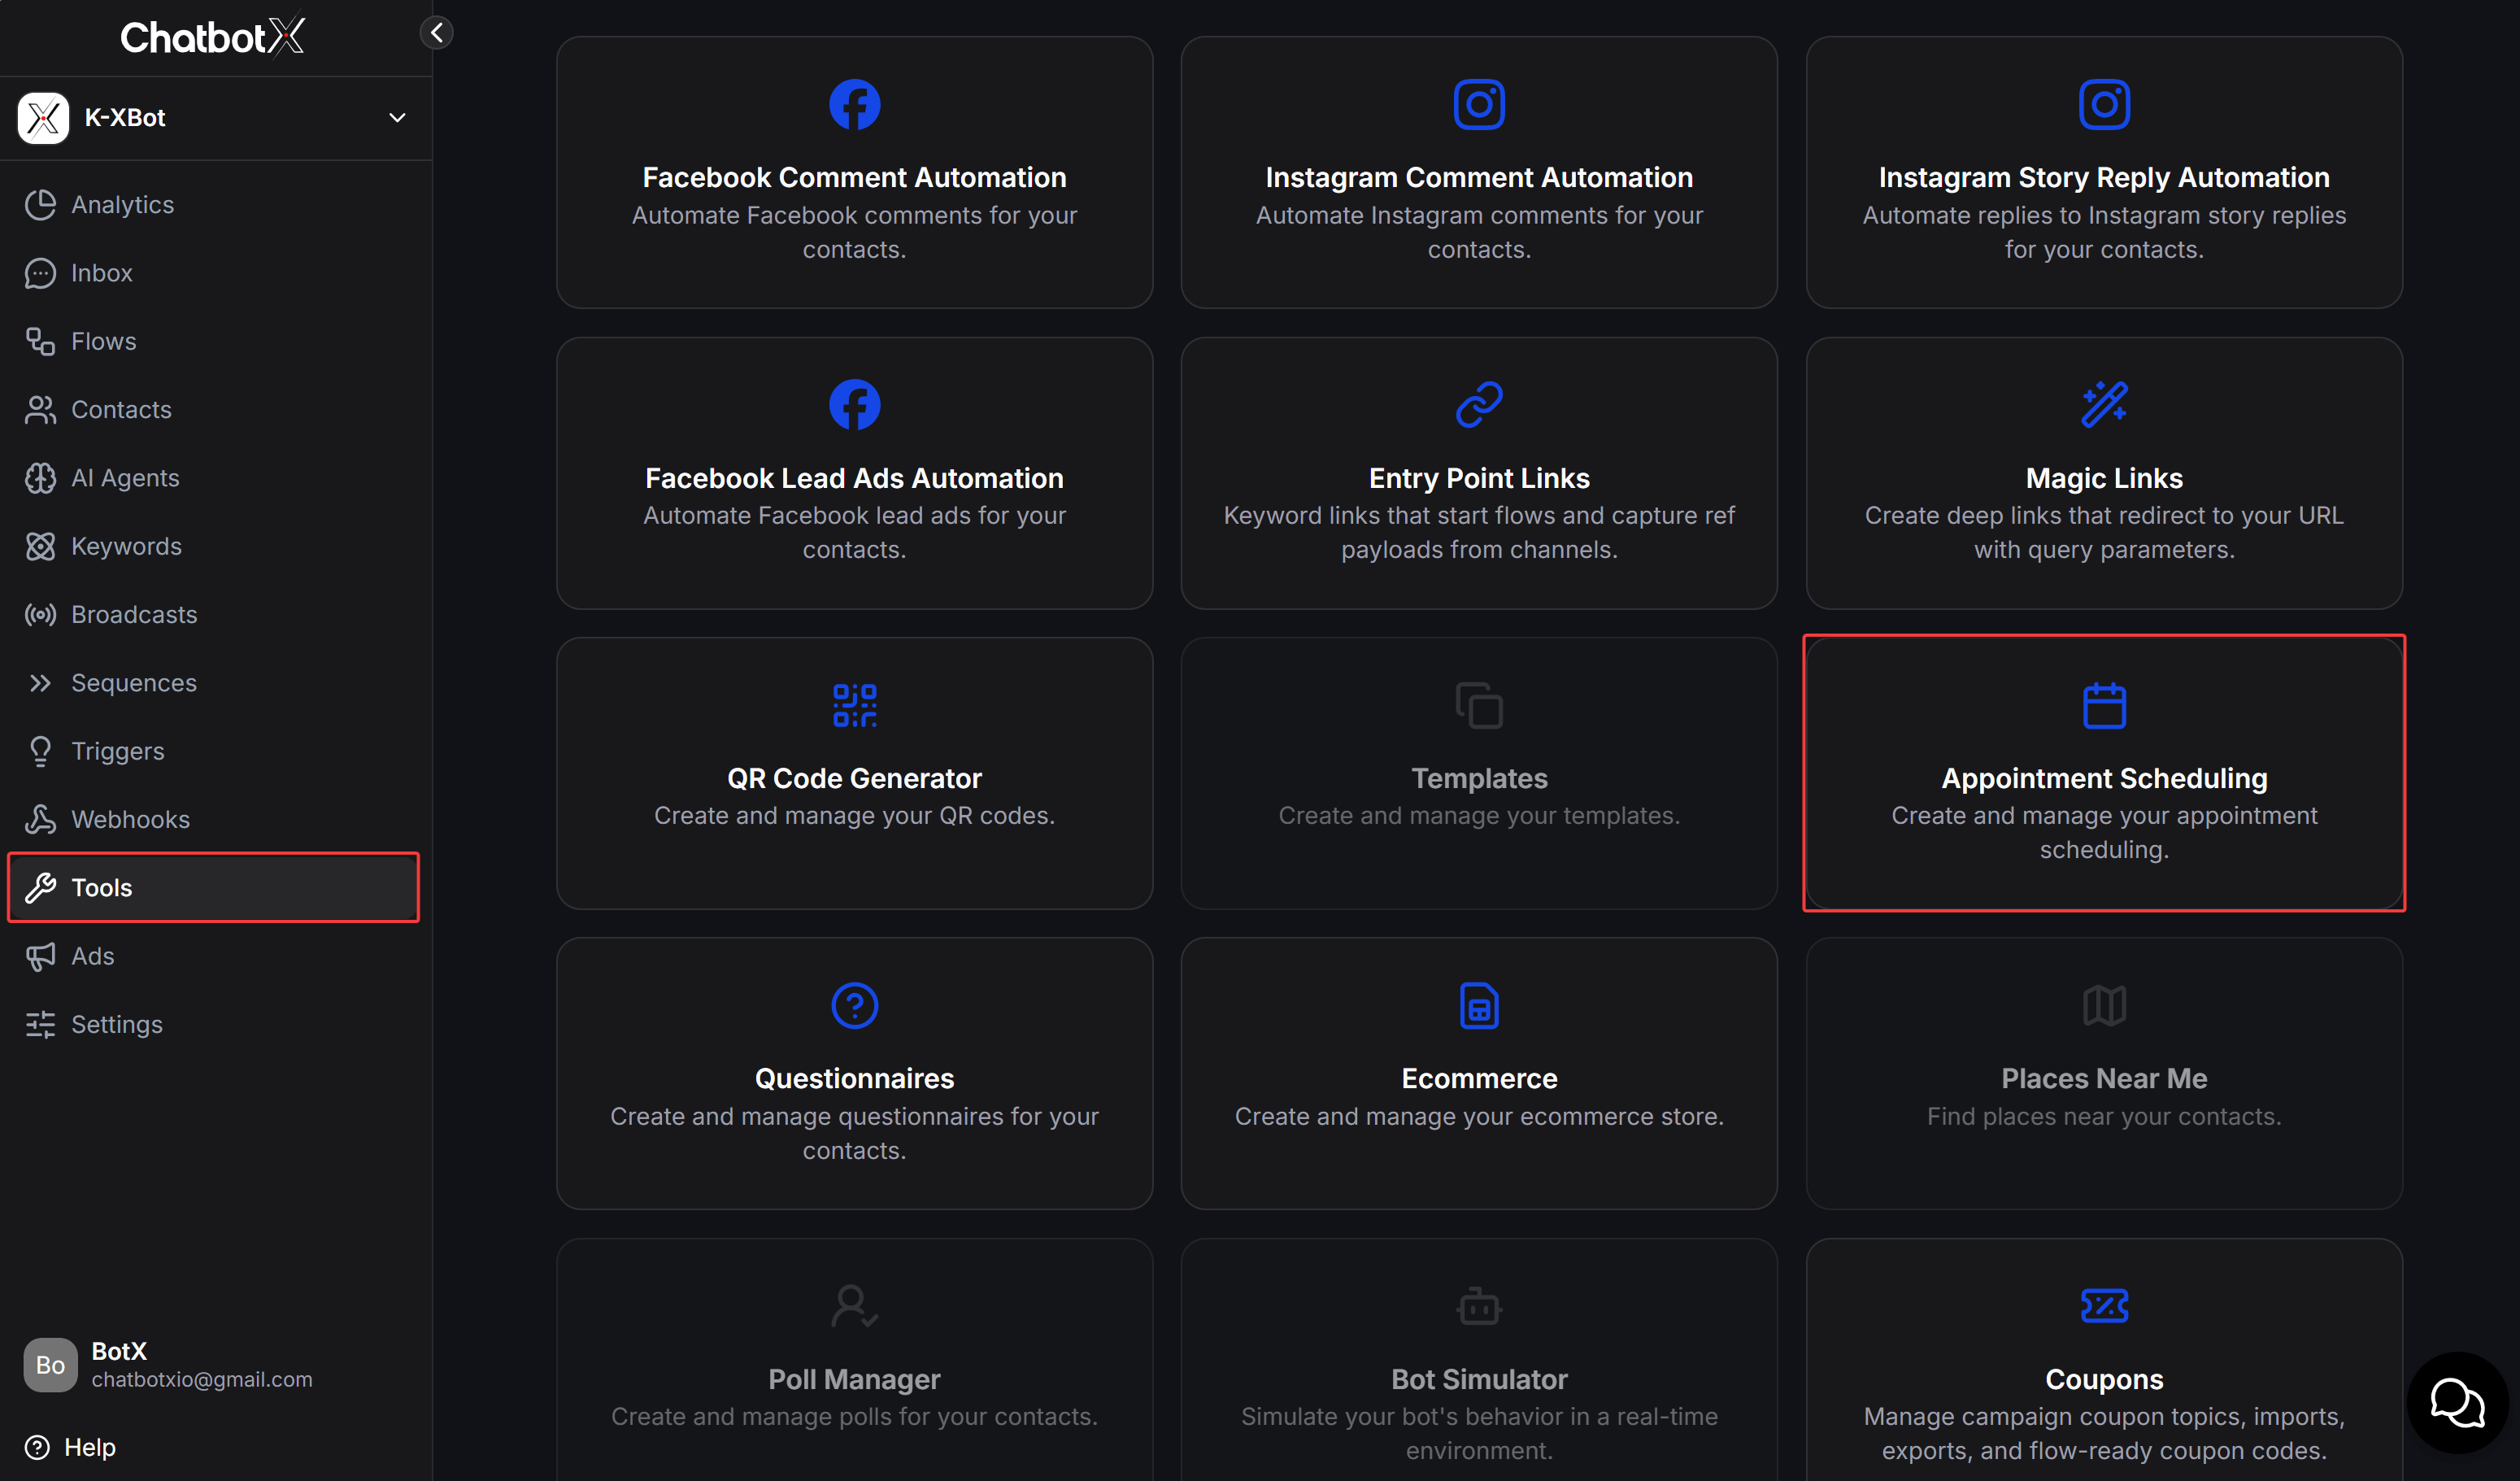 The Appointment Scheduling page has three tabs:
* **Calendars**: Create and configure appointment calendars.
* **Appointments**: Track appointments booked by customers.
* **External Calendars**: Connect and manage external calendars.
## Create and manage a Calendar
The **Calendars** tab lists the calendars you have created. You can search by name, check a calendar's status, or click **Add** to create one.
The Appointment Scheduling page has three tabs:
* **Calendars**: Create and configure appointment calendars.
* **Appointments**: Track appointments booked by customers.
* **External Calendars**: Connect and manage external calendars.
## Create and manage a Calendar
The **Calendars** tab lists the calendars you have created. You can search by name, check a calendar's status, or click **Add** to create one.
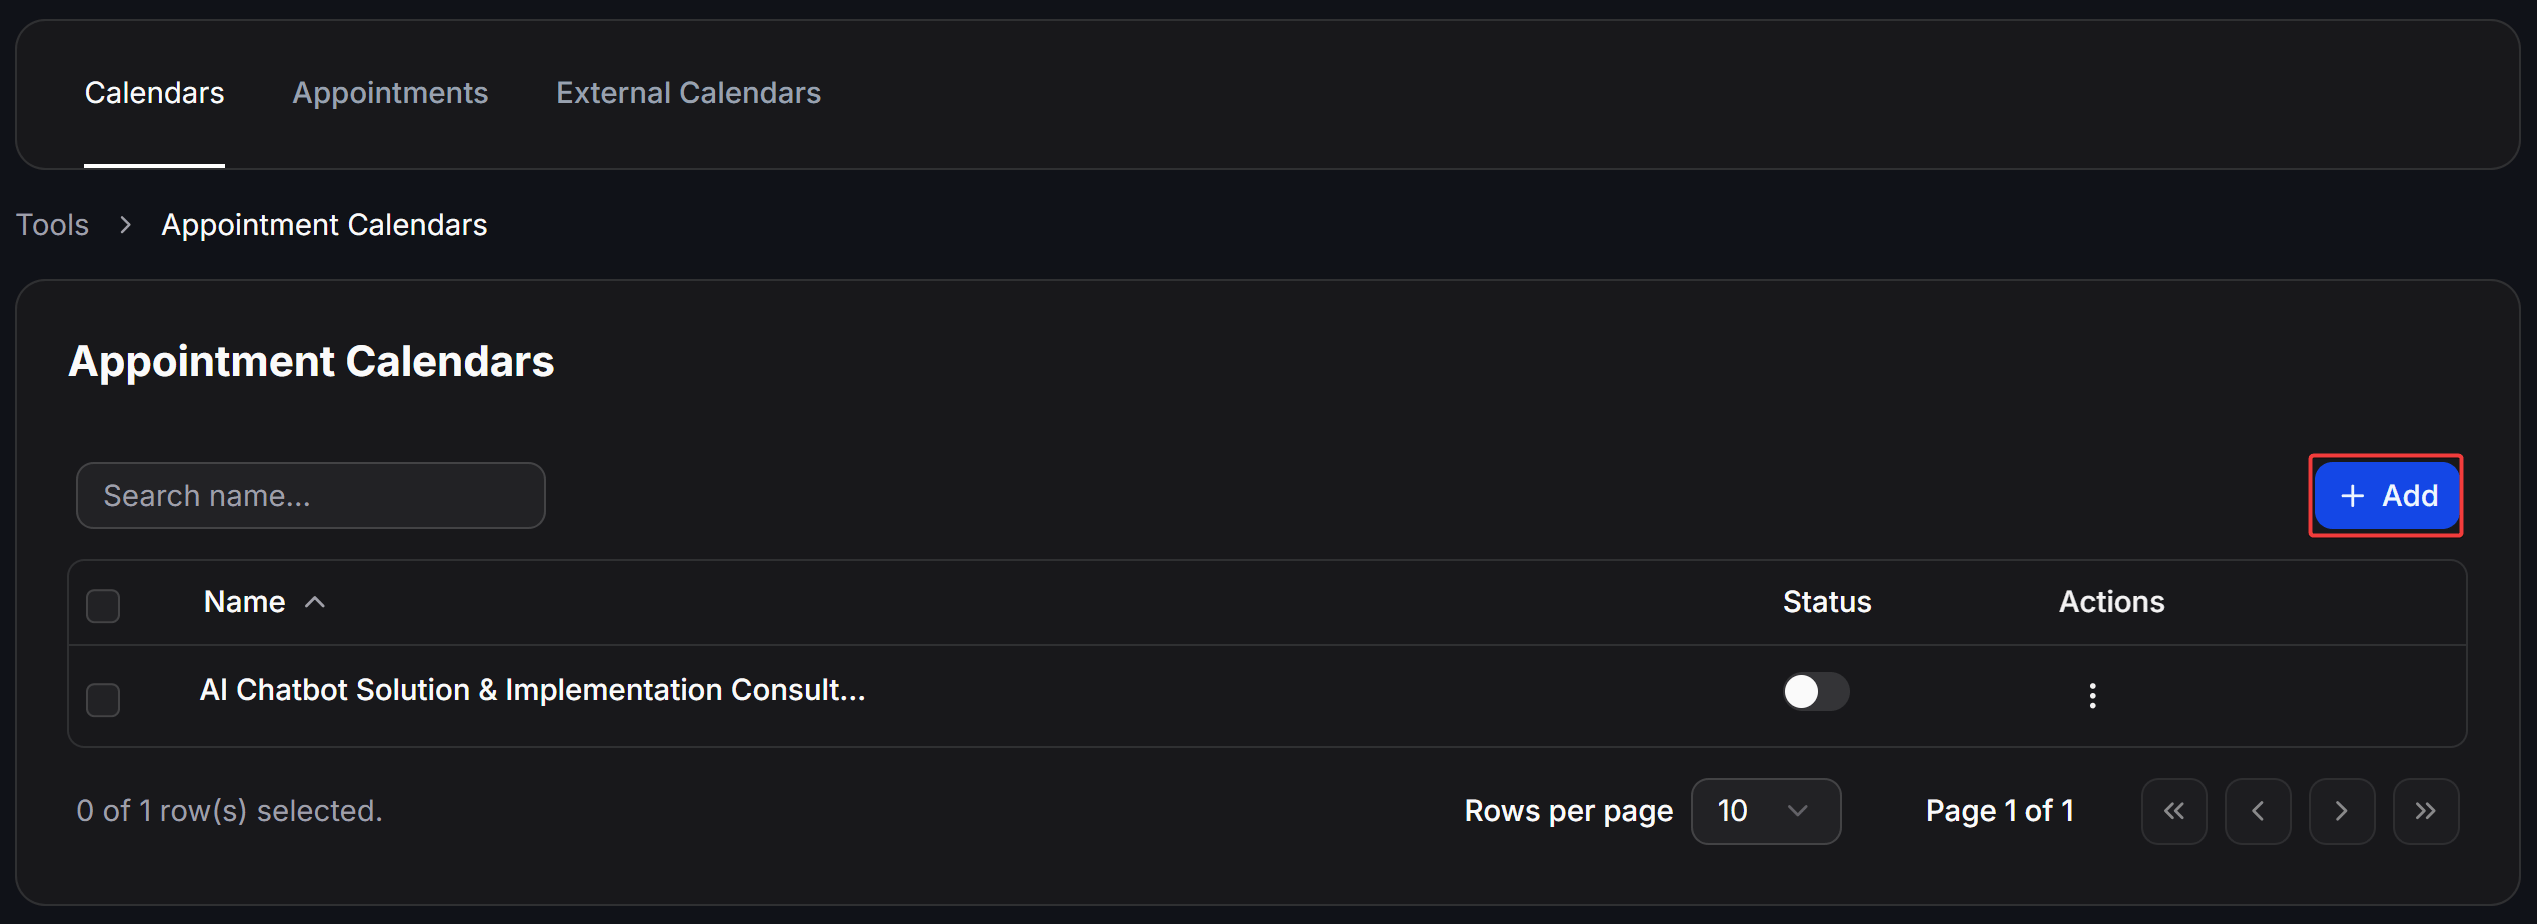 The management table contains the following items:
| Item | What it does |
| ------------------ | ----------------------------------------- |
| **Search name...** | Finds a Calendar by name. |
| **Name** | Shows the Calendar name. |
| **Status** | Enables or disables appointment bookings. |
| **Actions** | Opens the Calendar management options. |
| **Add** | Creates a new Calendar. |
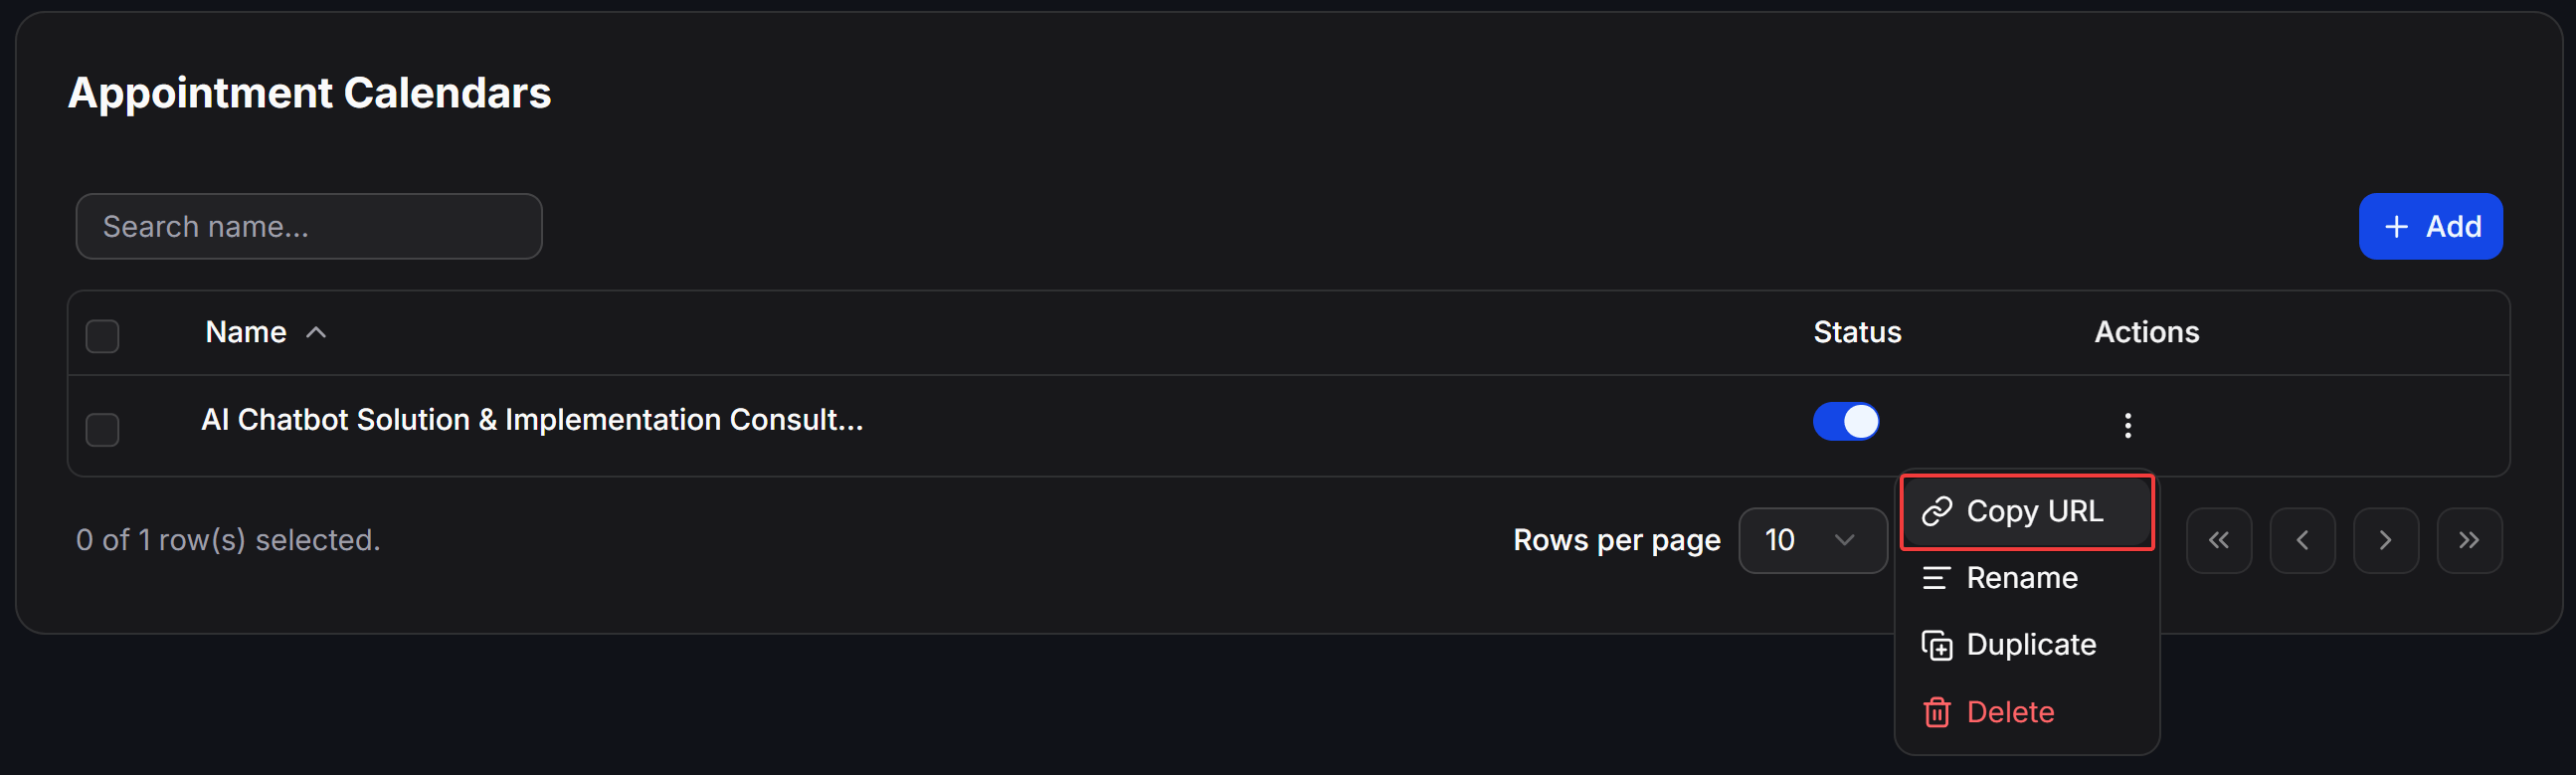
The **Actions** menu lets you edit, duplicate, copy the Booking Link, or delete a Calendar. The Booking Link must be added to a Flow and sent to the customer from that Flow. This allows ChatbotX to identify the contact who opens the link and books the appointment.
### Enter the appointment details
In **What is your appointment**, enter information that helps you identify the Calendar and tells customers what the appointment is about.
The management table contains the following items:
| Item | What it does |
| ------------------ | ----------------------------------------- |
| **Search name...** | Finds a Calendar by name. |
| **Name** | Shows the Calendar name. |
| **Status** | Enables or disables appointment bookings. |
| **Actions** | Opens the Calendar management options. |
| **Add** | Creates a new Calendar. |
The **Actions** menu lets you edit, duplicate, copy the Booking Link, or delete a Calendar. The Booking Link must be added to a Flow and sent to the customer from that Flow. This allows ChatbotX to identify the contact who opens the link and books the appointment.
### Enter the appointment details
In **What is your appointment**, enter information that helps you identify the Calendar and tells customers what the appointment is about.
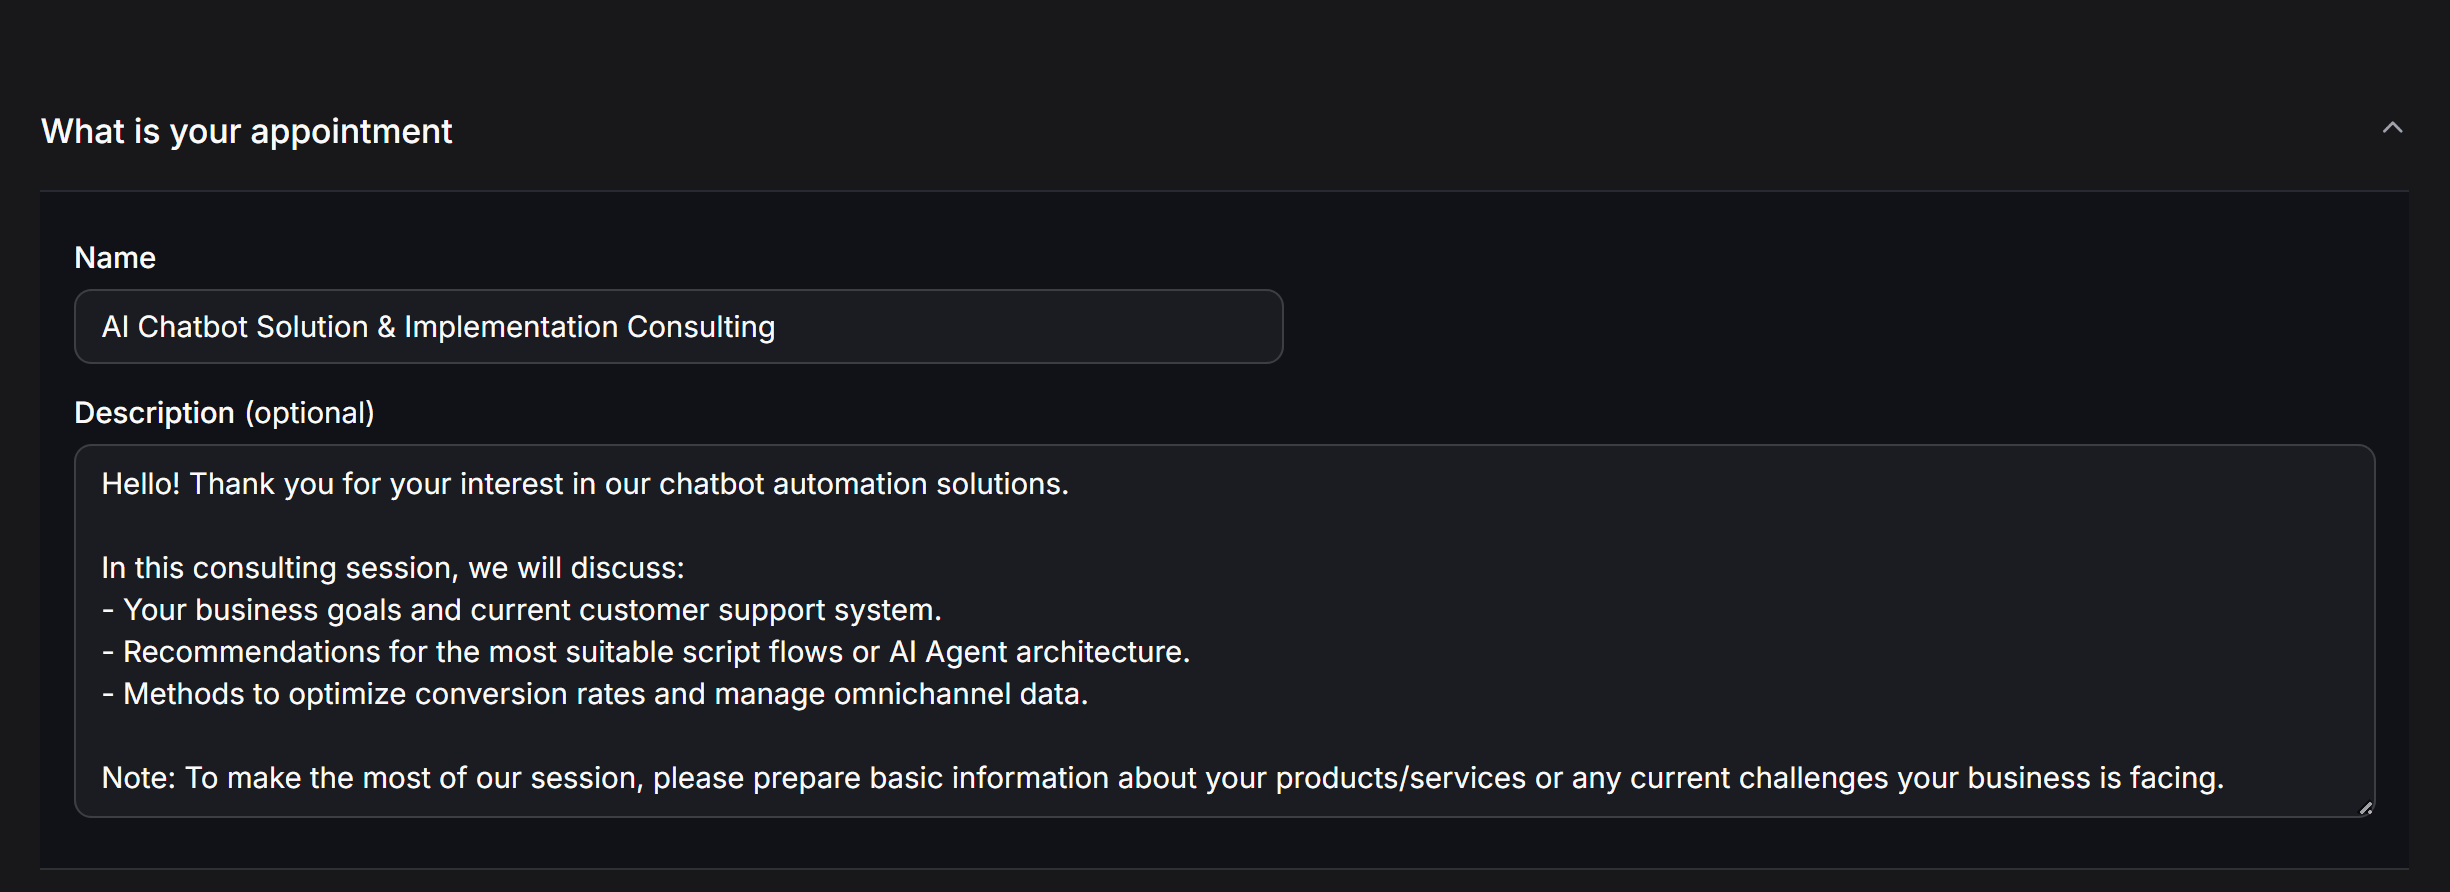 * **Name**: The appointment name, for example `ChatbotX solution consultation`.
* **Description (optional)**: The purpose of the appointment and any information customers should prepare in advance.
Use a short and clear name. The description should tell customers what you will discuss and what they need to prepare.
### Set the available booking times
The **When can people book?** section defines the days and times when you accept appointments. Each day of the week can use different hours.
* **Name**: The appointment name, for example `ChatbotX solution consultation`.
* **Description (optional)**: The purpose of the appointment and any information customers should prepare in advance.
Use a short and clear name. The description should tell customers what you will discuss and what they need to prepare.
### Set the available booking times
The **When can people book?** section defines the days and times when you accept appointments. Each day of the week can use different hours.
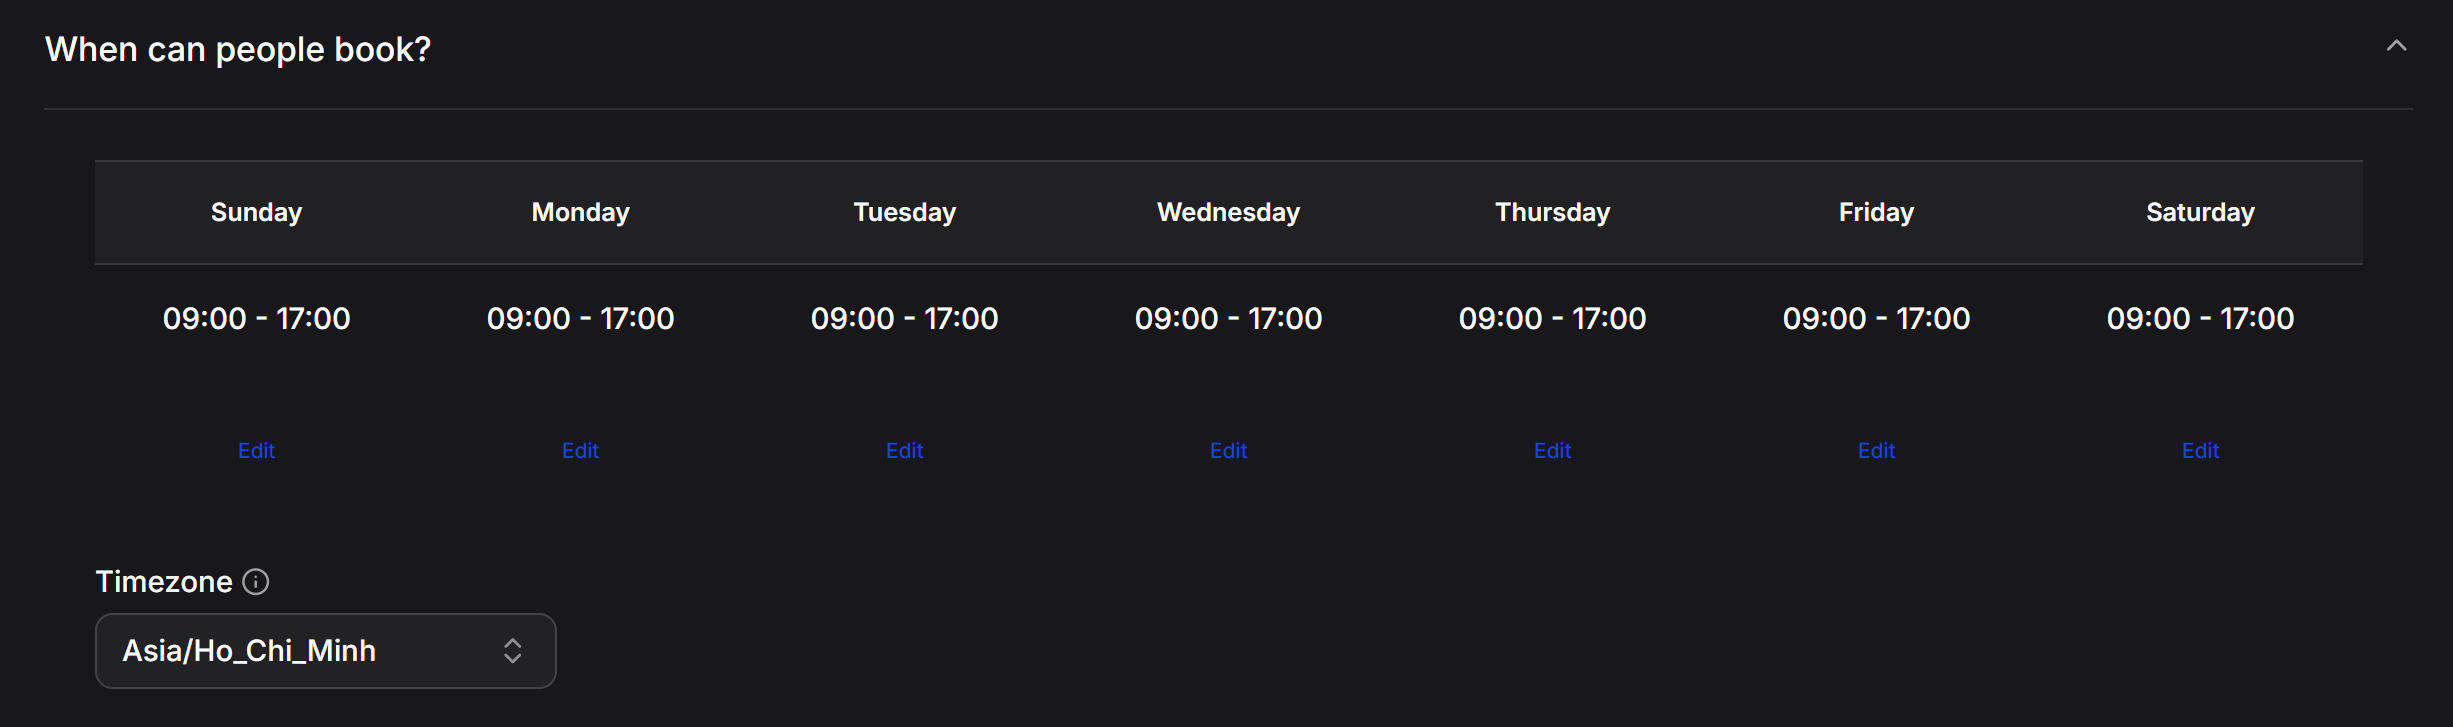 Click **Edit** under a day to change its start and end times. Select the correct **Timezone** so appointment times are displayed consistently.
In the day editor, each row contains a **Start Time** and **End Time**. Click **Add Interval** to create multiple booking periods on the same day.
Click **Edit** under a day to change its start and end times. Select the correct **Timezone** so appointment times are displayed consistently.
In the day editor, each row contains a **Start Time** and **End Time**. Click **Add Interval** to create multiple booking periods on the same day.
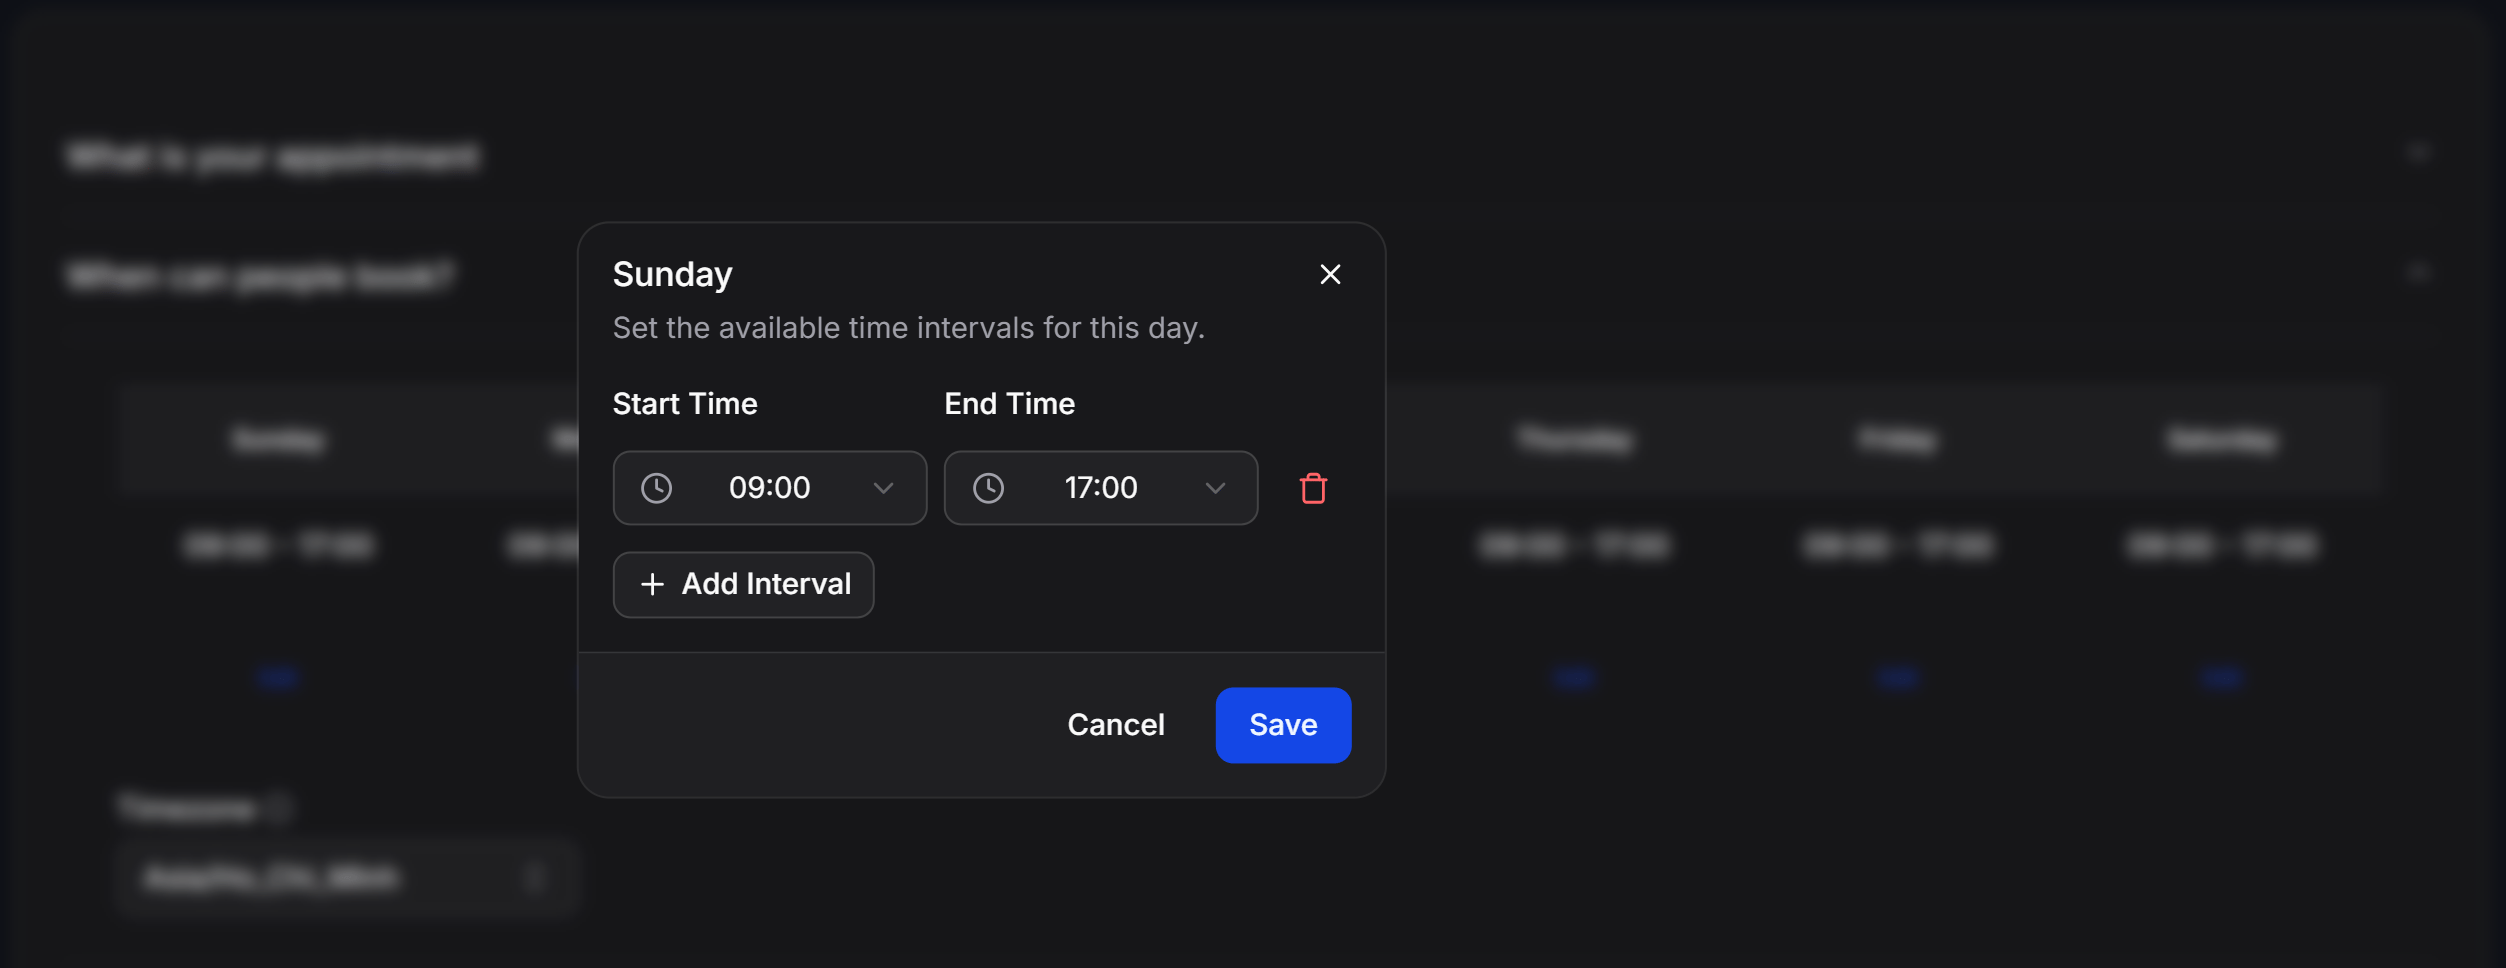 For example, accept appointments from 9:00 AM to 12:00 PM, take a lunch break, and continue from 1:30 PM to 5:00 PM. Click the trash icon to remove a time period, then click **Save**.
### Choose the appointment location
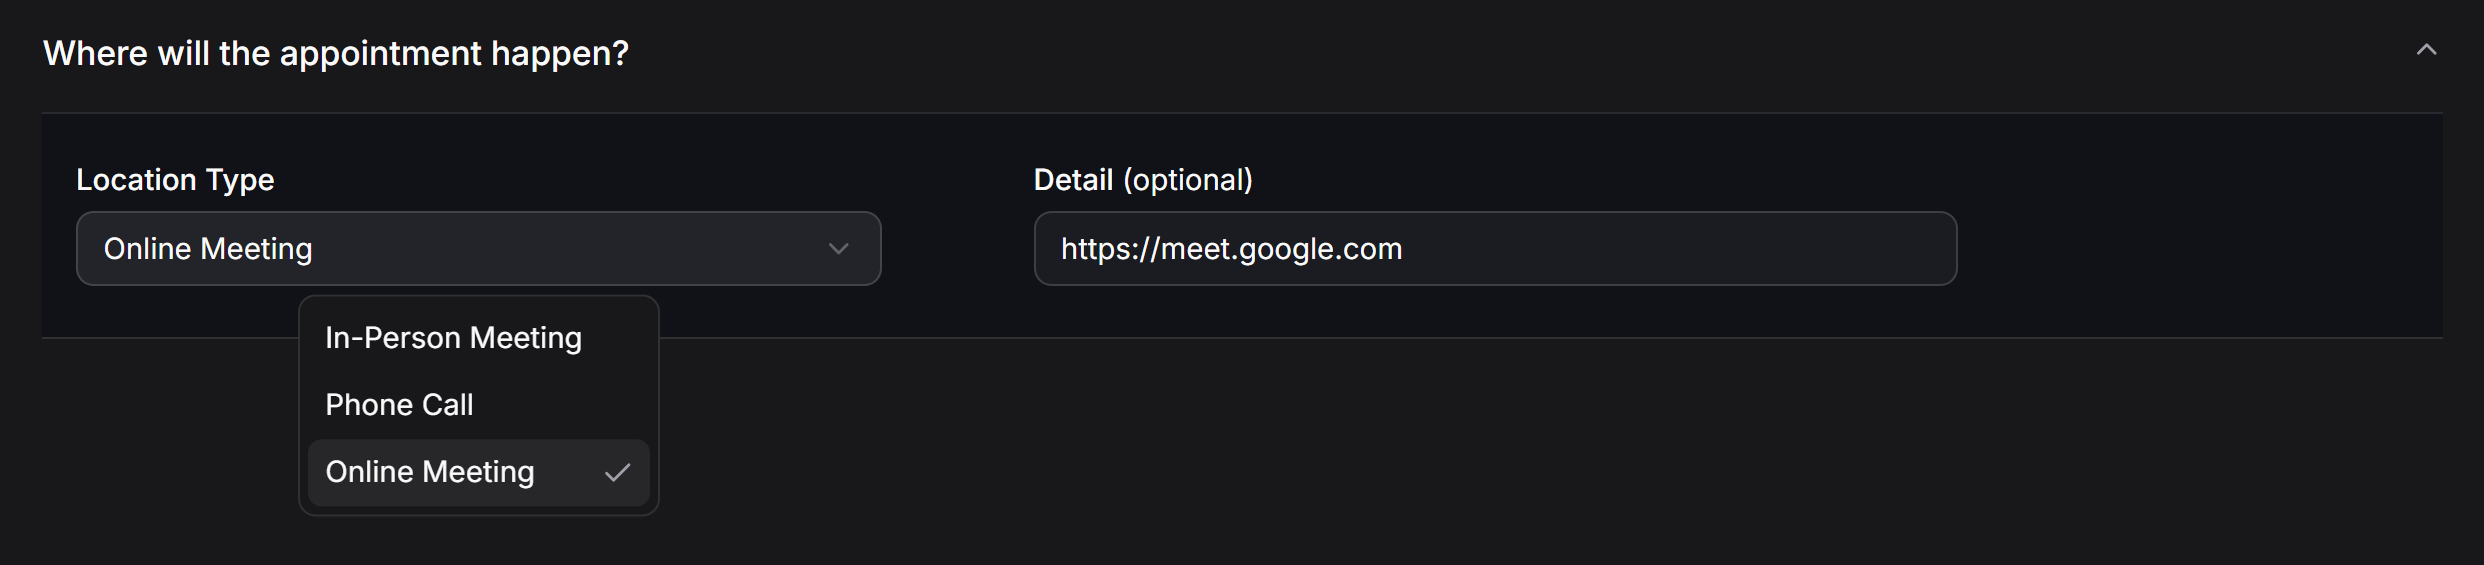
The **Where will the appointment happen?** section lets you choose how the appointment takes place and provide the details customers need to join.
**Location Type** has three options:
* **In-Person Meeting**: Meet in person. Enter the address in **Detail (optional)**.
* **Phone Call**: Meet by phone. Enter a phone number or contact instructions.
* **Online Meeting**: Meet online. Enter a Google Meet, Zoom, or another meeting link.
For example, accept appointments from 9:00 AM to 12:00 PM, take a lunch break, and continue from 1:30 PM to 5:00 PM. Click the trash icon to remove a time period, then click **Save**.
### Choose the appointment location
The **Where will the appointment happen?** section lets you choose how the appointment takes place and provide the details customers need to join.
**Location Type** has three options:
* **In-Person Meeting**: Meet in person. Enter the address in **Detail (optional)**.
* **Phone Call**: Meet by phone. Enter a phone number or contact instructions.
* **Online Meeting**: Meet online. Enter a Google Meet, Zoom, or another meeting link.
 ### Configure confirmation and reminder messages
When you create an **Appointment Calendar**, ChatbotX automatically creates two Flows, which are automated message sequences, using the appointment name:
| Created sequence | Purpose | Where to select it in Notifications |
| ---------------------------------------------- | ---------------------------------------------------- | ----------------------------------- |
| **Booking confirmation - \[Appointment name]** | Sends a message after a customer books successfully. | **Confirmation Flow** |
| **Reminder - \[Appointment name]** | Sends a reminder before the appointment starts. | **Reminders** |
These sequences appear in [Flows](/docs/automation/flows). You can open each one and edit its message before selecting it in **Notifications**.
When customers use **Open booking page** or **Open availability page**, ChatbotX automatically sends the selected Flow after they finish booking or checking available times. If you select **None**, ChatbotX does not send the corresponding notification. Change the selection in the Appointment Calendar's **Notifications** section.
The **Notifications** section controls what customers receive after booking, after cancellation, or before the appointment begins:
* **Confirmation Message (optional)**: The message shown on the confirmation page after a successful booking. It is not an automatic chat message.
* **Confirmation Flow (optional)**: Select **Booking confirmation - \[Appointment name]**, another Flow, or **None**. The selected Flow runs after the appointment is confirmed.
* **Cancellation Flow (optional)**: Select the Flow used after an appointment is canceled, or select **None** if no notification is needed.
* **Reminders**: Select **Reminder - \[Appointment name]**, another Flow, or **None**. If you use a Flow, enter an amount and choose **Minutes before**, **Hours before**, or **Days before**.
### Configure confirmation and reminder messages
When you create an **Appointment Calendar**, ChatbotX automatically creates two Flows, which are automated message sequences, using the appointment name:
| Created sequence | Purpose | Where to select it in Notifications |
| ---------------------------------------------- | ---------------------------------------------------- | ----------------------------------- |
| **Booking confirmation - \[Appointment name]** | Sends a message after a customer books successfully. | **Confirmation Flow** |
| **Reminder - \[Appointment name]** | Sends a reminder before the appointment starts. | **Reminders** |
These sequences appear in [Flows](/docs/automation/flows). You can open each one and edit its message before selecting it in **Notifications**.
When customers use **Open booking page** or **Open availability page**, ChatbotX automatically sends the selected Flow after they finish booking or checking available times. If you select **None**, ChatbotX does not send the corresponding notification. Change the selection in the Appointment Calendar's **Notifications** section.
The **Notifications** section controls what customers receive after booking, after cancellation, or before the appointment begins:
* **Confirmation Message (optional)**: The message shown on the confirmation page after a successful booking. It is not an automatic chat message.
* **Confirmation Flow (optional)**: Select **Booking confirmation - \[Appointment name]**, another Flow, or **None**. The selected Flow runs after the appointment is confirmed.
* **Cancellation Flow (optional)**: Select the Flow used after an appointment is canceled, or select **None** if no notification is needed.
* **Reminders**: Select **Reminder - \[Appointment name]**, another Flow, or **None**. If you use a Flow, enter an amount and choose **Minutes before**, **Hours before**, or **Days before**.
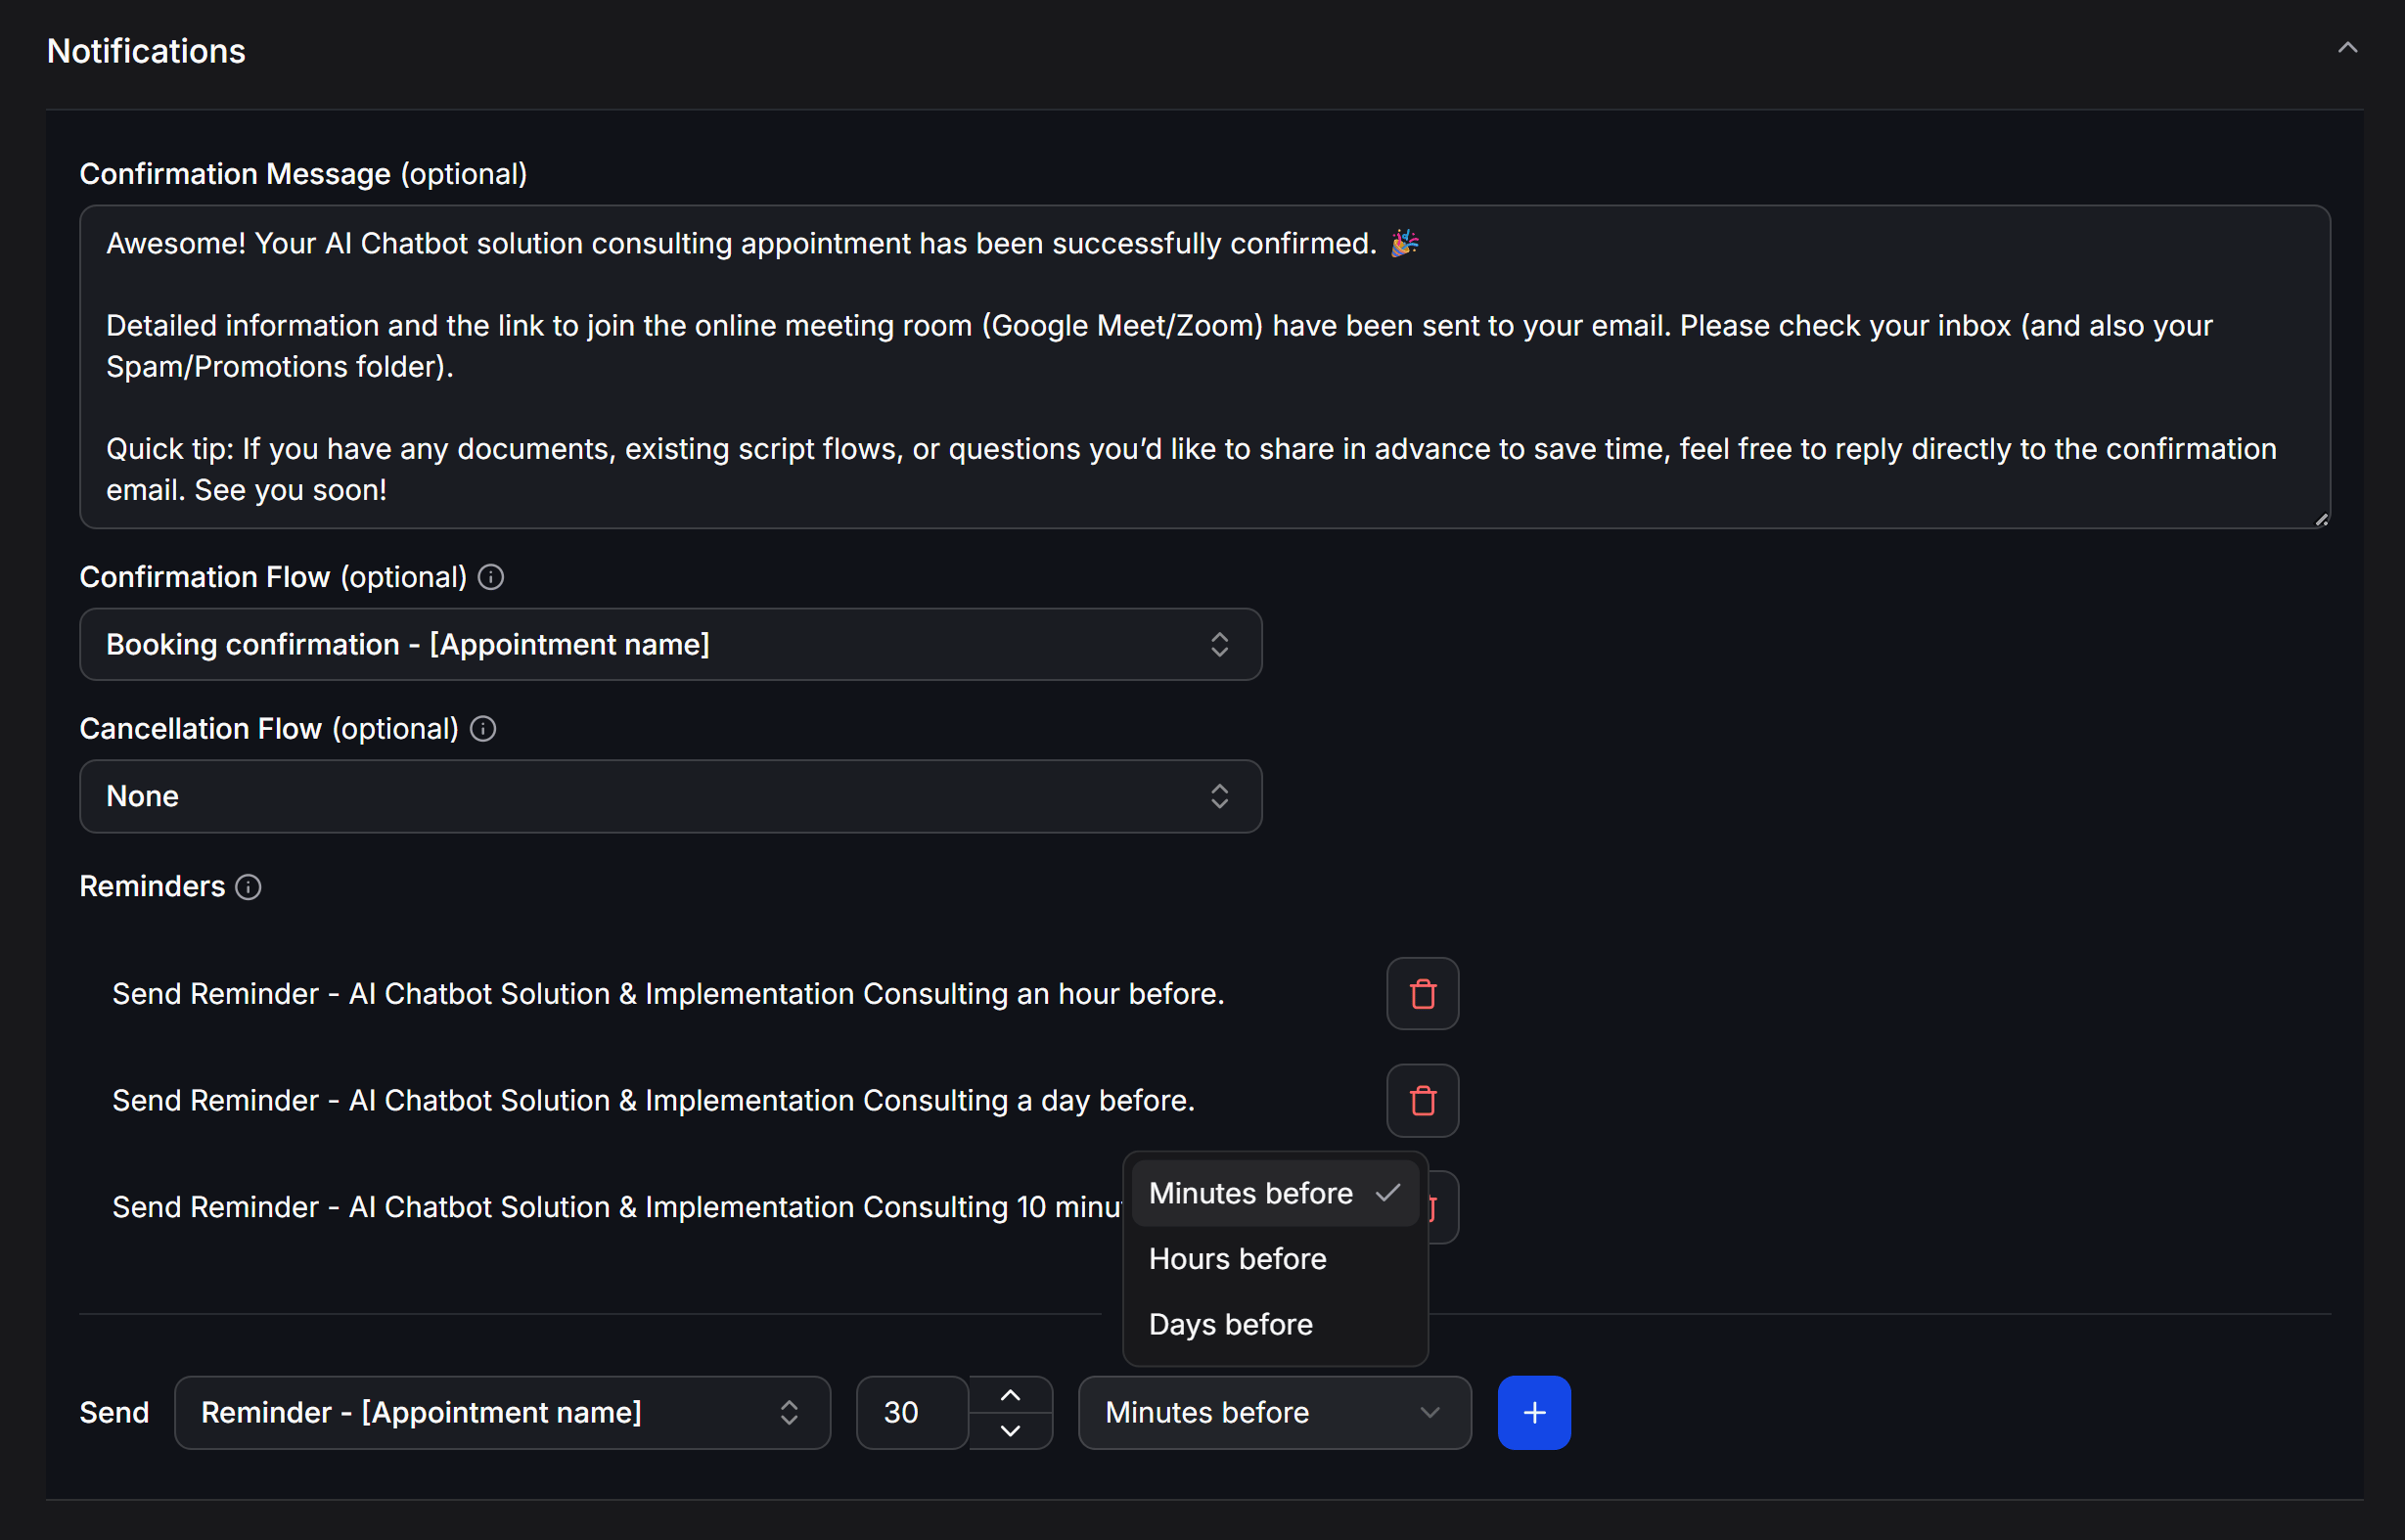 The two automatically created Flows are templates. Under **Confirmation Flow**, **Cancellation Flow**, and **Reminders**, you can independently select another Flow or **None** for each notification type.
Click **+** to add multiple reminder times. For example, send one reminder a day before, another an hour before, and a final reminder 10 minutes before the appointment. Click the trash icon to remove a reminder you no longer need.
### Set booking limits
The **Restrictions** section controls appointment duration, booking limits, and how far in advance customers can book.
| Setting | What it does |
| ------------------------------------ | ---------------------------------------------------------------------------------------------------- |
| **Appointment duration** | Sets the duration of each appointment. |
| **Add time after your appointments** | Adds a break between consecutive appointments. |
| **People can schedule** | Selects the date range in which customers can book. |
| **Maximum appointments per user** | Limits appointments for each customer or allows Unlimited bookings. |
| **Rolling days** | Limits how many future days are open for booking. |
| **Minimum days in advance** | Requires customers to book a set number of days in advance. |
| **Daily limit** | Limits the total appointments per day. When enabled, enter the limit in **Max Per Day**. |
| **Allow Group Meeting** | Allows multiple customers to book the same time. When enabled, set the capacity in **Max Per Slot**. |
The two automatically created Flows are templates. Under **Confirmation Flow**, **Cancellation Flow**, and **Reminders**, you can independently select another Flow or **None** for each notification type.
Click **+** to add multiple reminder times. For example, send one reminder a day before, another an hour before, and a final reminder 10 minutes before the appointment. Click the trash icon to remove a reminder you no longer need.
### Set booking limits
The **Restrictions** section controls appointment duration, booking limits, and how far in advance customers can book.
| Setting | What it does |
| ------------------------------------ | ---------------------------------------------------------------------------------------------------- |
| **Appointment duration** | Sets the duration of each appointment. |
| **Add time after your appointments** | Adds a break between consecutive appointments. |
| **People can schedule** | Selects the date range in which customers can book. |
| **Maximum appointments per user** | Limits appointments for each customer or allows Unlimited bookings. |
| **Rolling days** | Limits how many future days are open for booking. |
| **Minimum days in advance** | Requires customers to book a set number of days in advance. |
| **Daily limit** | Limits the total appointments per day. When enabled, enter the limit in **Max Per Day**. |
| **Allow Group Meeting** | Allows multiple customers to book the same time. When enabled, set the capacity in **Max Per Slot**. |
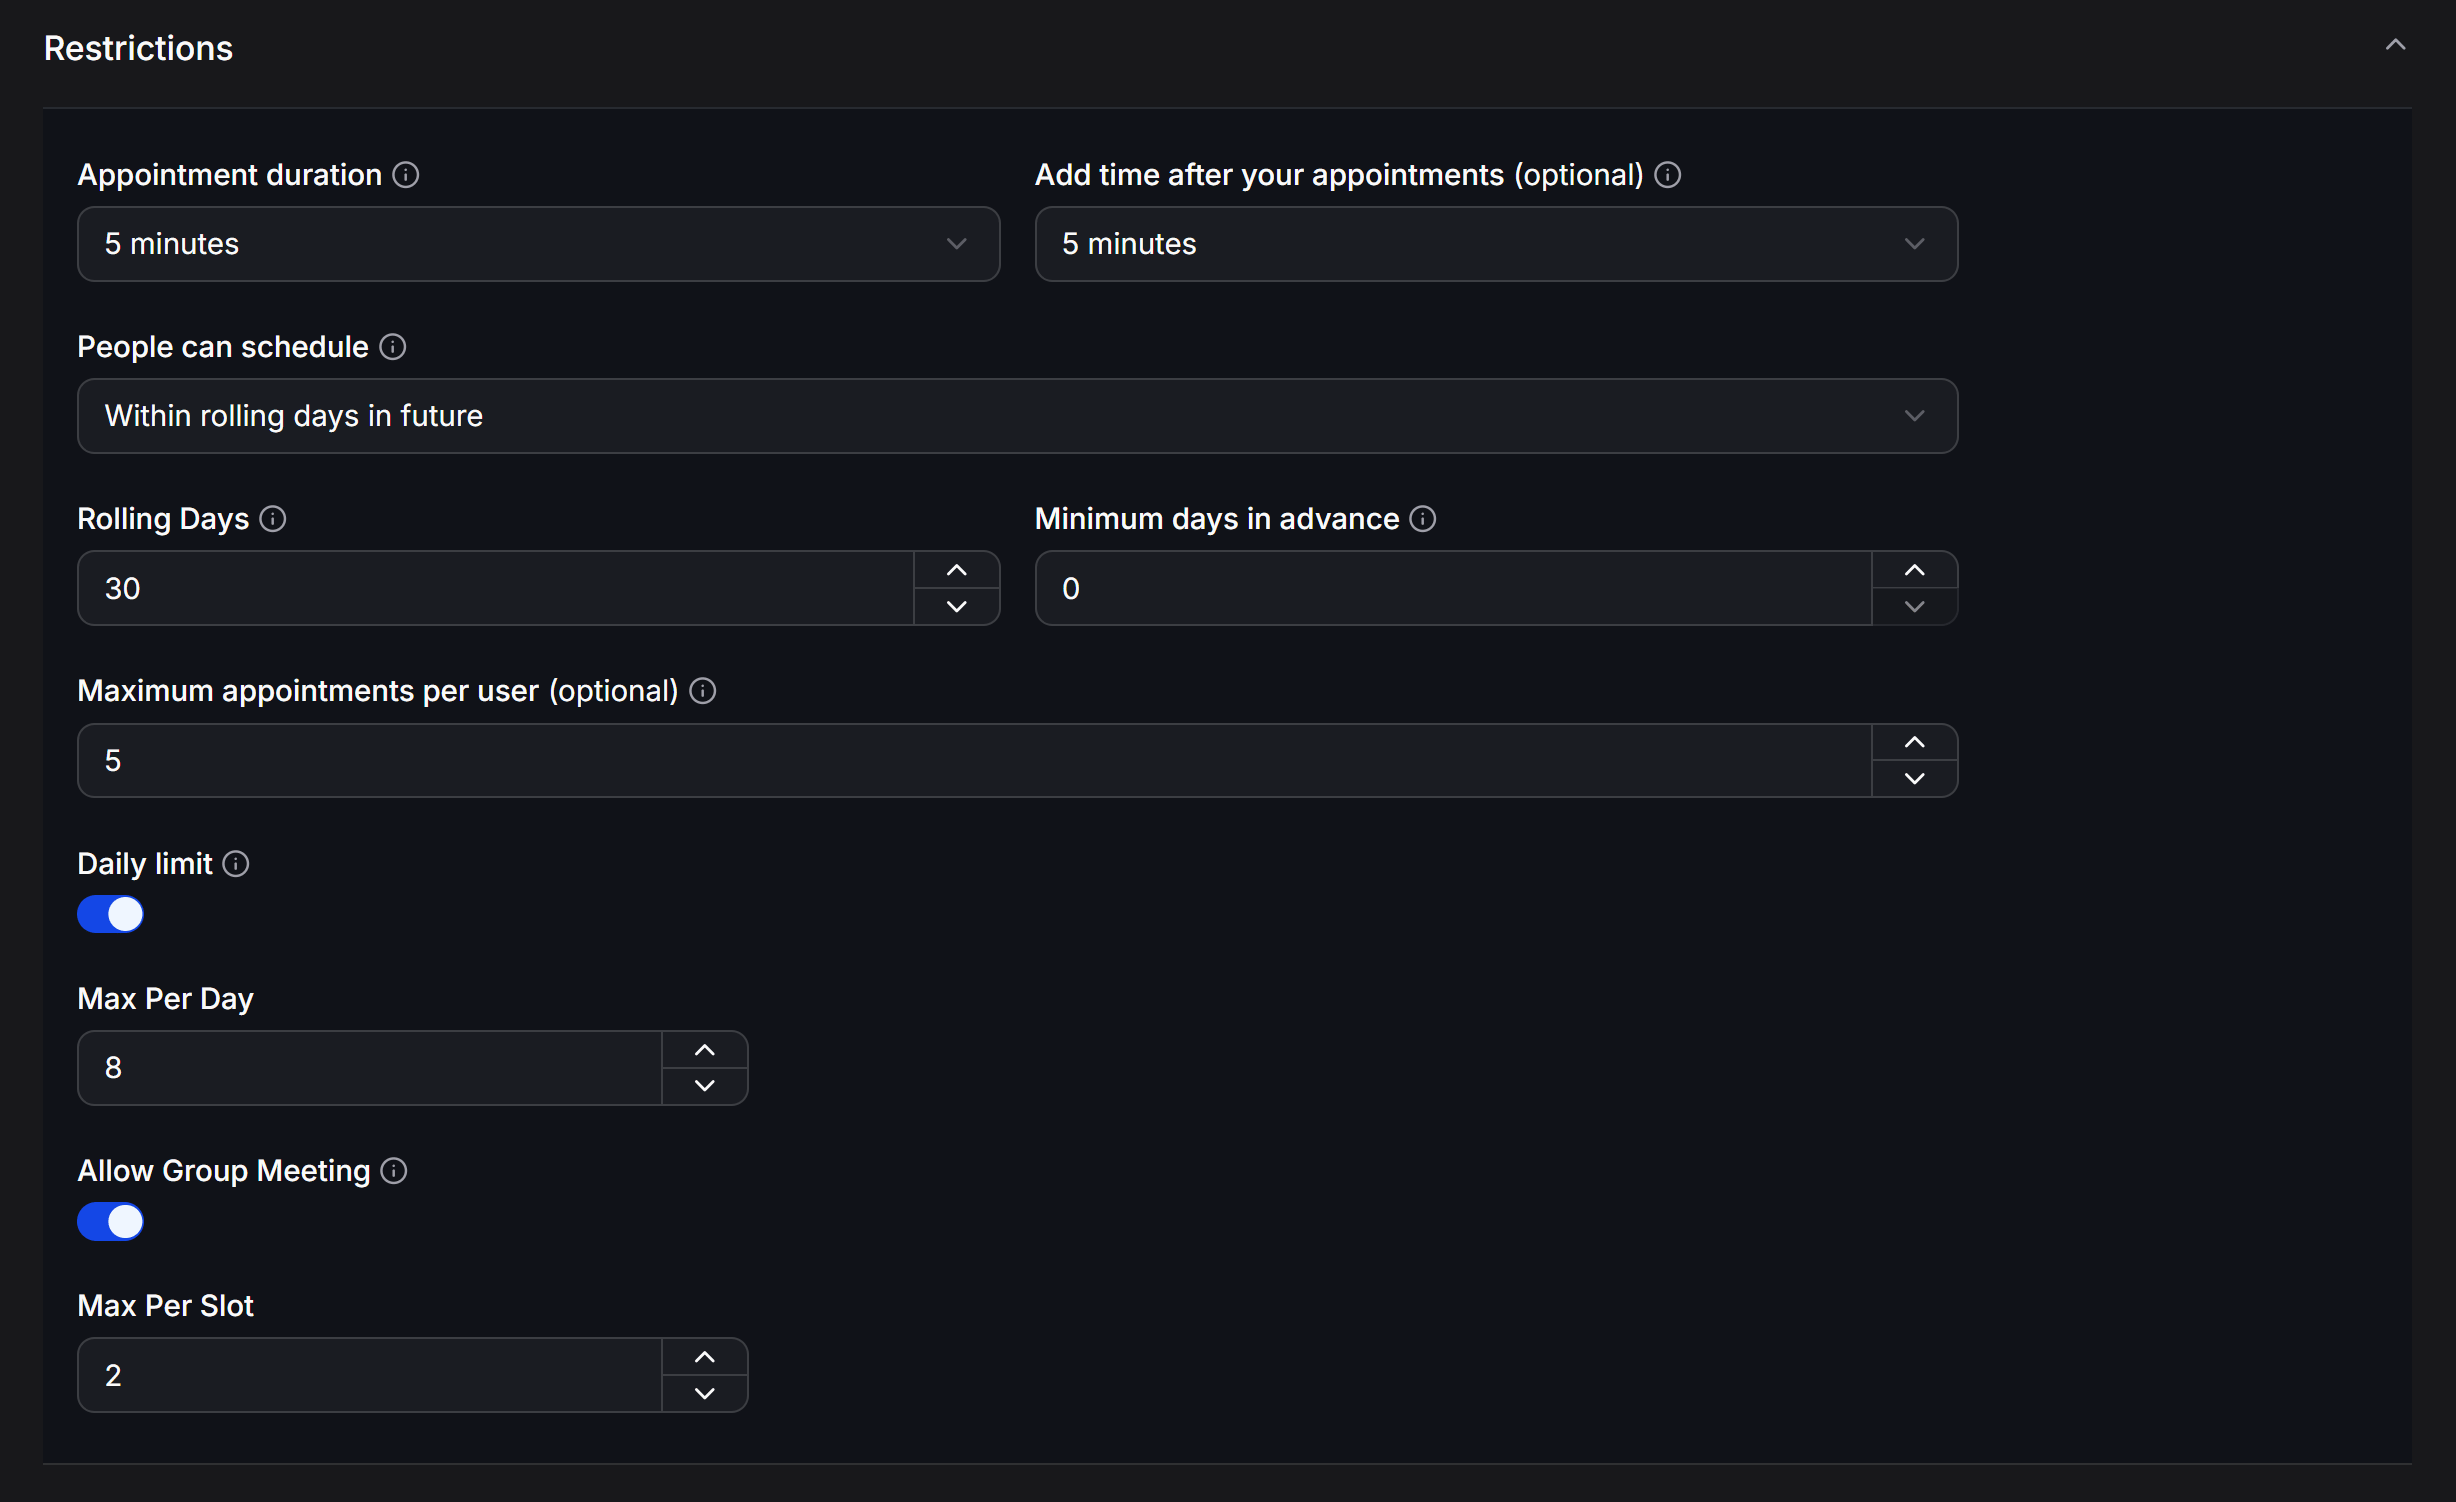 In the example above, each appointment lasts 5 minutes with a 5-minute break afterward. Customers can book within the next 30 days, with up to 5 appointments per customer. The Calendar accepts up to 8 appointments per day and 2 customers in the same time slot.
### Select an External Calendar
The **Connect Google Calendar** section lets you attach an external calendar to the Calendar you are configuring. **External Calendar (optional)** lists connected calendars. Keep **None** if you do not want to use one.
In the example above, each appointment lasts 5 minutes with a 5-minute break afterward. Customers can book within the next 30 days, with up to 5 appointments per customer. The Calendar accepts up to 8 appointments per day and 2 customers in the same time slot.
### Select an External Calendar
The **Connect Google Calendar** section lets you attach an external calendar to the Calendar you are configuring. **External Calendar (optional)** lists connected calendars. Keep **None** if you do not want to use one.
 If the calendar you need is not listed, open [External Calendars](#external-calendars) and connect Google Calendar first.
### Save and enable the appointment calendar
After completing the settings, save the Calendar. Return to the **Calendars** tab and enable **Status** so customers can start booking appointments.
Once the calendar is active, add the [Booking Link](#use-the-booking-link) to a Flow or add [Appointment Scheduling to a Flow](#use-appointment-scheduling-in-a-flow). Send the Flow to the customer so ChatbotX can identify who books the appointment. The new appointment then appears in the selected Calendar.
## Manage appointments and external calendars
### Track Appointments
Go to **Tools** > **Appointment Scheduling** and select the **Appointments** tab to view appointments for all customers. Select **Next** for upcoming appointments or **Past** for previous appointments. Use **Search by name...** to find an appointment by customer name.
If the calendar you need is not listed, open [External Calendars](#external-calendars) and connect Google Calendar first.
### Save and enable the appointment calendar
After completing the settings, save the Calendar. Return to the **Calendars** tab and enable **Status** so customers can start booking appointments.
Once the calendar is active, add the [Booking Link](#use-the-booking-link) to a Flow or add [Appointment Scheduling to a Flow](#use-appointment-scheduling-in-a-flow). Send the Flow to the customer so ChatbotX can identify who books the appointment. The new appointment then appears in the selected Calendar.
## Manage appointments and external calendars
### Track Appointments
Go to **Tools** > **Appointment Scheduling** and select the **Appointments** tab to view appointments for all customers. Select **Next** for upcoming appointments or **Past** for previous appointments. Use **Search by name...** to find an appointment by customer name.
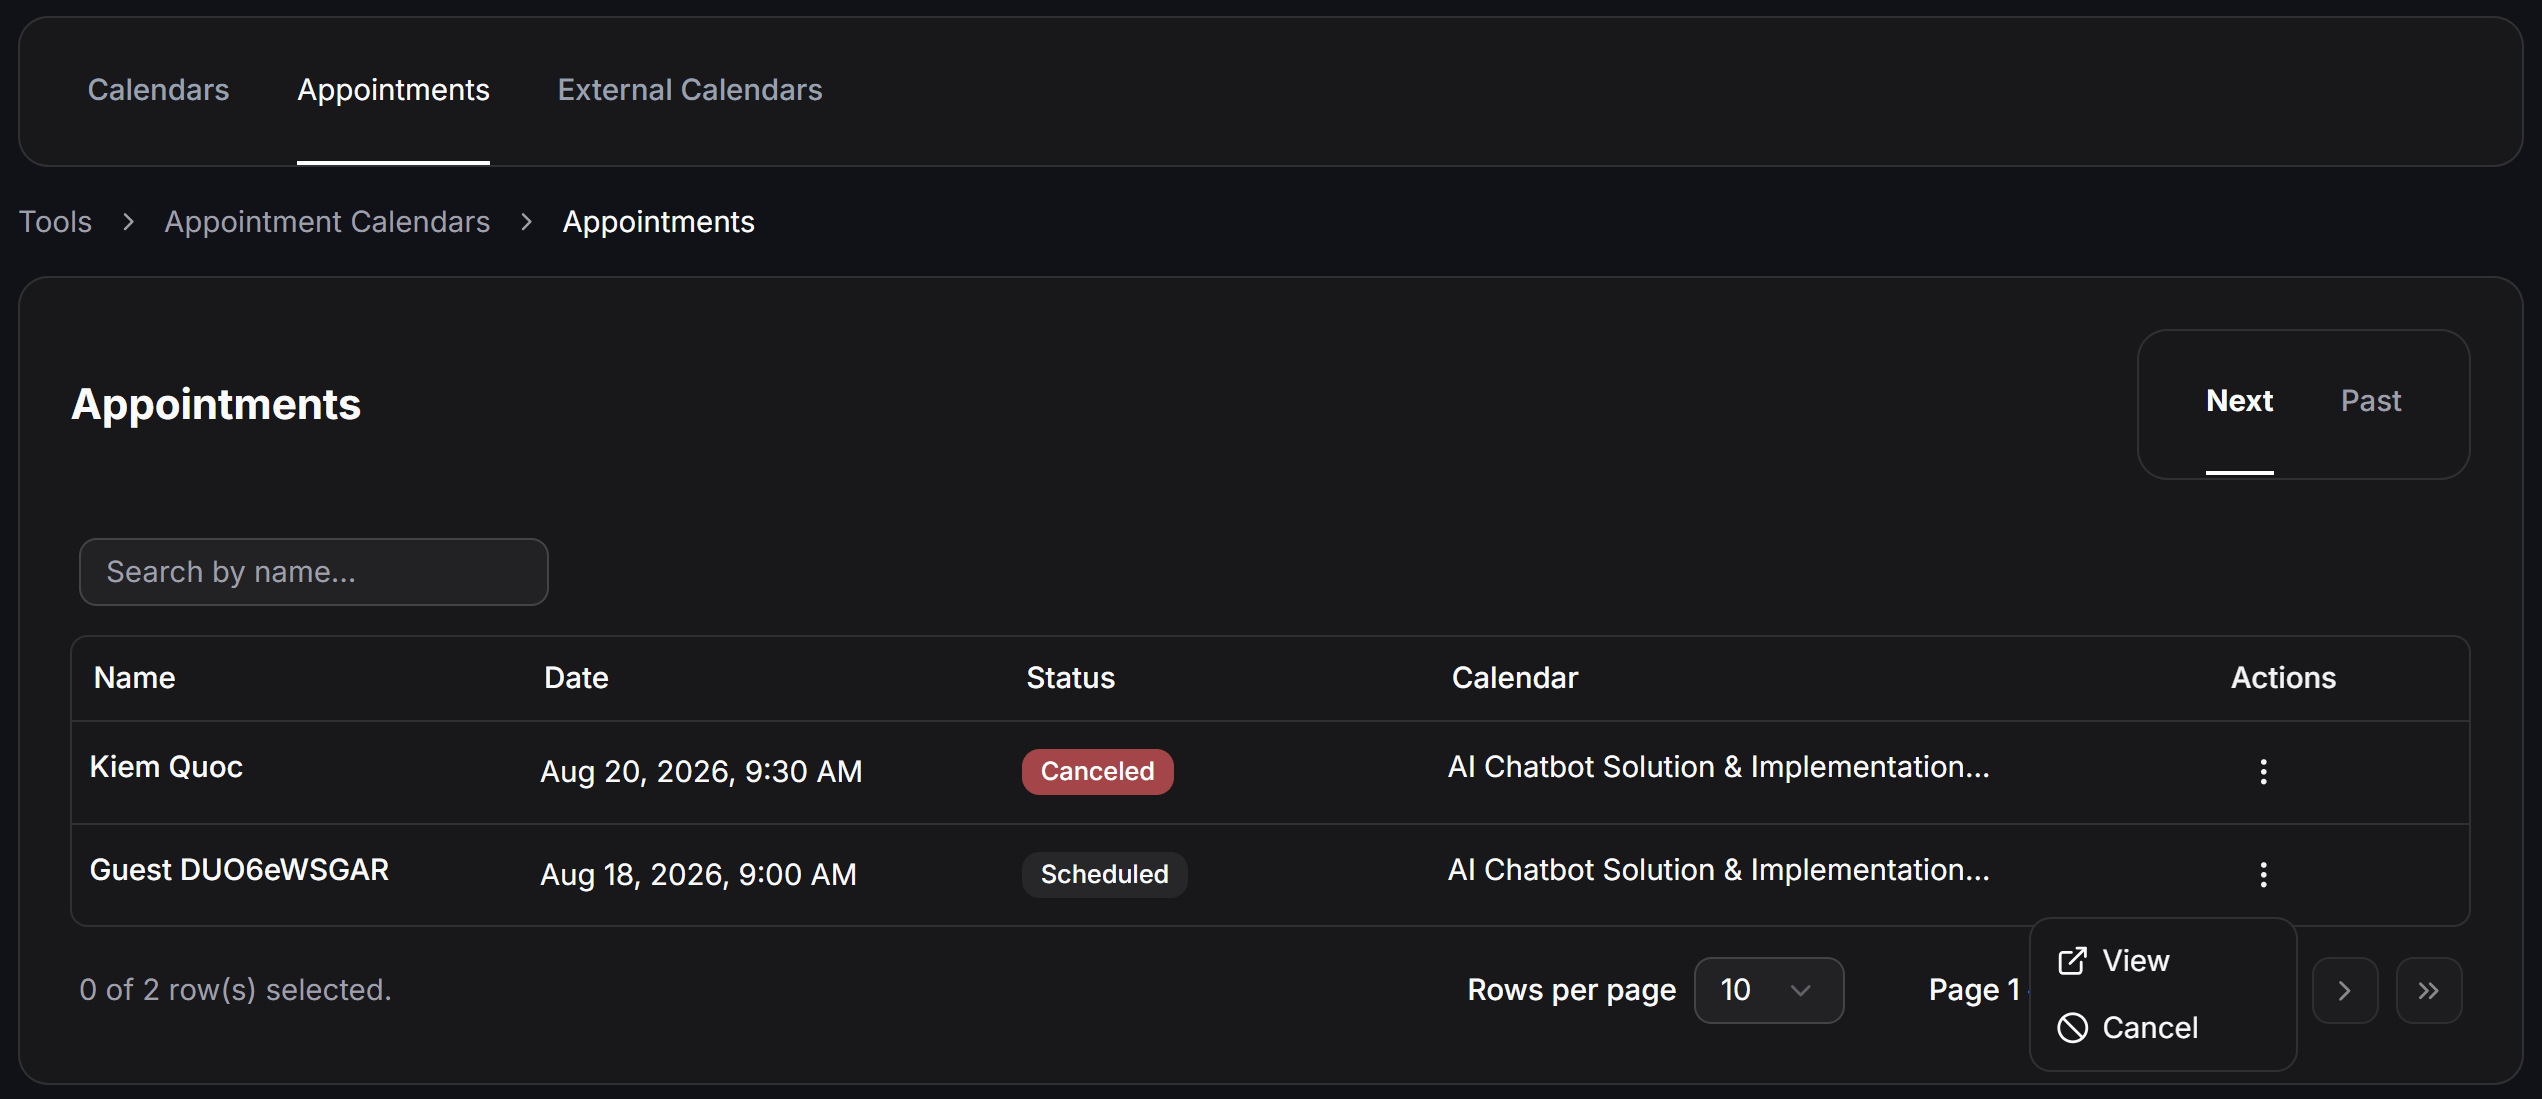 The Appointments table includes:
| Column | Information |
| ------------ | ----------------------------------------------------- |
| **Name** | The customer who booked the appointment. |
| **Date** | The appointment date and time. |
| **Status** | The status, such as **Scheduled** or **Canceled**. |
| **Calendar** | The Calendar that received the appointment. |
| **Actions** | Opens appointment details or cancels the appointment. |
Open **Actions** and select **View** to see appointment details. Select **Cancel** to cancel a scheduled appointment.
The details page shows the status, Calendar name, Confirmation Message, invitee, time, Timezone, and location. For online appointments, **Location** contains the meeting link.
The Appointments table includes:
| Column | Information |
| ------------ | ----------------------------------------------------- |
| **Name** | The customer who booked the appointment. |
| **Date** | The appointment date and time. |
| **Status** | The status, such as **Scheduled** or **Canceled**. |
| **Calendar** | The Calendar that received the appointment. |
| **Actions** | Opens appointment details or cancels the appointment. |
Open **Actions** and select **View** to see appointment details. Select **Cancel** to cancel a scheduled appointment.
The details page shows the status, Calendar name, Confirmation Message, invitee, time, Timezone, and location. For online appointments, **Location** contains the meeting link.
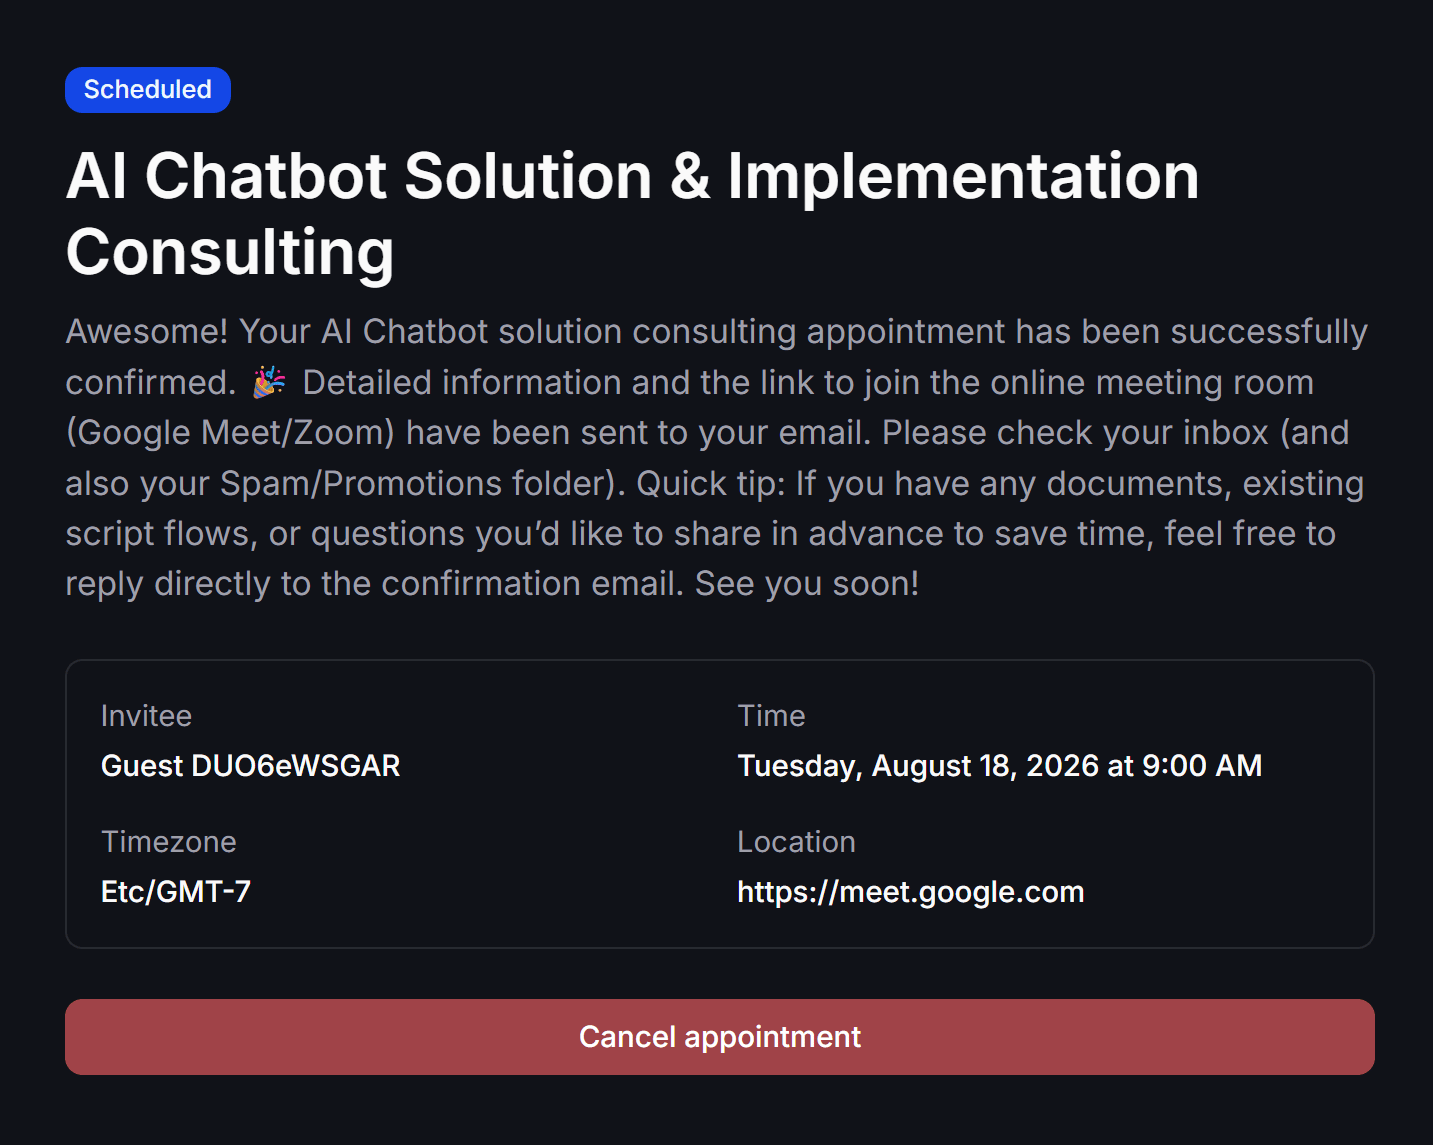 Click **Cancel appointment** to cancel it from the details page. ChatbotX updates the status and sends a cancellation message if you selected content under **Cancellation Flow**.
### View appointments for a contact in Inbox
Team members can view each customer's appointments in [Inbox](/docs/inbox/conversations) without reopening **Appointment Scheduling**.
Open the customer's conversation and find **Appointments** in the Contact information panel on the right. Expand it to view the appointment time and Calendar name.
Click **Cancel appointment** to cancel it from the details page. ChatbotX updates the status and sends a cancellation message if you selected content under **Cancellation Flow**.
### View appointments for a contact in Inbox
Team members can view each customer's appointments in [Inbox](/docs/inbox/conversations) without reopening **Appointment Scheduling**.
Open the customer's conversation and find **Appointments** in the Contact information panel on the right. Expand it to view the appointment time and Calendar name.
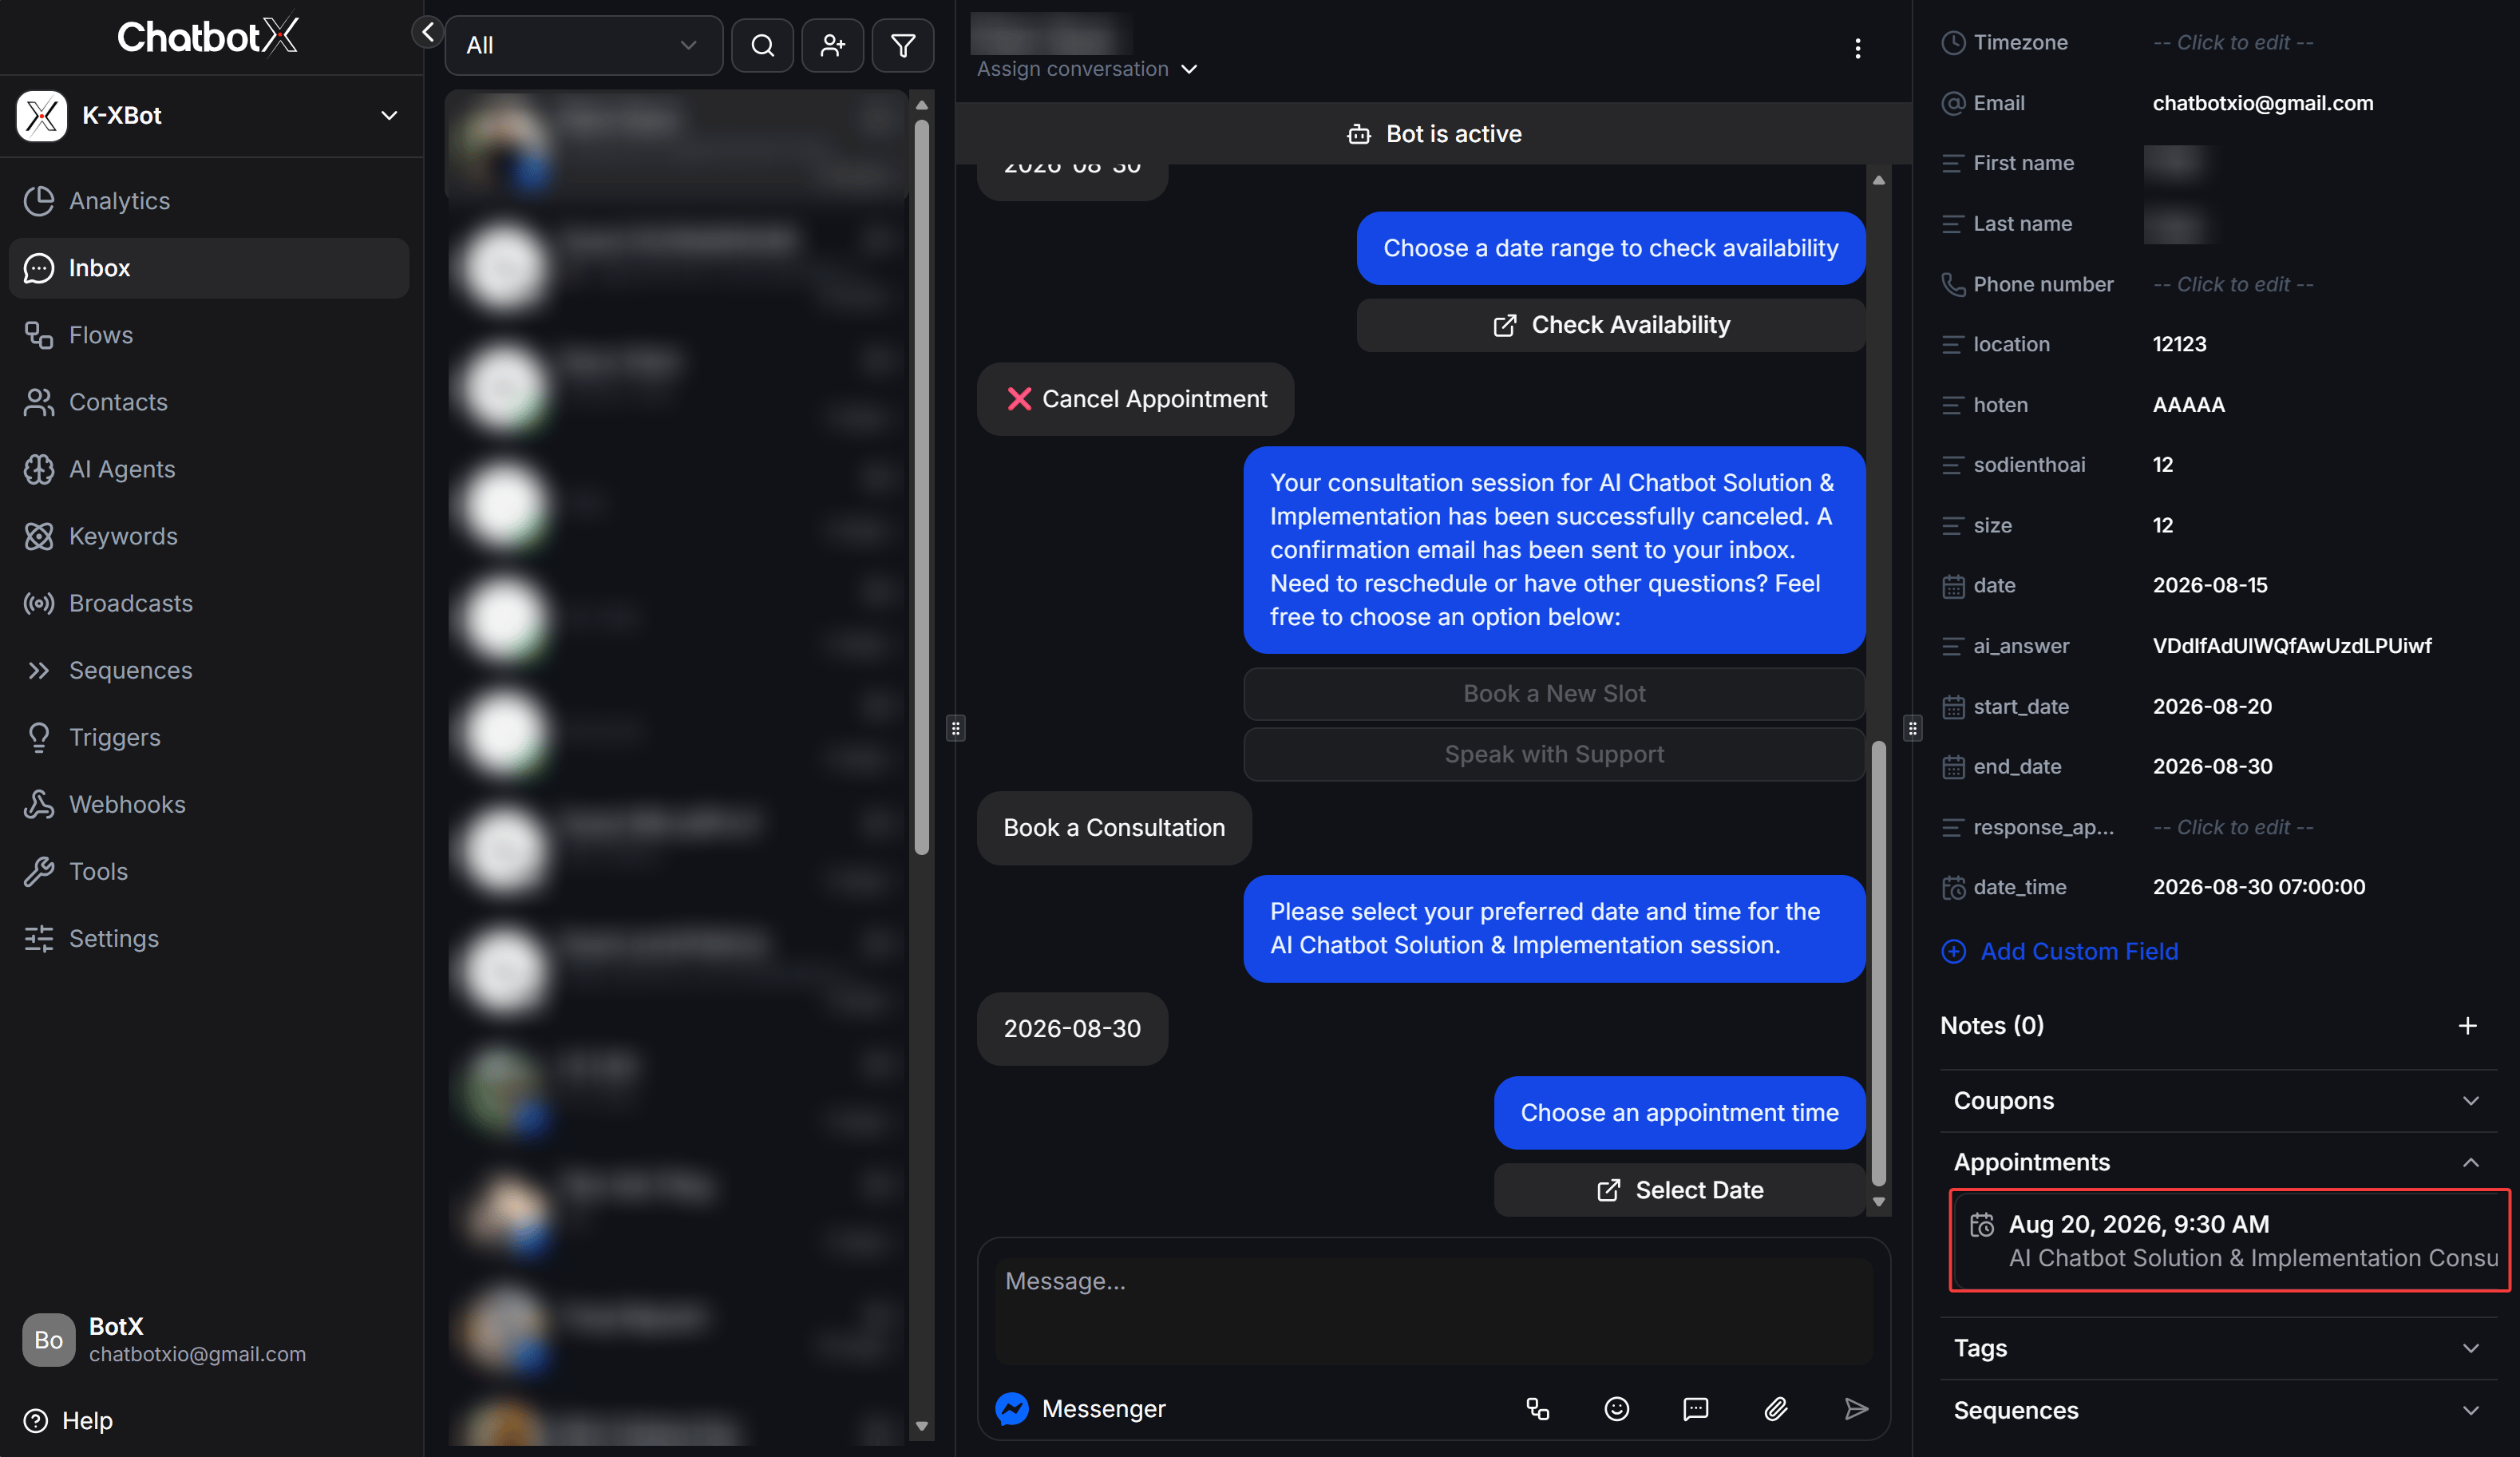 This information helps team members check an appointment while speaking with the customer. They can confirm the time or help the customer change the booking.
To search or manage appointments for all customers, return to [Track Appointments](#track-appointments).
### External Calendars
The **External Calendars** tab connects Google Calendar to Appointment Scheduling. Click **Connect Google**, sign in to your Google account, and grant the requested access.
This information helps team members check an appointment while speaking with the customer. They can confirm the time or help the customer change the booking.
To search or manage appointments for all customers, return to [Track Appointments](#track-appointments).
### External Calendars
The **External Calendars** tab connects Google Calendar to Appointment Scheduling. Click **Connect Google**, sign in to your Google account, and grant the requested access.
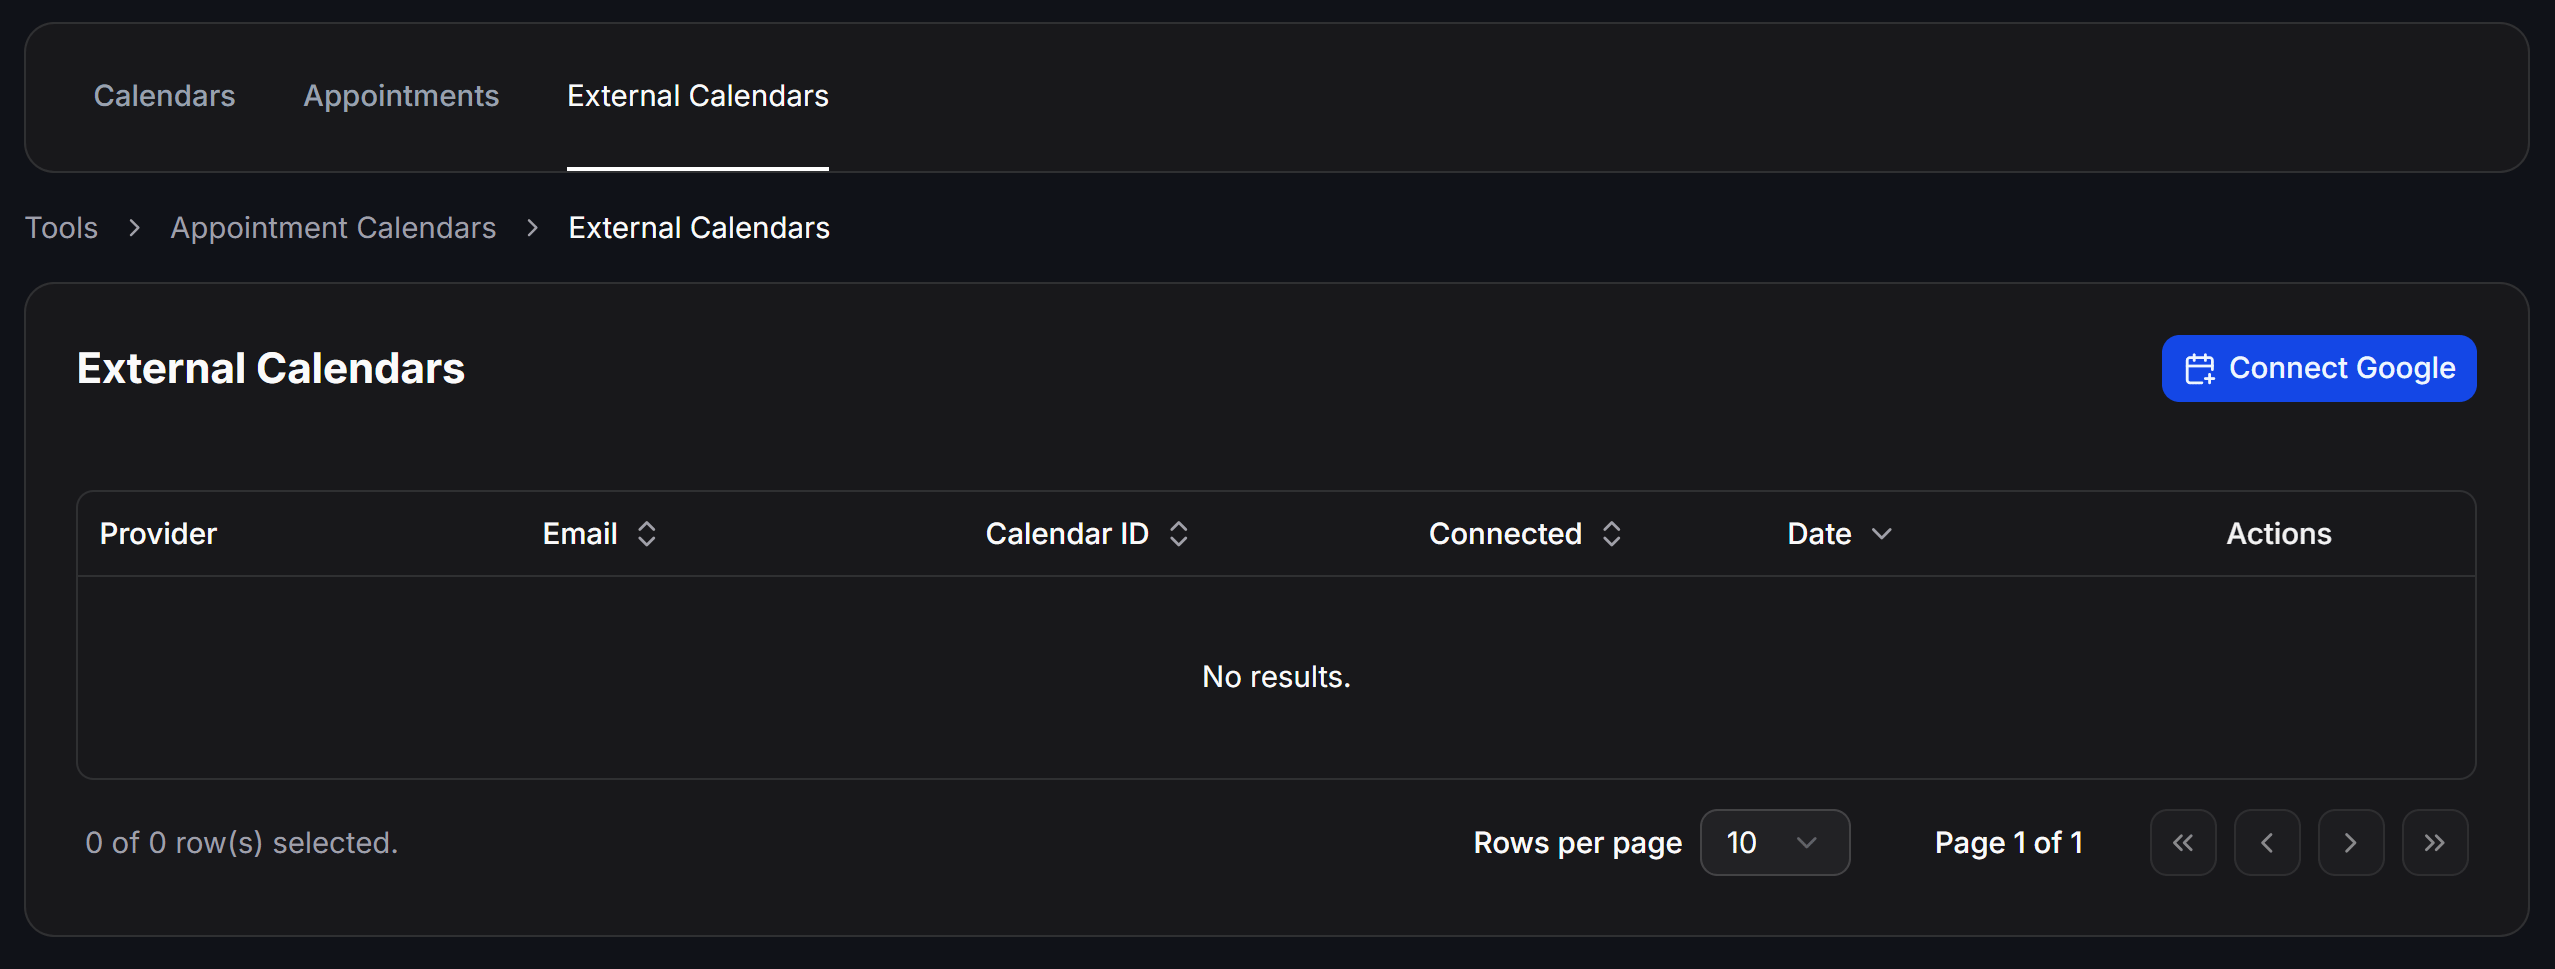 After a successful connection, the table shows:
* **Provider**: The connected calendar provider.
* **Email**: The Google account used for the connection.
* **Calendar ID**: The Google Calendar identifier.
* **Connected**: The connection status.
* **Date**: The date the connection was created.
* **Actions**: Options for managing the connection.
Connecting the correct Google Calendar allows ChatbotX to check busy times before showing available slots to customers. Return to the Calendar settings and select it under **External Calendar (optional)**.
## Use the Booking Link
Open the Calendar's **Actions** menu and select **Get Link** to copy the Booking Link. Add the link to a message or button inside a Flow, then let that Flow send it to the customer in the conversation.
ChatbotX uses the Flow delivery context to identify the contact who opens the Booking Link. Do not send this link independently by email, publish it on a website, or share it outside a Flow because ChatbotX cannot identify which contact is booking.
After a successful connection, the table shows:
* **Provider**: The connected calendar provider.
* **Email**: The Google account used for the connection.
* **Calendar ID**: The Google Calendar identifier.
* **Connected**: The connection status.
* **Date**: The date the connection was created.
* **Actions**: Options for managing the connection.
Connecting the correct Google Calendar allows ChatbotX to check busy times before showing available slots to customers. Return to the Calendar settings and select it under **External Calendar (optional)**.
## Use the Booking Link
Open the Calendar's **Actions** menu and select **Get Link** to copy the Booking Link. Add the link to a message or button inside a Flow, then let that Flow send it to the customer in the conversation.
ChatbotX uses the Flow delivery context to identify the contact who opens the Booking Link. Do not send this link independently by email, publish it on a website, or share it outside a Flow because ChatbotX cannot identify which contact is booking.
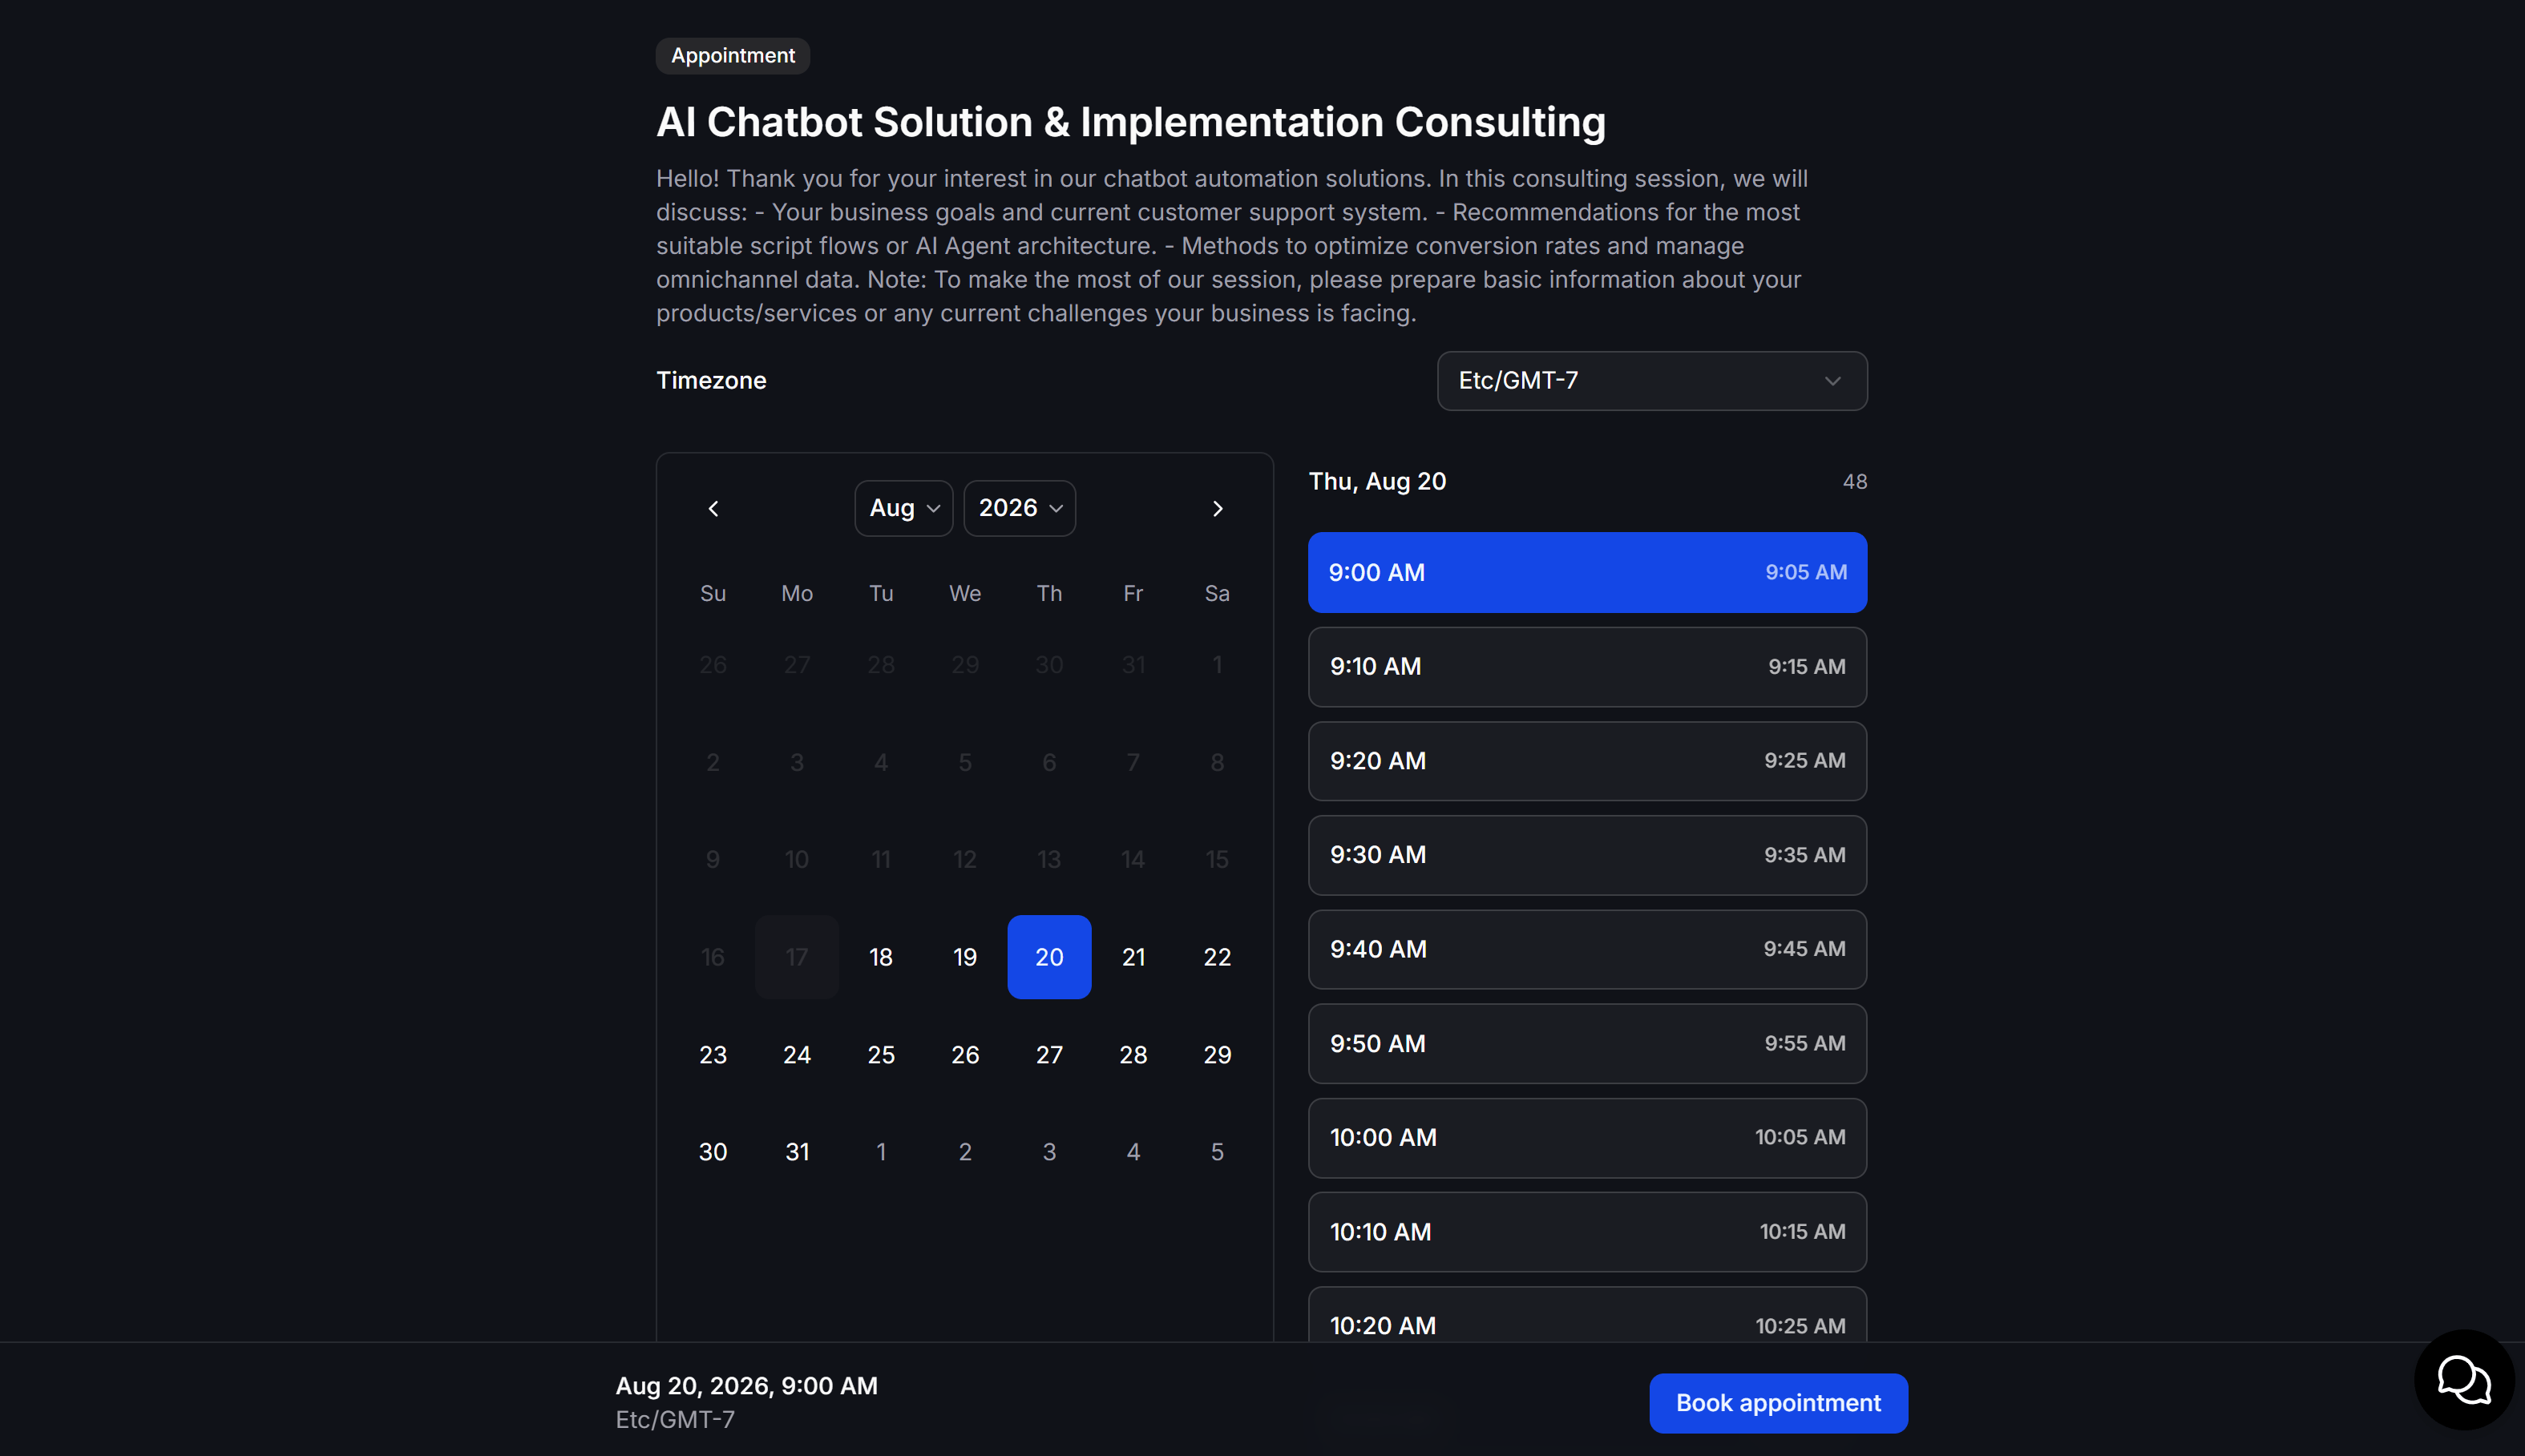
 When customers open the link from the Flow, they see the appointment name and description. They then:
* Select the correct **Timezone**.
* Select an available date on the Calendar.
* Select an available time slot. Each option shows its start and end times.
* Review the selected time, then click **Book appointment**.
After confirmation, ChatbotX saves the appointment and sends the confirmation or reminder messages you configured.
You can find the new appointment in the [Appointments](#track-appointments) tab or under [Appointments for the Contact in Inbox](#view-appointments-for-a-contact-in-inbox).
## Use Appointment Scheduling in a Flow
In [Flow Builder](/docs/automation/flows), the **Appointment Scheduling** group contains five Actions. **Book appointment** and **Check availability** receive data from Custom Fields, process the request, and save the result to a response field. The two Actions **Open booking page** and **Open availability page** send content with a button that lets the customer open a time-selection page.
### Collect the time with Get User Data
Add a **Get User Data** block before the Appointment Scheduling Action. Ask the customer for the value required by the next Action and save it to a [Custom Field](/docs/automation/custom-fields):
* **Date time**: The appointment date and time used by **Book appointment**. For example: `date_time`.
* **Start time**: The beginning of the period used by **Check availability**. For example: `start_date`.
* **End time**: The end of the period used by **Check availability**. For example: `end_date`.
After **Get User Data** saves the customer's answer, connect the block to **Book appointment** or **Check availability**. These two Actions read the values directly from Custom Fields, so they do not send a button or open a time-selection page for the customer.
### Add Appointment Scheduling to a Send Message block
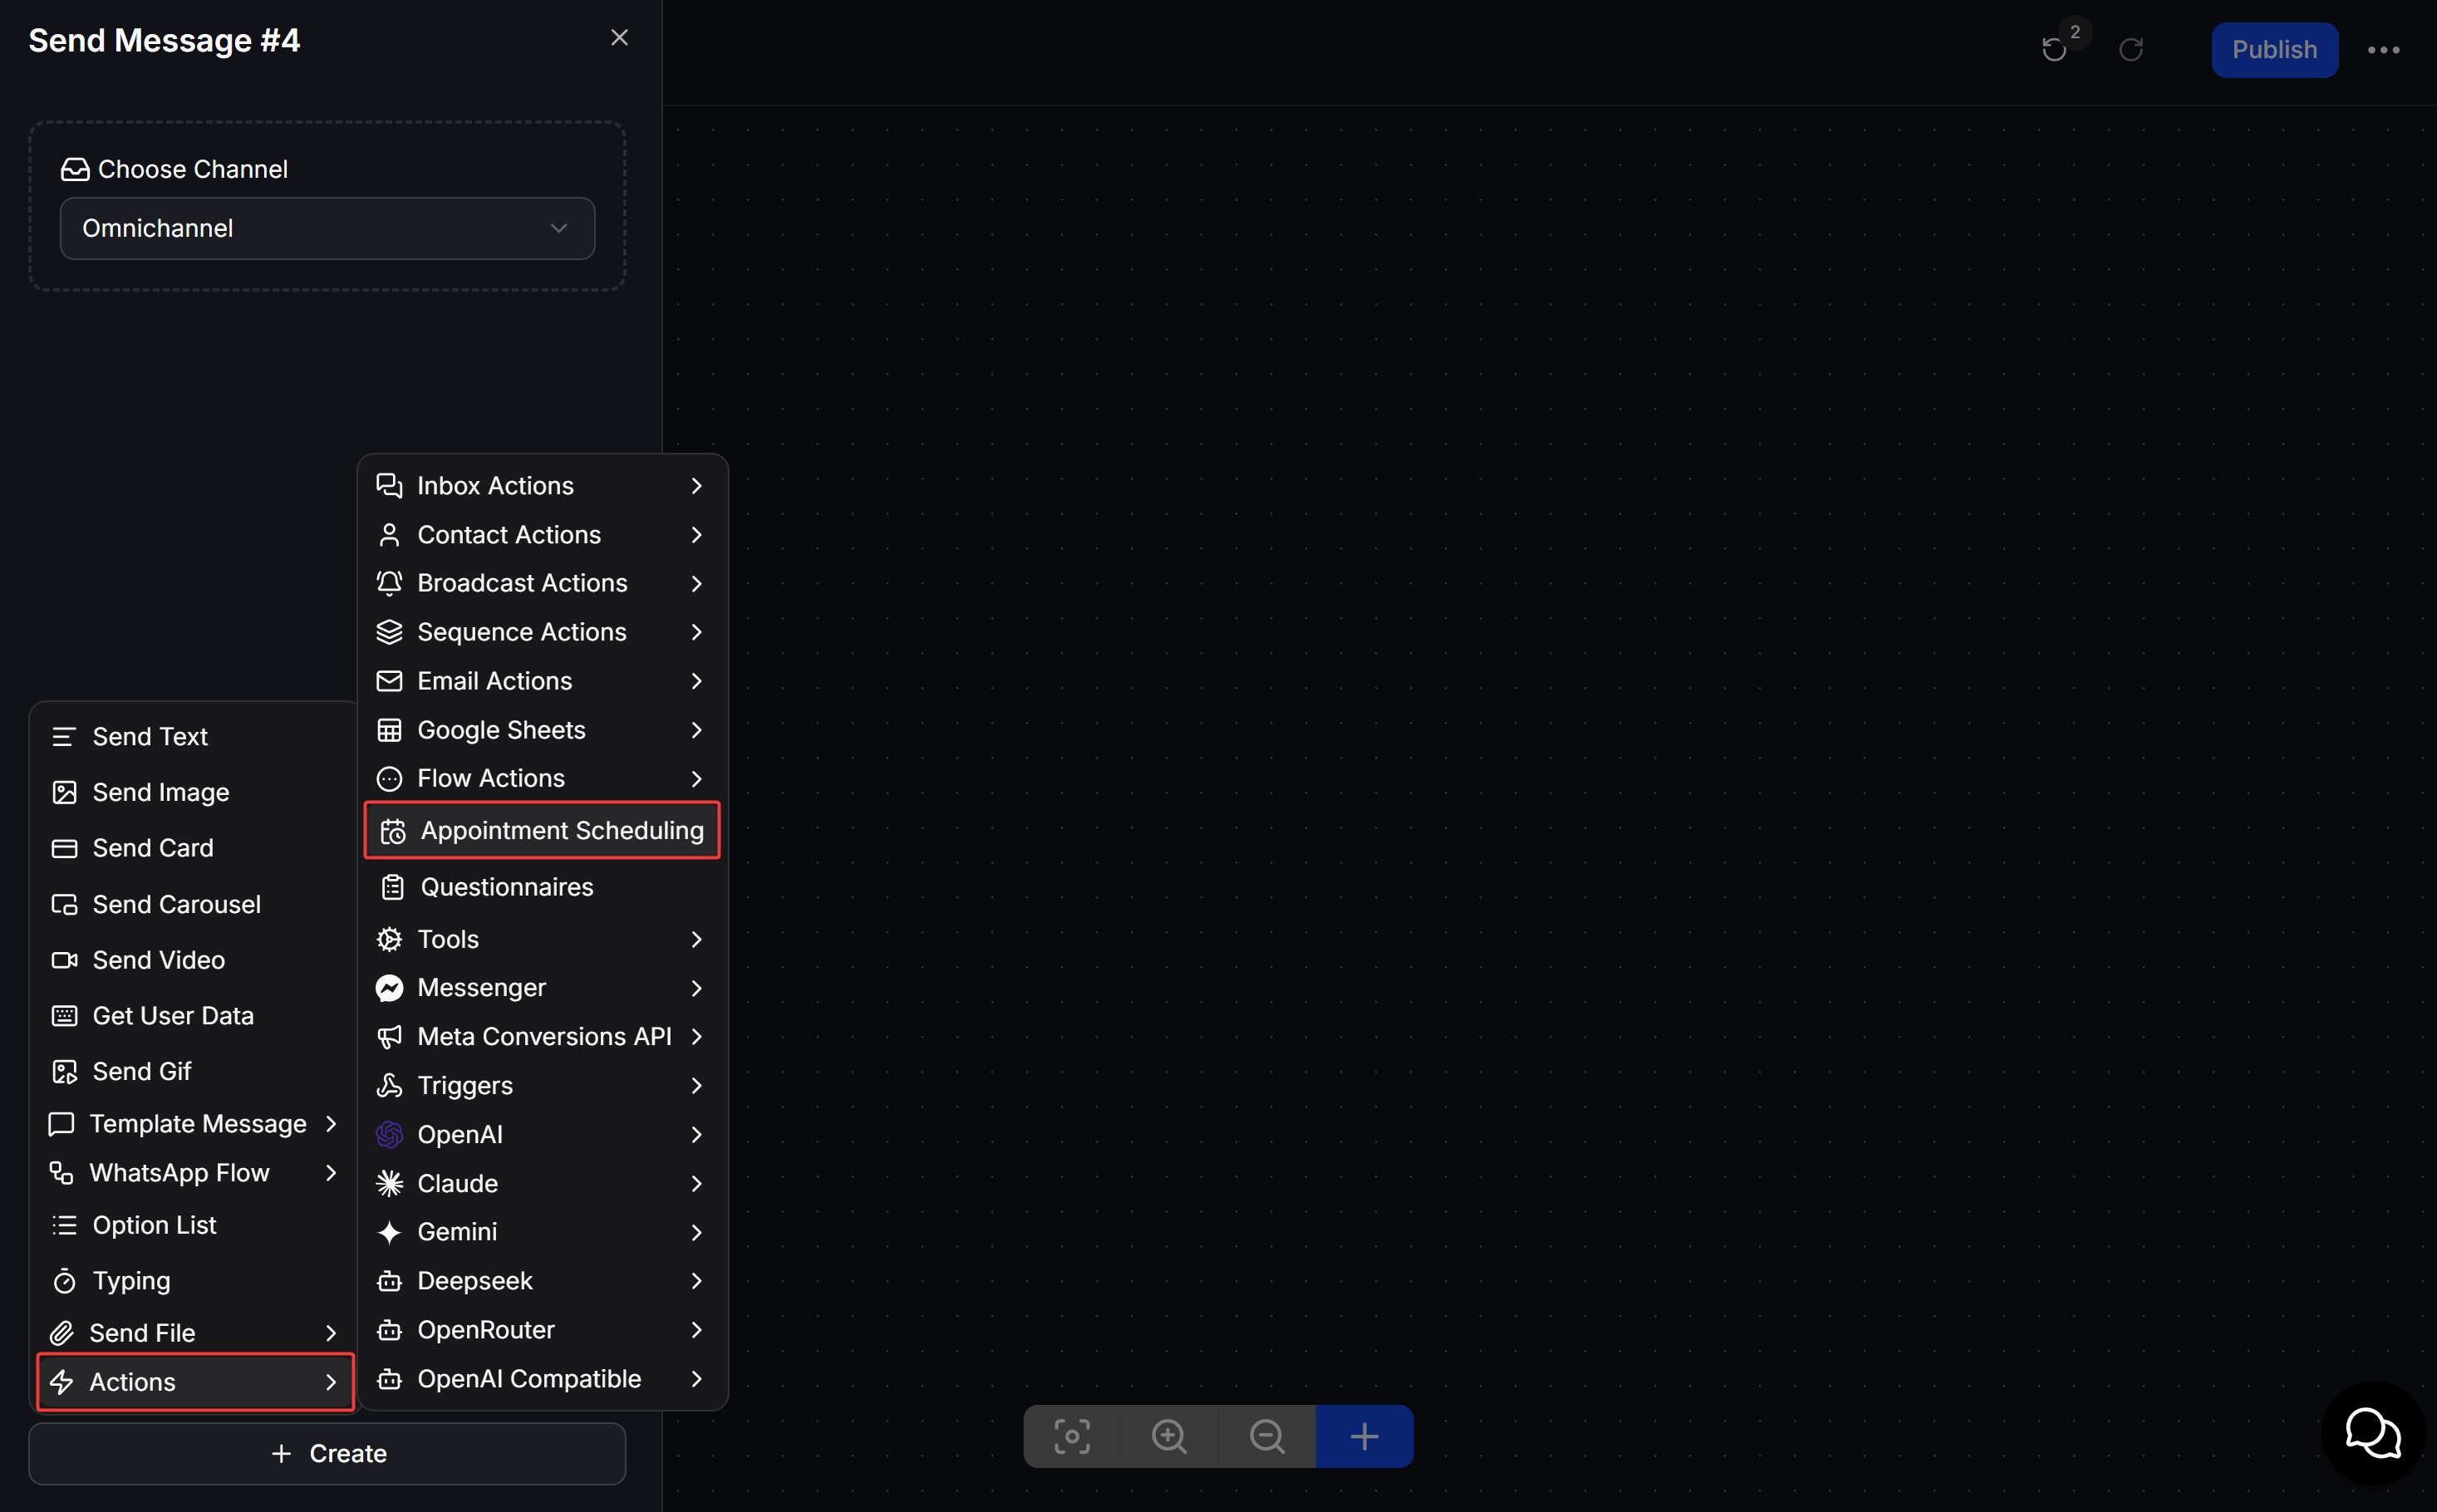
Create or open a **Send Message** block, then click **Create** at the bottom of the settings panel.
Select **Actions** from the menu.
Select **Appointment Scheduling** to add it to the **Send Message** block, then click **Edit**.
When customers open the link from the Flow, they see the appointment name and description. They then:
* Select the correct **Timezone**.
* Select an available date on the Calendar.
* Select an available time slot. Each option shows its start and end times.
* Review the selected time, then click **Book appointment**.
After confirmation, ChatbotX saves the appointment and sends the confirmation or reminder messages you configured.
You can find the new appointment in the [Appointments](#track-appointments) tab or under [Appointments for the Contact in Inbox](#view-appointments-for-a-contact-in-inbox).
## Use Appointment Scheduling in a Flow
In [Flow Builder](/docs/automation/flows), the **Appointment Scheduling** group contains five Actions. **Book appointment** and **Check availability** receive data from Custom Fields, process the request, and save the result to a response field. The two Actions **Open booking page** and **Open availability page** send content with a button that lets the customer open a time-selection page.
### Collect the time with Get User Data
Add a **Get User Data** block before the Appointment Scheduling Action. Ask the customer for the value required by the next Action and save it to a [Custom Field](/docs/automation/custom-fields):
* **Date time**: The appointment date and time used by **Book appointment**. For example: `date_time`.
* **Start time**: The beginning of the period used by **Check availability**. For example: `start_date`.
* **End time**: The end of the period used by **Check availability**. For example: `end_date`.
After **Get User Data** saves the customer's answer, connect the block to **Book appointment** or **Check availability**. These two Actions read the values directly from Custom Fields, so they do not send a button or open a time-selection page for the customer.
### Add Appointment Scheduling to a Send Message block
Create or open a **Send Message** block, then click **Create** at the bottom of the settings panel.
Select **Actions** from the menu.
Select **Appointment Scheduling** to add it to the **Send Message** block, then click **Edit**.
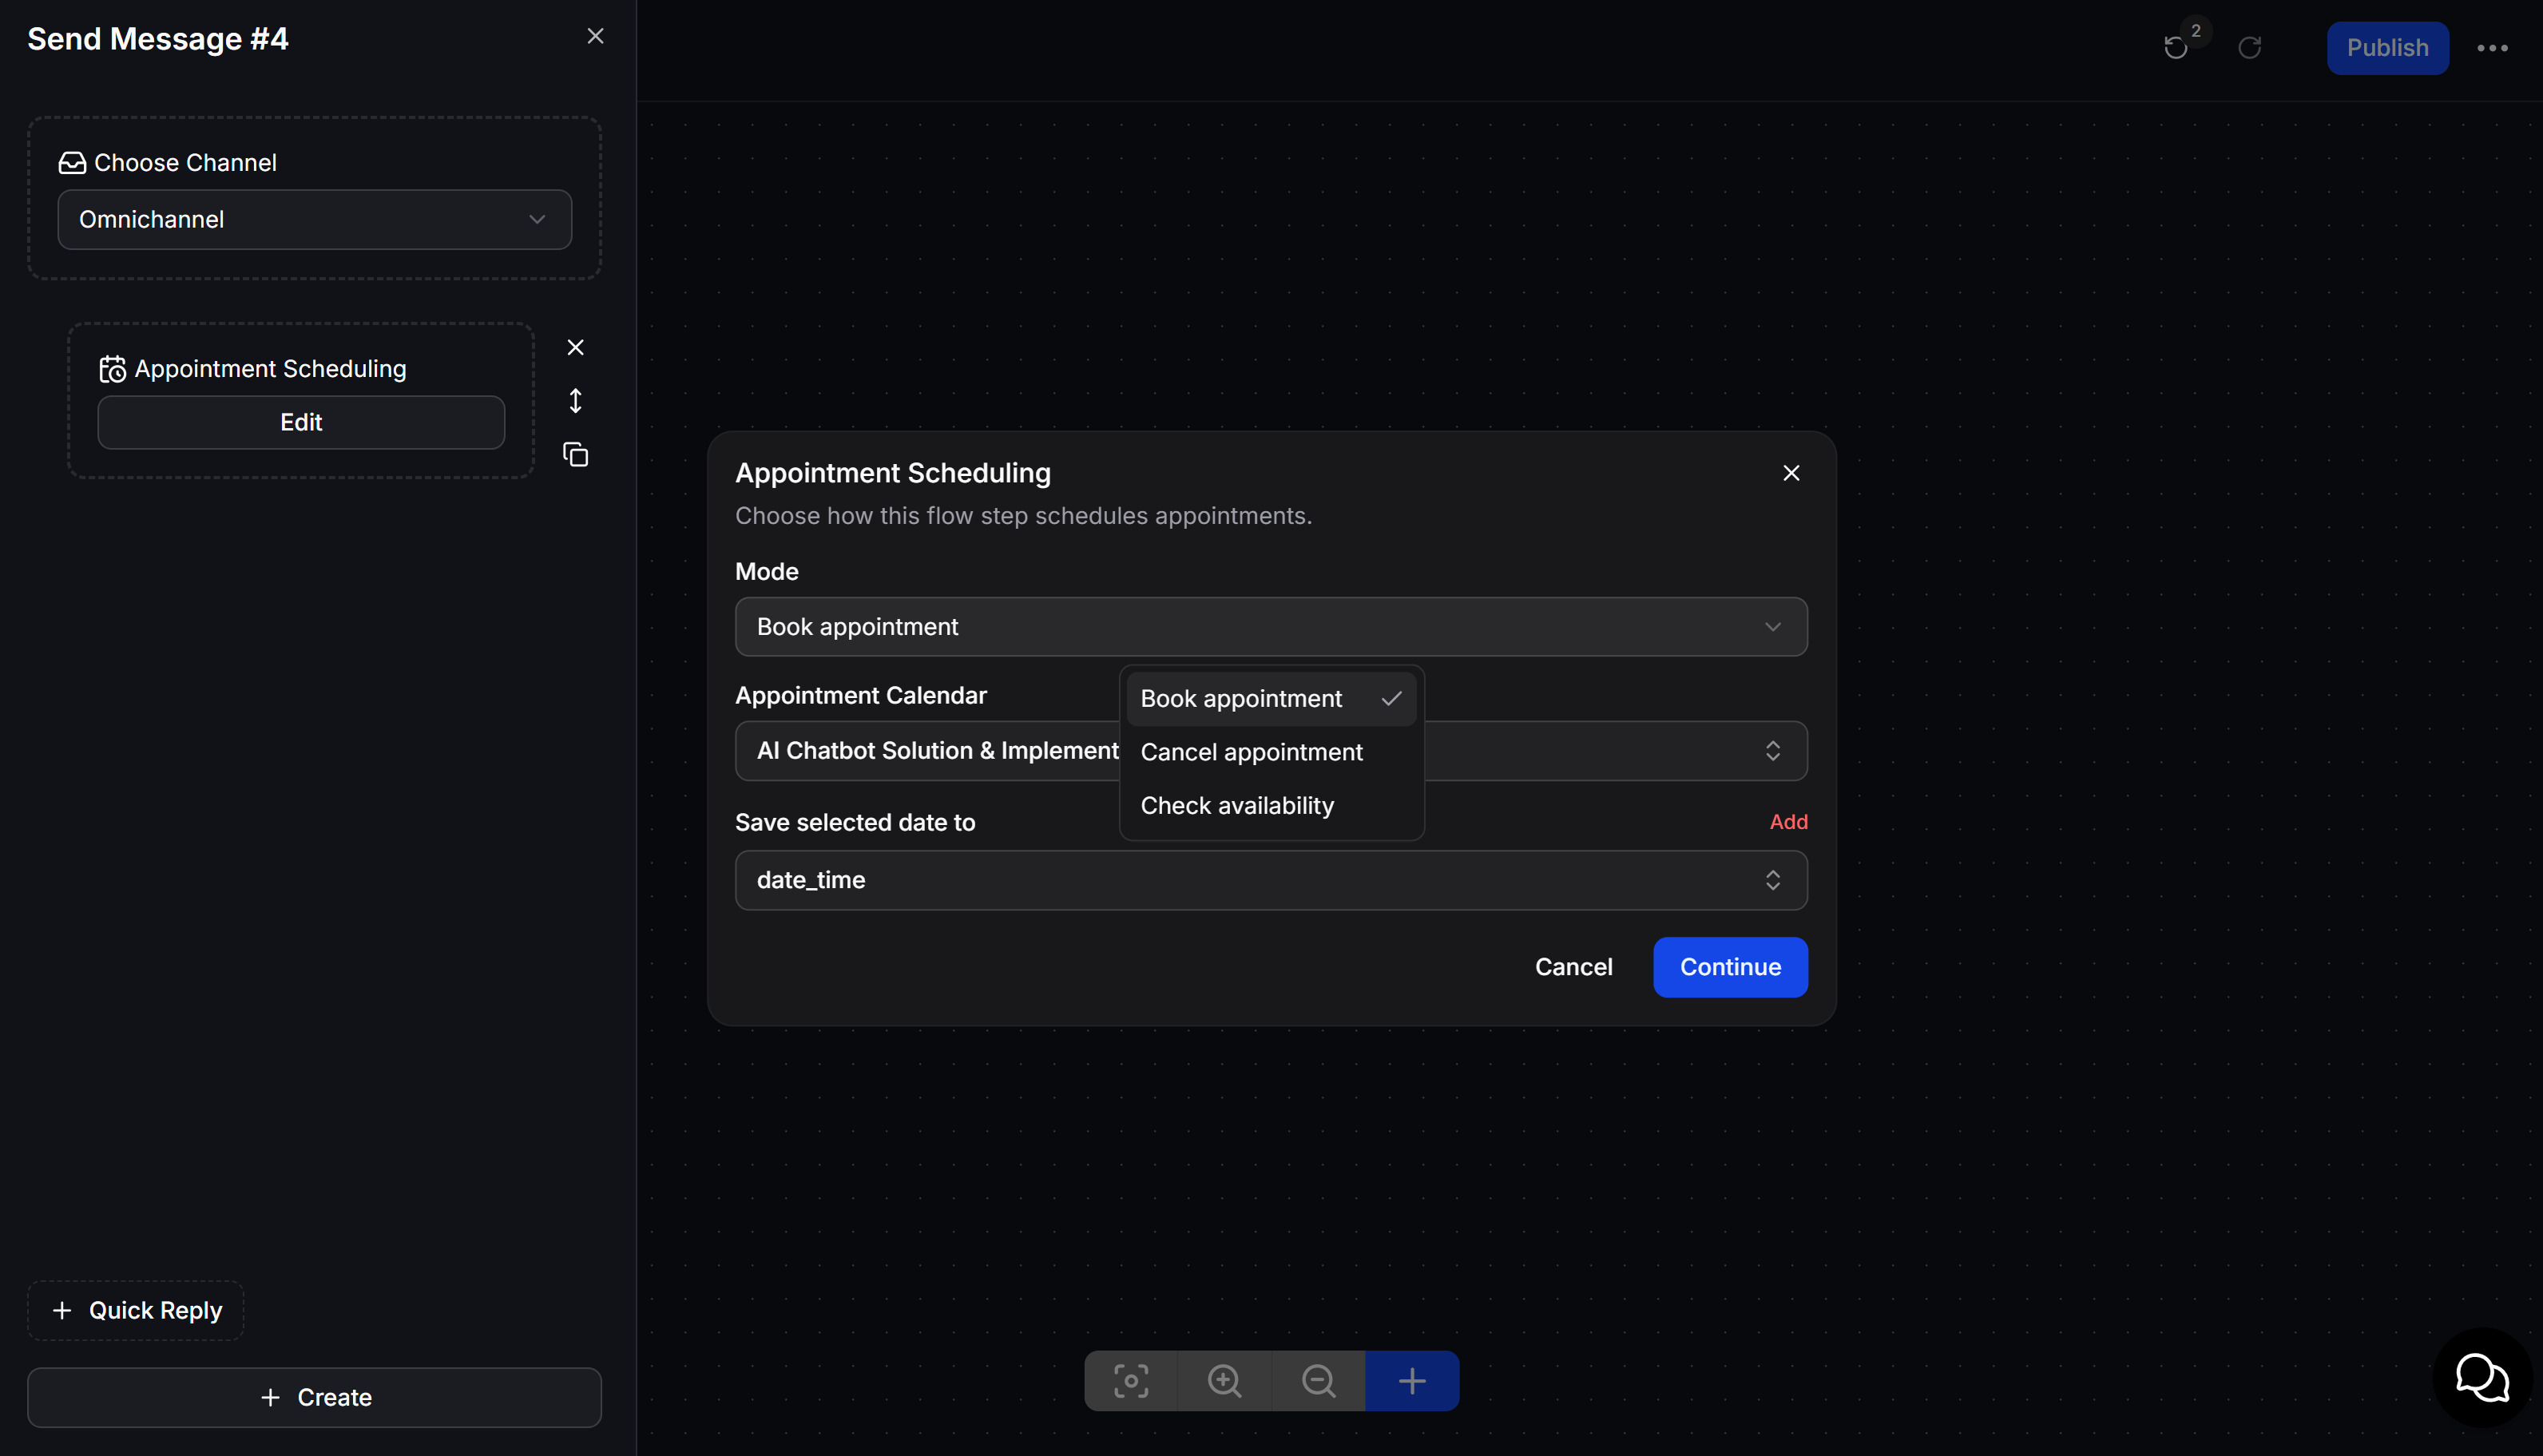
 The **Mode** field has five options:
| Option | What it does |
| -------------------------- | -------------------------------------------------------------------- |
| **Book appointment** | Books a new appointment on the selected Appointment Calendar. |
| **Cancel appointment** | Cancels an appointment from the selected Appointment Calendar. |
| **Check availability** | Checks available times and saves the result for the next step. |
| **Open booking page** | Sends content with a button that opens the appointment booking page. |
| **Open availability page** | Sends content with a button that opens the availability page. |
### Book appointment
Select **Book appointment** to create an appointment from data that the Flow has already collected:
* **Appointment Calendar**: Select a calendar configured in Tools.
* **Date time**: Select the Custom Field containing the appointment date and time. For example: `date_time`.
* **Save response to a custom field**: Select the Custom Field used to store the booking result. For example: `response_appointment`.
The **Mode** field has five options:
| Option | What it does |
| -------------------------- | -------------------------------------------------------------------- |
| **Book appointment** | Books a new appointment on the selected Appointment Calendar. |
| **Cancel appointment** | Cancels an appointment from the selected Appointment Calendar. |
| **Check availability** | Checks available times and saves the result for the next step. |
| **Open booking page** | Sends content with a button that opens the appointment booking page. |
| **Open availability page** | Sends content with a button that opens the availability page. |
### Book appointment
Select **Book appointment** to create an appointment from data that the Flow has already collected:
* **Appointment Calendar**: Select a calendar configured in Tools.
* **Date time**: Select the Custom Field containing the appointment date and time. For example: `date_time`.
* **Save response to a custom field**: Select the Custom Field used to store the booking result. For example: `response_appointment`.
 When the conversation reaches this Action, ChatbotX reads the date and time from the Custom Field, creates the appointment on the Calendar, and saves the response to the result field.
### Cancel appointment
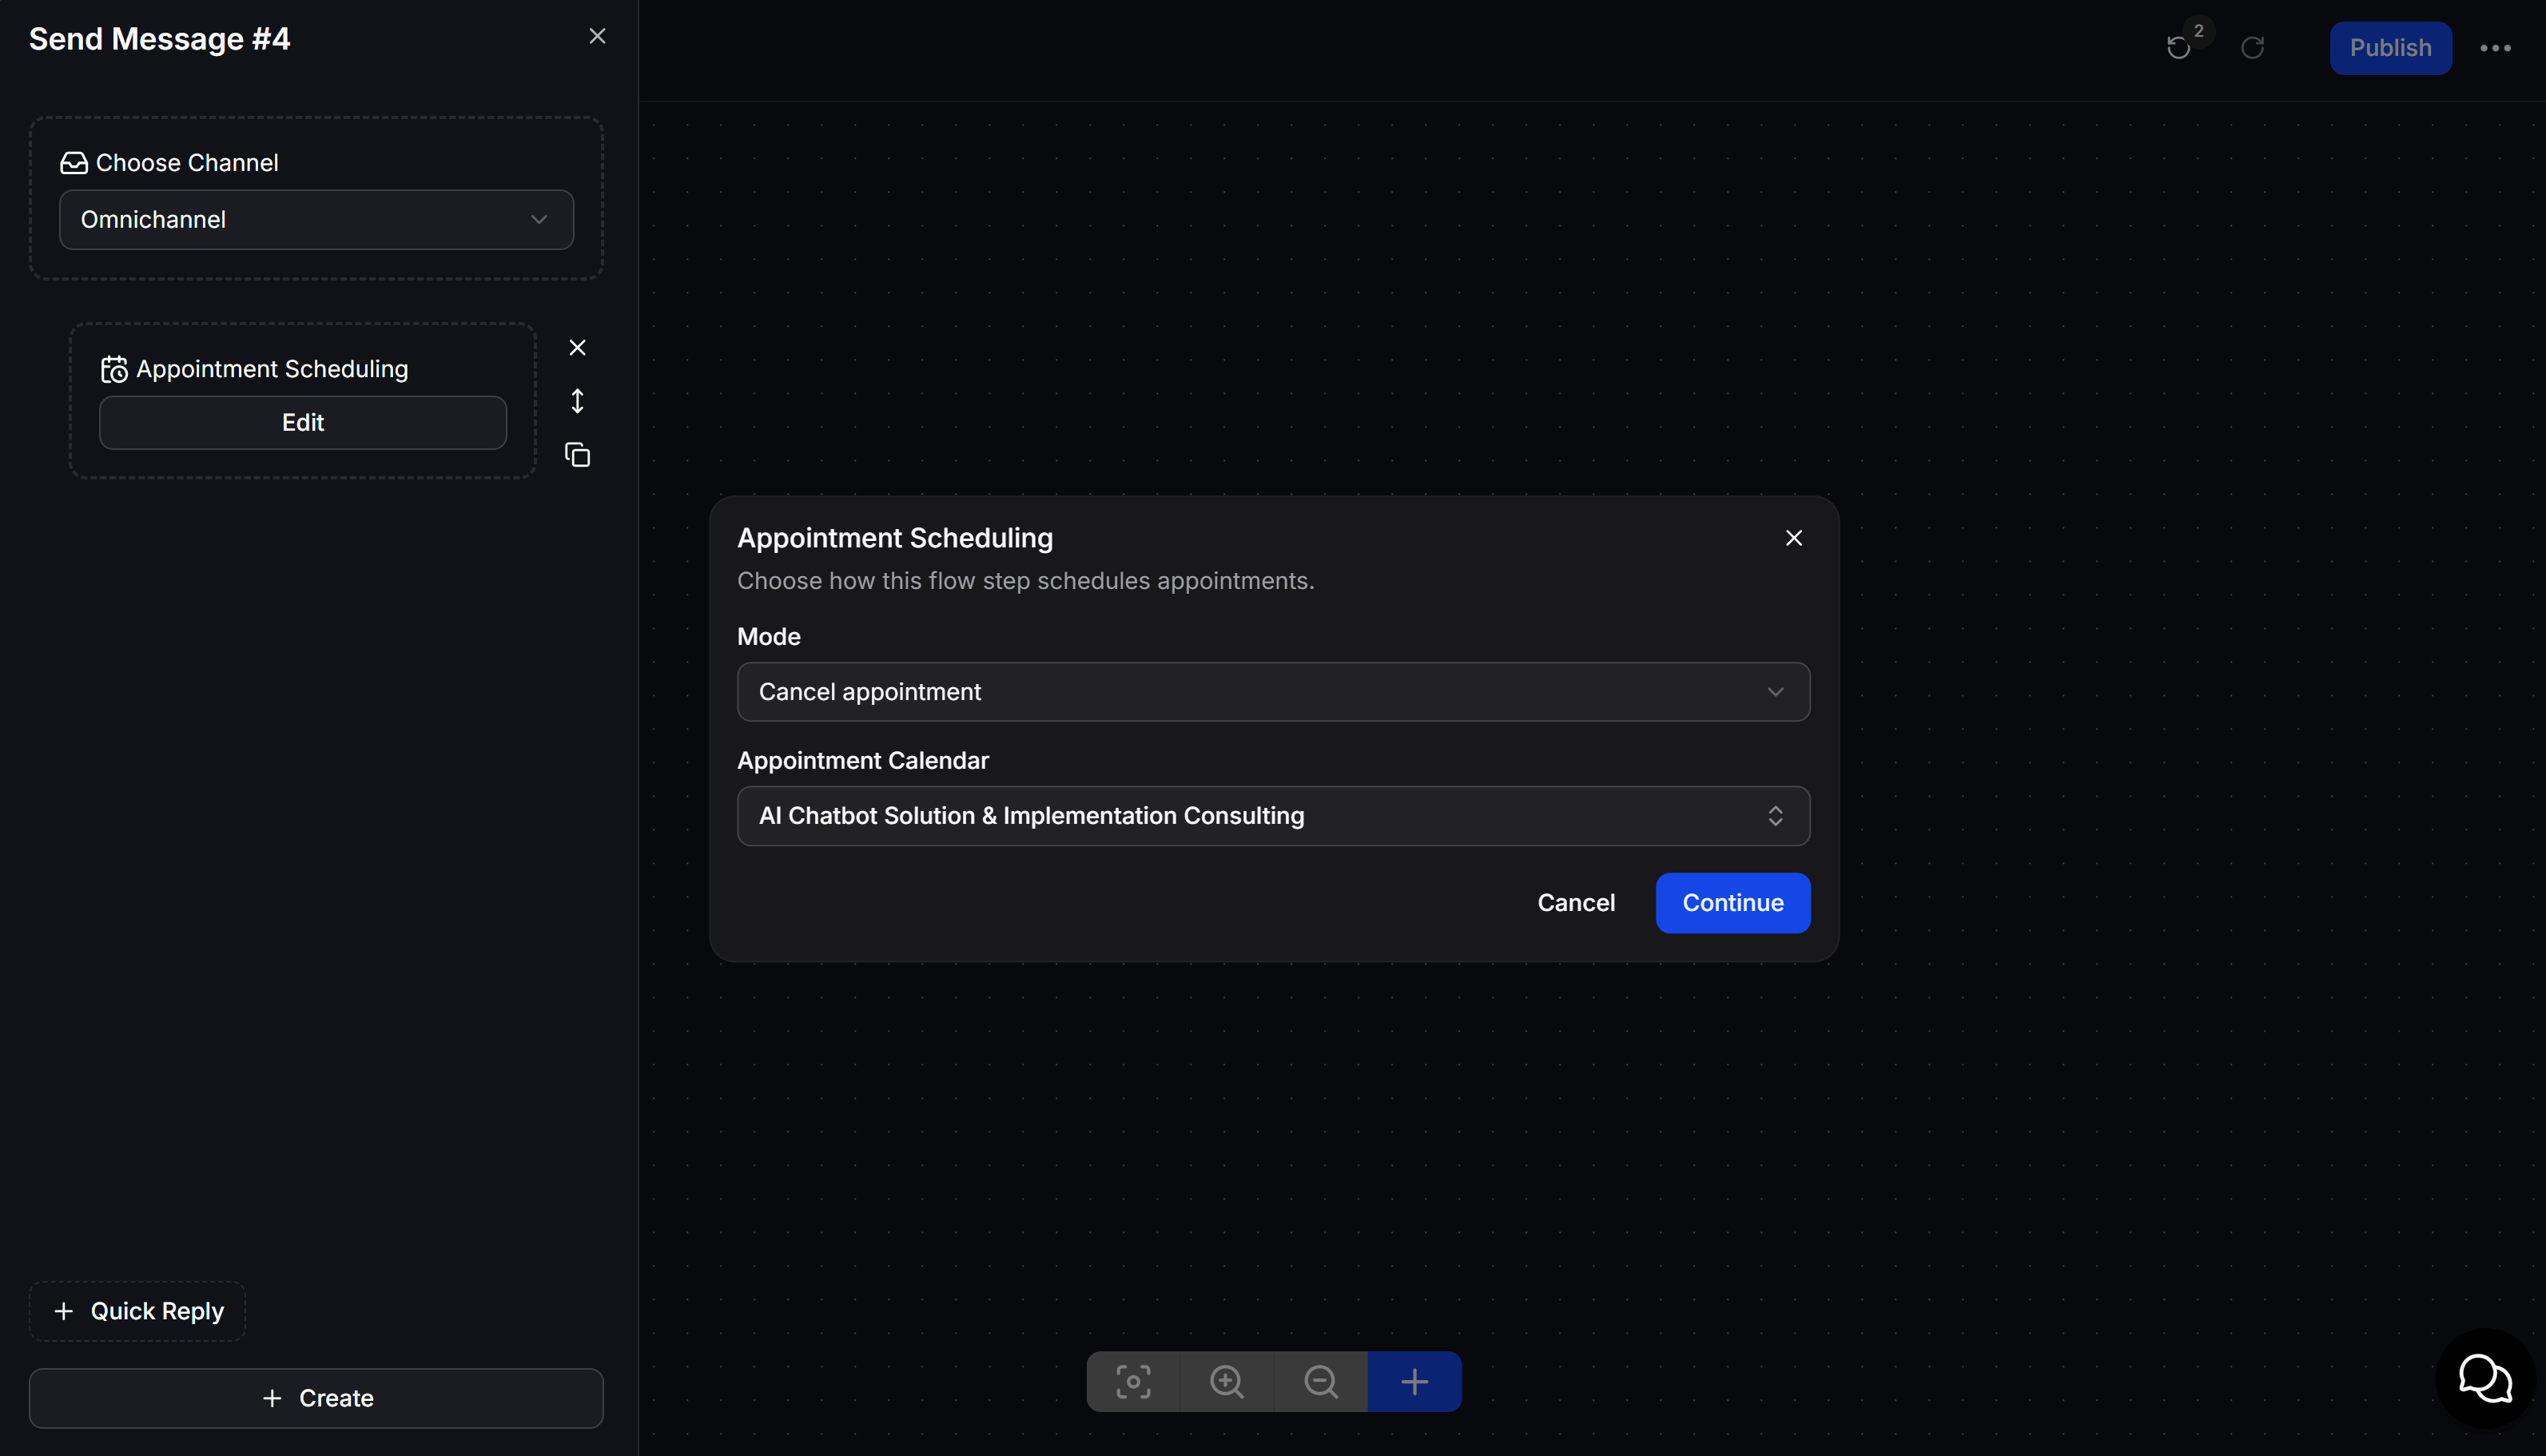
Select **Cancel appointment**, then select the **Appointment Calendar** containing the appointment. When the customer reaches this step, ChatbotX cancels their appointment from the selected calendar.
If you selected content under **Cancellation Flow**, ChatbotX sends the configured cancellation message to the customer.
When the conversation reaches this Action, ChatbotX reads the date and time from the Custom Field, creates the appointment on the Calendar, and saves the response to the result field.
### Cancel appointment
Select **Cancel appointment**, then select the **Appointment Calendar** containing the appointment. When the customer reaches this step, ChatbotX cancels their appointment from the selected calendar.
If you selected content under **Cancellation Flow**, ChatbotX sends the configured cancellation message to the customer.
 ### Check availability
Select **Check availability** to find open times on an Appointment Calendar:
* **Appointment Calendar**: Select the calendar to check.
* **Start time**: Select the Custom Field containing the beginning of the period to check. For example: `start_date`.
* **End time**: Select the Custom Field containing the end of the period to check. For example: `end_date`.
* **Use result for AI**: Allows AI to use the availability result when creating a reply.
* **Save response to a custom field**: Select a field for the result, for example `response_appointment`, for use in the next message.
### Check availability
Select **Check availability** to find open times on an Appointment Calendar:
* **Appointment Calendar**: Select the calendar to check.
* **Start time**: Select the Custom Field containing the beginning of the period to check. For example: `start_date`.
* **End time**: Select the Custom Field containing the end of the period to check. For example: `end_date`.
* **Use result for AI**: Allows AI to use the availability result when creating a reply.
* **Save response to a custom field**: Select a field for the result, for example `response_appointment`, for use in the next message.
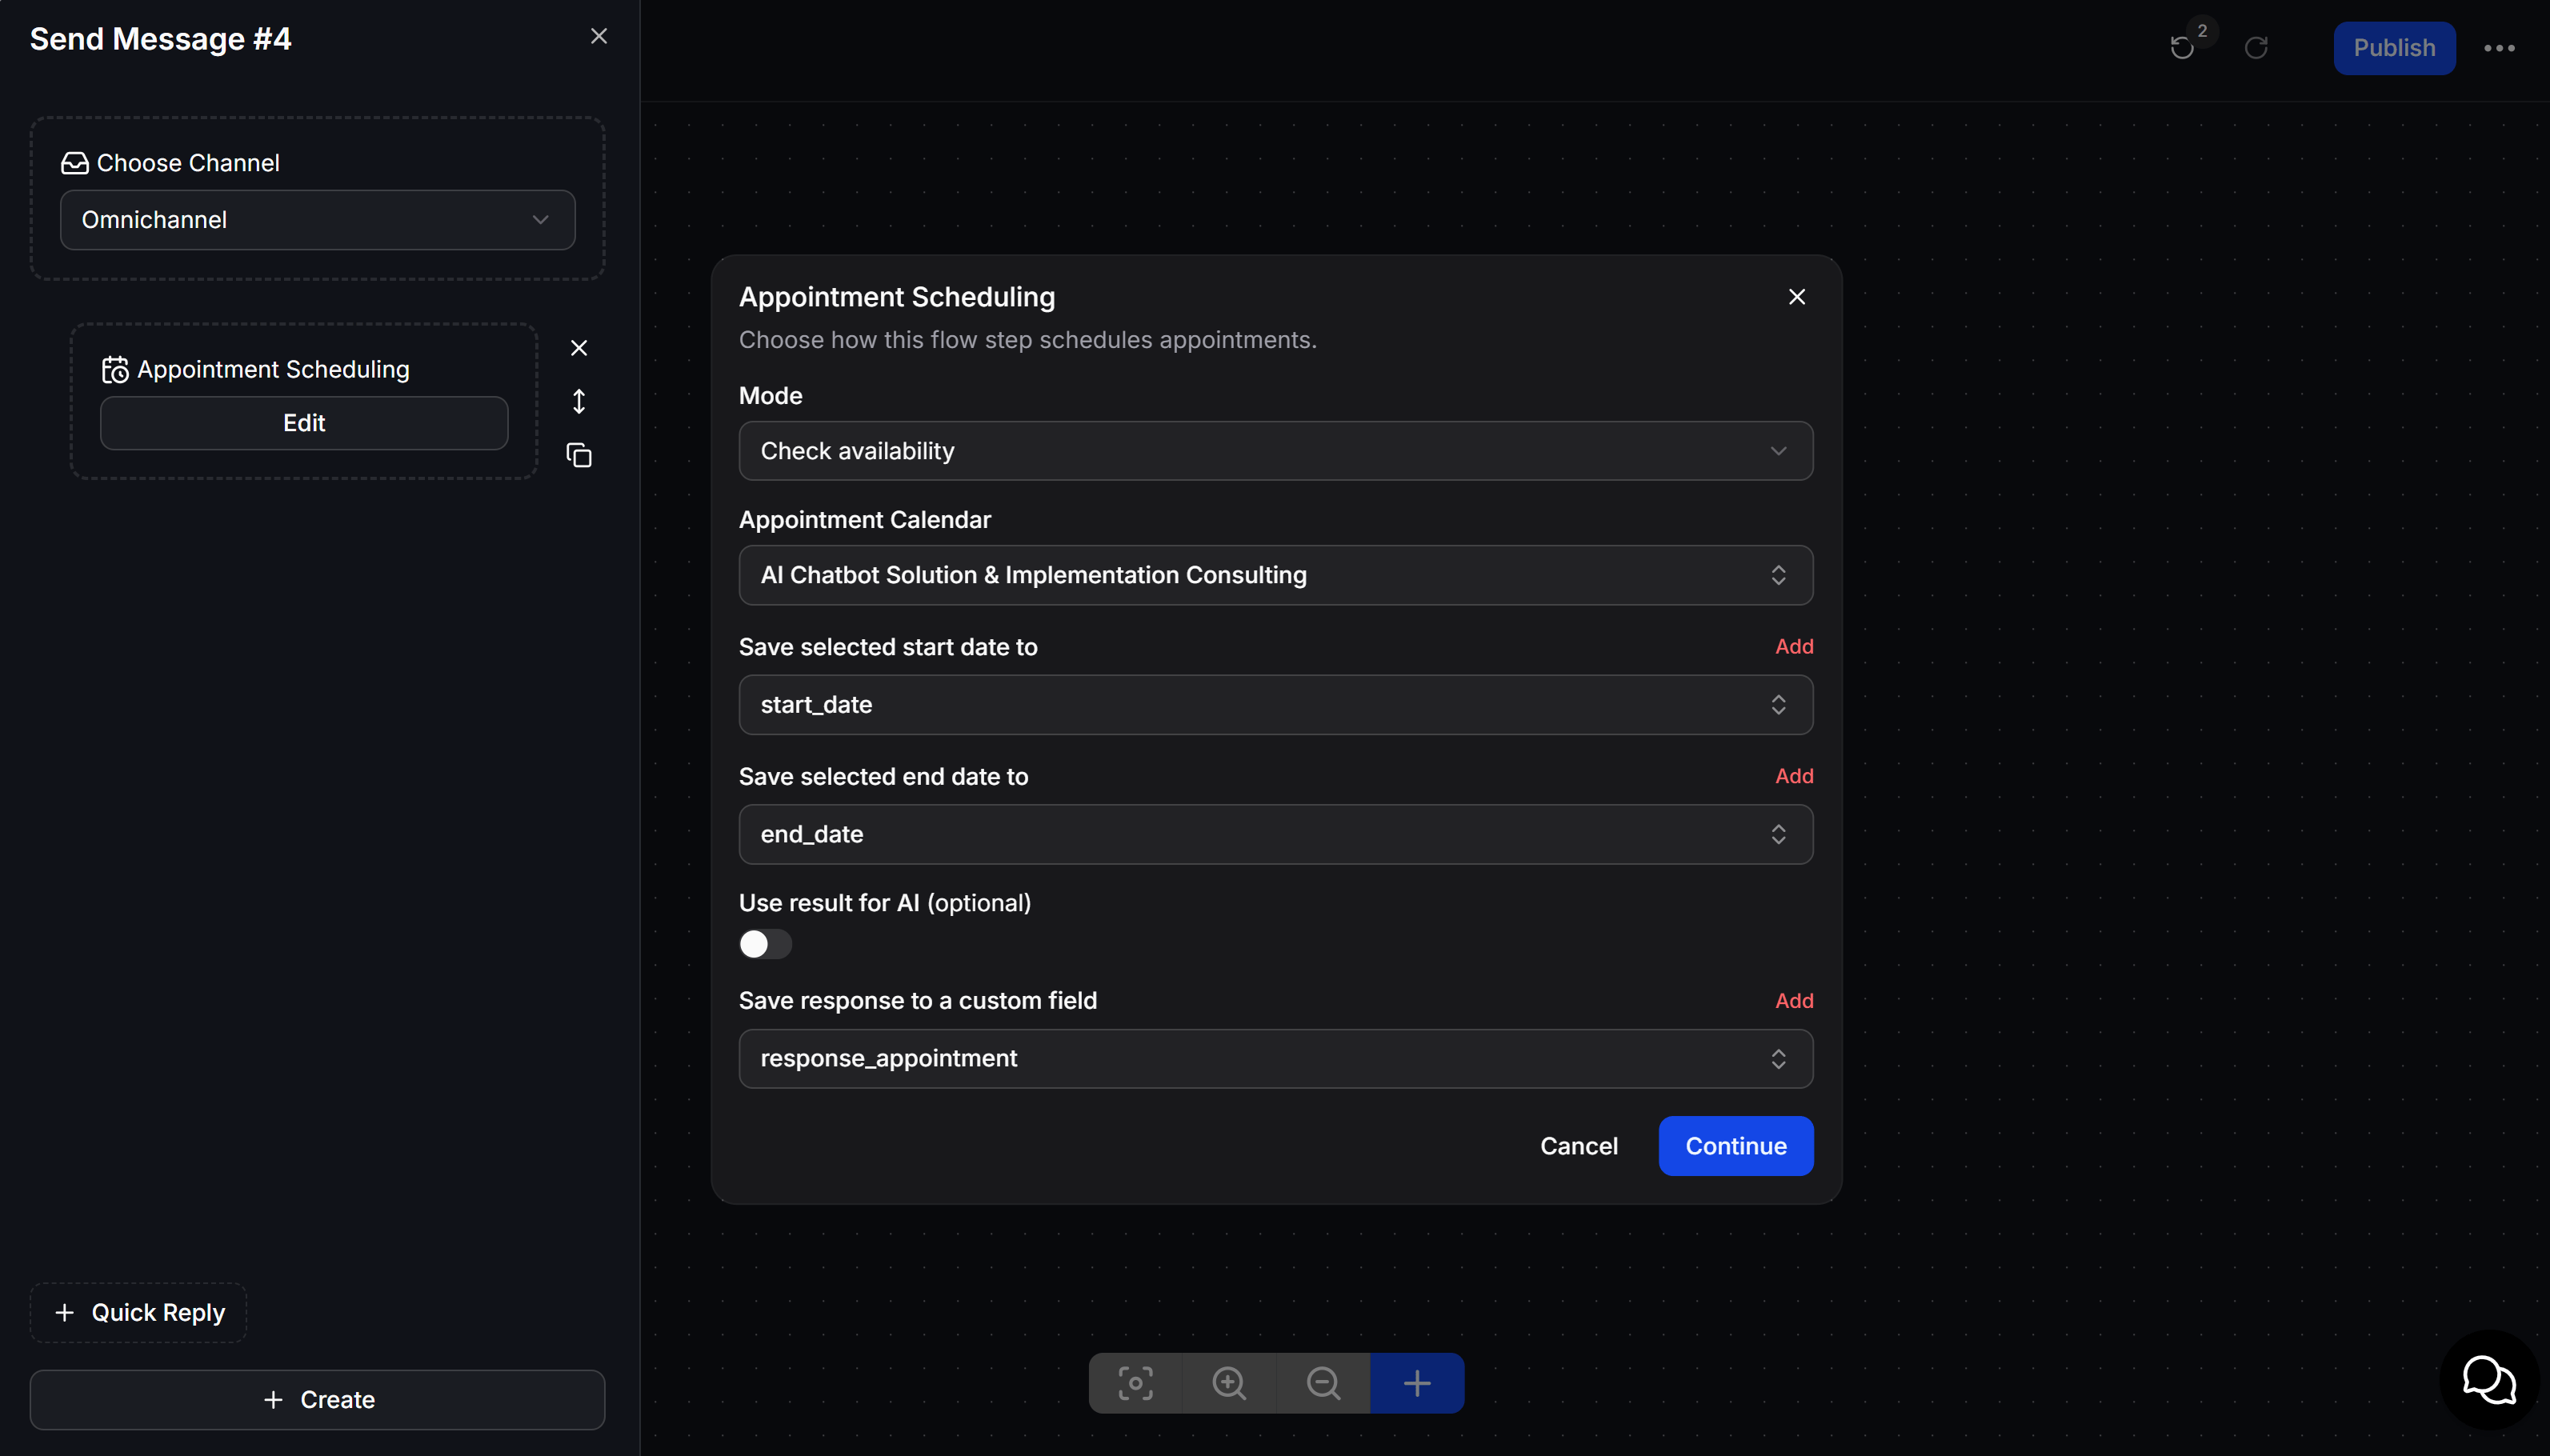 When the conversation reaches this Action, ChatbotX reads the start and end times from the Custom Fields, checks the Calendar, and saves the response.
### Open booking page
Select **Open booking page**, then select the **Appointment Calendar** to display.
When the conversation reaches this Action, ChatbotX reads the start and end times from the Custom Fields, checks the Calendar, and saves the response.
### Open booking page
Select **Open booking page**, then select the **Appointment Calendar** to display.
 When the customer passes through this Action, ChatbotX sends content with a **Select Date** button in the conversation.
The customer clicks the button to open the booking page, selects the Timezone, date, and an available time slot, then clicks **Book appointment**. ChatbotX identifies the Contact from the conversation and saves the appointment to the selected Calendar.
This Action does not have a **Success** or **Error** branch. After the customer completes the booking, ChatbotX automatically sends the notification configured under [Configure confirmation and reminder messages](#configure-confirmation-and-reminder-messages).
When the customer passes through this Action, ChatbotX sends content with a **Select Date** button in the conversation.
The customer clicks the button to open the booking page, selects the Timezone, date, and an available time slot, then clicks **Book appointment**. ChatbotX identifies the Contact from the conversation and saves the appointment to the selected Calendar.
This Action does not have a **Success** or **Error** branch. After the customer completes the booking, ChatbotX automatically sends the notification configured under [Configure confirmation and reminder messages](#configure-confirmation-and-reminder-messages).
 ### Open availability page
Select **Open availability page**, then select the **Appointment Calendar** to check.
### Open availability page
Select **Open availability page**, then select the **Appointment Calendar** to check.
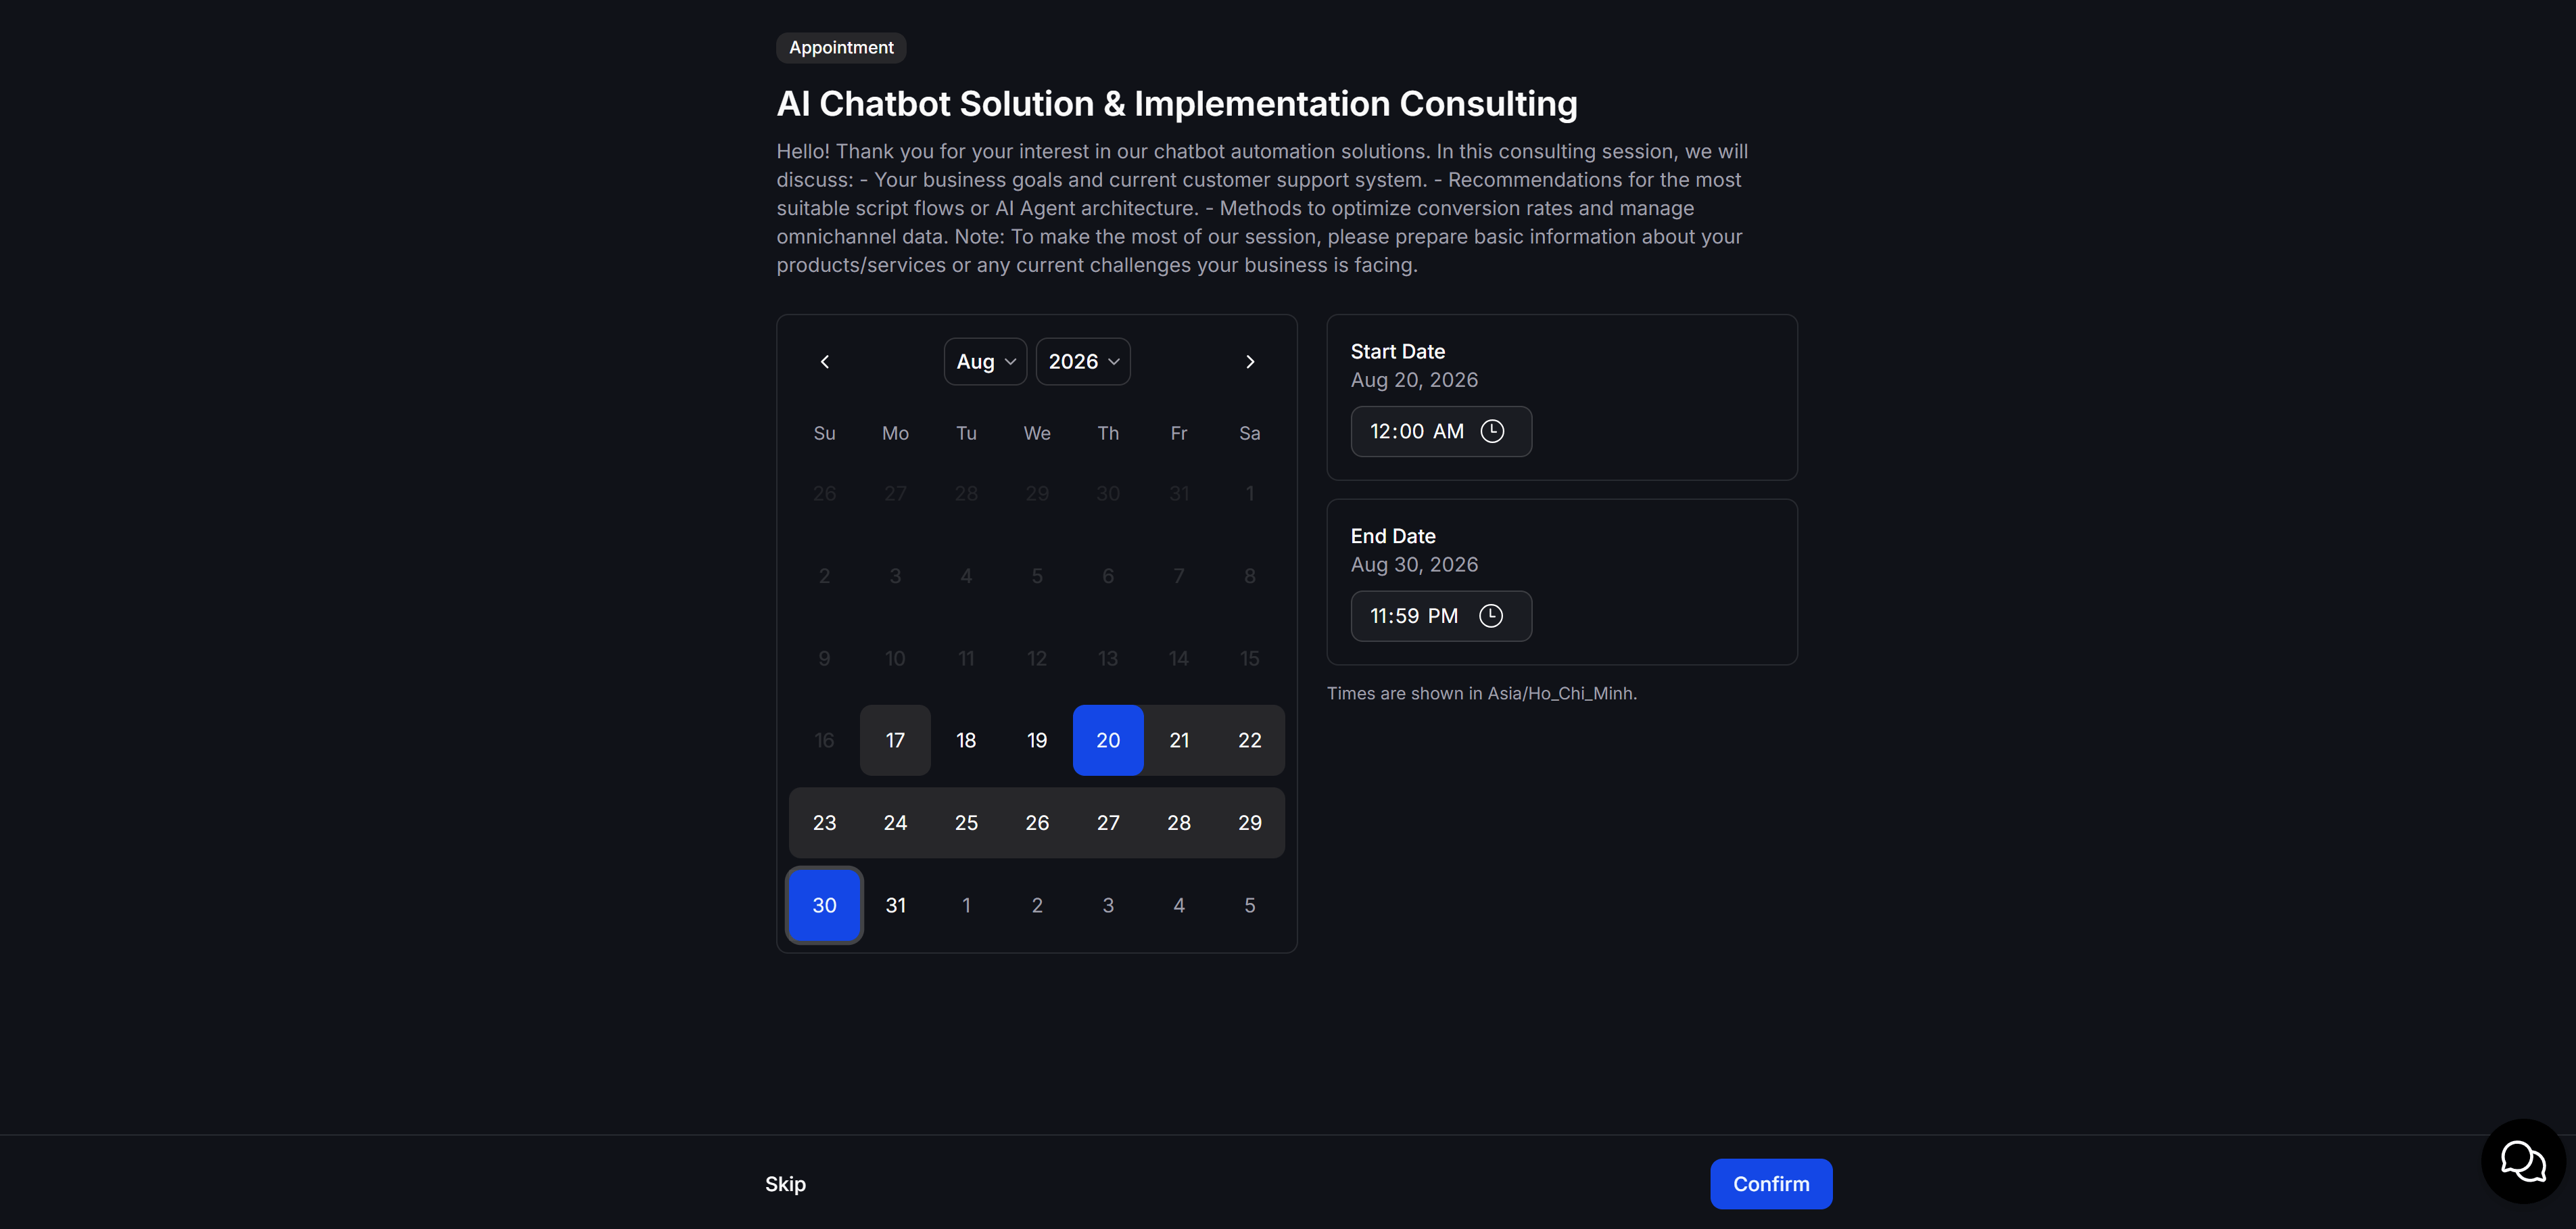
 When the customer passes through this Action, ChatbotX sends content with a **Check Availability** button.
The customer clicks the button to open the availability page, selects the **Start Date**, **End Date**, and timezone, then clicks **Confirm**. This page only checks available times within the selected period; it does not create an appointment.
This Action does not have a **Success** or **Error** branch. After the customer completes the check, ChatbotX automatically sends the notification configured under [Configure confirmation and reminder messages](#configure-confirmation-and-reminder-messages).
When the customer passes through this Action, ChatbotX sends content with a **Check Availability** button.
The customer clicks the button to open the availability page, selects the **Start Date**, **End Date**, and timezone, then clicks **Confirm**. This page only checks available times within the selected period; it does not create an appointment.
This Action does not have a **Success** or **Error** branch. After the customer completes the check, ChatbotX automatically sends the notification configured under [Configure confirmation and reminder messages](#configure-confirmation-and-reminder-messages).
 ### Send a message based on the result
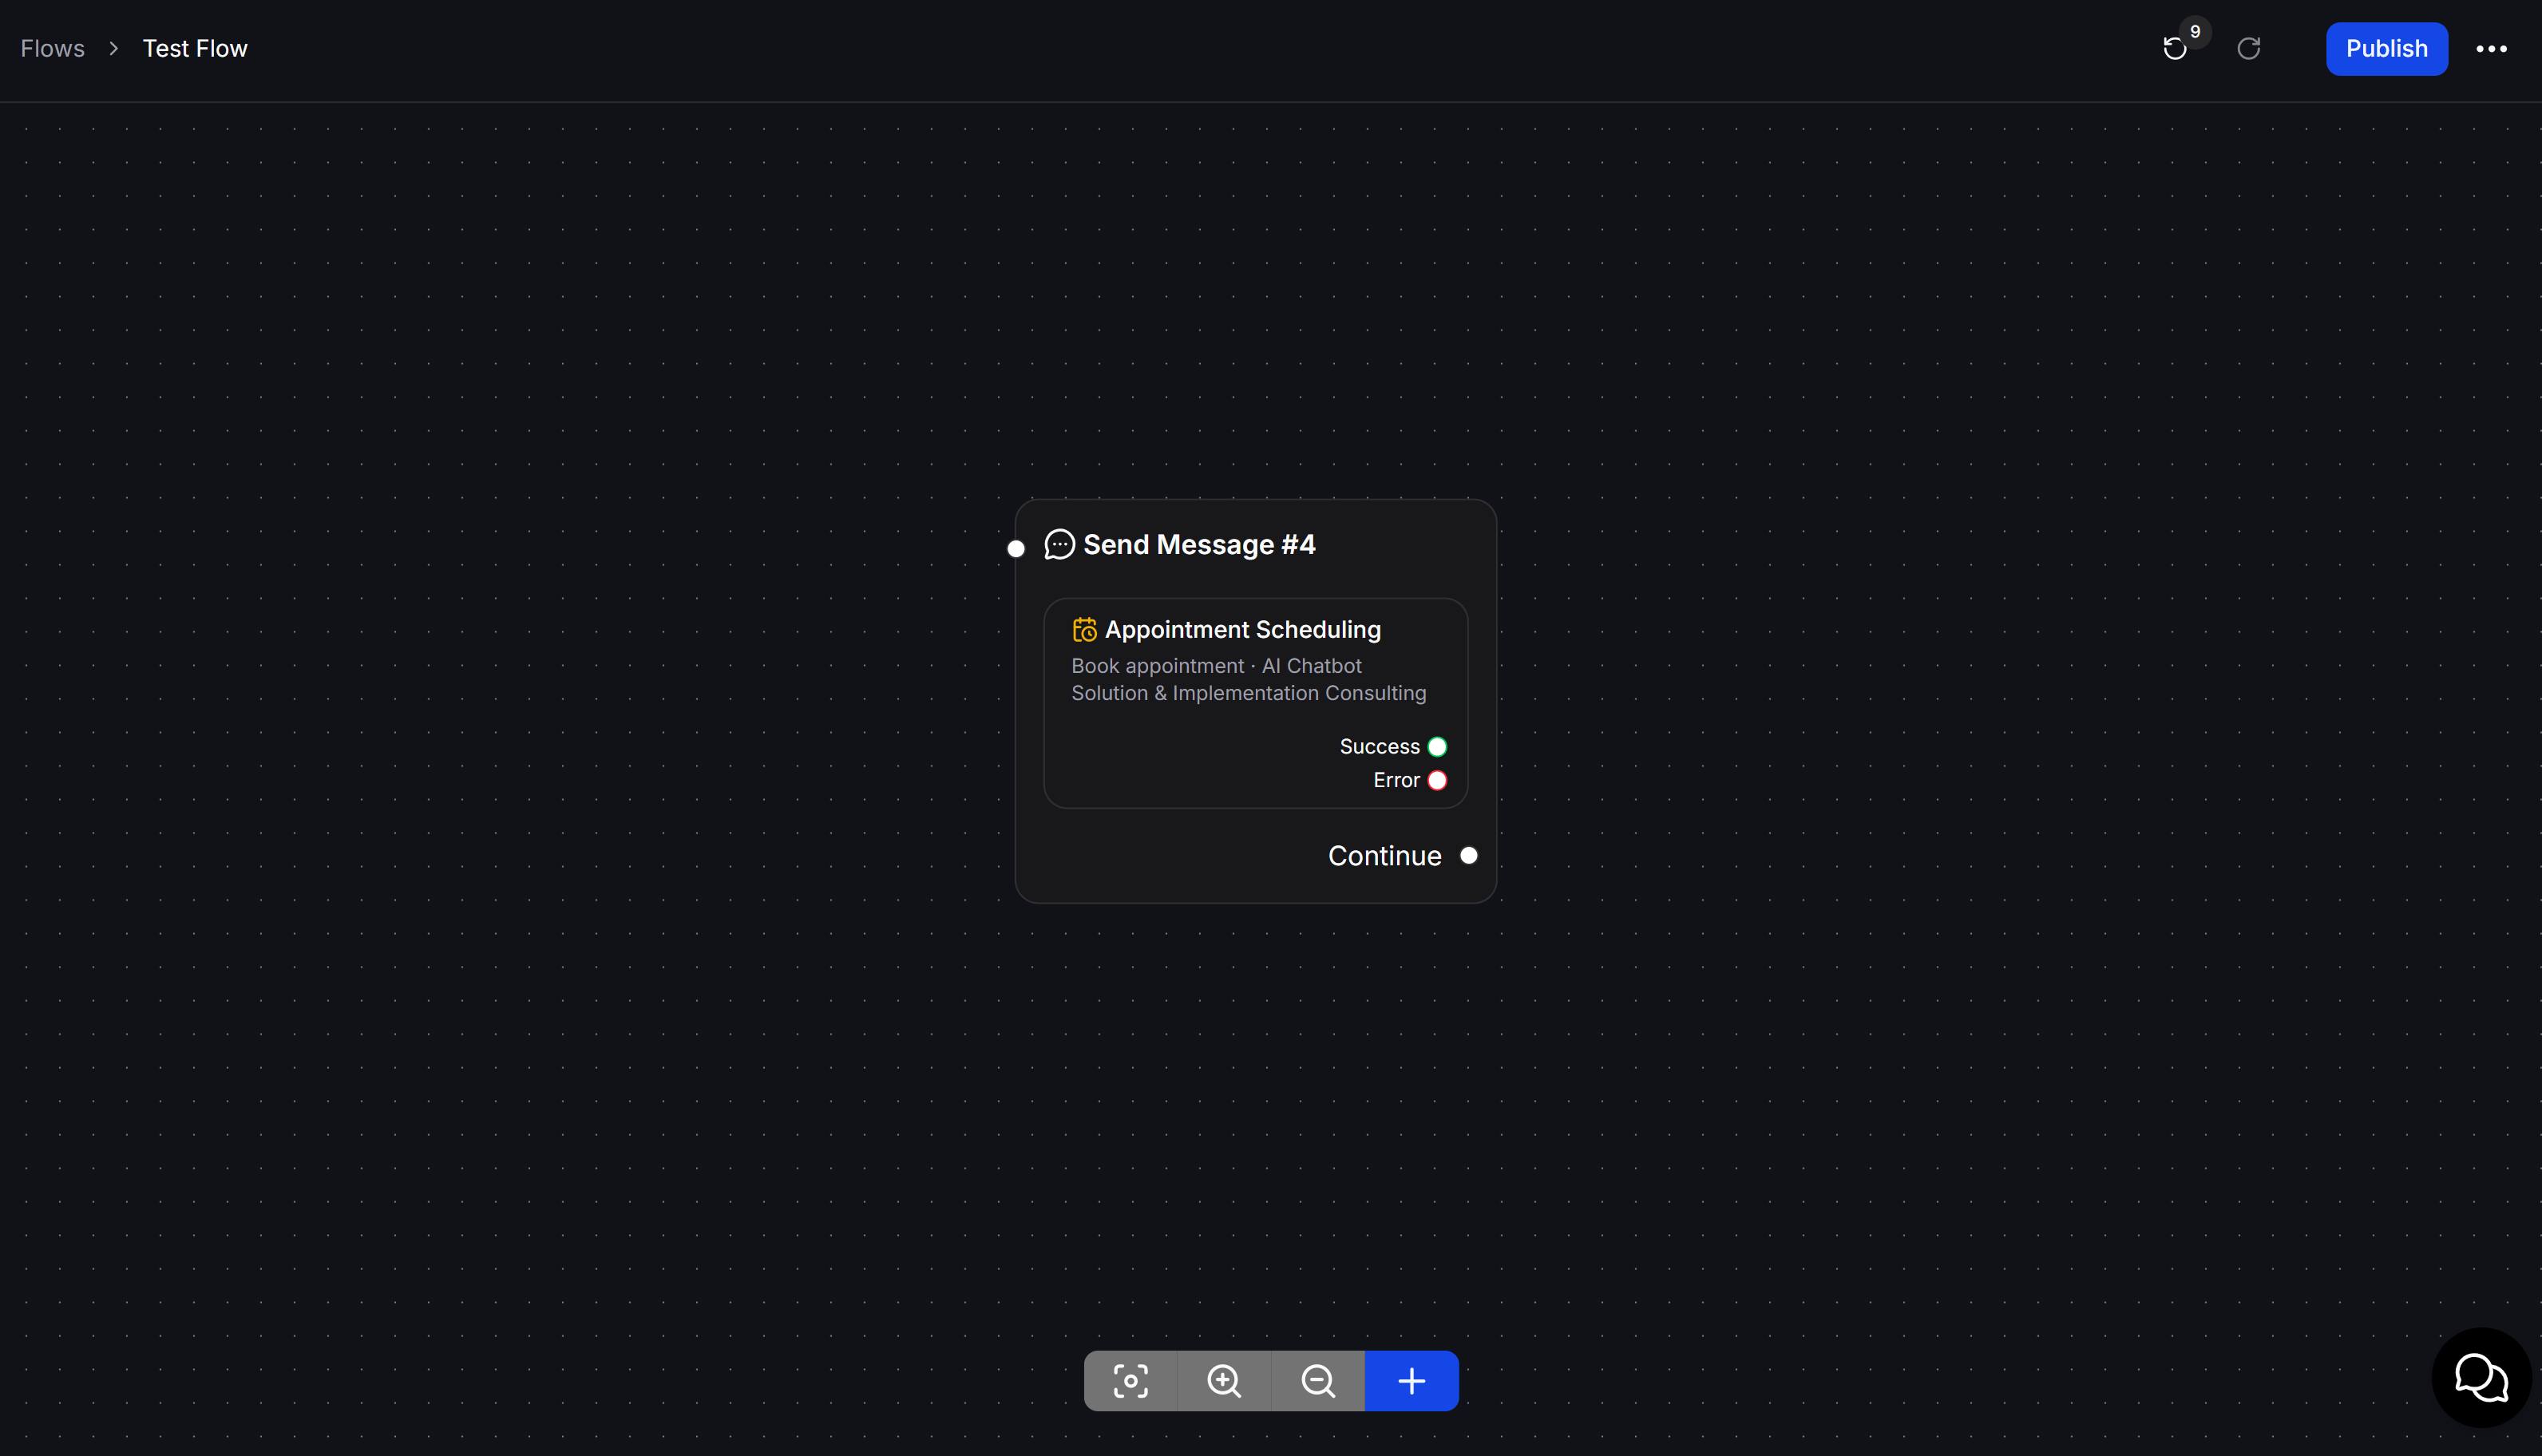
After you save the settings, the three Actions **Book appointment**, **Cancel appointment**, and **Check availability** display two result connectors:
* **Success**: The Action successfully booked, canceled, or checked availability.
* **Error**: ChatbotX could not complete the request, for example because another customer just booked the selected time.
Connect each result to a separate **Send Text** block. The customer receives the message that matches what happened.
### Send a message based on the result
After you save the settings, the three Actions **Book appointment**, **Cancel appointment**, and **Check availability** display two result connectors:
* **Success**: The Action successfully booked, canceled, or checked availability.
* **Error**: ChatbotX could not complete the request, for example because another customer just booked the selected time.
Connect each result to a separate **Send Text** block. The customer receives the message that matches what happened.
 Example messages for each option:
| Option | Message after success | Message when unsuccessful |
| ---------------------- | ---------------------------------------------------------------------------- | -------------------------------------------------------------------------------------------- |
| **Book appointment** | "Your appointment has been booked. Please review the confirmation details." | "This time is no longer available. Please choose another time." |
| **Cancel appointment** | "Your appointment has been canceled." | "We could not cancel the appointment. Please check the details or contact our support team." |
| **Check availability** | "Here are the available times. Please choose the option that works for you." | "We could not check availability right now. Please try again later." |
For **Check availability**, you can insert the field containing the result or let AI use the result to reply to the customer.
## Example
A consultation booking sequence can work as follows:
The Bot collects the topic the customer wants to discuss. **Get User Data** saves the preferred date and time to a Custom Field.
**Check availability** finds suitable time slots on the Calendar.
**Book appointment** reads the date and time from the Custom Field, creates the appointment, and saves the response.
ChatbotX sends a confirmation after booking and a reminder before the appointment.
Example messages for each option:
| Option | Message after success | Message when unsuccessful |
| ---------------------- | ---------------------------------------------------------------------------- | -------------------------------------------------------------------------------------------- |
| **Book appointment** | "Your appointment has been booked. Please review the confirmation details." | "This time is no longer available. Please choose another time." |
| **Cancel appointment** | "Your appointment has been canceled." | "We could not cancel the appointment. Please check the details or contact our support team." |
| **Check availability** | "Here are the available times. Please choose the option that works for you." | "We could not check availability right now. Please try again later." |
For **Check availability**, you can insert the field containing the result or let AI use the result to reply to the customer.
## Example
A consultation booking sequence can work as follows:
The Bot collects the topic the customer wants to discuss. **Get User Data** saves the preferred date and time to a Custom Field.
**Check availability** finds suitable time slots on the Calendar.
**Book appointment** reads the date and time from the Custom Field, creates the appointment, and saves the response.
ChatbotX sends a confirmation after booking and a reminder before the appointment.