> ## Documentation Index
> Fetch the complete documentation index at: https://chatbotx.io/docs/llms.txt
> Use this file to discover all available pages before exploring further.
# Click to Message Ads
> Learn how to create and manage Click to Message Ads (CTM, CTWA, CTID) directly in ChatbotX to drive conversations into Messenger, WhatsApp, and Instagram.
**Click to Message Ads** is a built-in advertising tool that allows you to create and manage Meta messaging ad campaigns directly within ChatbotX. When customers click your ads on Facebook or Instagram, they are instantly directed into an automated chat conversation on **WhatsApp**, **Facebook Messenger**, or **Instagram Direct**.
This feature streamlines campaign creation, links your ads directly to automated chatbot workflows (Flows), and helps optimize conversion tracking without requiring complex setup inside Meta Ads Manager.
## Accessing Click to Message Ads
To access the messaging ads management interface:
From the left navigation sidebar in ChatbotX, select **Tools**.
In the tools directory, click the **Click to Message Ads** card described as: *Ads send people directly into a conversation on Messenger, Instagram, or WhatsApp.*
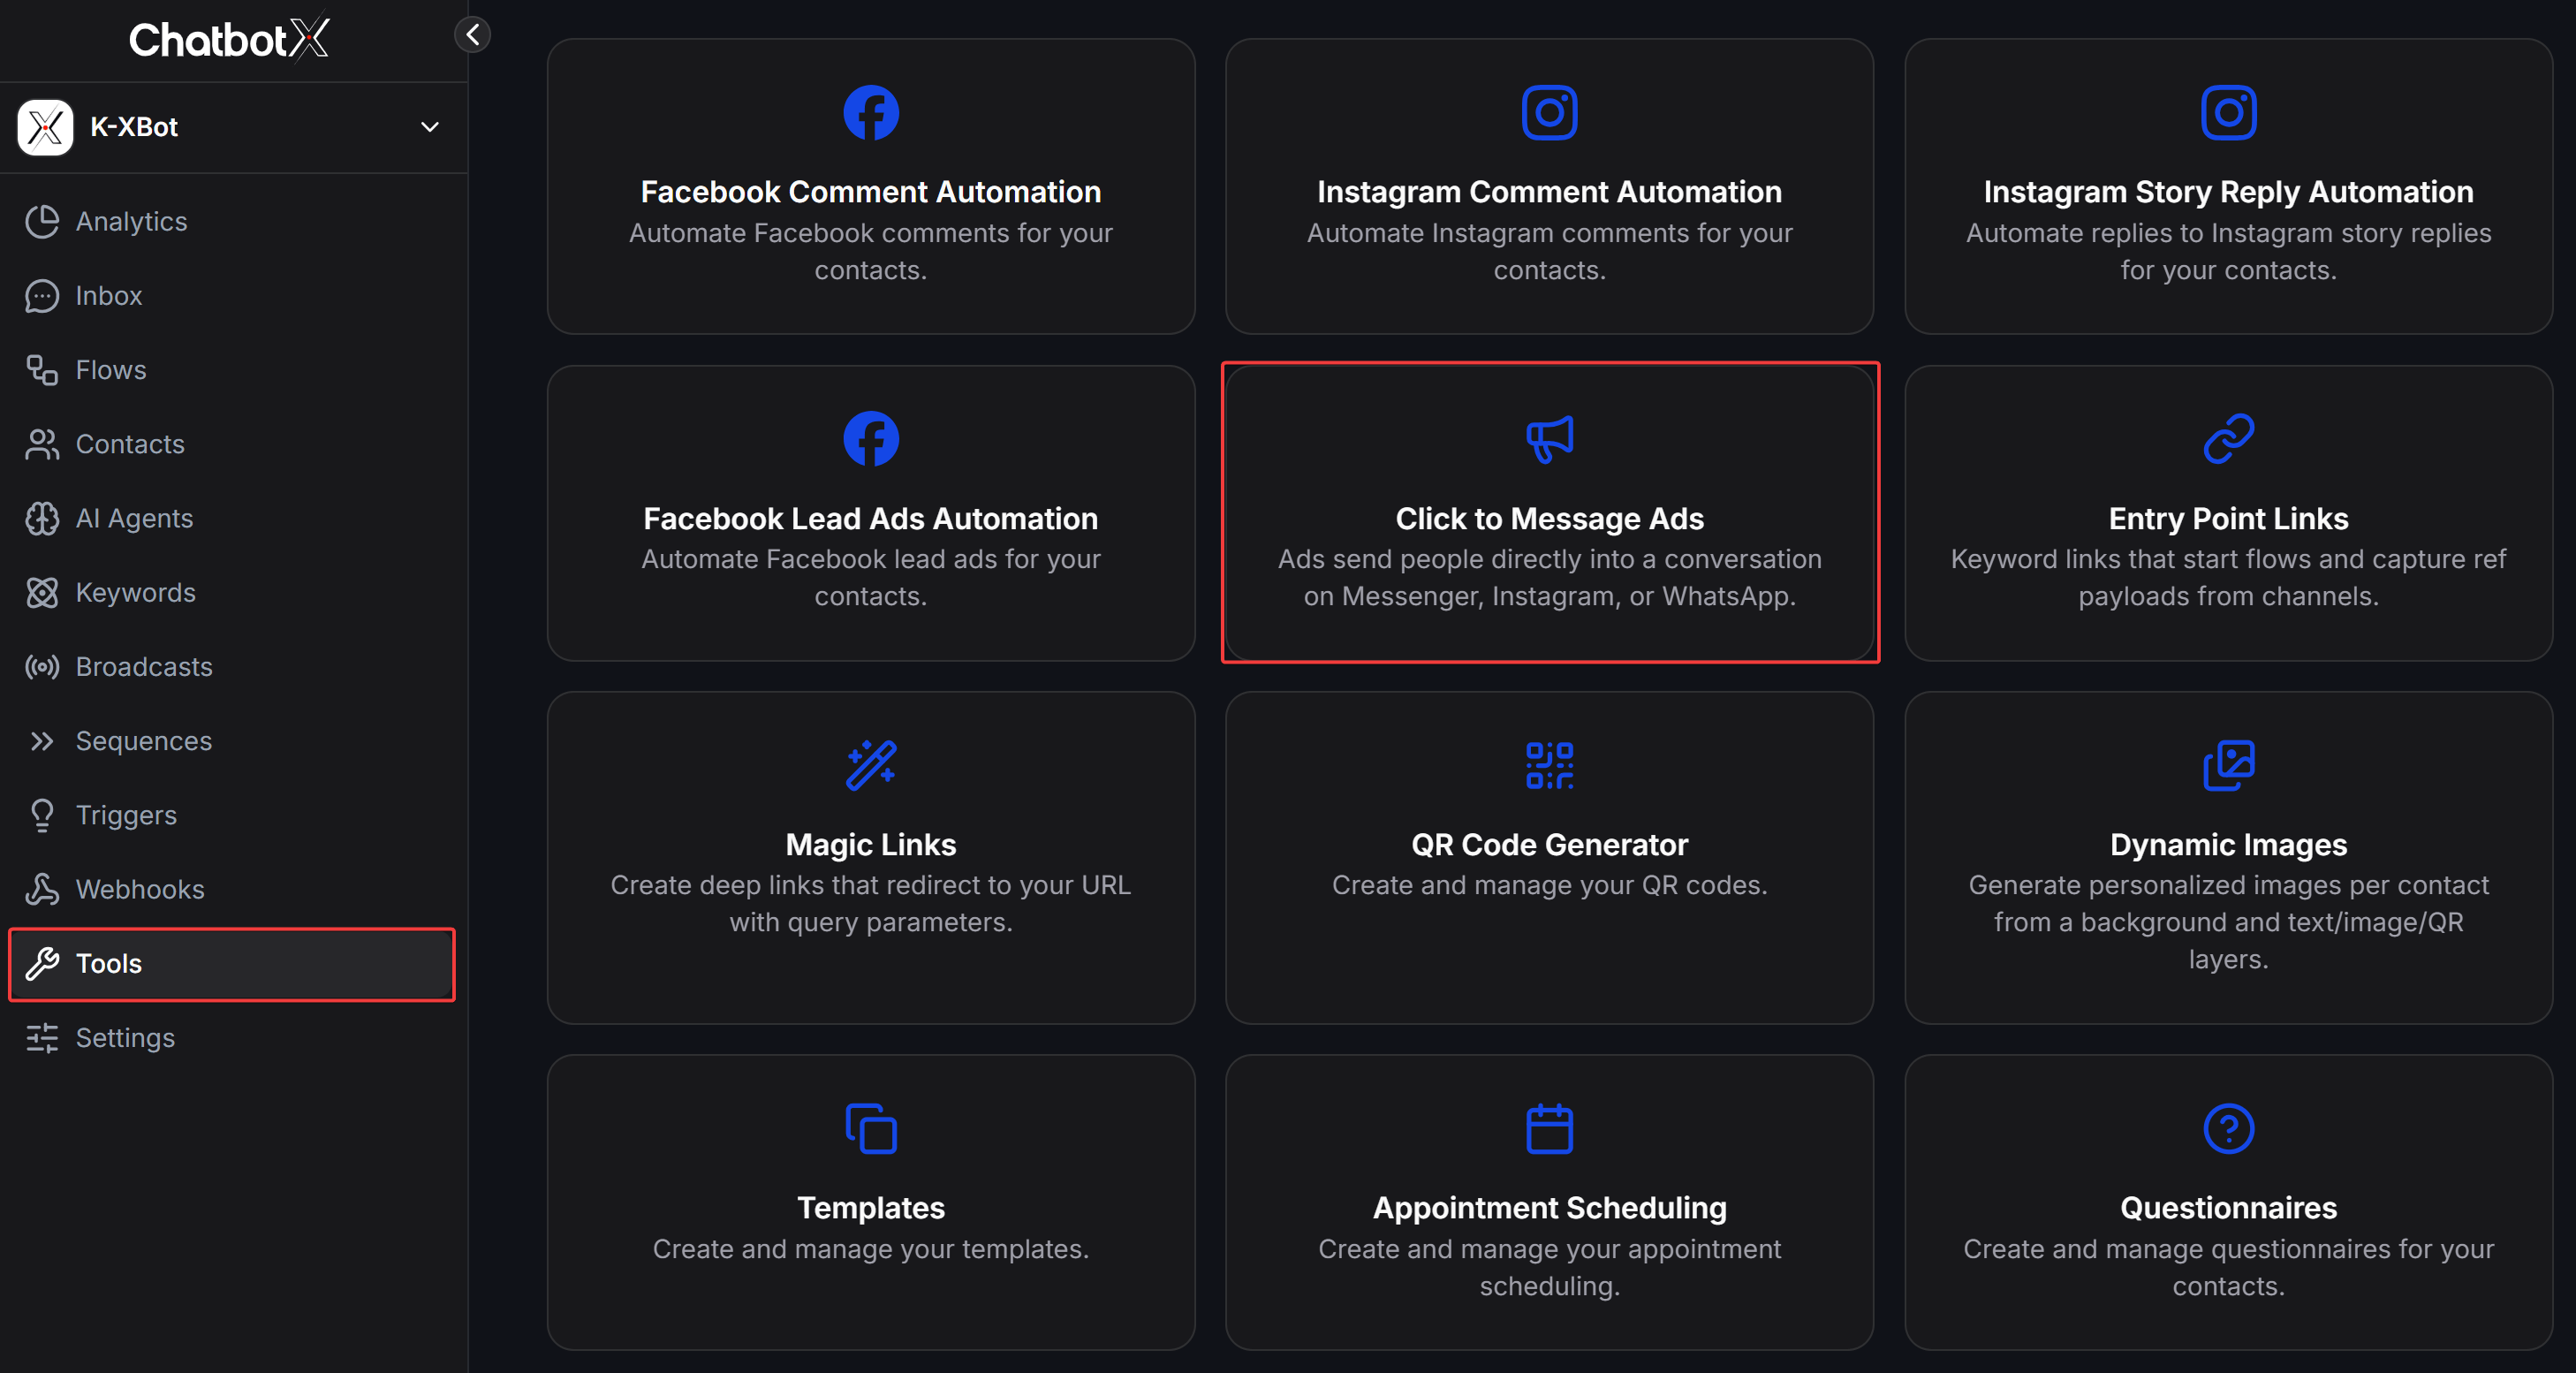 The breadcrumb trail at the top displays: `Tools > Click to Message Ads`.
## Channel-Specific Management Interface
The Click to Message Ads workspace is organized into 3 tabs corresponding to supported Meta messaging channels:
The **CTWA** (Click-to-WhatsApp) tab allows you to launch campaigns on Facebook and Instagram that direct users straight to your WhatsApp Business phone number.
The breadcrumb trail at the top displays: `Tools > Click to Message Ads`.
## Channel-Specific Management Interface
The Click to Message Ads workspace is organized into 3 tabs corresponding to supported Meta messaging channels:
The **CTWA** (Click-to-WhatsApp) tab allows you to launch campaigns on Facebook and Instagram that direct users straight to your WhatsApp Business phone number.
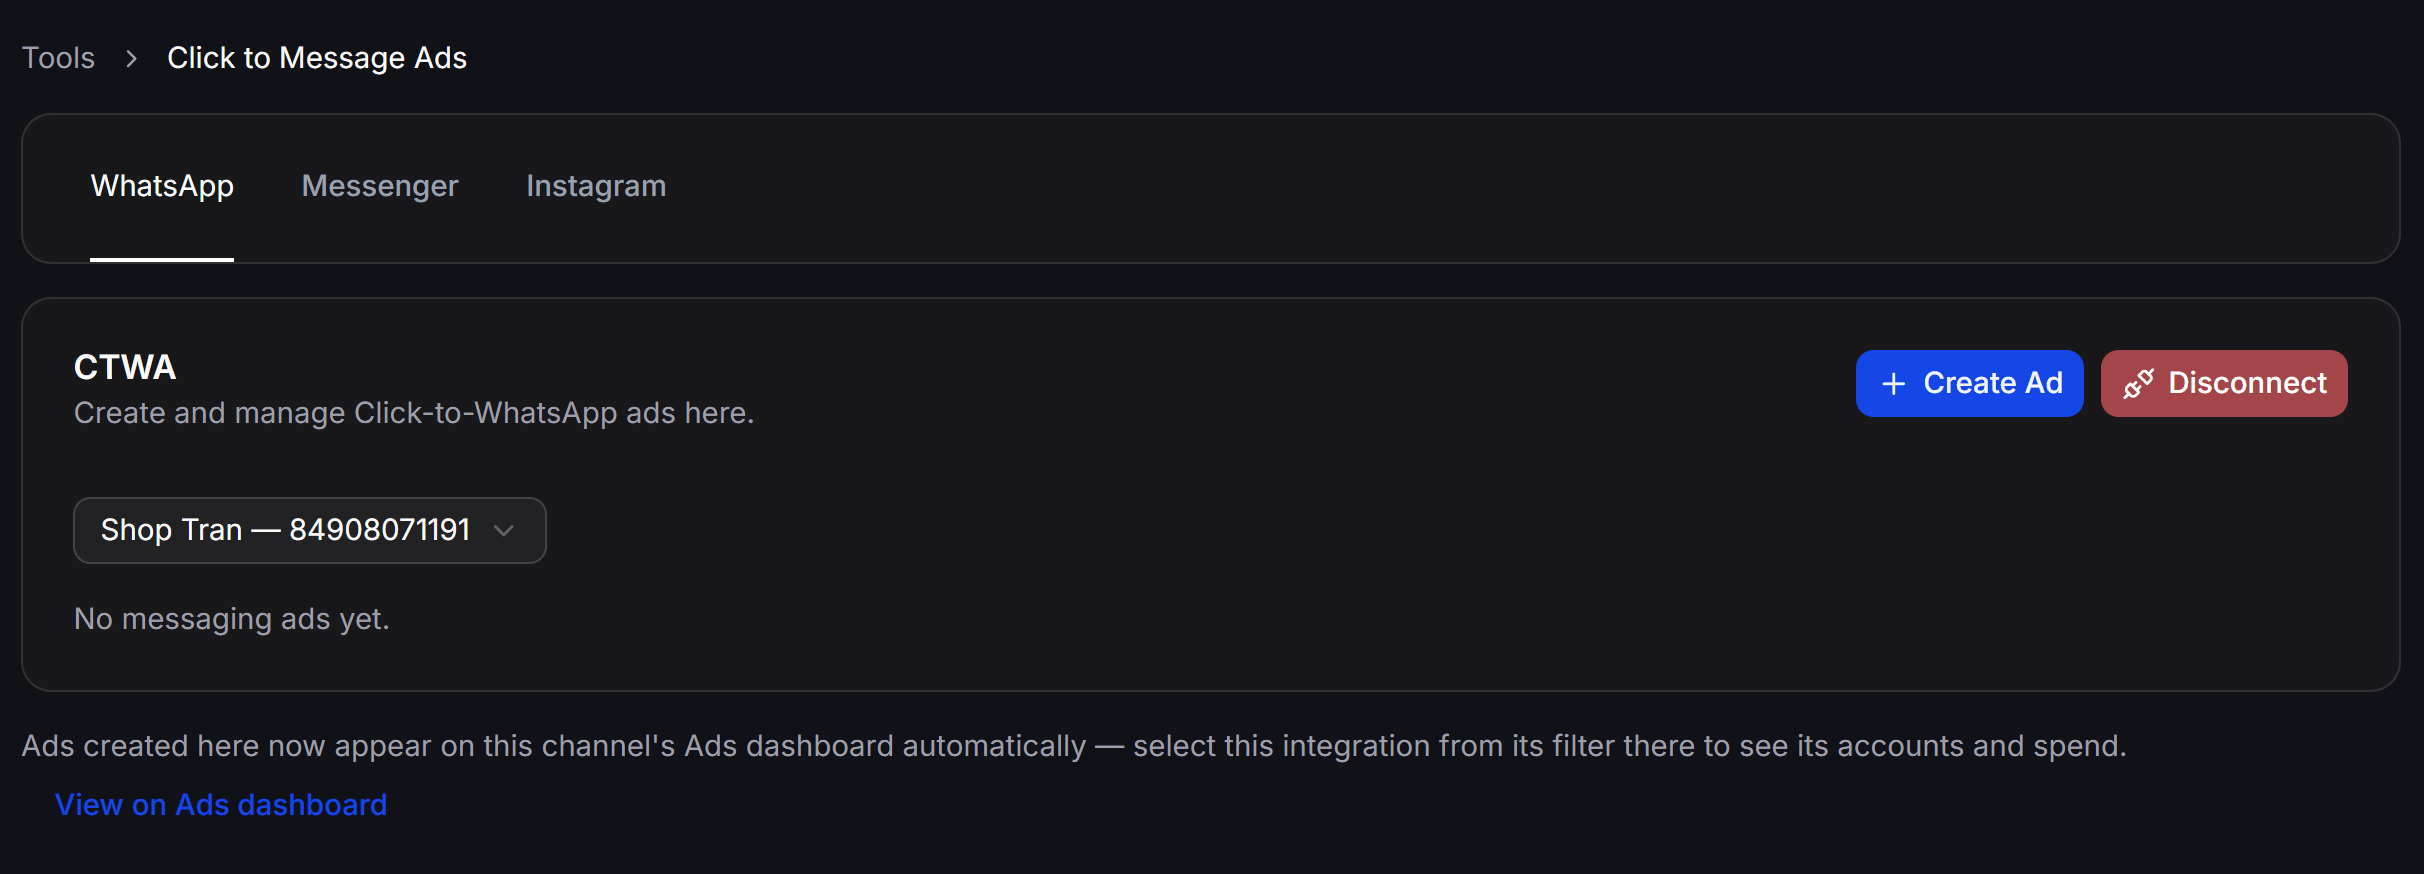 Key interface elements in the WhatsApp tab:
* **CTWA Header:** Card header stating: *Create and manage Click-to-WhatsApp ads here.*
* **Account Selector Dropdown:** Select the connected WhatsApp phone number or business account.
* **+ Create Ad Button:** Launches the 4-step wizard to set up a new Click-to-WhatsApp campaign.
* **Disconnect Button:** Unlinks the advertising connection for this WhatsApp channel.
* **Ad List Area:** Displays *No messaging ads yet.* when no active ads are created.
* **Ads Dashboard Sync Notice:** Informs you that ads created here appear automatically on the channel's Ads dashboard, with a direct **View on Ads dashboard** link to view accounts and spend.
The **CTM** (Click-to-Messenger) tab allows you to configure ads routing users directly into your Facebook Page inbox on Messenger.
Key interface elements in the WhatsApp tab:
* **CTWA Header:** Card header stating: *Create and manage Click-to-WhatsApp ads here.*
* **Account Selector Dropdown:** Select the connected WhatsApp phone number or business account.
* **+ Create Ad Button:** Launches the 4-step wizard to set up a new Click-to-WhatsApp campaign.
* **Disconnect Button:** Unlinks the advertising connection for this WhatsApp channel.
* **Ad List Area:** Displays *No messaging ads yet.* when no active ads are created.
* **Ads Dashboard Sync Notice:** Informs you that ads created here appear automatically on the channel's Ads dashboard, with a direct **View on Ads dashboard** link to view accounts and spend.
The **CTM** (Click-to-Messenger) tab allows you to configure ads routing users directly into your Facebook Page inbox on Messenger.
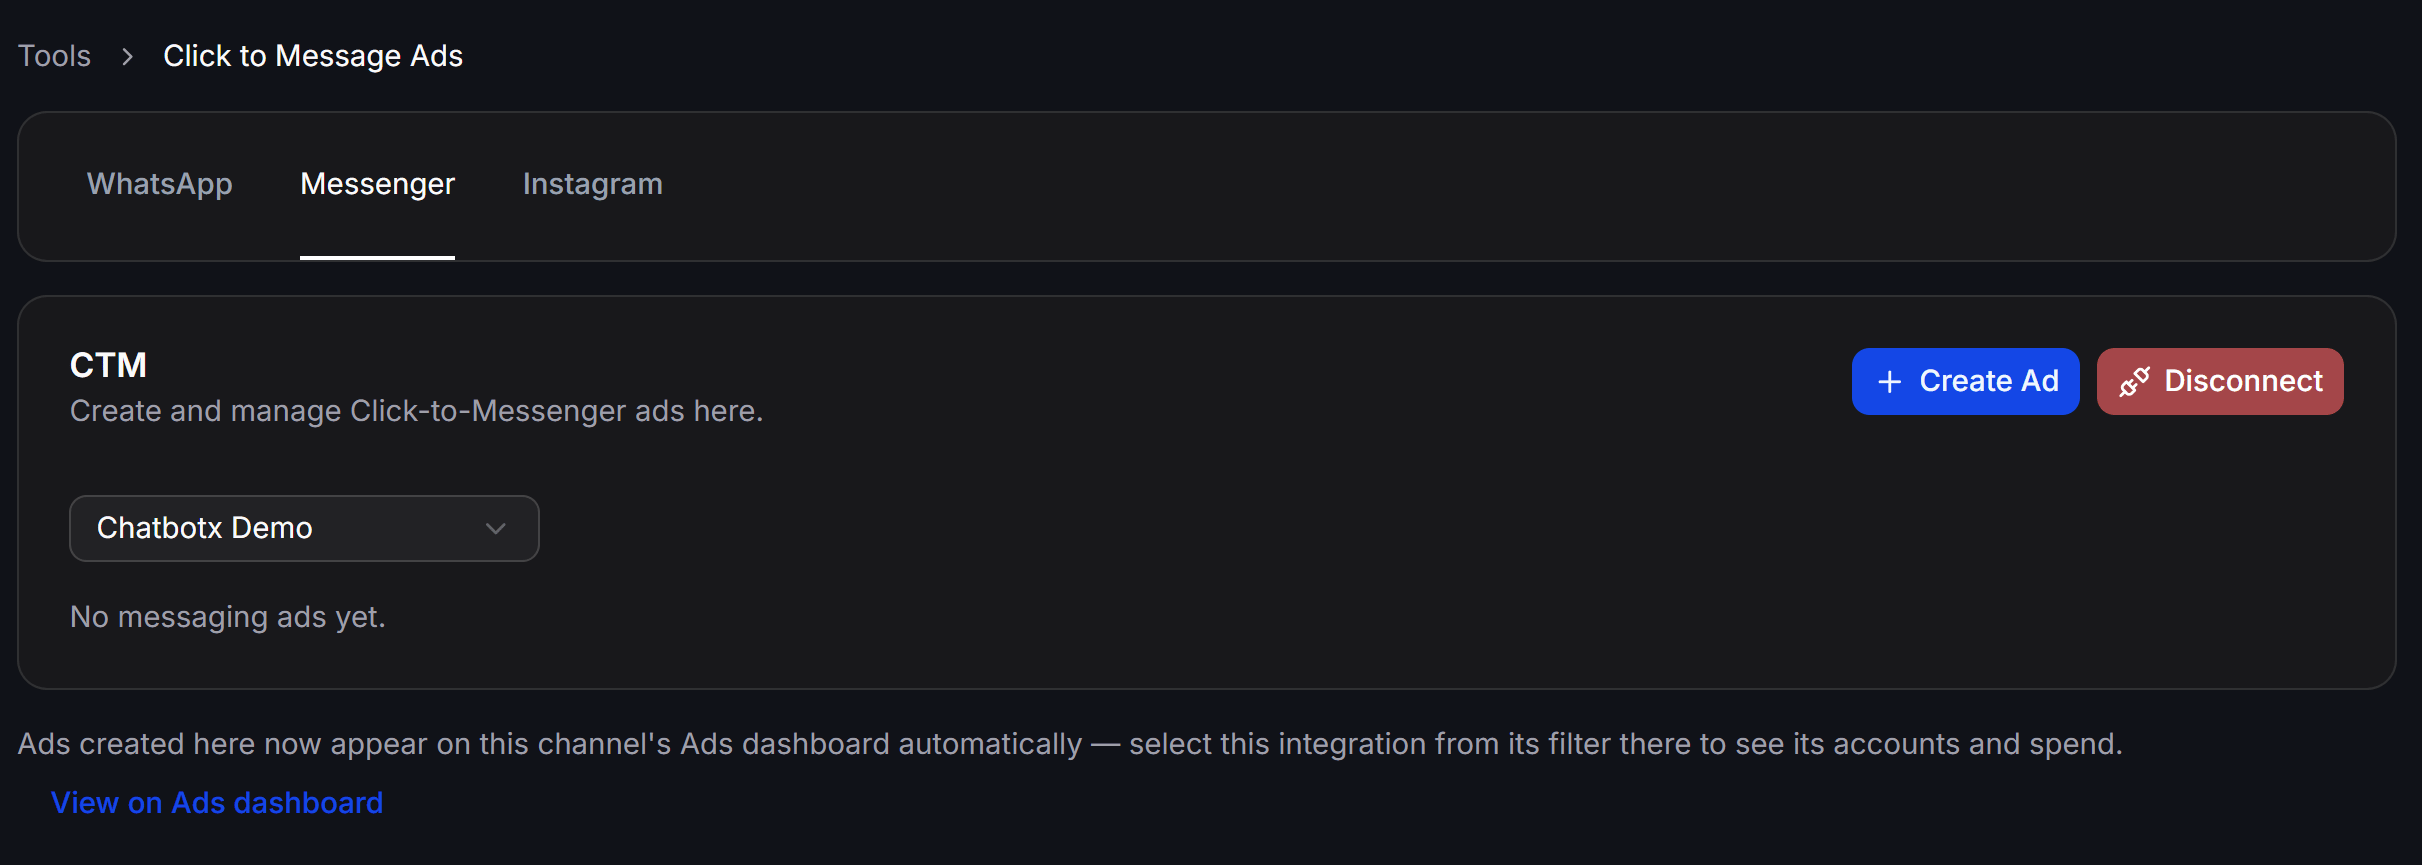 Key interface elements in the Messenger tab:
* **CTM Header:** Card header stating: *Create and manage Click-to-Messenger ads here.*
* **Page Selector Dropdown:** Select the connected Facebook Page for your ad campaign.
* **+ Create Ad Button:** Opens the campaign creation flow for Messenger.
* **Disconnect Button:** Revokes advertising integration for the selected Facebook Page.
* **Ad List Area:** Displays campaign status and configured ads.
* **Ads Dashboard Sync Notice:** Keeps you informed about ad account synchronization with a quick **View on Ads dashboard** link.
The **CTID** (Click-to-Instagram Direct) tab lets you build ads across Instagram Feed, Stories, and Reels that open direct Instagram conversations (DM).
Key interface elements in the Messenger tab:
* **CTM Header:** Card header stating: *Create and manage Click-to-Messenger ads here.*
* **Page Selector Dropdown:** Select the connected Facebook Page for your ad campaign.
* **+ Create Ad Button:** Opens the campaign creation flow for Messenger.
* **Disconnect Button:** Revokes advertising integration for the selected Facebook Page.
* **Ad List Area:** Displays campaign status and configured ads.
* **Ads Dashboard Sync Notice:** Keeps you informed about ad account synchronization with a quick **View on Ads dashboard** link.
The **CTID** (Click-to-Instagram Direct) tab lets you build ads across Instagram Feed, Stories, and Reels that open direct Instagram conversations (DM).
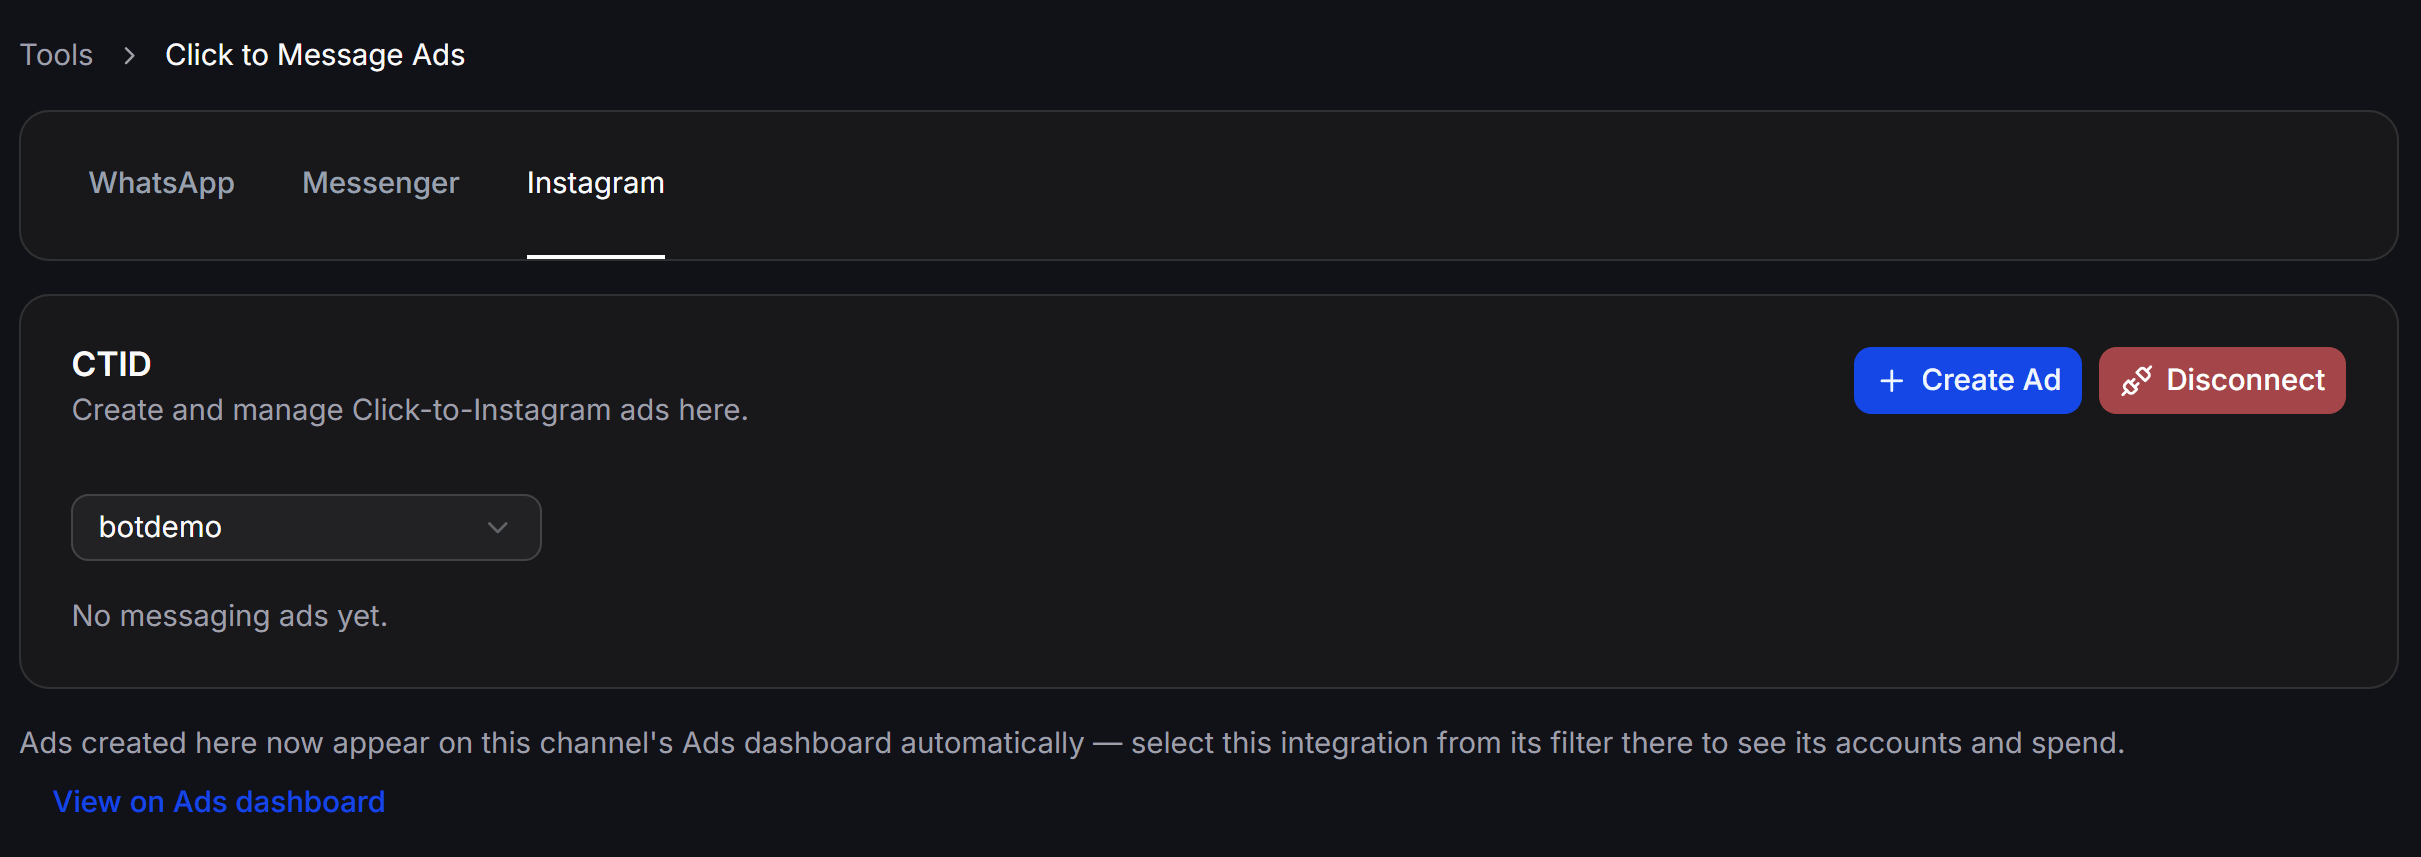 Key interface elements in the Instagram tab:
* **CTID Header:** Card header stating: *Create and manage Click-to-Instagram ads here.*
* **Account Selector Dropdown:** Select the connected Instagram Business account.
* **+ Create Ad Button:** Initiates the Click-to-Instagram ad creation process.
* **Disconnect Button:** Unlinks Instagram advertising access.
* **Ad List Area:** Manages created Instagram messaging ads.
* **Ads Dashboard Sync Notice:** Includes **View on Ads dashboard** for spend and attribution tracking.
## Creating Click to Message Ads
Clicking the **+ Create Ad** button on any channel tab opens a standardized 4-step campaign creation wizard:
Set the basic campaign properties:
* **Name:** Enter a descriptive campaign title (for example: `Promo Campaign Q3`).
* **Objective:** Automatically preset to `Engagement (messaging)`.
* **Special ad category (optional):** If advertising regulated verticals (Housing, Employment, Financial products and services, Credit, or Politics), select the corresponding category.
* **Ad category country (optional):** Choose the authorized country where you have permission to run regulated category ads (for example: `Vietnam`, `Singapore`).
Key interface elements in the Instagram tab:
* **CTID Header:** Card header stating: *Create and manage Click-to-Instagram ads here.*
* **Account Selector Dropdown:** Select the connected Instagram Business account.
* **+ Create Ad Button:** Initiates the Click-to-Instagram ad creation process.
* **Disconnect Button:** Unlinks Instagram advertising access.
* **Ad List Area:** Manages created Instagram messaging ads.
* **Ads Dashboard Sync Notice:** Includes **View on Ads dashboard** for spend and attribution tracking.
## Creating Click to Message Ads
Clicking the **+ Create Ad** button on any channel tab opens a standardized 4-step campaign creation wizard:
Set the basic campaign properties:
* **Name:** Enter a descriptive campaign title (for example: `Promo Campaign Q3`).
* **Objective:** Automatically preset to `Engagement (messaging)`.
* **Special ad category (optional):** If advertising regulated verticals (Housing, Employment, Financial products and services, Credit, or Politics), select the corresponding category.
* **Ad category country (optional):** Choose the authorized country where you have permission to run regulated category ads (for example: `Vietnam`, `Singapore`).
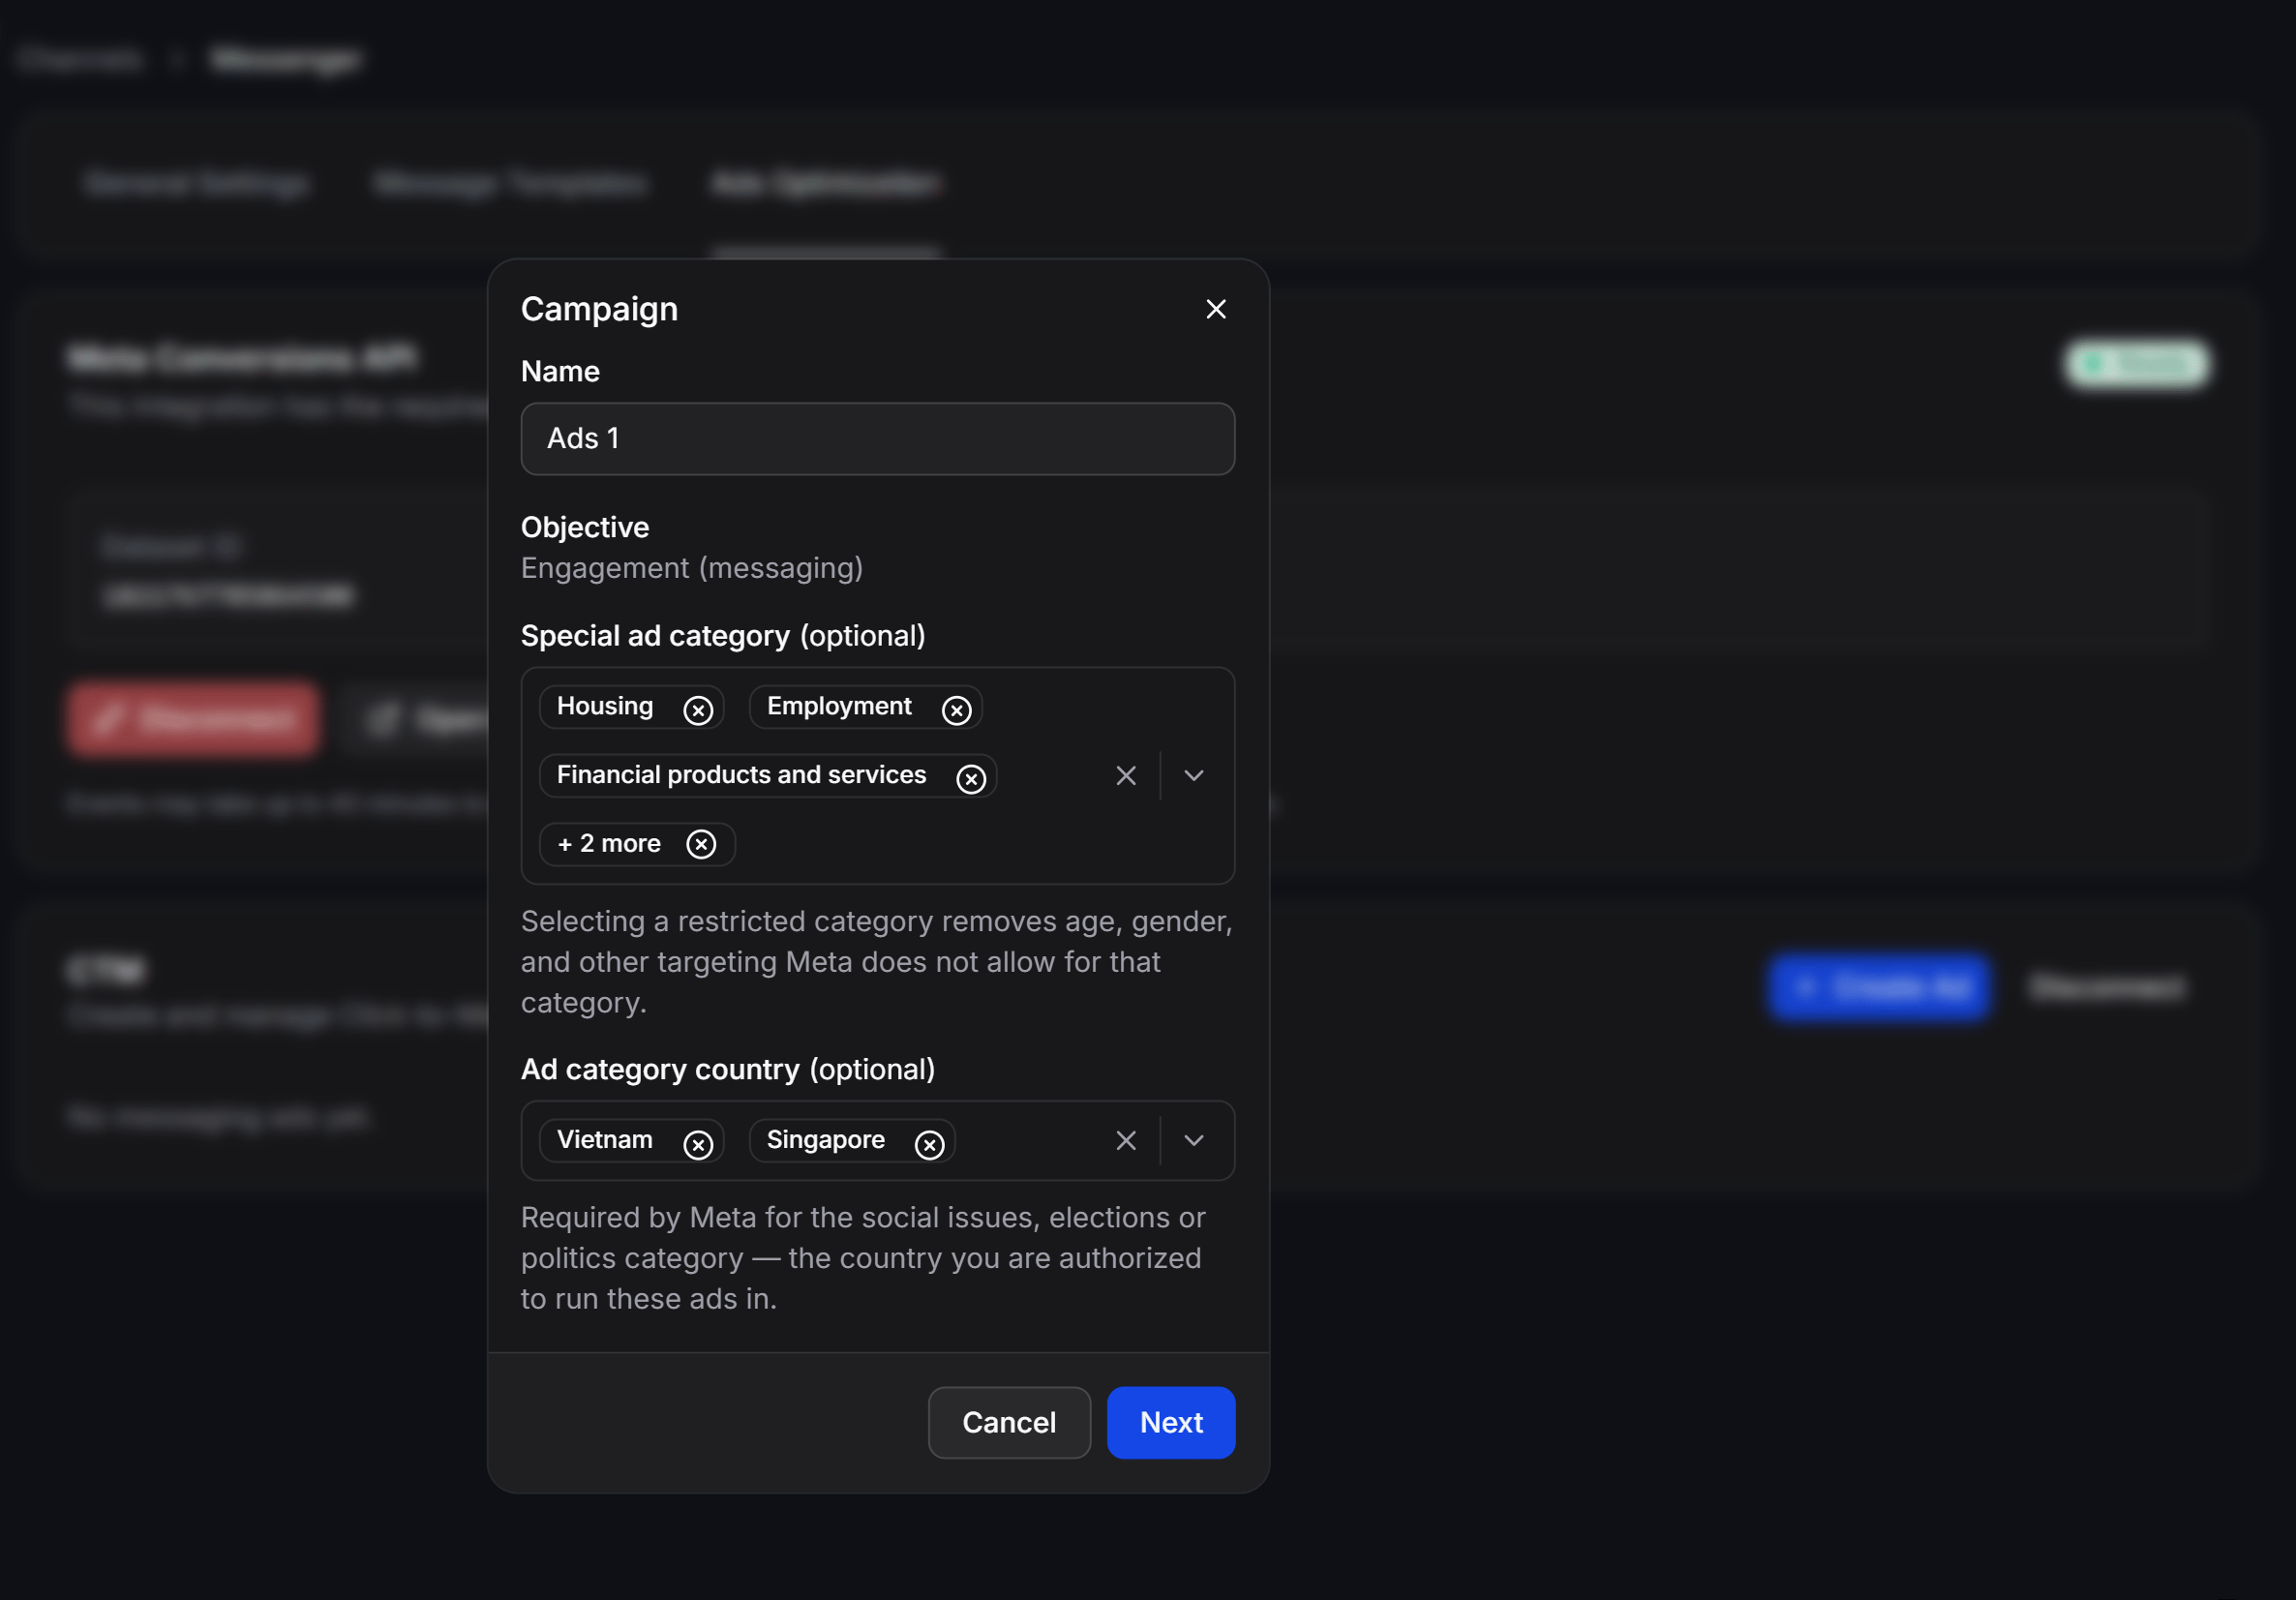 Per Meta policies, selecting a Special Ad Category automatically disables granular demographic targeting such as age, gender, and narrow geographic locations.
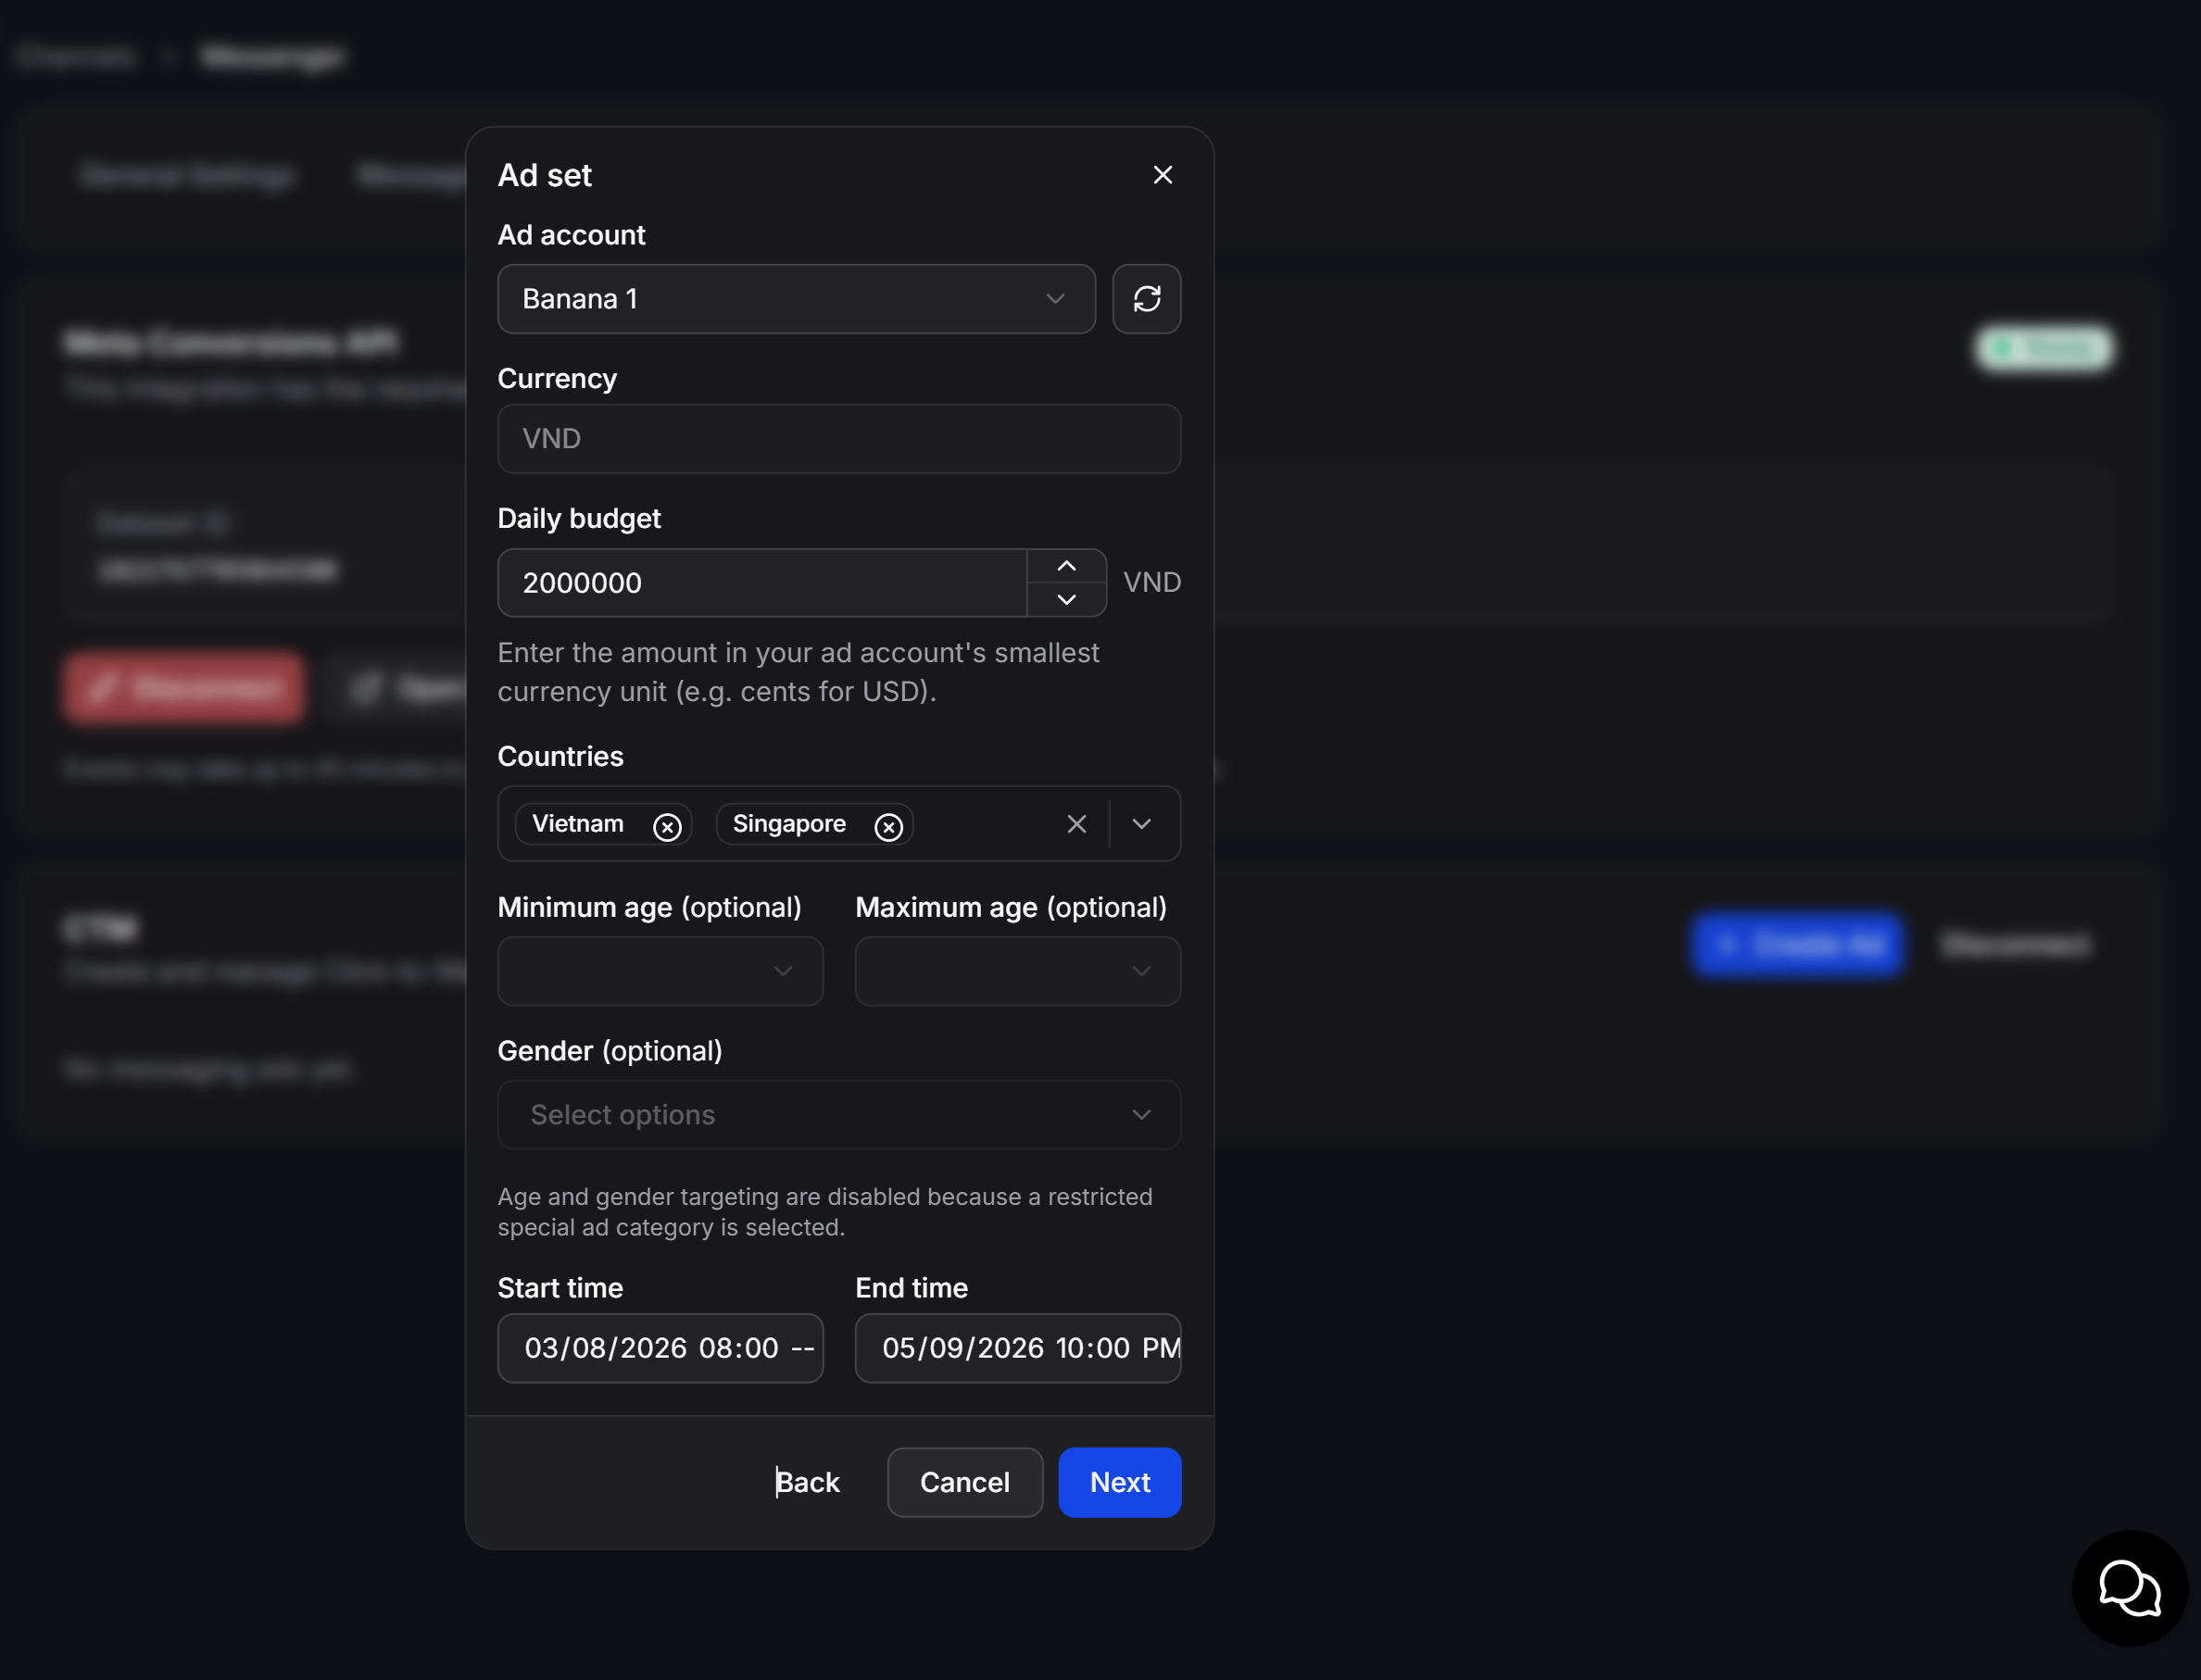
Define budget, distribution schedule, and target audience:
* **Ad account:** Select your connected Meta ad account (use the refresh icon to reload available accounts).
* **Currency:** The currency code of the selected ad account (for example: `VND`, `USD`).
* **Daily budget:** Enter your daily spend budget in the smallest currency unit.
* **Countries:** Select target countries for ad delivery.
* **Minimum age & Maximum age (optional):** Set age constraints for ad visibility.
* **Gender (optional):** Select target gender (All, Men, or Women).
* **Start time & End time:** Define the exact campaign start and end dates.
Per Meta policies, selecting a Special Ad Category automatically disables granular demographic targeting such as age, gender, and narrow geographic locations.
Define budget, distribution schedule, and target audience:
* **Ad account:** Select your connected Meta ad account (use the refresh icon to reload available accounts).
* **Currency:** The currency code of the selected ad account (for example: `VND`, `USD`).
* **Daily budget:** Enter your daily spend budget in the smallest currency unit.
* **Countries:** Select target countries for ad delivery.
* **Minimum age & Maximum age (optional):** Set age constraints for ad visibility.
* **Gender (optional):** Select target gender (All, Men, or Women).
* **Start time & End time:** Define the exact campaign start and end dates.
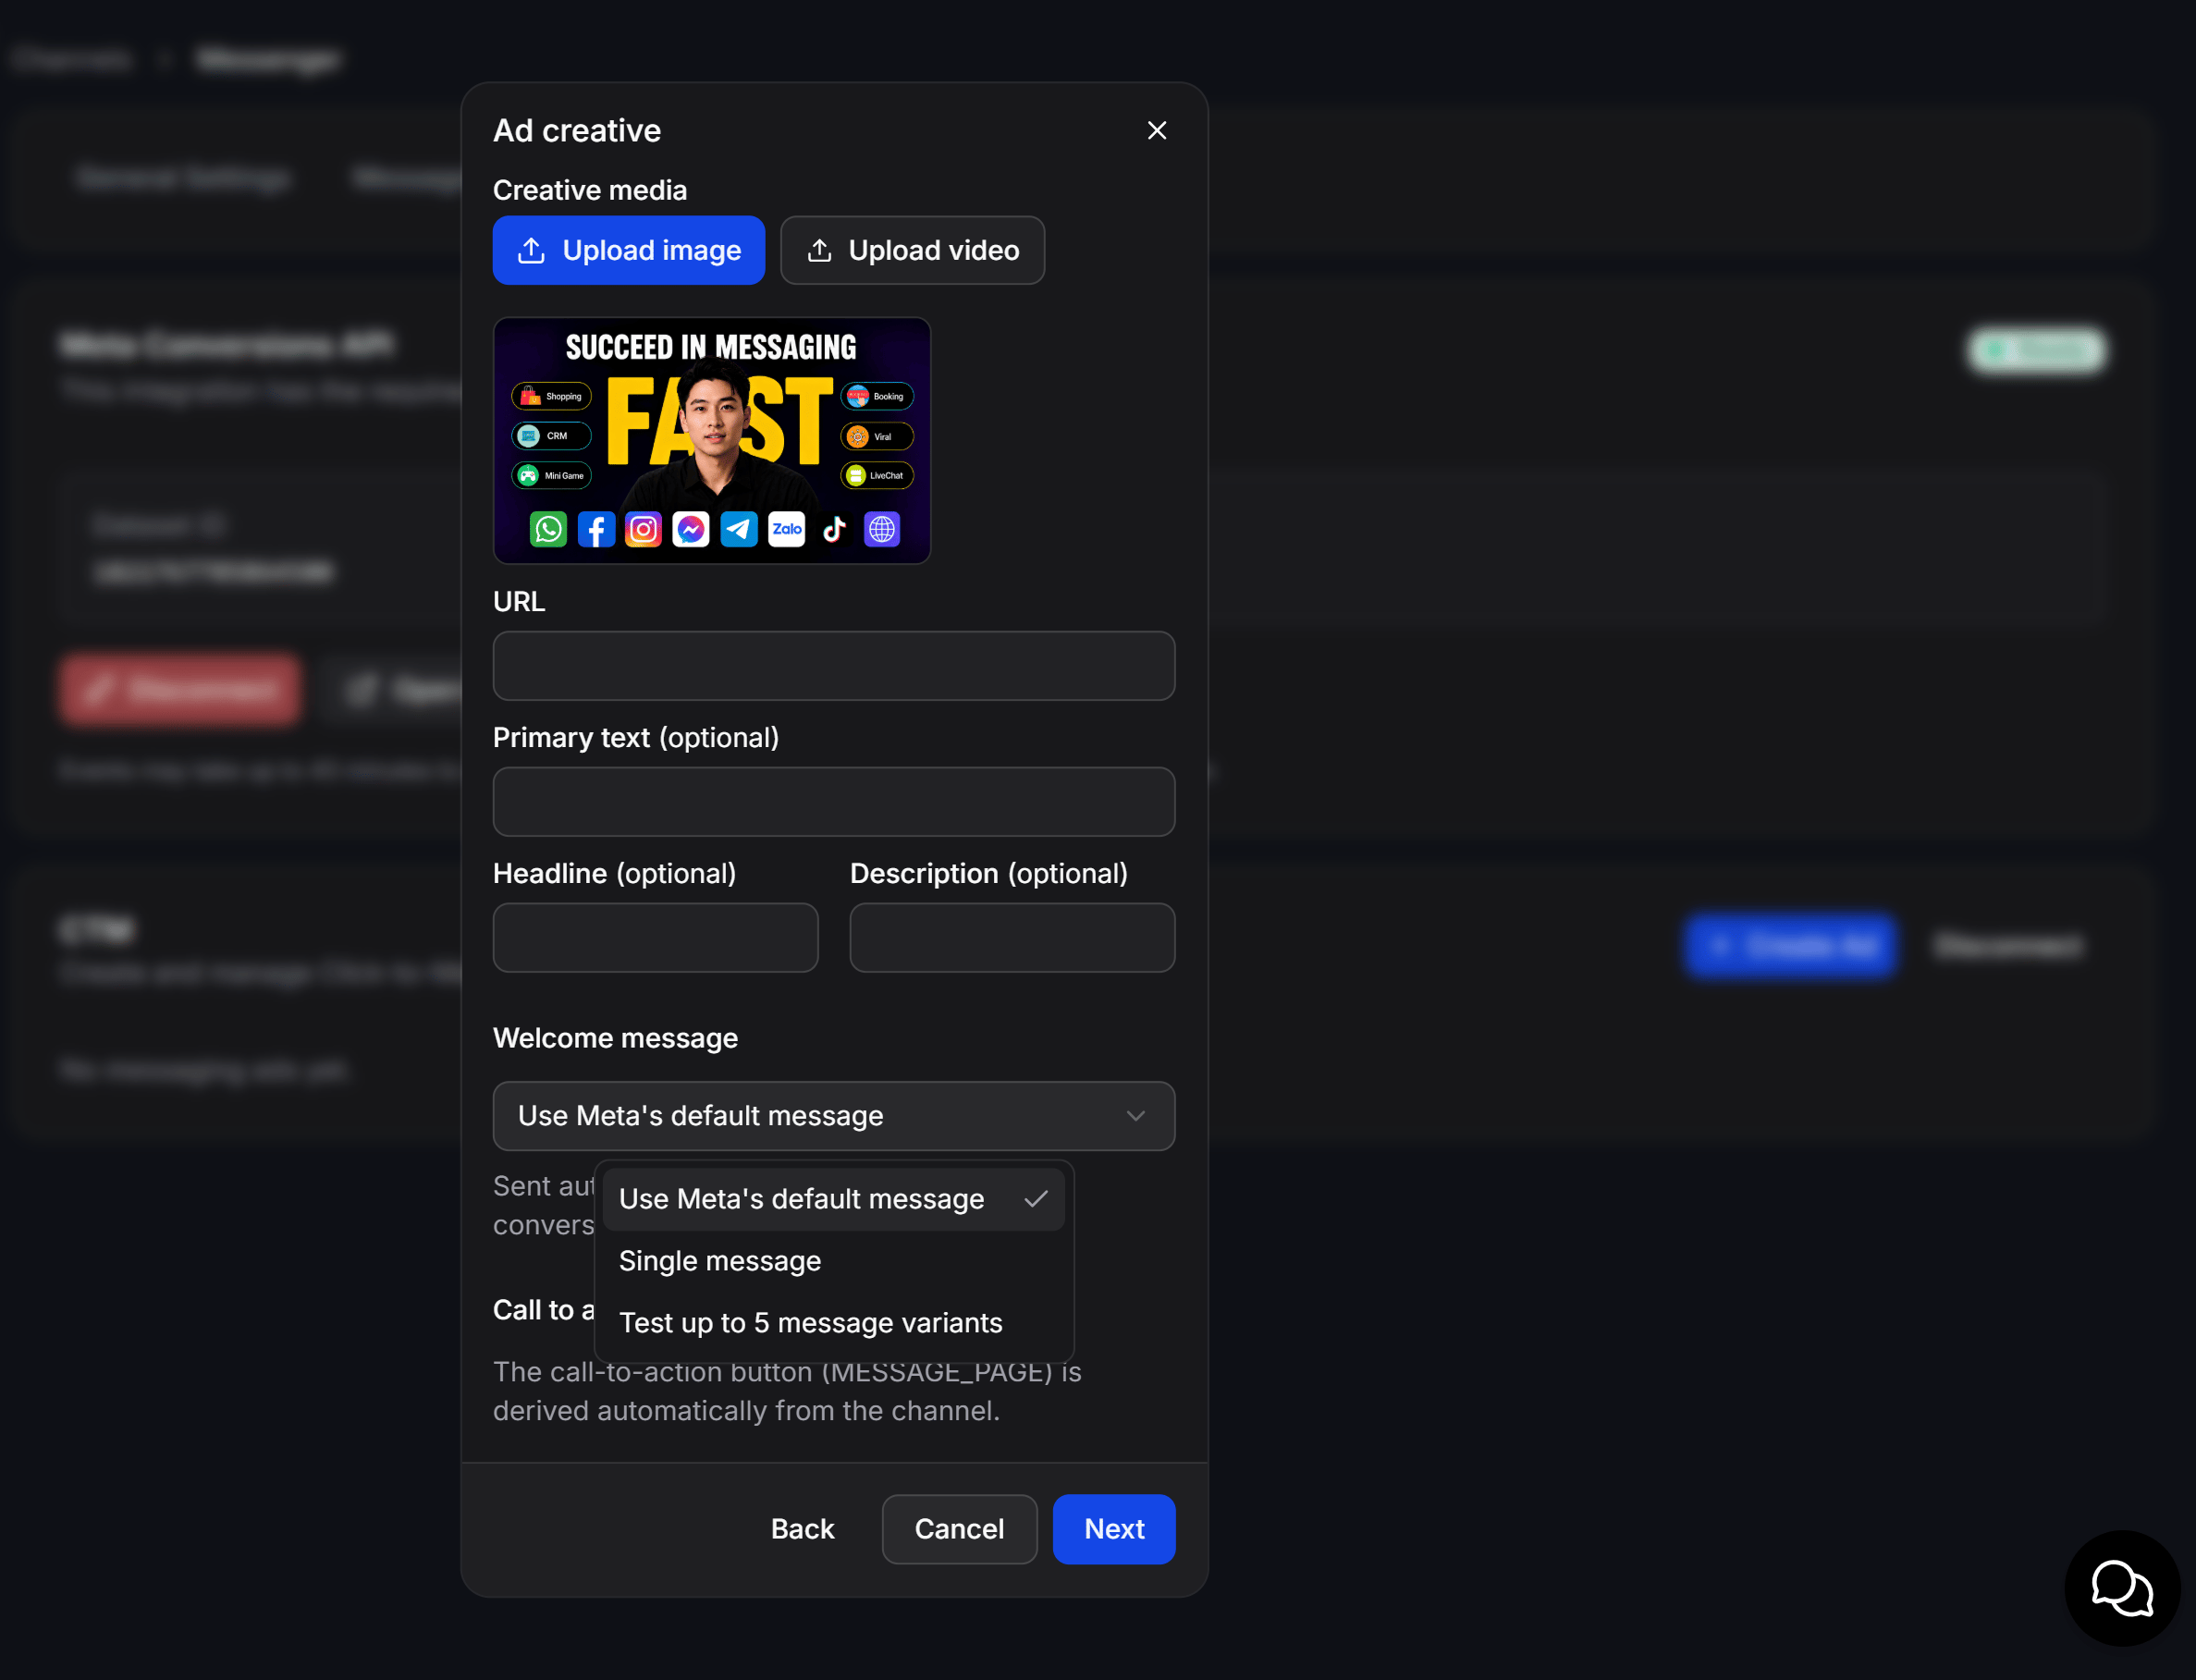
 Upload media assets and customize conversation opening messages:
* **Creative media:** Click **Upload image** or **Upload video** to upload your ad media.
* **URL (optional):** Add a supplementary destination web address.
* **Primary text (optional):** The main ad copy displayed in the post caption.
* **Headline & Description (optional):** The bold headline and subtext next to the call-to-action button.
* **Welcome message:** Choose how the chat opens when users click the ad:
* `Use Meta's default message`: Uses Meta's standard greeting template.
* `Single message`: Defines a custom static opening greeting.
* `Test up to 5 message variants`: Performs an A/B test across up to 5 welcome message variants to optimize reply rates.
* **Call to action:** Automatically assigned based on the channel (e.g., `MESSAGE_PAGE` for Messenger, `WHATSAPP_MESSAGE` for WhatsApp).
Upload media assets and customize conversation opening messages:
* **Creative media:** Click **Upload image** or **Upload video** to upload your ad media.
* **URL (optional):** Add a supplementary destination web address.
* **Primary text (optional):** The main ad copy displayed in the post caption.
* **Headline & Description (optional):** The bold headline and subtext next to the call-to-action button.
* **Welcome message:** Choose how the chat opens when users click the ad:
* `Use Meta's default message`: Uses Meta's standard greeting template.
* `Single message`: Defines a custom static opening greeting.
* `Test up to 5 message variants`: Performs an A/B test across up to 5 welcome message variants to optimize reply rates.
* **Call to action:** Automatically assigned based on the channel (e.g., `MESSAGE_PAGE` for Messenger, `WHATSAPP_MESSAGE` for WhatsApp).
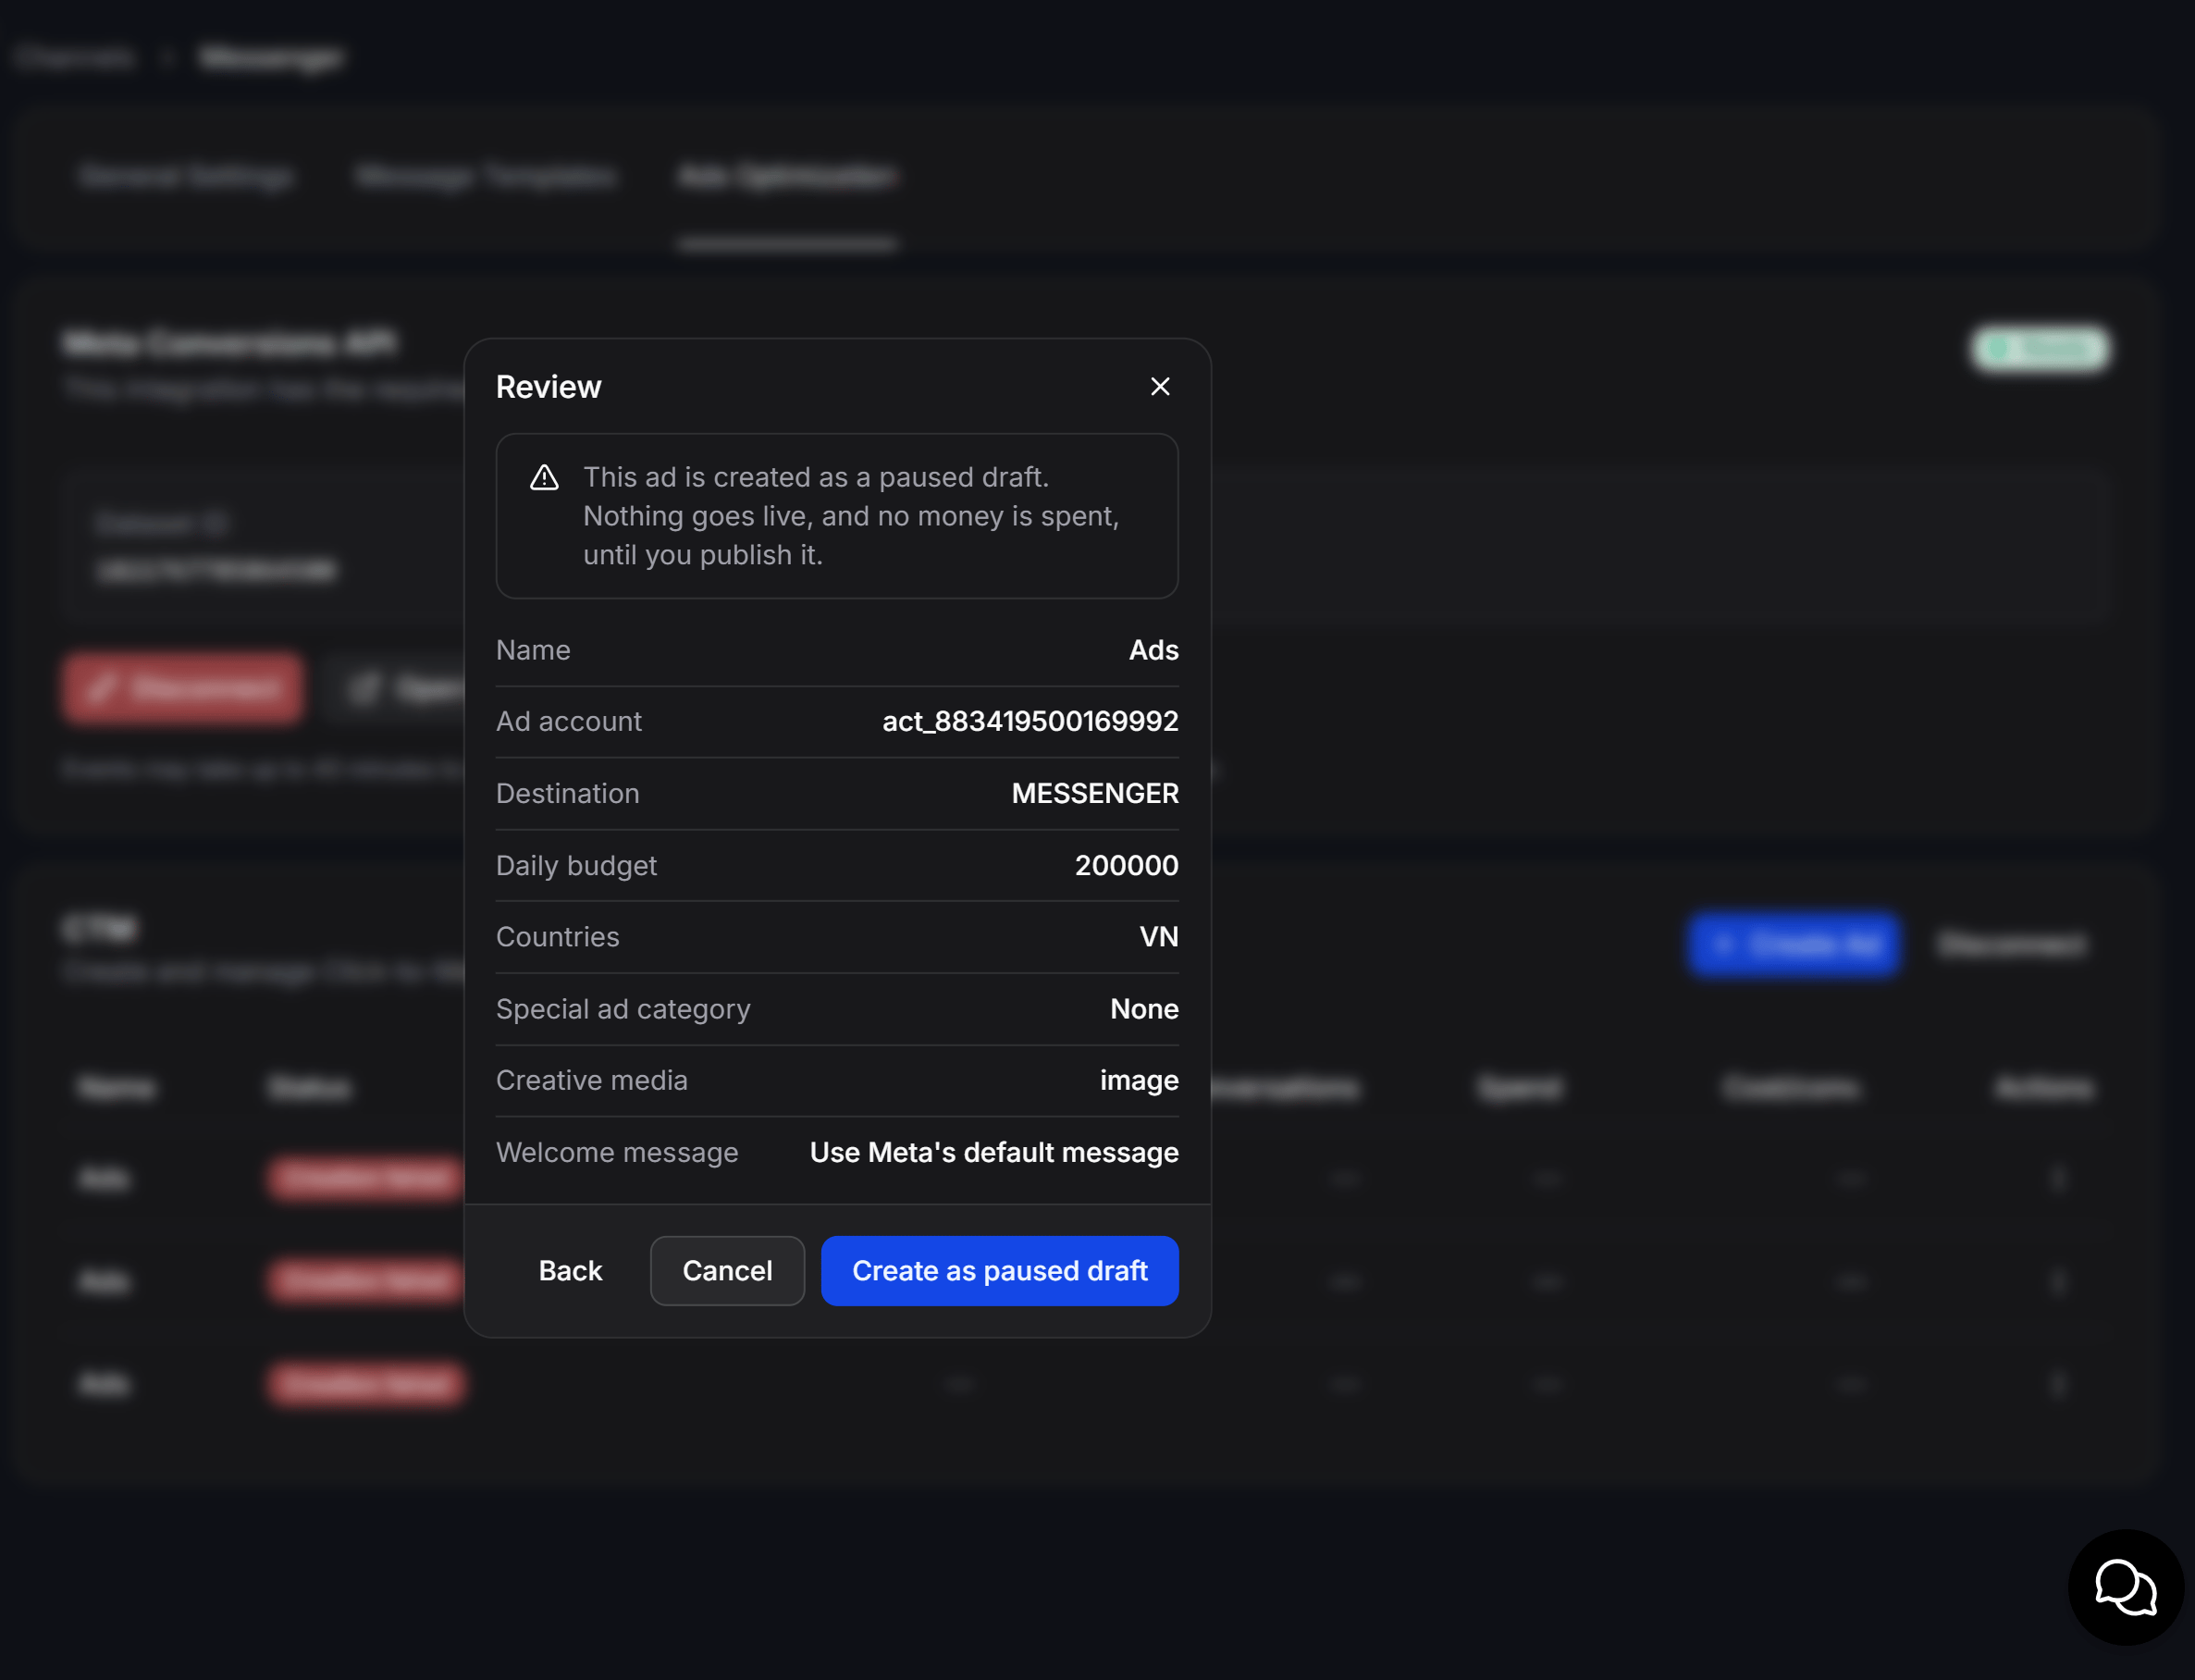
 Verify all configured parameters on the **Review** modal:
* Summary parameters: `Name`, `Ad account`, `Destination`, `Daily budget`, `Countries`, `Special ad category`, `Creative media`, and `Welcome message`.
* **Safety-by-Design Mechanism:** Clicking **Create as paused draft** publishes the campaign to Meta Ads Manager in a **Paused (PAUSED)** status. This ensures that no budget is spent and the ad does not go live until you actively review and activate it inside Meta Ads Manager.
Verify all configured parameters on the **Review** modal:
* Summary parameters: `Name`, `Ad account`, `Destination`, `Daily budget`, `Countries`, `Special ad category`, `Creative media`, and `Welcome message`.
* **Safety-by-Design Mechanism:** Clicking **Create as paused draft** publishes the campaign to Meta Ads Manager in a **Paused (PAUSED)** status. This ensures that no budget is spent and the ad does not go live until you actively review and activate it inside Meta Ads Manager.
 ## Connecting with Flows and Conversion Optimization
To maximize return on ad spend (ROAS), connect your messaging ads with ChatbotX automation features:
### 1. Welcome Leads with Automated Flows
When users click your ad and message your channel:
* Greet them instantly with relevant information tailored to the ad creative.
* Collect lead details (Name, Phone Number, Email) and store them automatically in **Contacts**.
* Qualify potential customers using Tags or Custom Fields.
### 2. Track Conversions with Meta CAPI Event
Insert the **Send Meta CAPI Event** action inside your Flow immediately after a lead submits their information or makes a purchase:
* Server-side conversion events (`Lead Submitted`, `Purchase`, etc.) stream directly to Meta Events Manager.
* Meta's machine learning algorithms optimize ad delivery to audience segments most likely to convert.
* For complete Dataset configuration steps, refer to [Meta CAPI Event](/docs/automation/meta-capi-event).
## Important Notes
Ads created from this tool automatically sync to each channel's Ads dashboard. Click **View on Ads dashboard** anytime to inspect connected accounts, delivery metrics, and total spend.
Ensure your Meta Business Manager, Facebook Page, or WhatsApp Business account has full advertising permissions before creating ads to prevent permission errors during submission.
## Connecting with Flows and Conversion Optimization
To maximize return on ad spend (ROAS), connect your messaging ads with ChatbotX automation features:
### 1. Welcome Leads with Automated Flows
When users click your ad and message your channel:
* Greet them instantly with relevant information tailored to the ad creative.
* Collect lead details (Name, Phone Number, Email) and store them automatically in **Contacts**.
* Qualify potential customers using Tags or Custom Fields.
### 2. Track Conversions with Meta CAPI Event
Insert the **Send Meta CAPI Event** action inside your Flow immediately after a lead submits their information or makes a purchase:
* Server-side conversion events (`Lead Submitted`, `Purchase`, etc.) stream directly to Meta Events Manager.
* Meta's machine learning algorithms optimize ad delivery to audience segments most likely to convert.
* For complete Dataset configuration steps, refer to [Meta CAPI Event](/docs/automation/meta-capi-event).
## Important Notes
Ads created from this tool automatically sync to each channel's Ads dashboard. Click **View on Ads dashboard** anytime to inspect connected accounts, delivery metrics, and total spend.
Ensure your Meta Business Manager, Facebook Page, or WhatsApp Business account has full advertising permissions before creating ads to prevent permission errors during submission.