> ## Documentation Index
> Fetch the complete documentation index at: https://chatbotx.io/docs/llms.txt
> Use this file to discover all available pages before exploring further.
# Webhooks
> Learn how to create and configure Webhooks in ChatbotX so data is sent automatically to external apps when an event happens.
**Webhook** is the way ChatbotX automatically notifies another app when an event happens, instead of making you check and sync data manually.
A simple example: when a new customer sends a message, ChatbotX can automatically send that customer's data to your CRM through a Webhook, with no manual work and no missed records.
## Webhooks interface
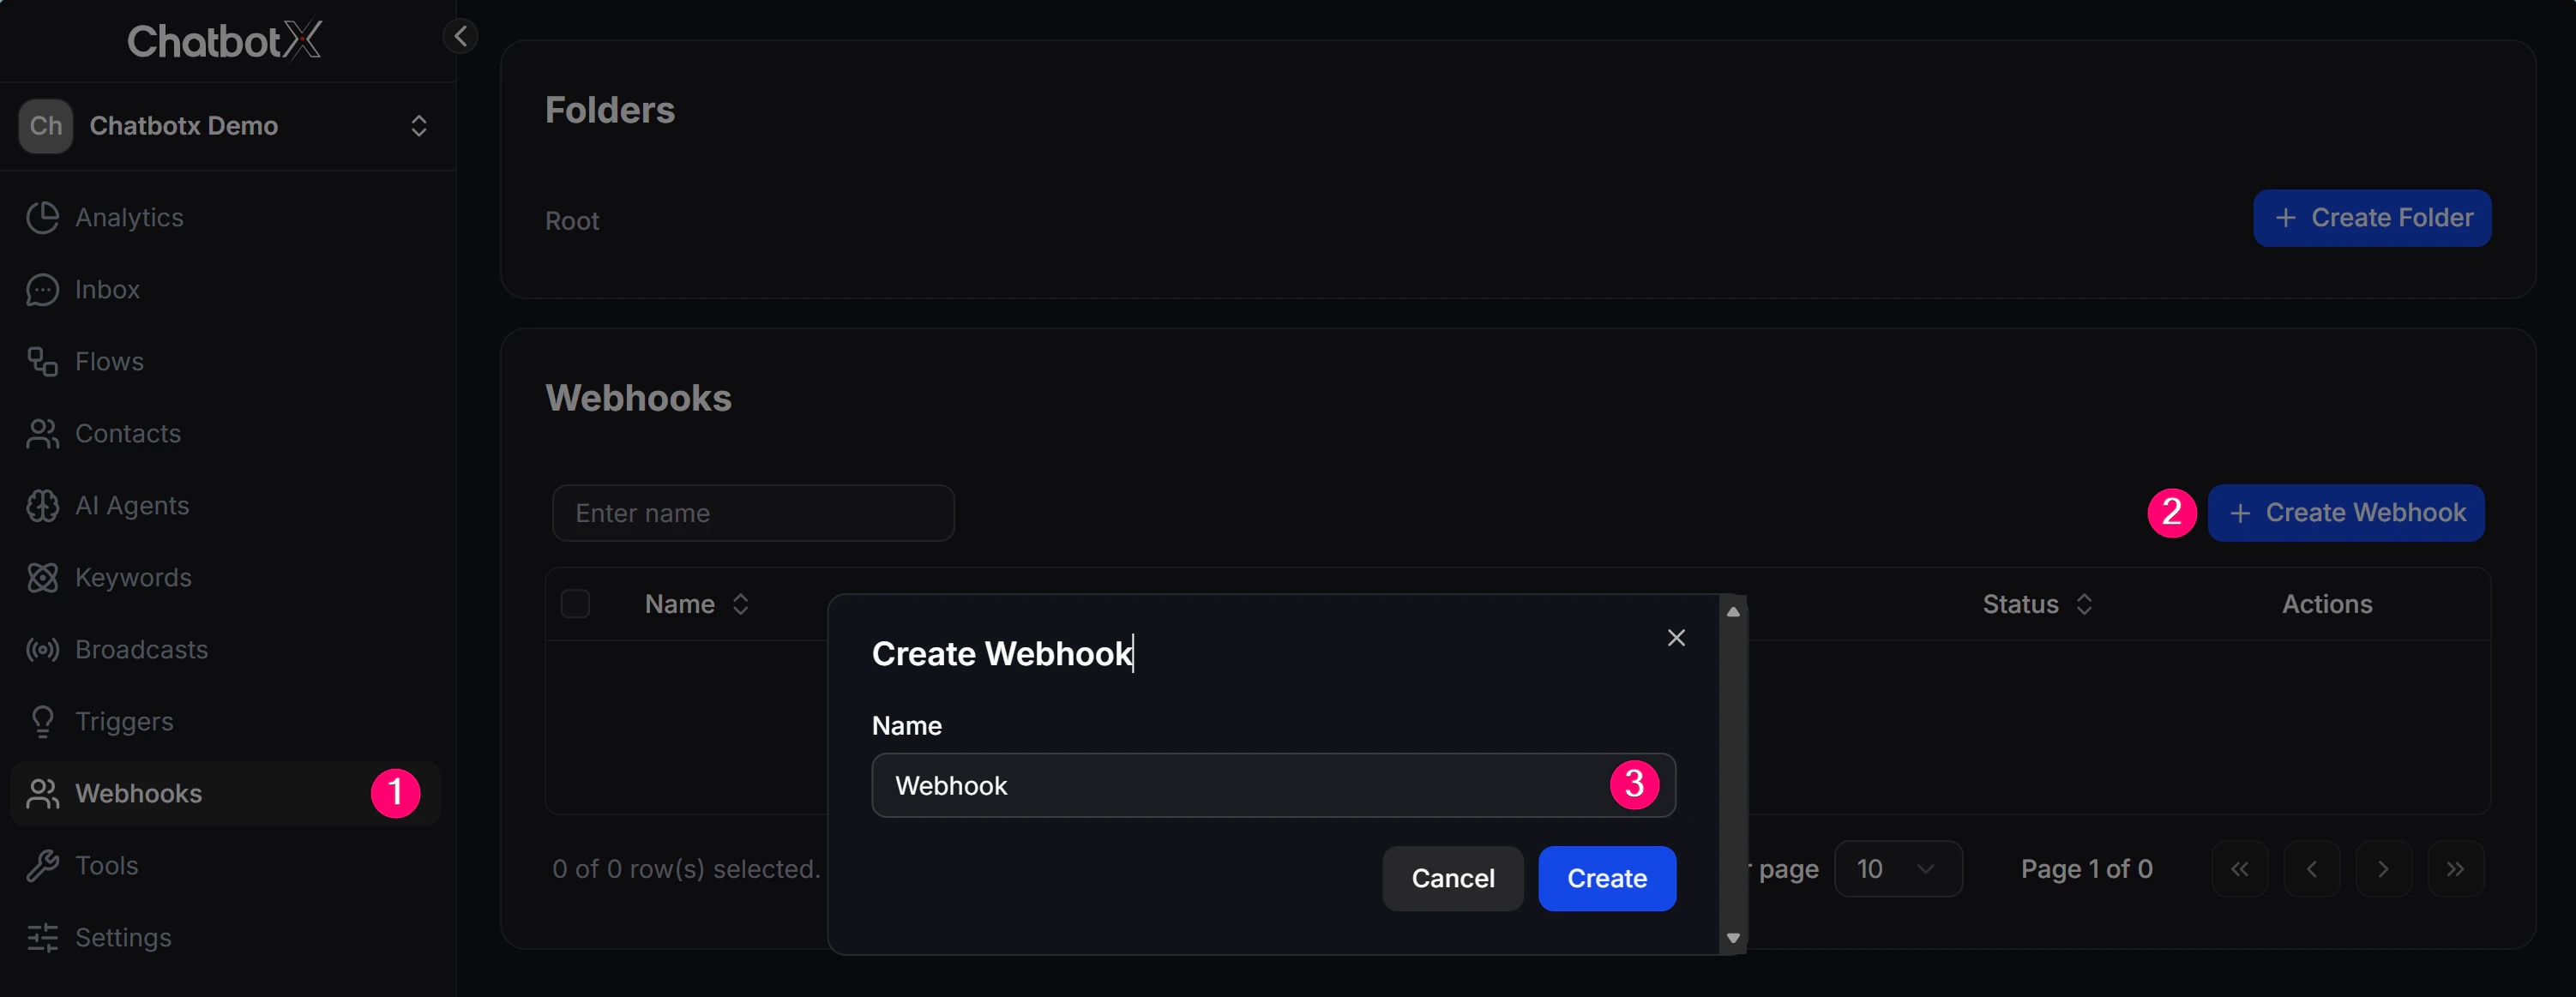
The Webhooks page has 2 main parts:
* **Folders**: Group Webhooks so they are easier to manage.
* **Webhooks**: A list of every Webhook you created, with a toggle to turn each one on or off.
* **To create a Webhook**: Click **+ Create Webhook**, then enter a name.
 ### When this happens
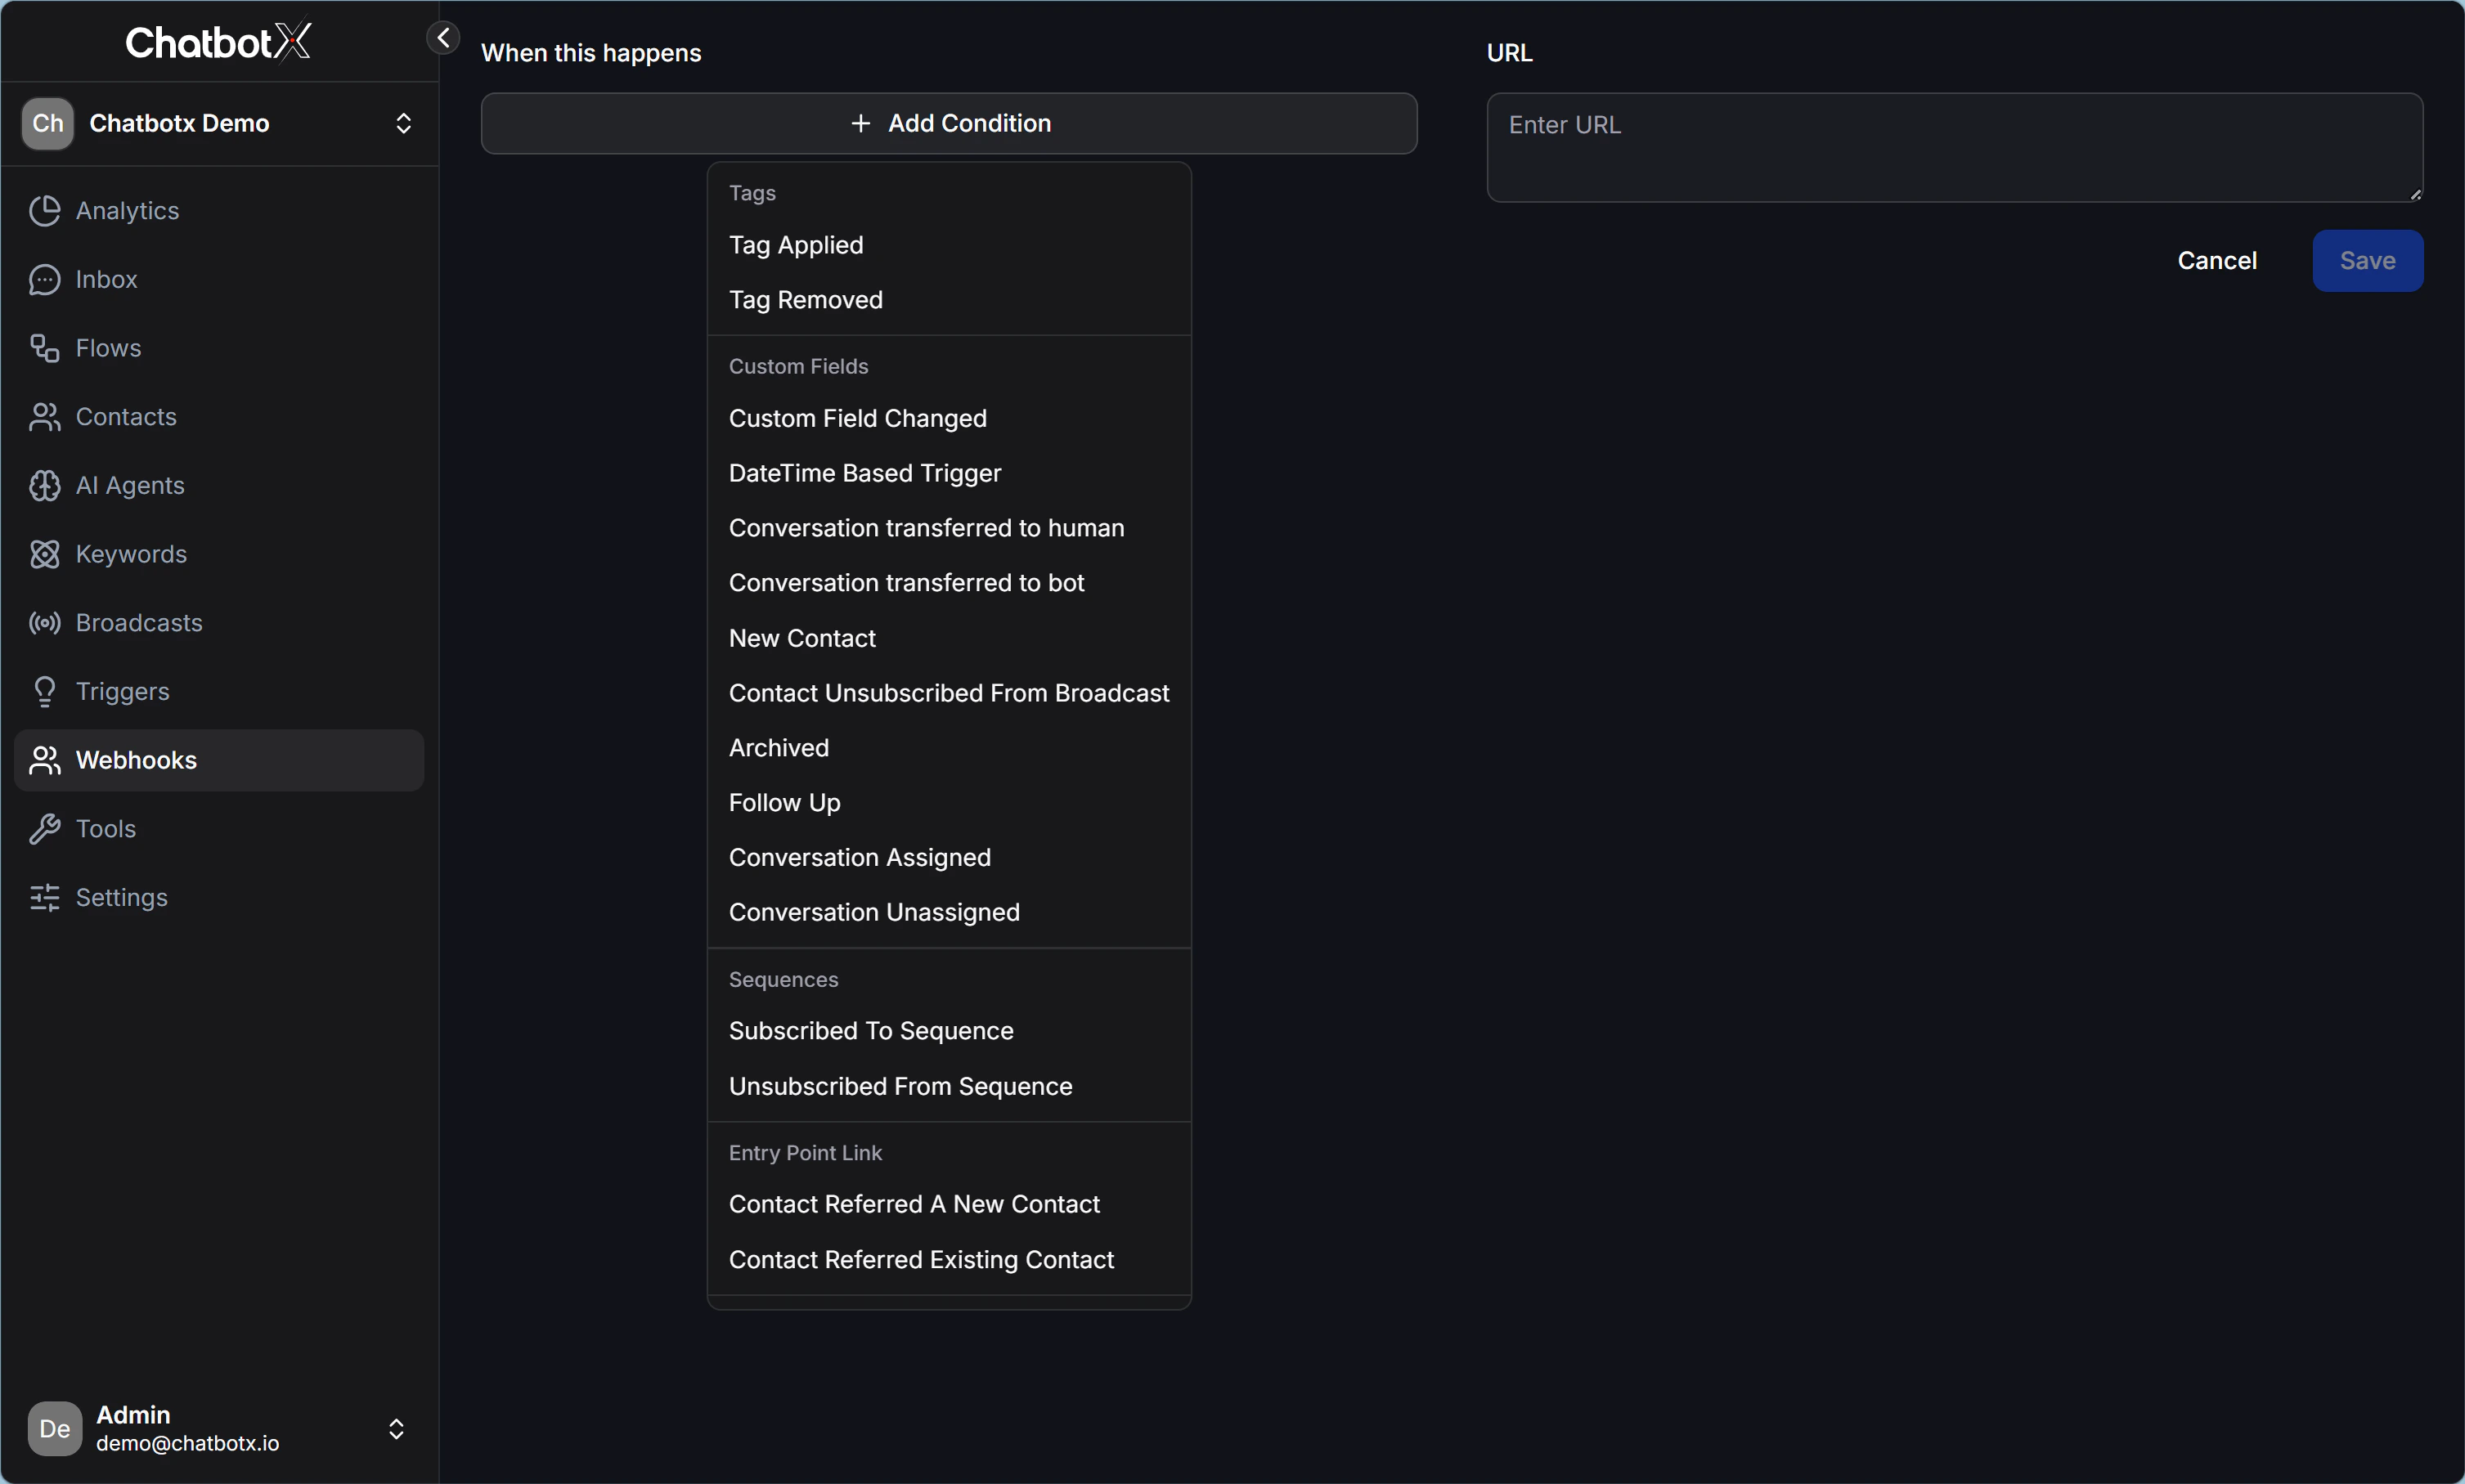
Choose the event that should trigger the Webhook. The condition list matches the Triggers feature:
**Tags:** Tag Applied, Tag Removed
**Custom Fields:** Custom Field Changed, DateTime Based Trigger, Conversation transferred to human/bot, New Contact, Contact Unsubscribed From Broadcast, Archived, Follow Up, Conversation Assigned/Unassigned
**Sequences:** Subscribed To Sequence, Unsubscribed From Sequence
**Entry Point Link:** Contact Referred A New Contact, Contact Referred Existing Contact
### URL
Paste the endpoint URL of the external application here. This is the address ChatbotX will send data to whenever the selected condition is met.
4. Click **Save** to store the Webhook.
### When this happens
Choose the event that should trigger the Webhook. The condition list matches the Triggers feature:
**Tags:** Tag Applied, Tag Removed
**Custom Fields:** Custom Field Changed, DateTime Based Trigger, Conversation transferred to human/bot, New Contact, Contact Unsubscribed From Broadcast, Archived, Follow Up, Conversation Assigned/Unassigned
**Sequences:** Subscribed To Sequence, Unsubscribed From Sequence
**Entry Point Link:** Contact Referred A New Contact, Contact Referred Existing Contact
### URL
Paste the endpoint URL of the external application here. This is the address ChatbotX will send data to whenever the selected condition is met.
4. Click **Save** to store the Webhook.
 ## How a Webhook works
When the selected condition happens, ChatbotX automatically sends an **HTTP POST request** with the contact data to the URL you configured.
The receiving app, such as a CRM, Google Sheets, Zapier, or Make, then handles that data using its own logic.
**Common data included in the payload:**
* Contact name and contact ID
* Channel, such as Messenger, WhatsApp, or Zalo
* Existing Tags and Custom Fields
* Information about the event that triggered the Webhook
## Real examples
| Scenario | What the Webhook does |
| ------------------------------------------- | ------------------------------------------------------------------------- |
| A customer just gets the Tag "Order Closed" | Send that customer's data to Google Sheets so the sales team can track it |
| A chat is transferred to a human agent | Create a new ticket in a support system such as Freshdesk or Zendesk |
| A new contact arrives from an ad | Create a new lead in a CRM such as HubSpot or Salesforce |
| A customer subscribes to a Sequence | Send a welcome email through an external email marketing system |
> **Note:** Each Webhook has its own toggle, so you can turn it on or off without deleting it. Use Folders to group Webhooks by campaign or by channel for easier management.
## How a Webhook works
When the selected condition happens, ChatbotX automatically sends an **HTTP POST request** with the contact data to the URL you configured.
The receiving app, such as a CRM, Google Sheets, Zapier, or Make, then handles that data using its own logic.
**Common data included in the payload:**
* Contact name and contact ID
* Channel, such as Messenger, WhatsApp, or Zalo
* Existing Tags and Custom Fields
* Information about the event that triggered the Webhook
## Real examples
| Scenario | What the Webhook does |
| ------------------------------------------- | ------------------------------------------------------------------------- |
| A customer just gets the Tag "Order Closed" | Send that customer's data to Google Sheets so the sales team can track it |
| A chat is transferred to a human agent | Create a new ticket in a support system such as Freshdesk or Zendesk |
| A new contact arrives from an ad | Create a new lead in a CRM such as HubSpot or Salesforce |
| A customer subscribes to a Sequence | Send a welcome email through an external email marketing system |
> **Note:** Each Webhook has its own toggle, so you can turn it on or off without deleting it. Use Folders to group Webhooks by campaign or by channel for easier management.