> ## Documentation Index
> Fetch the complete documentation index at: https://chatbotx.io/docs/llms.txt
> Use this file to discover all available pages before exploring further.
# Configure Facebook Messenger
> Learn how to create a Facebook App and configure credentials to connect the Messenger channel on your portal.
Creating your own Facebook Messenger app allows you to customize the permission screen to show your own brand name and logo when customers connect their Facebook Pages.
## Prerequisites
Before you begin, make sure you have:
* A valid Facebook account
* A Facebook Page you own or administer
* Super Admin access to your portal to input configurations
If you are developing locally, you will need a tunneling tool such as ngrok to expose your local server to the internet to receive Facebook webhooks.
## Step 1: Create a Facebook App
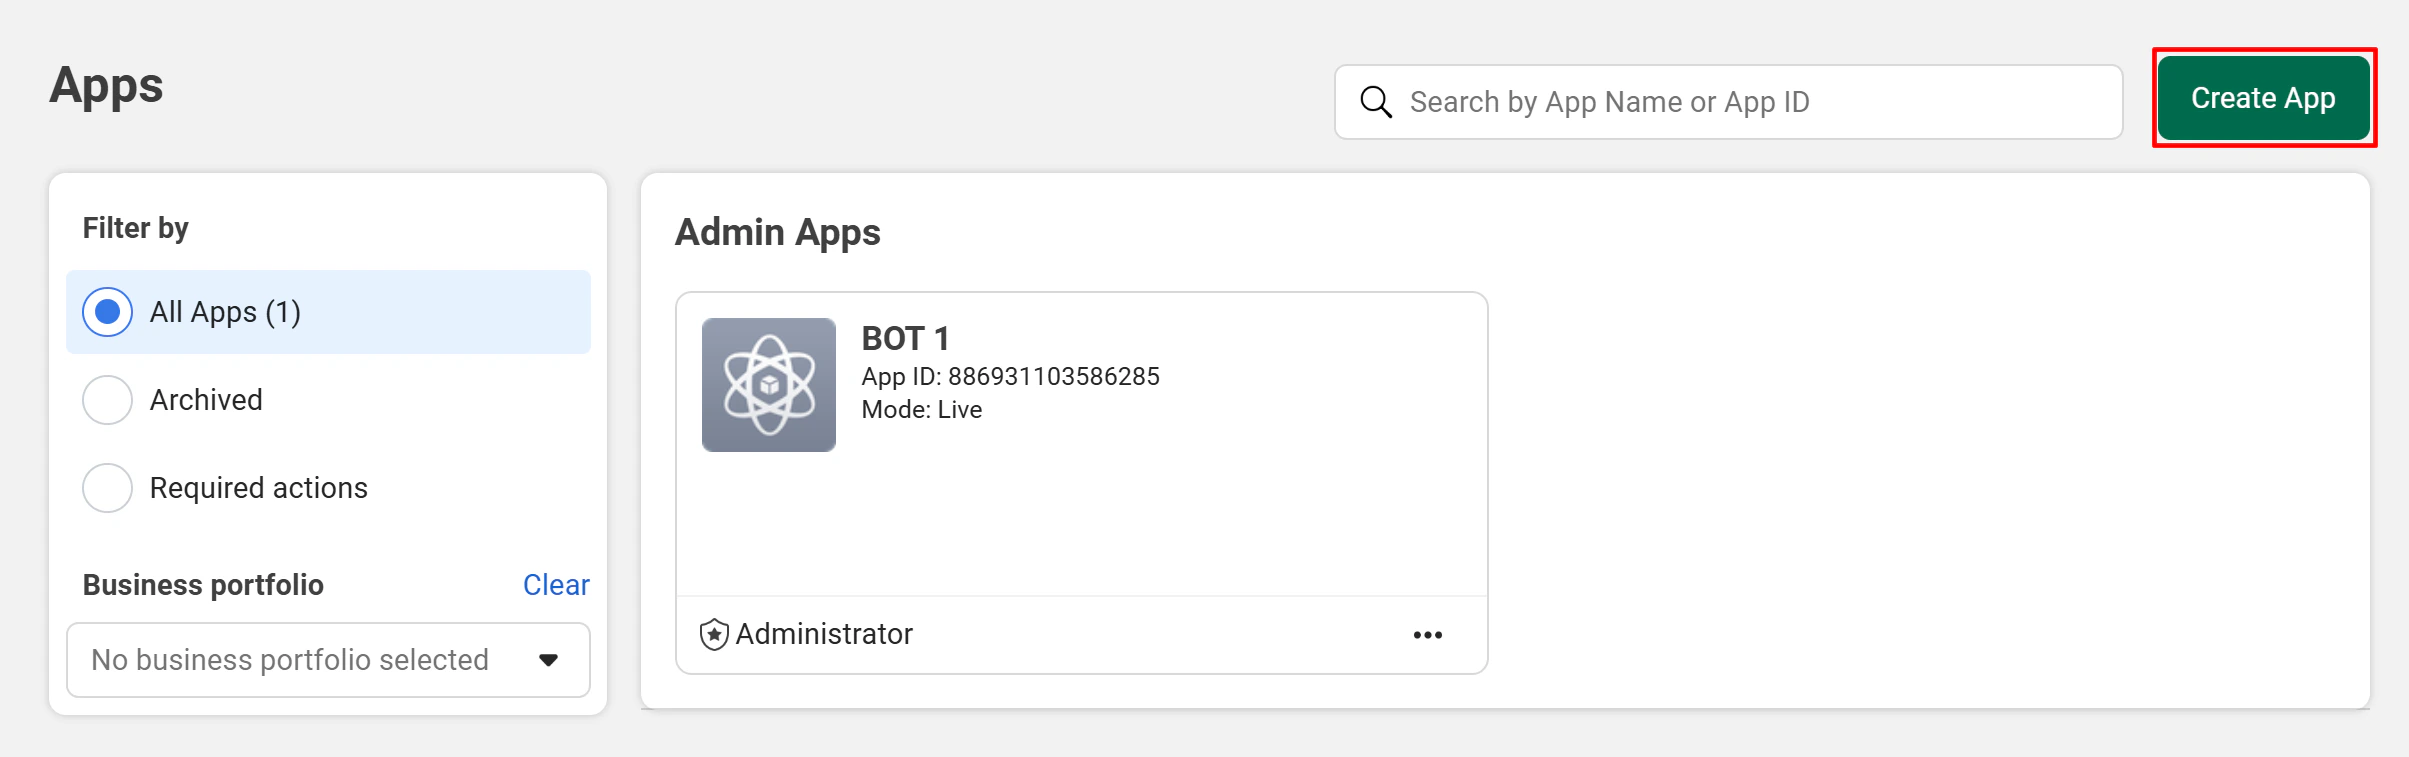
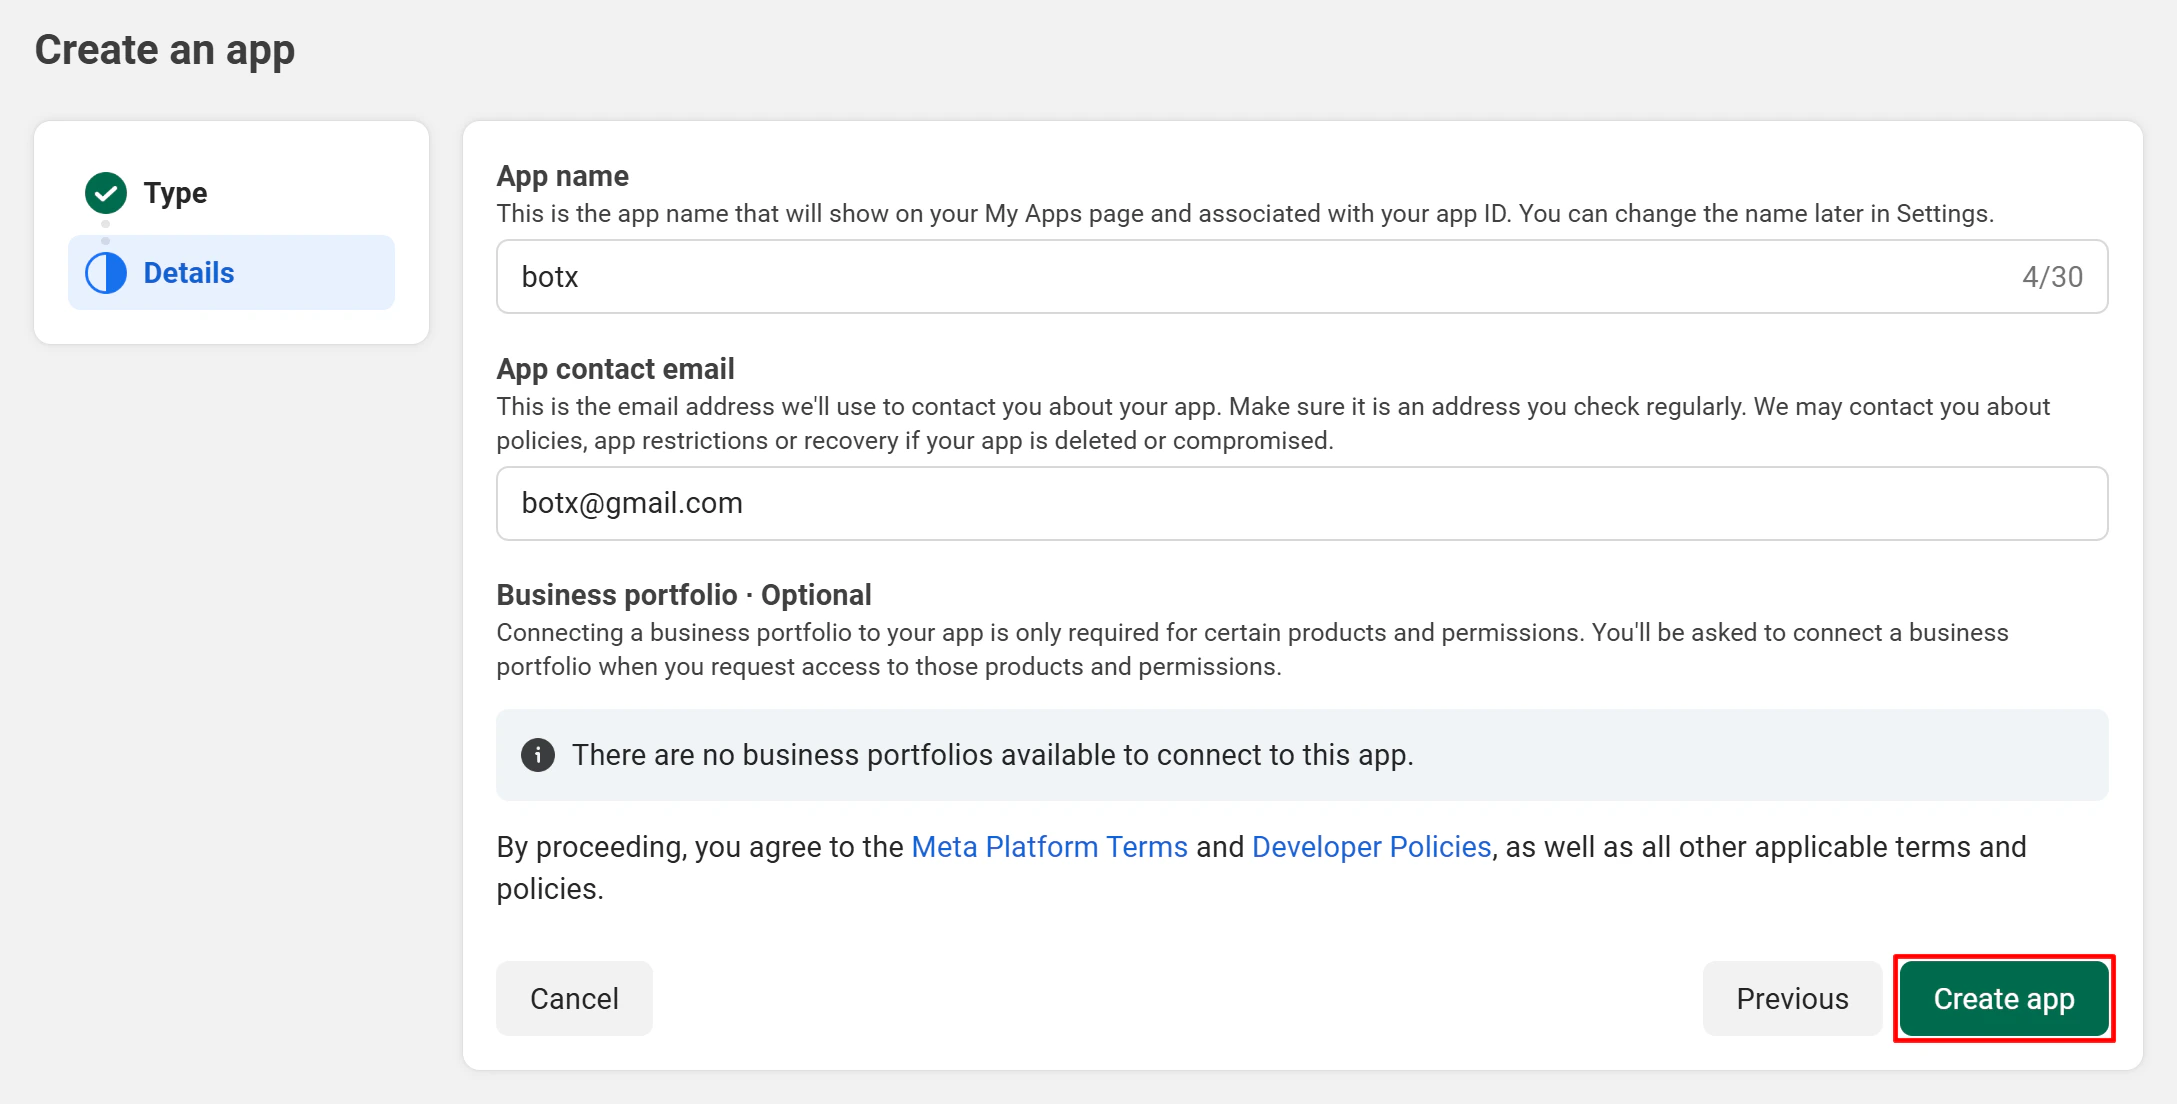
Go to the [Facebook Developer Portal](https://developers.facebook.com/apps/) and click **Create App**.
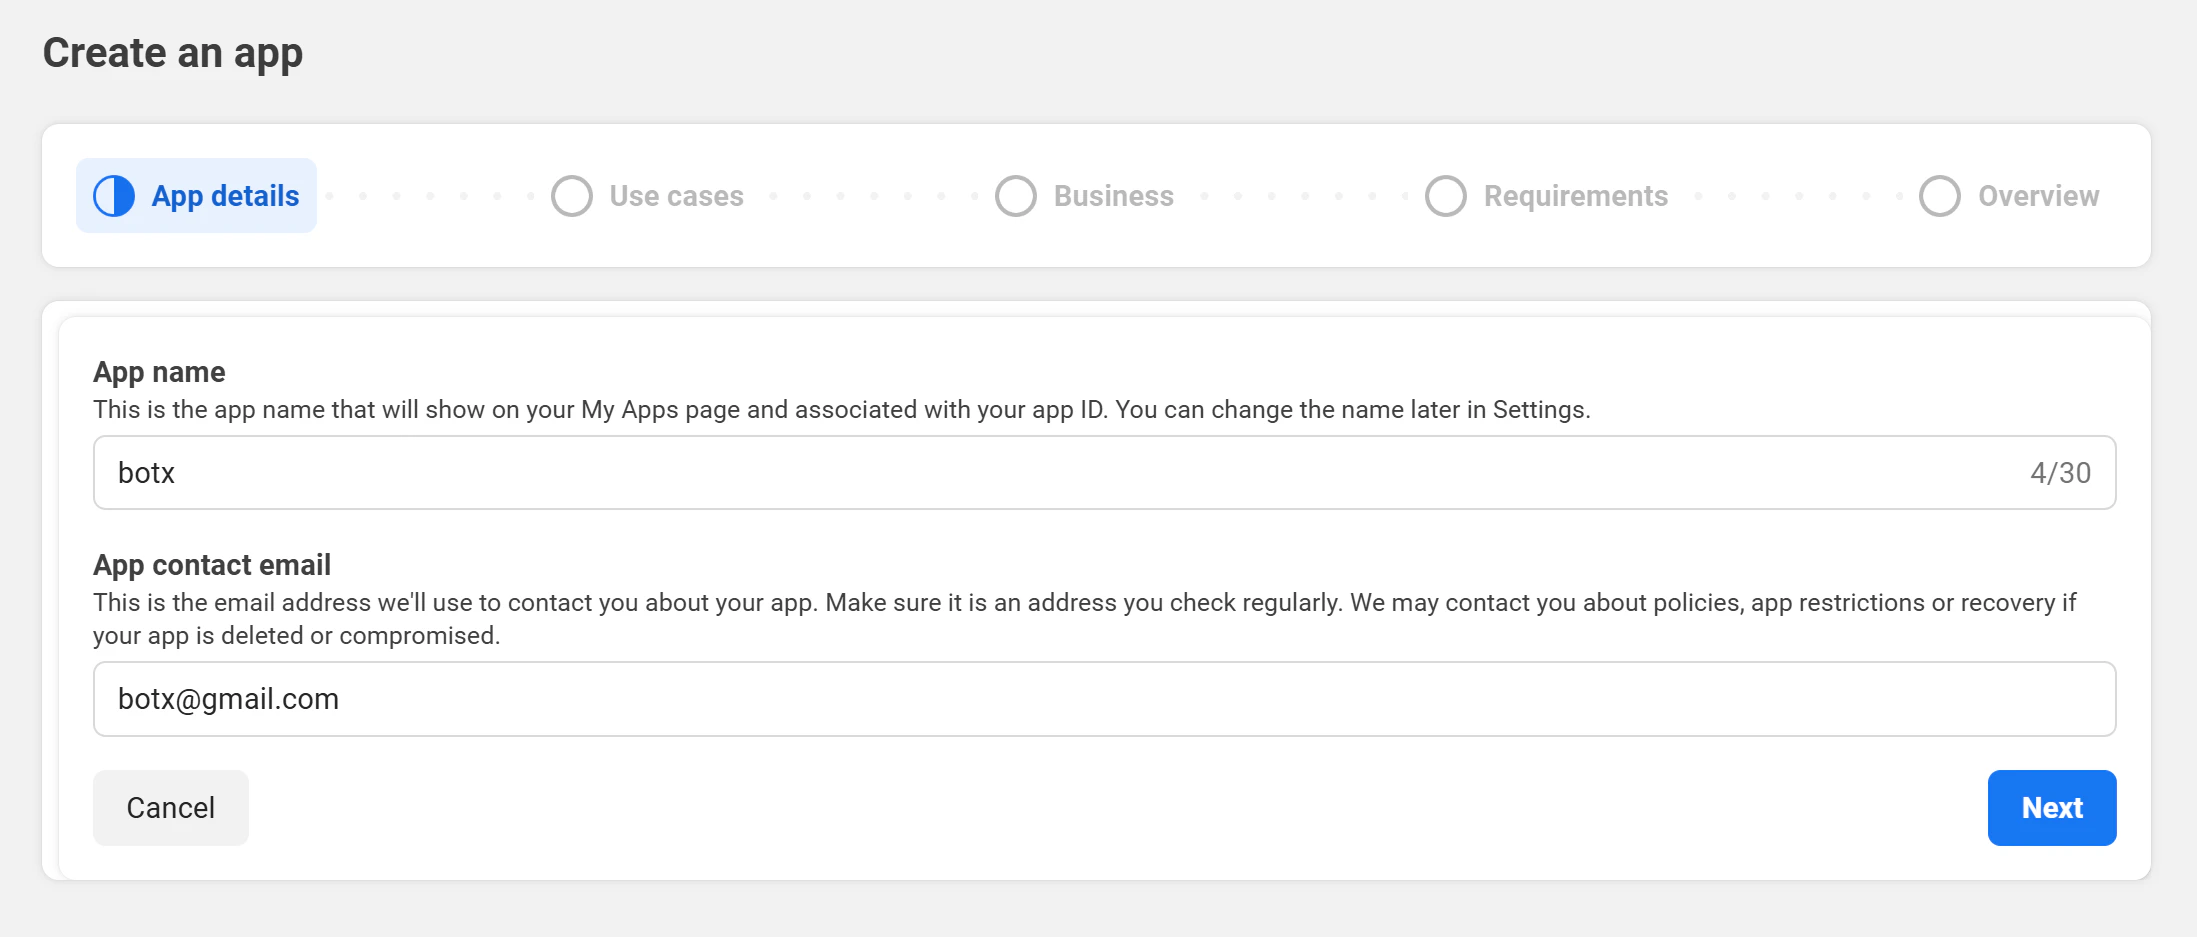
 Enter your **App name** and **contact email**, then click **Next**.
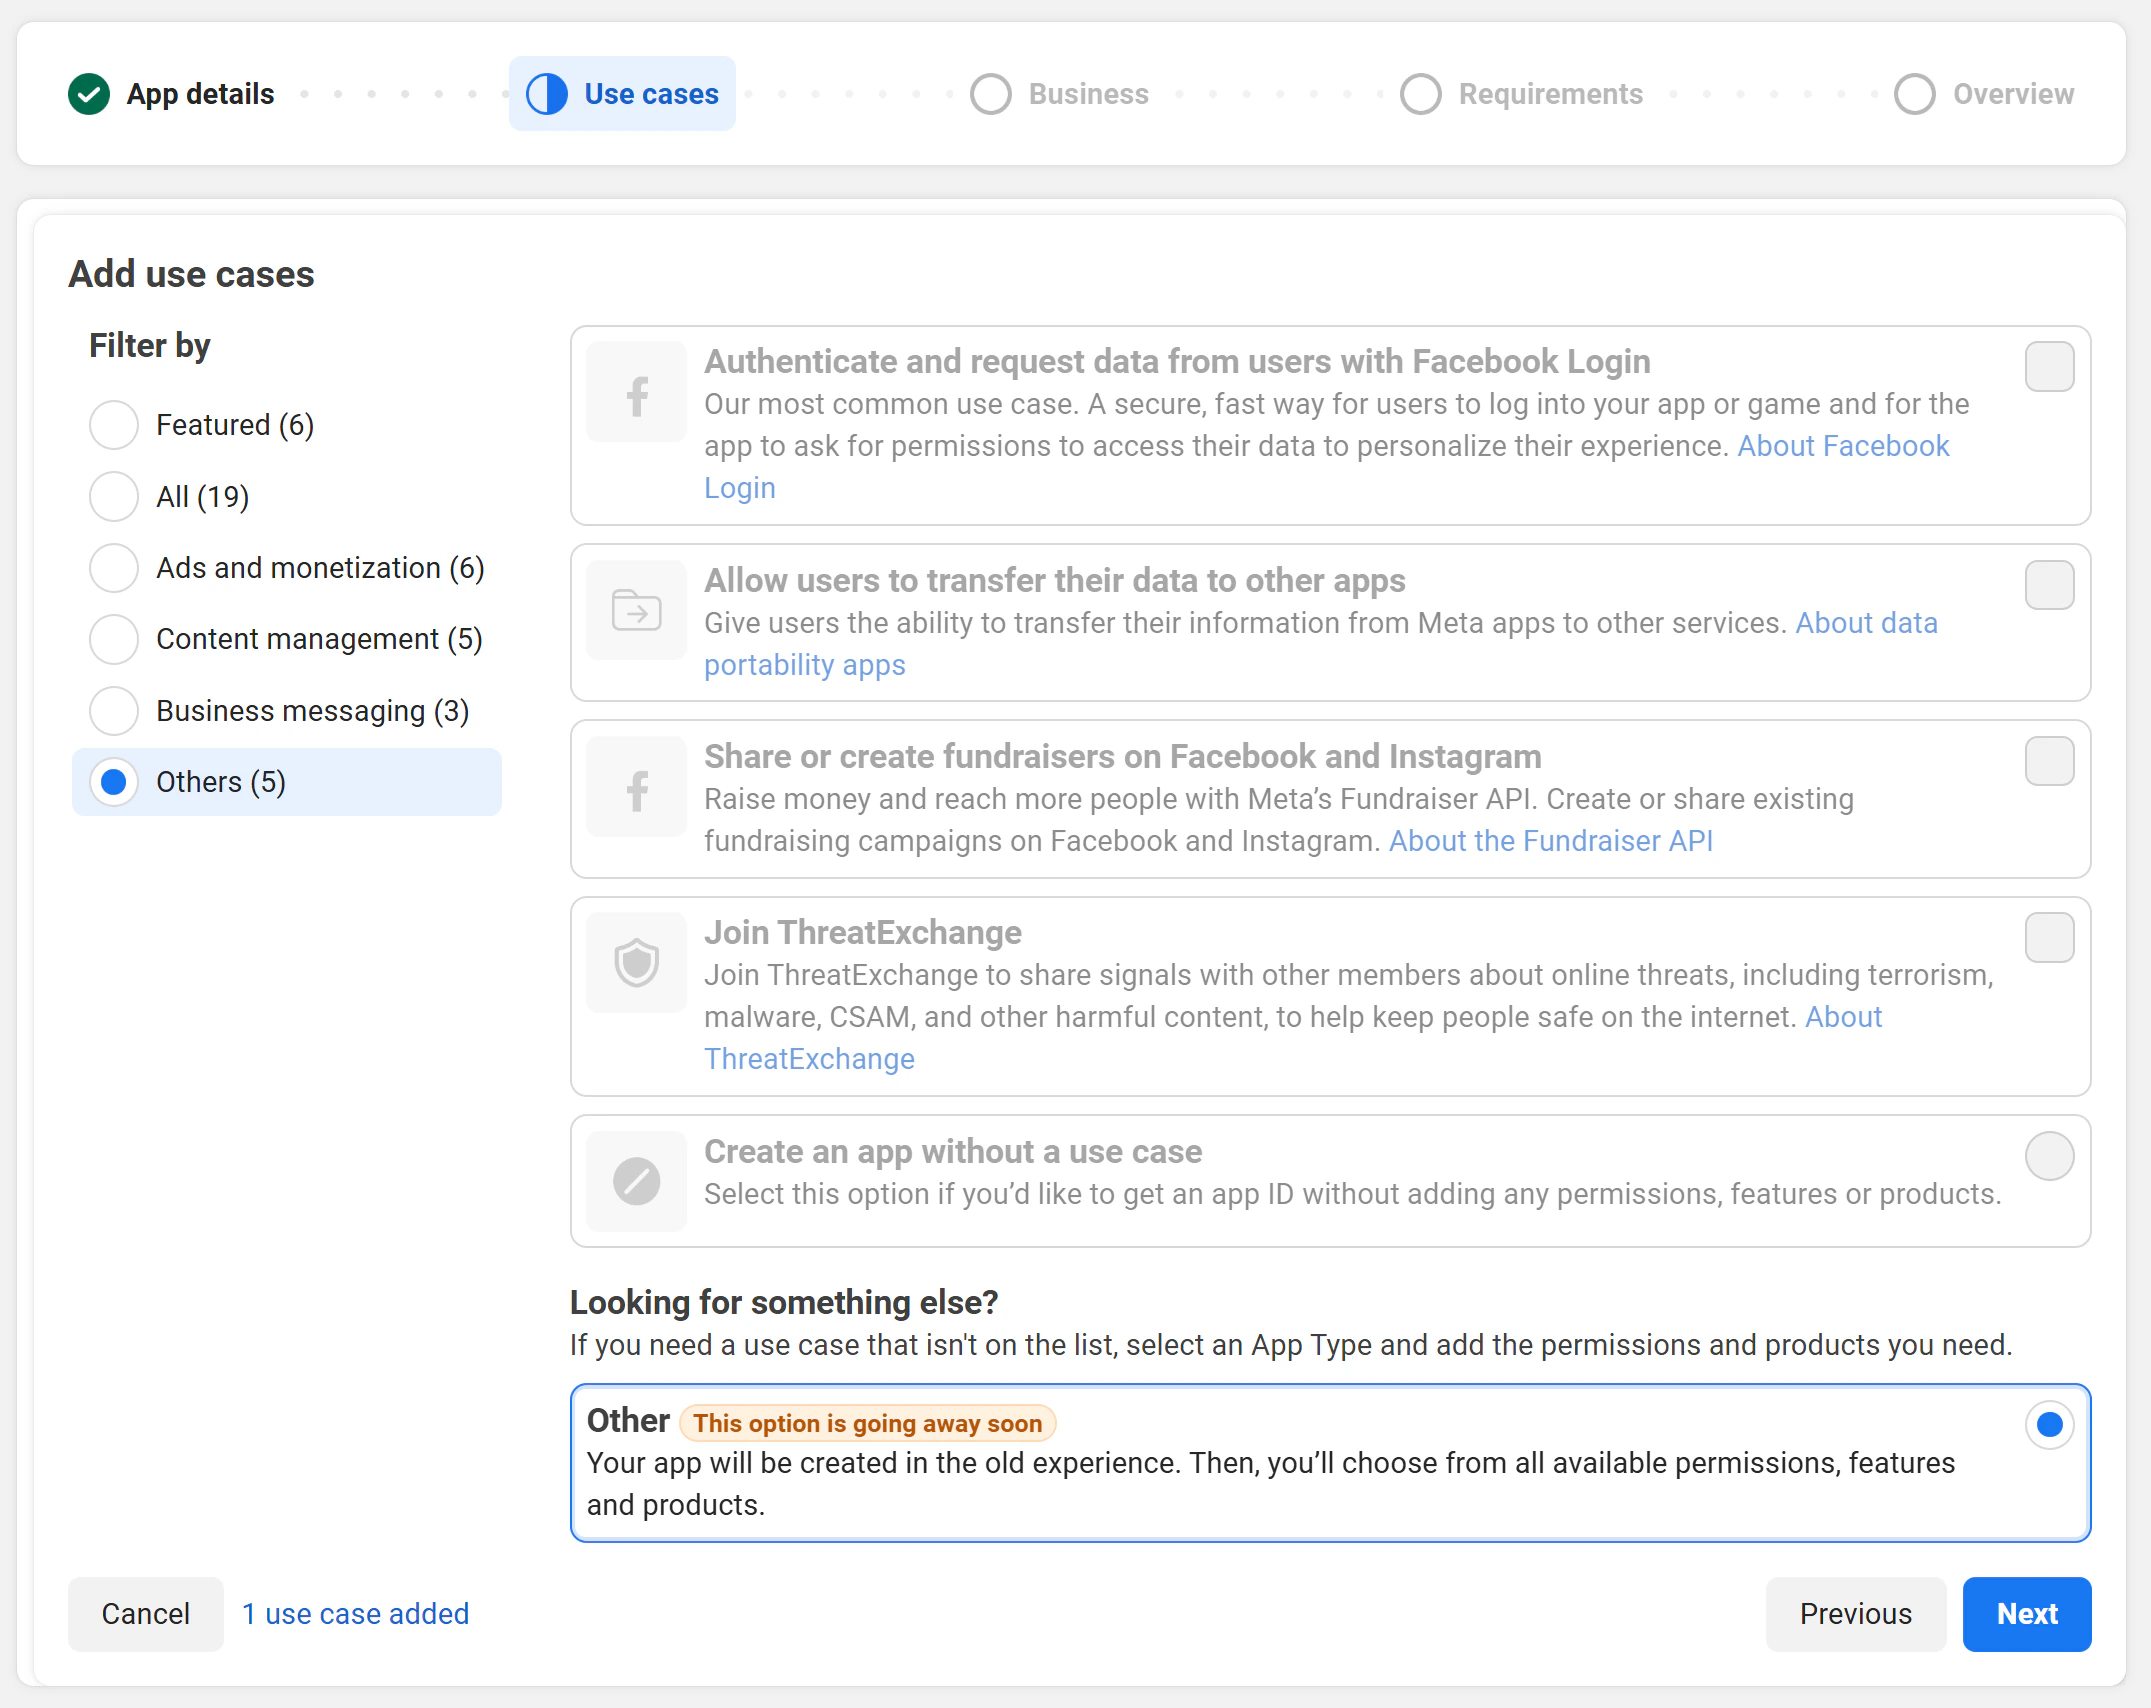
 When asked for a use case, select **Other**.
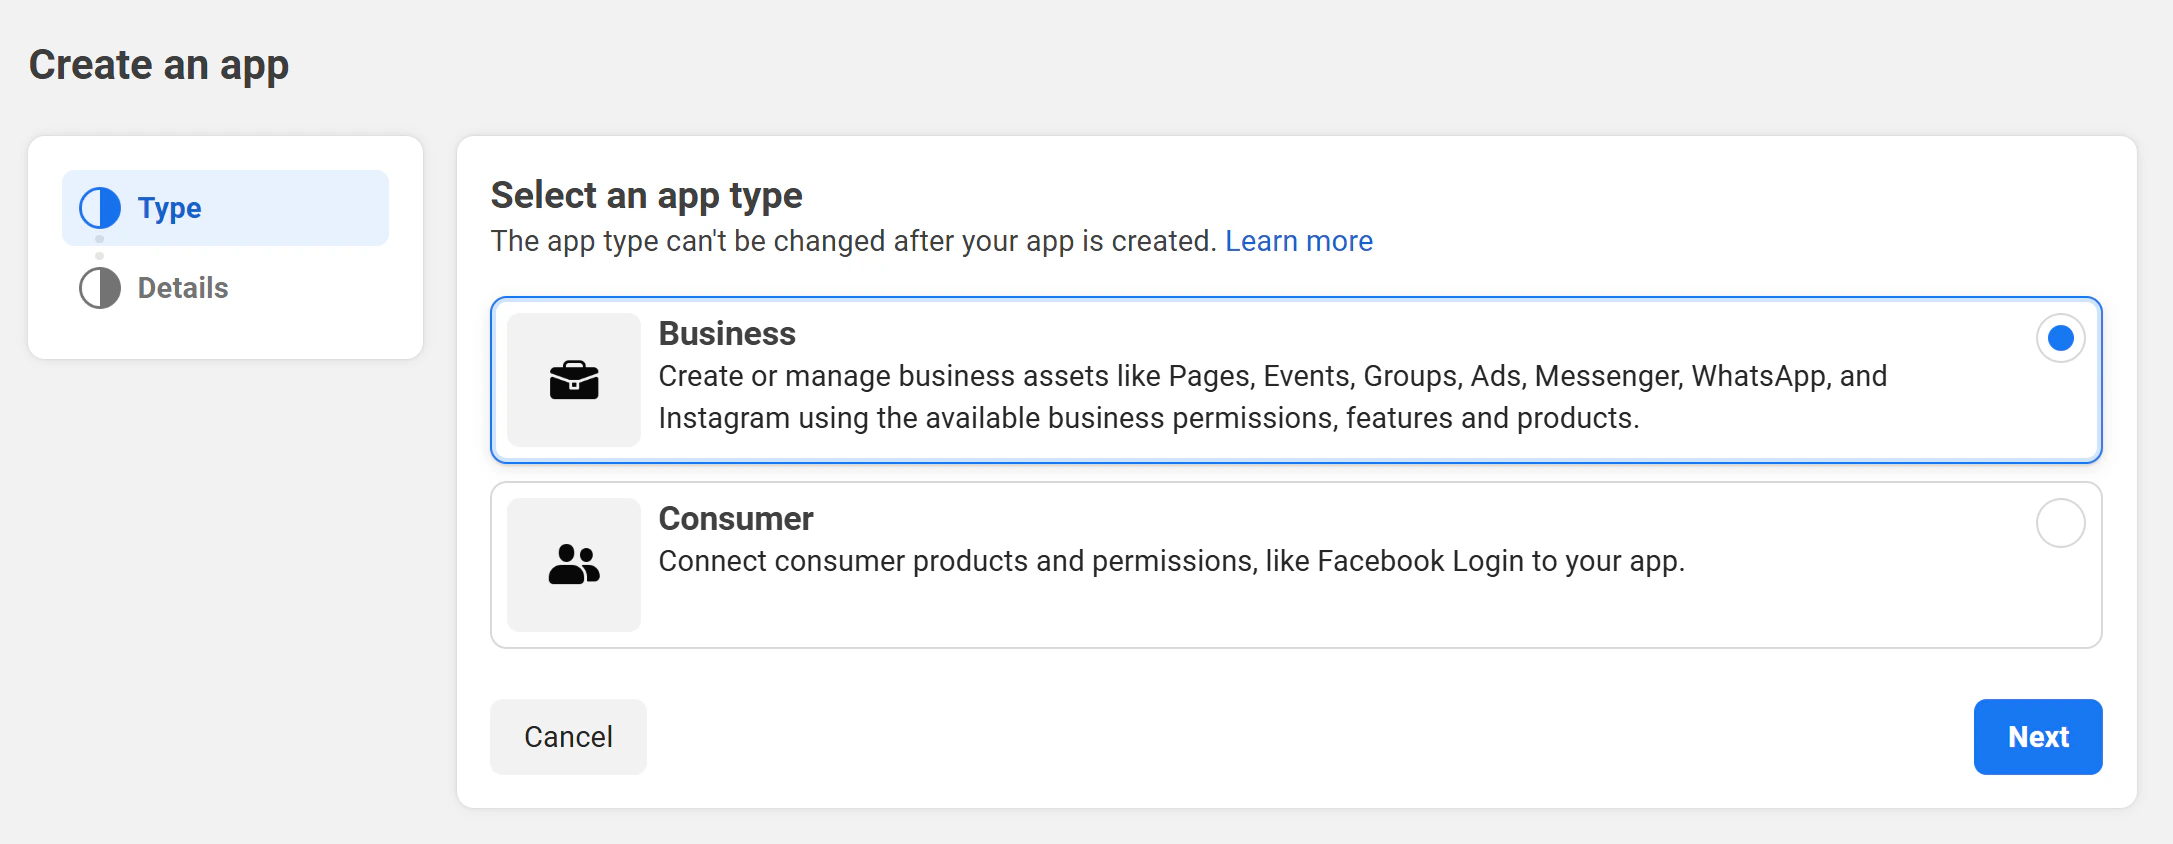
 For the app type, choose **Business**.
 Review your details and click **Create App** to finish.
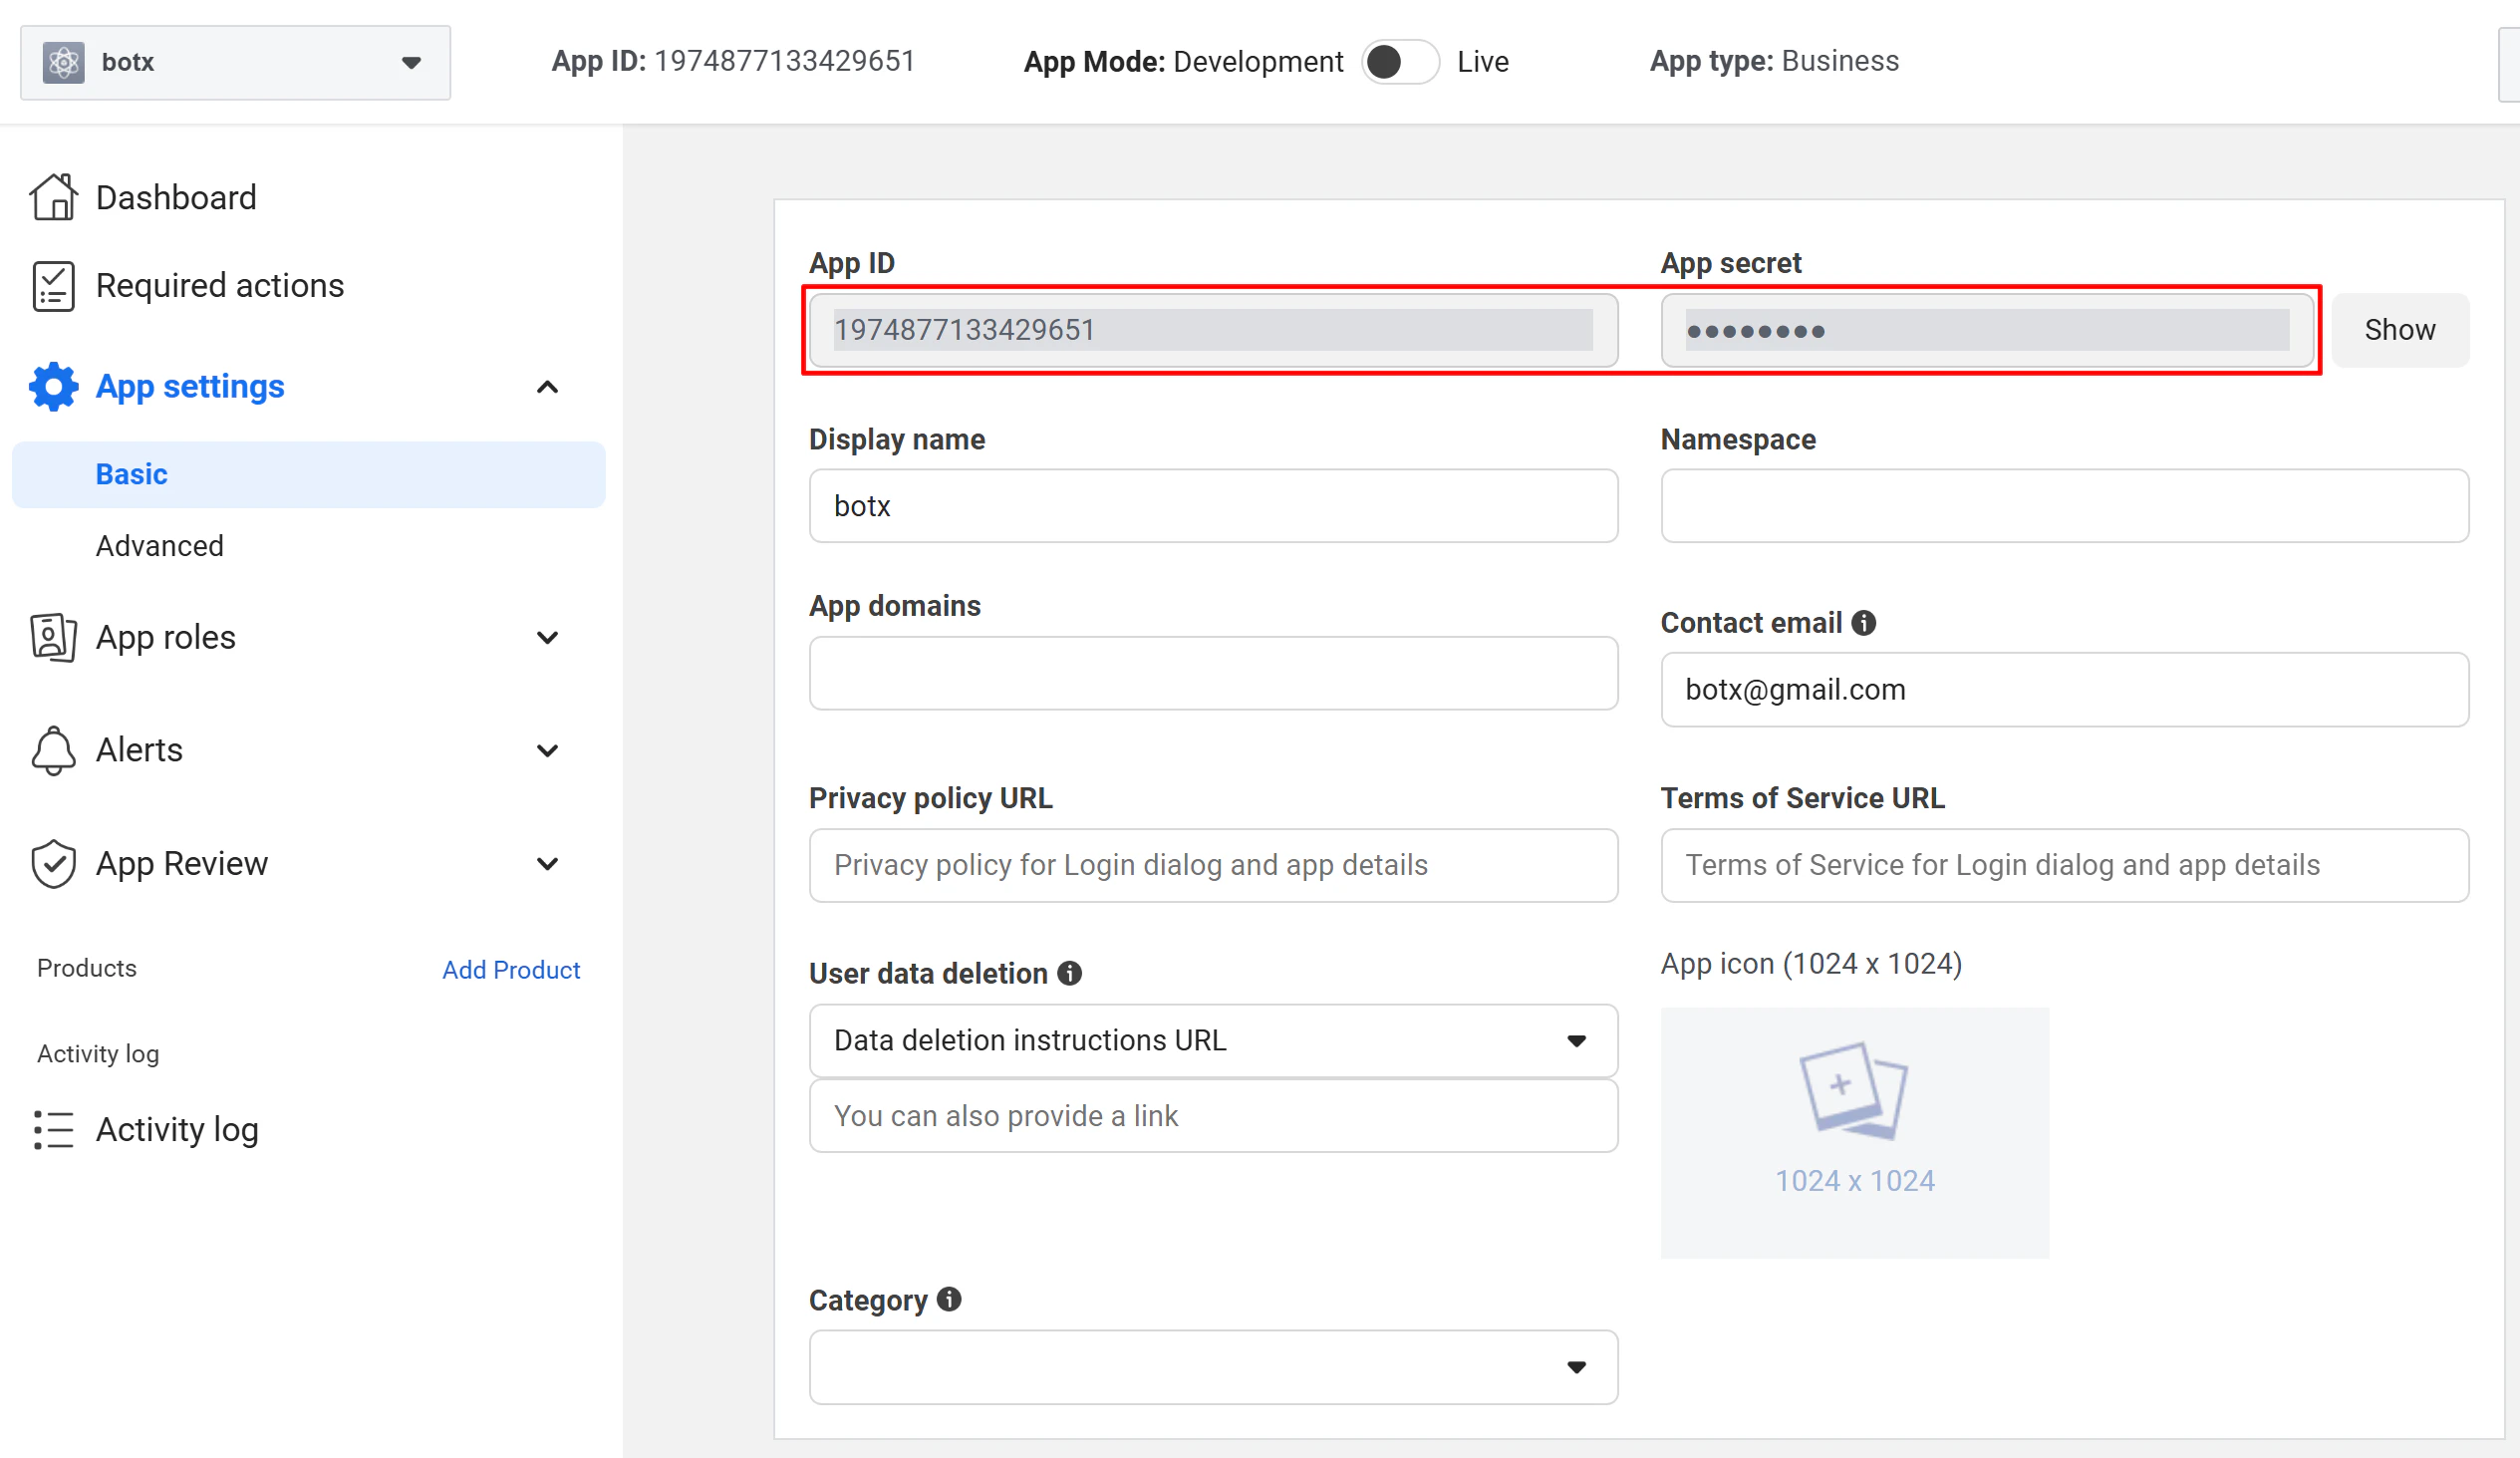
 After creating your app, go to **Settings → Basic** to find your **App ID** and **App Secret**. You will need both values in the next step.
 ## Step 2: Configure Credentials in the Admin Portal
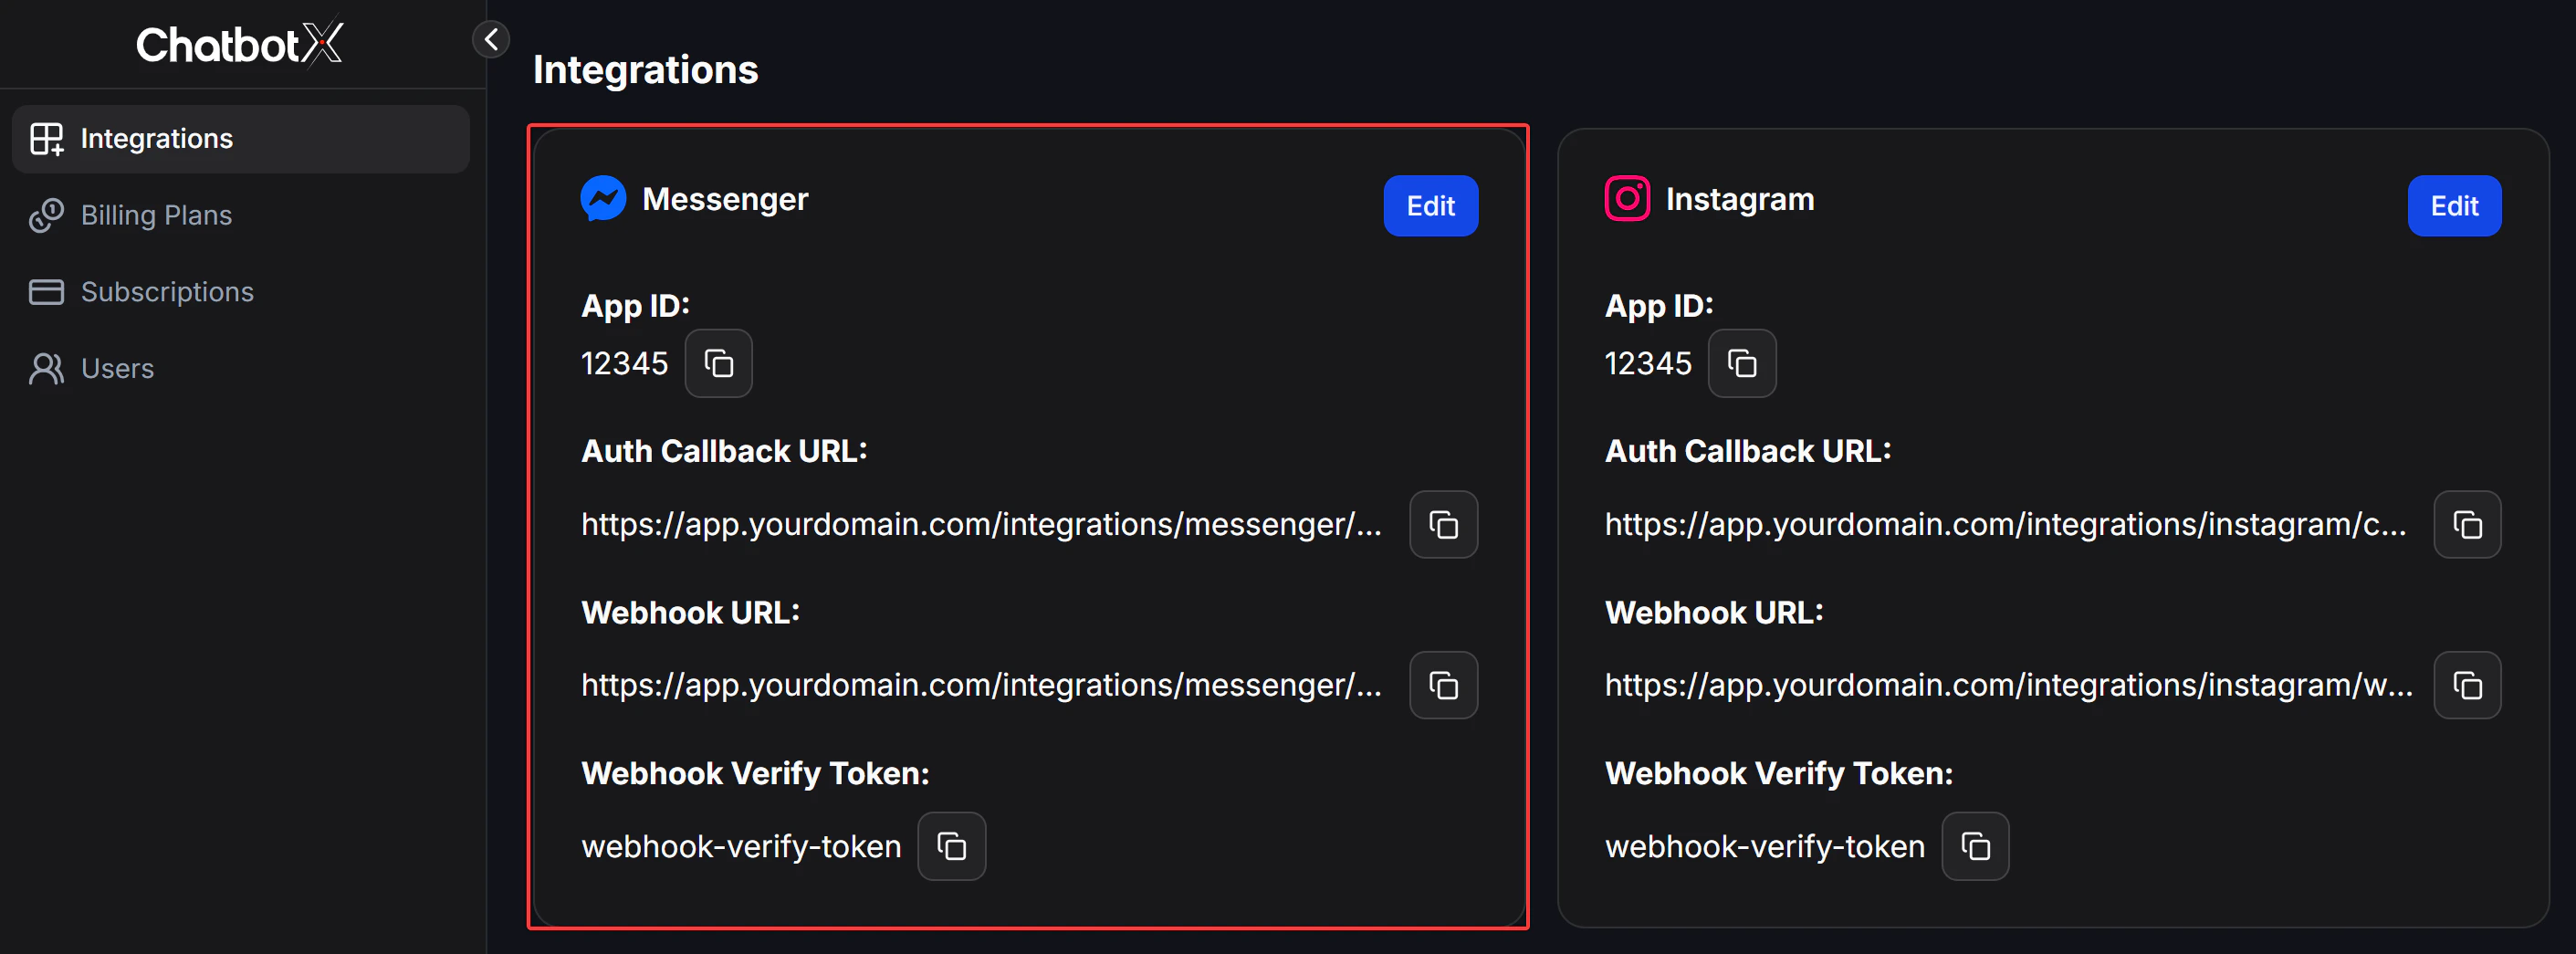
You must enter the Facebook App credentials in the Admin Portal to enable the Messenger connection feature for your customers.
Log in to your Admin Portal, navigate to:
```text theme={null}
https://app.chatconnectx.com/manage/integrations
```
Then select **Messenger**.
## Step 2: Configure Credentials in the Admin Portal
You must enter the Facebook App credentials in the Admin Portal to enable the Messenger connection feature for your customers.
Log in to your Admin Portal, navigate to:
```text theme={null}
https://app.chatconnectx.com/manage/integrations
```
Then select **Messenger**.
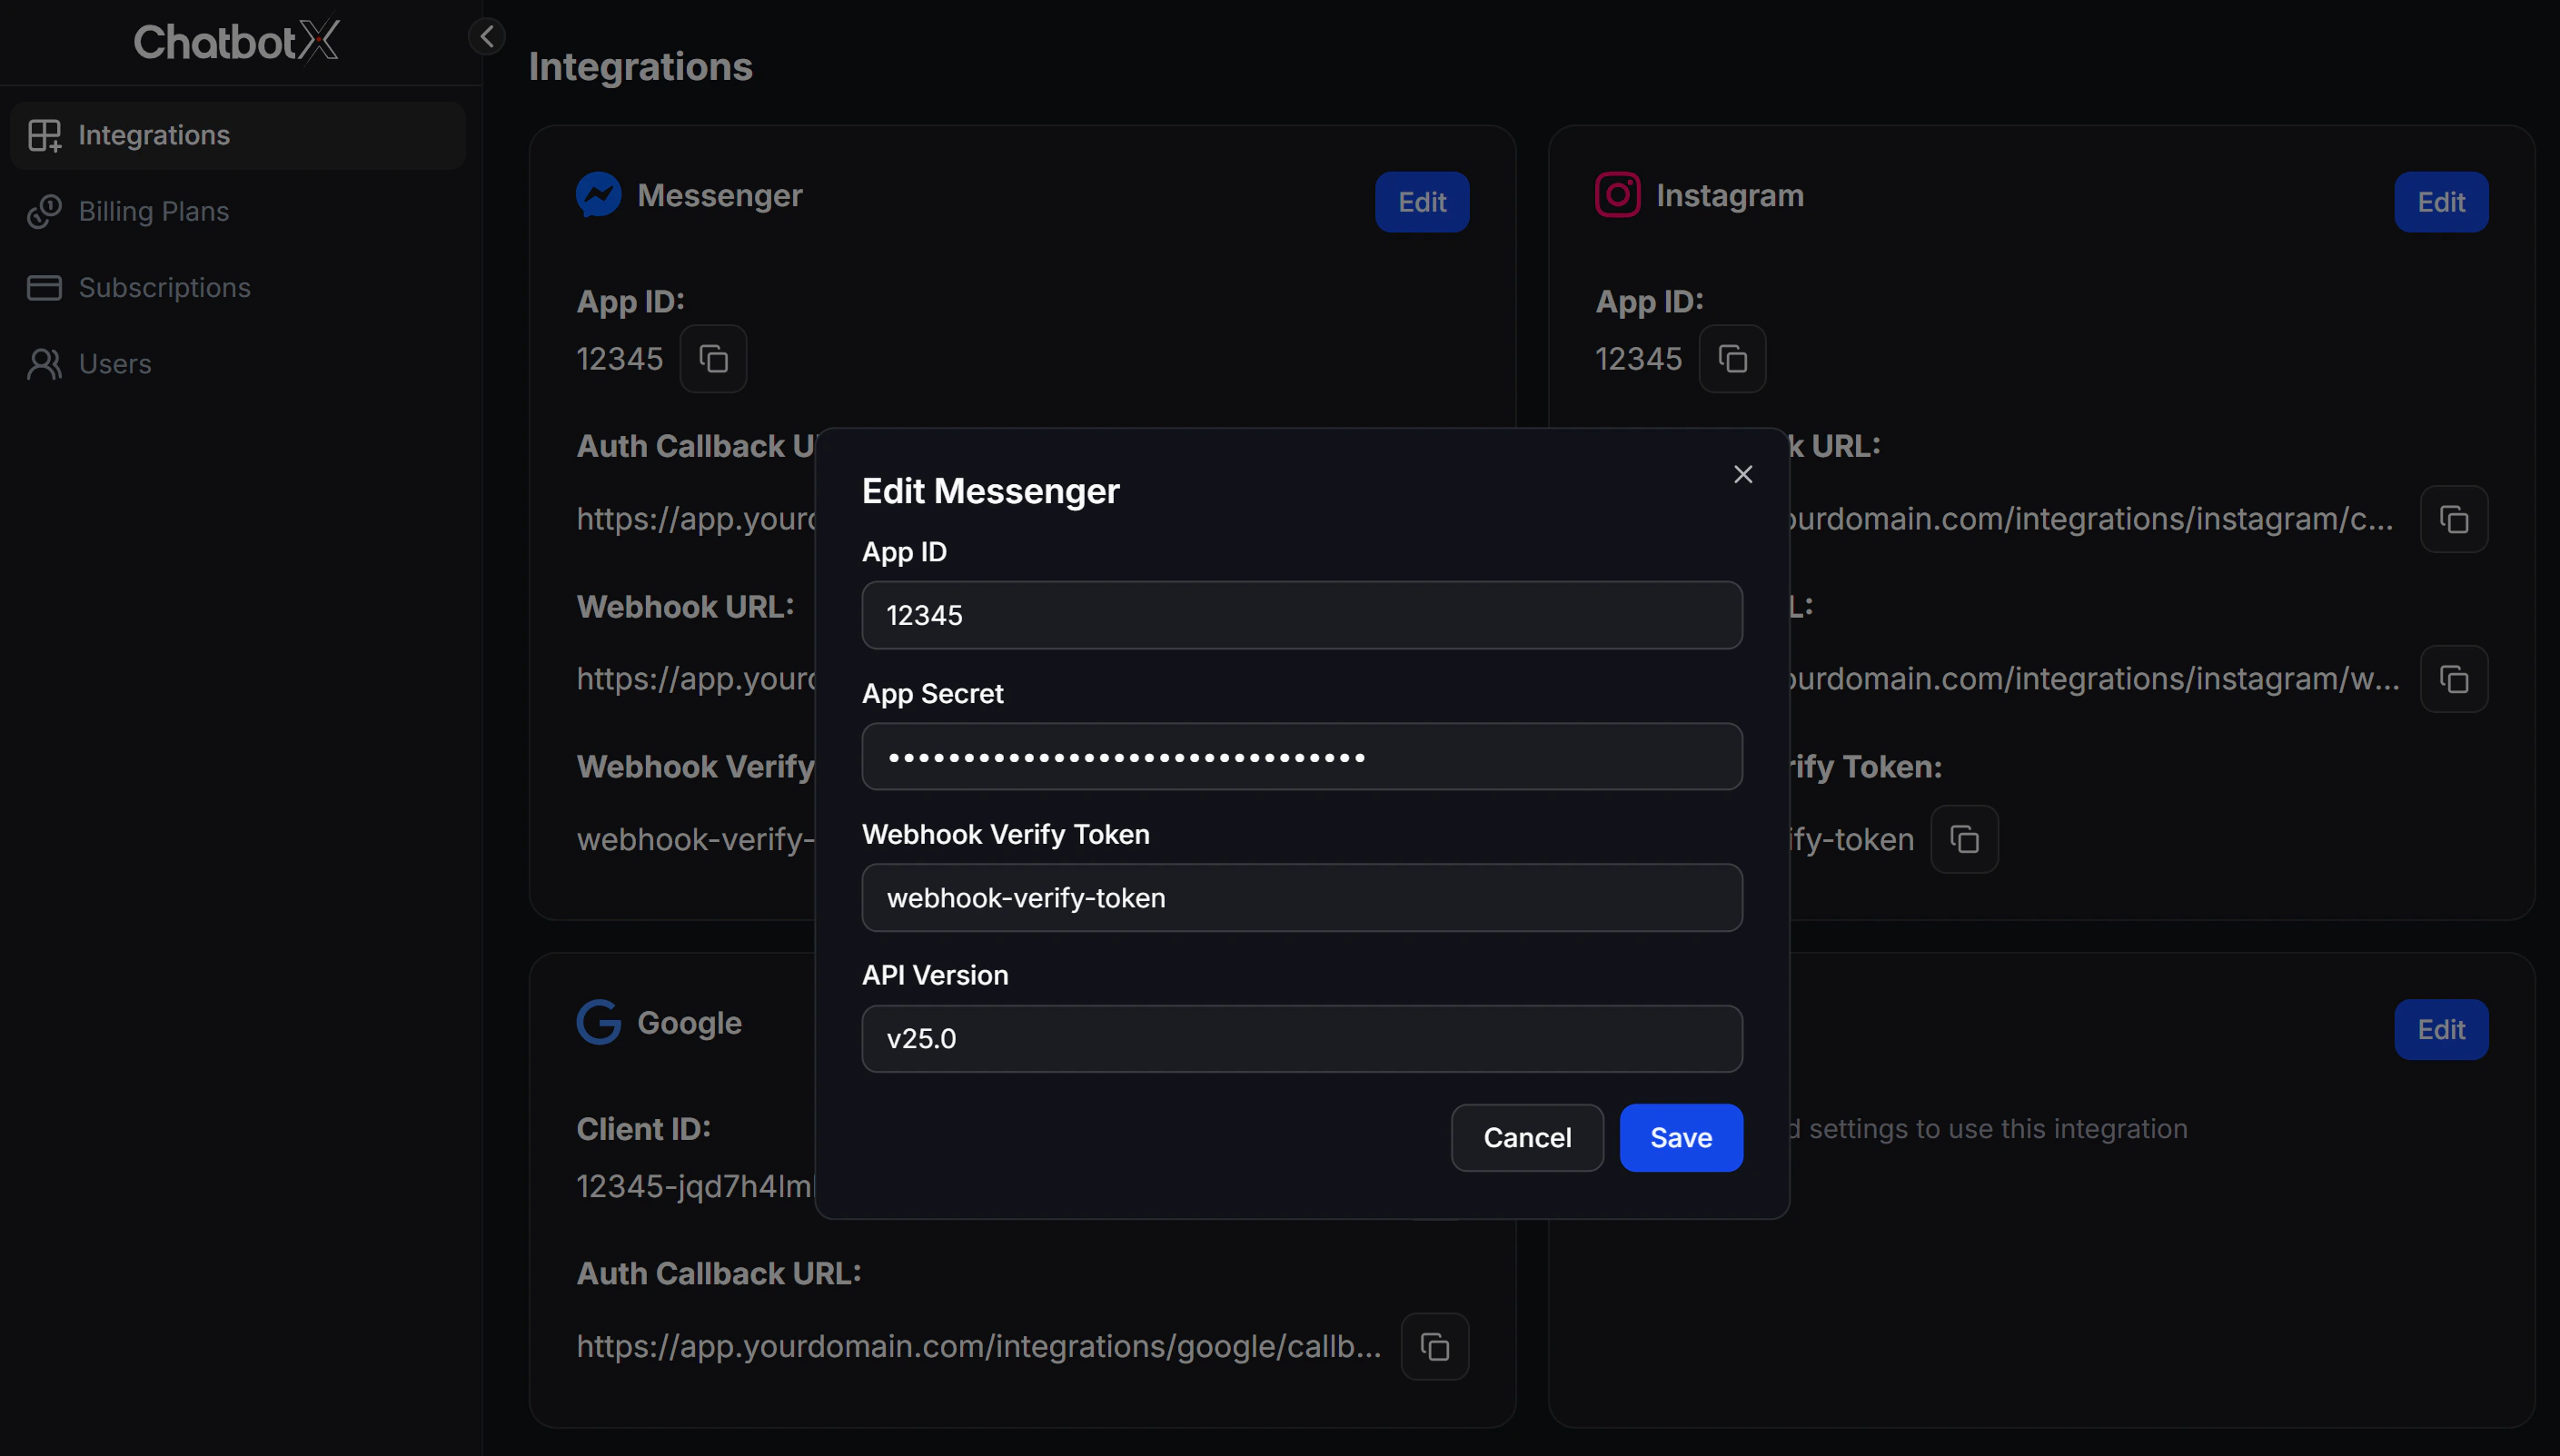 Fill in the fields using the values from the Meta Developer Portal:
| Field | Description | Where to find it |
| :--------------------- | :------------------------------------- | :------------------------------------ |
| `App ID` | Your Facebook **App ID** | **Settings → Basic** |
| `App Secret` | Your Facebook **App Secret** | **Settings → Basic** → click **Show** |
| `Webhook Verify Token` | Random string for webhook verification | Self-generated |
| `API Version` | Facebook API version (use `v25.0`) | **Settings → Advanced** |
Click **Save**. The Messenger channel will now be ready for your customers to connect.
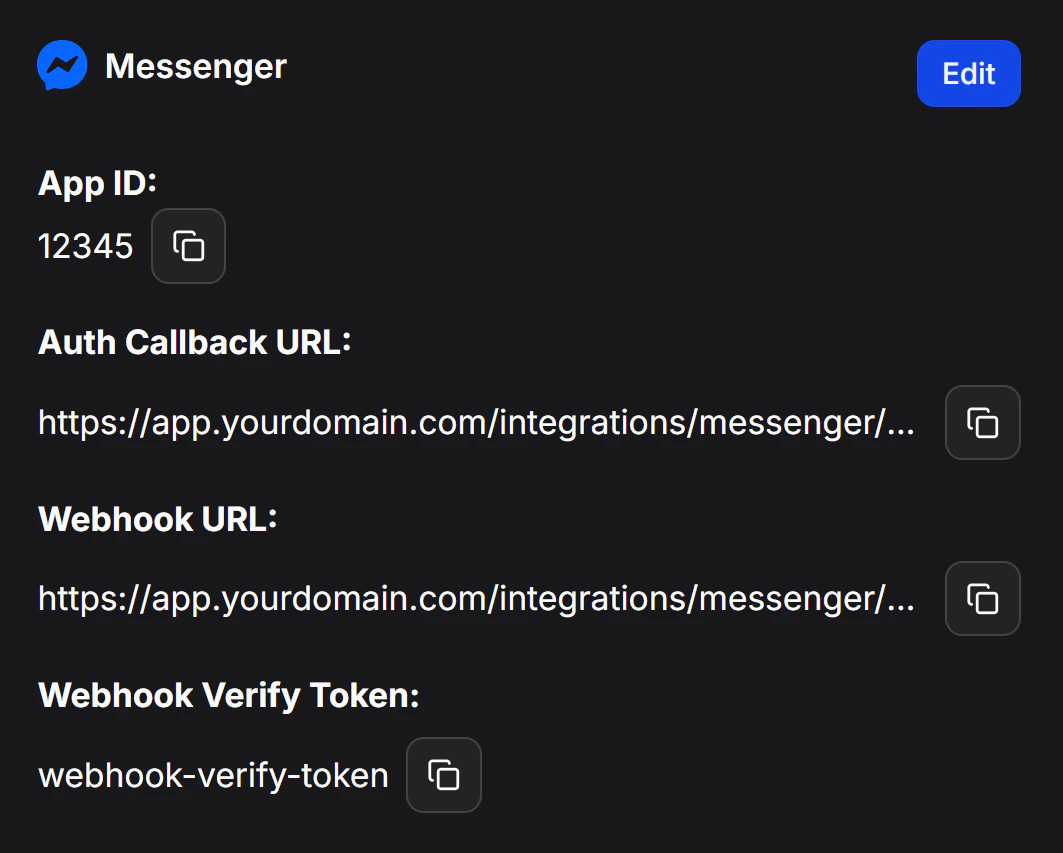
After saving, the system will display a **Webhook URL**. Copy this URL to use in Step 4.
Fill in the fields using the values from the Meta Developer Portal:
| Field | Description | Where to find it |
| :--------------------- | :------------------------------------- | :------------------------------------ |
| `App ID` | Your Facebook **App ID** | **Settings → Basic** |
| `App Secret` | Your Facebook **App Secret** | **Settings → Basic** → click **Show** |
| `Webhook Verify Token` | Random string for webhook verification | Self-generated |
| `API Version` | Facebook API version (use `v25.0`) | **Settings → Advanced** |
Click **Save**. The Messenger channel will now be ready for your customers to connect.
After saving, the system will display a **Webhook URL**. Copy this URL to use in Step 4.
 ## Step 3: Configure Facebook Login
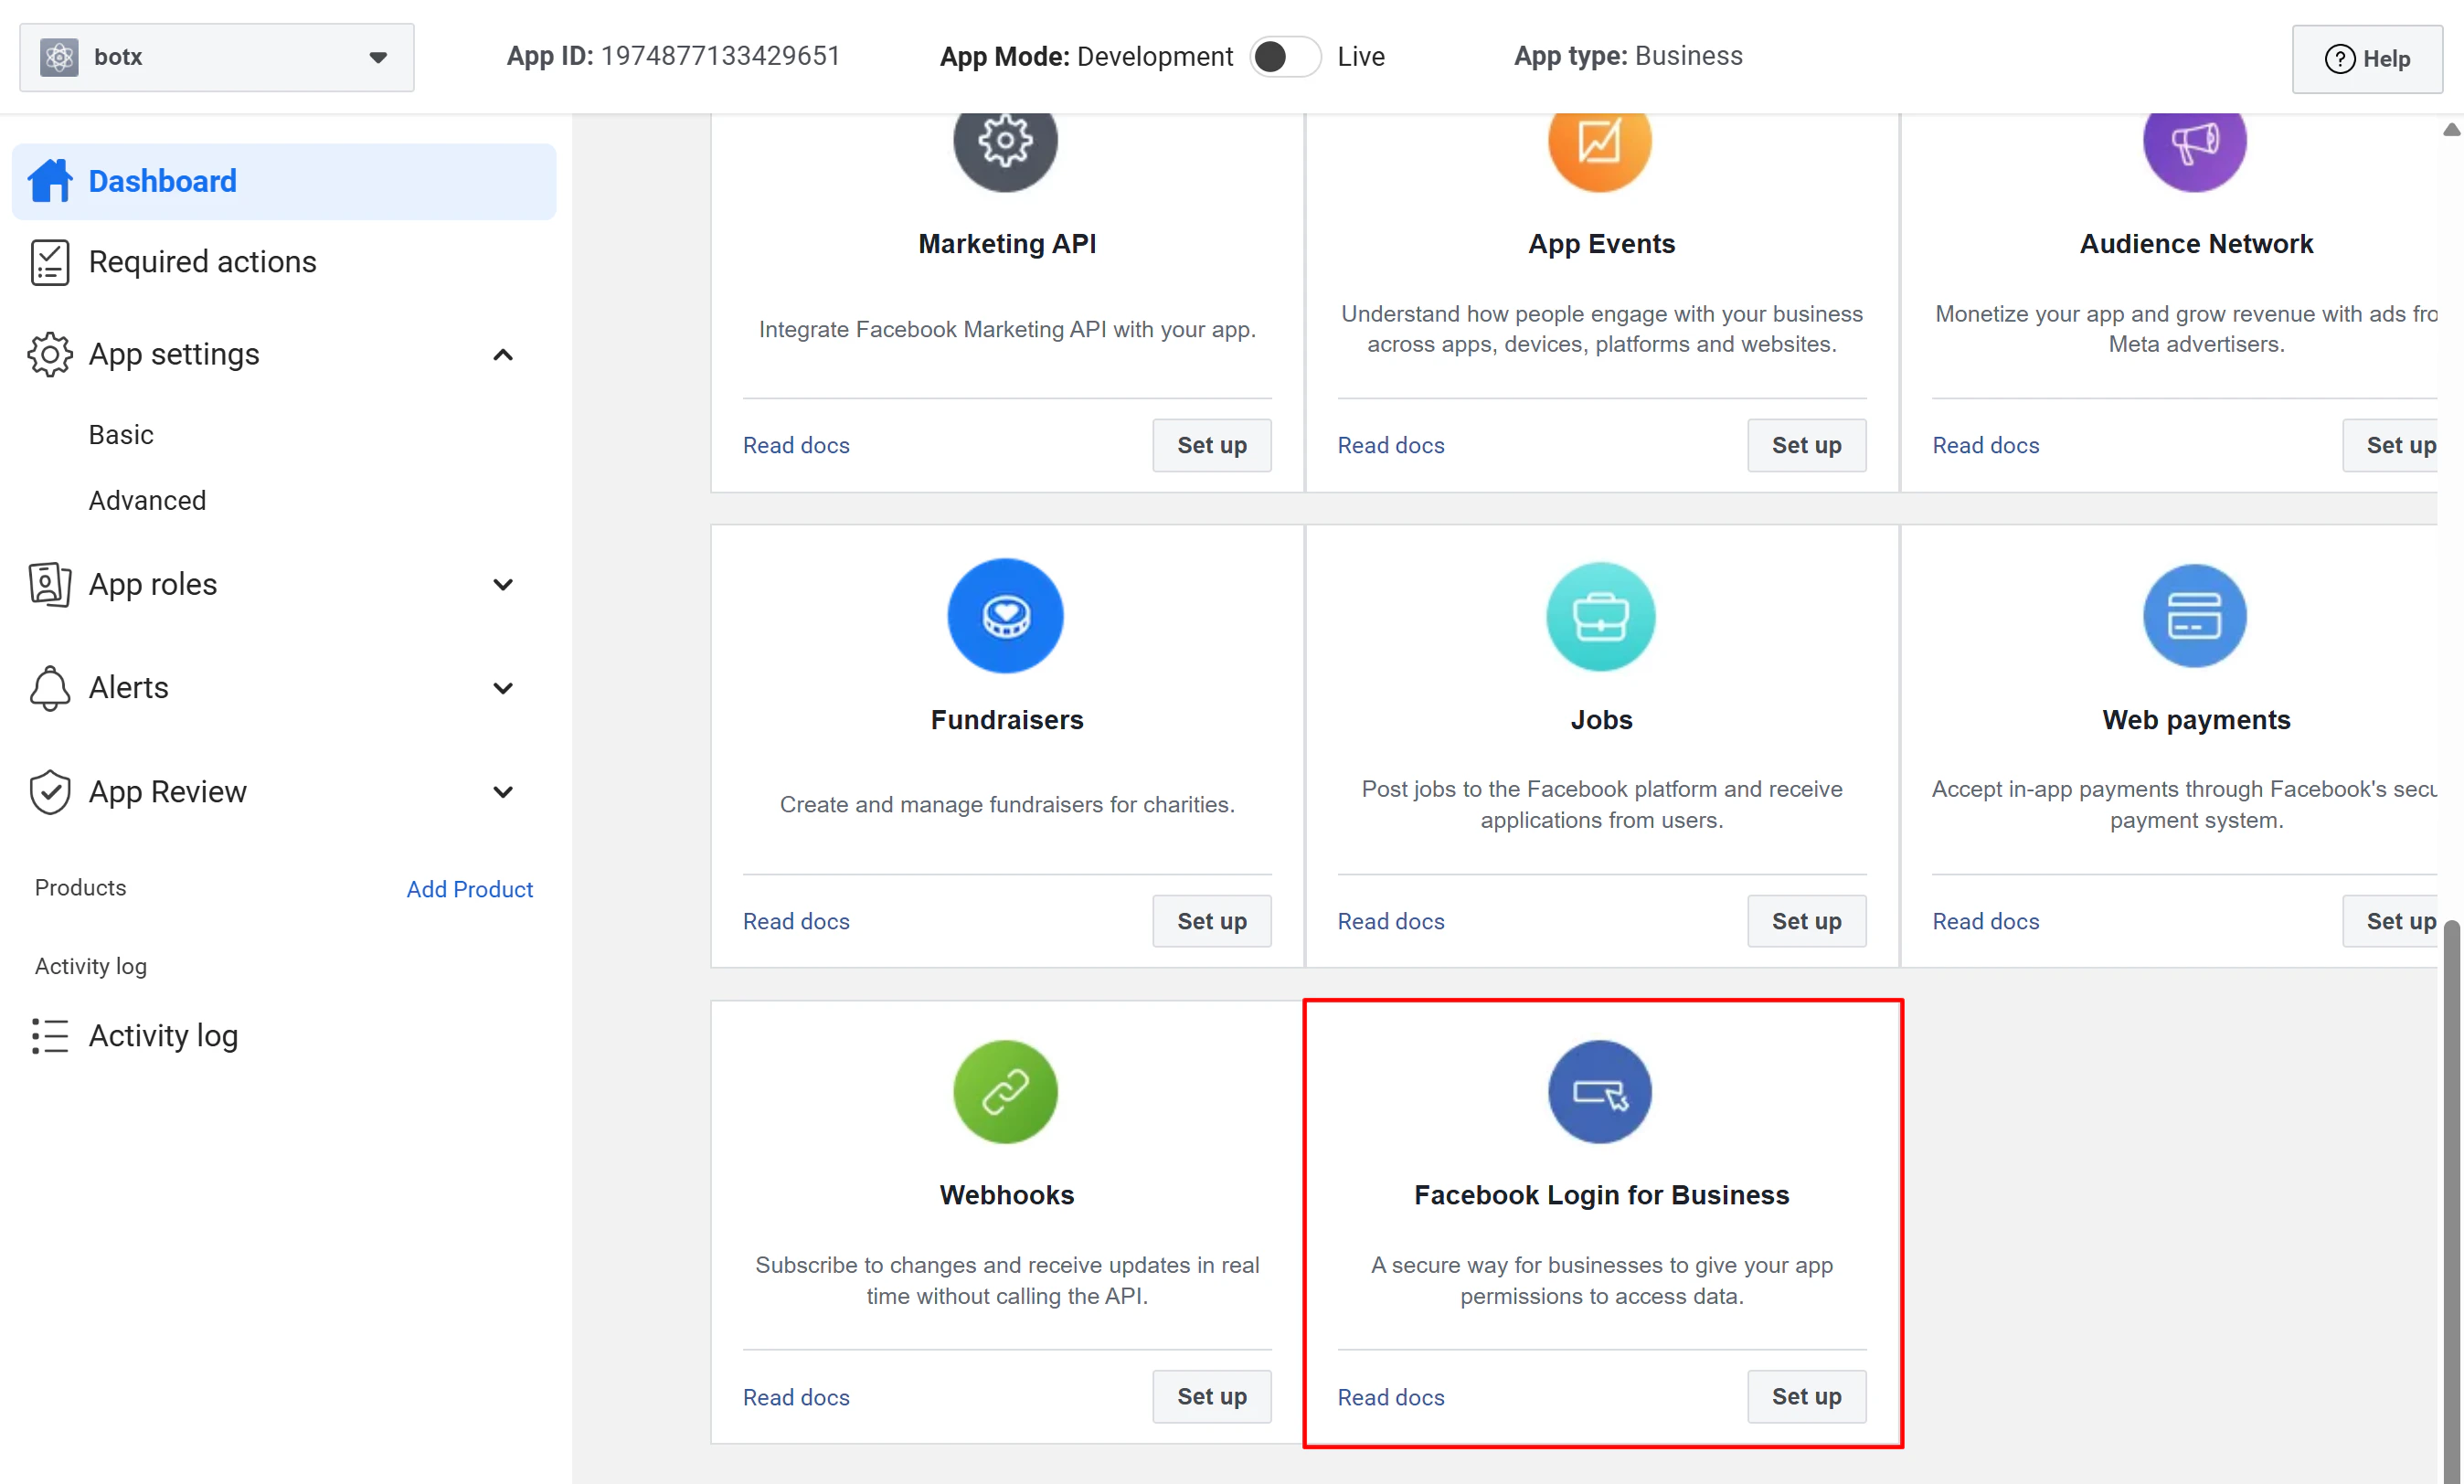
From your app dashboard, add the **Facebook Login** product.
## Step 3: Configure Facebook Login
From your app dashboard, add the **Facebook Login** product.
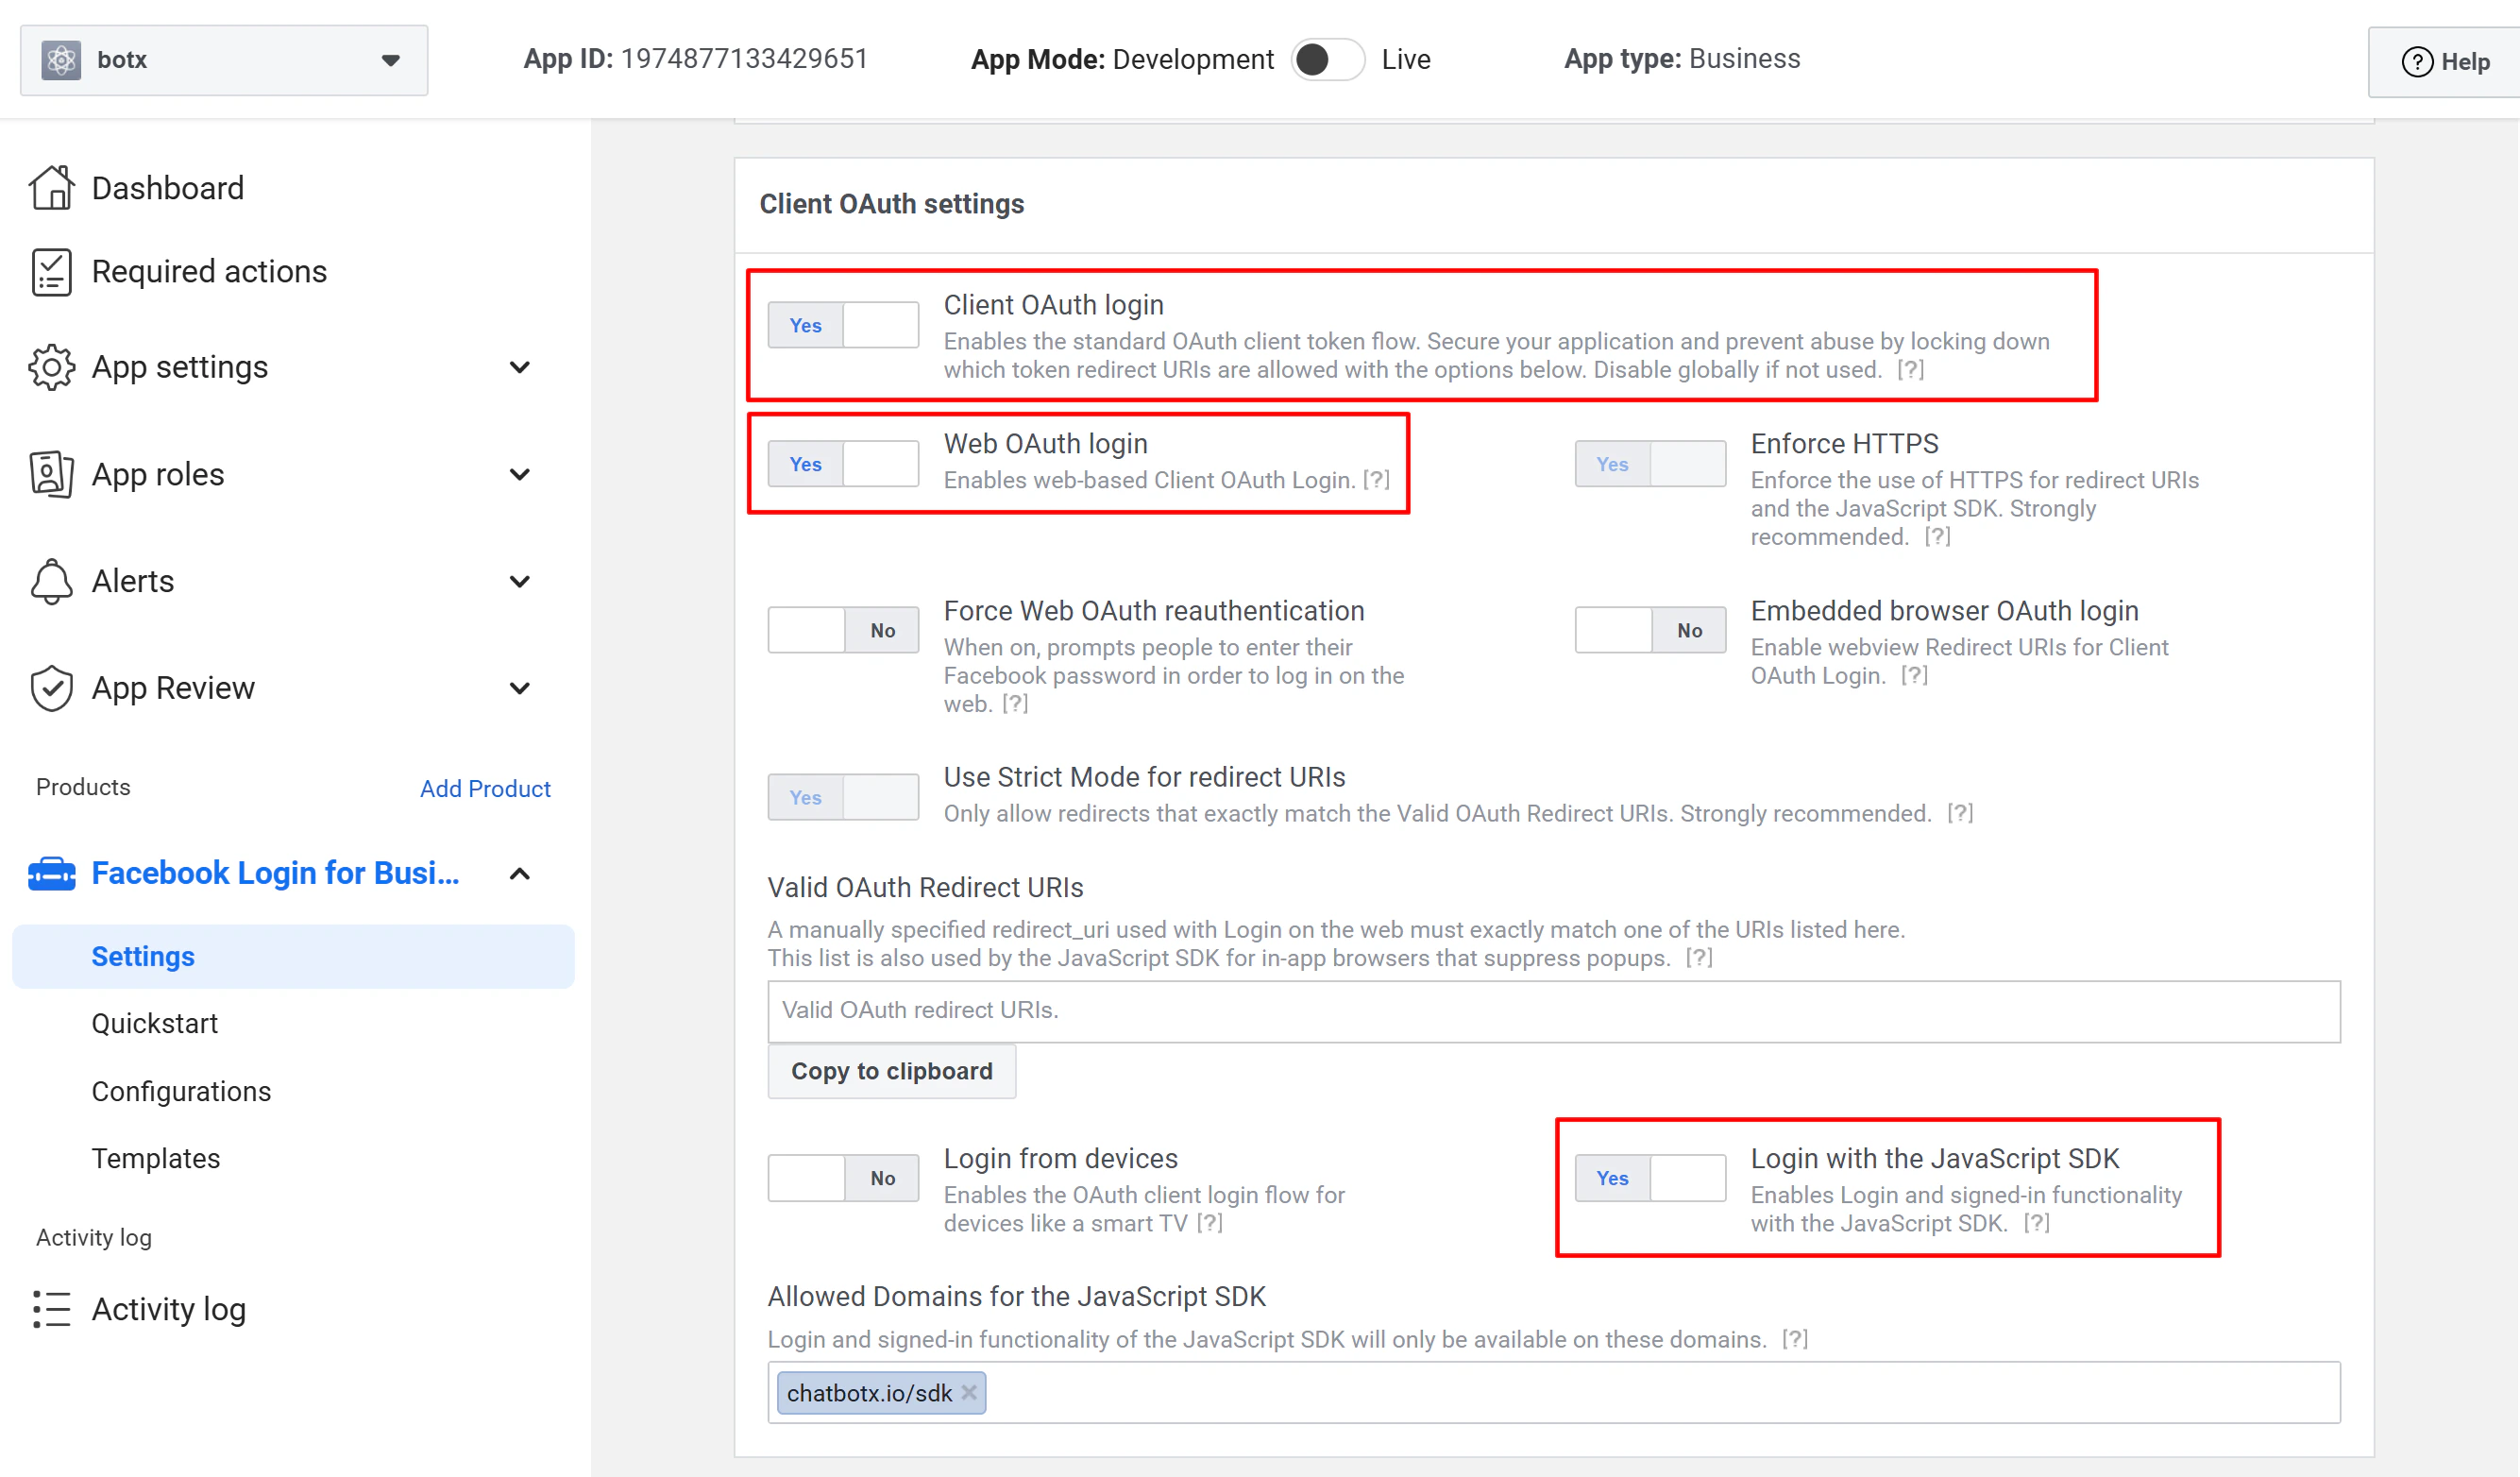
 In the Facebook Login settings:
* Enable **Web OAuth Login**
* Enable **Login with JavaScript SDK**
* Add your portal domain to **Allowed Domains for the JavaScript SDK** (e.g., `app.chatconnectx.com`)
In the Facebook Login settings:
* Enable **Web OAuth Login**
* Enable **Login with JavaScript SDK**
* Add your portal domain to **Allowed Domains for the JavaScript SDK** (e.g., `app.chatconnectx.com`)
 ## Step 4: Configure Webhooks on the Facebook App
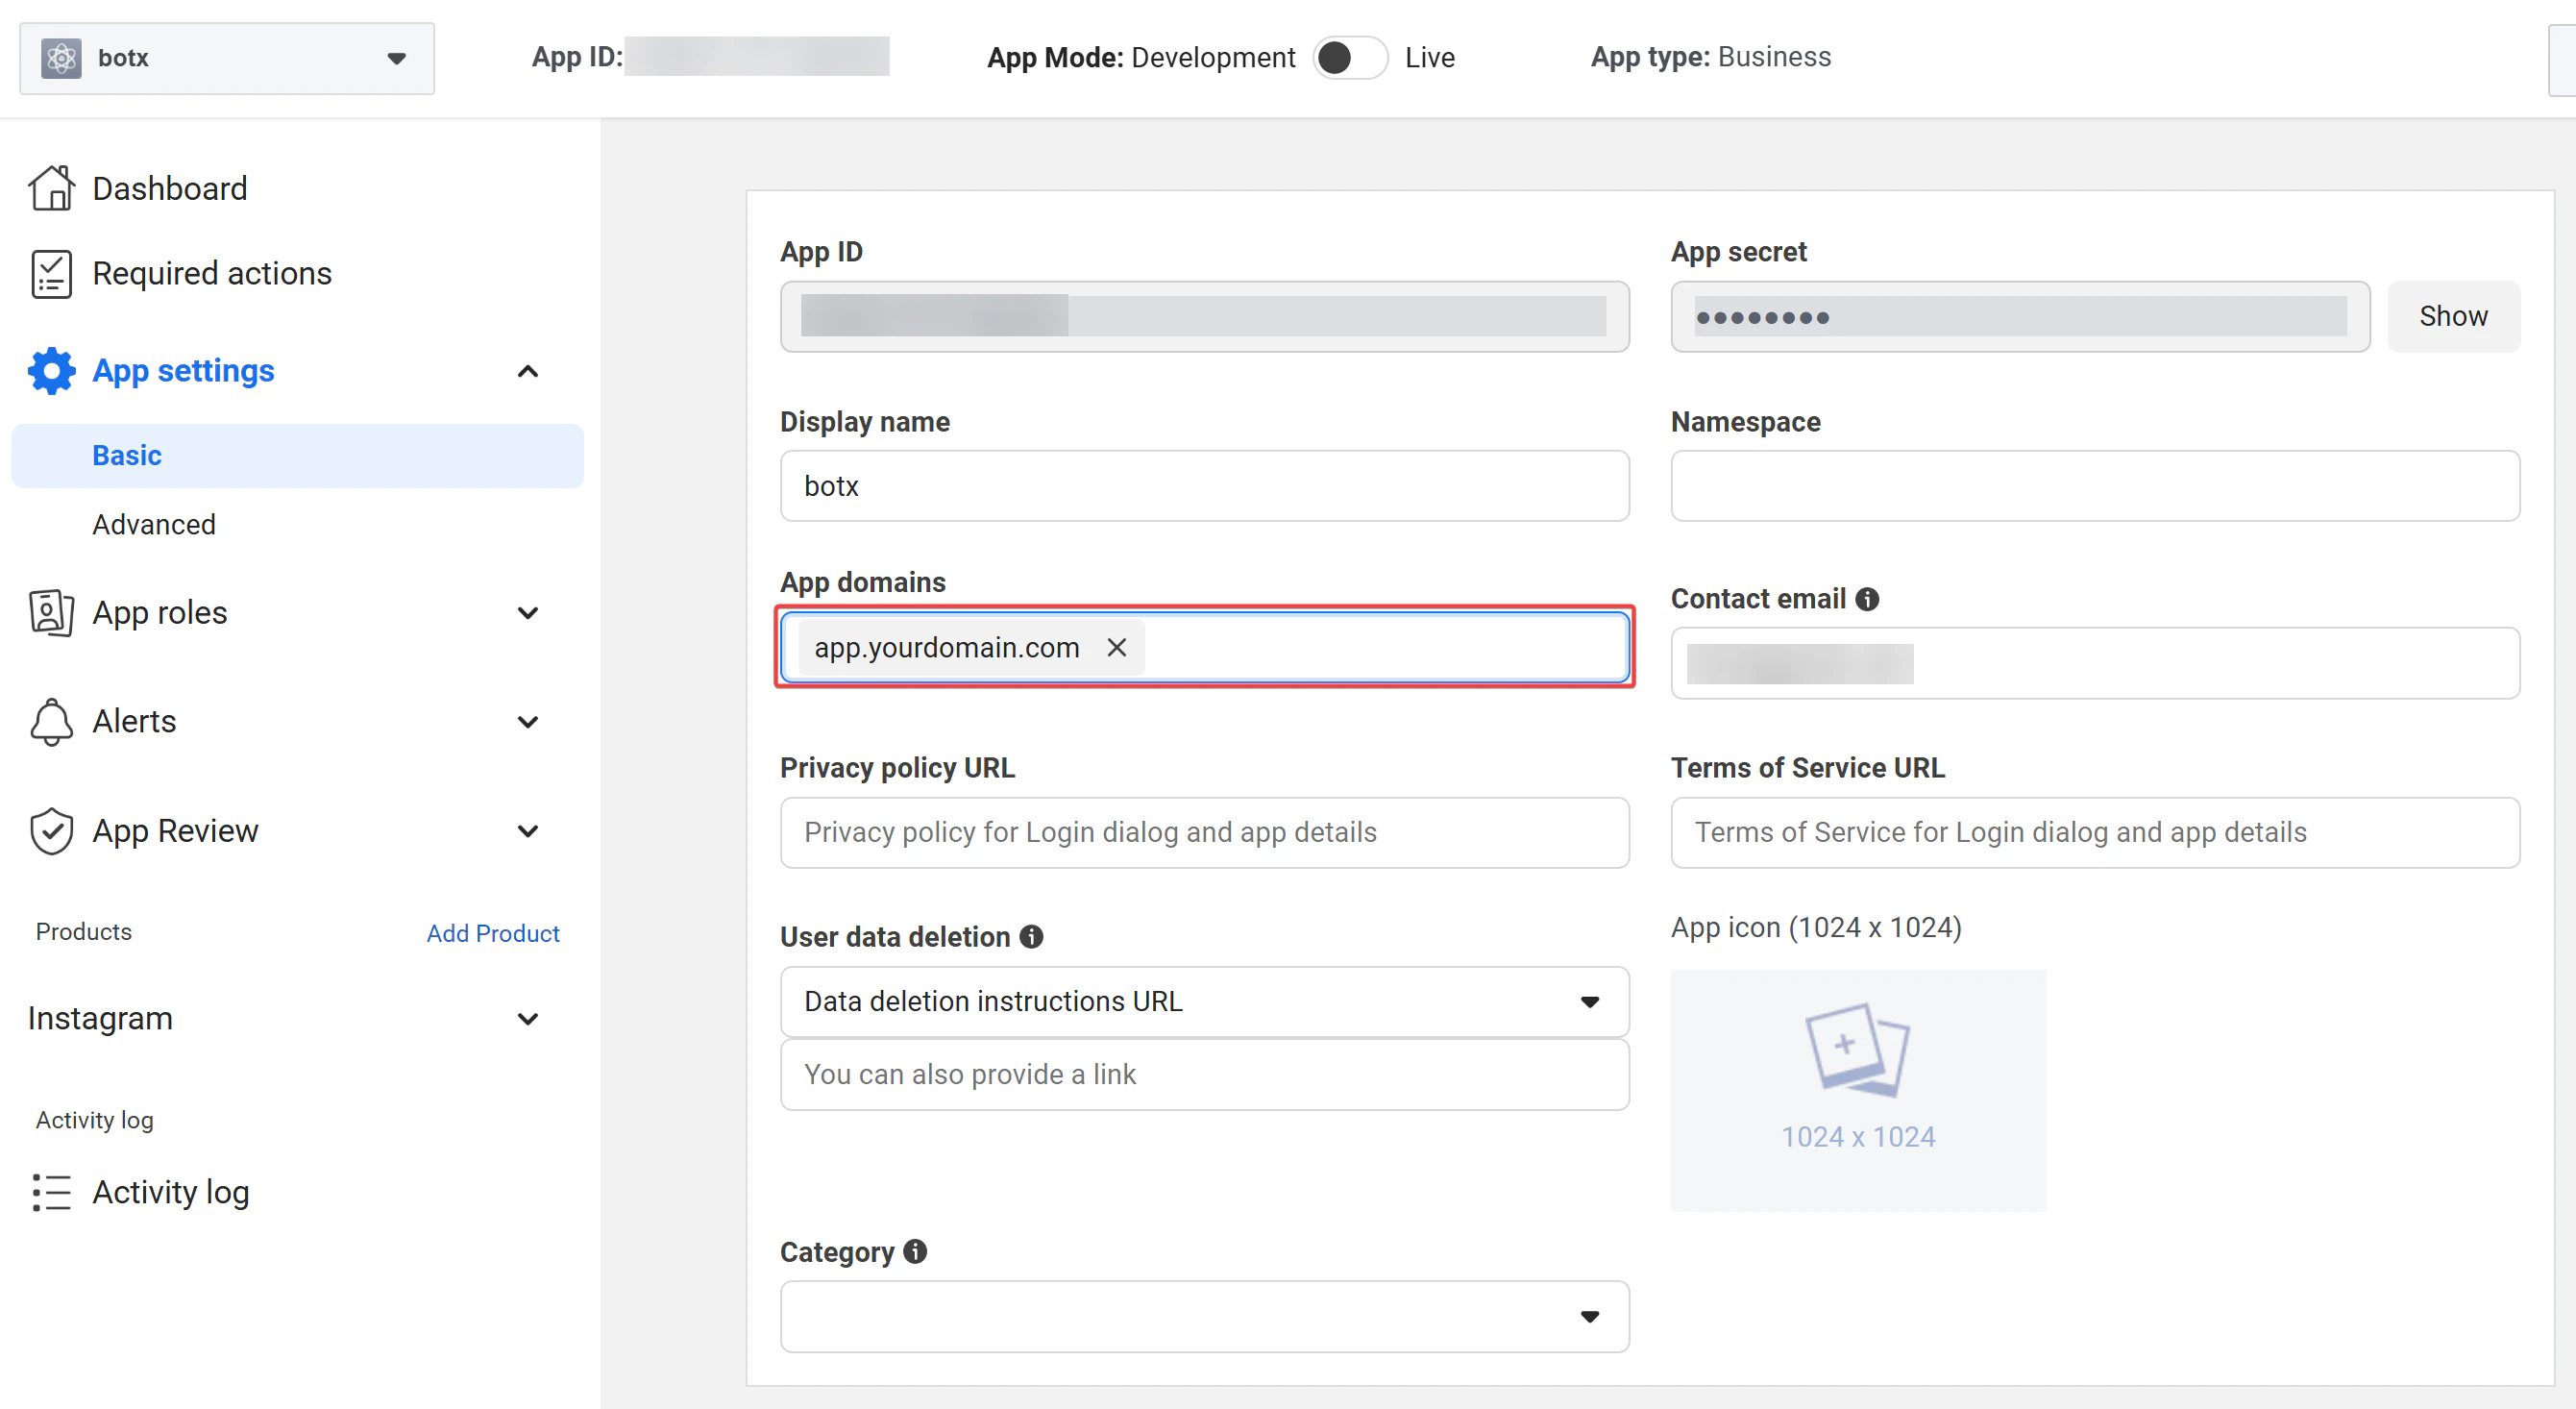
Under **Settings → Basic**, add your portal domain (e.g., `app.chatconnectx.com`) as an app domain.
## Step 4: Configure Webhooks on the Facebook App
Under **Settings → Basic**, add your portal domain (e.g., `app.chatconnectx.com`) as an app domain.
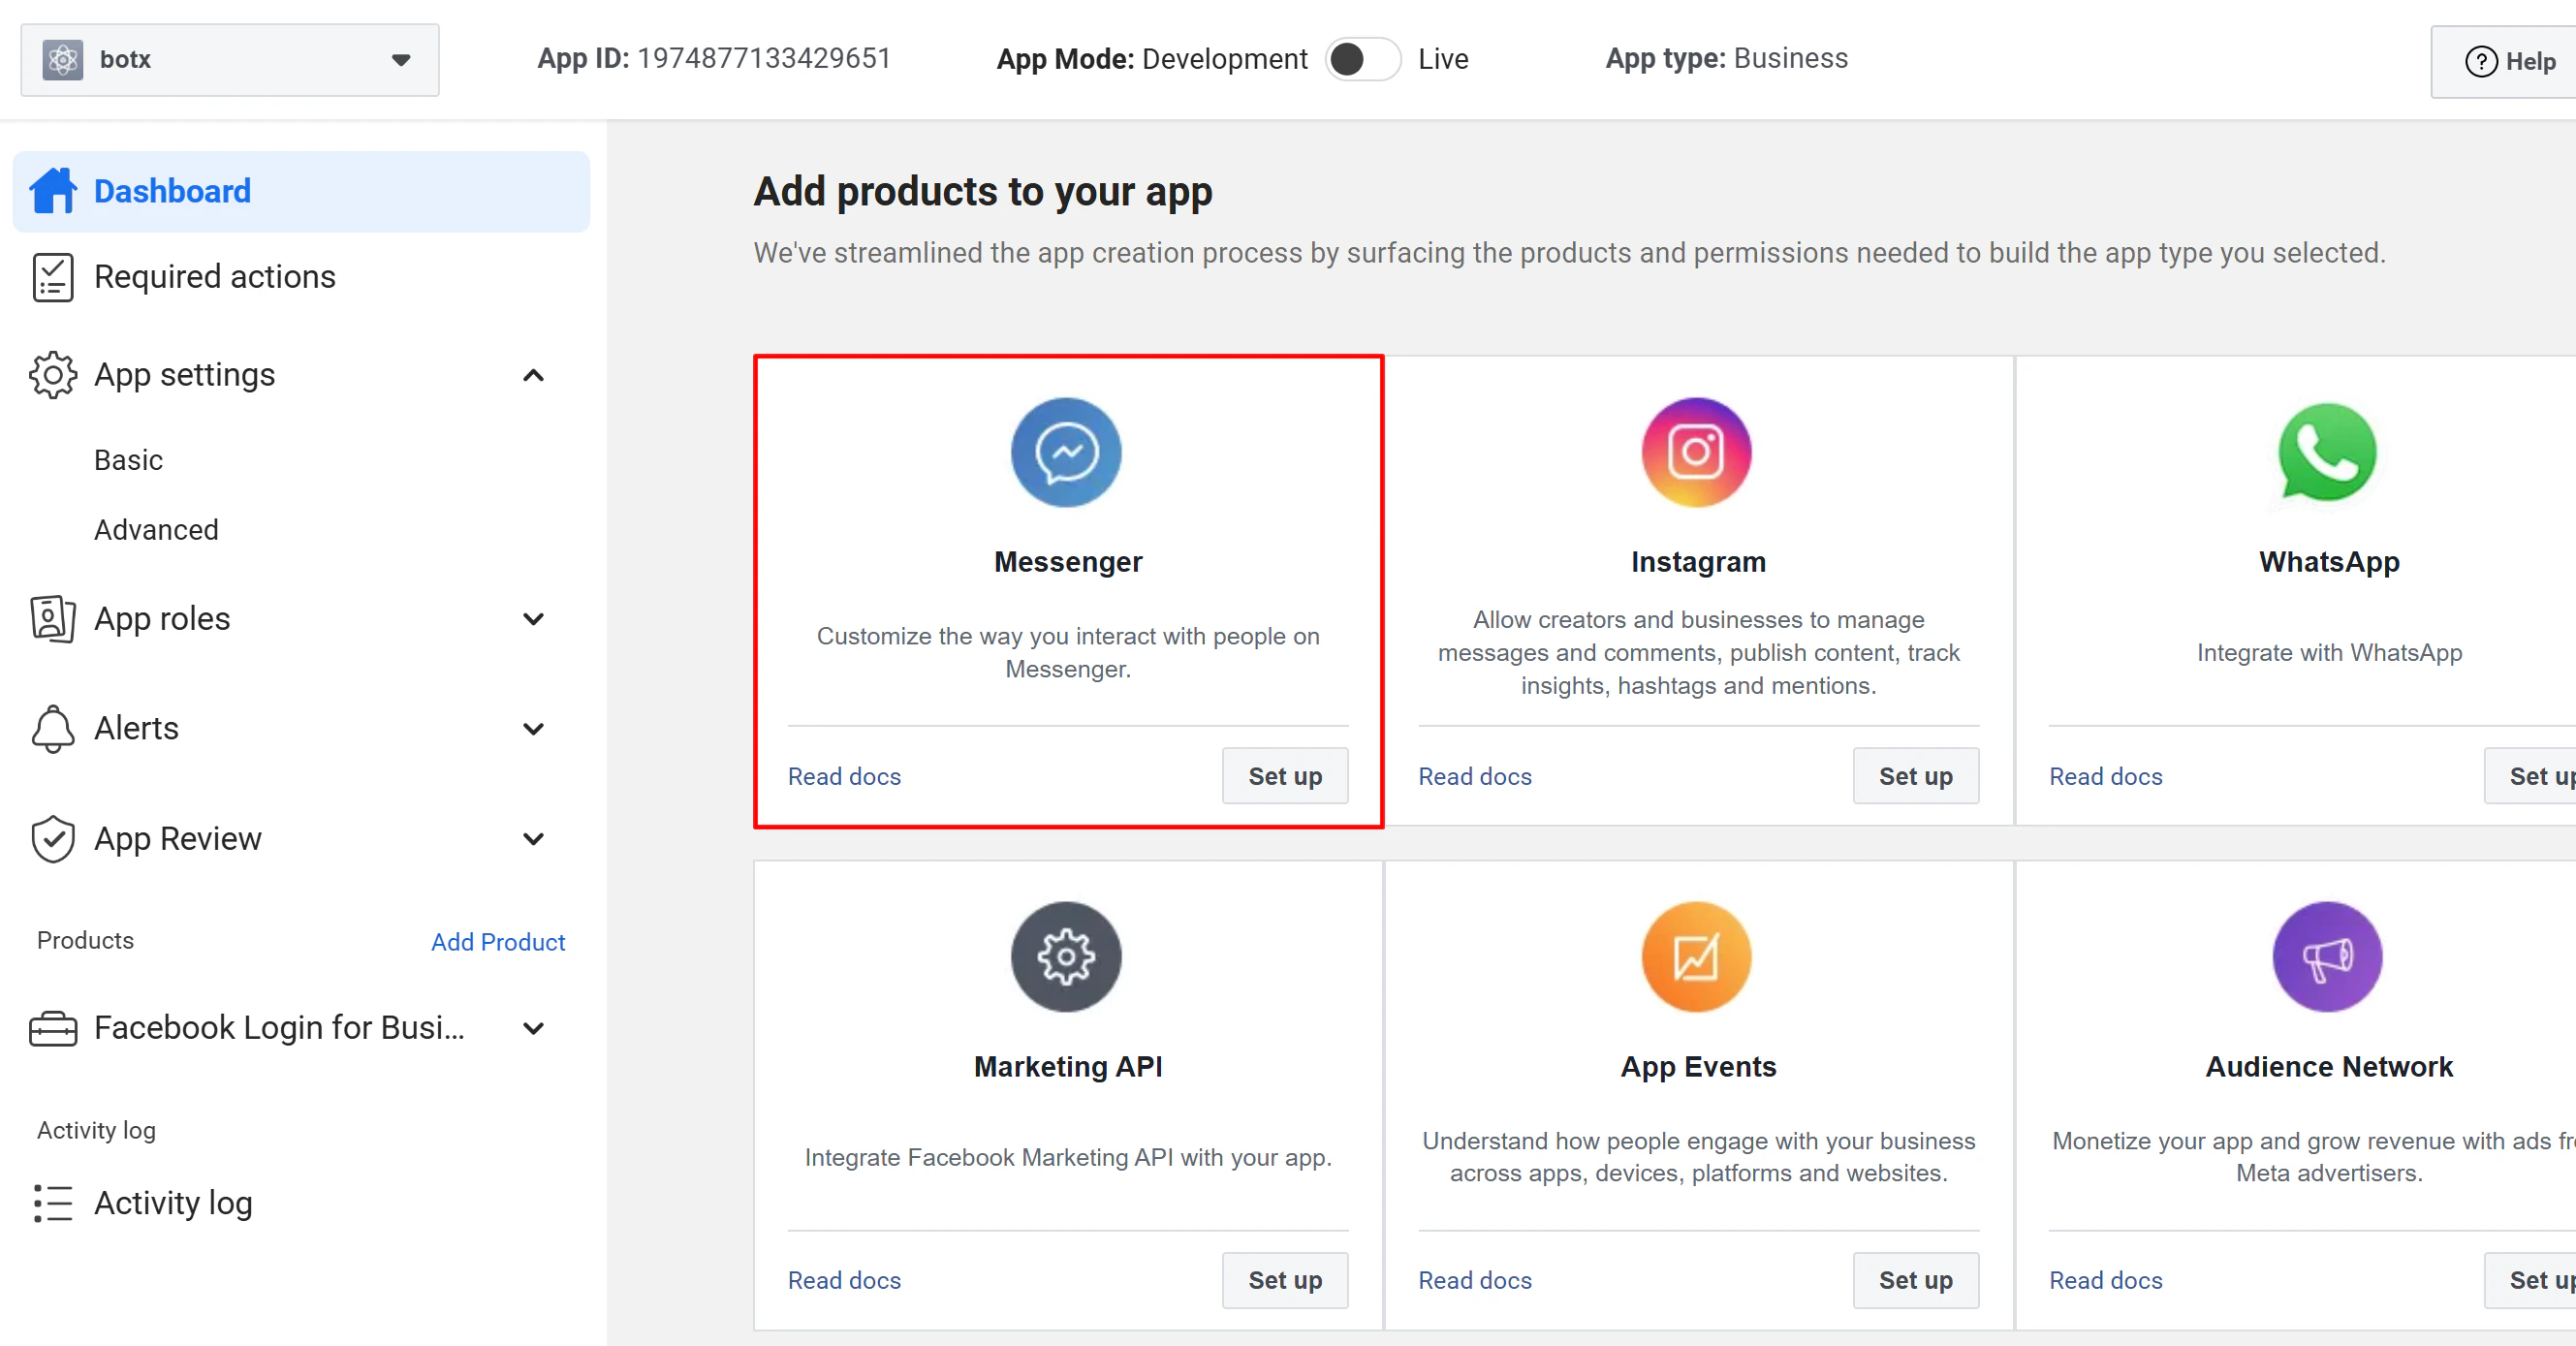
 From the **Products** section, add **Messenger** to your app.
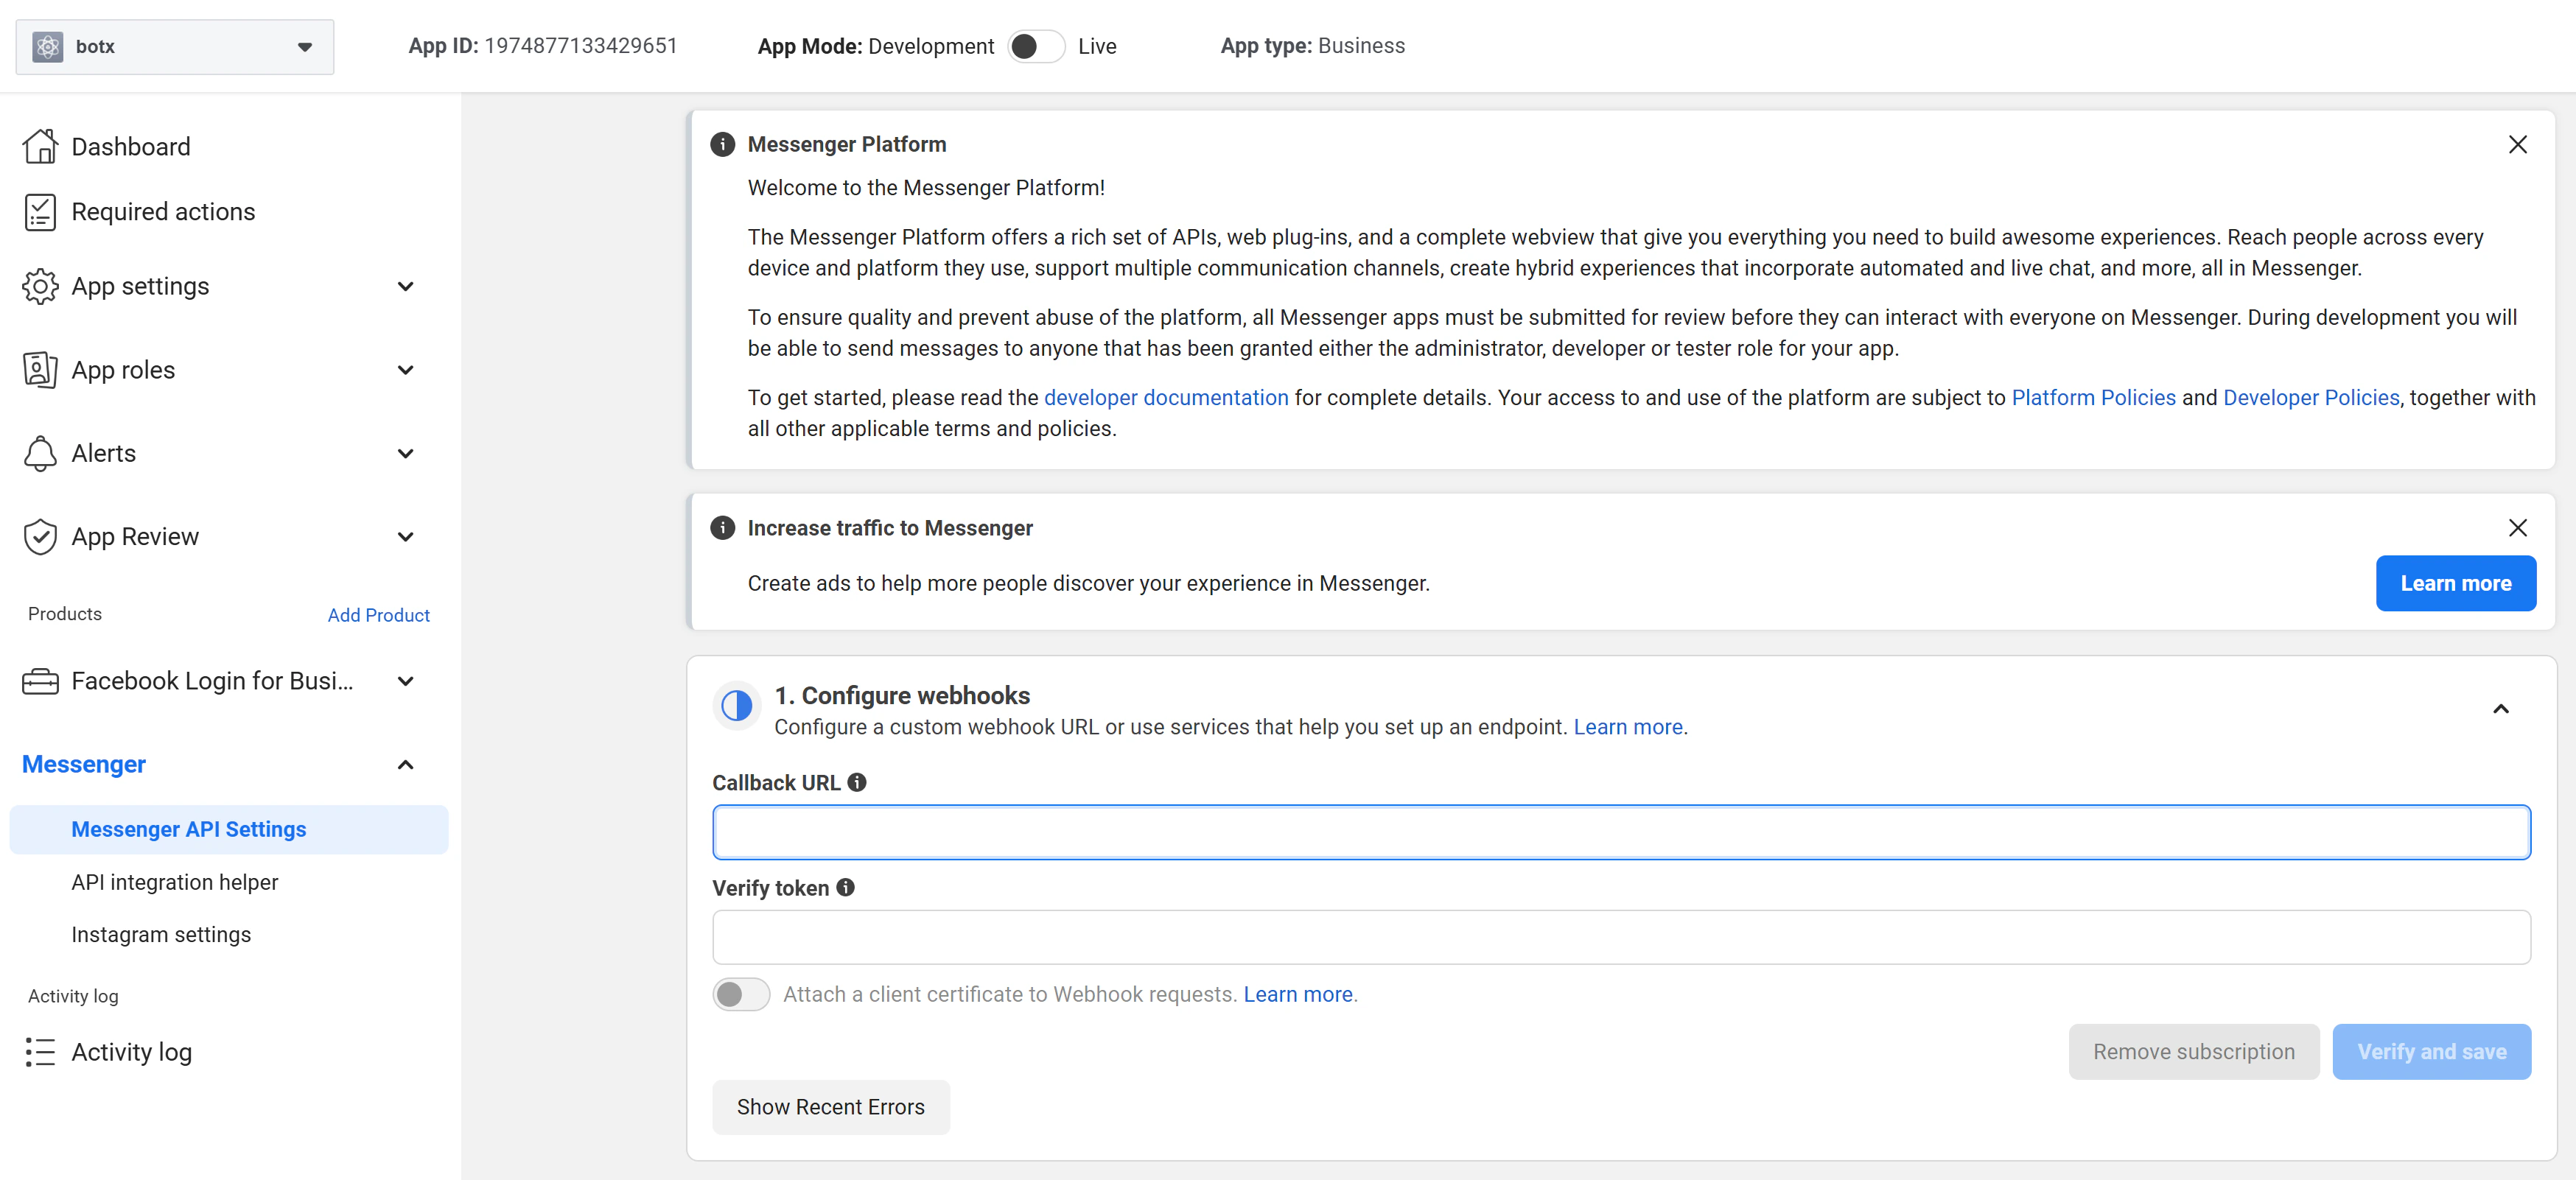
 In the **Messenger settings**, configure the webhook:
* **Callback URL**: Use the **Webhook URL** generated by the Admin Portal in Step 2 (e.g., `https://app.chatconnectx.com/integrations/messenger/callback`)
* **Verify Token**: Enter the **Webhook Verify Token** value you configured in the Admin Portal (Step 2)
In the **Messenger settings**, configure the webhook:
* **Callback URL**: Use the **Webhook URL** generated by the Admin Portal in Step 2 (e.g., `https://app.chatconnectx.com/integrations/messenger/callback`)
* **Verify Token**: Enter the **Webhook Verify Token** value you configured in the Admin Portal (Step 2)
 ## Step 5: Test before Going to Production
Meta does not forward page messages to your webhook until your app is approved Live. You need to add a tester account to verify it first.
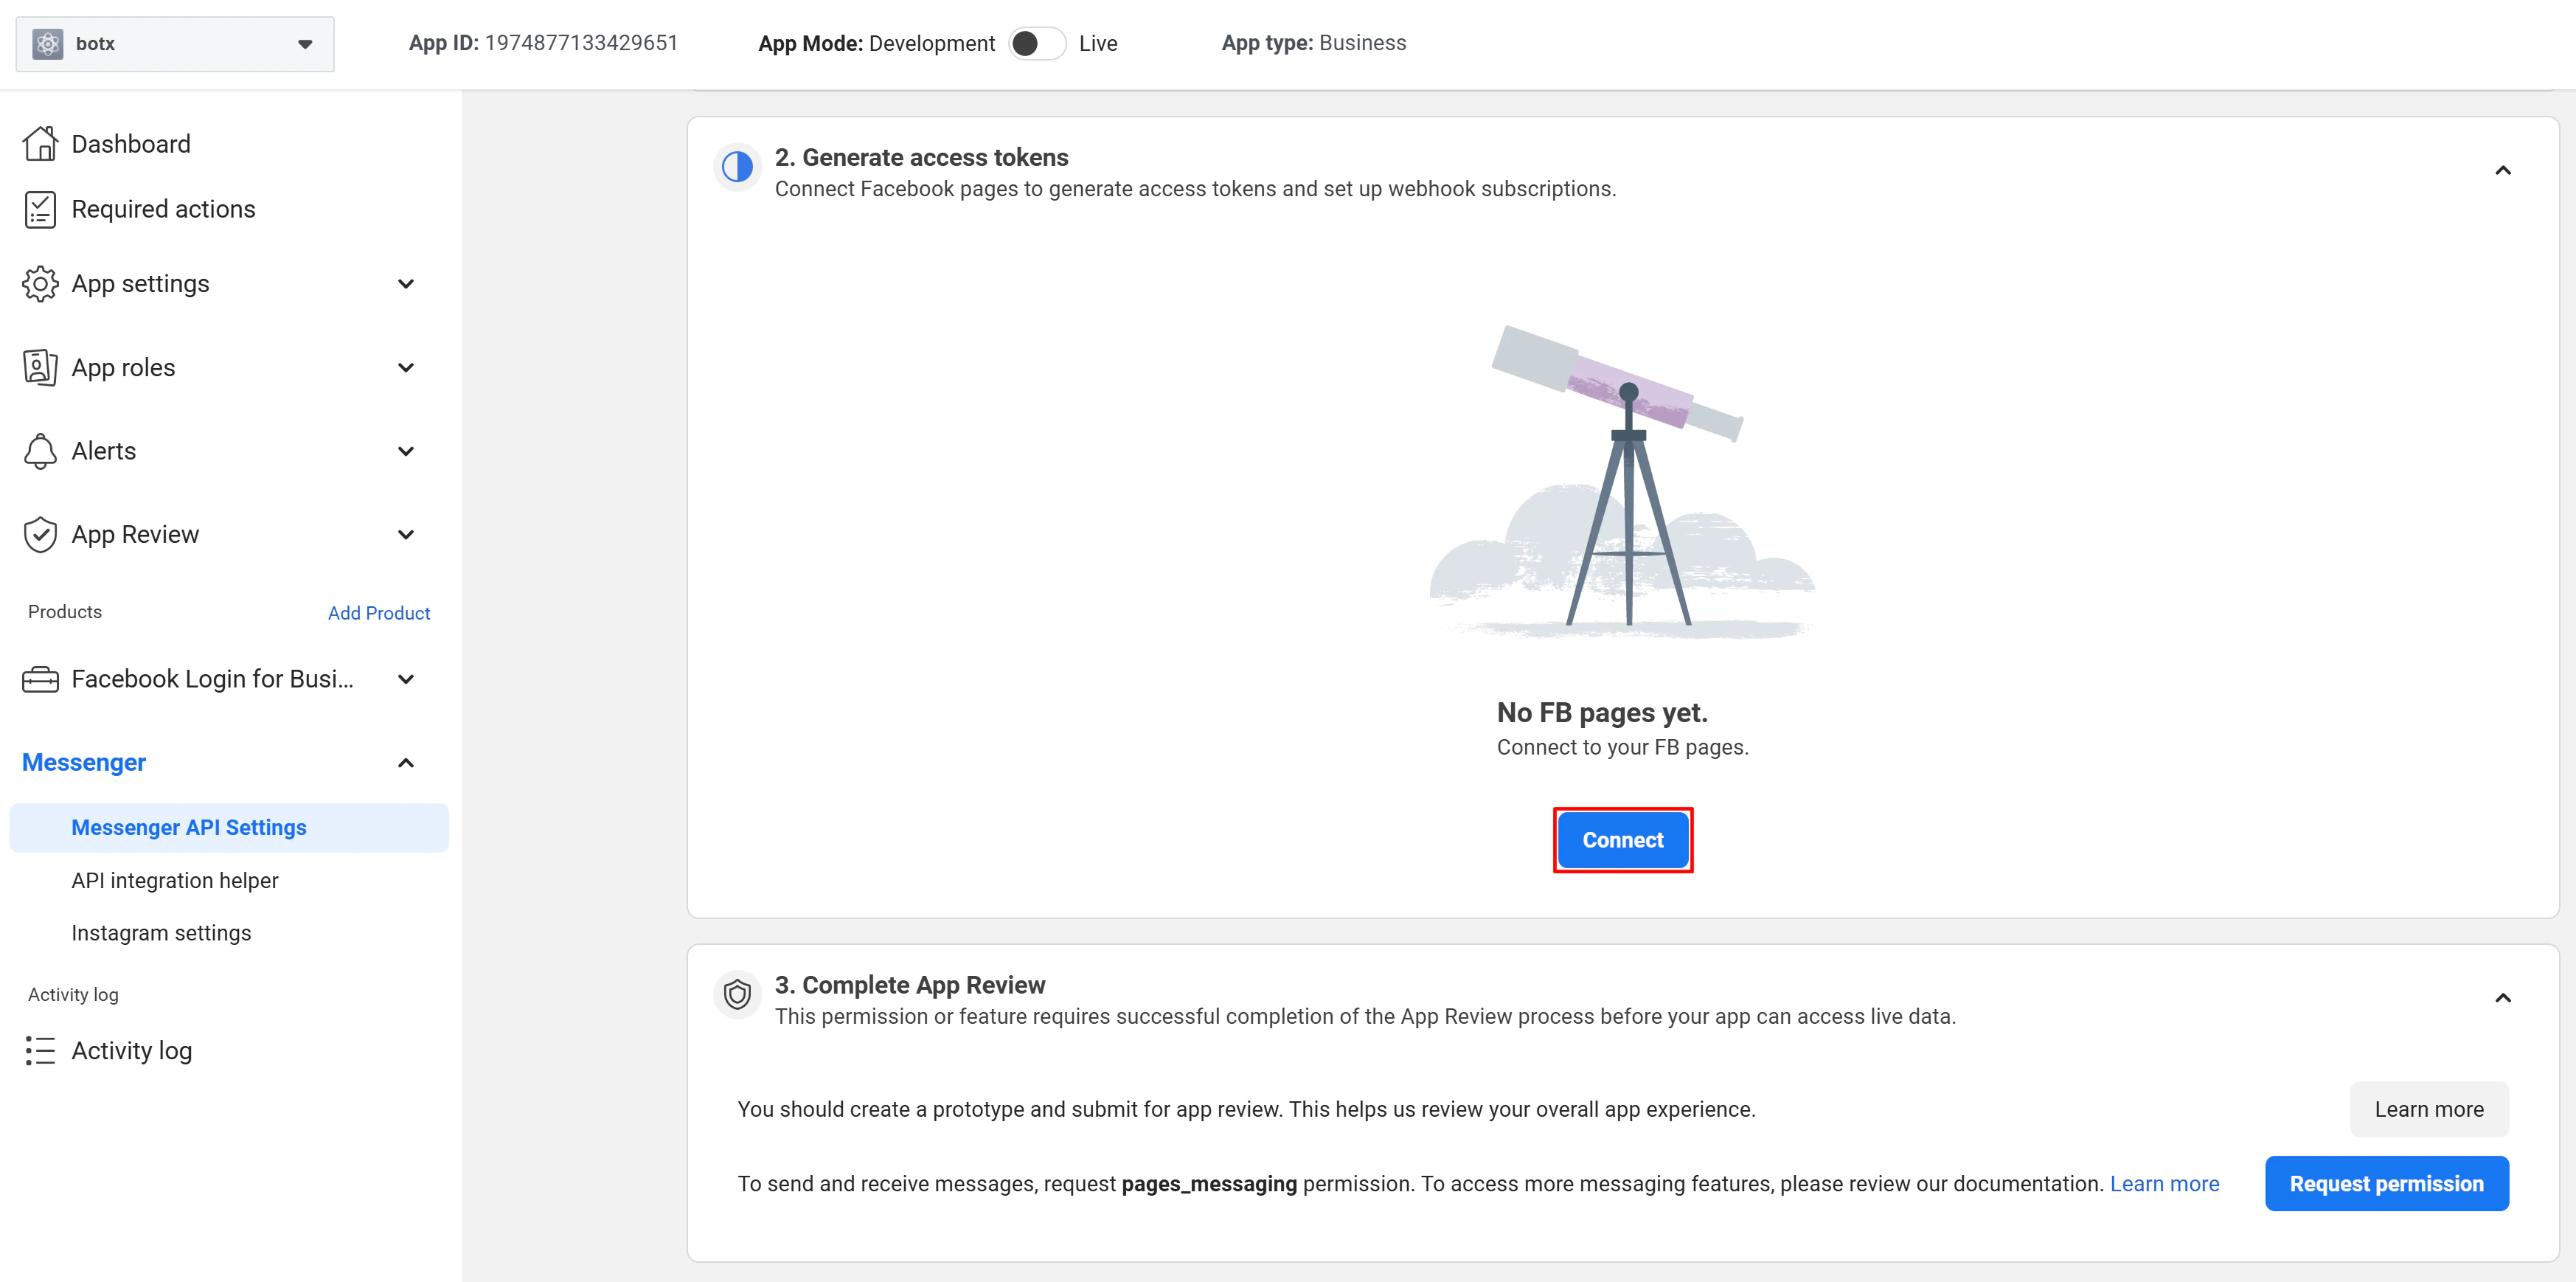
In the Messenger settings of the Facebook App, click **Connect** next to the page you want to use for testing.
## Step 5: Test before Going to Production
Meta does not forward page messages to your webhook until your app is approved Live. You need to add a tester account to verify it first.
In the Messenger settings of the Facebook App, click **Connect** next to the page you want to use for testing.
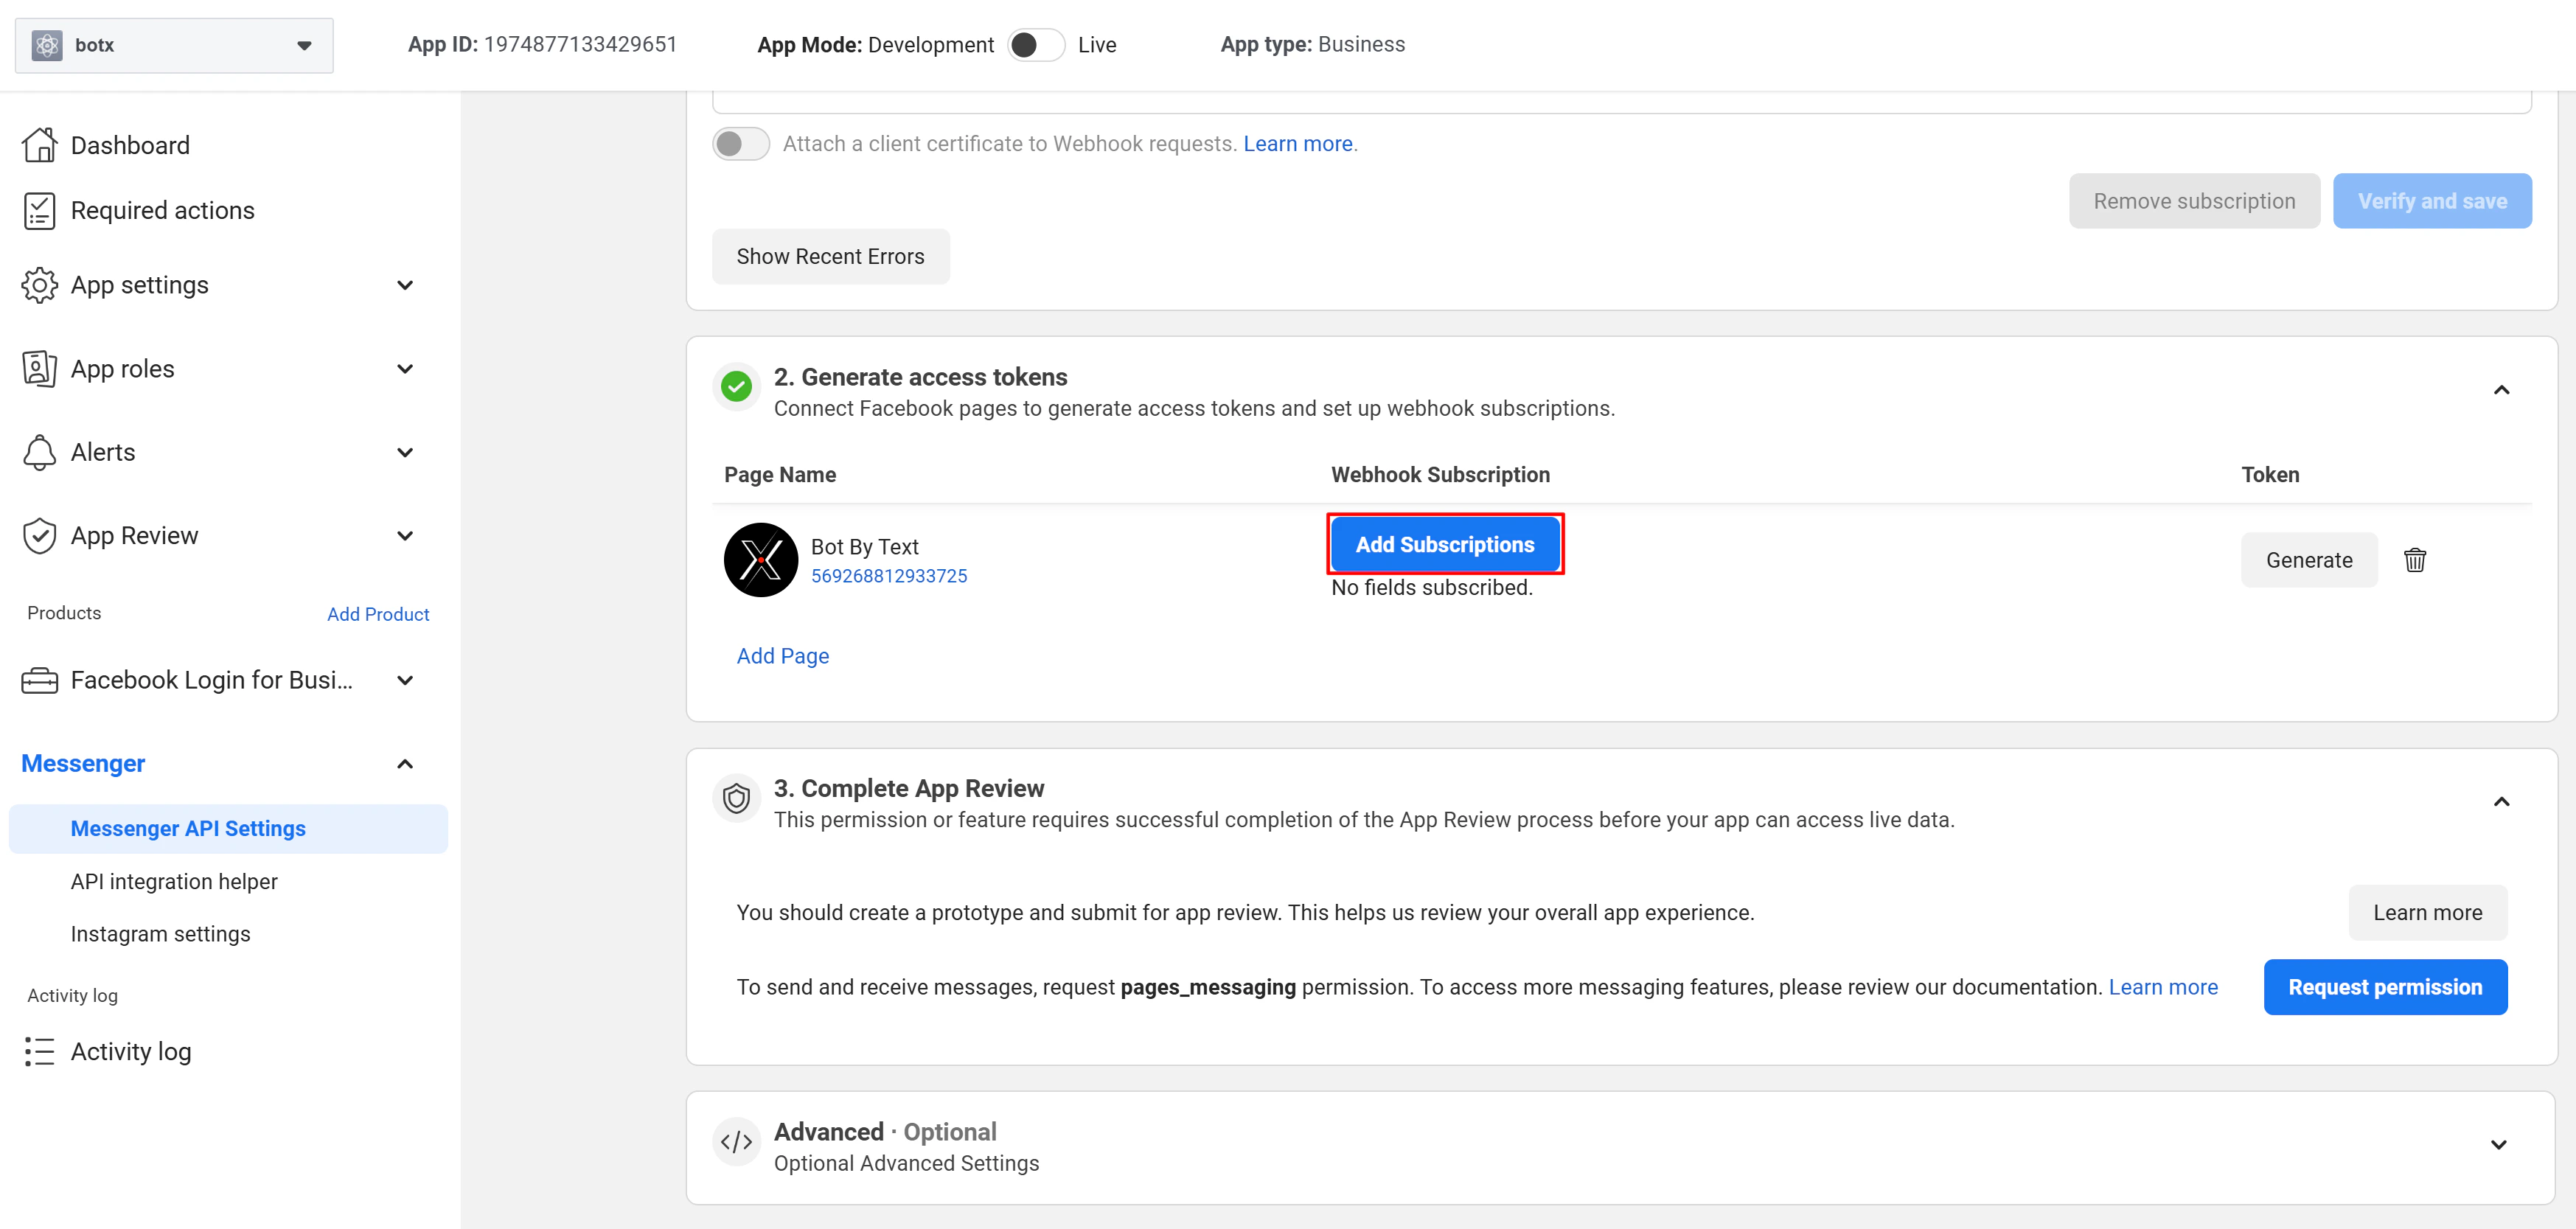
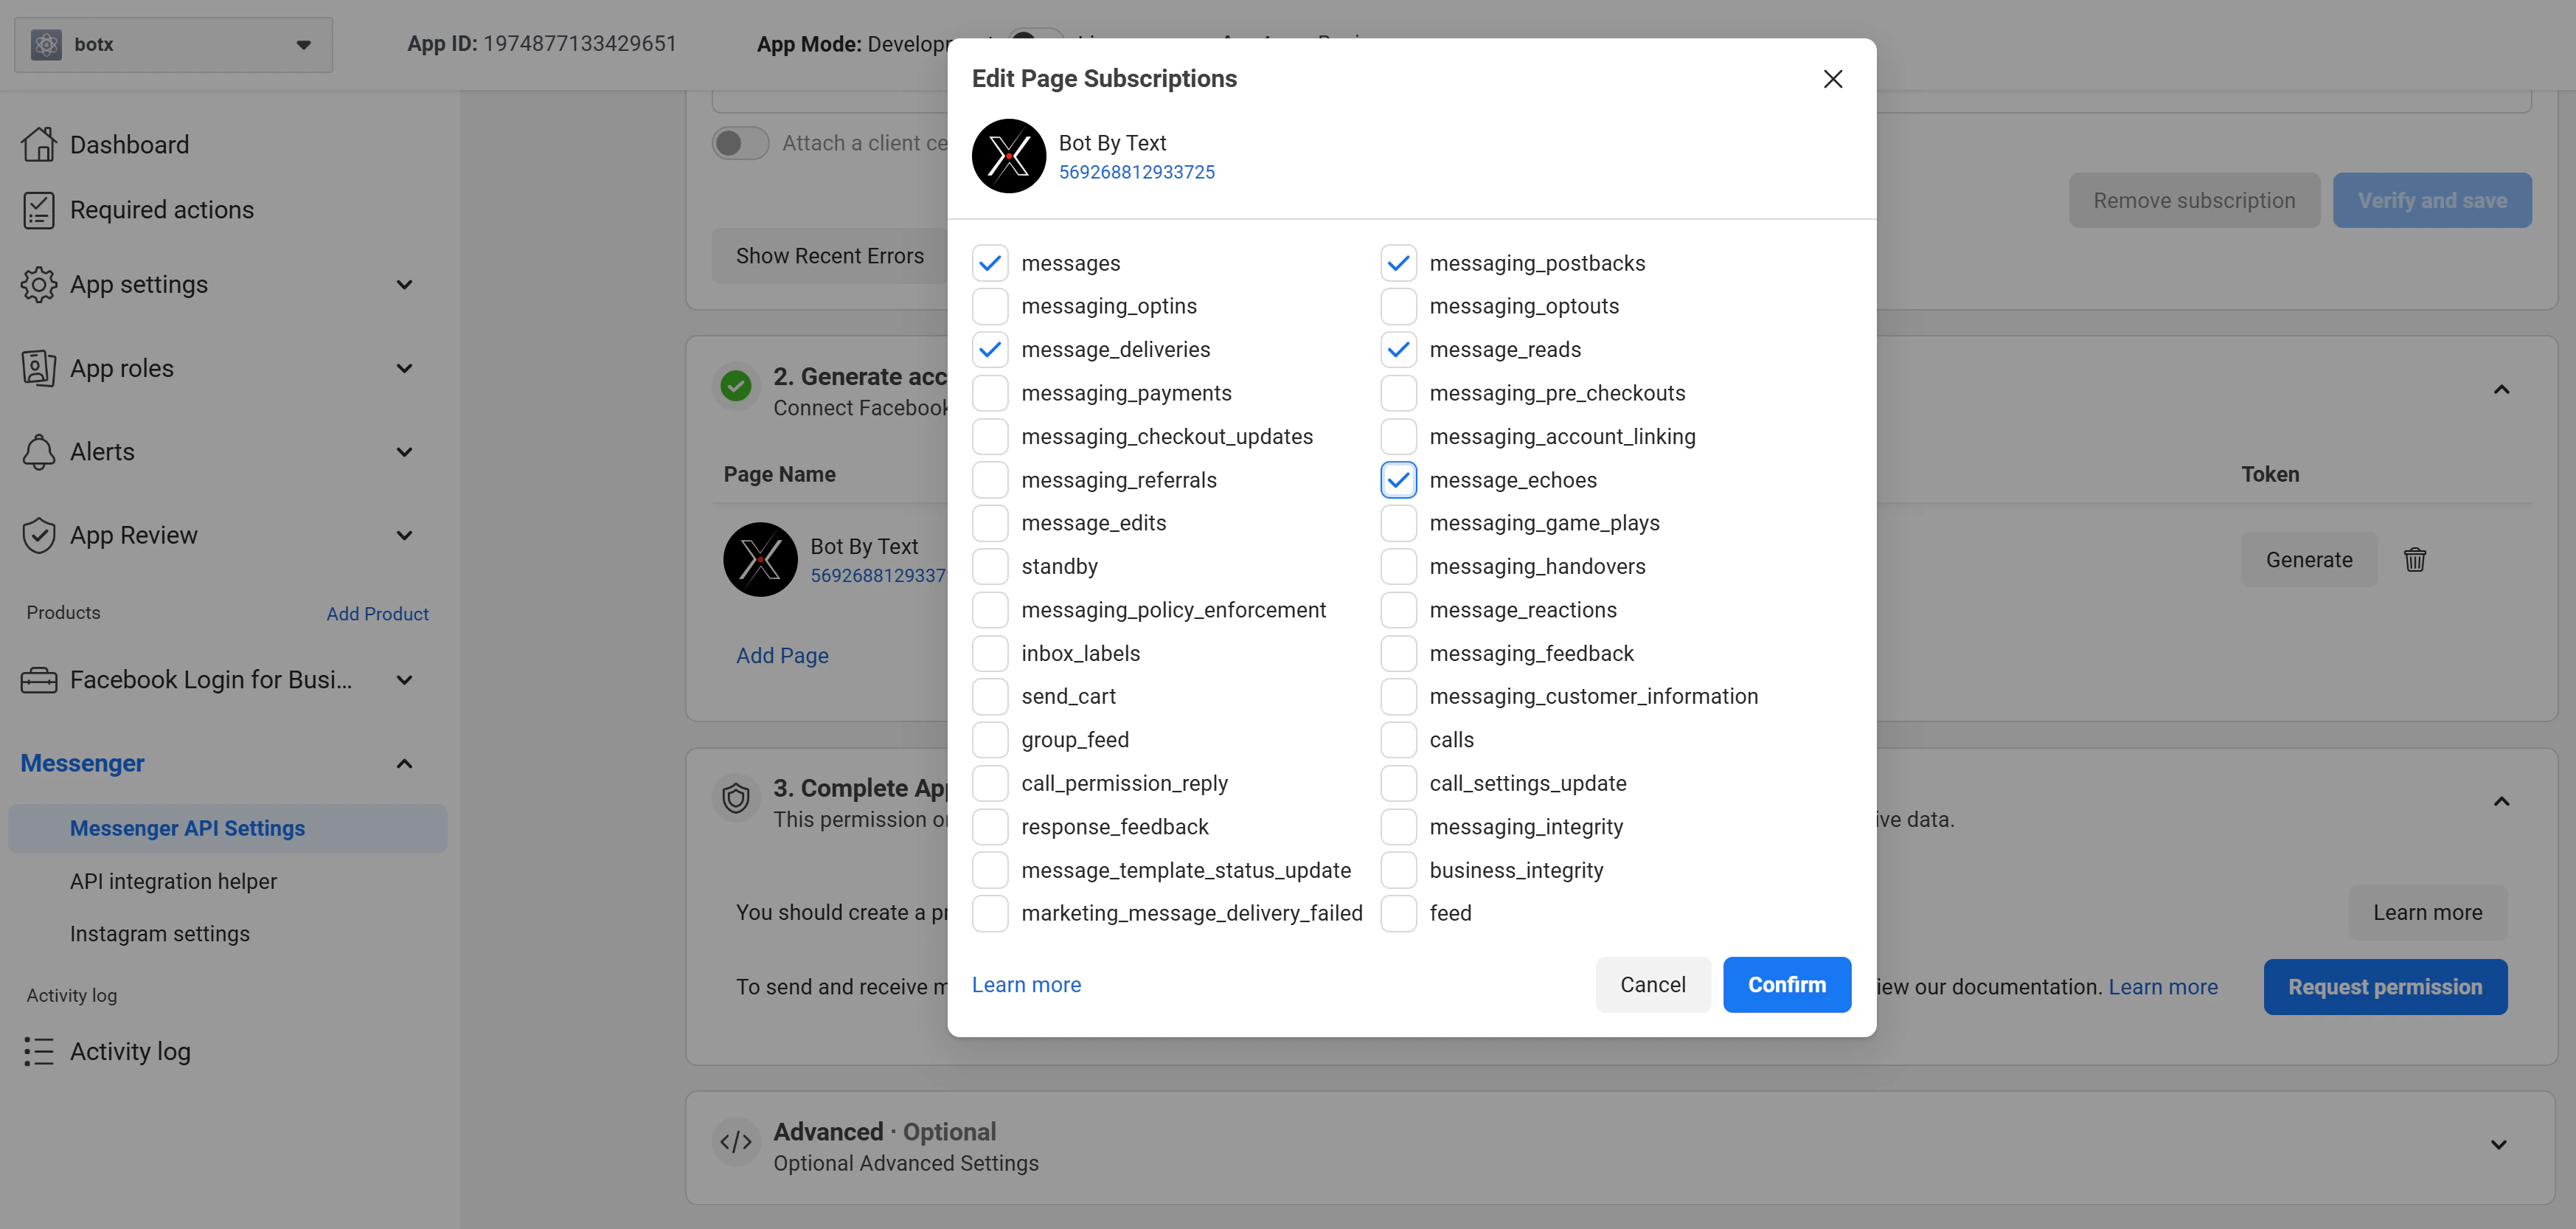
 On the connected page, click **Add subscriptions**.
 Subscribe to the following fields and save:
```text theme={null}
messages
messaging_postbacks
message_reads
message_echoes
messaging_optins
messaging_feedback
messaging_referrals
```
Subscribe to the following fields and save:
```text theme={null}
messages
messaging_postbacks
message_reads
message_echoes
messaging_optins
messaging_feedback
messaging_referrals
```
 Send a test message to your page from a personal Facebook account (which has Admin/Tester role in the app). It should appear in your portal.
## Going to Production
Before your app can receive messages from real users, Meta must review and approve it.
Follow the [Facebook App Review](https://developers.facebook.com/docs/apps/review/) process to get your app verified.
Request **advanced access** to the permissions below:
**Required permissions**
| Permission | Purpose |
| :---------------------- | :--------------------------------------- |
| `pages_messaging` | Send messages on behalf of your Page |
| `pages_show_list` | List Pages available to connect |
| `pages_manage_metadata` | Subscribe webhooks on behalf of the Page |
**Optional permissions**
| Permission | Purpose |
| :------------------------ | :--------------------------------------------------- |
| `pages_user_gender` | Access a user's gender via the connected Page |
| `pages_user_locale` | Access a user's locale via the connected Page |
| `pages_user_timezone` | Access a user's timezone via the connected Page |
| `pages_utility_messaging` | Send utility messages and manage messaging templates |
## API Version
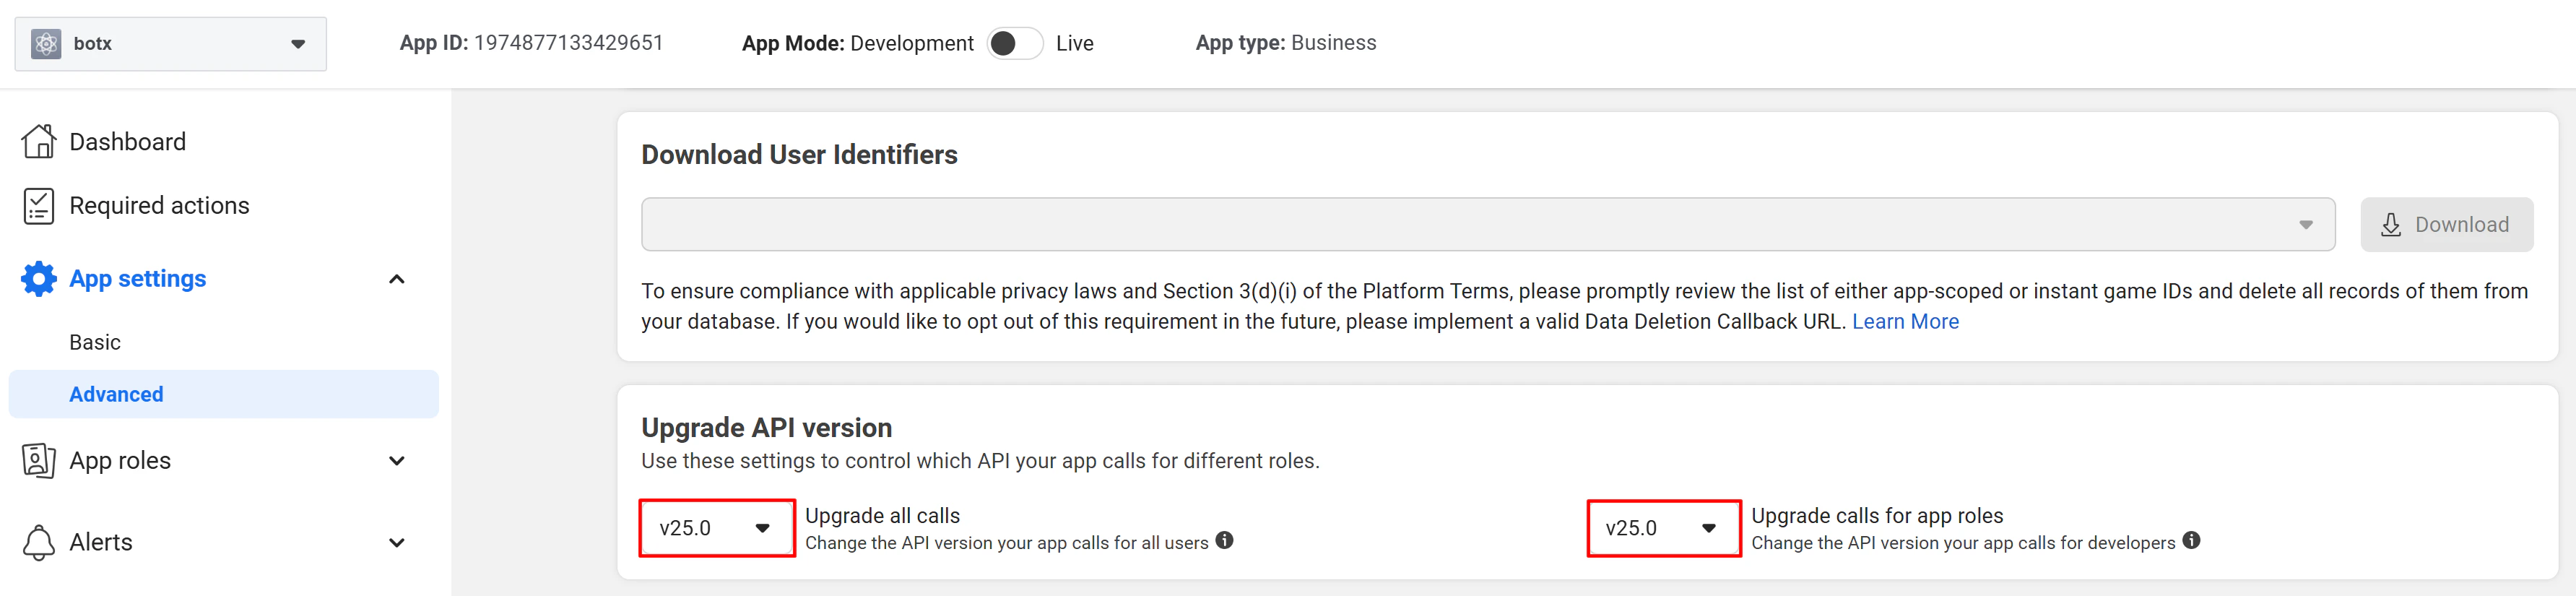
The system supports **Facebook API v25.0**. Make sure your app is configured to use this version.
* Update the API version under **Settings → Advanced** in your Facebook app.
* Verify that your webhook subscription version is also set to **v25.0**.
Send a test message to your page from a personal Facebook account (which has Admin/Tester role in the app). It should appear in your portal.
## Going to Production
Before your app can receive messages from real users, Meta must review and approve it.
Follow the [Facebook App Review](https://developers.facebook.com/docs/apps/review/) process to get your app verified.
Request **advanced access** to the permissions below:
**Required permissions**
| Permission | Purpose |
| :---------------------- | :--------------------------------------- |
| `pages_messaging` | Send messages on behalf of your Page |
| `pages_show_list` | List Pages available to connect |
| `pages_manage_metadata` | Subscribe webhooks on behalf of the Page |
**Optional permissions**
| Permission | Purpose |
| :------------------------ | :--------------------------------------------------- |
| `pages_user_gender` | Access a user's gender via the connected Page |
| `pages_user_locale` | Access a user's locale via the connected Page |
| `pages_user_timezone` | Access a user's timezone via the connected Page |
| `pages_utility_messaging` | Send utility messages and manage messaging templates |
## API Version
The system supports **Facebook API v25.0**. Make sure your app is configured to use this version.
* Update the API version under **Settings → Advanced** in your Facebook app.
* Verify that your webhook subscription version is also set to **v25.0**.
 ## User Connection Guide
After completing the app configuration on the Meta Developer Portal and entering the Credentials in the Admin Portal, your customers can connect their Facebook Pages.
For step-by-step instructions, see the [Facebook Messenger Connection Guide](/channels/messenger/connect-facebook-messenger).
## User Connection Guide
After completing the app configuration on the Meta Developer Portal and entering the Credentials in the Admin Portal, your customers can connect their Facebook Pages.
For step-by-step instructions, see the [Facebook Messenger Connection Guide](/channels/messenger/connect-facebook-messenger).