> ## Documentation Index
> Fetch the complete documentation index at: https://chatbotx.io/docs/llms.txt
> Use this file to discover all available pages before exploring further.
# Plans + Top-up packs
> Learn how to create Plans, set Bot message limits, and sell Top-up packs through Stripe in ChatbotX White Label.
**Plans** let you create service packages to sell or assign to White Label customers. Each Plan defines the available resources, Bot message allowance, and pricing.
**Top-up packs** let customers purchase additional bot-message credits when their Plan allowance runs low. You manage Plans and Top-up packs from the **SaaS** section in the left sidebar.
## Public pricing page
ChatbotX creates a public pricing page from Plans that have both **Public** and **Active** enabled. The URL usually follows this format: `https://[your-domain]/portal/pricing`.
* **Copy URL**: Copy the pricing page URL to share with customers or add to your website.
* **View pricing page**: Open the page and review what customers see.
The **Upgrade plan** button in a customer account also opens this page.
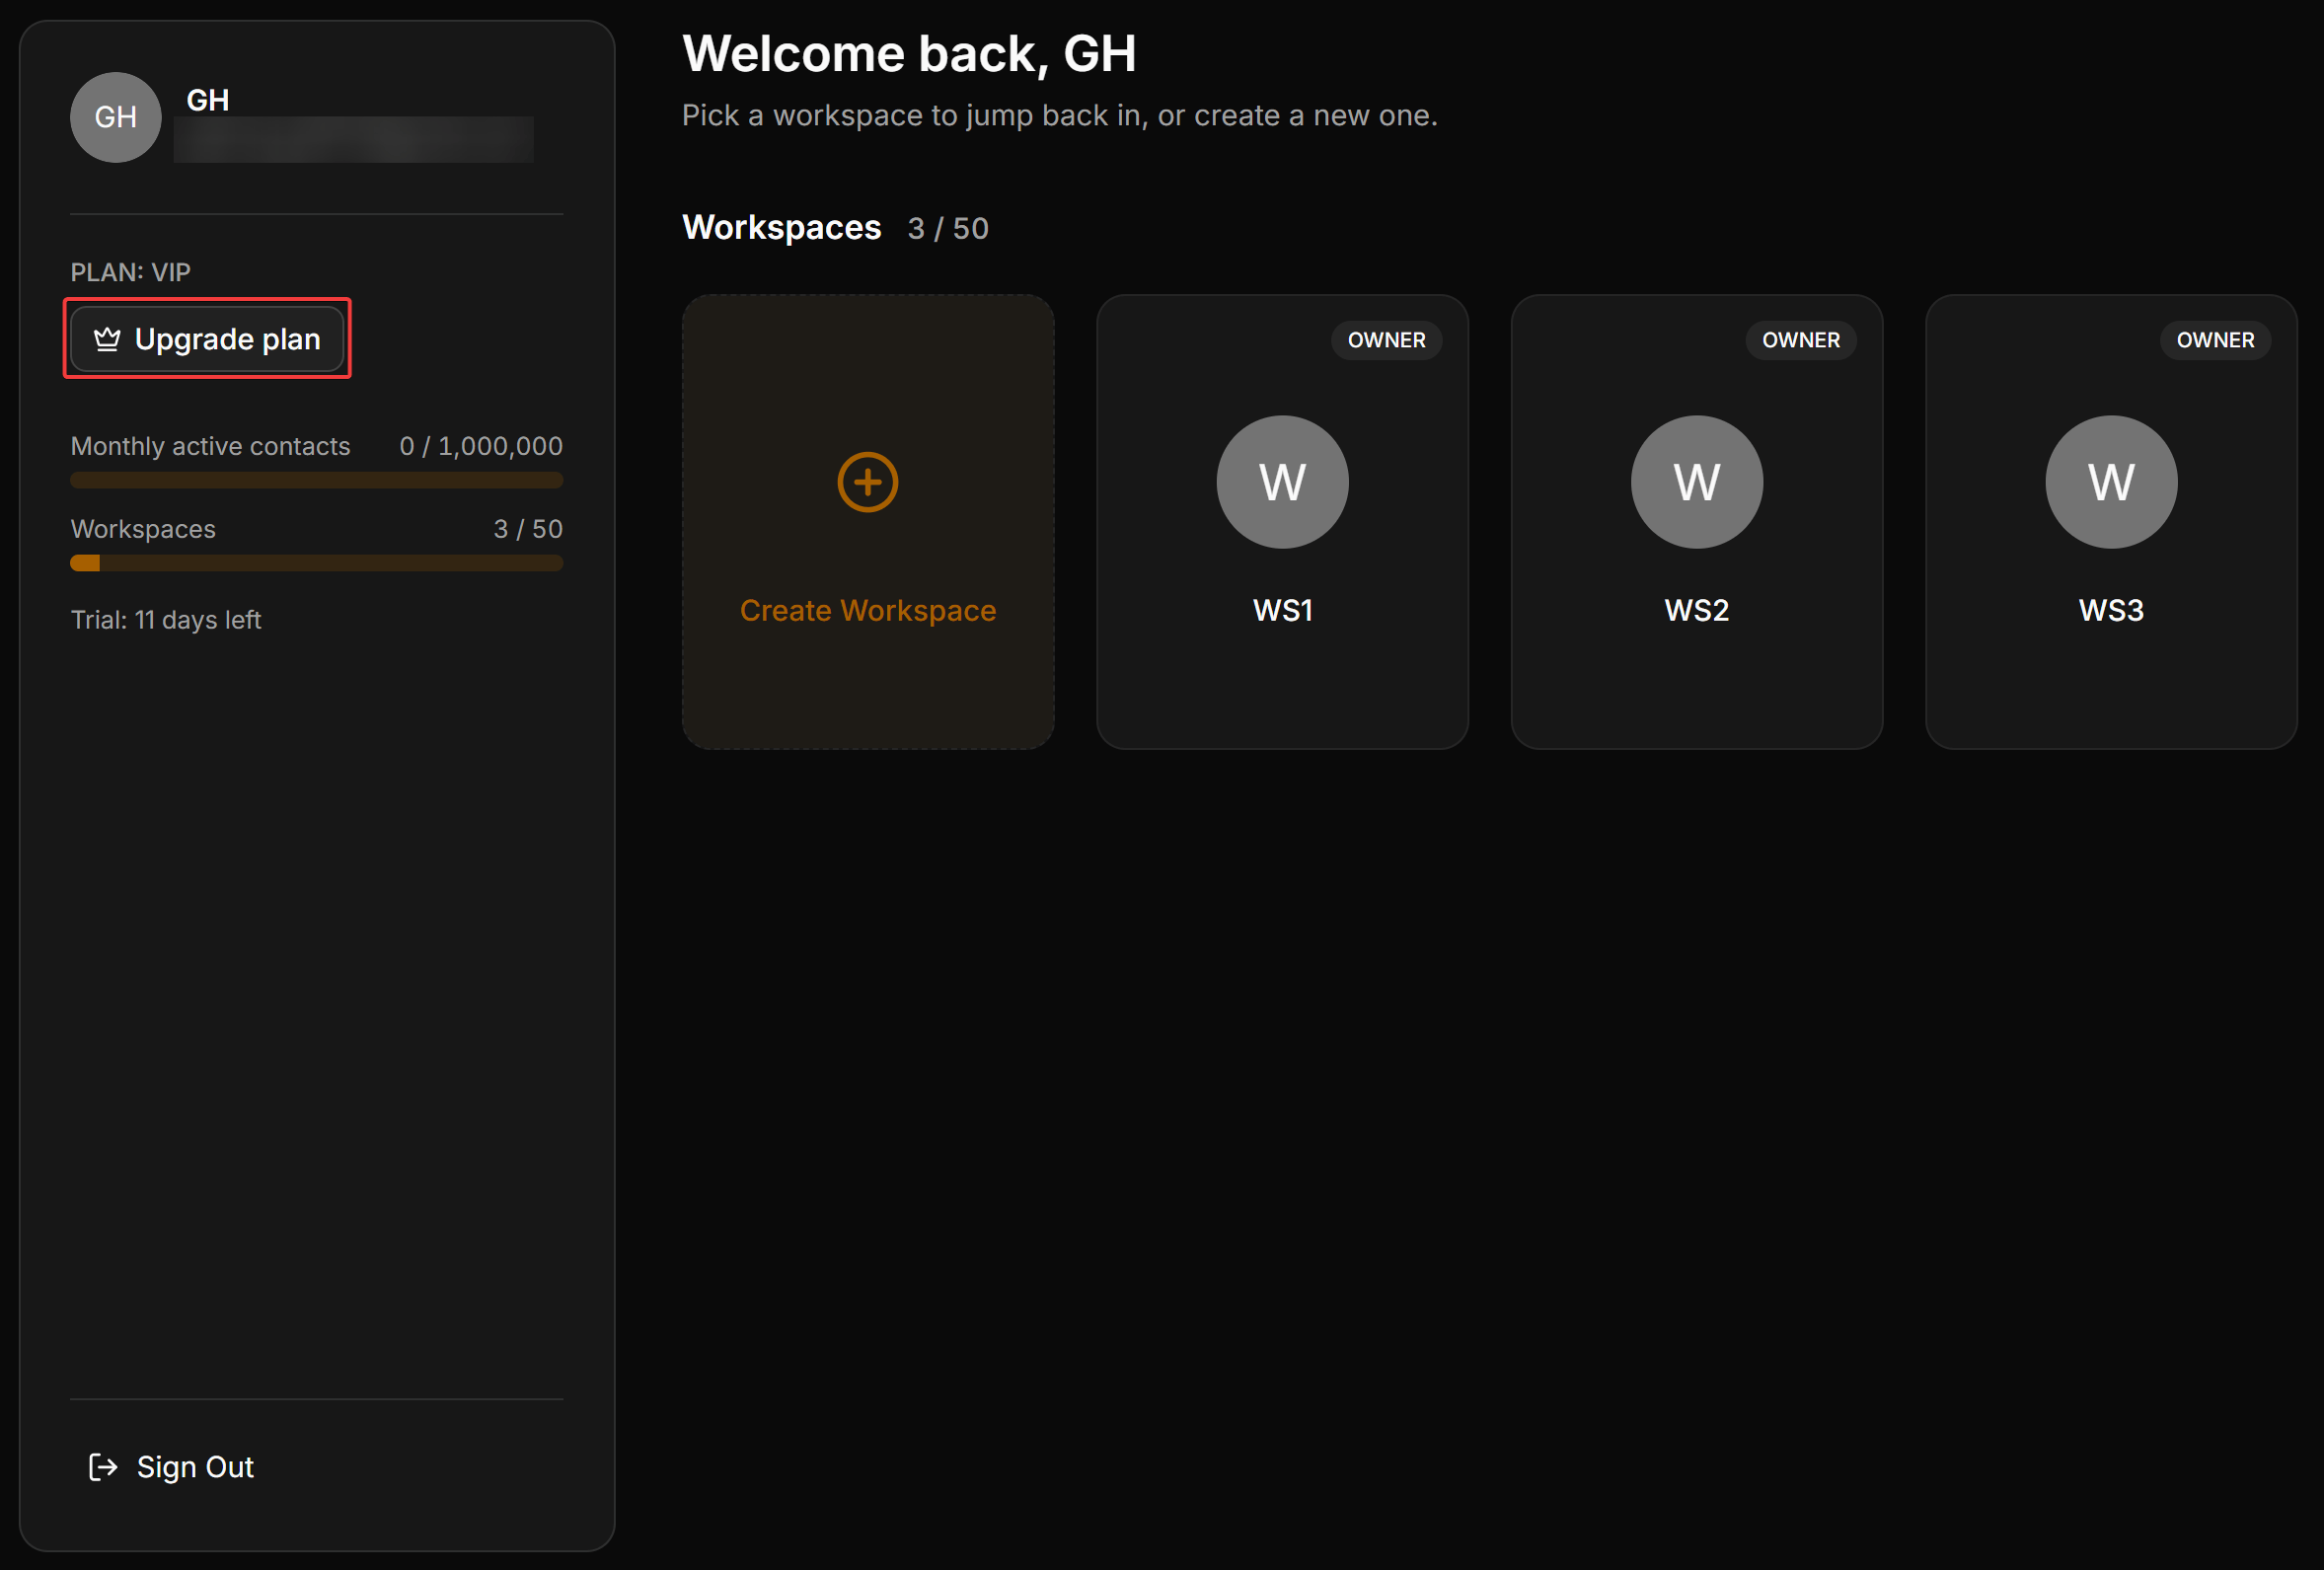 Customers can purchase only Plans that are public and active. An administrator can still assign a hidden Plan manually.
## Manage the Plan list
Each row represents a Plan and its current status. Select the three-dot menu `...` to open the available actions.
Customers can purchase only Plans that are public and active. An administrator can still assign a hidden Plan manually.
## Manage the Plan list
Each row represents a Plan and its current status. Select the three-dot menu `...` to open the available actions.
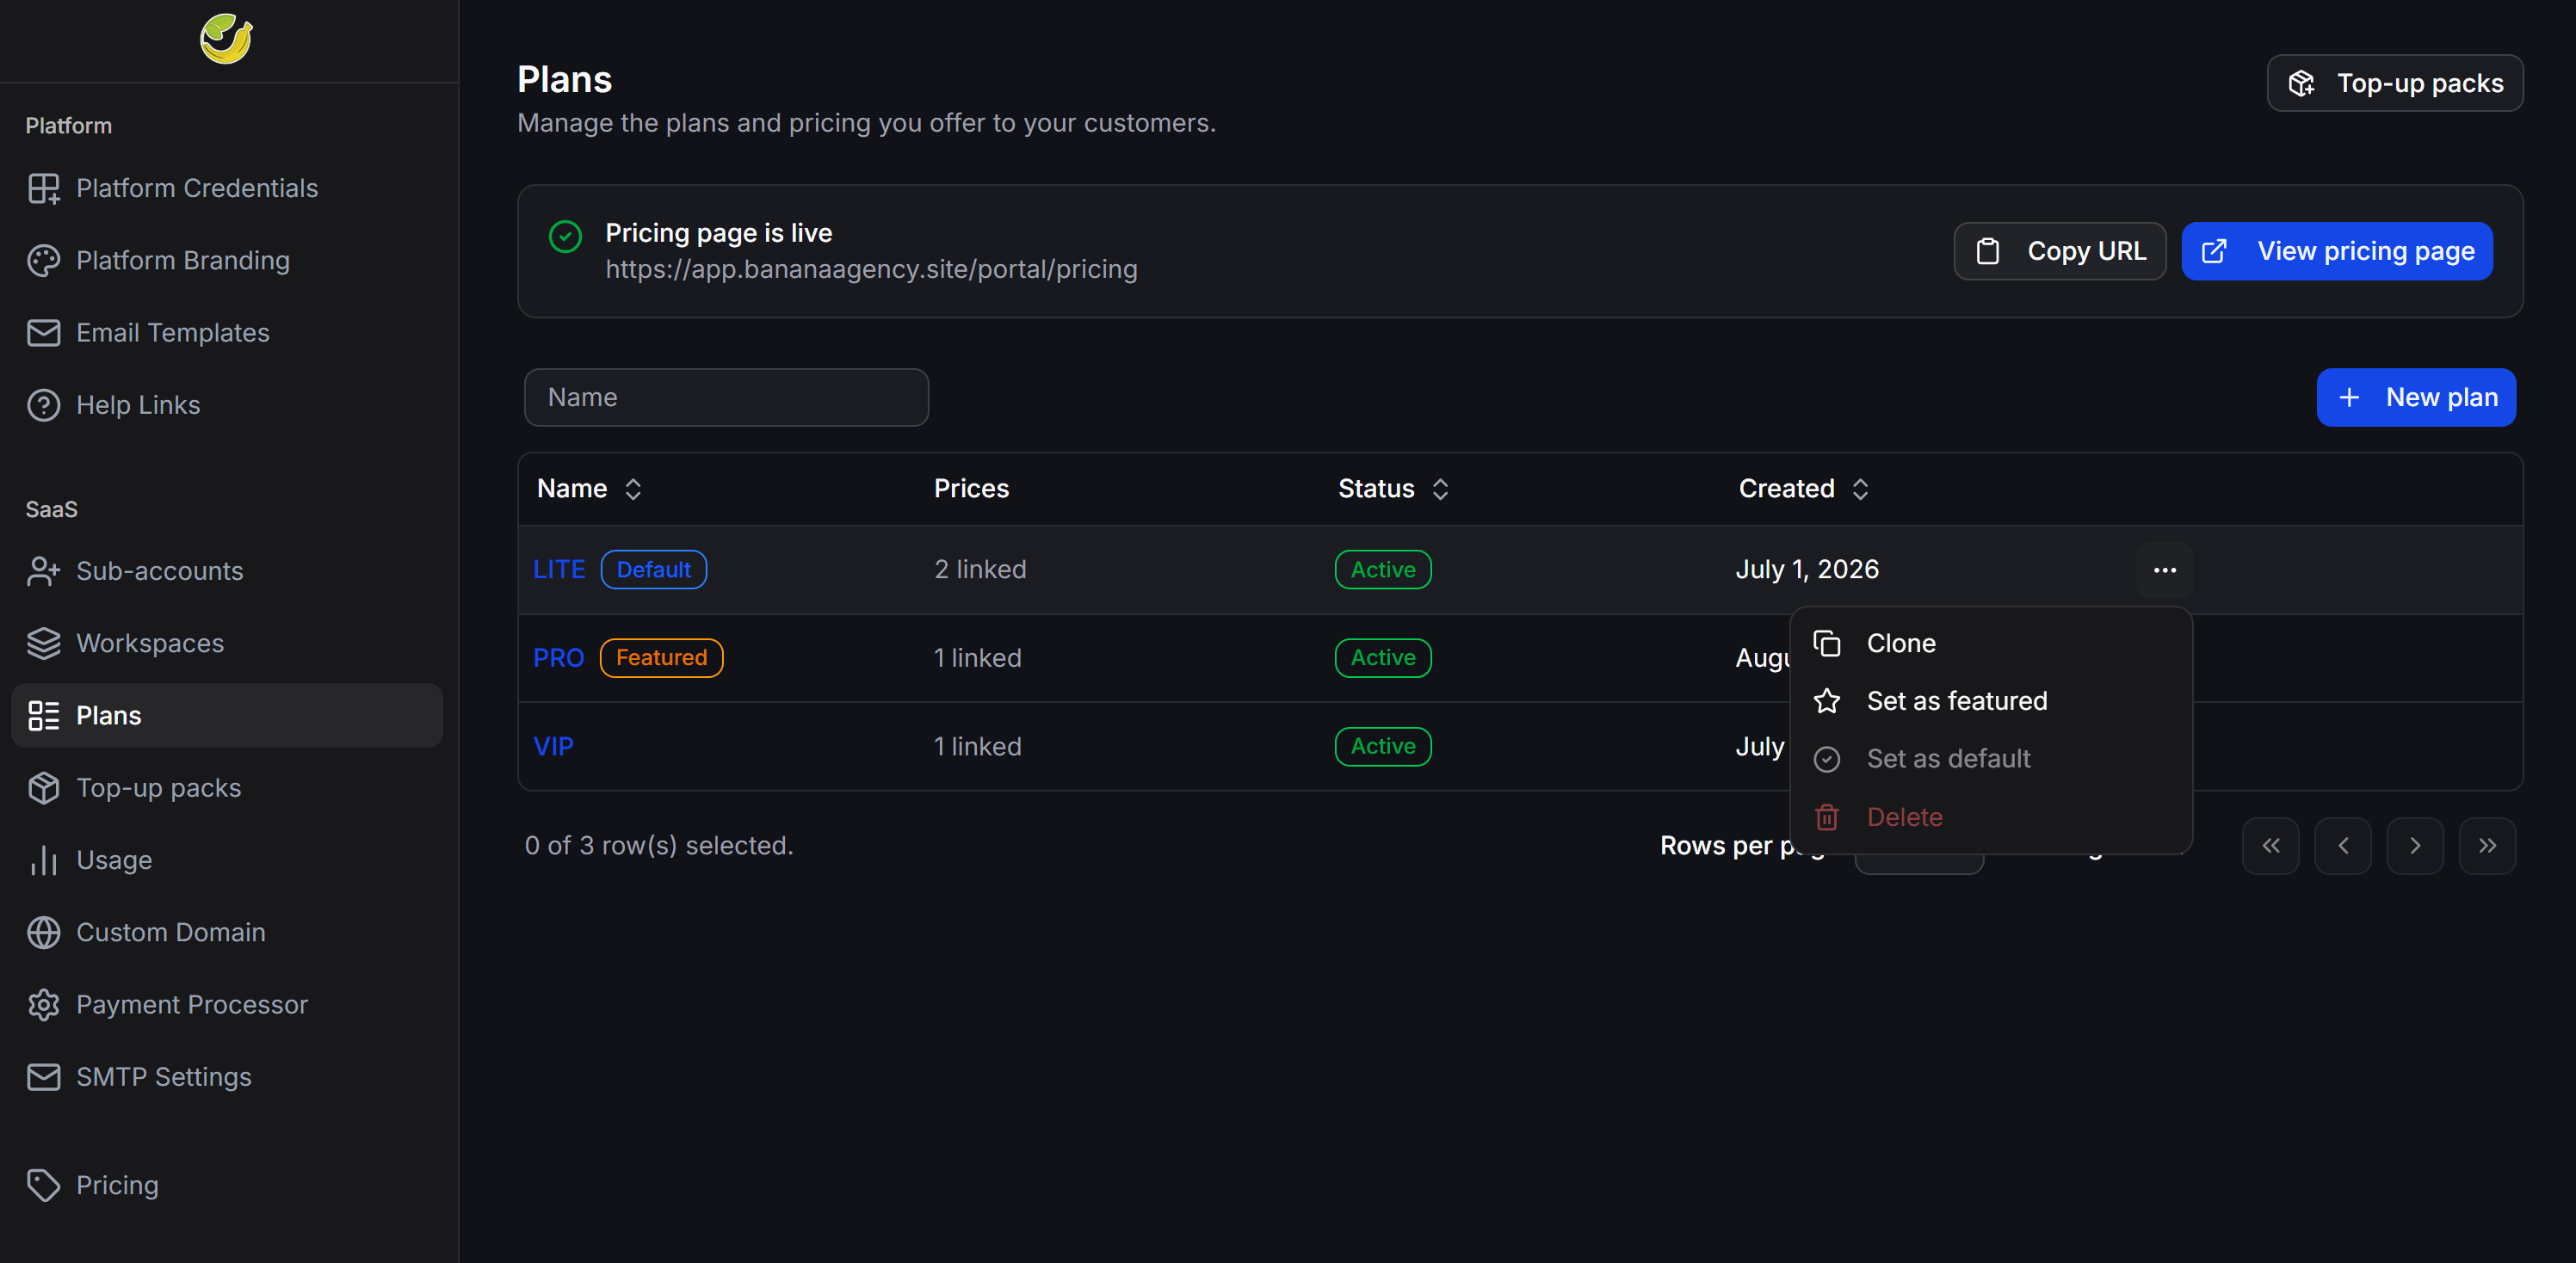 * **Clone**: Create a new Plan from the current configuration.
* **Set as featured**: Highlight the Plan. The public pricing page displays it with the **Most Popular** label.
* **Set as default**: Use the Plan as the default package for new accounts.
* **Delete**: Remove the Plan from the list of available options.
Before deleting a Plan, identify the customers using it and prepare a migration option if needed.
### Top-up packs
**Top-up packs** are additional bot-message credit packages sold on top of a Plan allowance. Each pack uses a one-time Stripe Price.
On the **Plans** page, select **Top-up packs** in the upper-right corner. You can also select **SaaS > Top-up packs** from the left sidebar.
* **Clone**: Create a new Plan from the current configuration.
* **Set as featured**: Highlight the Plan. The public pricing page displays it with the **Most Popular** label.
* **Set as default**: Use the Plan as the default package for new accounts.
* **Delete**: Remove the Plan from the list of available options.
Before deleting a Plan, identify the customers using it and prepare a migration option if needed.
### Top-up packs
**Top-up packs** are additional bot-message credit packages sold on top of a Plan allowance. Each pack uses a one-time Stripe Price.
On the **Plans** page, select **Top-up packs** in the upper-right corner. You can also select **SaaS > Top-up packs** from the left sidebar.
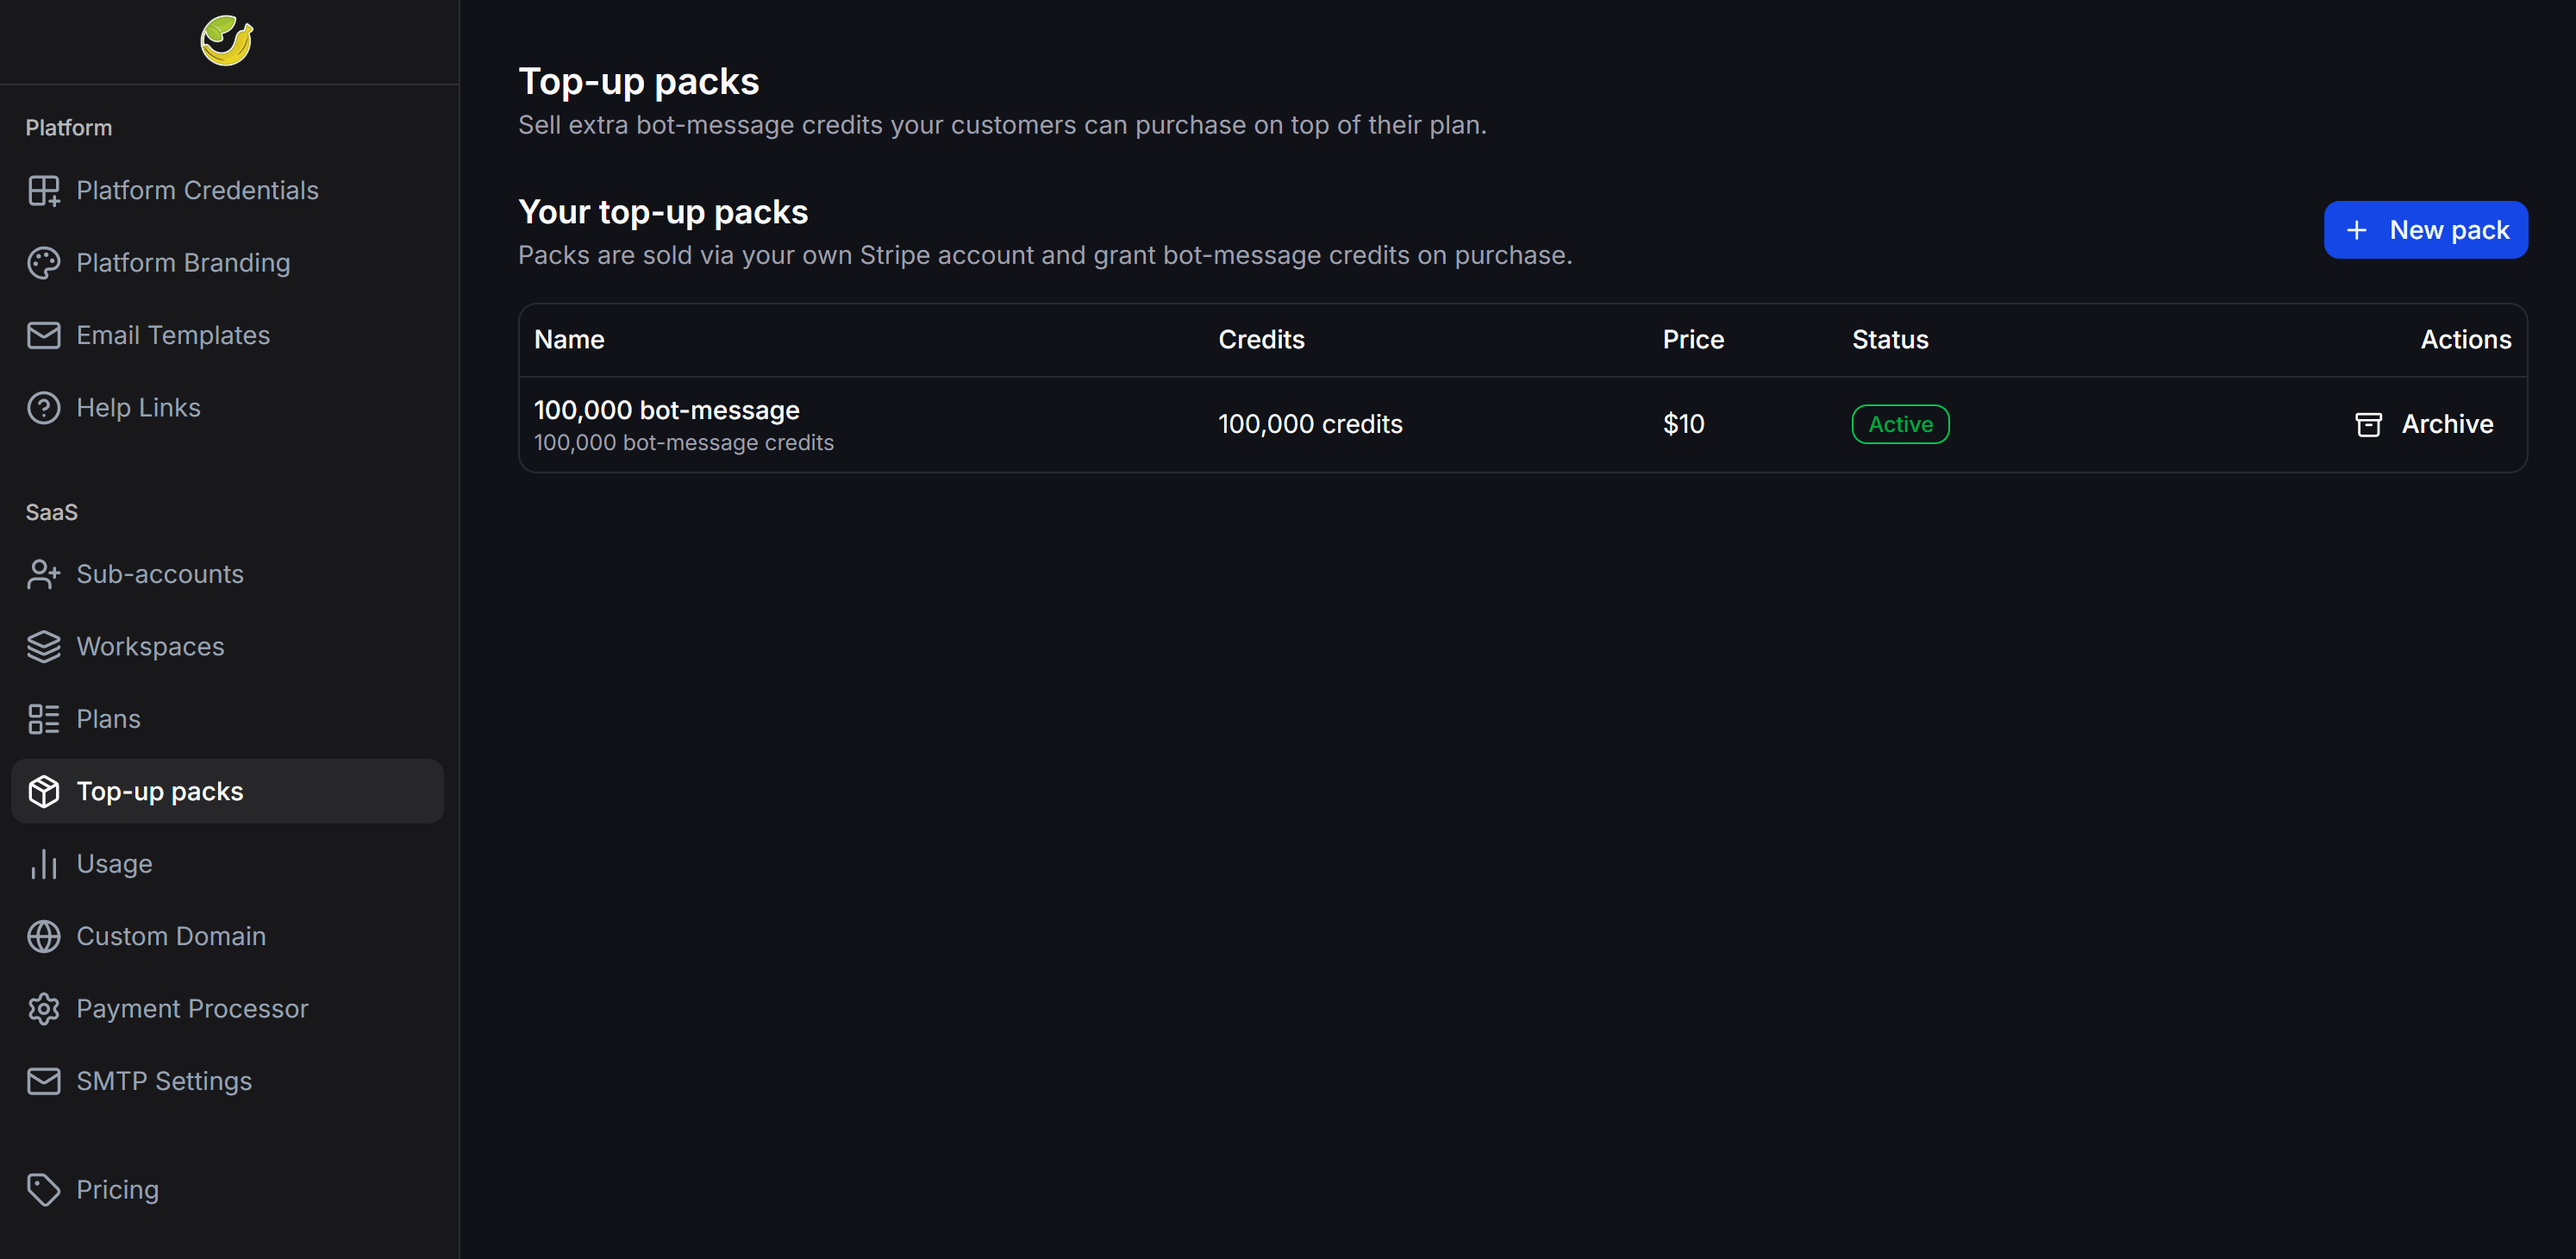 The **Top-up packs** page displays each pack's name, credits, price, status, and available actions.
* **Credits**: The number of bot-message credits granted per purchase.
* **Price**: The amount from the linked Stripe Price.
* **Status**: The pack's current status.
* **Archive**: Archive a pack when you no longer want to sell it.
#### Create a new Top-up pack
Connect your Stripe account and create a one-time Stripe Price before creating a pack.
On the **Top-up packs** page, select **+ New pack**.
Enter the name, description, credit quantity, Stripe price ID, and sort order.
The **Top-up packs** page displays each pack's name, credits, price, status, and available actions.
* **Credits**: The number of bot-message credits granted per purchase.
* **Price**: The amount from the linked Stripe Price.
* **Status**: The pack's current status.
* **Archive**: Archive a pack when you no longer want to sell it.
#### Create a new Top-up pack
Connect your Stripe account and create a one-time Stripe Price before creating a pack.
On the **Top-up packs** page, select **+ New pack**.
Enter the name, description, credit quantity, Stripe price ID, and sort order.
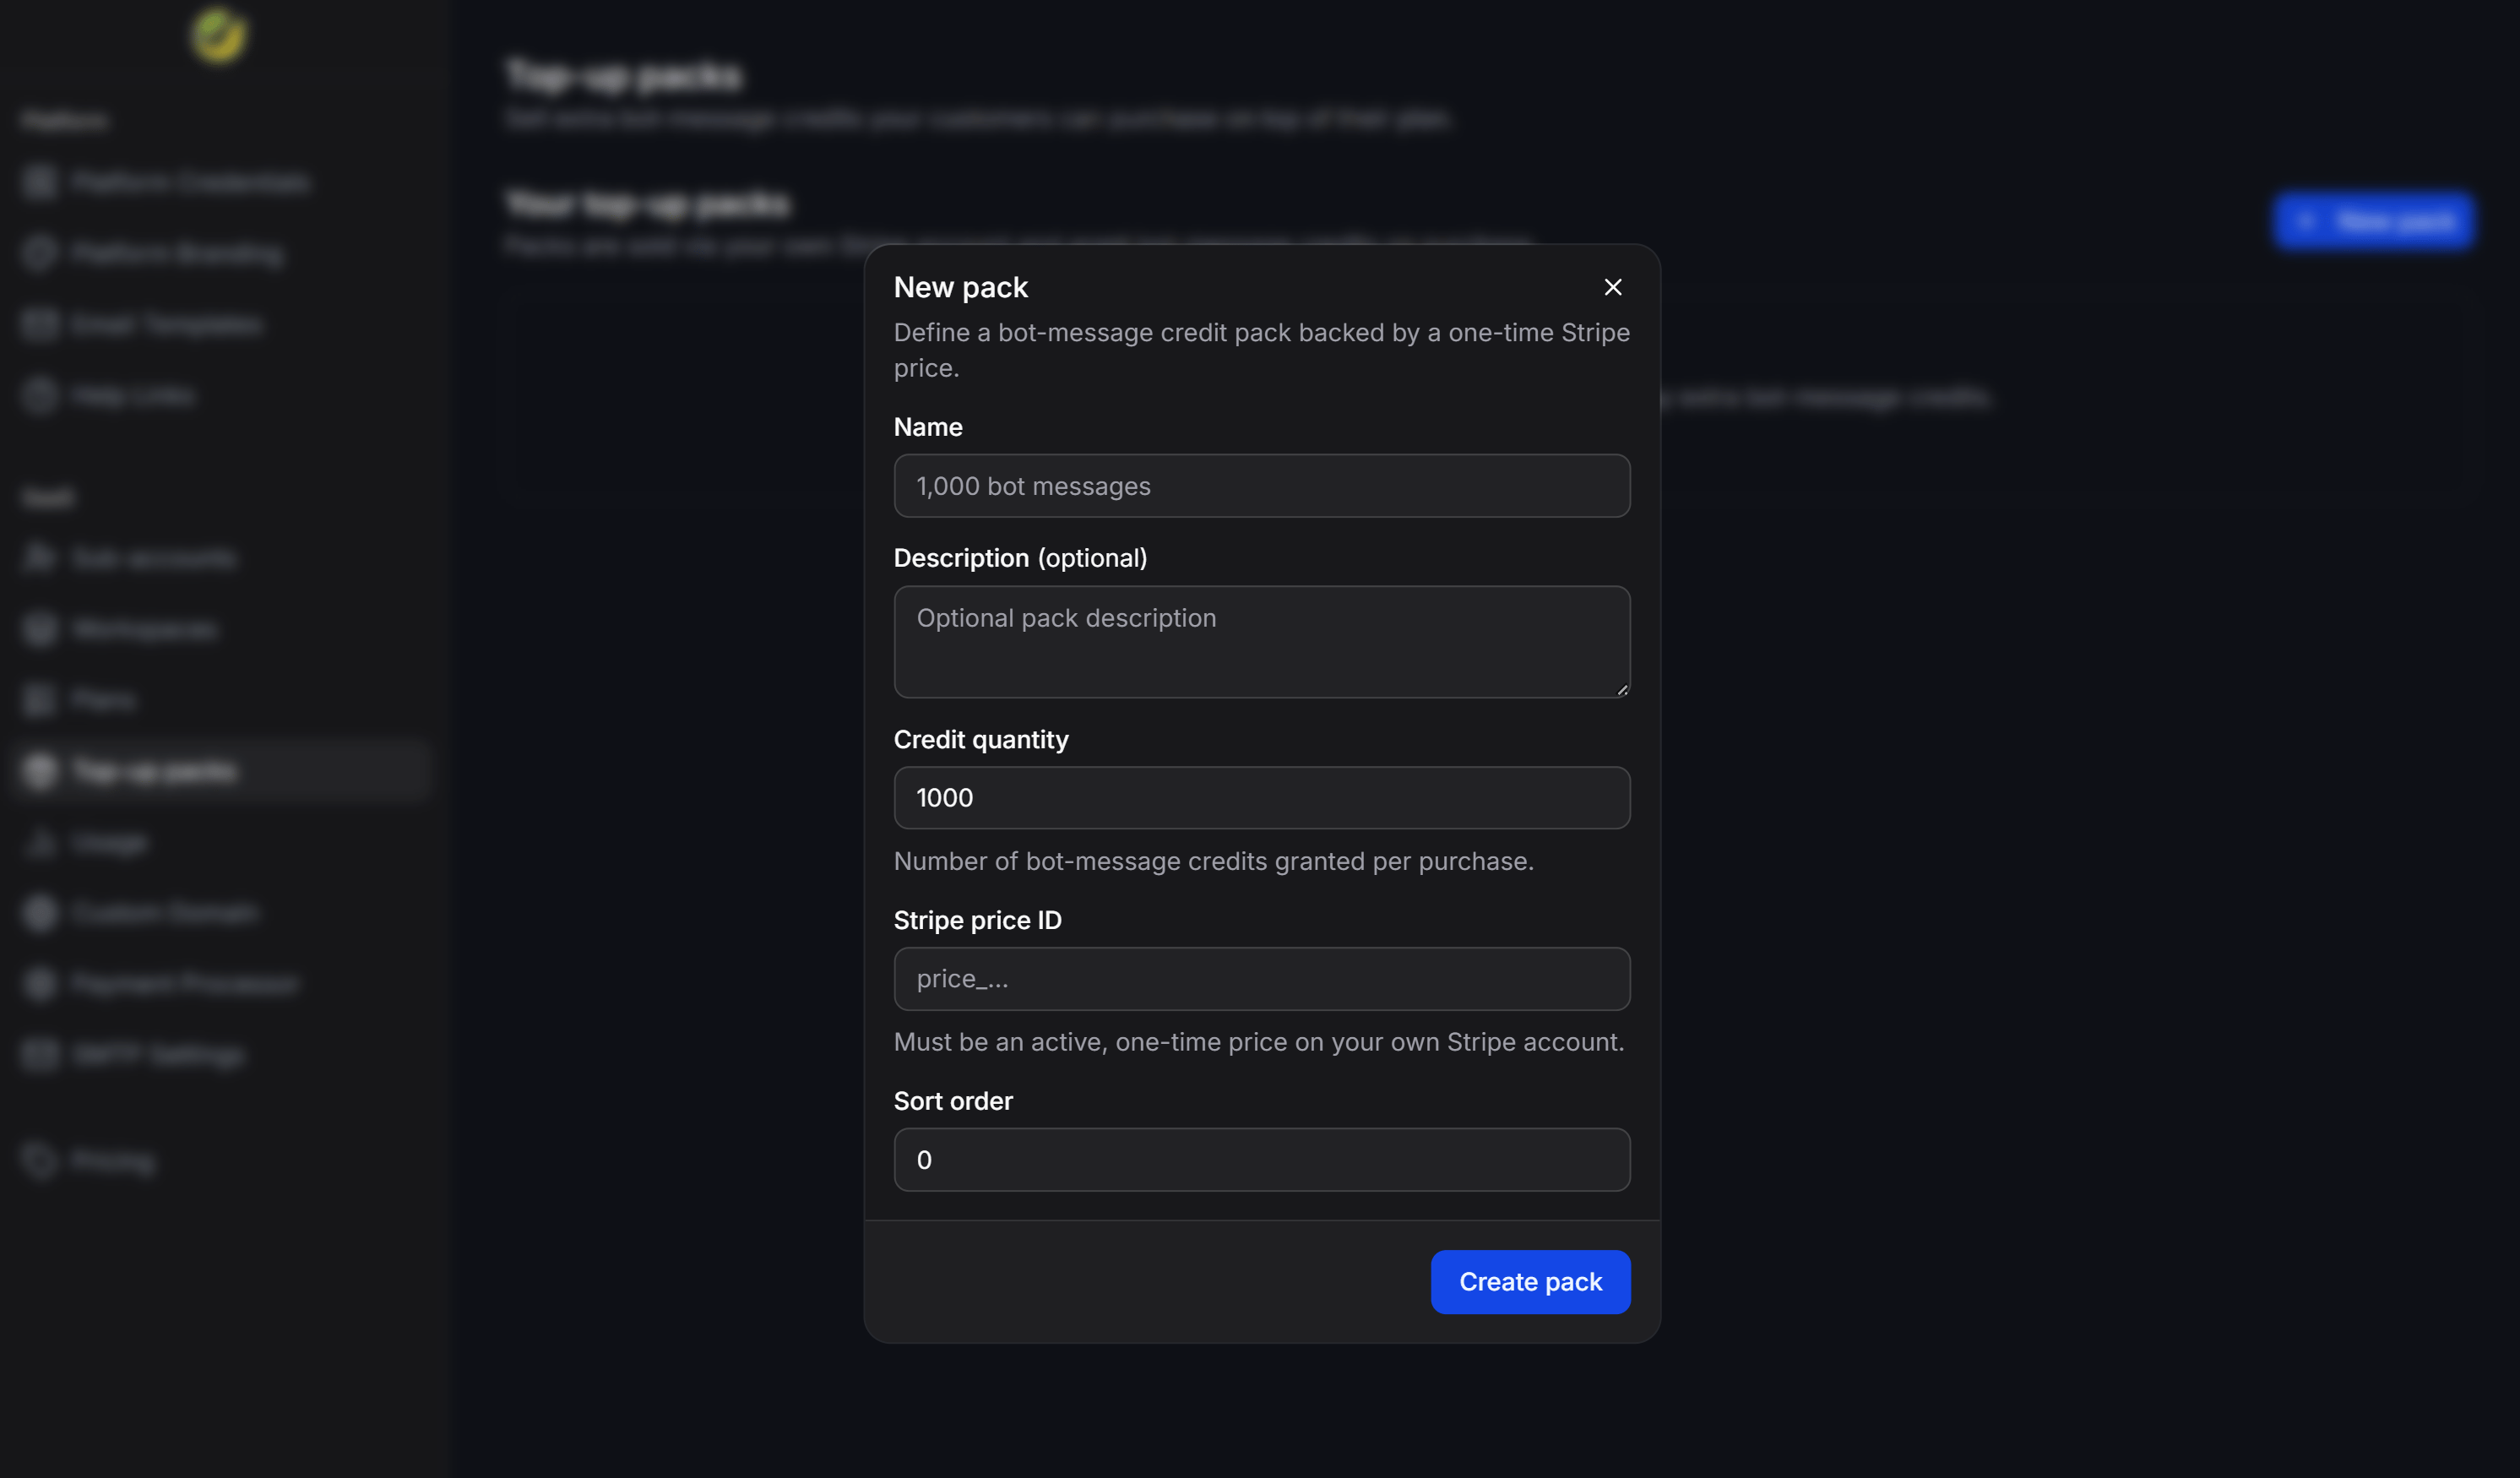 Review the details, then select **Create pack**.
| Field | How to configure it |
| -------------------------- | -------------------------------------------------------------------------------------------------------- |
| **Name** | Enter the customer-facing pack name, such as `100,000 bot-message`. |
| **Description (optional)** | Briefly describe the credit amount or intended use. |
| **Credit quantity** | Enter the number of bot-message credits granted after each purchase. |
| **Stripe price ID** | Enter the `price_` ID of an active, one-time Stripe Price. The Price must belong to your Stripe account. |
| **Sort order** | Enter the number used to order the pack when displayed. |
Do not use a recurring Stripe Price for a Top-up pack. **Stripe price ID** accepts only an active, one-time Price.
#### Let customers purchase a Top-up pack
Customers open **Billing** and find **Bot-message top-ups**. They select a pack and then select **Buy** to pay through Stripe.
Review the details, then select **Create pack**.
| Field | How to configure it |
| -------------------------- | -------------------------------------------------------------------------------------------------------- |
| **Name** | Enter the customer-facing pack name, such as `100,000 bot-message`. |
| **Description (optional)** | Briefly describe the credit amount or intended use. |
| **Credit quantity** | Enter the number of bot-message credits granted after each purchase. |
| **Stripe price ID** | Enter the `price_` ID of an active, one-time Stripe Price. The Price must belong to your Stripe account. |
| **Sort order** | Enter the number used to order the pack when displayed. |
Do not use a recurring Stripe Price for a Top-up pack. **Stripe price ID** accepts only an active, one-time Price.
#### Let customers purchase a Top-up pack
Customers open **Billing** and find **Bot-message top-ups**. They select a pack and then select **Buy** to pay through Stripe.
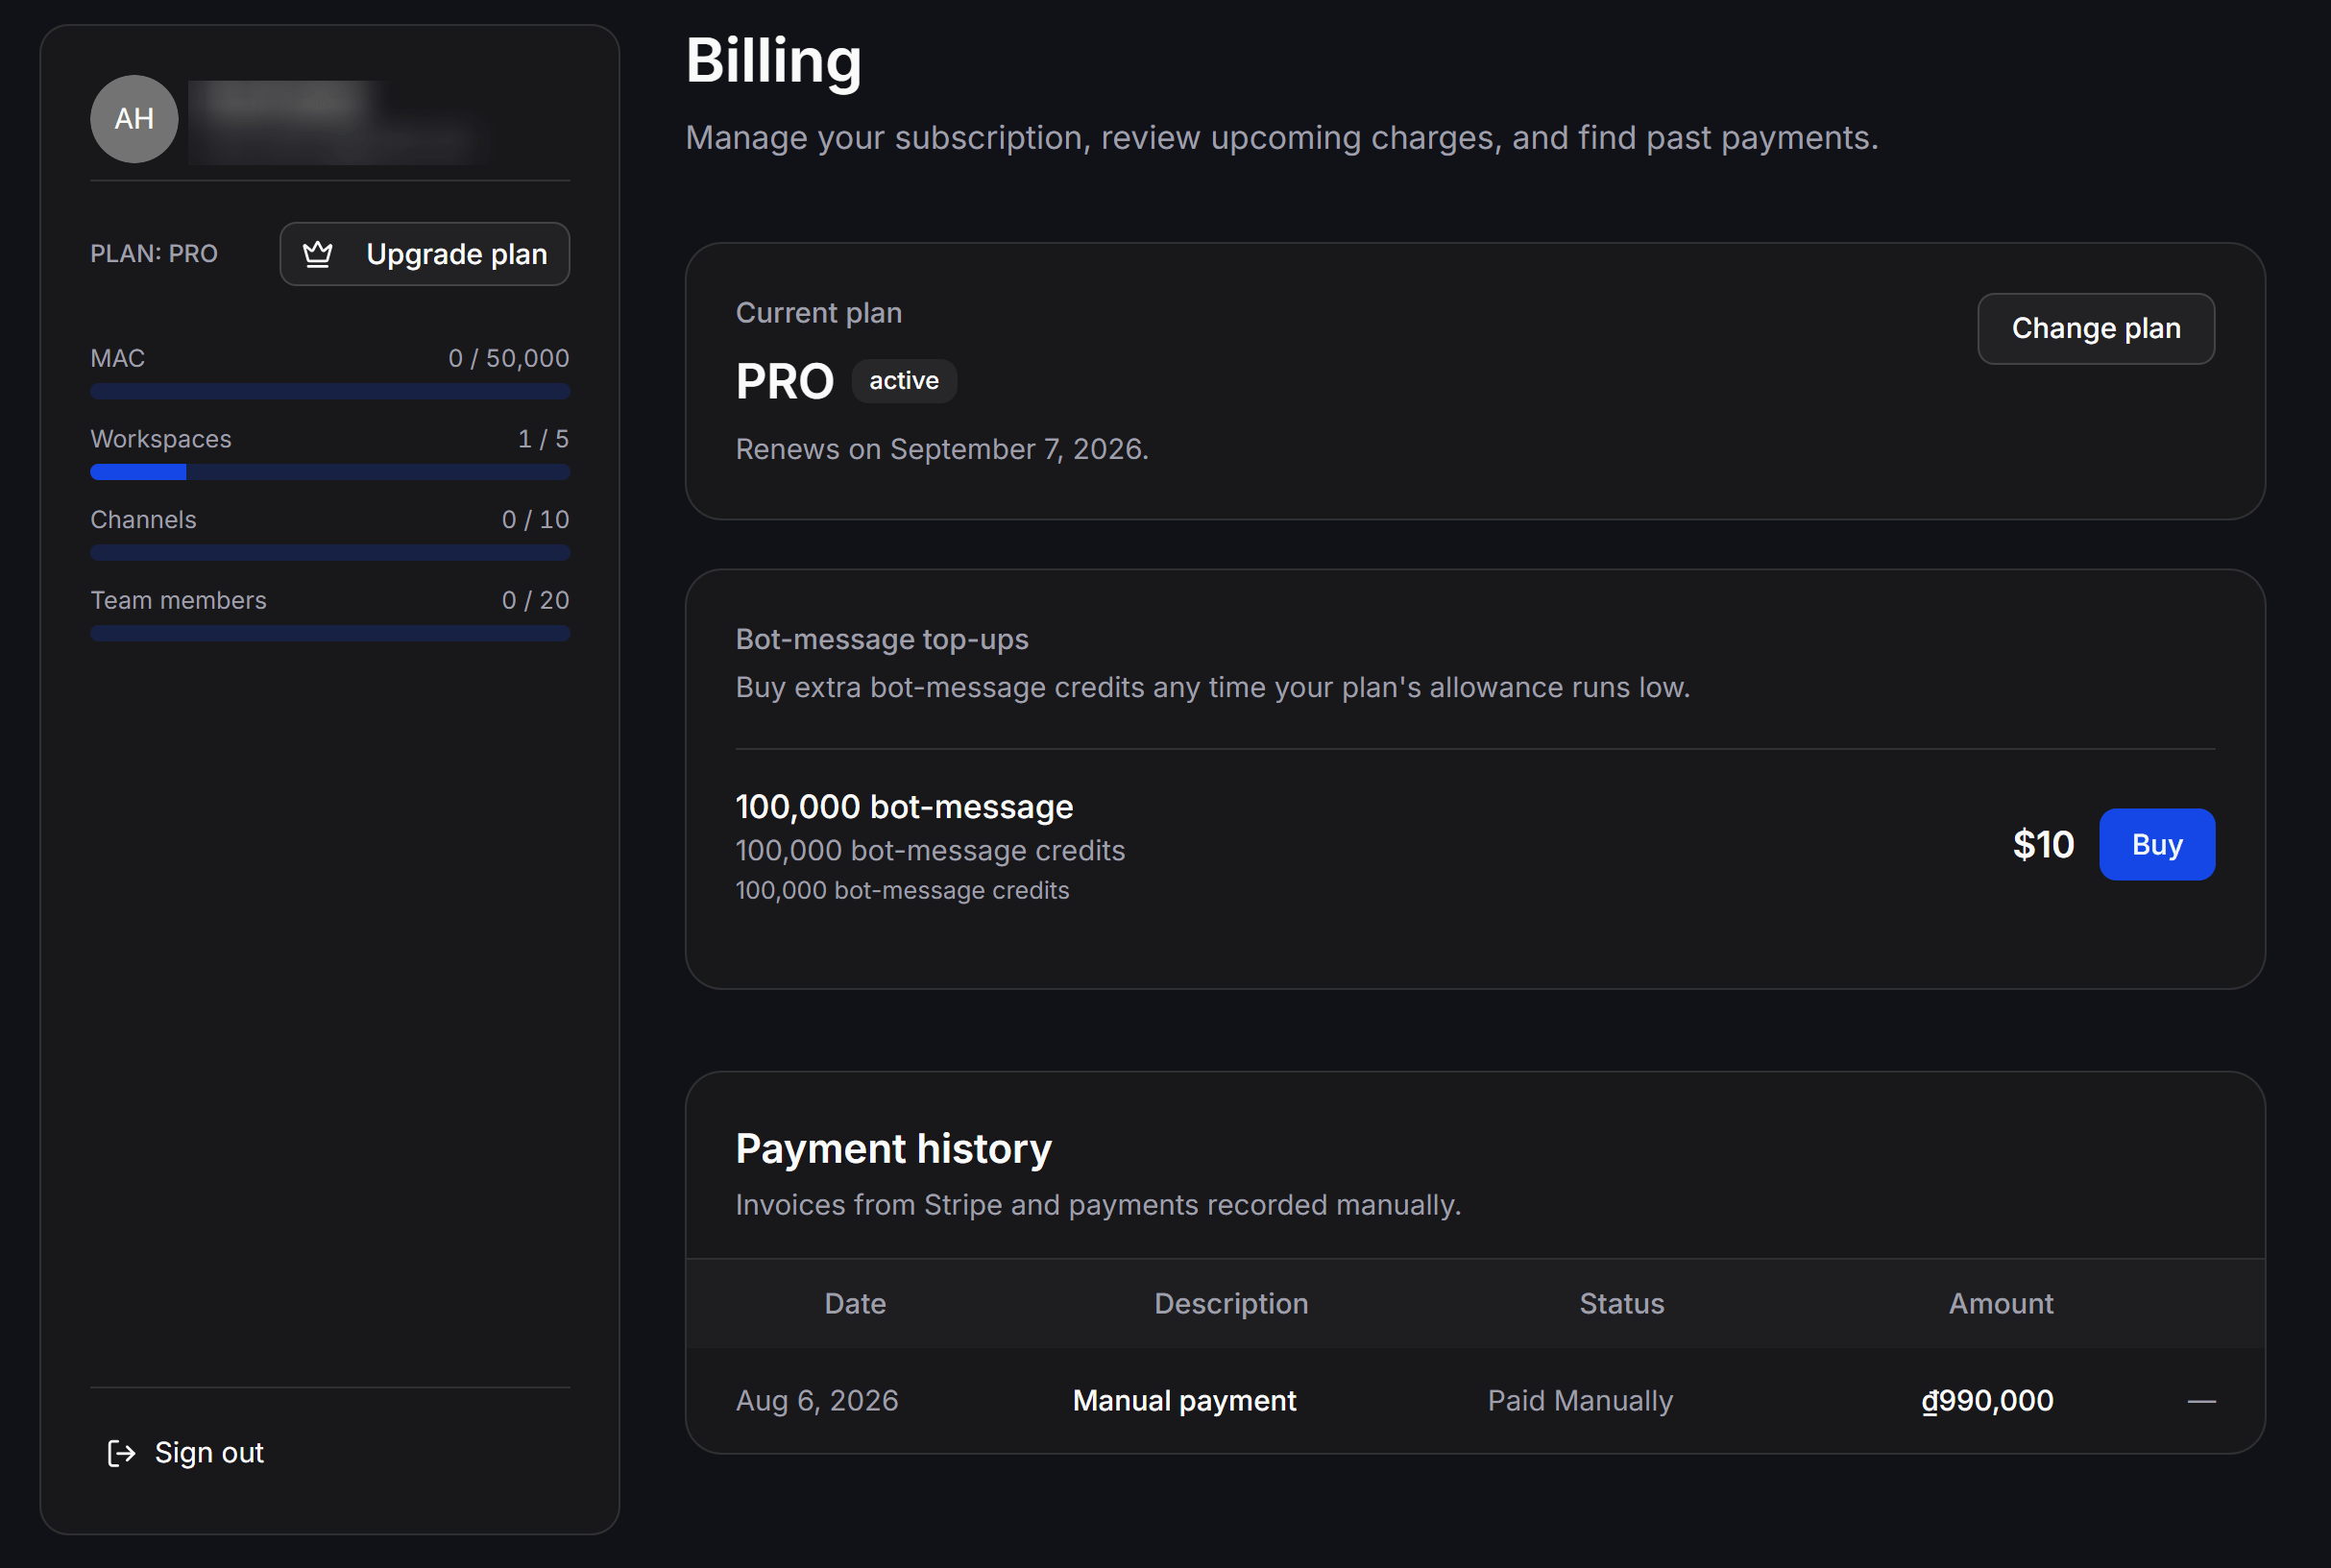 After the transaction completes, ChatbotX grants the number of bot-message credits configured in **Credit quantity**.
A Top-up pack adds only bot-message credits. It does not change the Plan's Workspaces, Channels, Team members, or Monthly active contacts limits.
## Create a new Plan
Create the Plan first. Then open the new Plan to add one or more prices.
Go to **SaaS > Plans** and select **+ New plan**.
Enter the name, description, free-trial period, and sort order. Then choose the **Public** and **Active** states for the Plan.
After the transaction completes, ChatbotX grants the number of bot-message credits configured in **Credit quantity**.
A Top-up pack adds only bot-message credits. It does not change the Plan's Workspaces, Channels, Team members, or Monthly active contacts limits.
## Create a new Plan
Create the Plan first. Then open the new Plan to add one or more prices.
Go to **SaaS > Plans** and select **+ New plan**.
Enter the name, description, free-trial period, and sort order. Then choose the **Public** and **Active** states for the Plan.
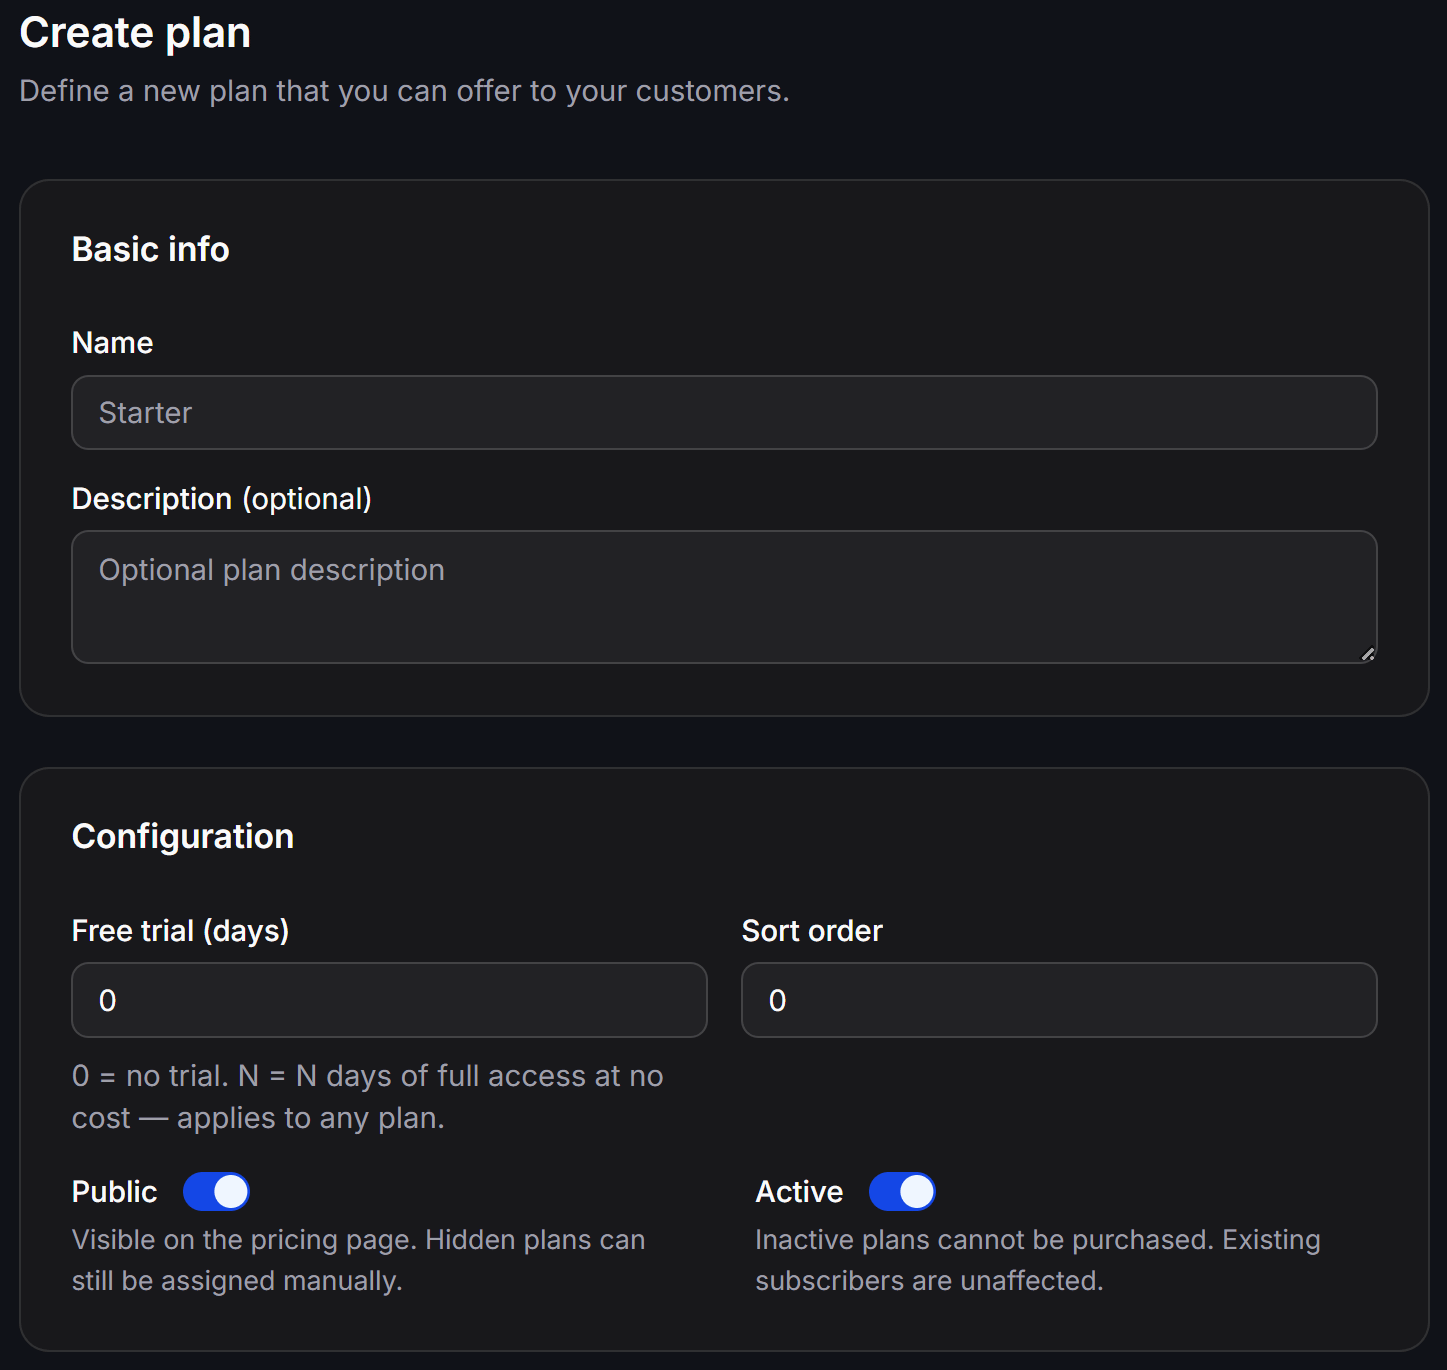 Continue by setting the resource limits, usage limits, and features displayed on the pricing page.
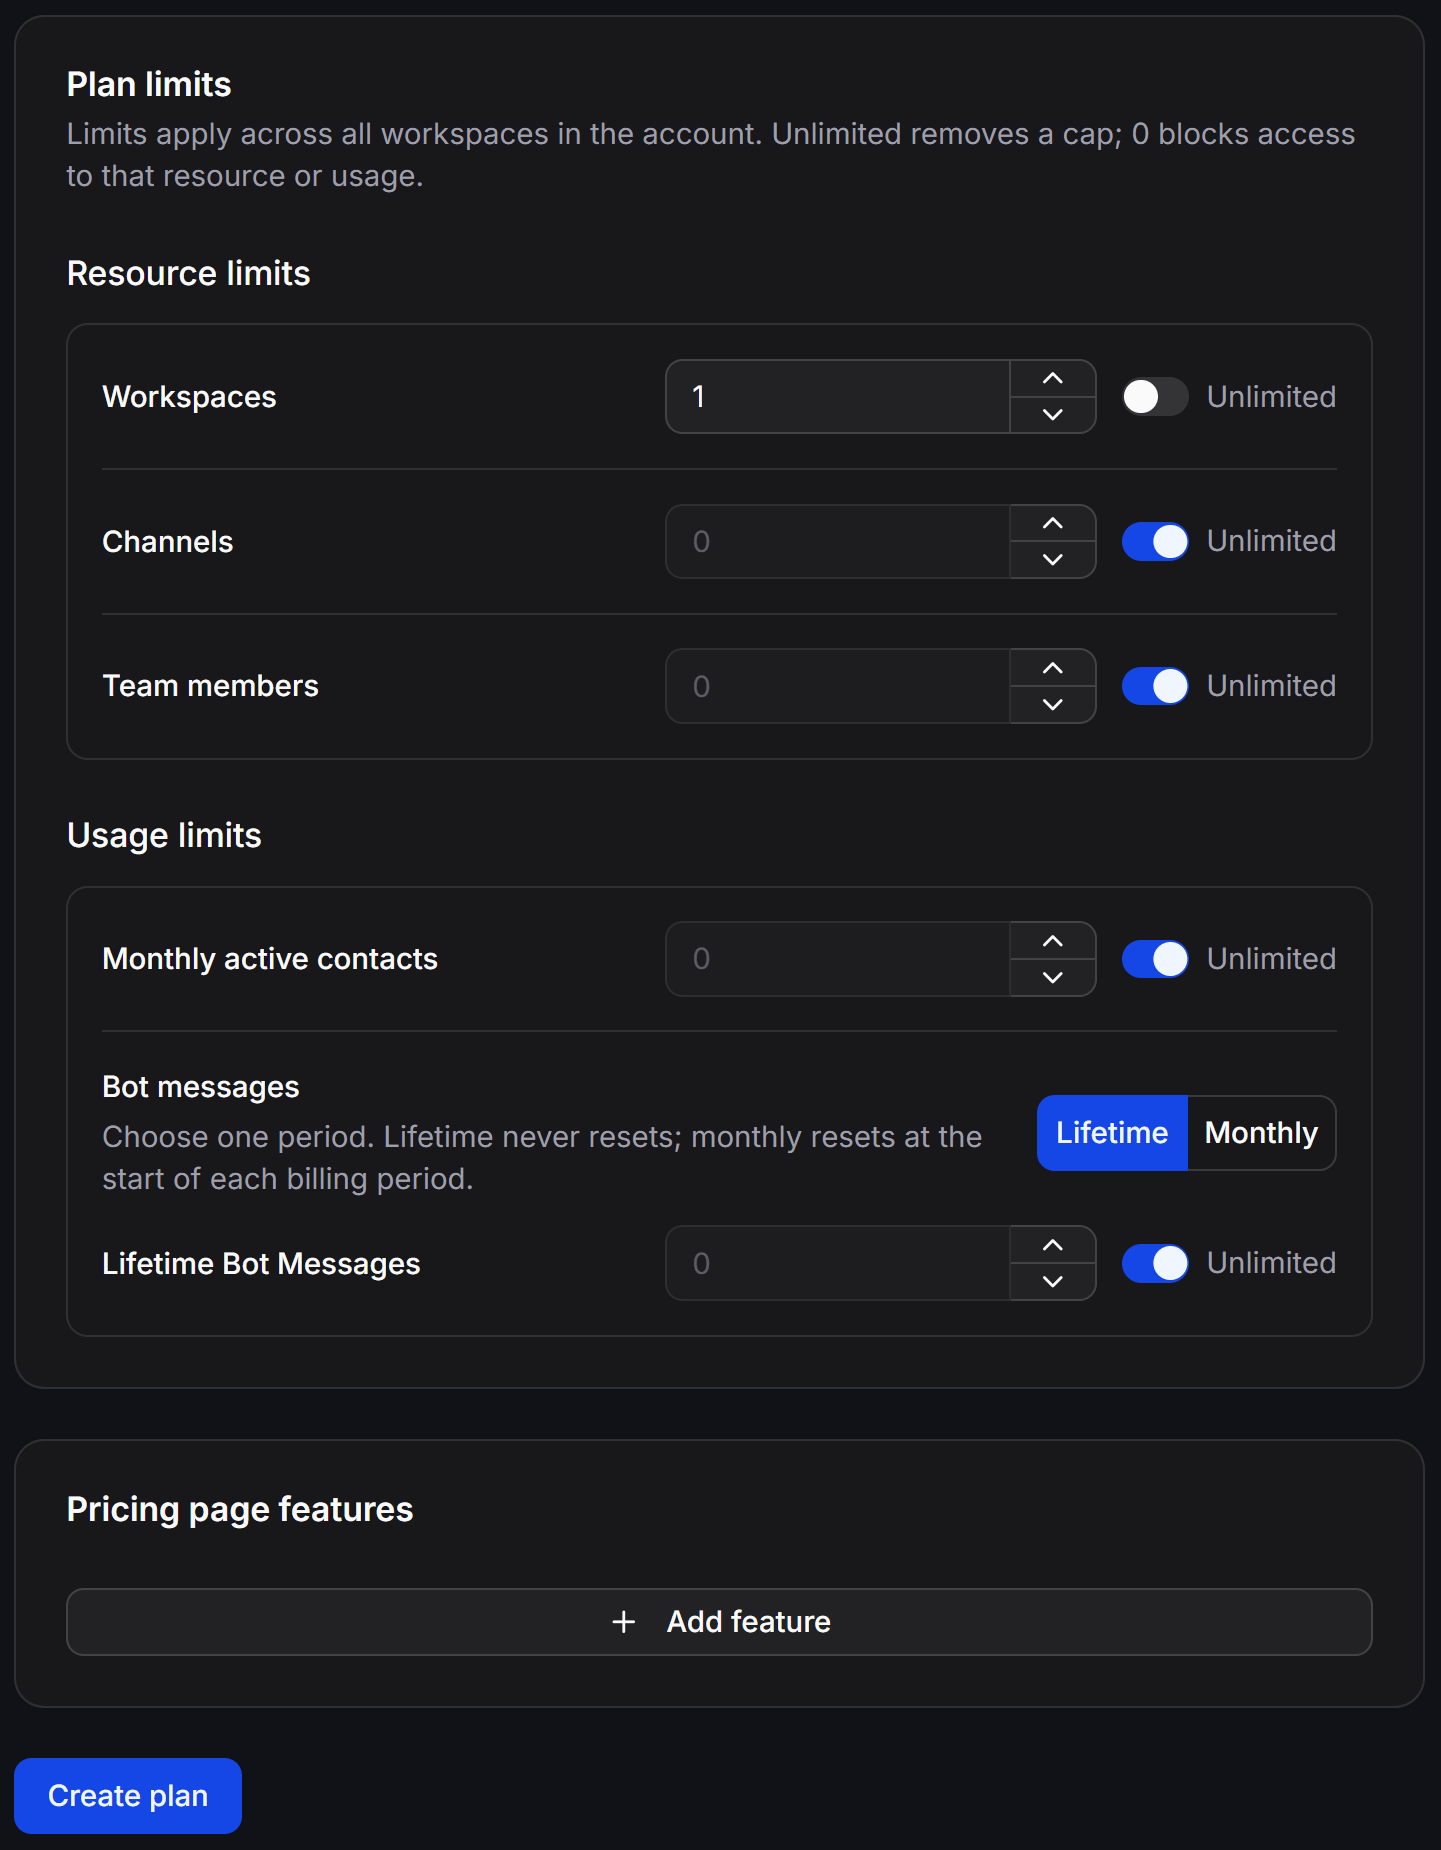 Review the configuration, then select **Create plan**.
### Basic info
* **Name**: The Plan name displayed to administrators and customers.
* **Description (optional)**: A short description of the intended customer or the Plan's primary value.
For example, a `Starter` Plan can serve a new store with one workspace and a monthly Bot message allowance.
### Configuration
| Option | How to configure it |
| --------------------- | ---------------------------------------------------------------------------------------------------------------------------------------------- |
| **Free trial (days)** | Enter `0` for no trial. Enter a number of days to grant full Plan access at no cost. This setting applies to every Plan, including free Plans. |
| **Sort order** | Enter the number used to order the Plan on the public pricing page. |
| **Public** | Enable this option to show the Plan on the pricing page. When disabled, an administrator can still assign the Plan manually. |
| **Active** | Enable this option to let customers purchase the Plan. Inactive Plans cannot receive new purchases, but existing subscribers are unaffected. |
## Set Plan limits
Plan limits apply across the customer's entire account, including every workspace in that account. Each workspace does not receive a separate copy of the allowance.
Enable **Unlimited** to remove a cap. When **Unlimited** is disabled, a value of `0` blocks access to that resource or usage type.
### Resource limits
| Limit | How it is calculated |
| ---------------- | ---------------------------------------------------------------------------- |
| **Workspaces** | The total number of workspaces the customer can create in the account. |
| **Channels** | The total number of channels the customer can connect across all workspaces. |
| **Team members** | The total number of members the customer can add to the account. |
For example, if a Plan includes `3` Channels and the customer connects two channels in workspace A, only one channel remains for all other workspaces.
### Usage limits
| Limit | How it is calculated |
| --------------------------- | ------------------------------------------------------------------------------------------------ |
| **Monthly active contacts** | The maximum number of active contacts per month across the entire account. |
| **Bot messages** | The number of messages sent by the Bot. Select either **Lifetime** or **Monthly** for each Plan. |
#### Calculate Bot messages
**Bot messages** use one of these allowance periods:
* **Lifetime**: Accumulates Bot messages for as long as the customer uses the Plan and never resets automatically.
* **Monthly**: Resets the number of used Bot messages at the start of each billing period.
After selecting the period, enter the allowed number of Bot messages or enable **Unlimited**. For example, enter `100000` and select **Monthly** to allow up to 100,000 Bot messages in each billing period.
Do not enter `0` if the customer should continue using the Bot. A value of `0` blocks Bot messages, while **Unlimited** removes the limit.
## Add pricing page features
Under **Pricing page features**, select **+ Add feature** to add descriptions to the Plan card. These entries help customers compare Plans but do not change the actual limits.
For example: `24/7 priority support` or `No ChatbotX branding`.
## Add a price to a Plan
After creating a Plan, open its details page and find **Linked prices**. Select **+ Add price** to create a price.
### Manual / Offline price
Select **Manual / Offline** when you confirm payments yourself or sell a Plan under a custom agreement.
Review the configuration, then select **Create plan**.
### Basic info
* **Name**: The Plan name displayed to administrators and customers.
* **Description (optional)**: A short description of the intended customer or the Plan's primary value.
For example, a `Starter` Plan can serve a new store with one workspace and a monthly Bot message allowance.
### Configuration
| Option | How to configure it |
| --------------------- | ---------------------------------------------------------------------------------------------------------------------------------------------- |
| **Free trial (days)** | Enter `0` for no trial. Enter a number of days to grant full Plan access at no cost. This setting applies to every Plan, including free Plans. |
| **Sort order** | Enter the number used to order the Plan on the public pricing page. |
| **Public** | Enable this option to show the Plan on the pricing page. When disabled, an administrator can still assign the Plan manually. |
| **Active** | Enable this option to let customers purchase the Plan. Inactive Plans cannot receive new purchases, but existing subscribers are unaffected. |
## Set Plan limits
Plan limits apply across the customer's entire account, including every workspace in that account. Each workspace does not receive a separate copy of the allowance.
Enable **Unlimited** to remove a cap. When **Unlimited** is disabled, a value of `0` blocks access to that resource or usage type.
### Resource limits
| Limit | How it is calculated |
| ---------------- | ---------------------------------------------------------------------------- |
| **Workspaces** | The total number of workspaces the customer can create in the account. |
| **Channels** | The total number of channels the customer can connect across all workspaces. |
| **Team members** | The total number of members the customer can add to the account. |
For example, if a Plan includes `3` Channels and the customer connects two channels in workspace A, only one channel remains for all other workspaces.
### Usage limits
| Limit | How it is calculated |
| --------------------------- | ------------------------------------------------------------------------------------------------ |
| **Monthly active contacts** | The maximum number of active contacts per month across the entire account. |
| **Bot messages** | The number of messages sent by the Bot. Select either **Lifetime** or **Monthly** for each Plan. |
#### Calculate Bot messages
**Bot messages** use one of these allowance periods:
* **Lifetime**: Accumulates Bot messages for as long as the customer uses the Plan and never resets automatically.
* **Monthly**: Resets the number of used Bot messages at the start of each billing period.
After selecting the period, enter the allowed number of Bot messages or enable **Unlimited**. For example, enter `100000` and select **Monthly** to allow up to 100,000 Bot messages in each billing period.
Do not enter `0` if the customer should continue using the Bot. A value of `0` blocks Bot messages, while **Unlimited** removes the limit.
## Add pricing page features
Under **Pricing page features**, select **+ Add feature** to add descriptions to the Plan card. These entries help customers compare Plans but do not change the actual limits.
For example: `24/7 priority support` or `No ChatbotX branding`.
## Add a price to a Plan
After creating a Plan, open its details page and find **Linked prices**. Select **+ Add price** to create a price.
### Manual / Offline price
Select **Manual / Offline** when you confirm payments yourself or sell a Plan under a custom agreement.
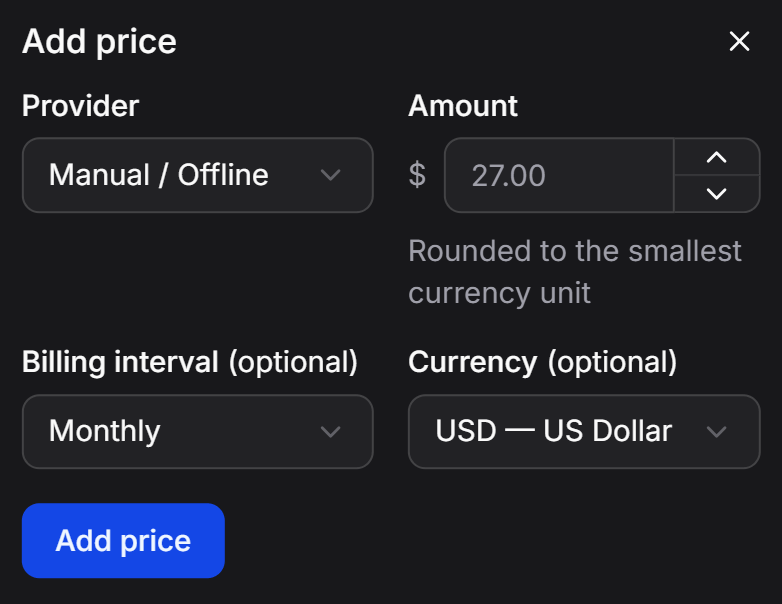 | Field | How to configure it |
| ------------------------------- | ------------------------------------------------------------------------------------------------------- |
| **Provider** | Select **Manual / Offline**. |
| **Amount** | Enter the amount in the selected currency. ChatbotX rounds it to that currency's smallest unit. |
| **Billing interval (optional)** | Select `Daily`, `Weekly`, `Monthly`, or `Yearly`. Leave the interval unselected for a one-time payment. |
| **Currency (optional)** | Select a supported currency. |
For example, enter `27` with `USD` to charge USD 27. With `VND`, enter `270000` to charge VND 270,000. Do not convert the amount to cents before entering it.
The current interface displays these currencies:
| Code | Currency | Code | Currency |
| ----- | --------------- | ----- | ----------------- |
| `USD` | US Dollar | `EUR` | Euro |
| `GBP` | British Pound | `VND` | Vietnamese Dong |
| `JPY` | Japanese Yen | `AUD` | Australian Dollar |
| `CAD` | Canadian Dollar | `SGD` | Singapore Dollar |
| `INR` | Indian Rupee | `CNY` | Chinese Yuan |
| `THB` | Thai Baht | | |
Select **Add price** to link the price to the Plan.
### Stripe price
Select **Stripe** to collect payments and manage subscriptions through Stripe. Connect Stripe before adding a price to the Plan.
| Field | How to configure it |
| ------------------------------- | ------------------------------------------------------------------------------------------------------- |
| **Provider** | Select **Manual / Offline**. |
| **Amount** | Enter the amount in the selected currency. ChatbotX rounds it to that currency's smallest unit. |
| **Billing interval (optional)** | Select `Daily`, `Weekly`, `Monthly`, or `Yearly`. Leave the interval unselected for a one-time payment. |
| **Currency (optional)** | Select a supported currency. |
For example, enter `27` with `USD` to charge USD 27. With `VND`, enter `270000` to charge VND 270,000. Do not convert the amount to cents before entering it.
The current interface displays these currencies:
| Code | Currency | Code | Currency |
| ----- | --------------- | ----- | ----------------- |
| `USD` | US Dollar | `EUR` | Euro |
| `GBP` | British Pound | `VND` | Vietnamese Dong |
| `JPY` | Japanese Yen | `AUD` | Australian Dollar |
| `CAD` | Canadian Dollar | `SGD` | Singapore Dollar |
| `INR` | Indian Rupee | `CNY` | Chinese Yuan |
| `THB` | Thai Baht | | |
Select **Add price** to link the price to the Plan.
### Stripe price
Select **Stripe** to collect payments and manage subscriptions through Stripe. Connect Stripe before adding a price to the Plan.
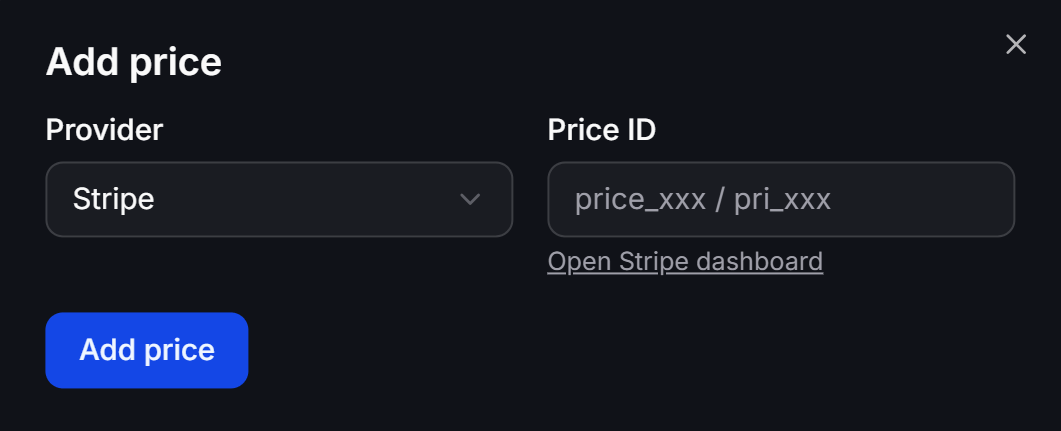 See [Connect Stripe and configure billing](/docs/whitelabel/saas/billing-stripe) to complete the setup.
## Check before publishing
Before sharing the pricing page with customers, confirm that:
* The Plan has both **Public** and **Active** enabled.
* `0` appears only for resources you intend to block.
* **Bot messages** use the correct **Lifetime** or **Monthly** period.
* **Amount**, **Billing interval**, and **Currency** match the published price.
* **Pricing page features** match the configured limits.
See [Connect Stripe and configure billing](/docs/whitelabel/saas/billing-stripe) to complete the setup.
## Check before publishing
Before sharing the pricing page with customers, confirm that:
* The Plan has both **Public** and **Active** enabled.
* `0` appears only for resources you intend to block.
* **Bot messages** use the correct **Lifetime** or **Monthly** period.
* **Amount**, **Billing interval**, and **Currency** match the published price.
* **Pricing page features** match the configured limits.