

Real-World Applications & Use Cases
The API Channel opens up unlimited automation possibilities for your business:In-App Chat for Mobile Apps & Websites
Embed a native chat interface directly inside your proprietary mobile application (E-commerce, delivery, fintech, member portal) or website. Customers chat inside your app while AI Agents and live staff manage all conversations in ChatbotX Inbox.
Connect Third-Party Messaging Platforms
Integrate international or specialized messaging networks not natively supported out of the box, such as Viber, custom Telegram bots, LINE, WeChat, Discord, or internal company chat tools.
Bidirectional SMS Gateway
Connect with telecommunications providers or SMS gateways (Twilio, SpeedSMS, eSMS). When customers reply to brand SMS notifications, messages flow into ChatbotX for automated AI handling and SMS reply dispatch.
Connect Personal WhatsApp / Web
Empower your business to use existing personal or business phone numbers for 1:1 customer communication via an external gateway bridge (such as WAHA) without incurring Meta Cloud API per-conversation fees.
Synchronize with Enterprise CRM & ERP
Connect enterprise platforms such as Salesforce, HubSpot, Zoho, or Odoo to dispatch real-time order alerts, contract status updates, or customer support tickets automatically.
Workflow Automation (n8n, Make, Zapier)
Connect ChatbotX with automation engines like n8n, Make.com, or Zapier to build intelligent multi-step workflows, query real-time databases, and trigger instantaneous AI responses.
Technical API Reference
If you are a developer looking to integrate the API Channel directly with your custom mobile app, proprietary website, or internal business backend, ChatbotX provides 5 standardized endpoints alongside bidirectional webhooks: 👉 Interactive API Reference: ChatbotX API Channel DocumentationAuthentication
All API Channel requests require yourChannel API Token to be included in the request headers:
1. Verify Token & Fetch Channel Identity (GET /v1/channels/api/me)
Validates the Channel API Token and retrieves metadata regarding the connected Inbox in your workspace.
2. Send Inbound Message to ChatbotX (POST /v1/channels/api/messages)
Pushes customer messages from your application directly into the ChatbotX Inbox. The system automatically creates or updates the subscriber profile (contact) and triggers active Flow Automations or AI Agents.
Supports text messages, multimedia attachments (images, audio, video, documents), geographical location coordinates (location), and postbackPayload.
3. Notify Contact Typing Indicator (POST /v1/channels/api/typing)
Sends a real-time signal notifying ChatbotX Inbox that the user is currently composing a message (triggering the “typing…” animation for human agents).
4. Notify Messages Read Status (POST /v1/channels/api/read)
Informs ChatbotX Inbox that the customer has opened and viewed replies sent by AI Agents or human team members.
5. Report Outbound Delivery Status (POST /v1/channels/api/delivery-status)
Reports the delivery state of an outbound message dispatched to the customer’s device (delivered, read, or failed with error details).
Receiving Agent Replies via Callback URL (Outbound Webhook)
When an AI Agent, Flow Automation, or live human agent sends a reply within ChatbotX Inbox, the system automatically posts an HTTPPOST event payload to the Callback URL configured in your API Channel settings.
Sample Outbound Webhook payload received by your server:
Installation & Integration Guide: Personal WhatsApp via WAHA ChatbotX Dashboard
Follow the steps below to set up and connect your personal WhatsApp number to ChatbotX:Part 1: Deploying WAHA ChatbotX Dashboard
WAHA (WhatsApp HTTP API) is a standalone open-source gateway. The WAHA ChatbotX Dashboard edition is specifically optimized with an intuitive web dashboard, built-in real-time synchronization, and dedicated ChatbotX routing webhooks.System Requirements:
- A local machine (Windows, macOS) or a Linux VPS (Ubuntu 20.04+, Debian 11+).
- Docker and Docker Compose installed and running.
Step-by-Step Deployment:
- Clone the repository: Open your Terminal or PowerShell and run:
- Verify the
docker-compose.chatbotx.yamlconfiguration: The configuration file is pre-tuned for ChatbotX with all required environment variables (including WebJS engine, port3000, session storage volumes, and the integrated dashboard). - Start the service in detached mode: Run Docker Compose to pull and run the container:
- Access the Web Dashboard: Once the container starts, open your browser and navigate to:
- Local machine:
http://localhost:3000/dashboard - Remote VPS server:
https://<your-domain-or-ip>/dashboard
- Local machine:
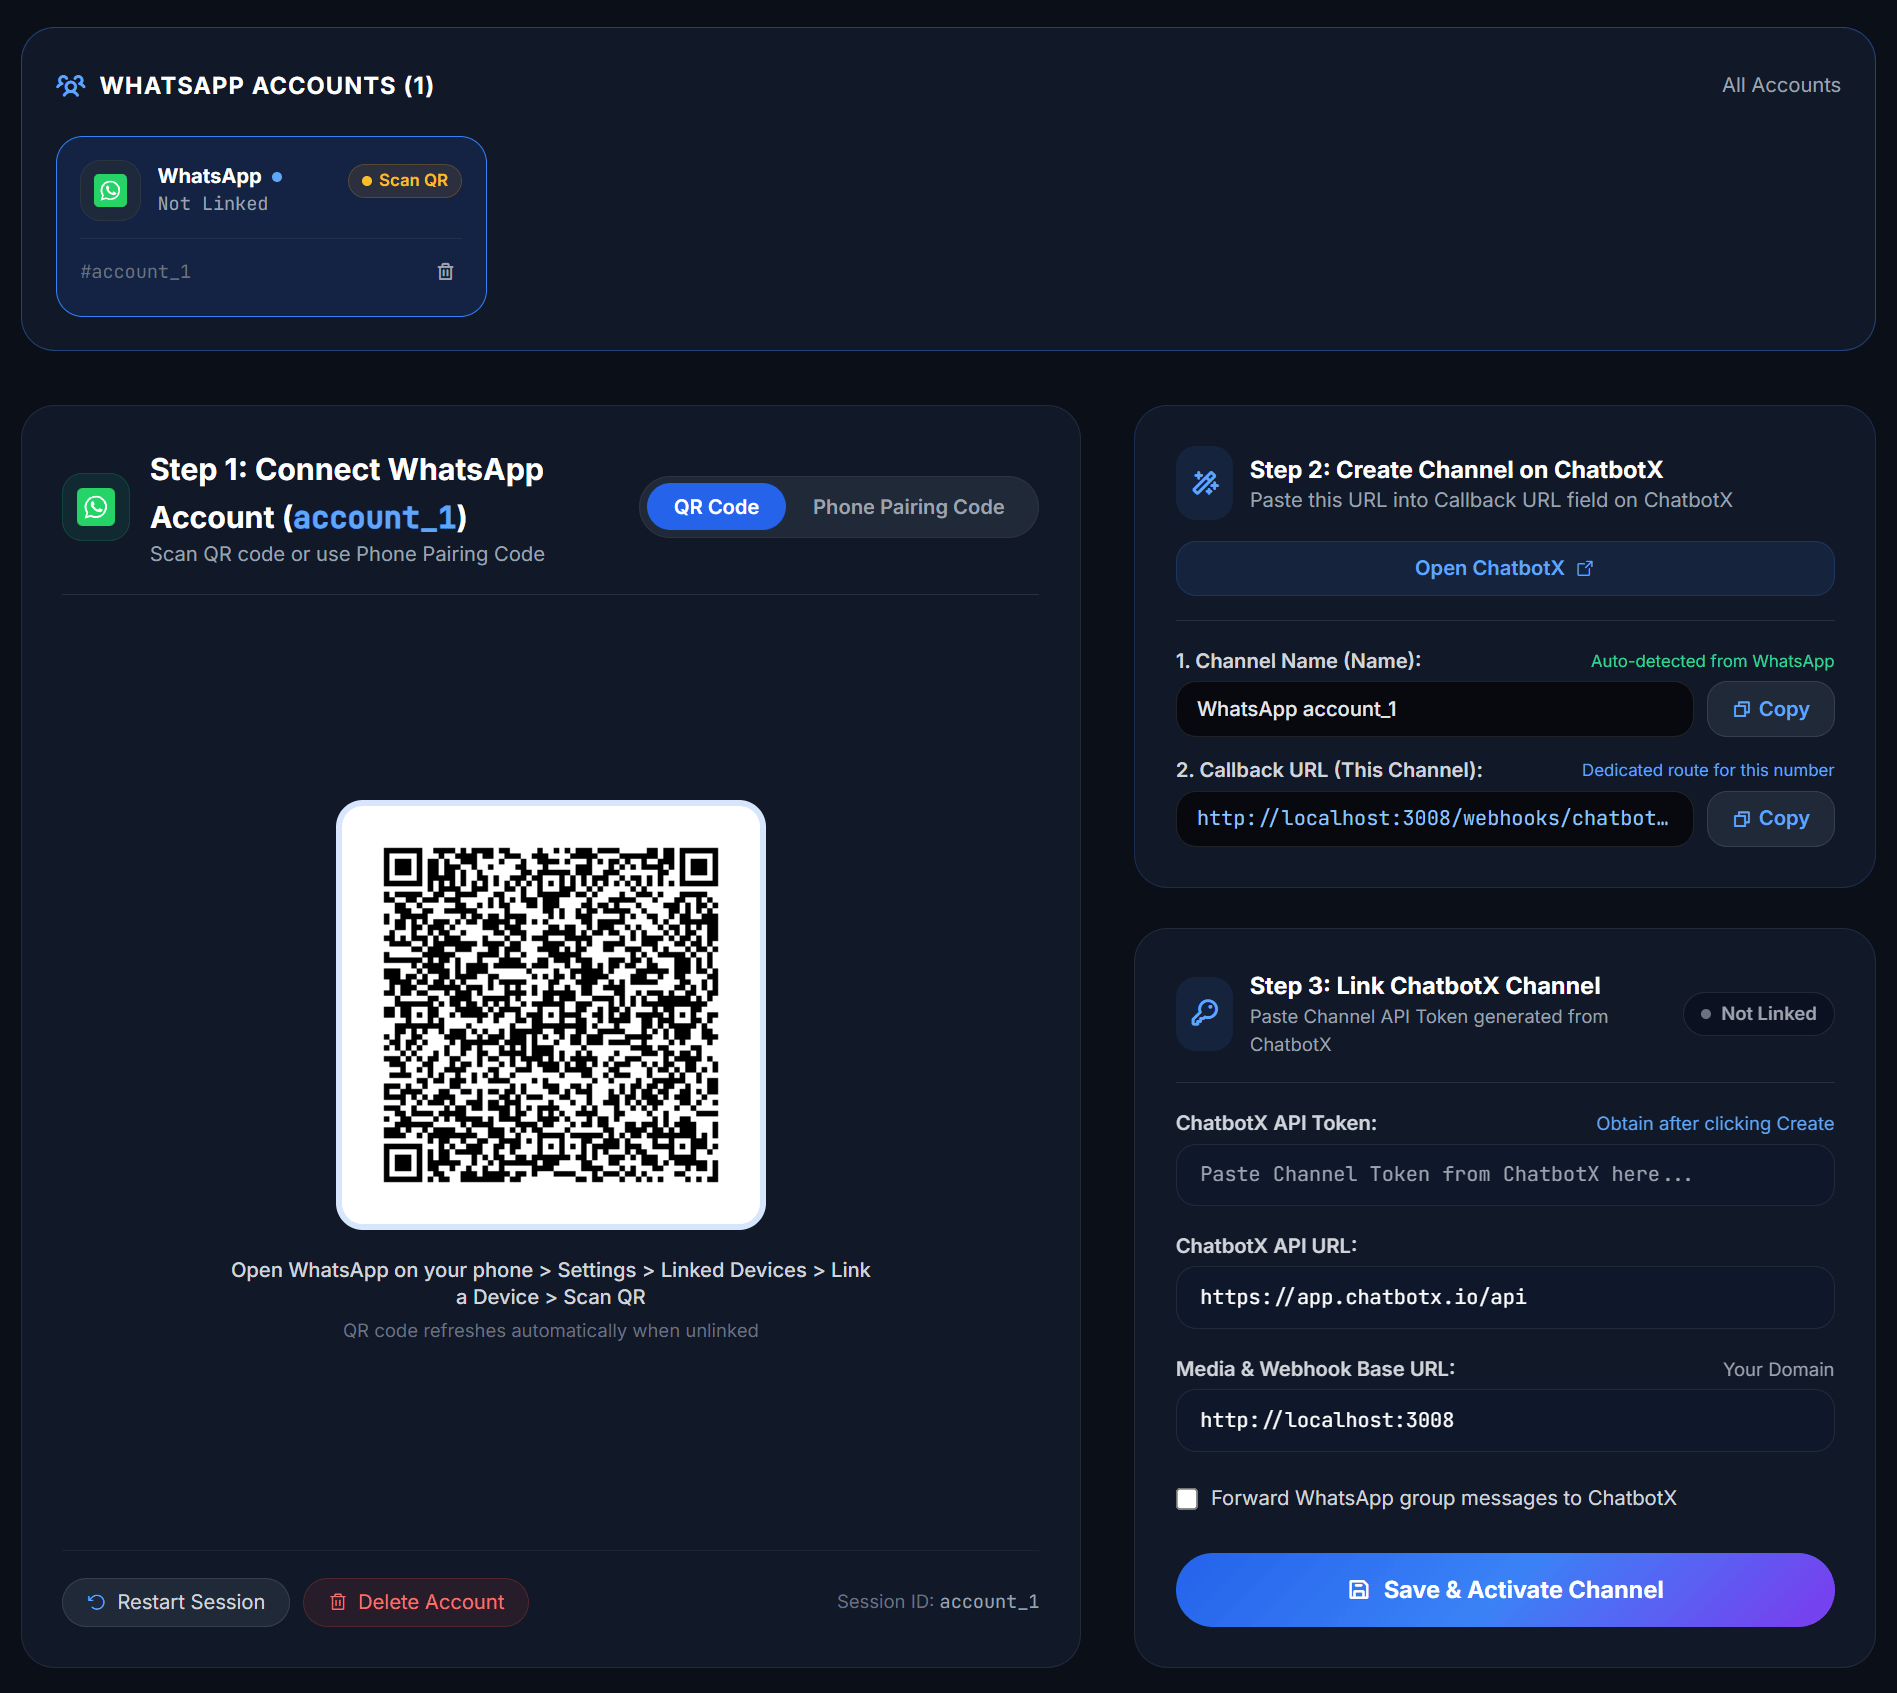
🔐 Default Login Credentials (HTTP Basic Auth):The dashboard interface displays the Multi-Account Management bar at the top, WhatsApp Connection card (Step 1 on the left), Create Channel card (Step 2 on the top-right), and Token Activation card (Step 3 on the bottom-right).(You can customize these credentials in the
- Username:
admin- Password:
Abcd@1234docker-compose.chatbotx.yamlfile prior to starting the service).
Part 2: Creating an API Channel and Integrating Personal WhatsApp
To connect your WhatsApp number to ChatbotX, follow these steps:Step 1: Connect Your WhatsApp Account (Dashboard Step 1)
In the Step 1: Connect WhatsApp Account card on the left side of the dashboard, choose your preferred pairing method:- Method 1: Scan QR Code (Recommended):
- Open WhatsApp on your phone.
- Go to Settings > select Linked Devices.
- Tap Link a Device and point your phone’s camera at the QR code displayed on your computer screen.
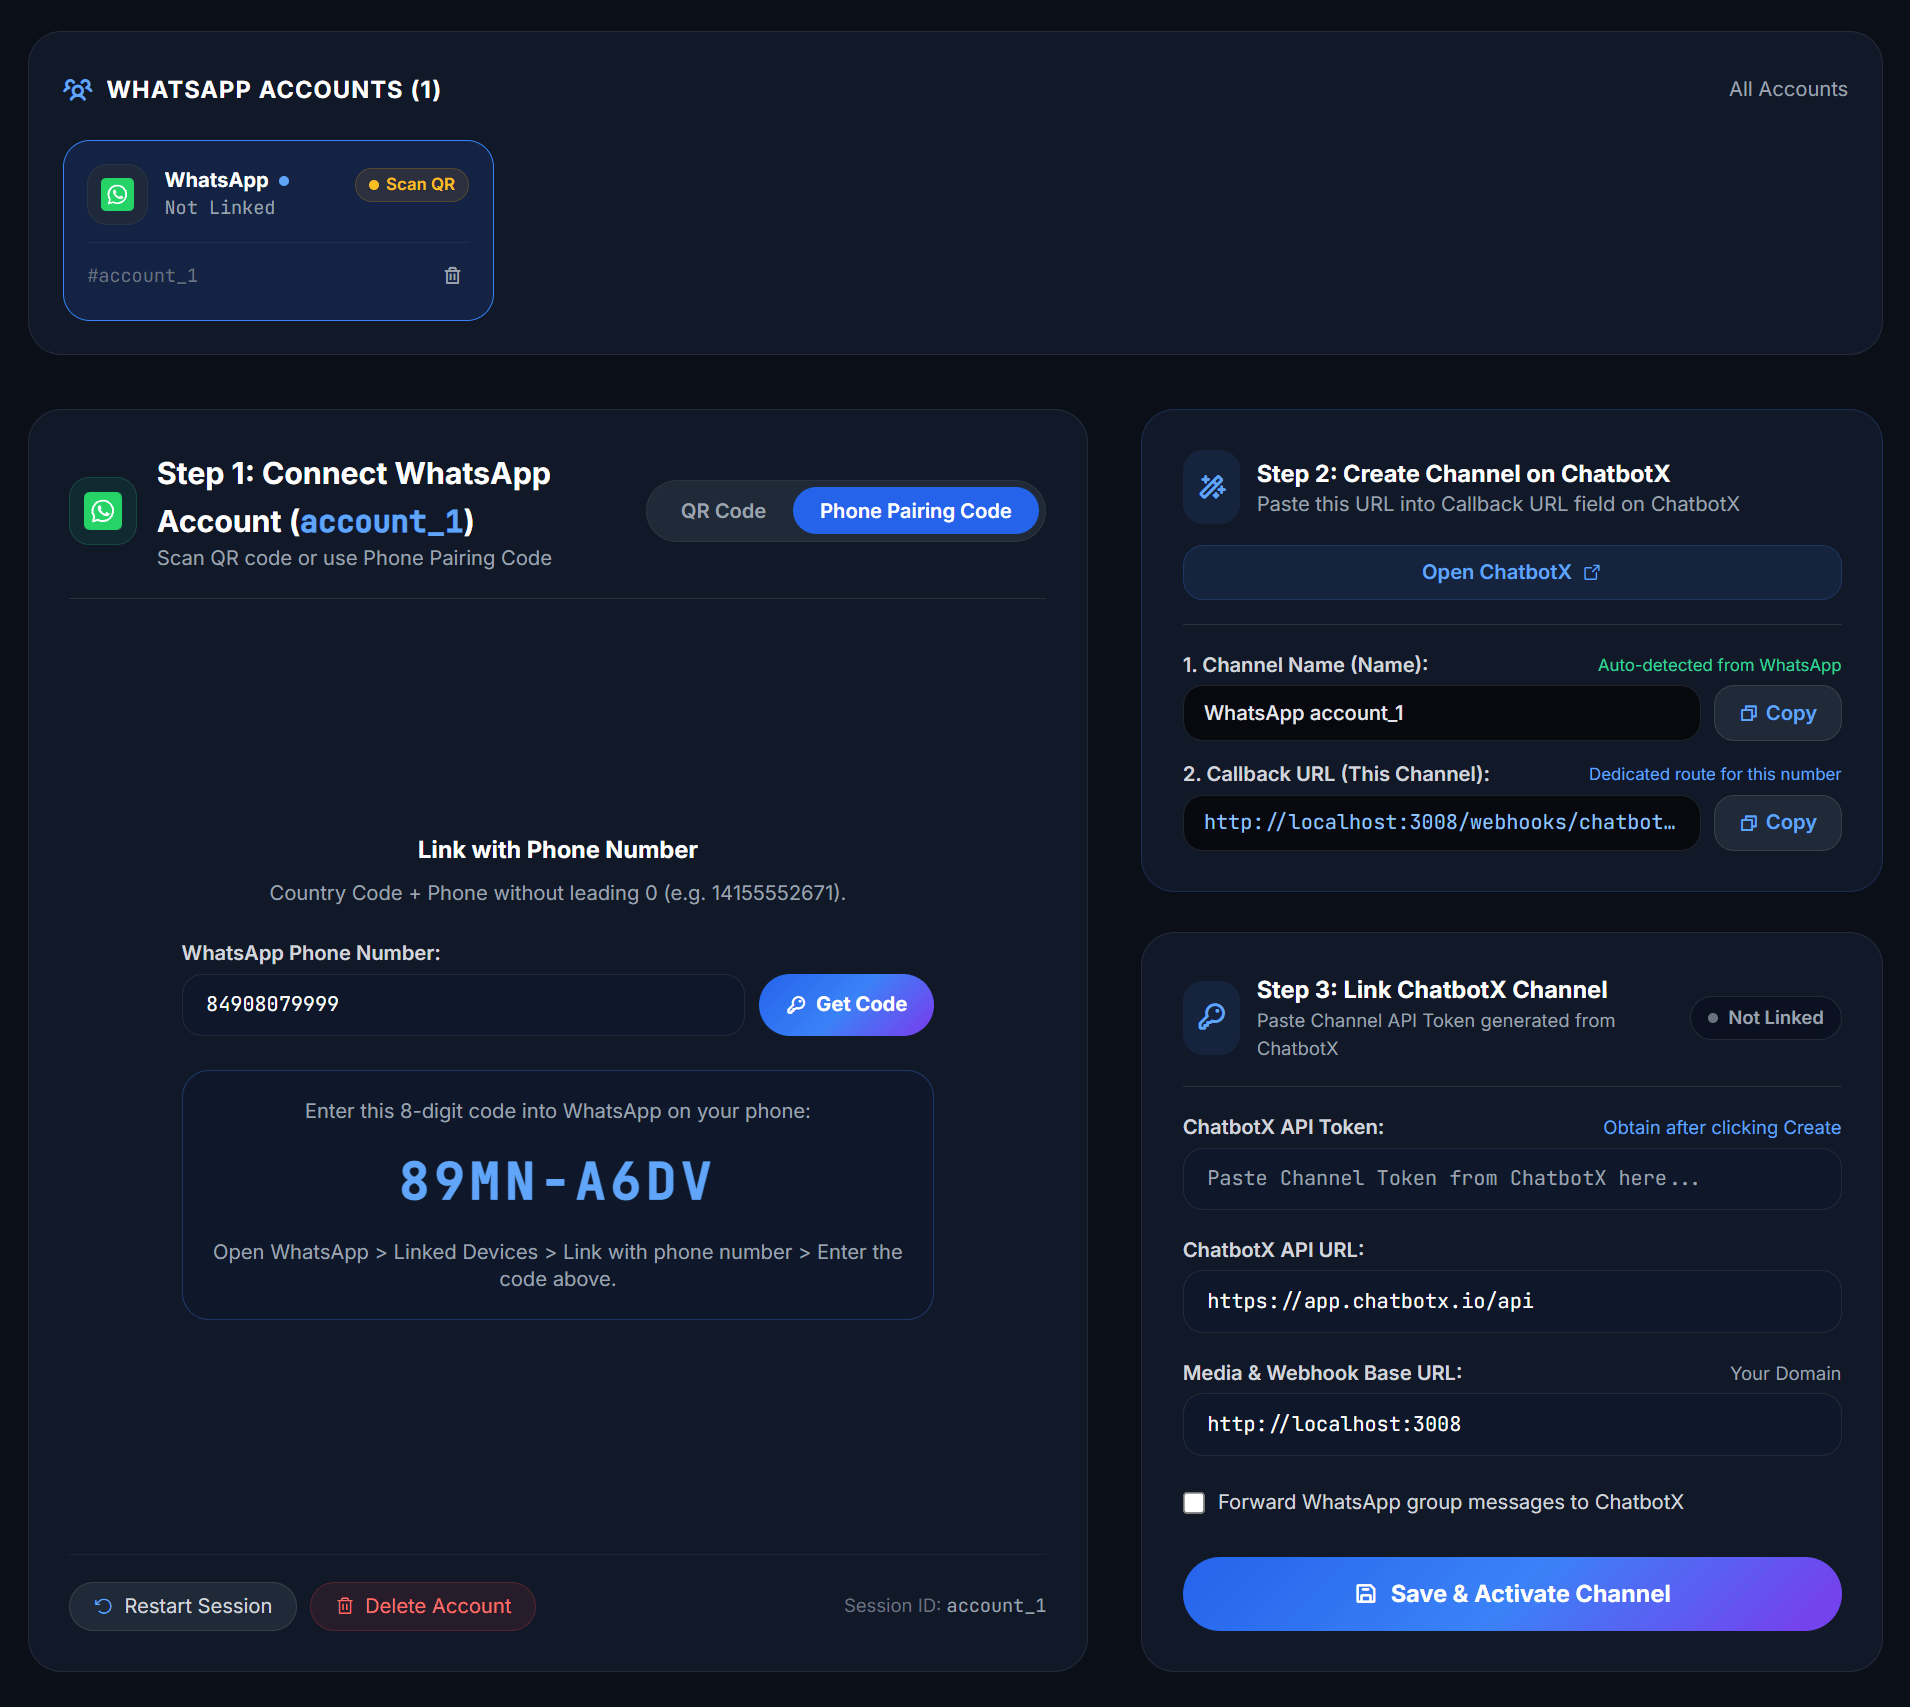
- Method 2: Phone Pairing Code:
- Select the Phone Pairing Code tab if your camera cannot scan the QR code.
- Enter your WhatsApp phone number in international format (including country code, without leading zeros).
- Click Get Code to receive an 8-digit code, then open WhatsApp on your phone > Linked Devices > Link with phone number > enter the 8-digit code to pair.
Step 2: Create an API Channel on ChatbotX (Dashboard Step 2)
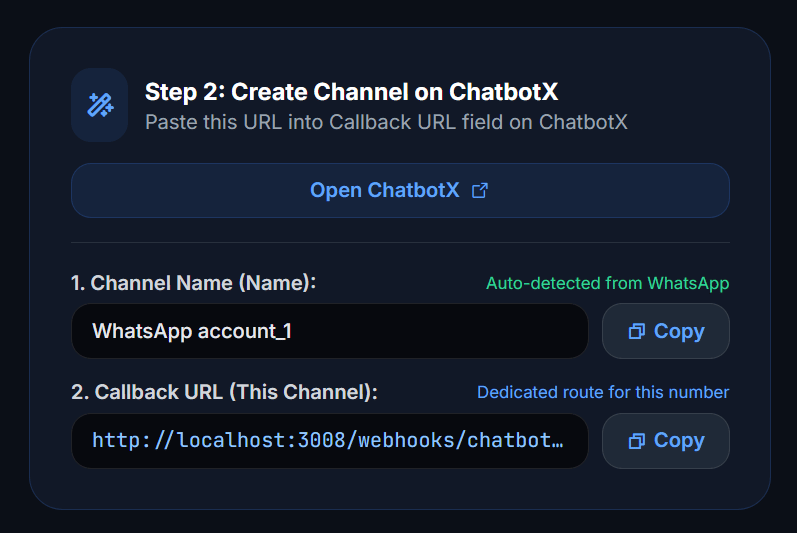
In the Step 2: Create Channel on ChatbotX card on the upper-right of WAHA Dashboard:- Click Open ChatbotX to open the channel creation page in a new tab, and copy the two pre-generated values:
- Name: The suggested channel name automatically synced with your WhatsApp profile.
- Callback URL: The dedicated Webhook routing URL created for this phone line.
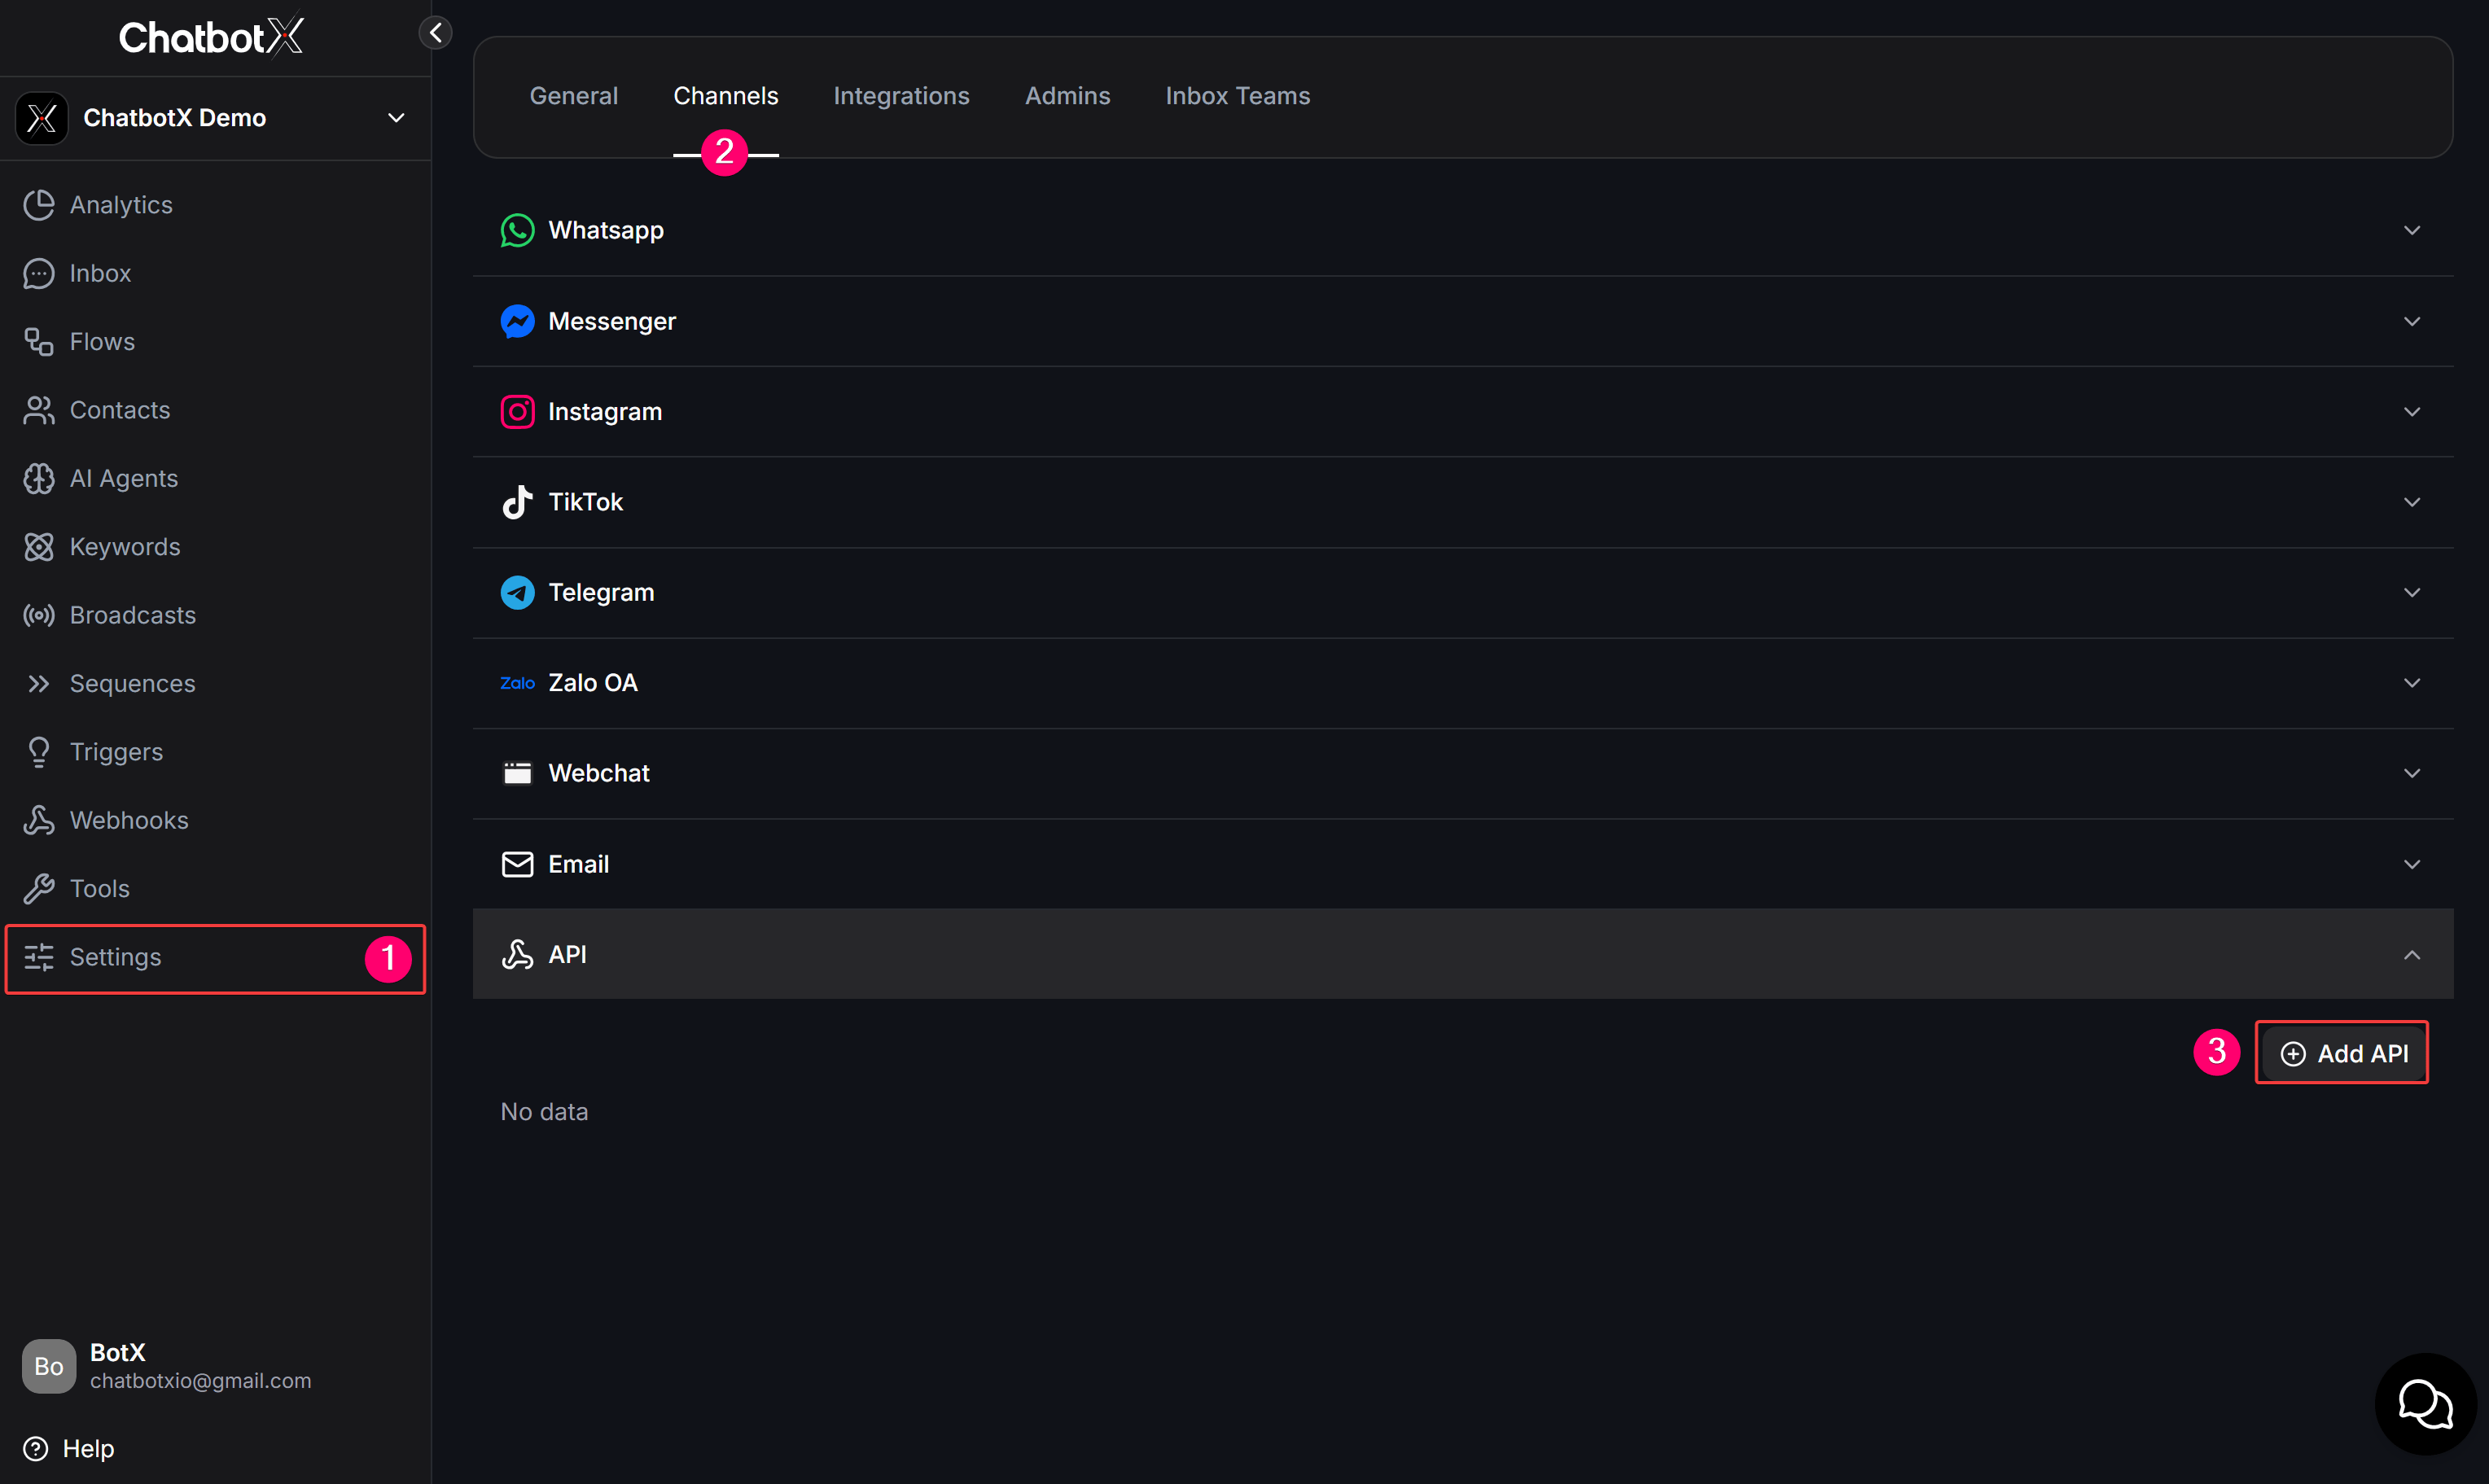
- In ChatbotX, go to Settings > Channels > select API > click the Add API button in the upper-right corner.
- In the Add API modal window, paste the Name and Callback URL copied from the WAHA Dashboard:
💡 Important Note: The API Channel is specifically designed for establishing bidirectional, interactive messaging channels (the Callback URL is used to receive outbound replies from AI agents or live staff). If your goal is simply to send one-way broadcast notifications or perform backend data operations, you do not need to create an API Channel. Instead, please refer directly to the general ChatbotX REST API documentation at:
👉 API Overview - ChatbotX Documentation
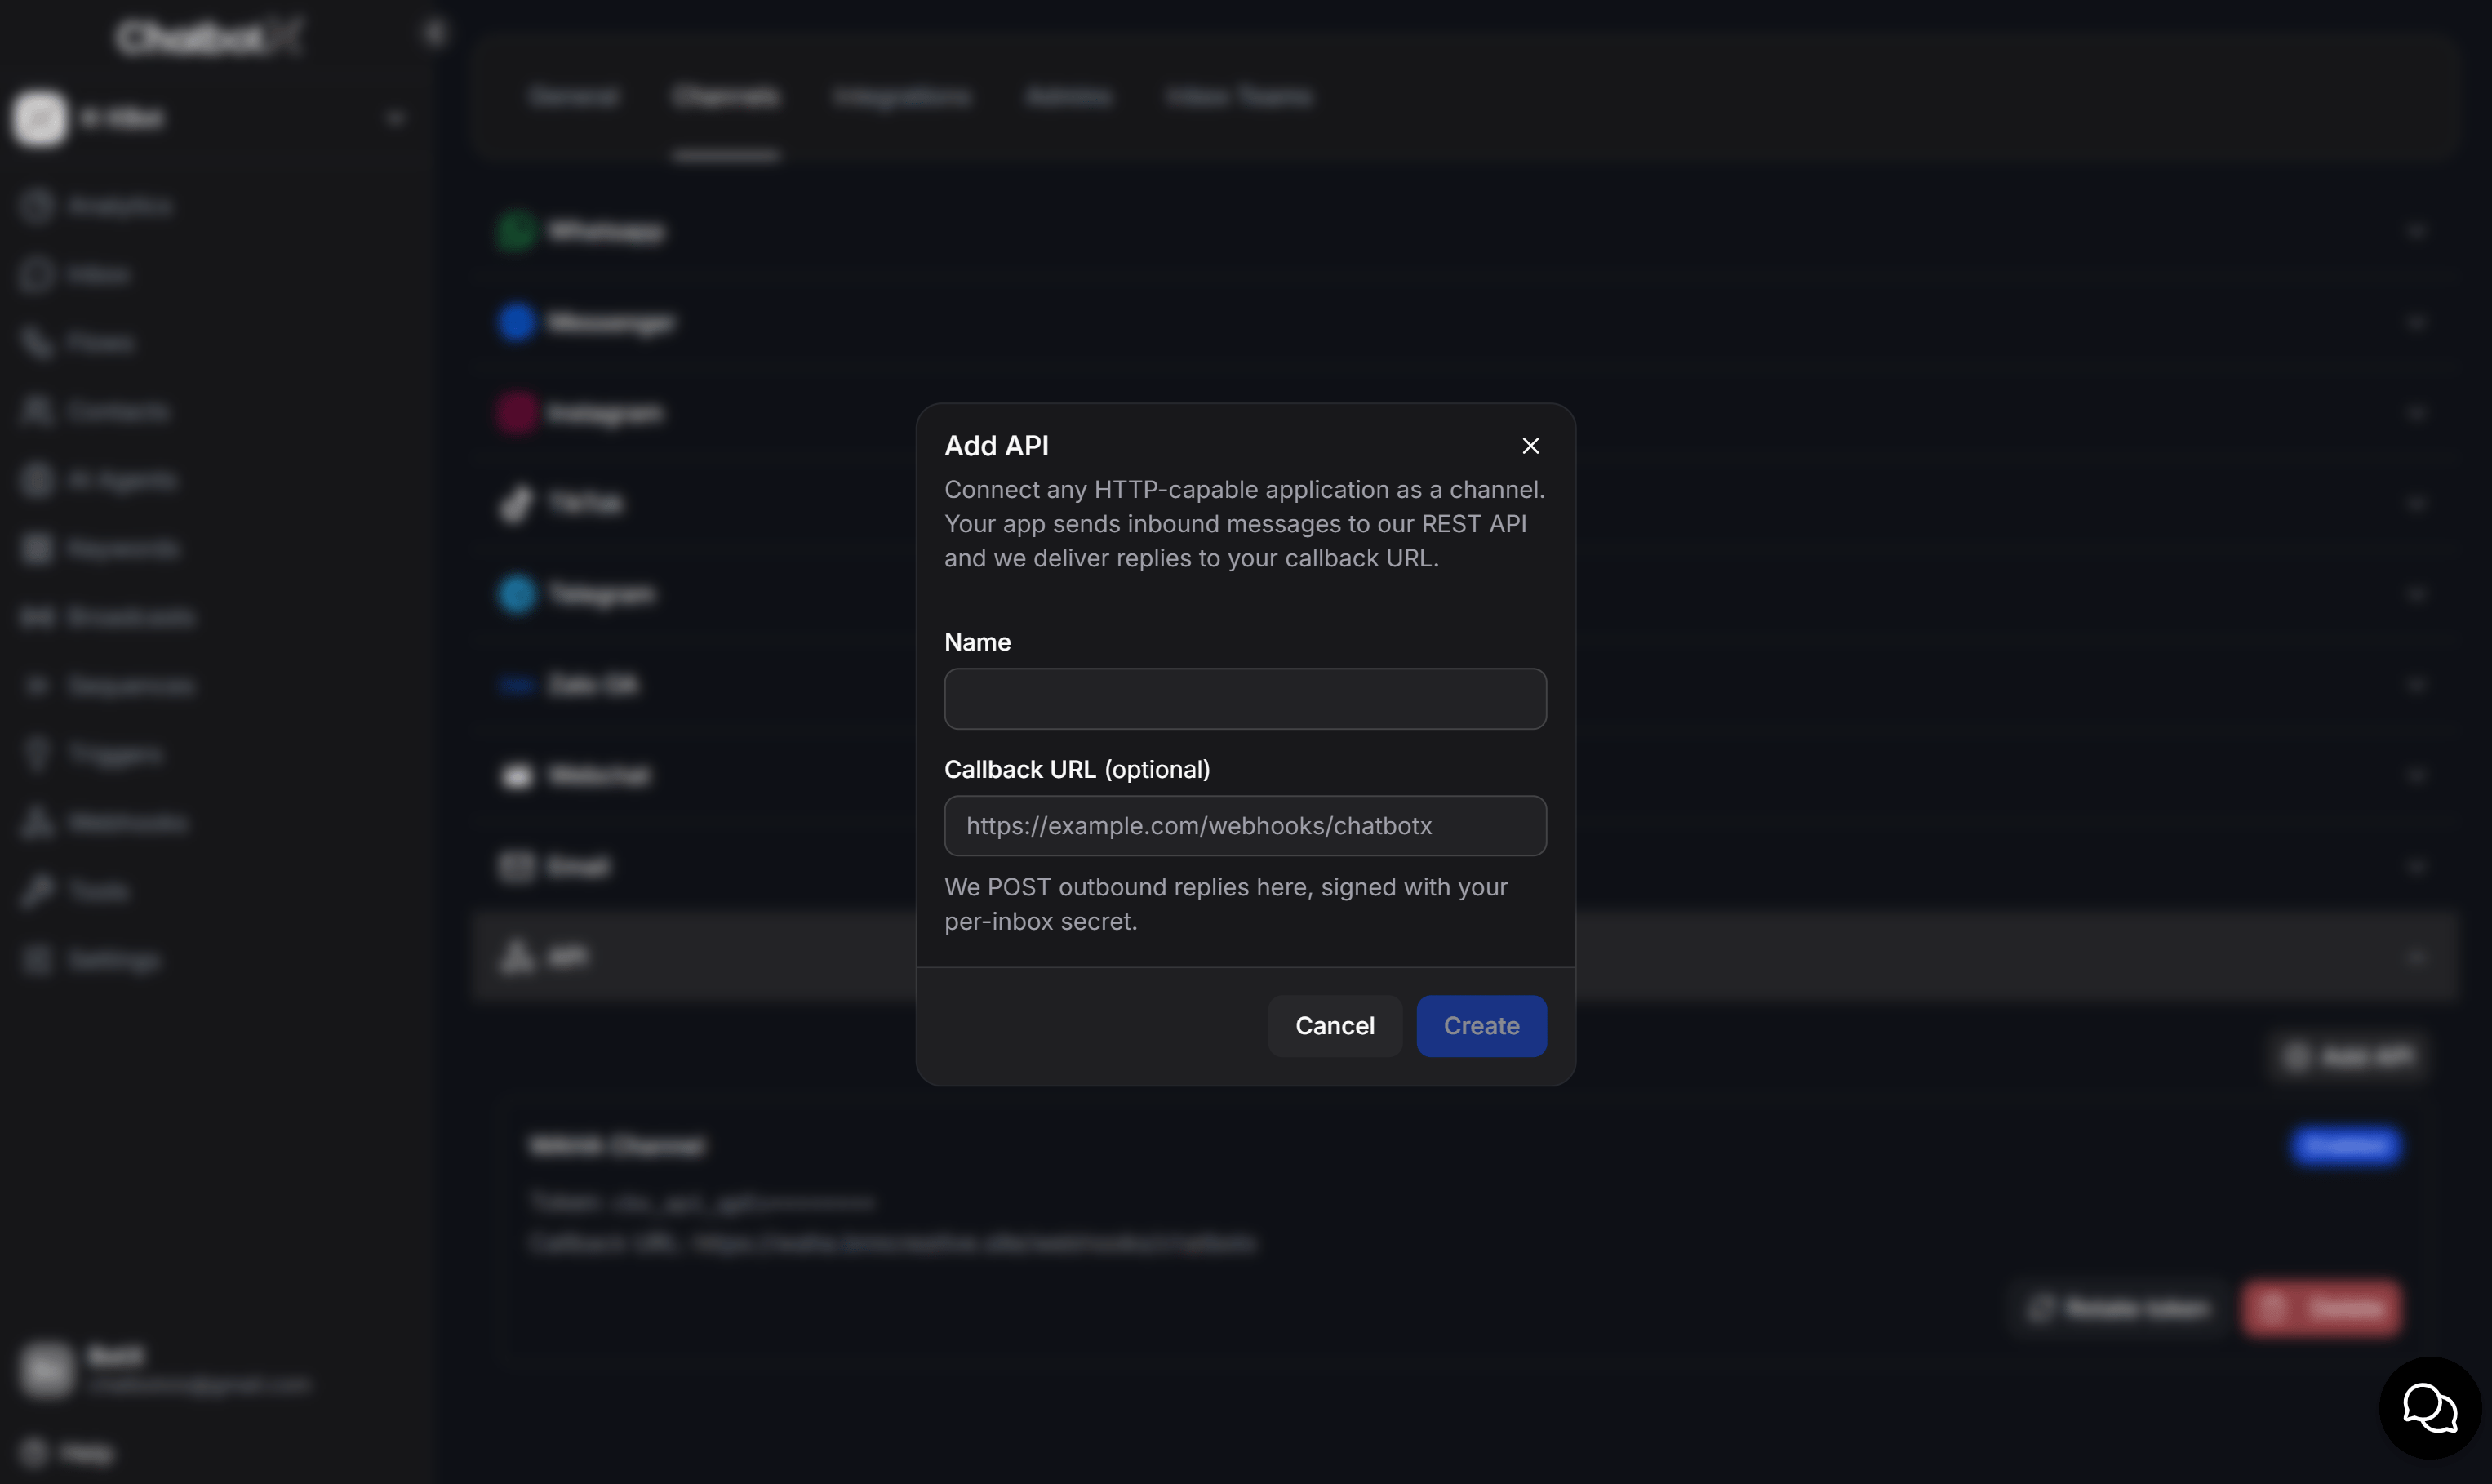
- Click the green Create button to create the channel and copy your unique Channel API Token (prefixed with
cbx_api_...).
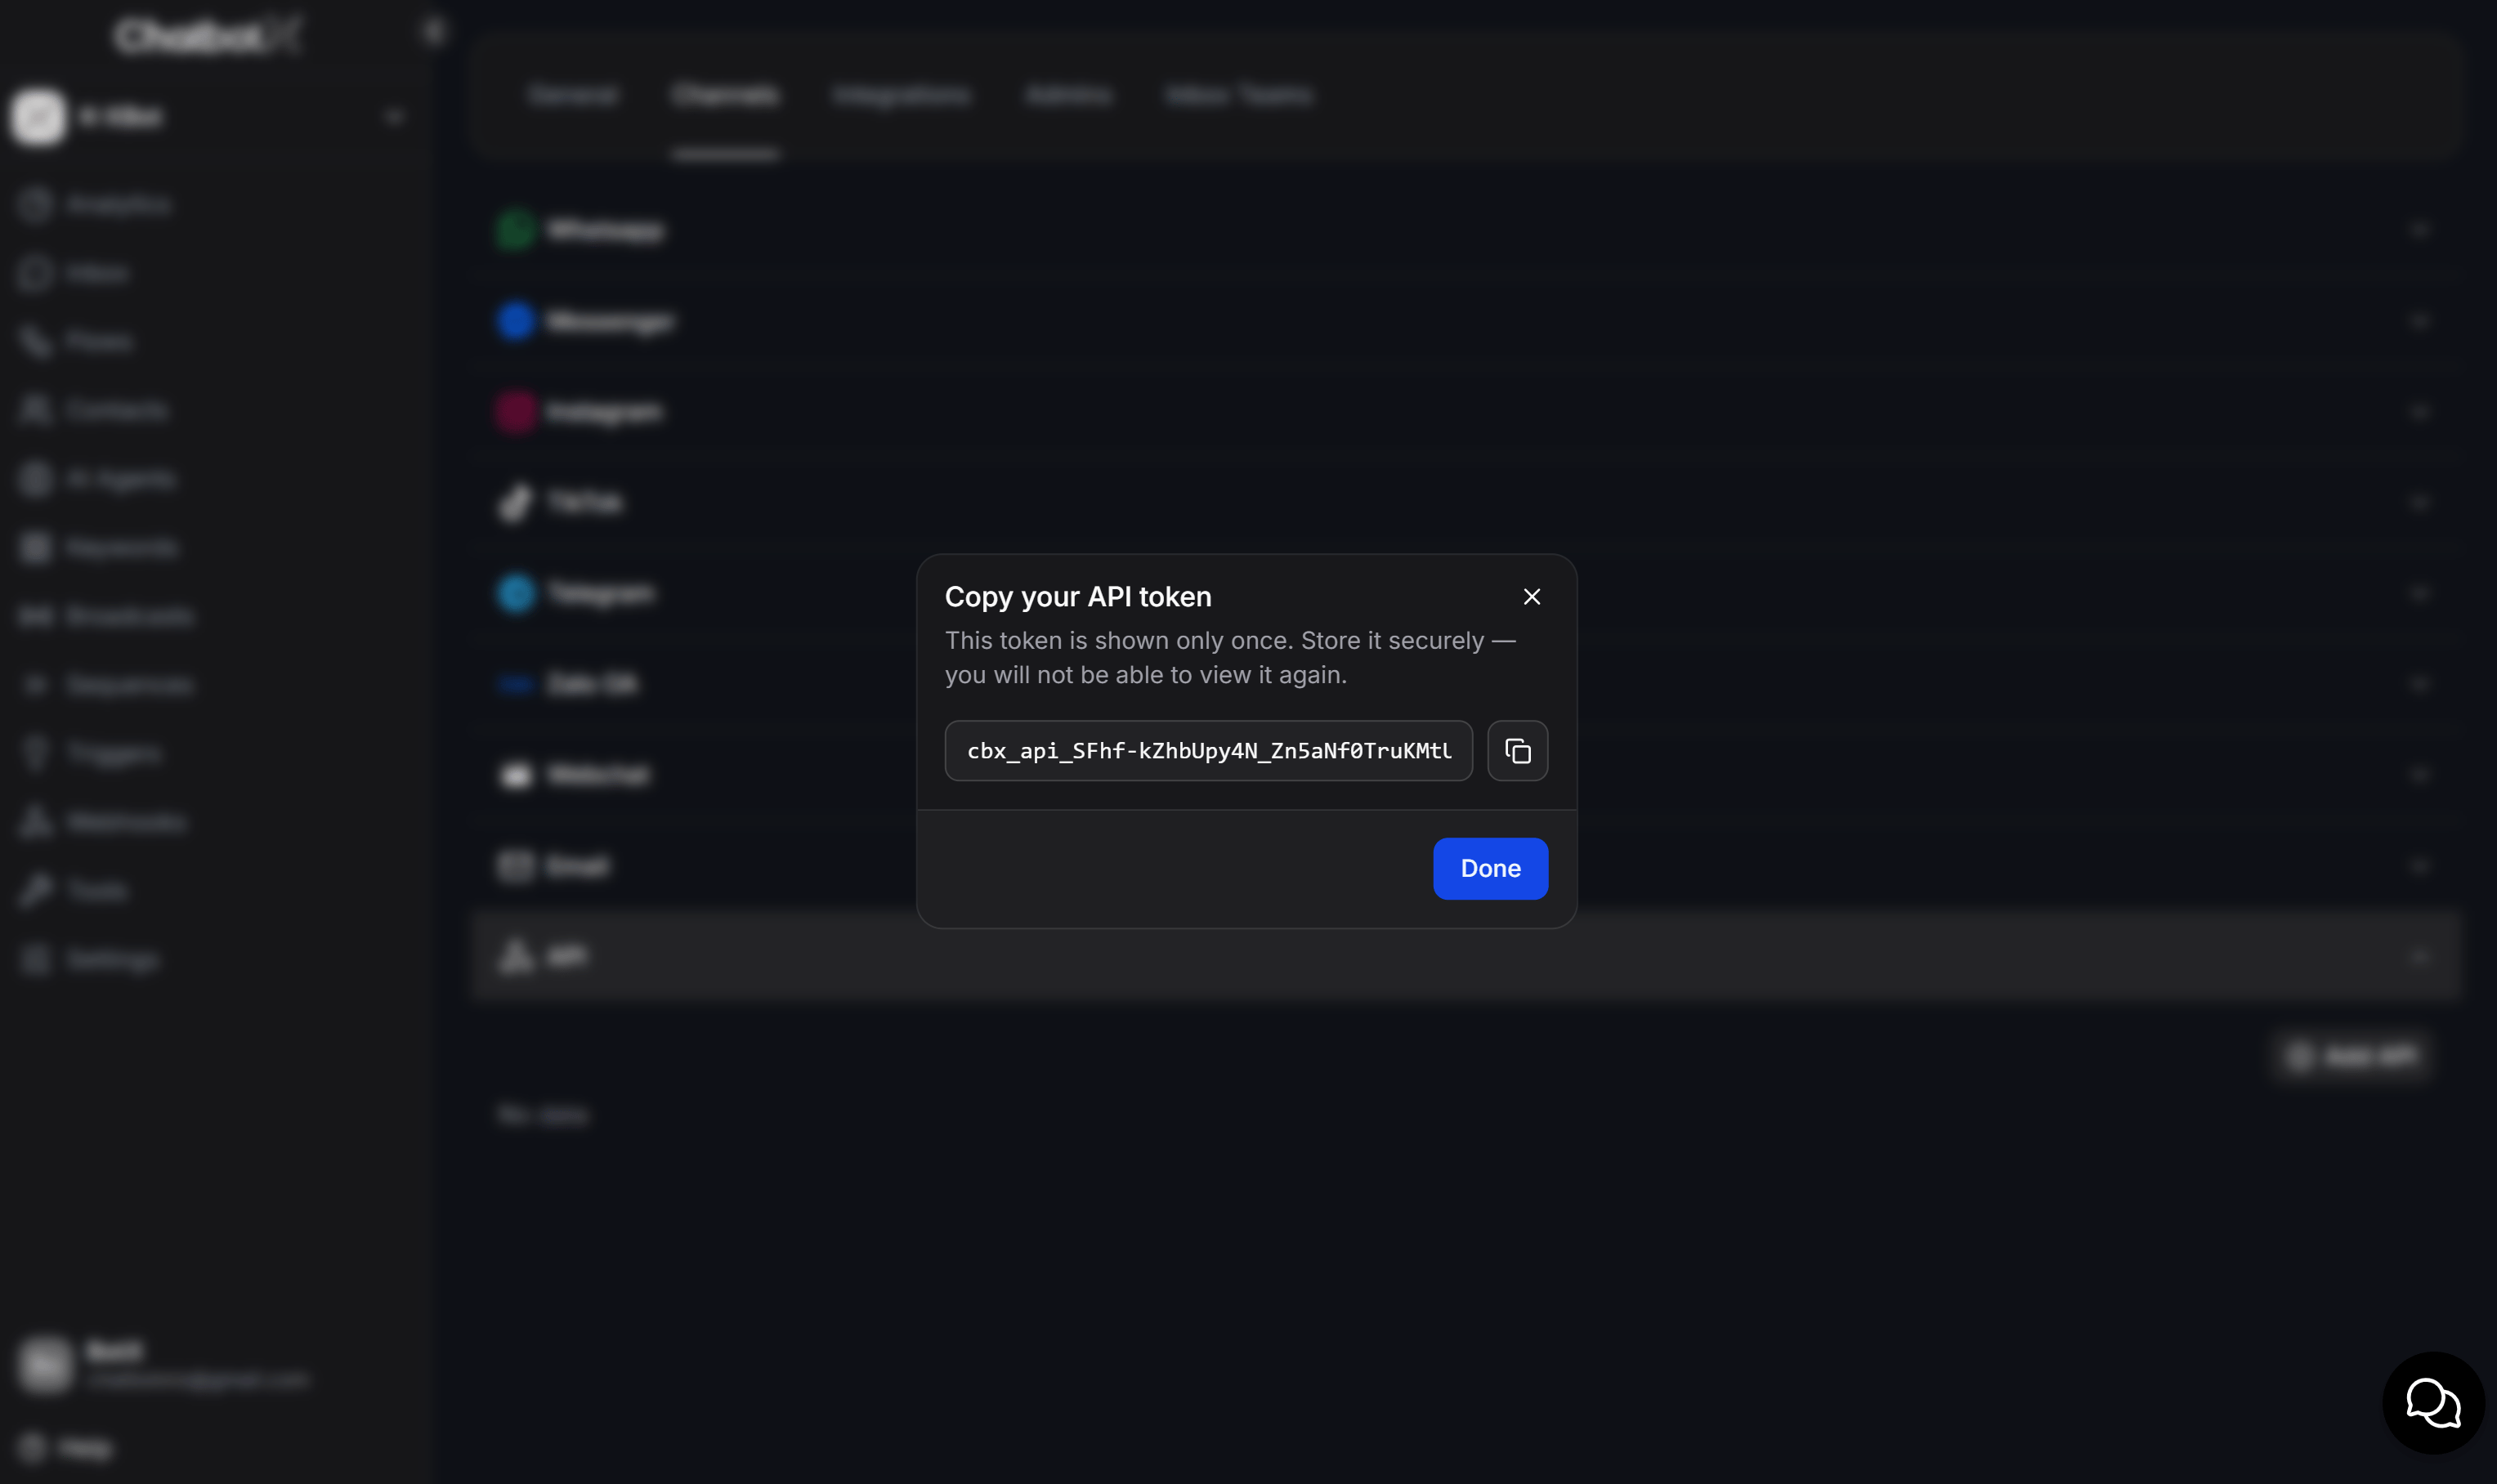
Step 3: Save Token and Activate Channel (Dashboard Step 3)
In the Step 3: Link ChatbotX Channel card on the lower-right of the WAHA Dashboard:- Paste your Channel API Token into the ChatbotX API Token input field.
- Check Forward WhatsApp group messages to ChatbotX if you want your AI bot to process group chat messages.
- Click Save & Activate Channel to complete the setup.
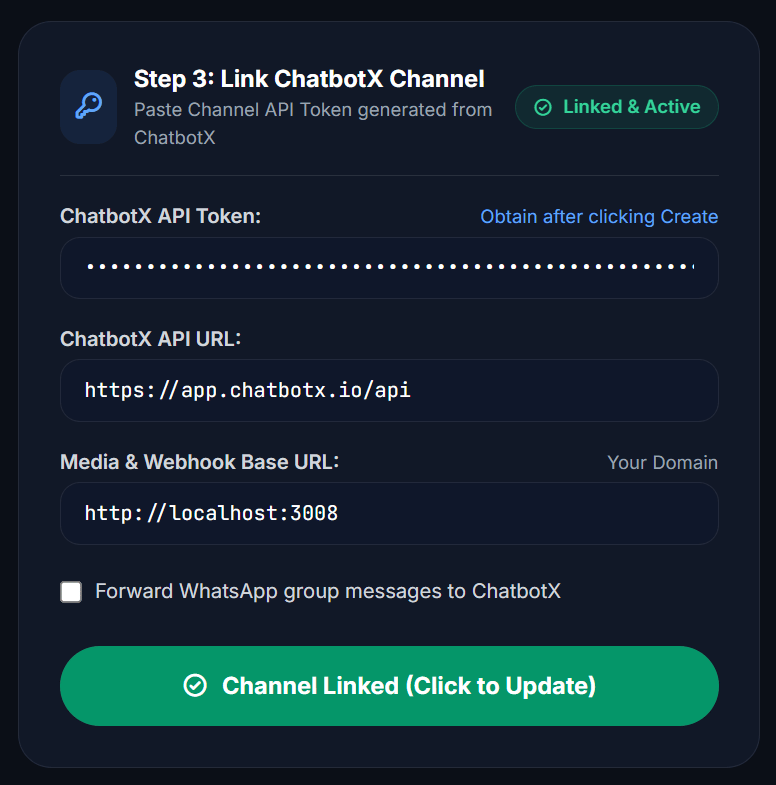
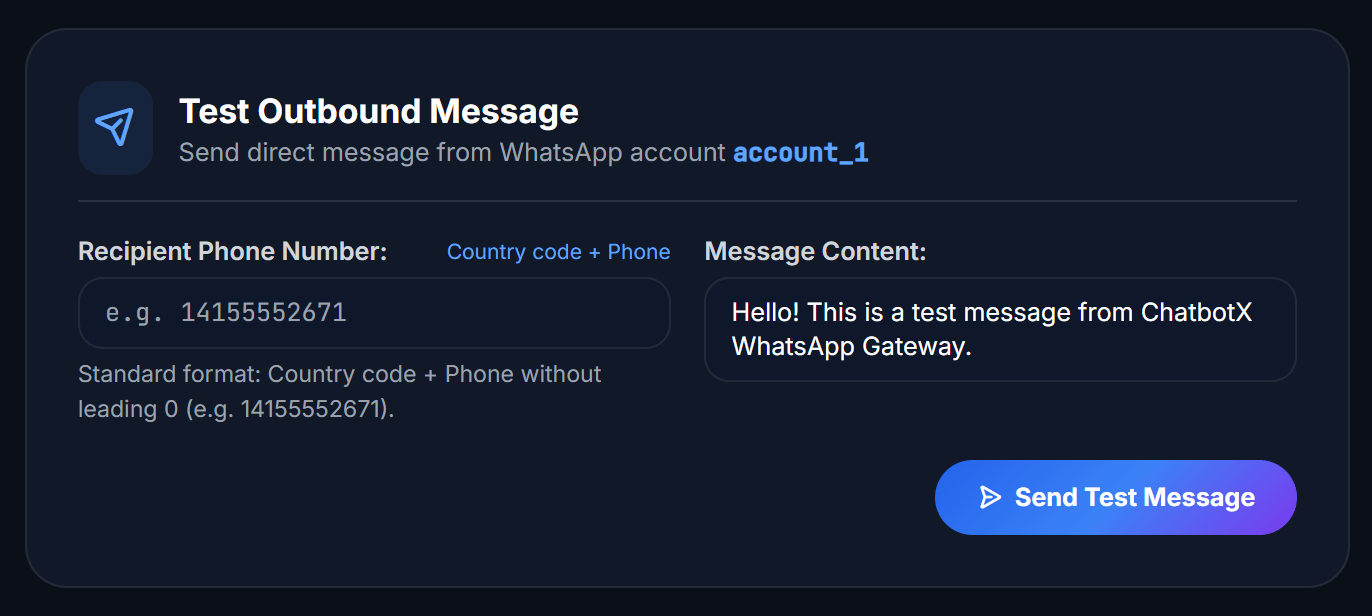
Step 4: Test Message Delivery (Test Outbound Message)
You can verify end-to-end message delivery directly from the dashboard:- In the Test Outbound Message card (at the bottom-left), enter a recipient phone number with country code.
- Type your message and click Send Test Message.
- The recipient will immediately receive the test message from your connected WhatsApp number.
Managing Multiple WhatsApp Accounts
If your business operates multiple phone numbers for different departments (e.g., Customer Support, Sales East, Sales West):- In the top accounts bar on the dashboard, click the + Add Account button.
- Enter an identifier for the new number (e.g.,
sales_ny,support_la). - Repeat the pairing and API Channel creation steps for each number.
Frequently Asked Questions (FAQ)
Does ChatbotX impose any message rate limits on API Channels?
Does ChatbotX impose any message rate limits on API Channels?
ChatbotX does not impose artificial rate limits on API Channels. Processing throughput depends on your Workspace plan tier and the capacity of your self-hosted webhook infrastructure.
Can I connect multiple personal WhatsApp numbers to a single Workspace?
Can I connect multiple personal WhatsApp numbers to a single Workspace?
Yes. You can connect an unlimited number of WhatsApp accounts. Each phone number corresponds to an isolated API Channel in ChatbotX for easy organization and inbox management.
When should I use Personal WhatsApp vs. Official WhatsApp Cloud API?
When should I use Personal WhatsApp vs. Official WhatsApp Cloud API?
- Use Personal WhatsApp (via WAHA Gateway): Best for 1:1 customer engagement using your existing phone numbers, saving on Meta conversation costs, and sharing an inbox among multiple agents.
- Use Official WhatsApp Cloud API: Best for mass broadcast marketing campaigns to thousands of contacts and official green badge verified business accounts.
What happens if my phone goes offline or runs out of battery?
What happens if my phone goes offline or runs out of battery?
WhatsApp uses the Linked Devices protocol. Once paired, the Gateway server maintains an active independent session and continues receiving customer messages even if your phone is temporarily offline or turned off.