The n8n integration lets you move data between ChatbotX and other applications without manual work. You can start a workflow when an event occurs, update a contact, or send another Flow from n8n. For example, after a customer completes a consultation form in ChatbotX, n8n can receive the information, apply a Tag, update a Custom Field, and send a confirmation Flow.

How the integration works

In n8n, a workflow is a process made of connected steps. The ChatbotX integration uses three main nodes: To get started, install the Community Node, connect your ChatbotX workspace with a Credential, select a Trigger, add the required Actions, and test the workflow.

Install the ChatbotX Community Node

Installing packages from npm is only available on self-hosted n8n instances. Unverified Community Nodes are not available on n8n Cloud.
You can install n8n-nodes-chatbotx directly from the self-hosted n8n interface without using commands.
1

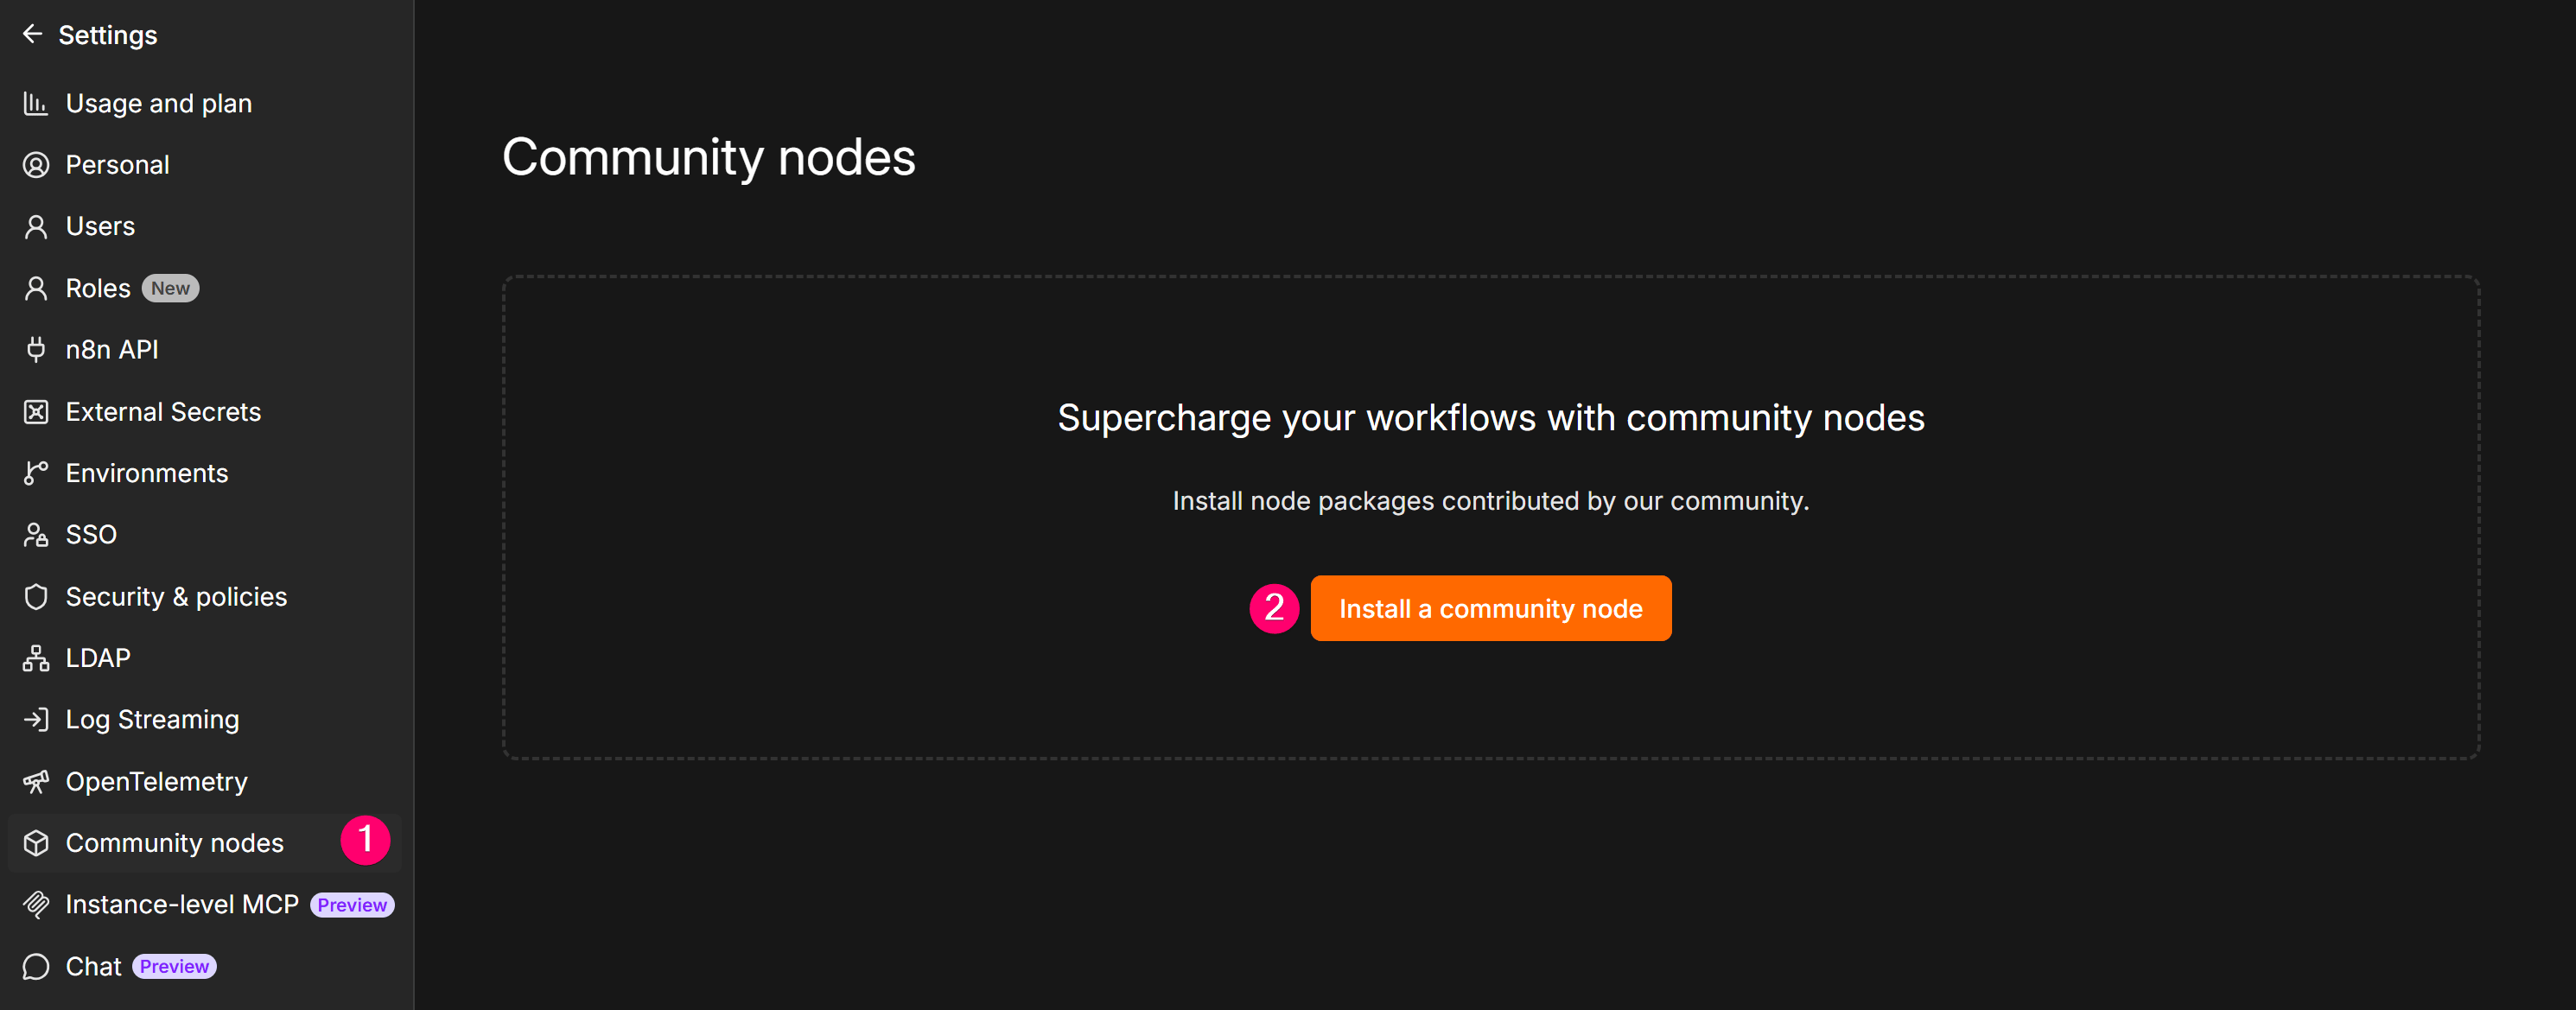
Open Community Nodes

In n8n, open Settings > Community Nodes. Your account must have permission to manage Community Nodes.
Open Community Nodes settings in n8n
2

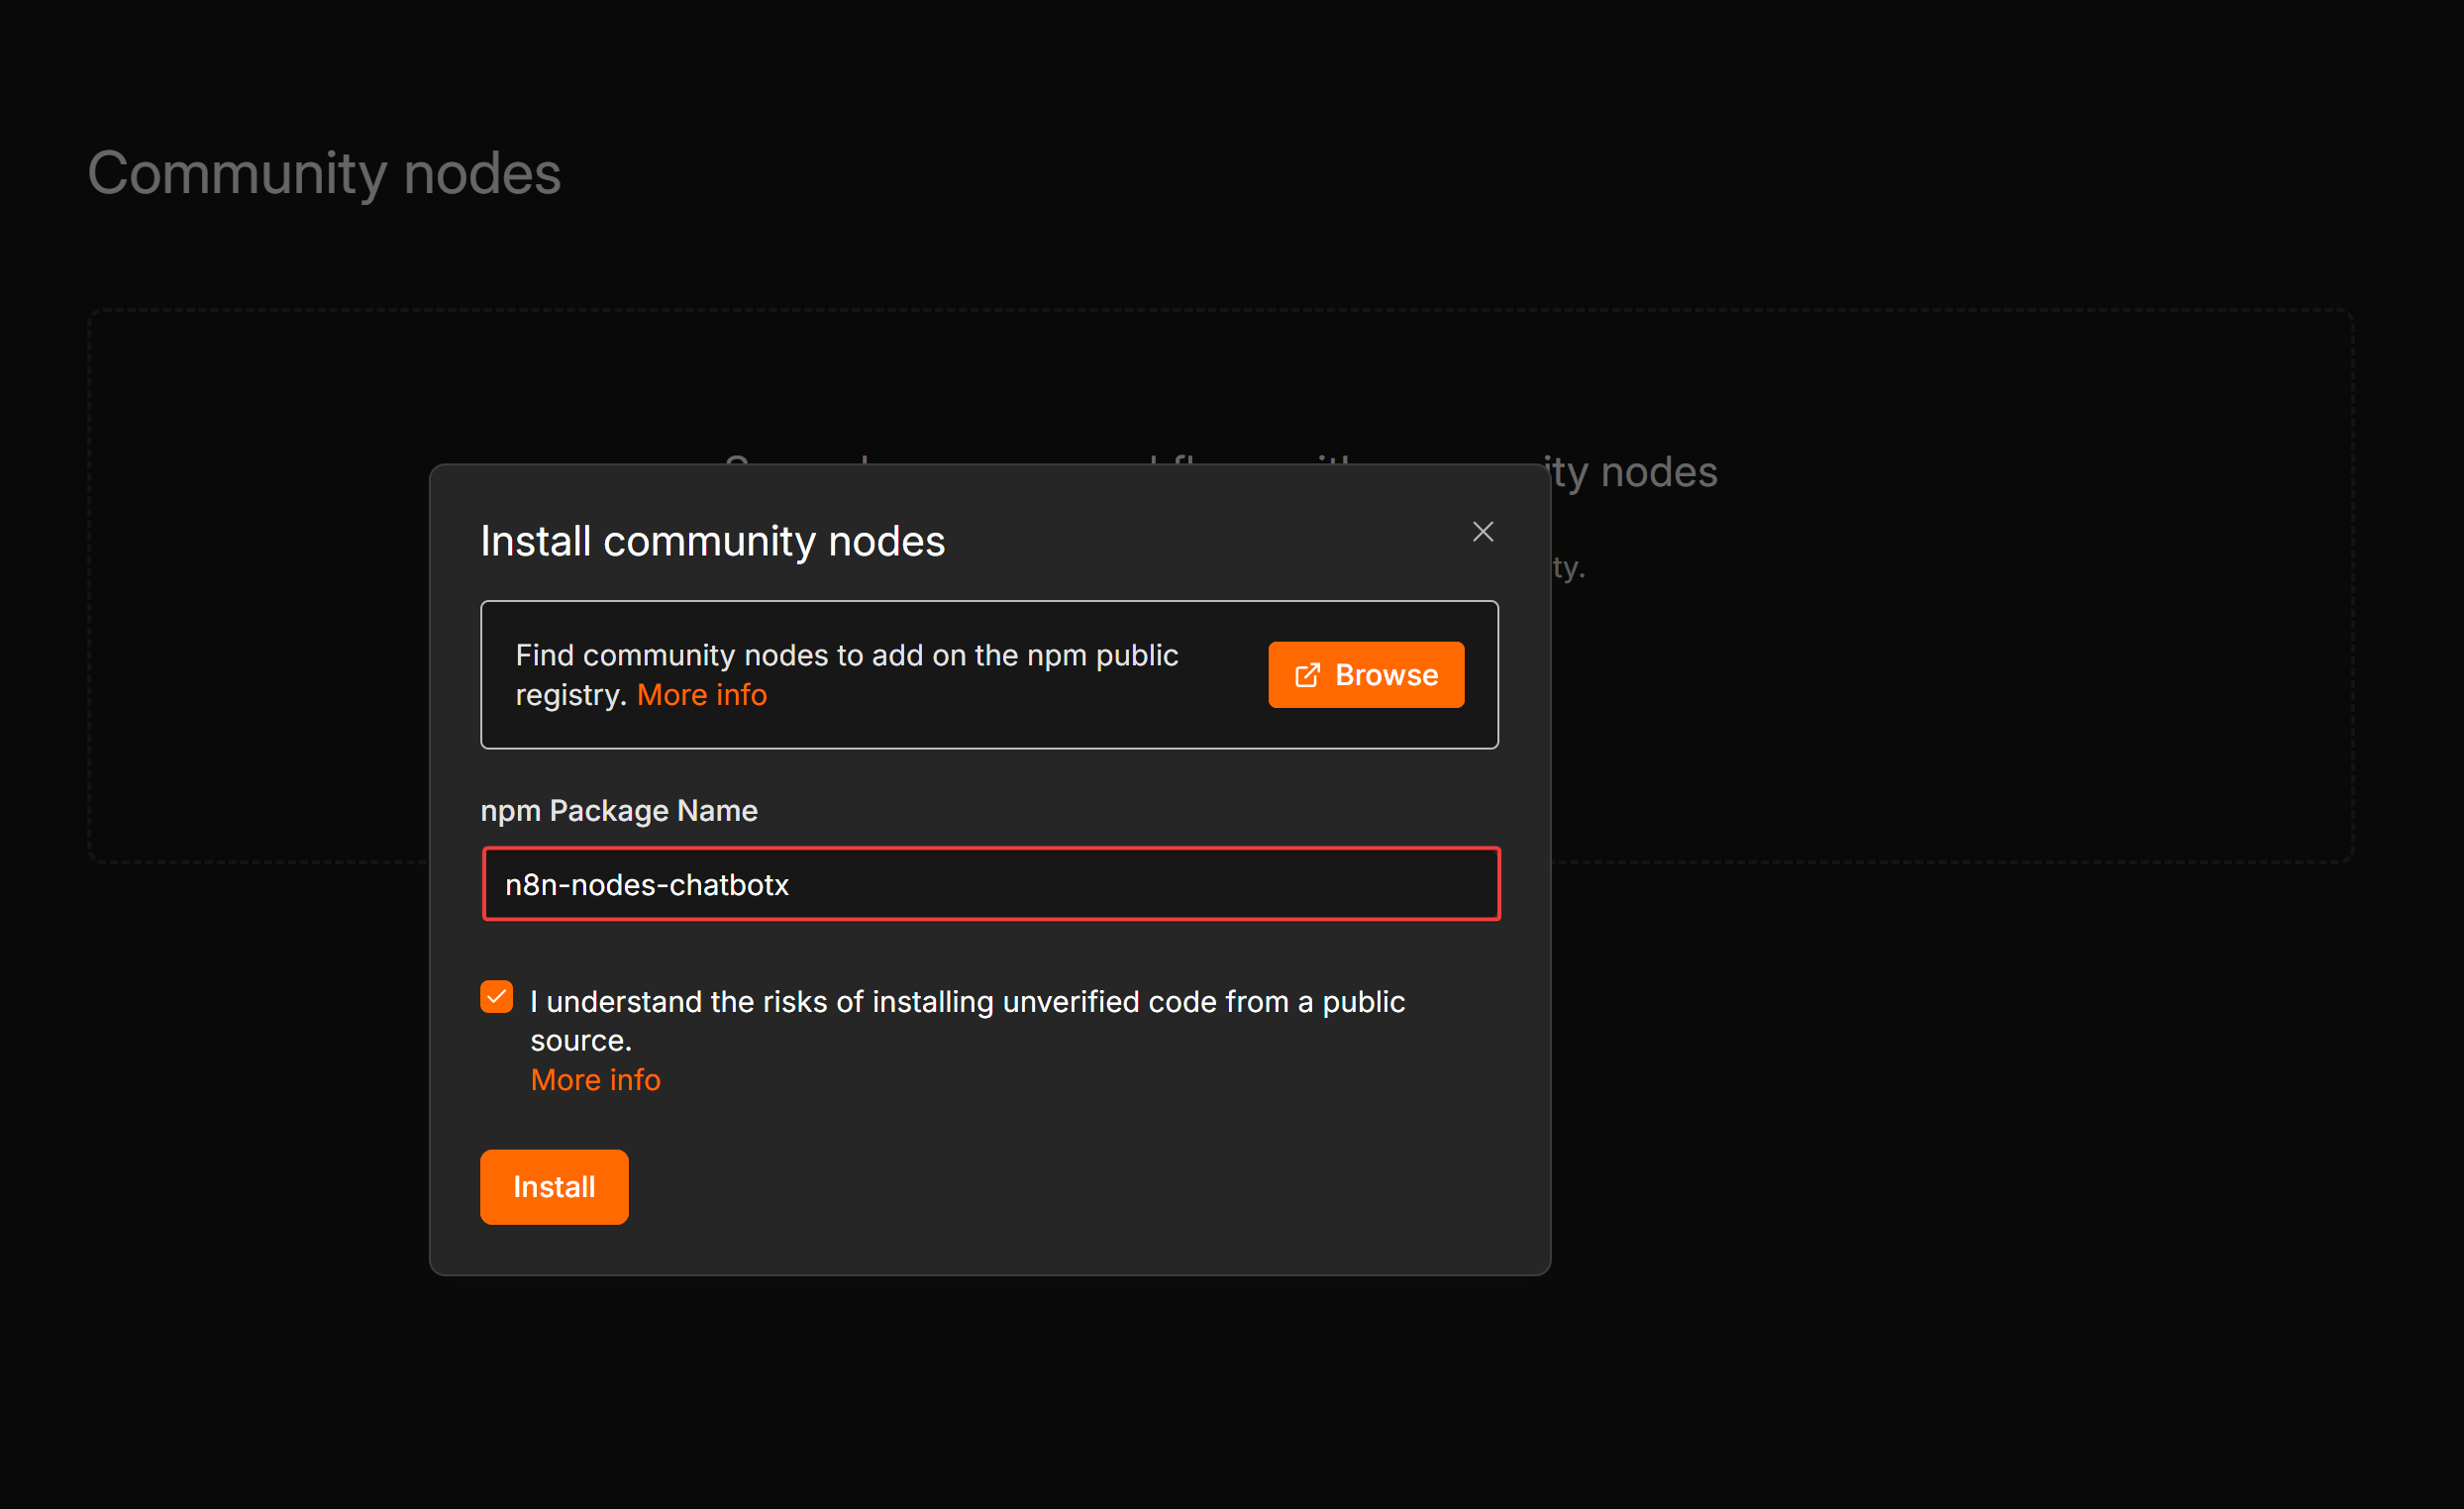
Enter the package name

Click Install a community node, then enter n8n-nodes-chatbotx.
Install the ChatbotX community node package in n8n
3

Confirm the installation

Wait for the Package installed message. The Community nodes list displays n8n-nodes-chatbotx, the installed version, and the three ChatbotX nodes.
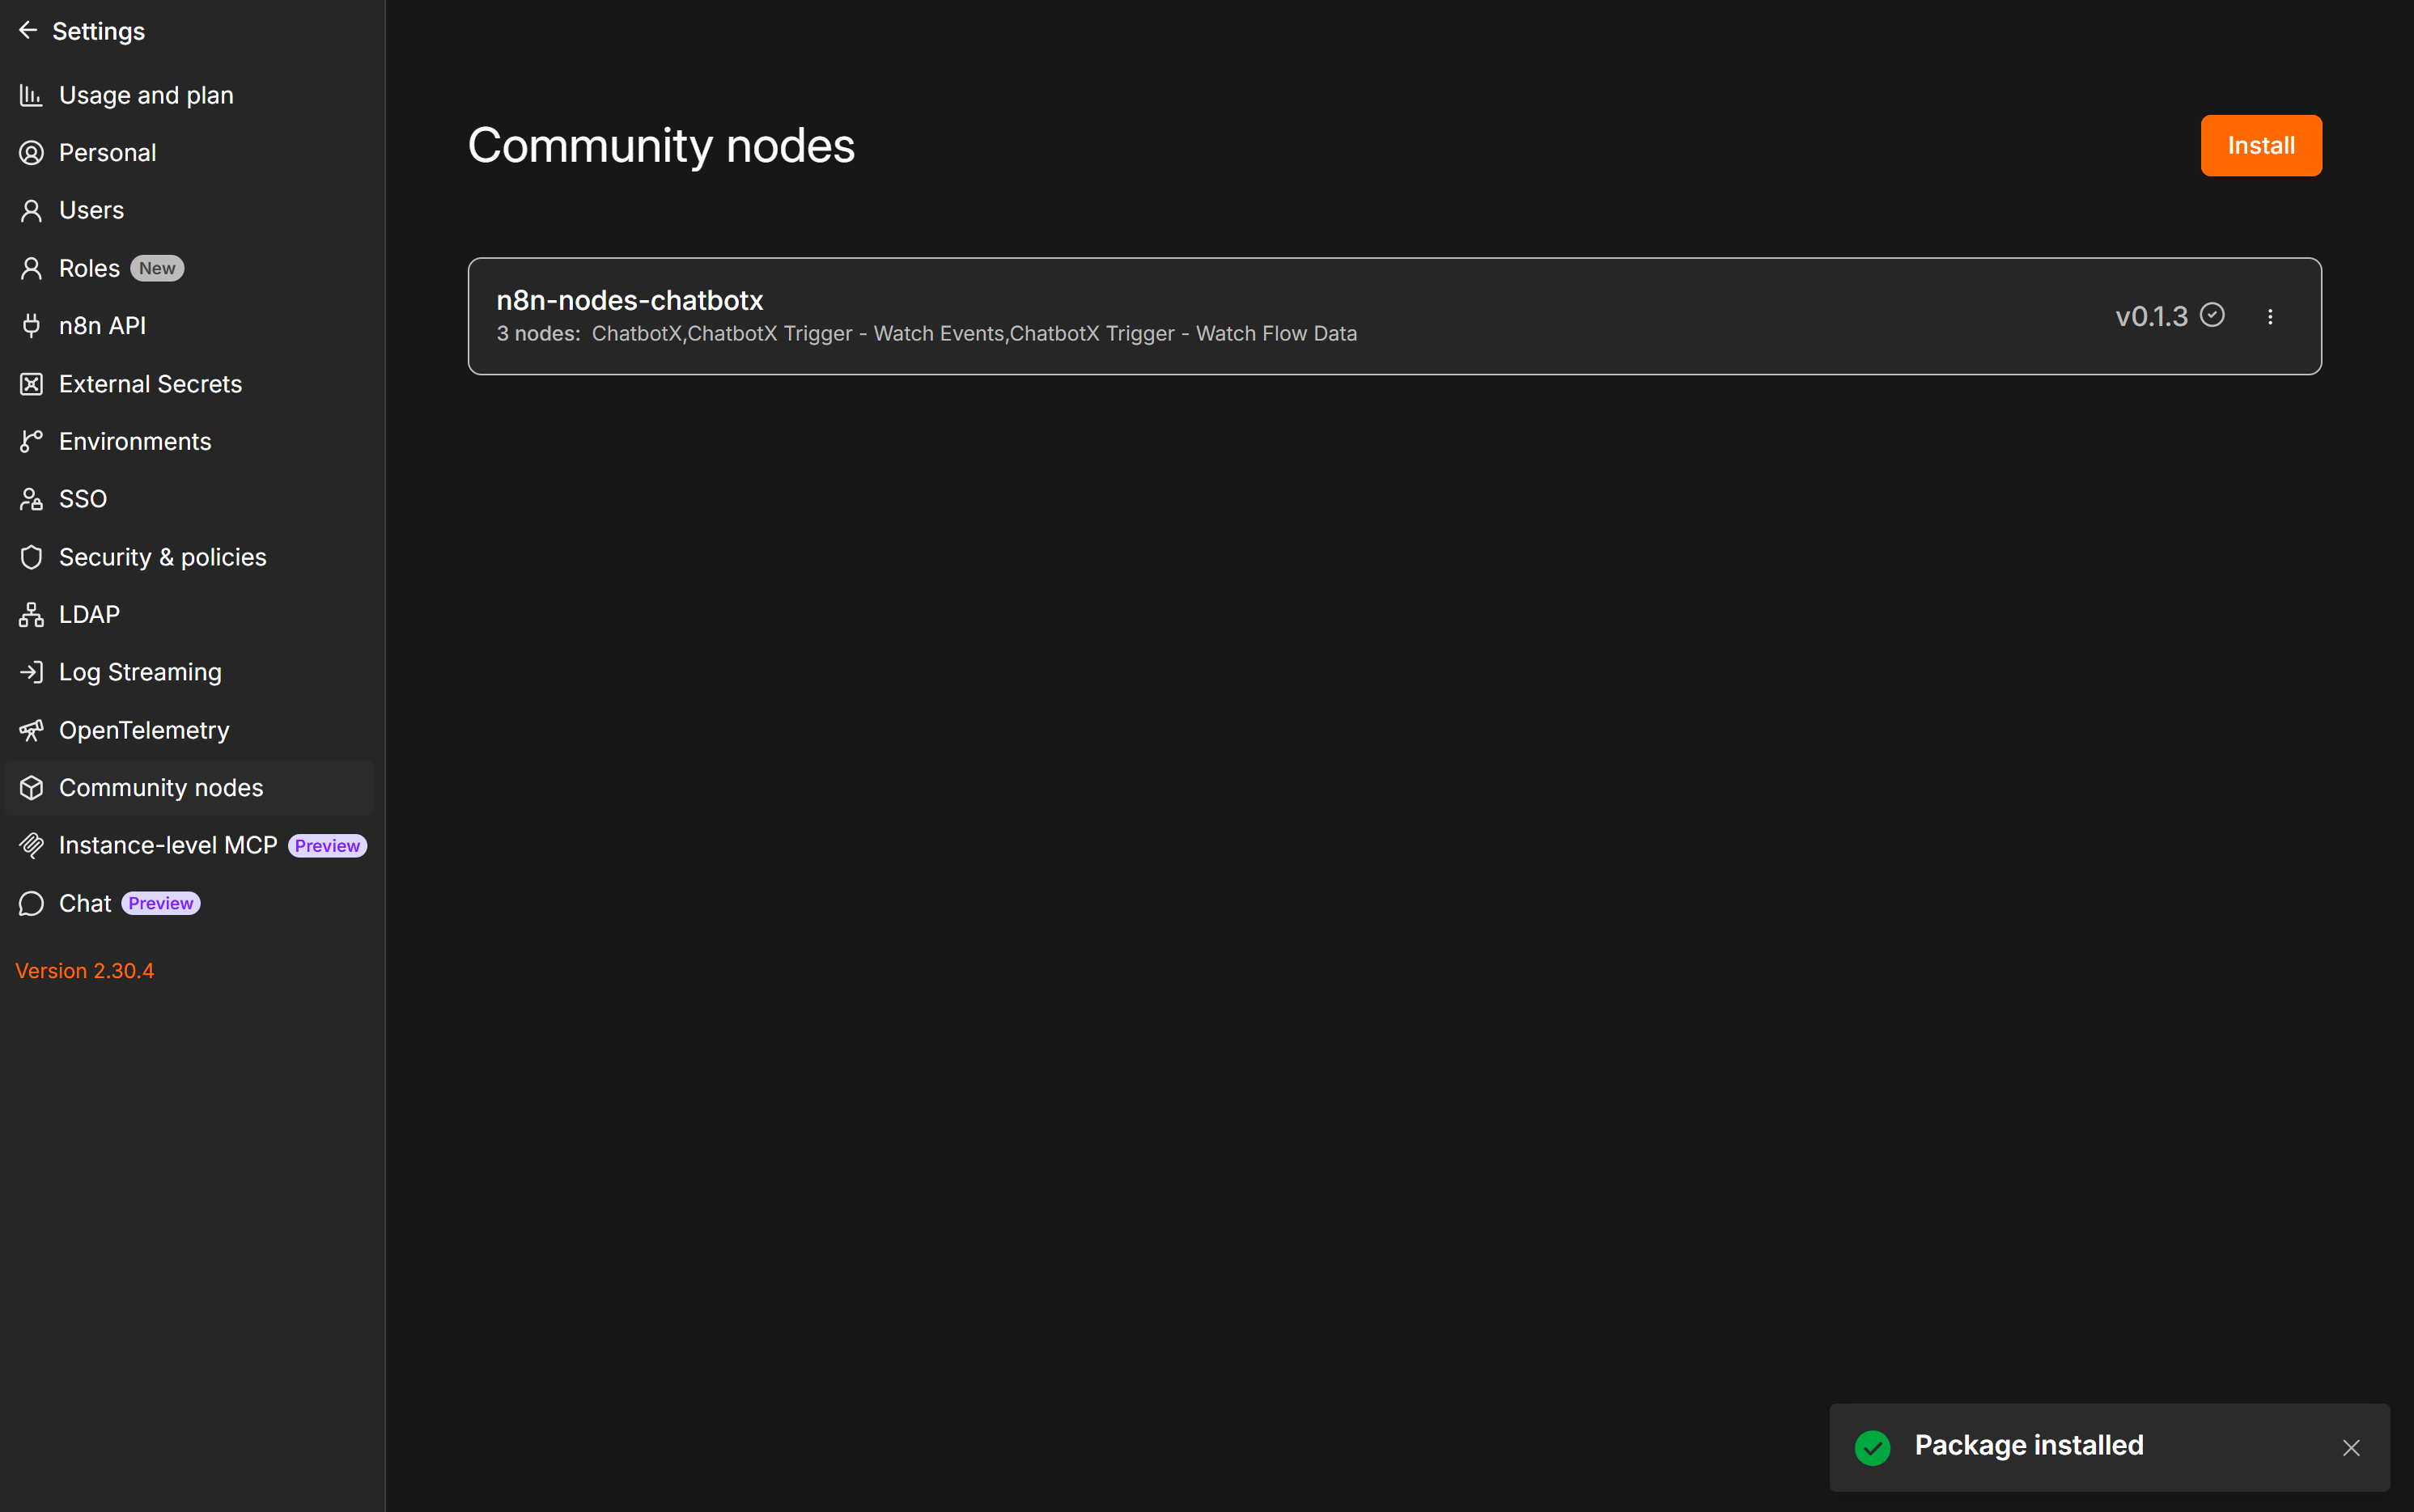
Confirm the ChatbotX community node package is installed in n8n
4

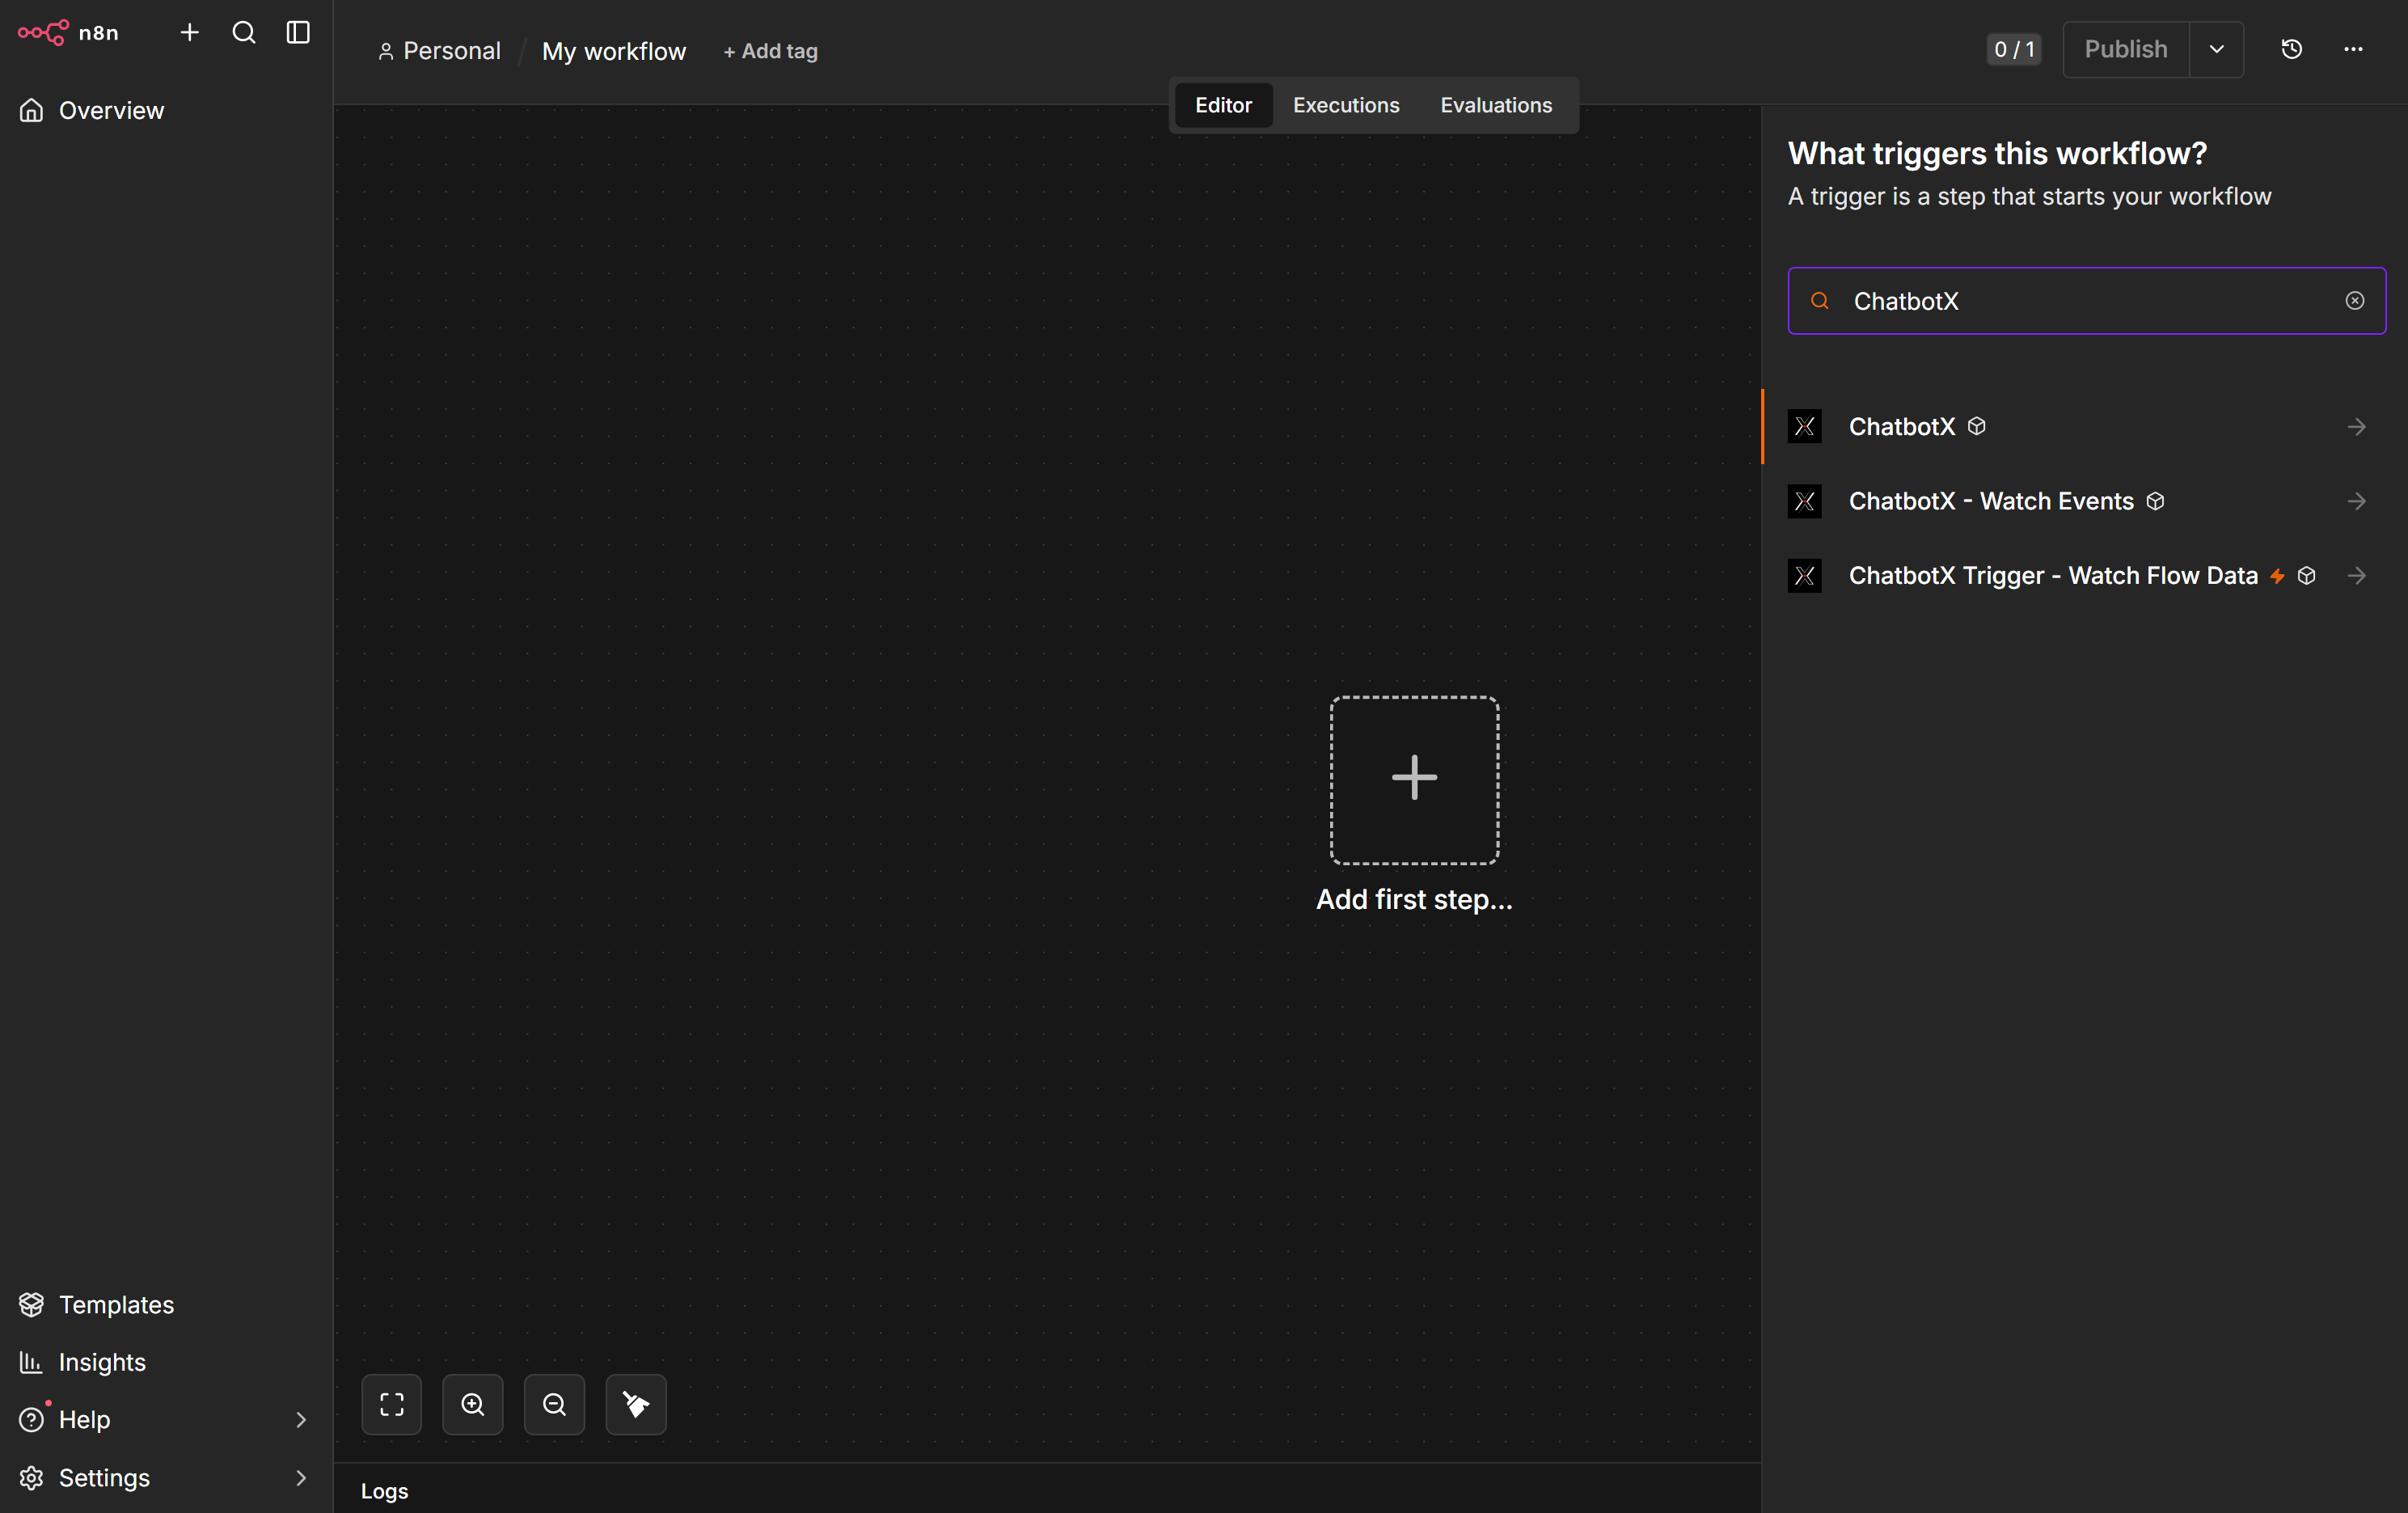
Check the ChatbotX nodes

Complete the installation and reload n8n if prompted. Open a workflow, click +, and search for ChatbotX.
Find the three ChatbotX nodes in n8n

Connect your ChatbotX workspace

A Credential lets n8n access the correct ChatbotX workspace. You only need to create it once and can reuse it in other nodes.
1

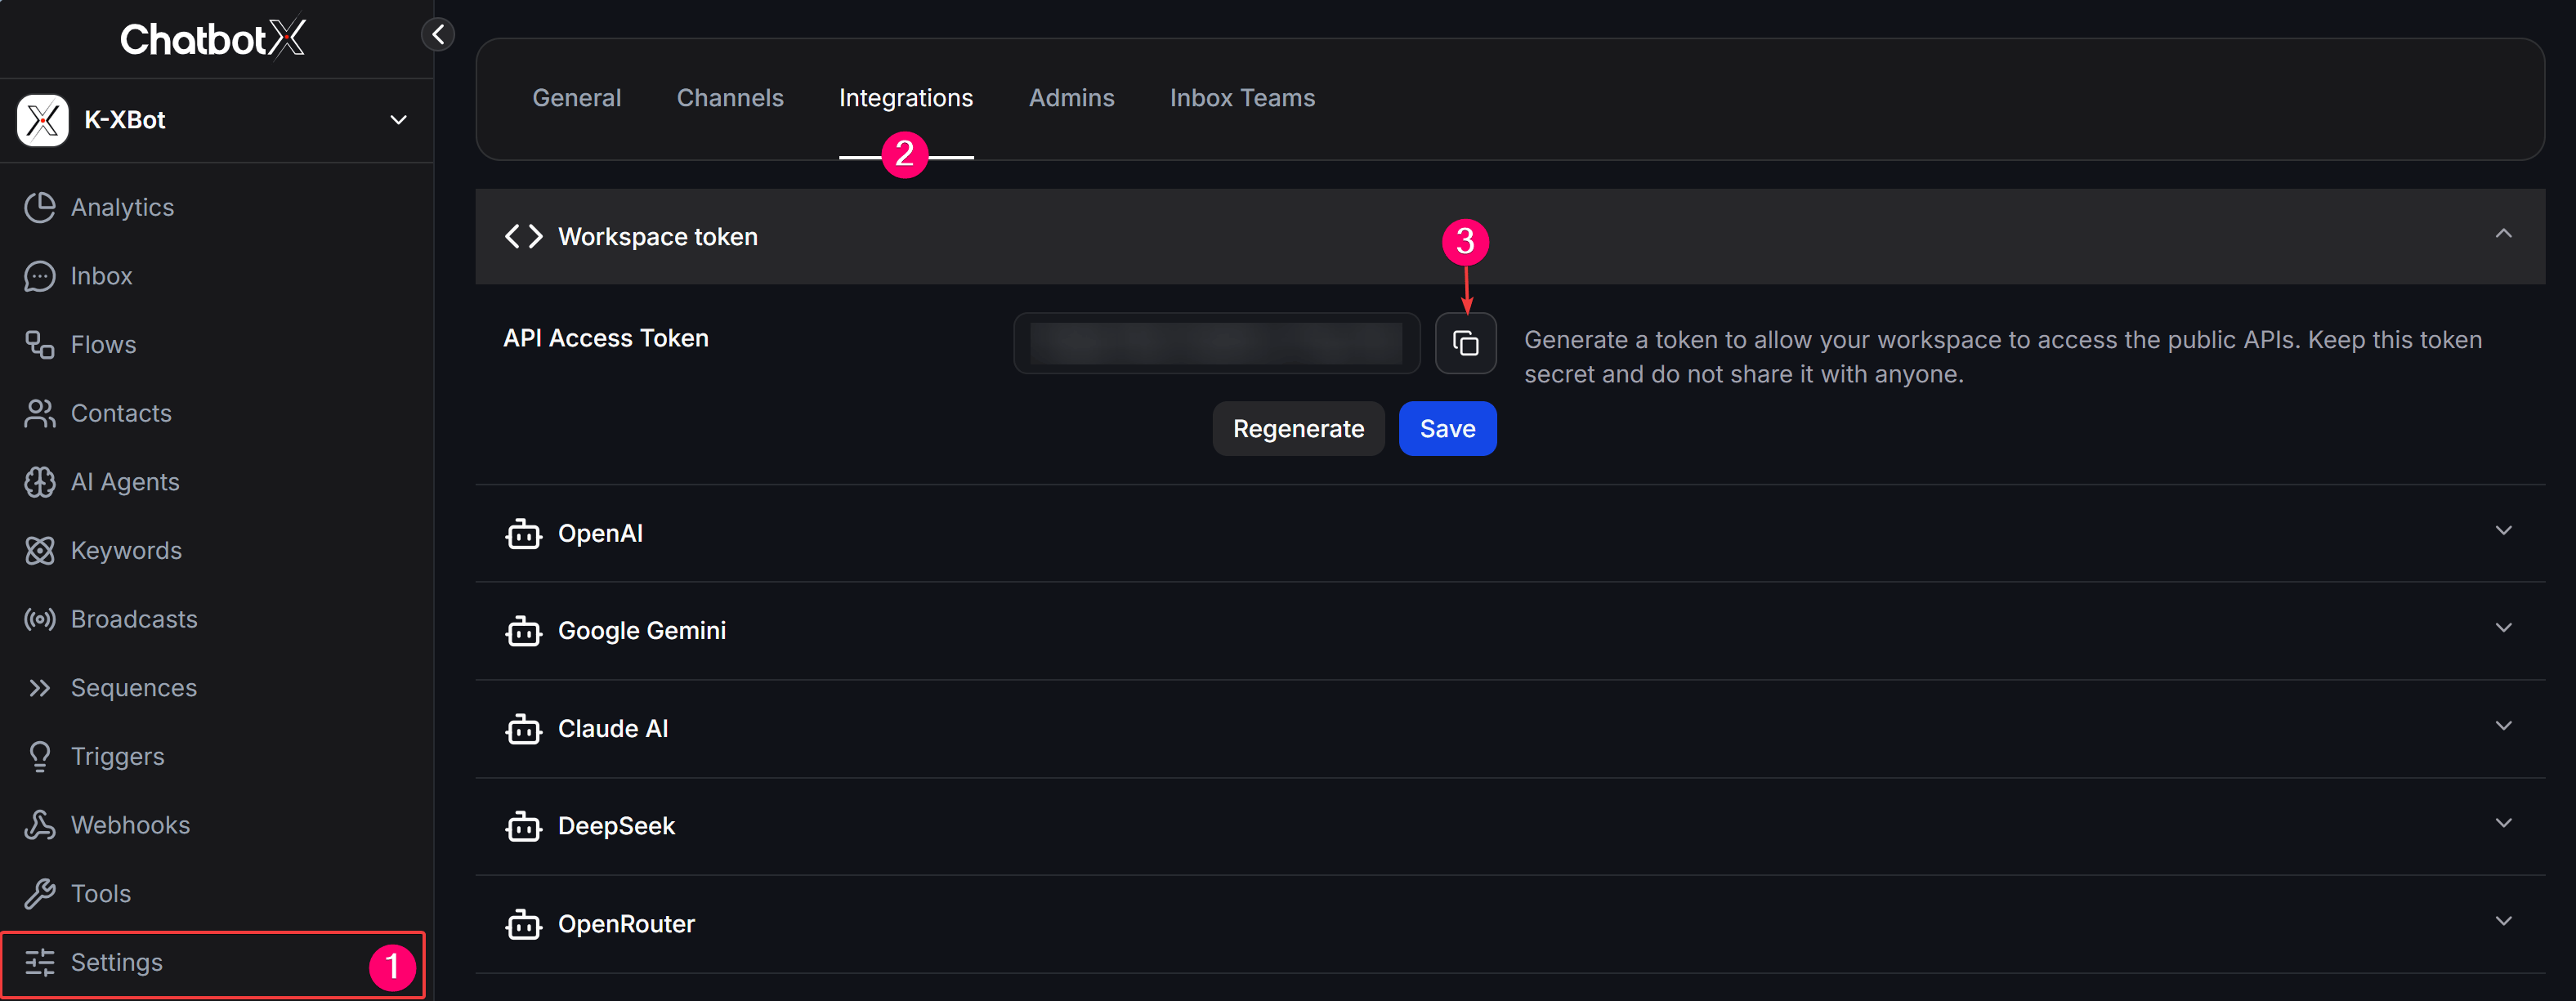
Copy the API Access Token

In ChatbotX, open Settings > Integrations > ChatbotX API Access Token and copy the workspace token.
Copy the ChatbotX API access token from Integrations settings
2

Create a ChatbotX API Credential

In a ChatbotX node in n8n, open the Credential field and create a new Credential.
3

Enter the connection details

Keep the API URL as https://app.chatbotx.io/api when using ChatbotX Cloud. Paste the token into Access Token, then save and test the connection.
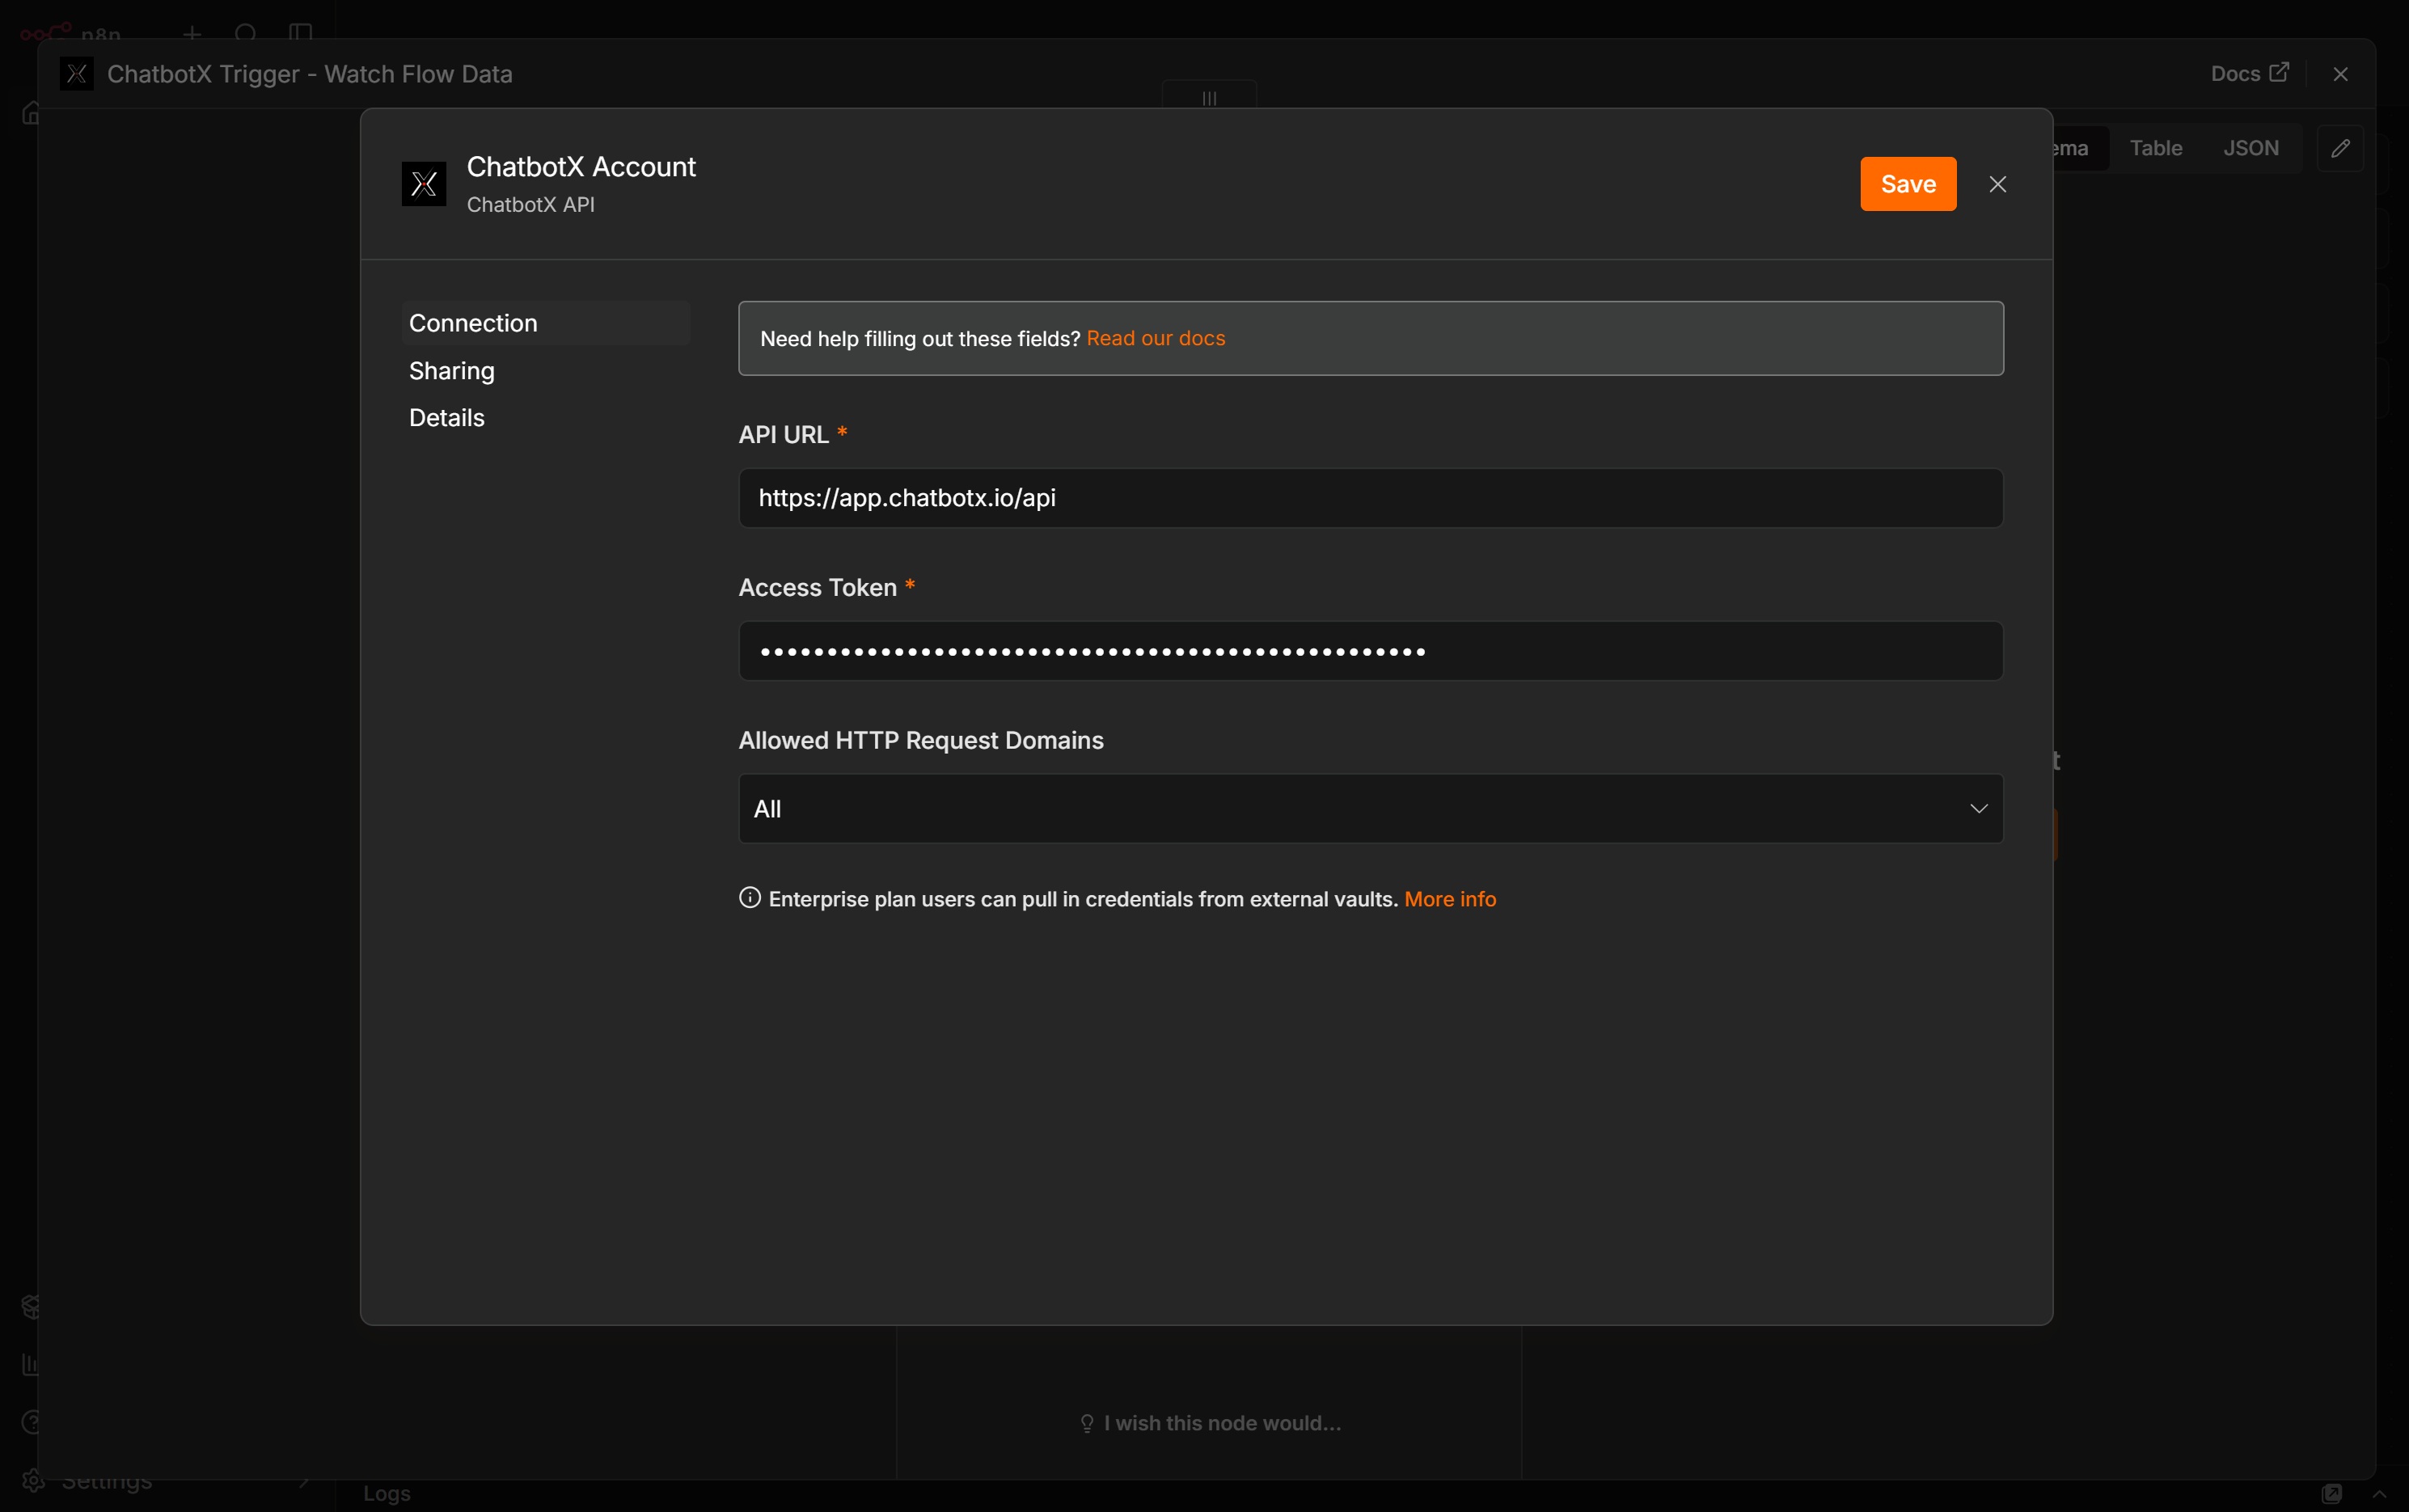
Configure the ChatbotX API credential in n8n
The Access Token allows other applications to access your workspace. Do not include it in screenshots, exported workflows, emails, or public documentation.

Choose the right Trigger

ChatbotX provides two Triggers for different ways of sending data:

Watch Events

Use it with Webhooks. Copy the Webhook URL from n8n and paste it into a Webhook in ChatbotX.

Watch Flow Data

Use it when the Actions > Triggers > Trigger n8n block in a Flow sends an Event Name to n8n.

Receive events with Watch Events

ChatbotX Trigger - Watch Events is suitable when an Action in a Flow produces an event such as Tag Applied, Tag Removed, or Custom Field Changed. ChatbotX sends data to the n8n Webhook URL when the configured conditions match.
The Webhook is sent only when the matching Action runs in the Flow’s Perform Action node. The same type of change made elsewhere in the workspace does not trigger the Webhook. Learn more in Webhooks.

Test with the Test URL

The following example uses Tag Applied. Select the same Event and Tag in n8n, ChatbotX Webhooks, and the Flow.
1

Add Watch Events

Create a workflow in n8n, add ChatbotX Trigger - Watch Events, select a Credential, and choose the Tag Applied Event.
2

Copy the Test URL

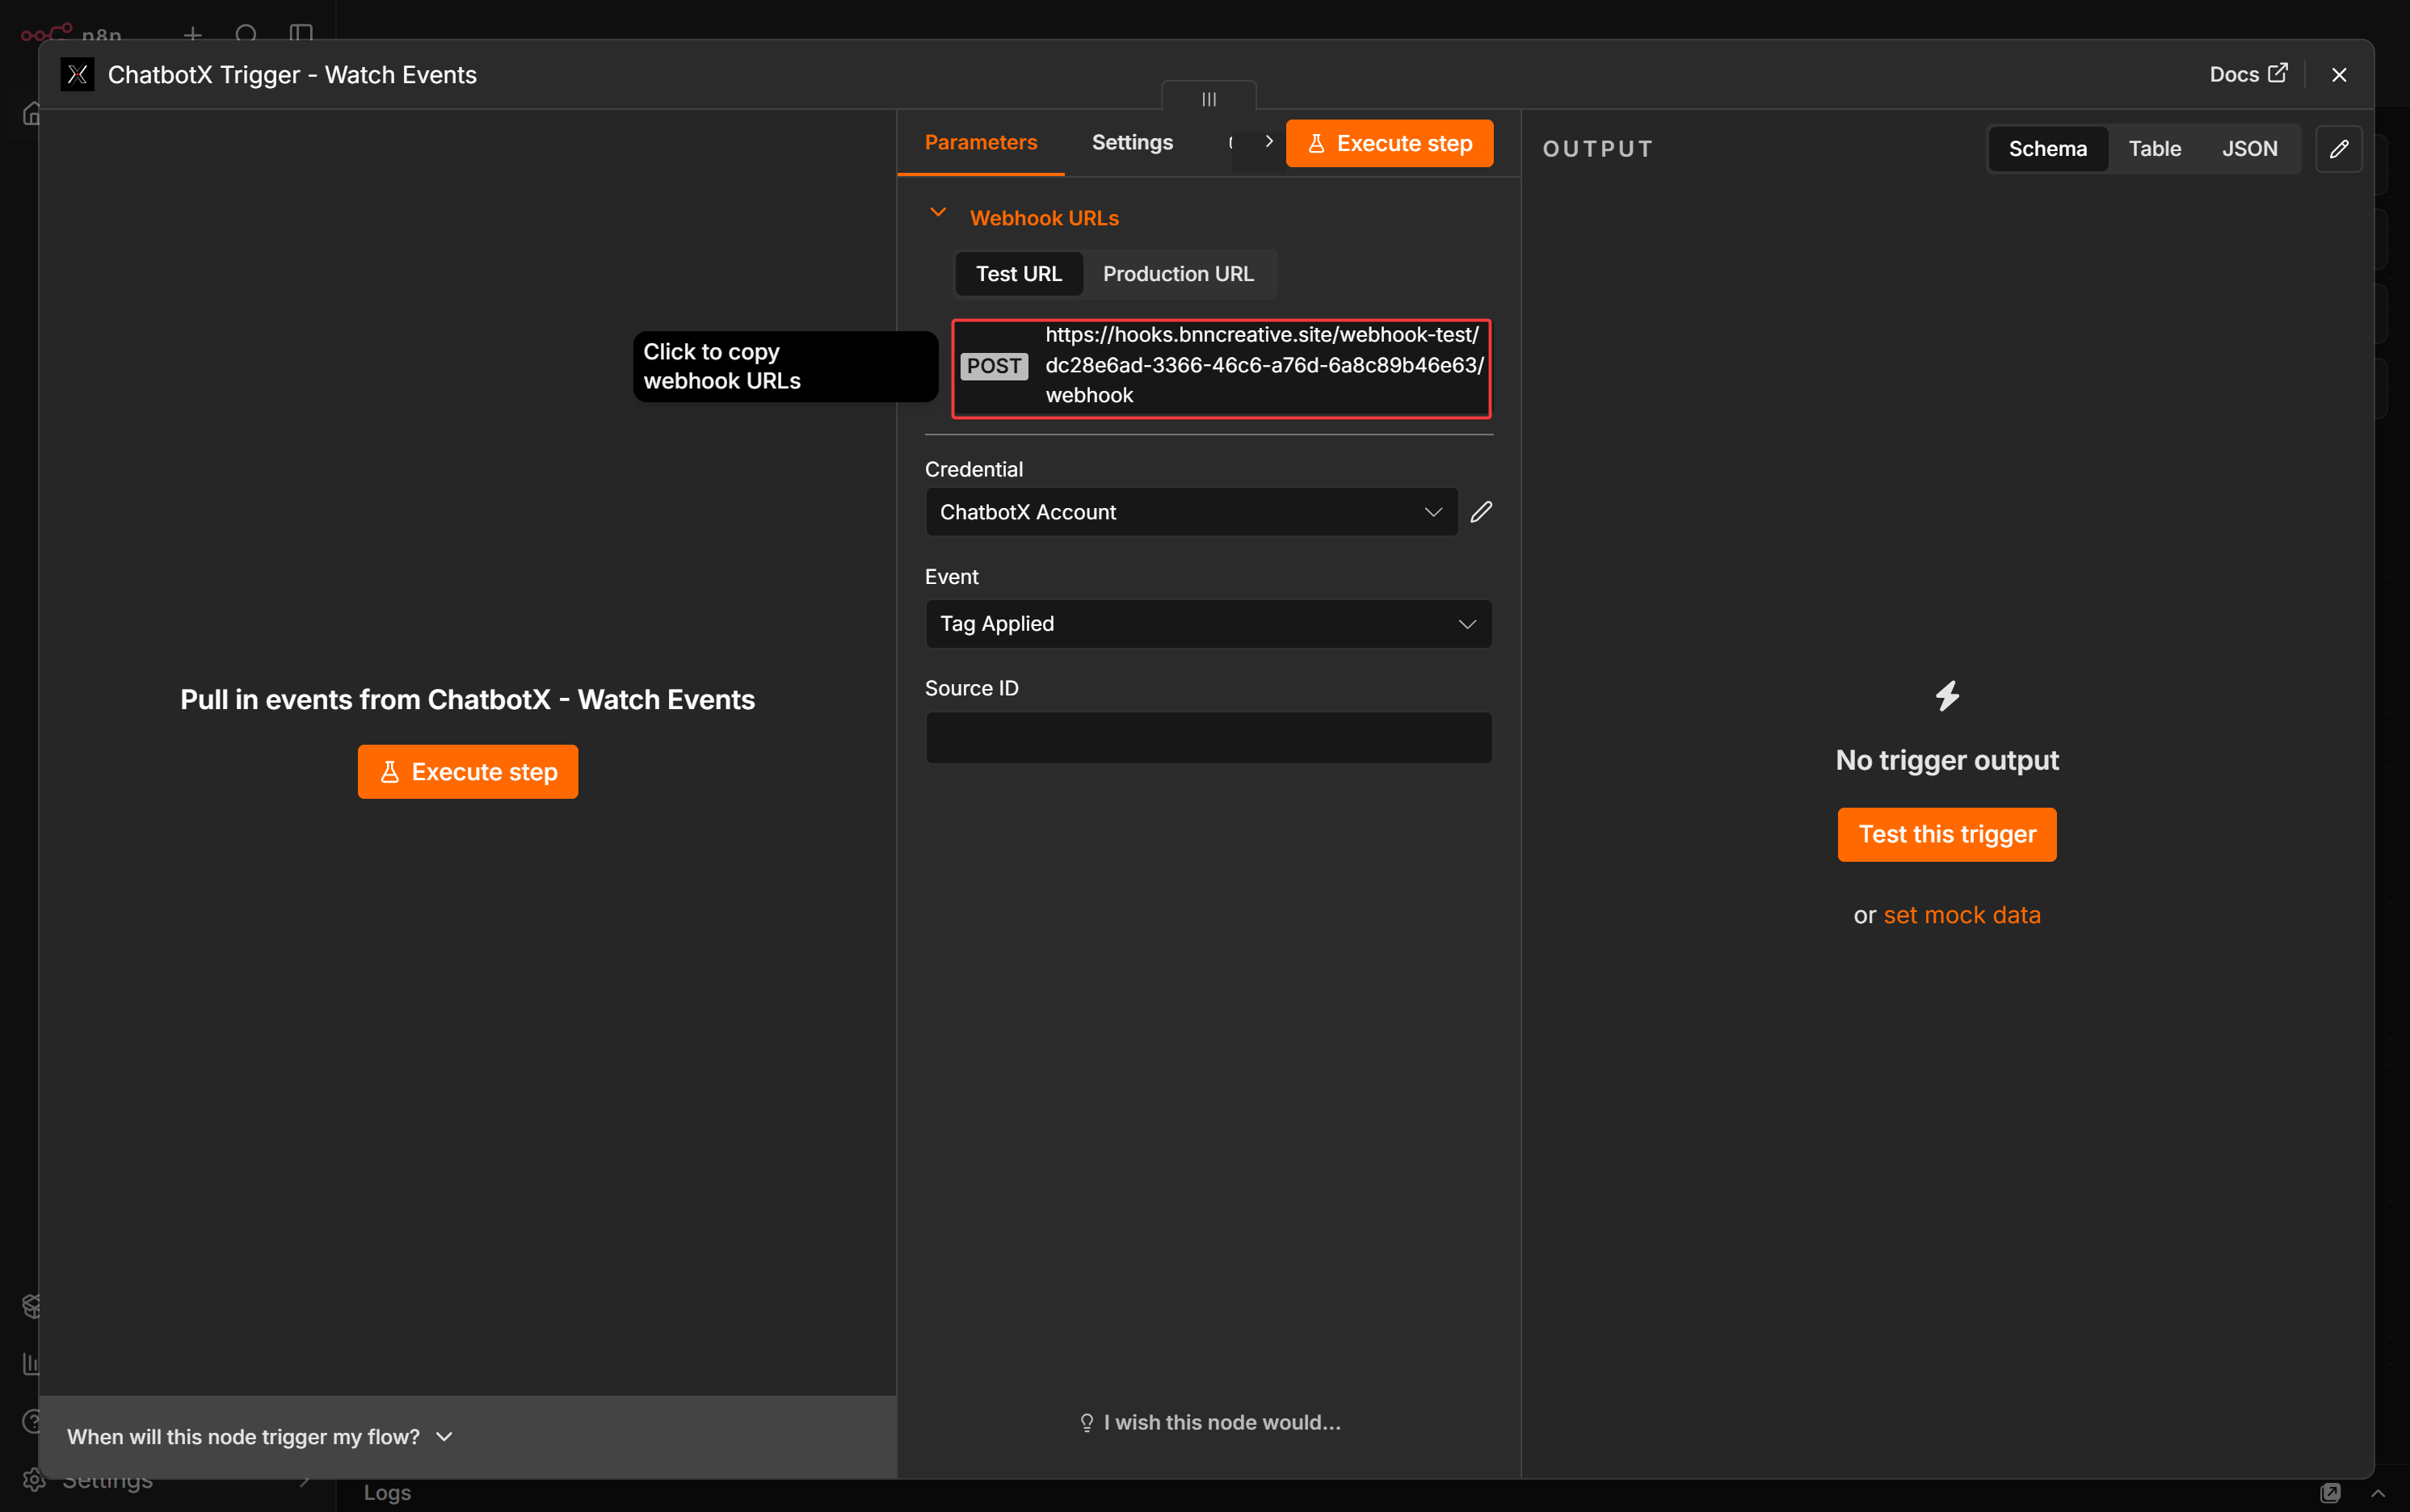
Open Webhook URLs, select Test URL, and copy the displayed address.
Copy the Watch Events test webhook URL in n8n
3

Create a Webhook in ChatbotX

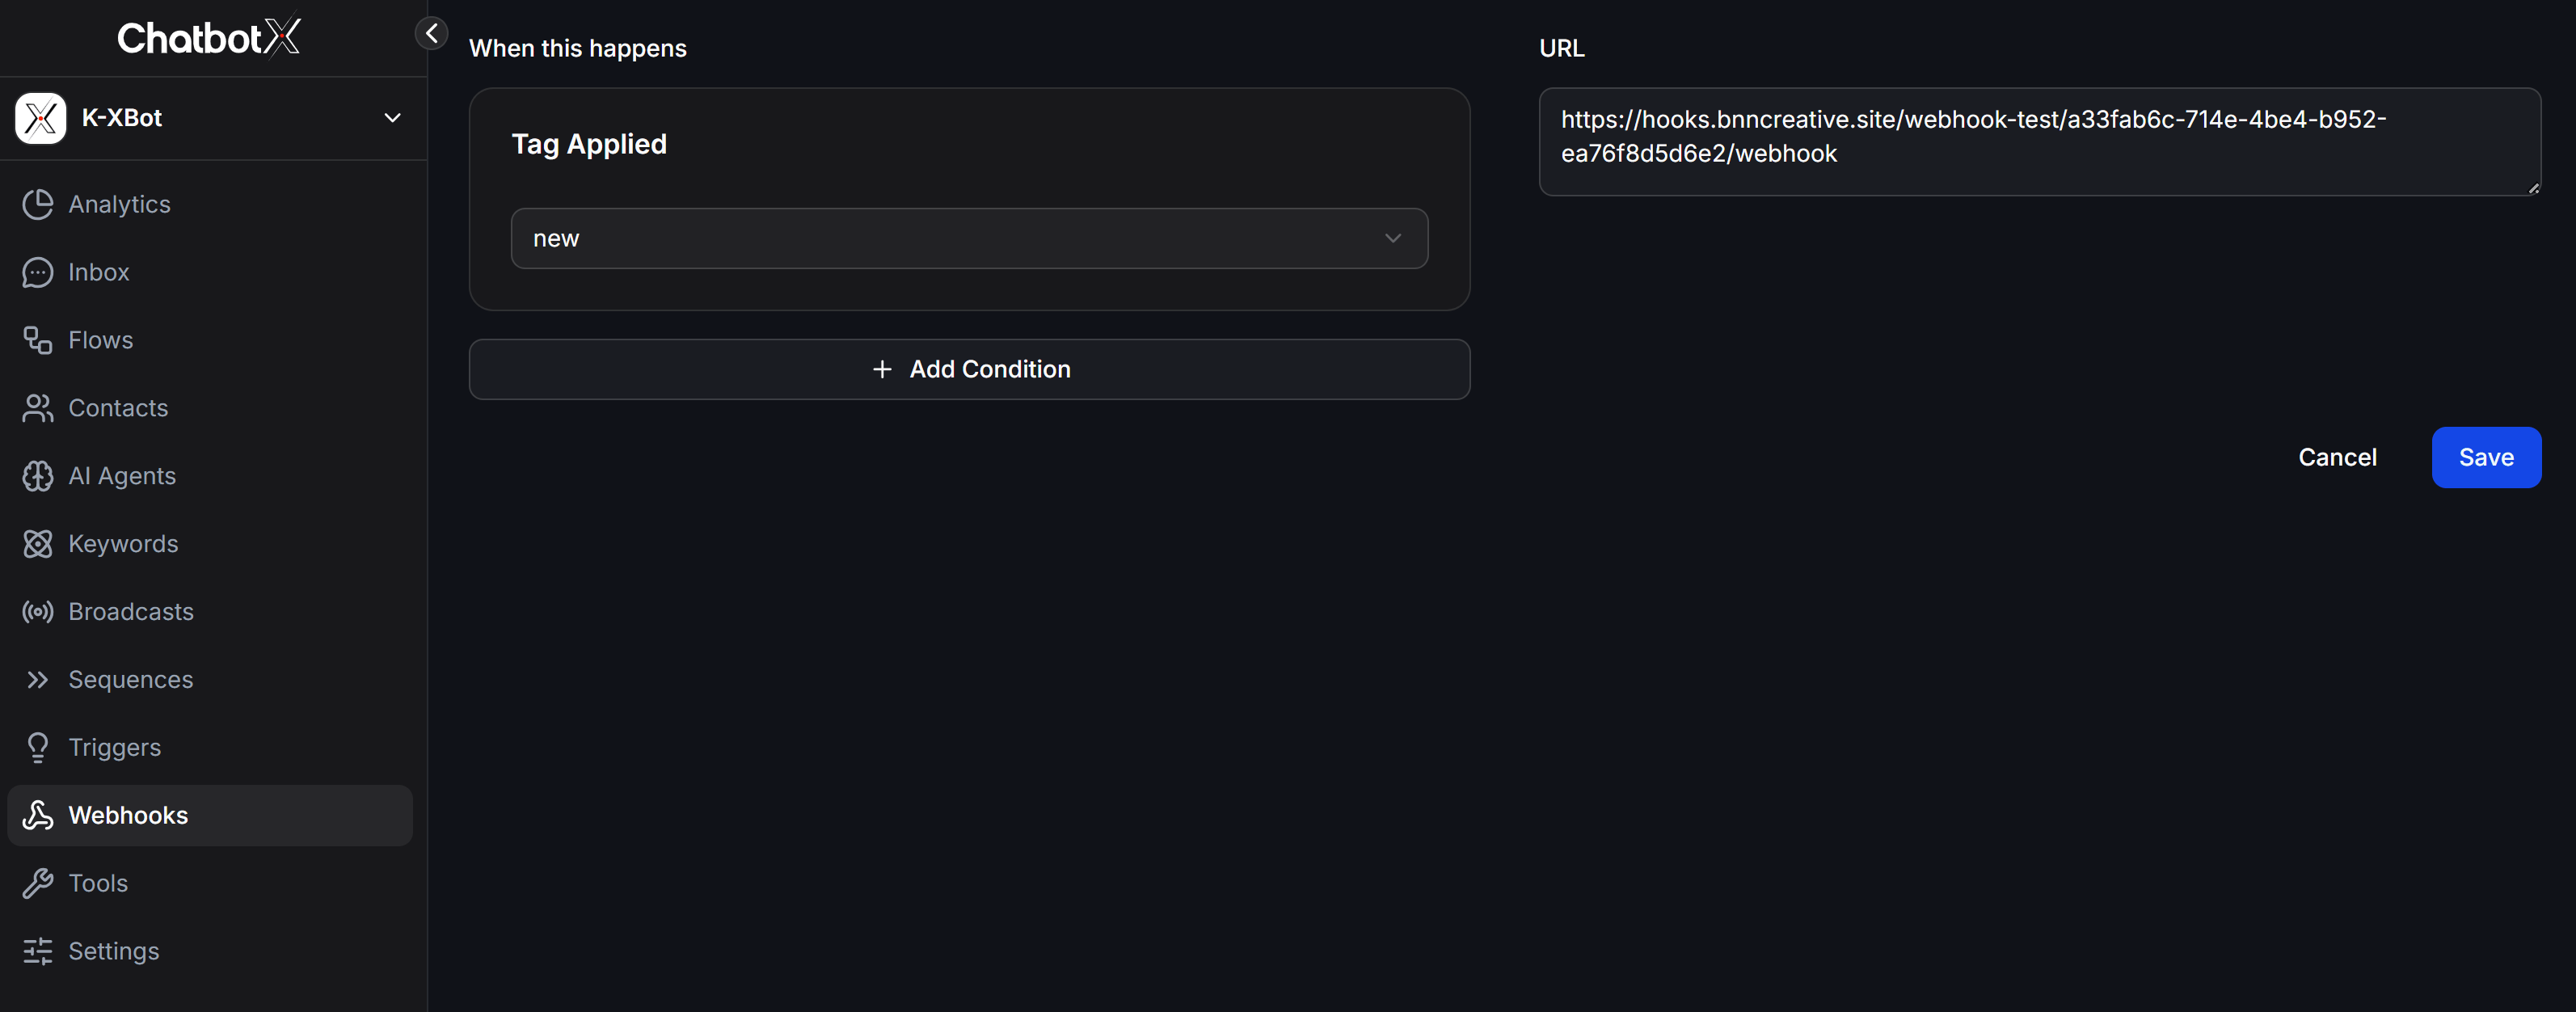
In ChatbotX, open Webhooks, create a Webhook, and select Tag Applied. Select the Tag you want to watch and paste the Test URL into the URL field.
Configure a matching ChatbotX webhook with the n8n test URL
4

Start listening for data

Save and enable the Webhook in ChatbotX. Return to n8n and click Execute step so n8n can wait for a test event.
5

Add the matching Action to a Flow

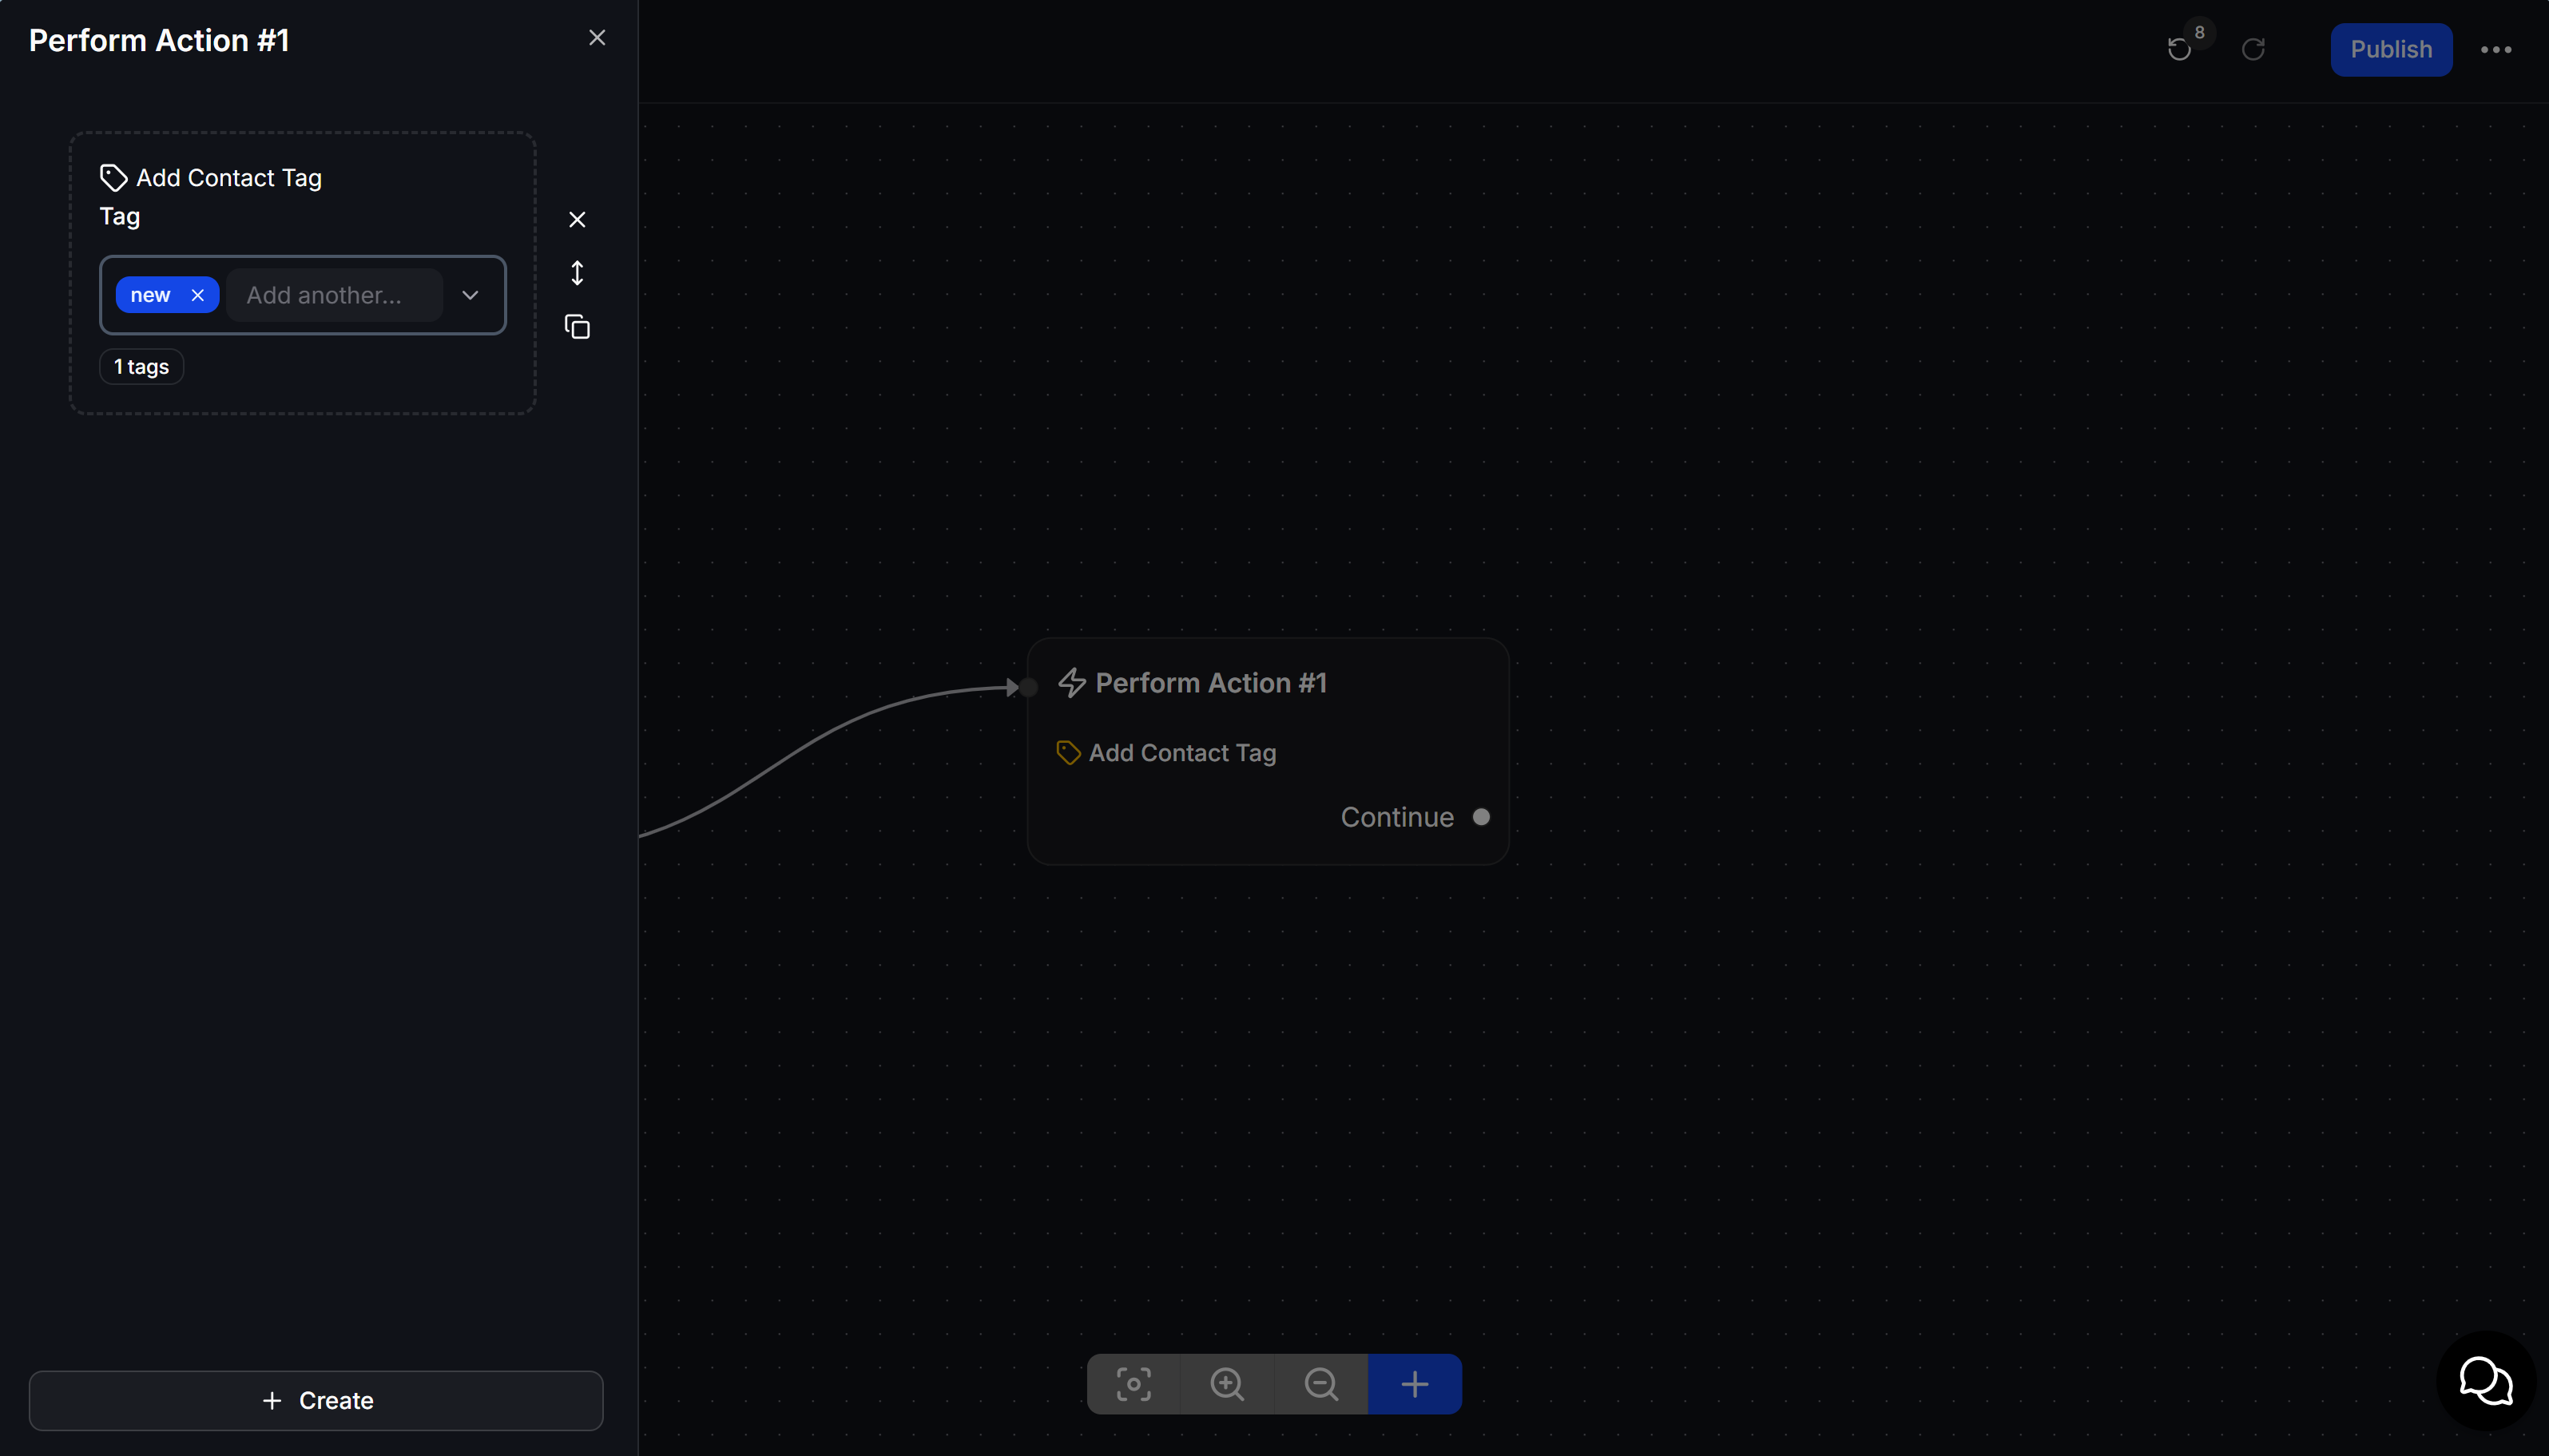
In the ChatbotX Flow, add a Perform Action node and select the Action that applies the Tag configured in the Webhook. Connect the node to the branch where it should run.
Add a matching Tag Applied action in ChatbotX Flow Builder
6

Run the Flow and check the data

Run the Flow with a test contact. When n8n receives the event, the contact data appears in OUTPUT.
The Test URL works only while n8n is waiting for data after you click Execute step.

Activate the workflow with the Production URL

After the Test URL receives data successfully, switch to the Production URL so the workflow can run continuously.
1

Copy the Production URL

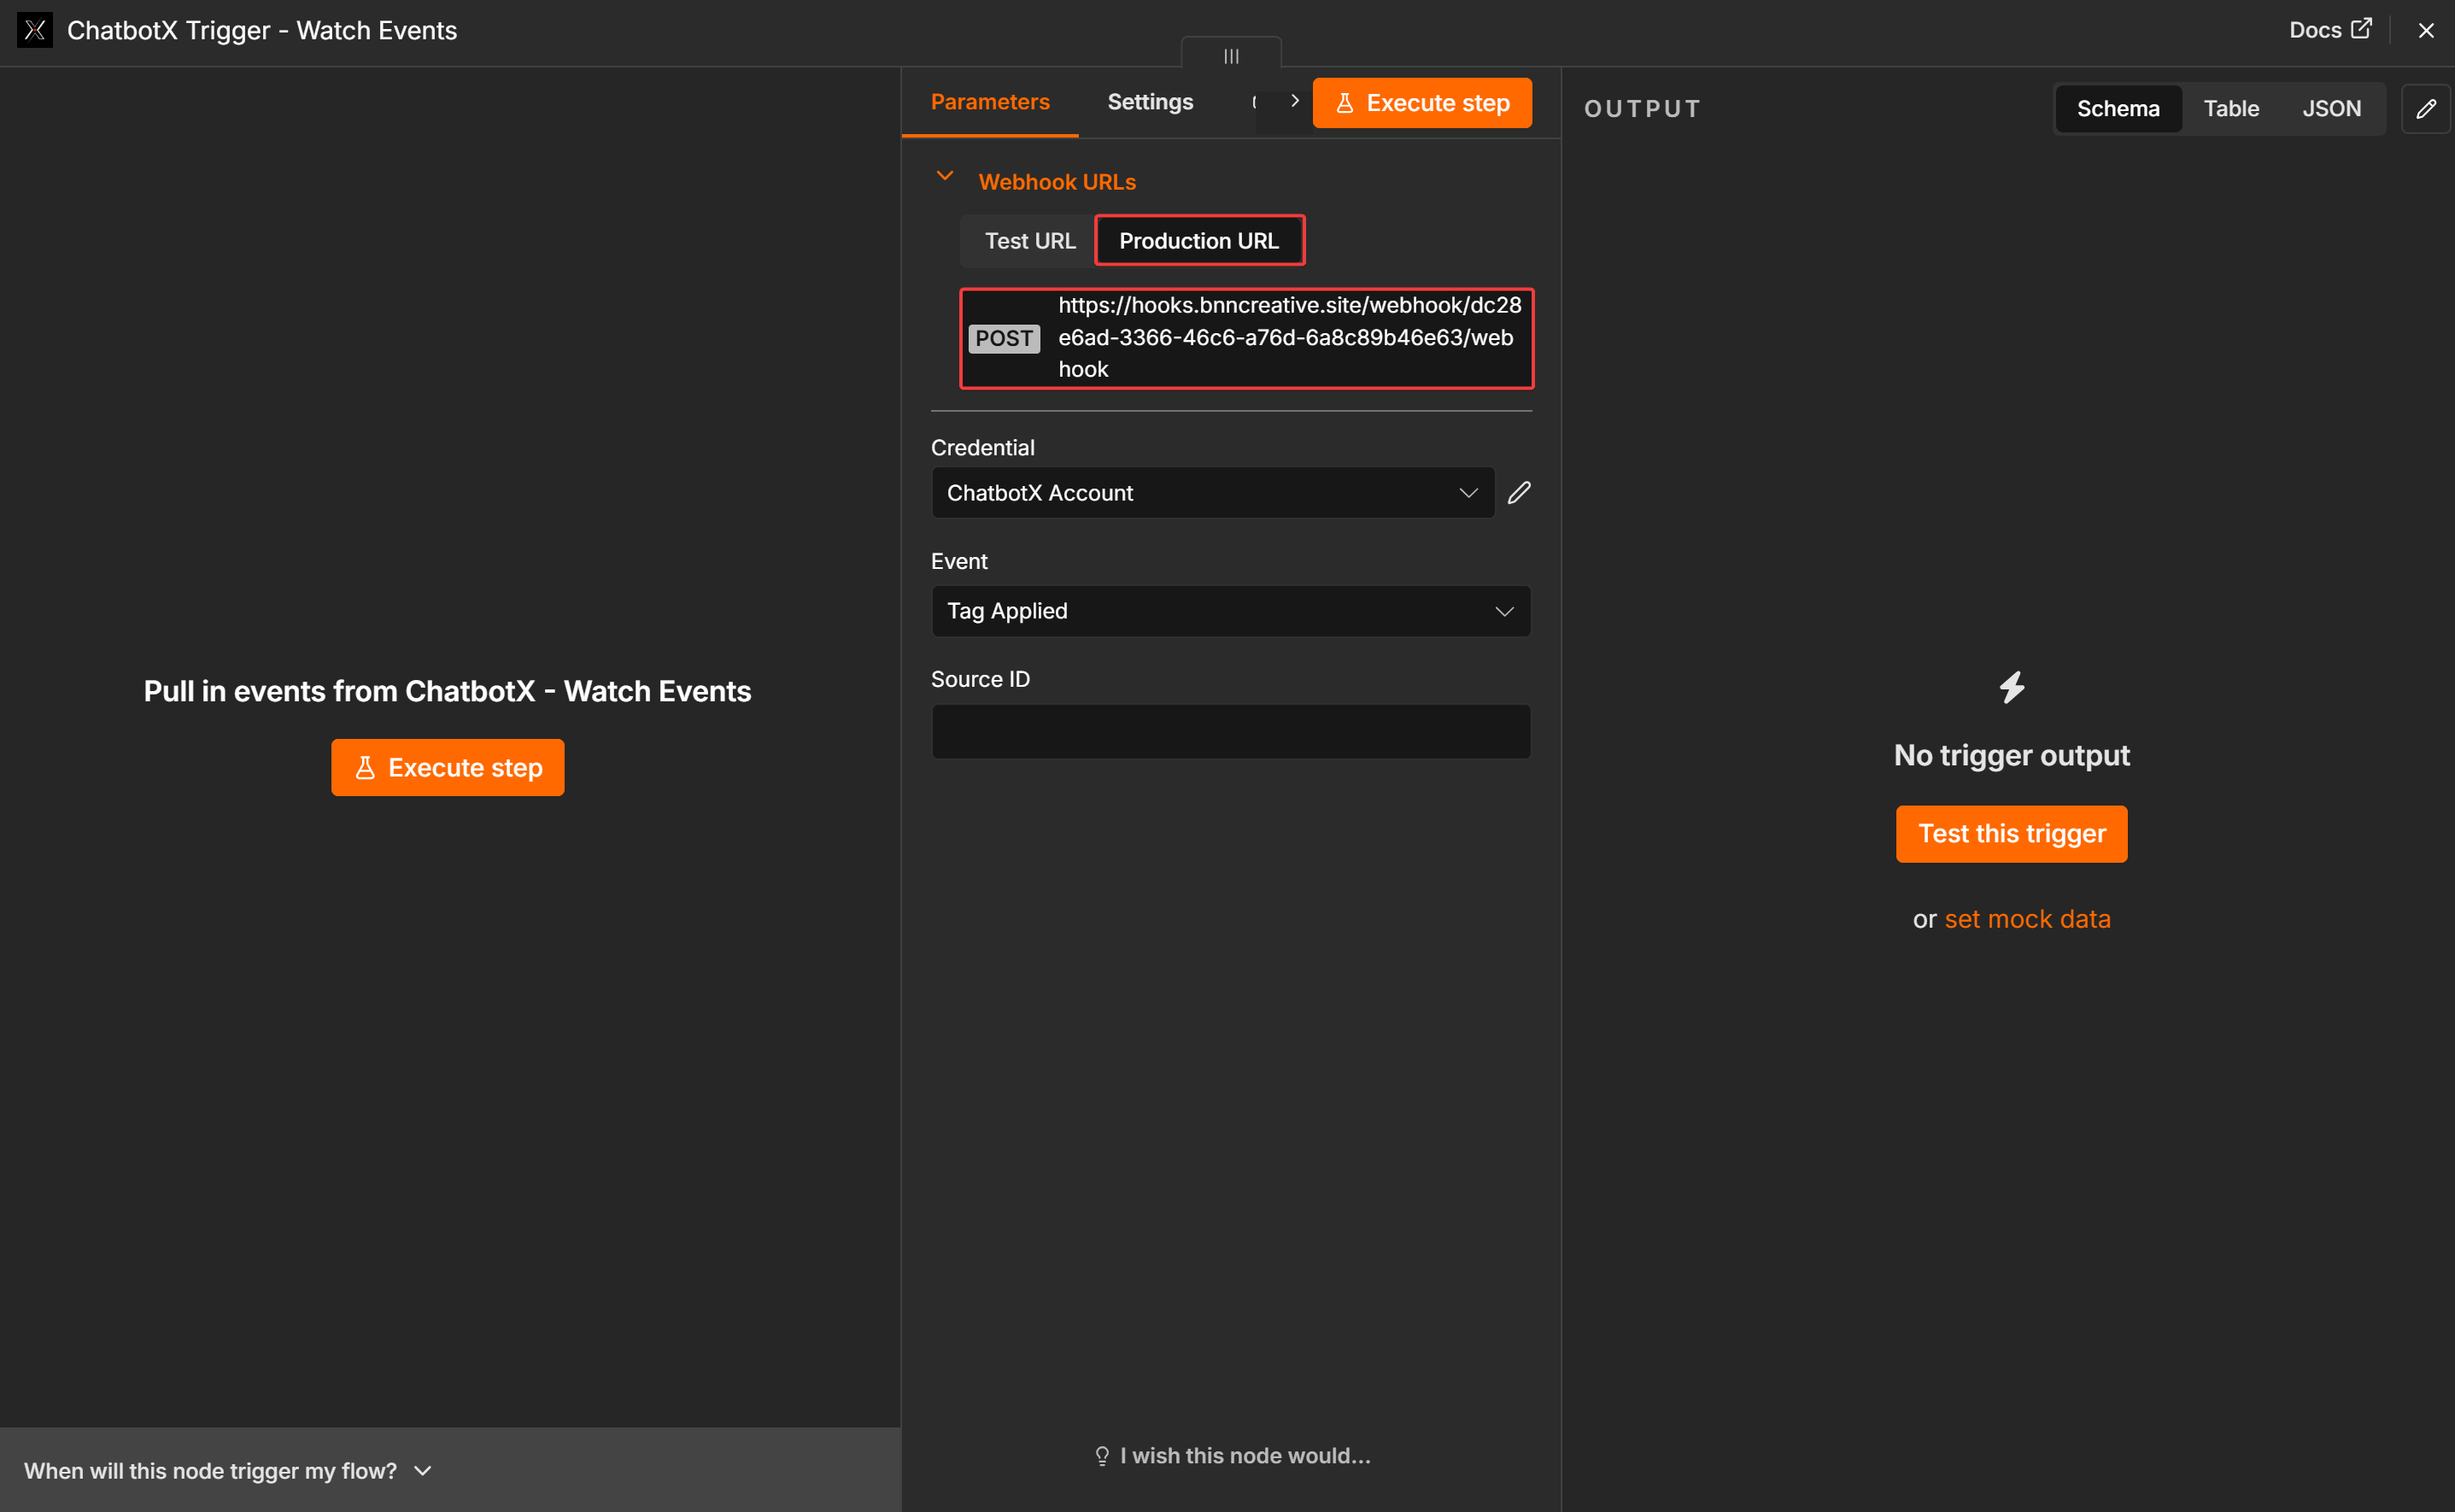
In Webhook URLs, select Production URL and copy the displayed address.
Copy the Watch Events production webhook URL in n8n
2

Update the Webhook in ChatbotX

Open the Webhook you created, replace the Test URL with the Production URL, and verify the Event and Tag.
3

Enable the Webhook

Click Save and make sure the Webhook is enabled in the Webhooks list.
4

Publish the n8n workflow

Return to n8n and click Publish. Run the Flow again, then open Executions to check the latest run.
Do not use the Test URL for an active workflow. The Production URL receives data only after the n8n workflow is Published.

Send data from a Flow with Watch Flow Data

ChatbotX Trigger - Watch Flow Data is suitable when you want to choose the exact point where a Flow sends data. For example, send data to n8n only after a customer completes a consultation form.

Set up the Trigger in n8n

1

Add Watch Flow Data

Create a workflow and add ChatbotX Trigger - Watch Flow Data.
2

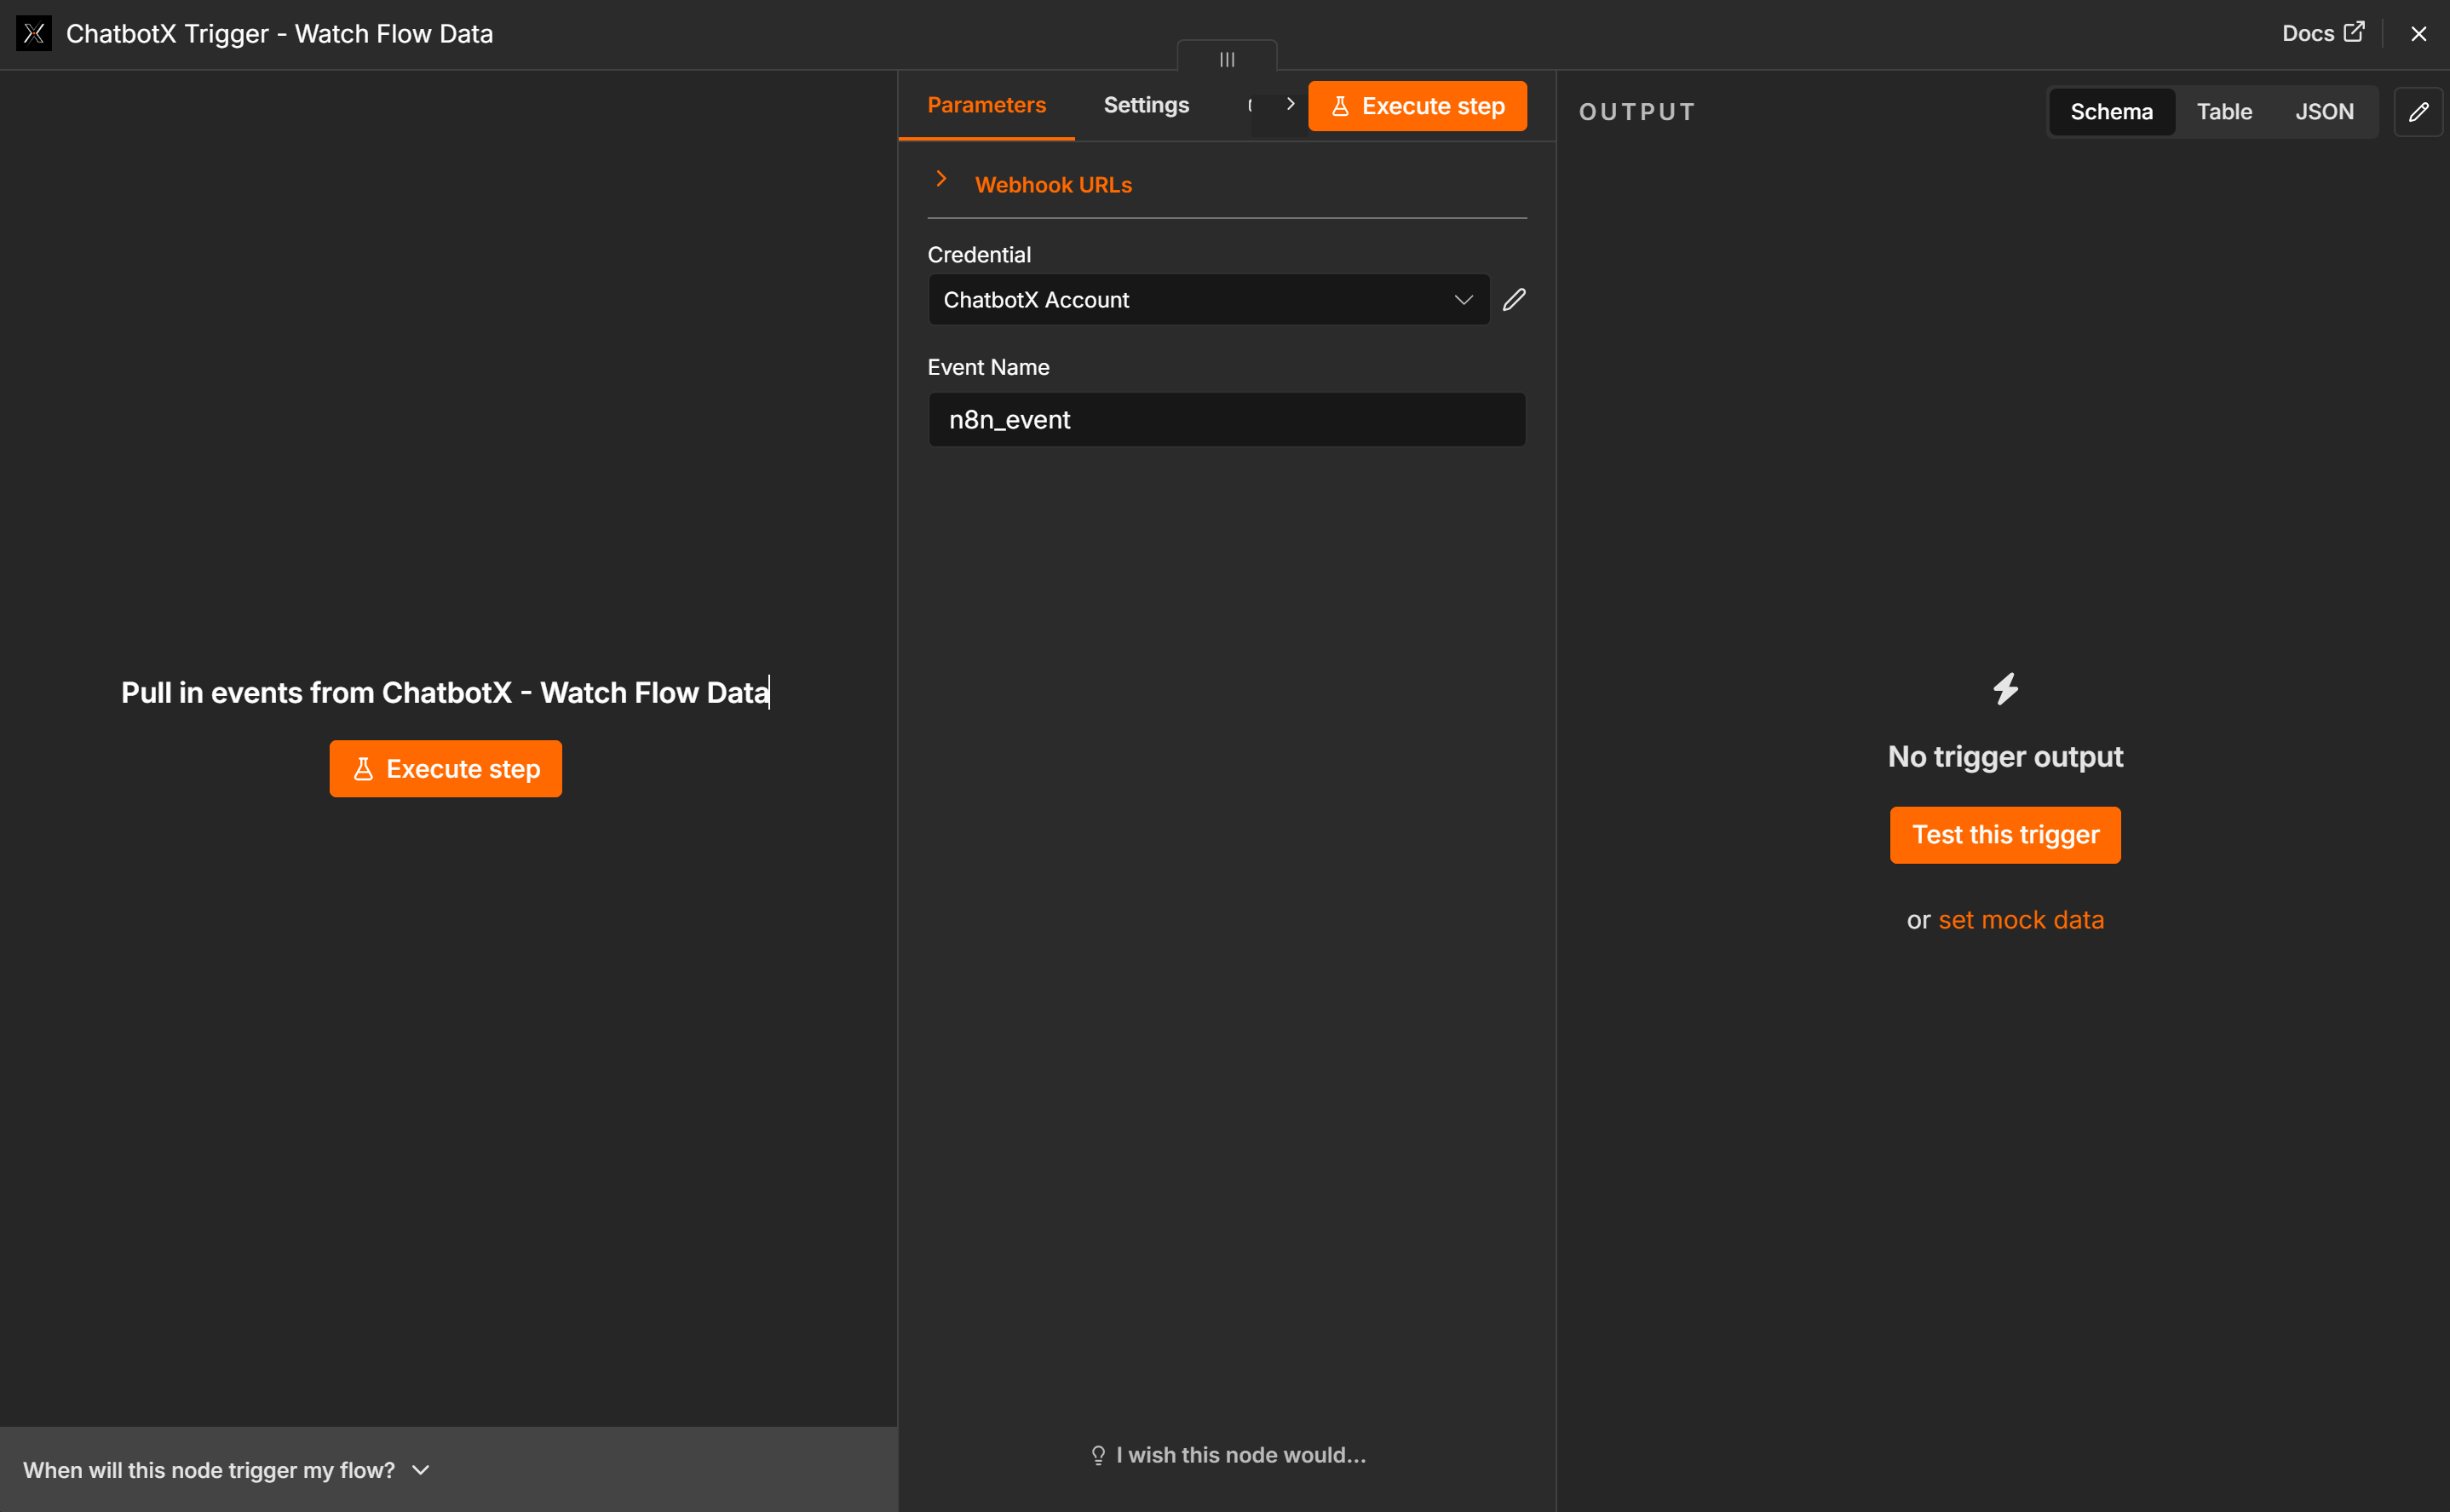
Enter the Event Name

Select a Credential and enter an Event Name, such as n8n_event.
Configure an event name in the ChatbotX Watch Flow Data trigger
3

Start listening for data

Click Execute step so n8n can wait for test data from the ChatbotX Flow.

Send an Event from a ChatbotX Flow

1

Open the Flow to connect

In ChatbotX, open the Flow that will send data and select the relevant message node.
2

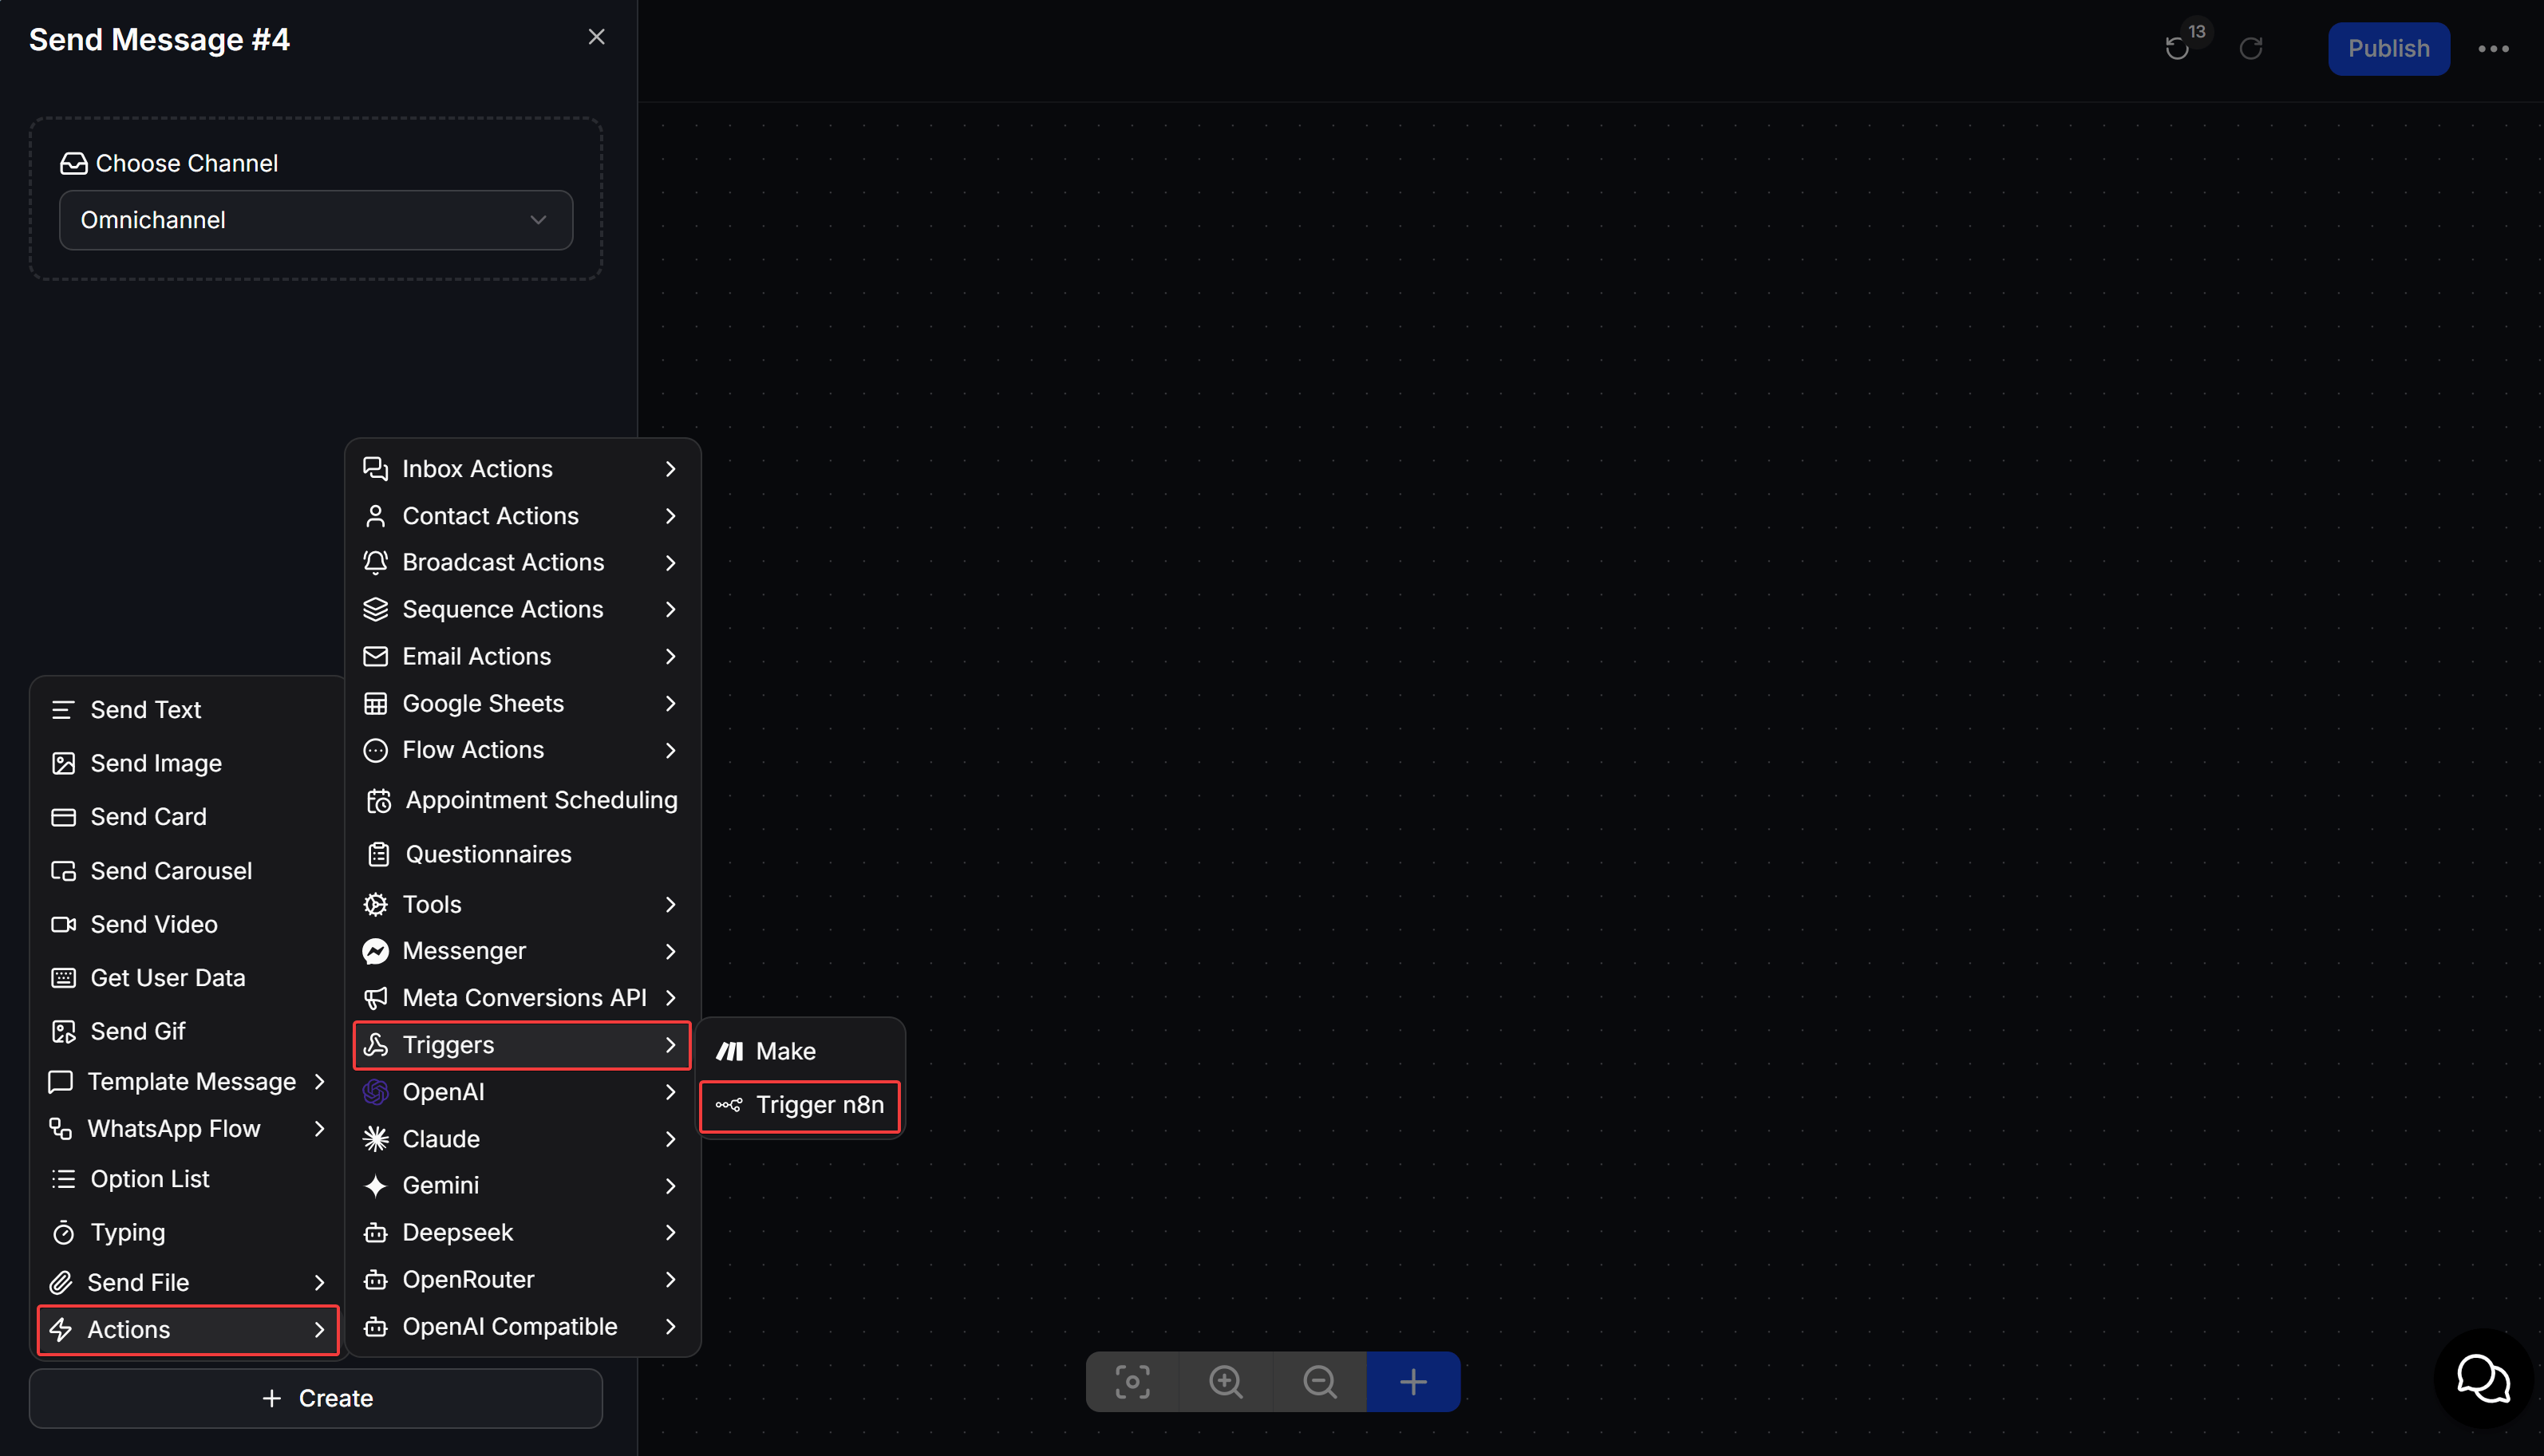
Add the Trigger n8n block

Click Create, then select Actions > Triggers > Trigger n8n.
Add the Trigger n8n action block in ChatbotX Flow Builder
3

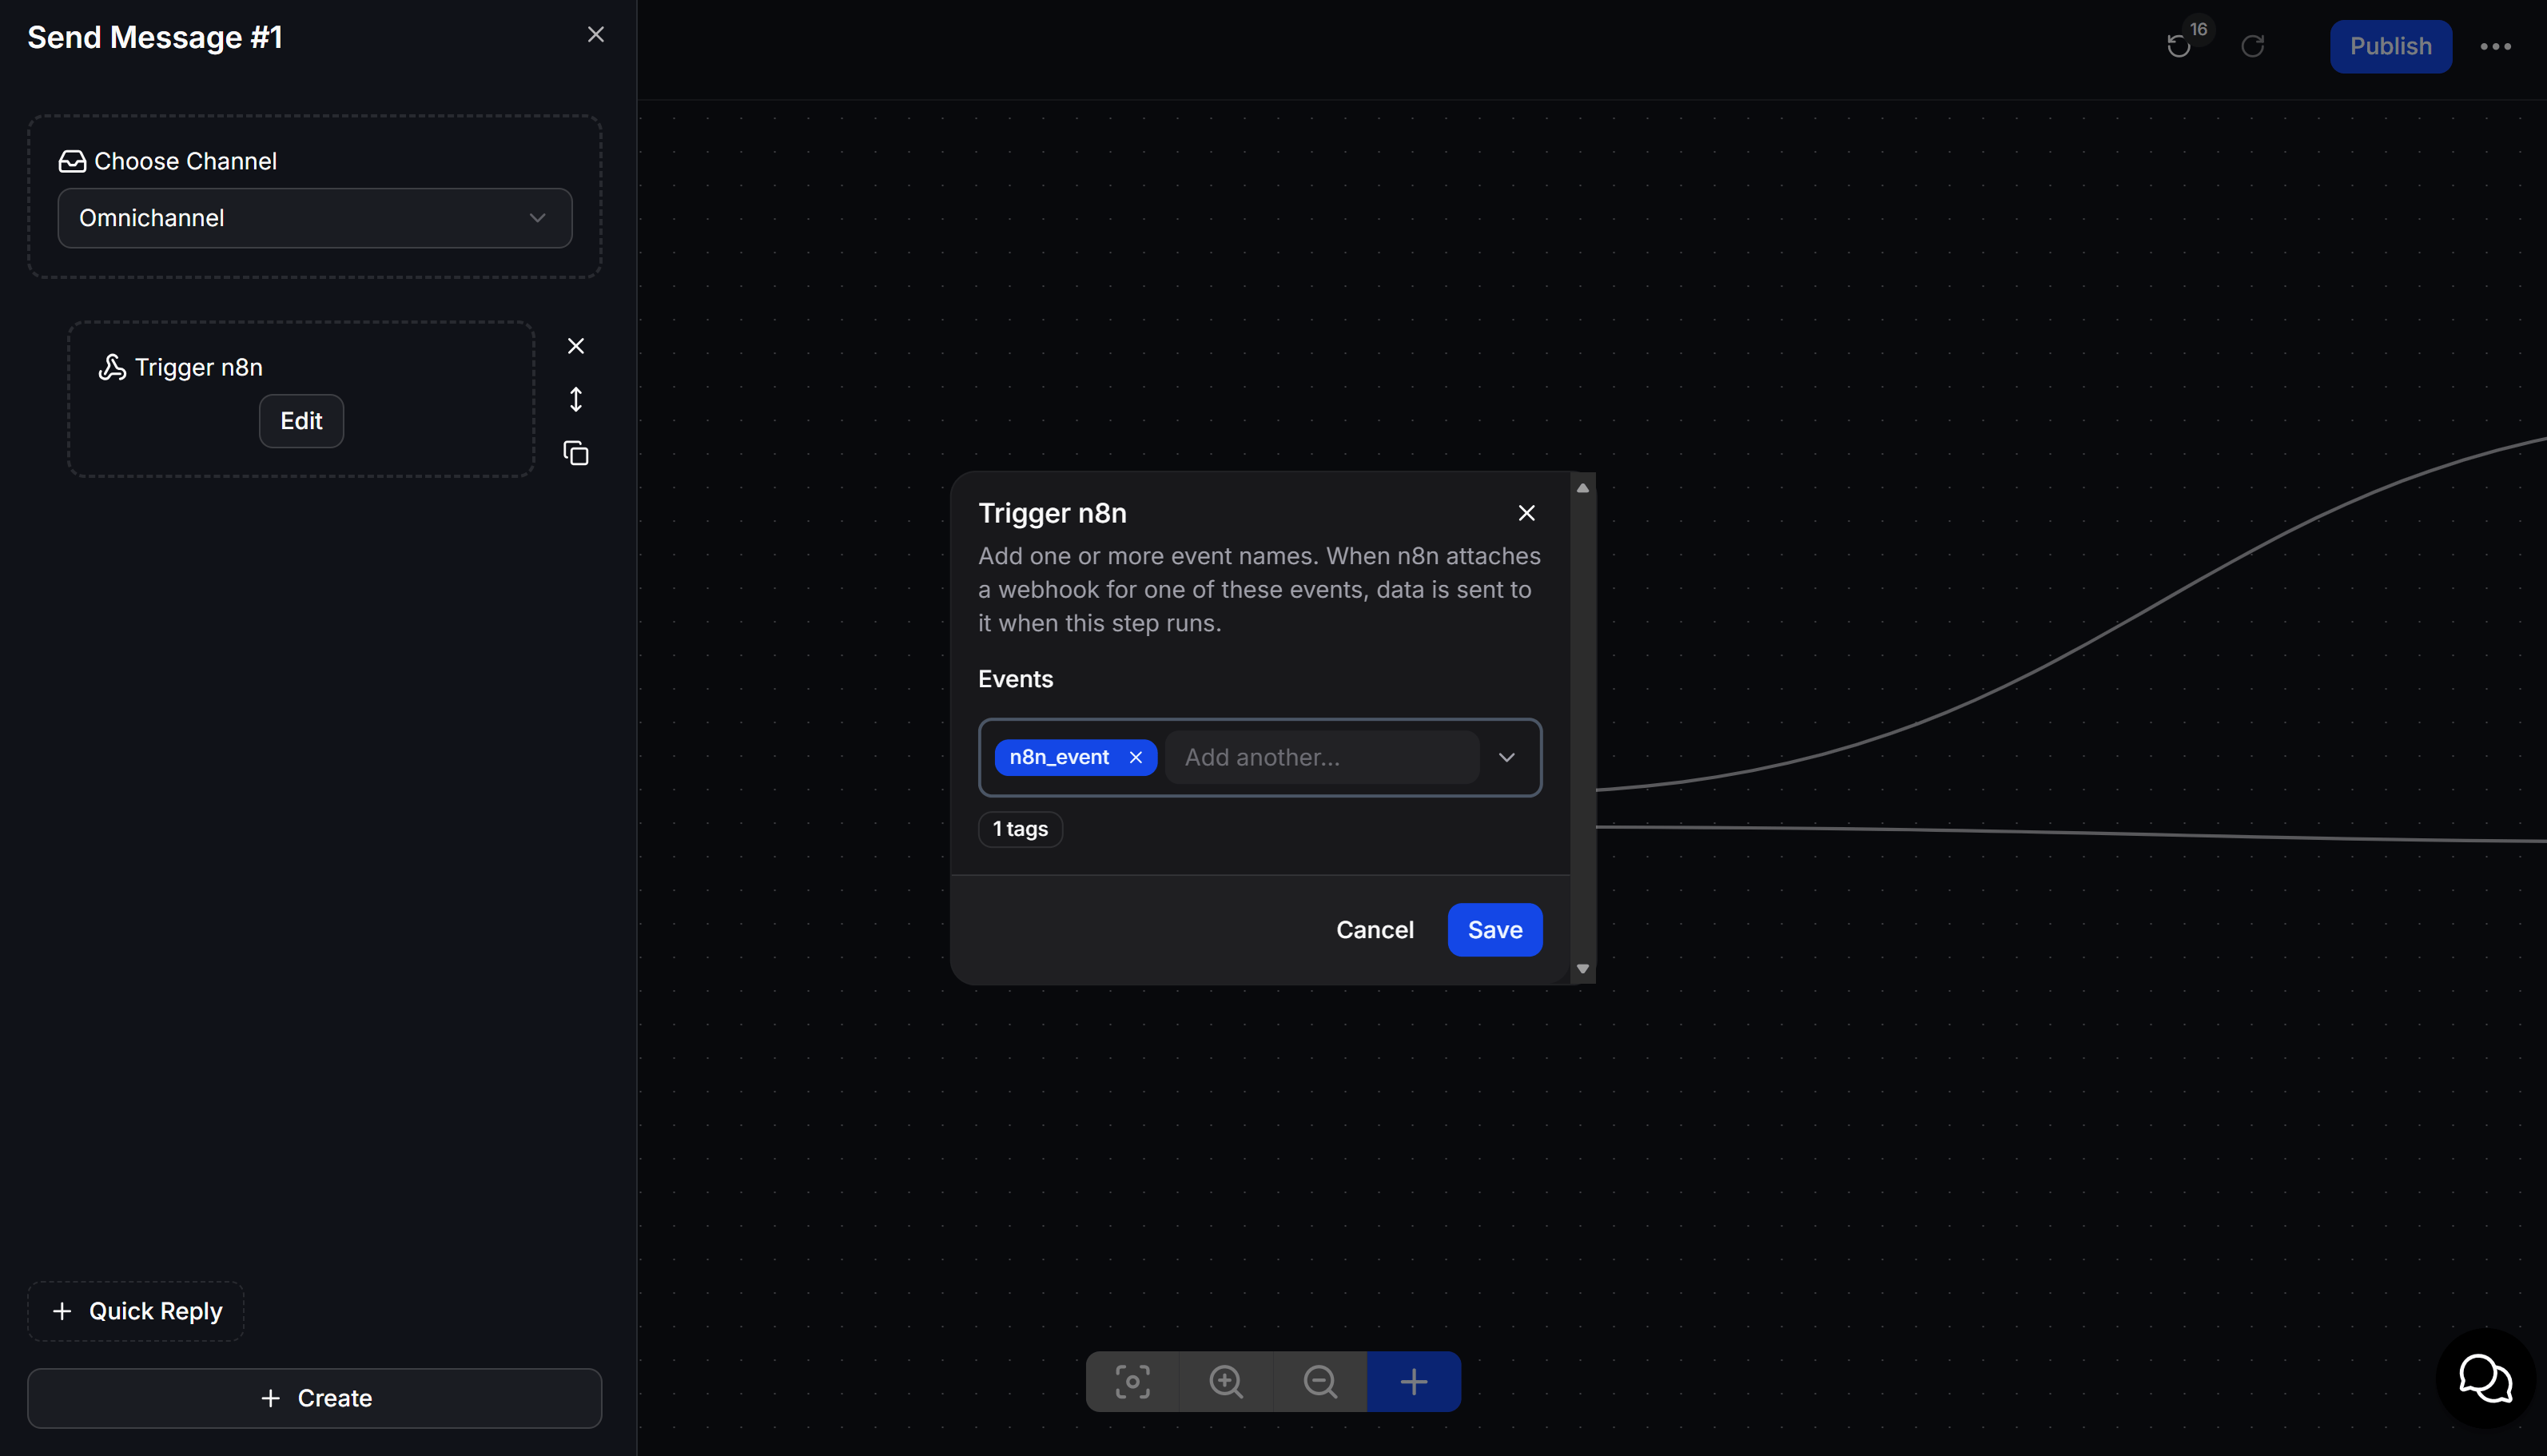
Match the Event Name with n8n

Click Edit on the Trigger n8n block, add n8n_event to Events, then click Save.
Match the Trigger n8n event name with the n8n workflow
4

Run the Flow

Run the Flow with a test contact. n8n displays the received data in OUTPUT.
5

Publish both Flows

When the test data is correct, Publish the ChatbotX Flow and the n8n workflow.
The Trigger n8n block does not have a Webhook URL field. The Event Name connects the ChatbotX Flow to Watch Flow Data, so it must match exactly on both sides.

Perform Actions in ChatbotX

The ChatbotX node runs after a Trigger and performs work in your workspace using data received from the previous step.

Manage contacts

Update Tags and Custom Fields

Send content

Delete permanently removes a contact. Run this Action only with a test contact while testing your workflow.

Use an Identifier

The Identifier tells the node which contact to update. You can enter it directly or drag a field from INPUT into this field.
1

Open the INPUT data

Open the Action you want to configure and find contact.id, contact.email, or contact.phoneNumber in INPUT.
2

Drag the field into Identifier

Drag the field you want to use into Identifier. n8n automatically creates an expression for that field.
3

Check the Result value

Open Expression mode and verify that Result displays the contact you want to process.

Make an advanced ChatbotX API call

Select Custom > API Call when the Action you need is not available in the list. You can select a method, enter an API path, and send JSON data using the current Credential. Read the API Overview before using this feature.

Build an example workflow

The following example receives a contact from a Flow, applies a Tag, updates a Custom Field, and sends a confirmation Flow: Watch Flow Data > Add Tags > Set Custom Fields > Send Flow
1

Receive data from the Flow

Configure Watch Flow Data with the Event Name n8n_event, then send the Event from the Trigger n8n block.
2

Add a Tag to the contact

Add a ChatbotX node, select Contact > Add Tags, drag contact.id into Identifier, and select a test Tag.
3

Update a Custom Field

Add another node, select Contact > Set Custom Fields, map the same Identifier, and select a test Custom Field.
4

Send the confirmation Flow

Add a Contact > Send Flow node, then select a Published Flow and the appropriate Inbox.
5

Test the workflow

Run each node and verify that every step returns a successful result.
6

Publish the workflow

Click Publish, run the ChatbotX Flow again, and open Executions to review the complete result.
The contact must have a previous conversation to receive a Message or Flow. The Flow you send must be Published.

Troubleshoot common issues

When a workflow does not run, check these items in order: Credential, Trigger, INPUT data, Identifier, Webhook status, and Published status.