

- Search live products, check variant stock (sizes, colors), and retrieve high-resolution images in real time.
- Present interactive product Carousels with action buttons.
- Automatically create customer profiles and register official orders in Shopify Admin with normalized address components (Address, City, Province).
- Generate unified multi-item checkout cart links for combined purchases.
- Automatically cancel orders and restock inventory directly on Shopify when requested.
- Track real-time fulfillment status, delivery milestones, and tracking numbers.
How It Works
The architecture operates as a 3-tier bridge:- Customer sends messages across any supported channel (Facebook Messenger, Instagram, Webchat, WhatsApp, Zalo).
- AI Agent (ChatbotX) processes natural language and automatically calls corresponding MCP tools.
- Shopify MCP Server acts as a bridge to process customer details (formatting phone numbers, shipping addresses) and sync directly with your Shopify store.
Step 1: Create an App in Shopify Dev Dashboard
To allow ChatbotX to query your store catalog and manage orders, create an app in the Shopify Dev Dashboard to generate your API credentials:Access Develop apps from Shopify Settings
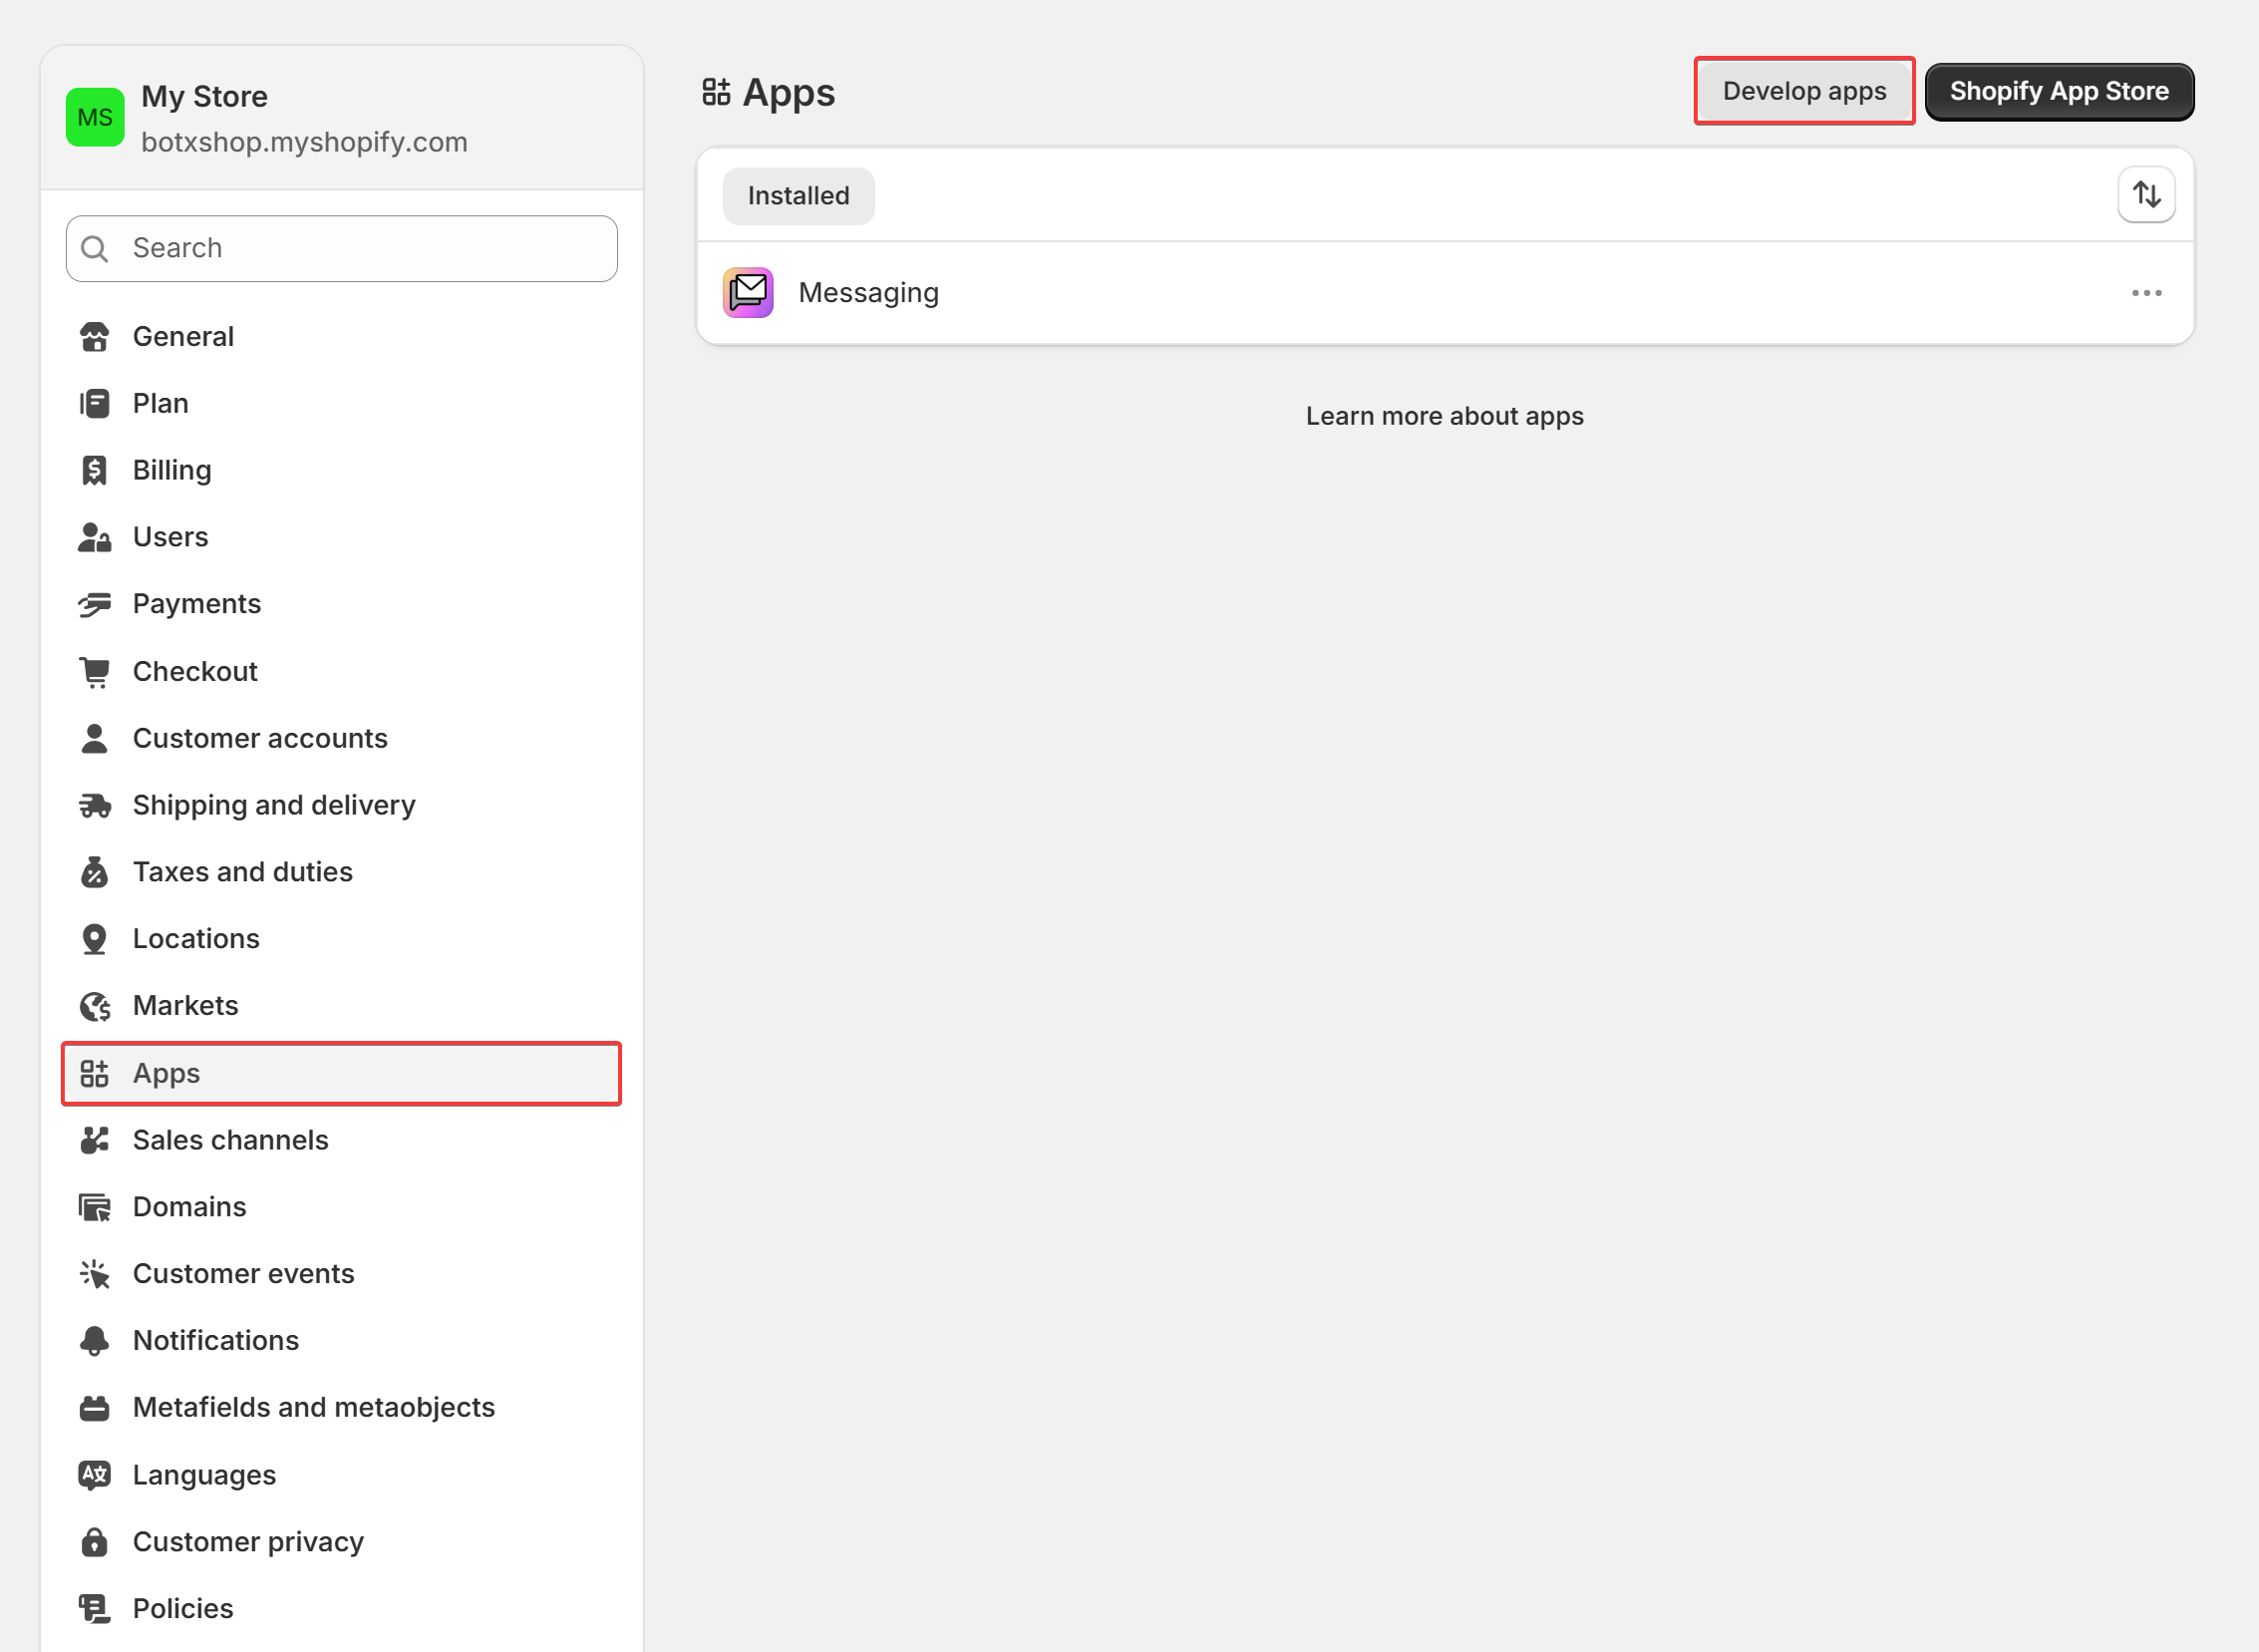
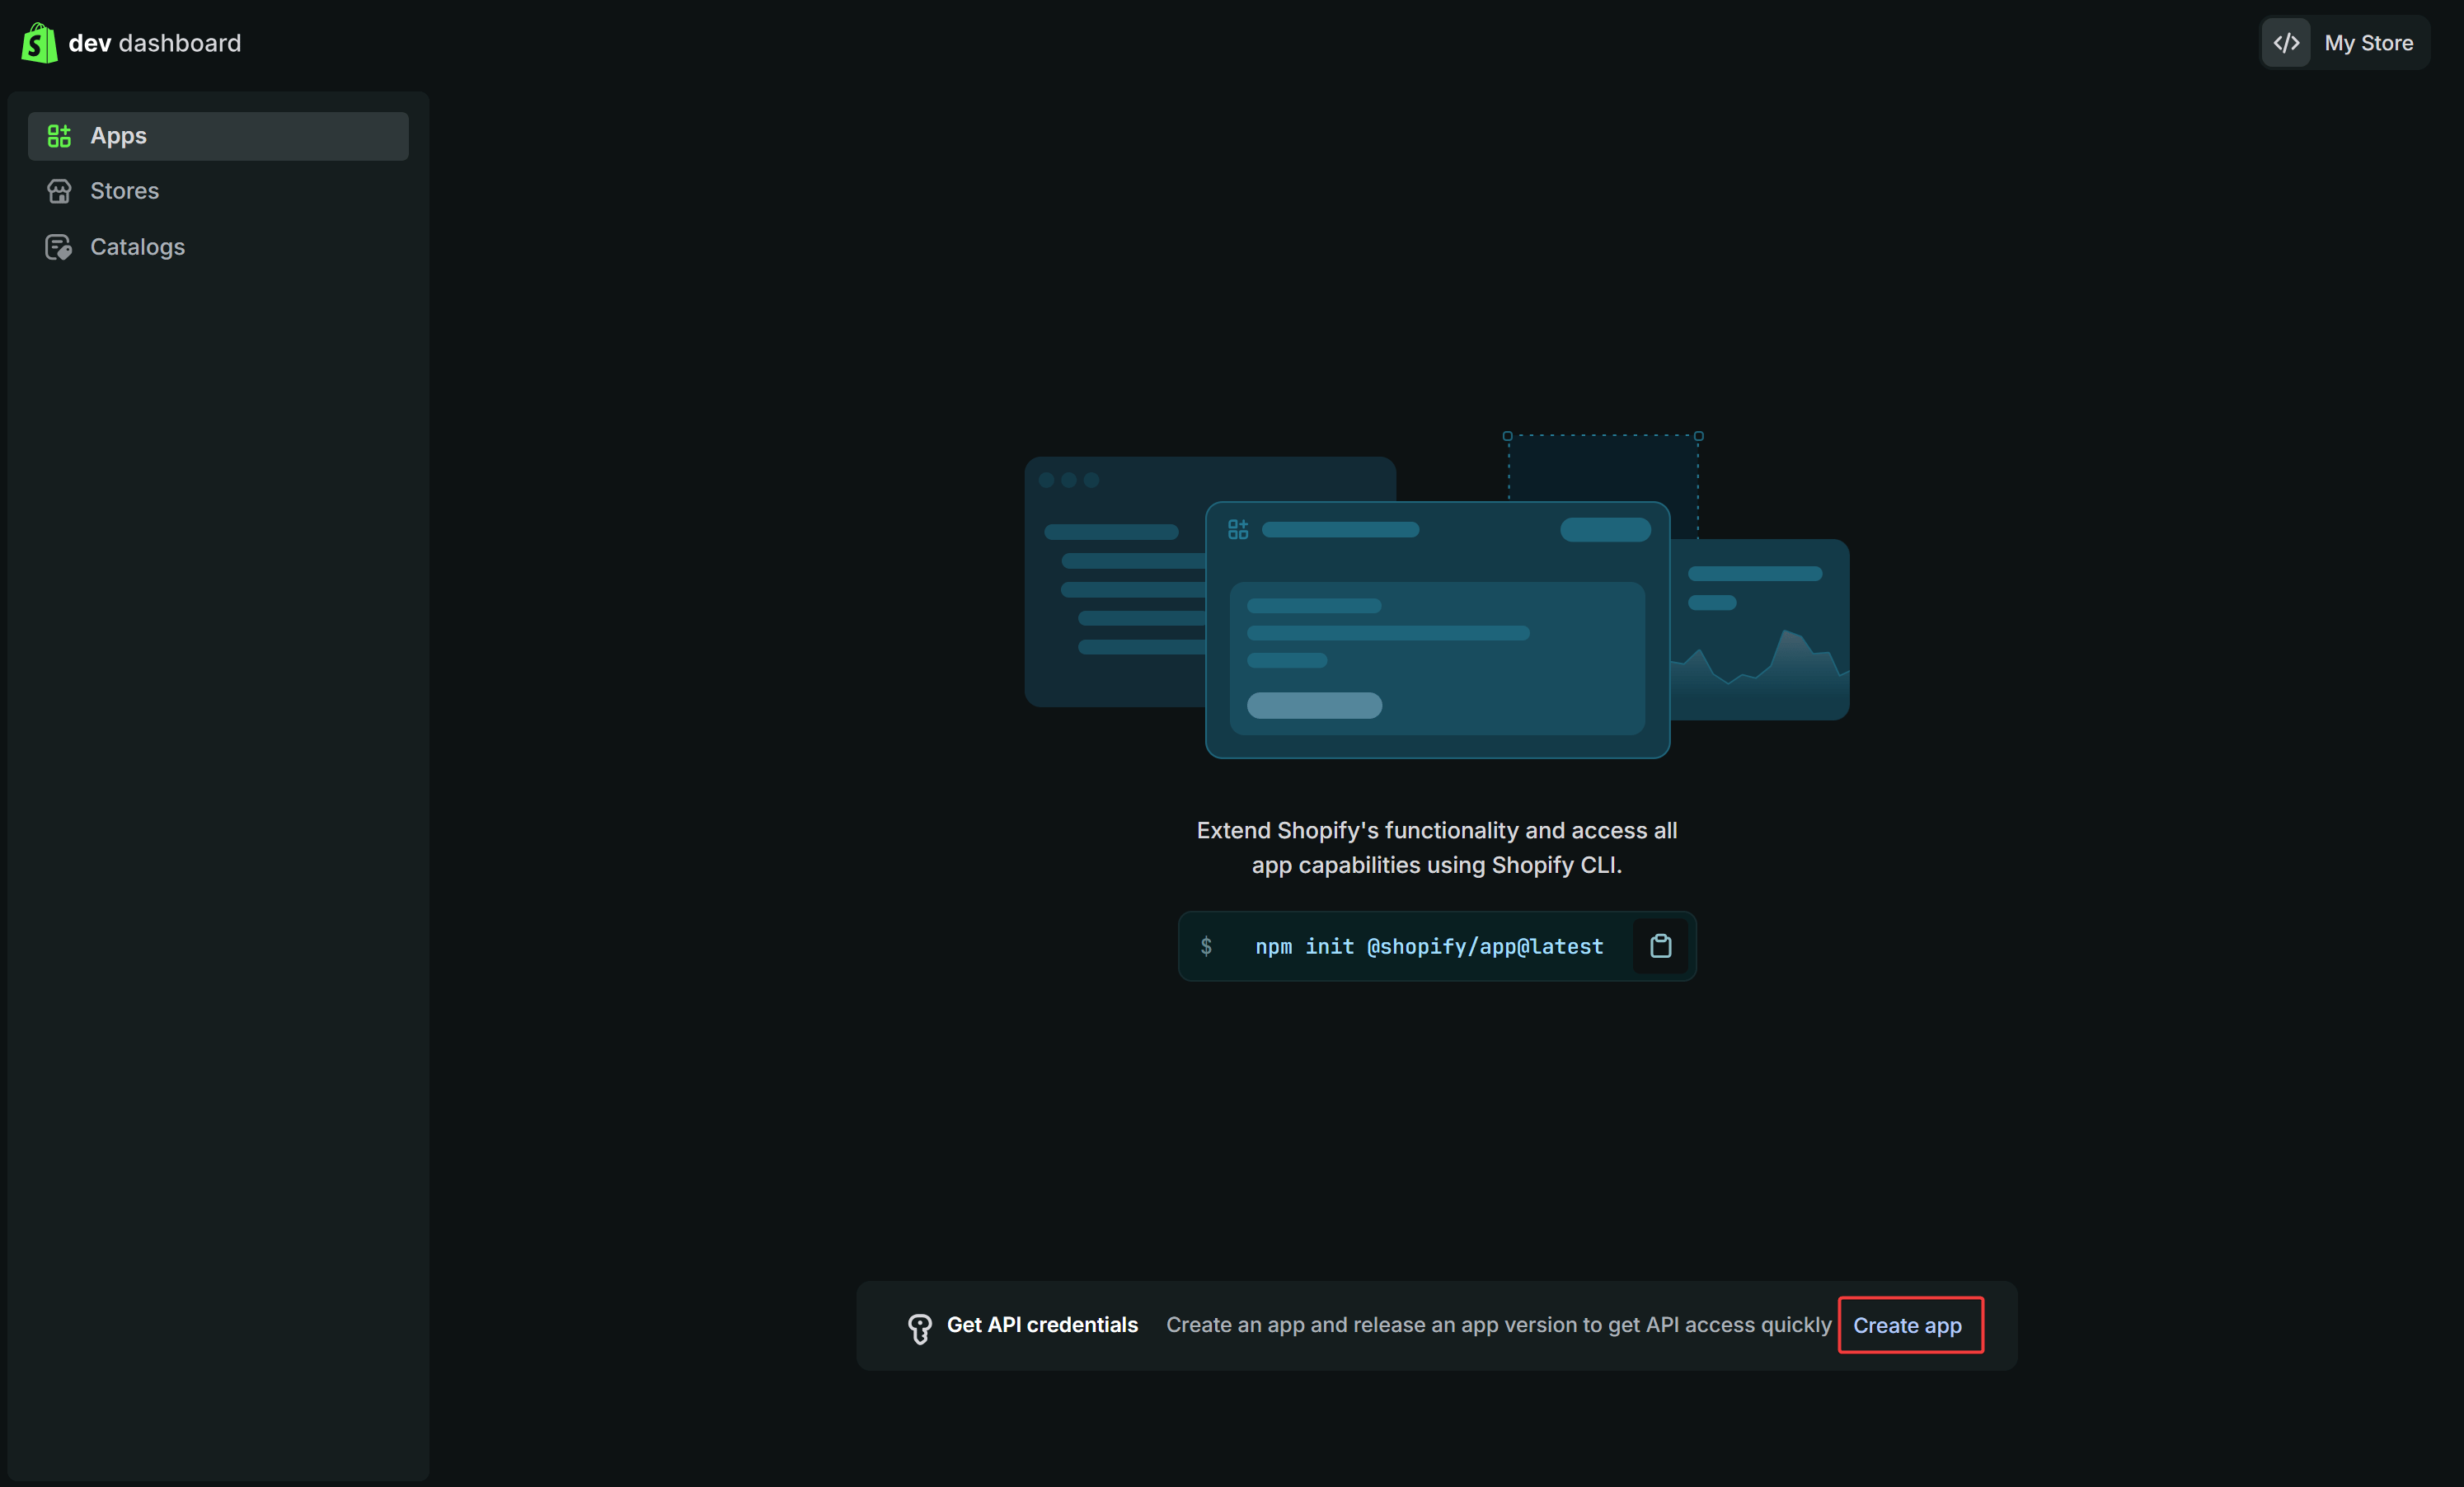
Start creating an app in Dev Dashboard
Enter your app name
BotX MCP) and click Create app.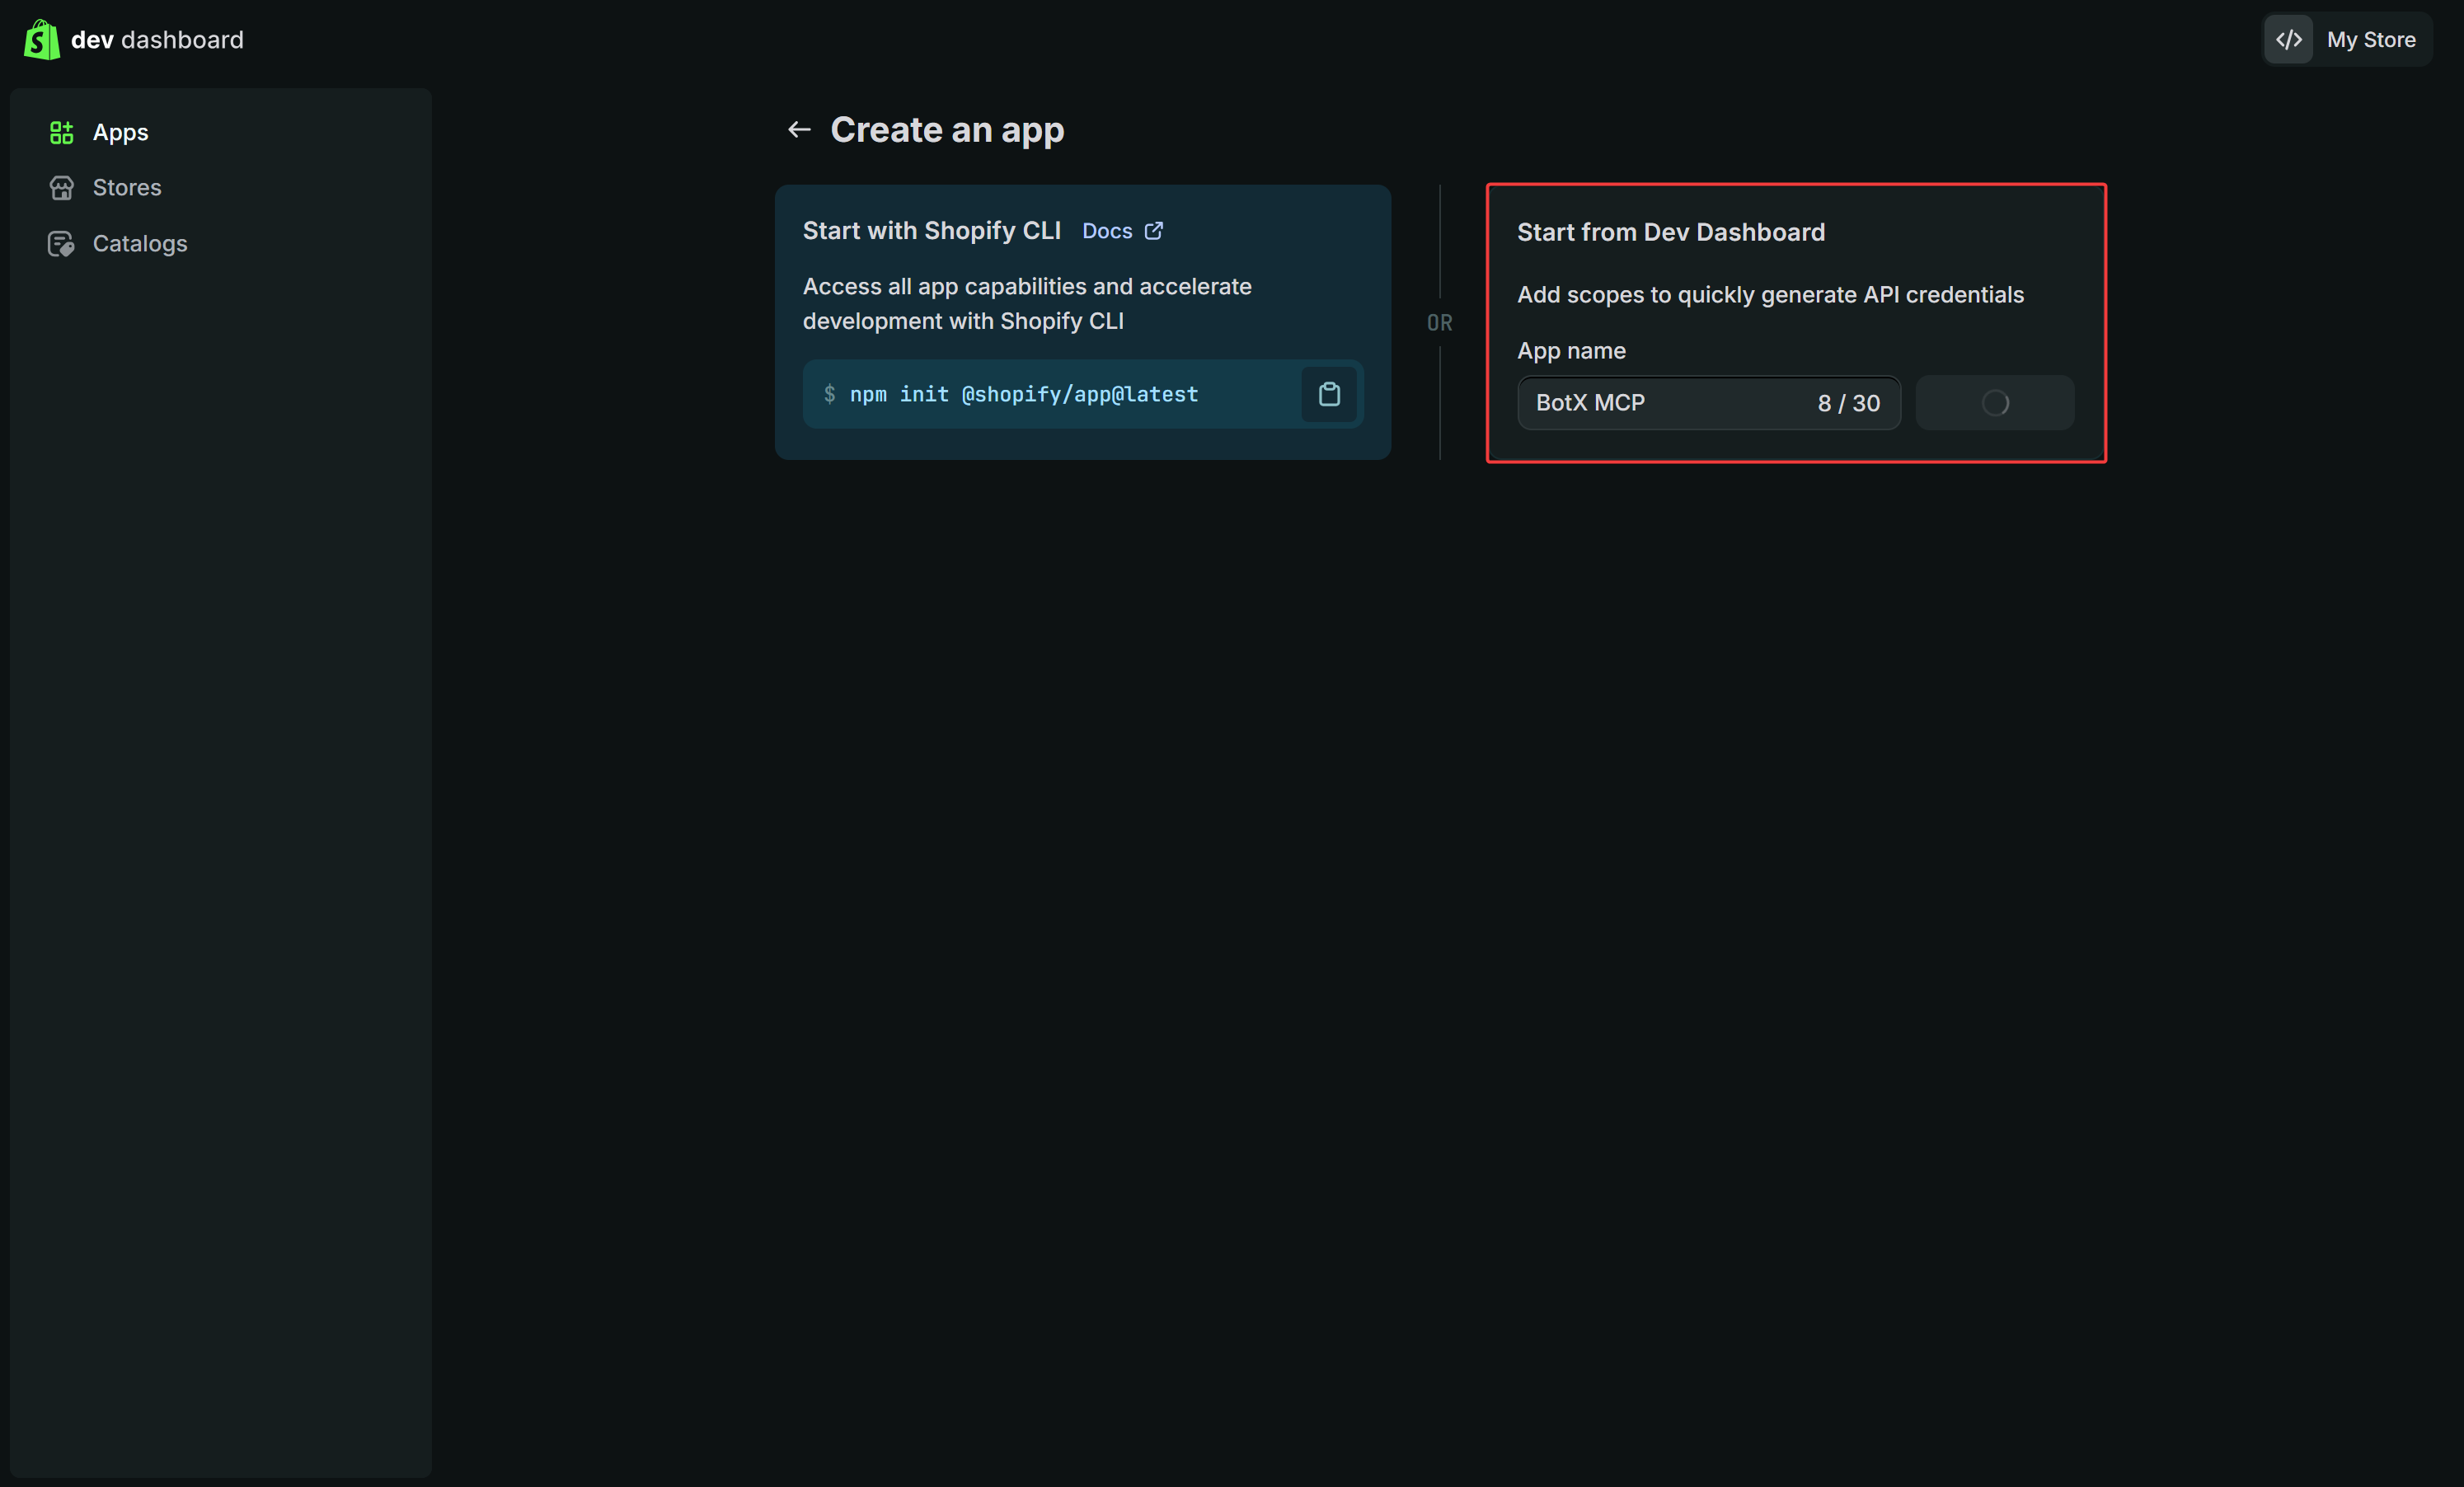
Open Admin API Scopes modal
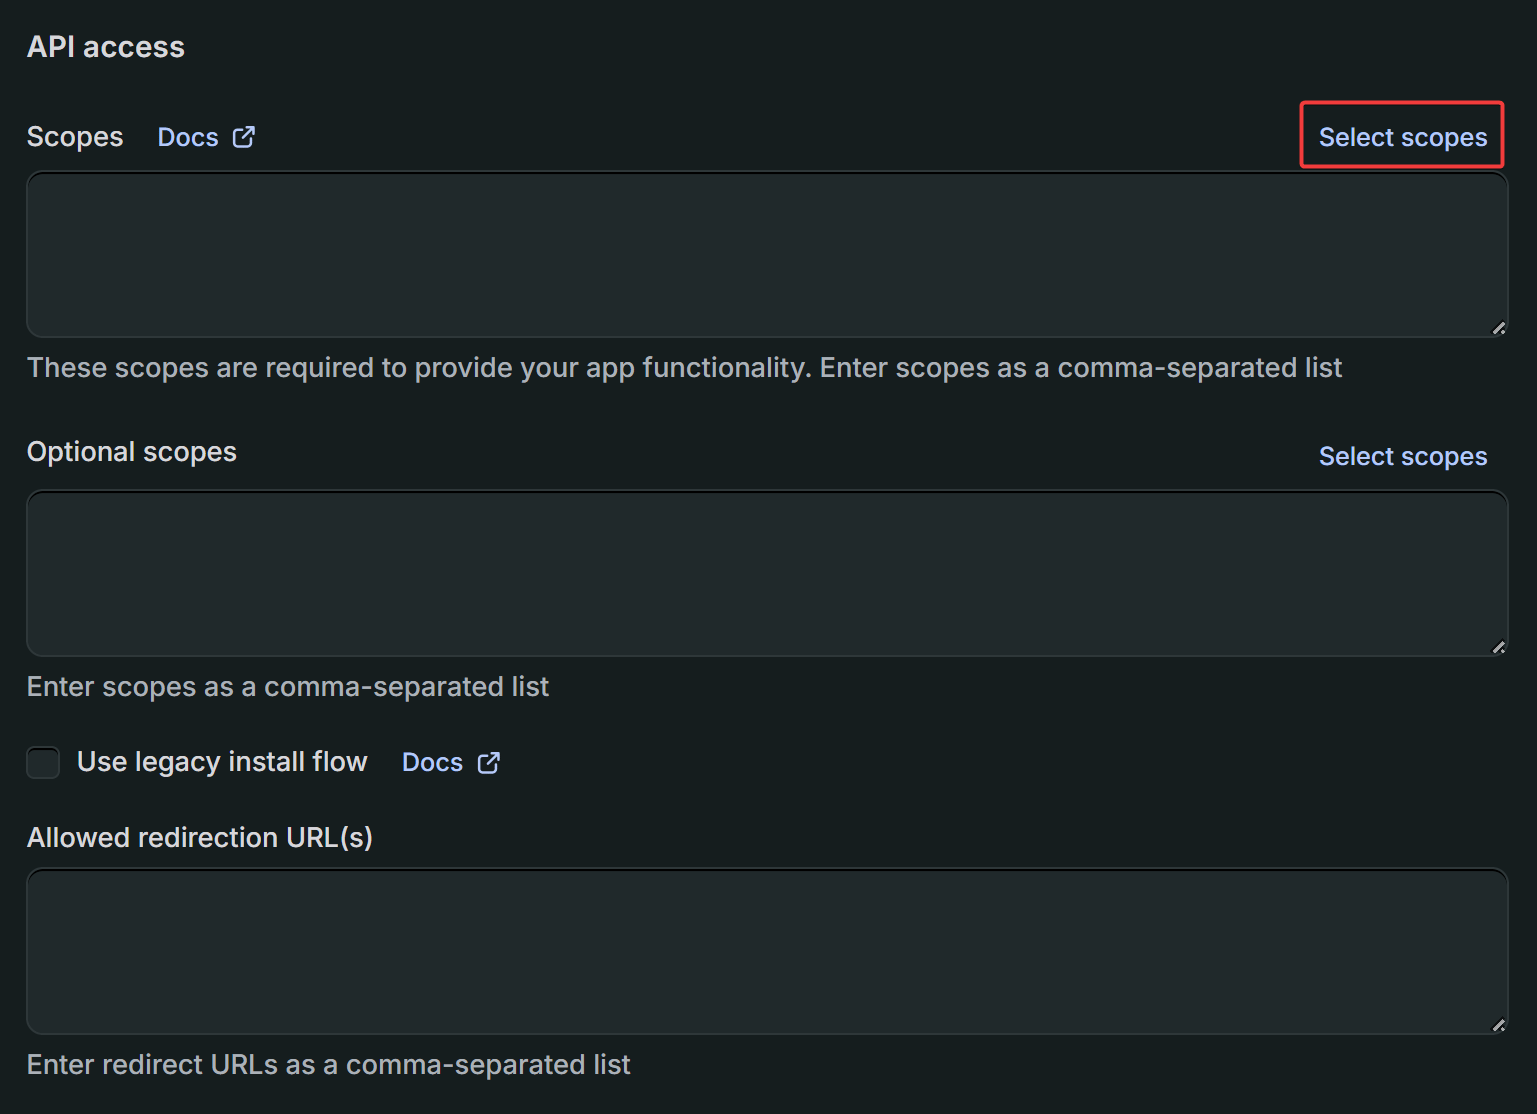
Search and enable required scopes
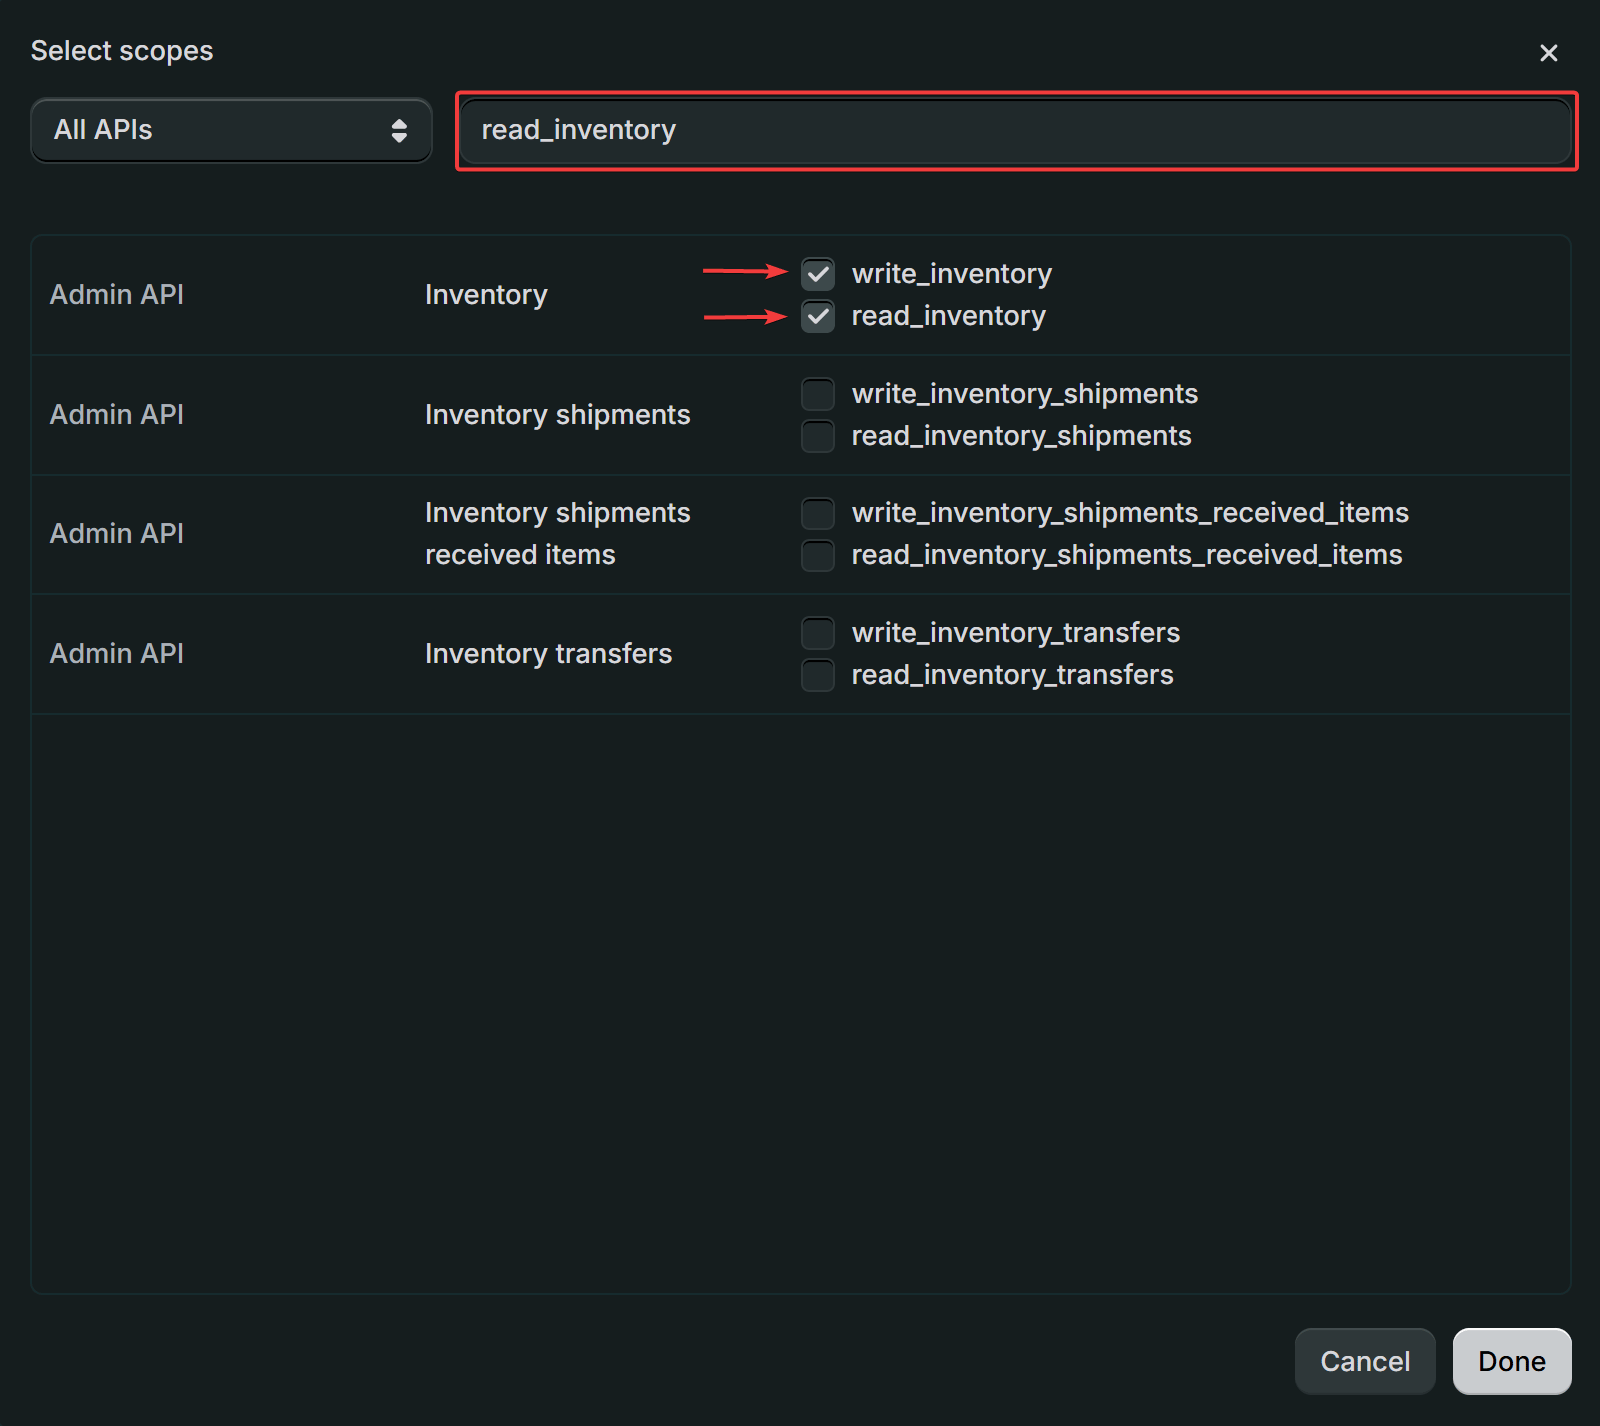
Fast-Search Scopes Cheat Sheet
To configure permissions quickly, copy each search keyword below, paste it into the Search bar at the top of the Select scopes modal, and tick the corresponding checkboxes:| Search Keyword | Permissions to Enable | Purpose |
|---|---|---|
read_products | read_products & write_products | Browse catalog, search products, and list collections |
read_inventory | read_inventory & write_inventory | Check live inventory and restock upon cancellation |
read_orders | read_orders & write_orders | Create orders, cancel orders, and track fulfillment |
read_draft_orders | read_draft_orders & write_draft_orders | Create pre-filled cart and checkout links |
read_customers | read_customers & write_customers | Automatically create customer profiles and link buyer data |
read_checkouts | read_checkouts & write_checkouts | Manage checkout sessions and cart recovery |
Release version
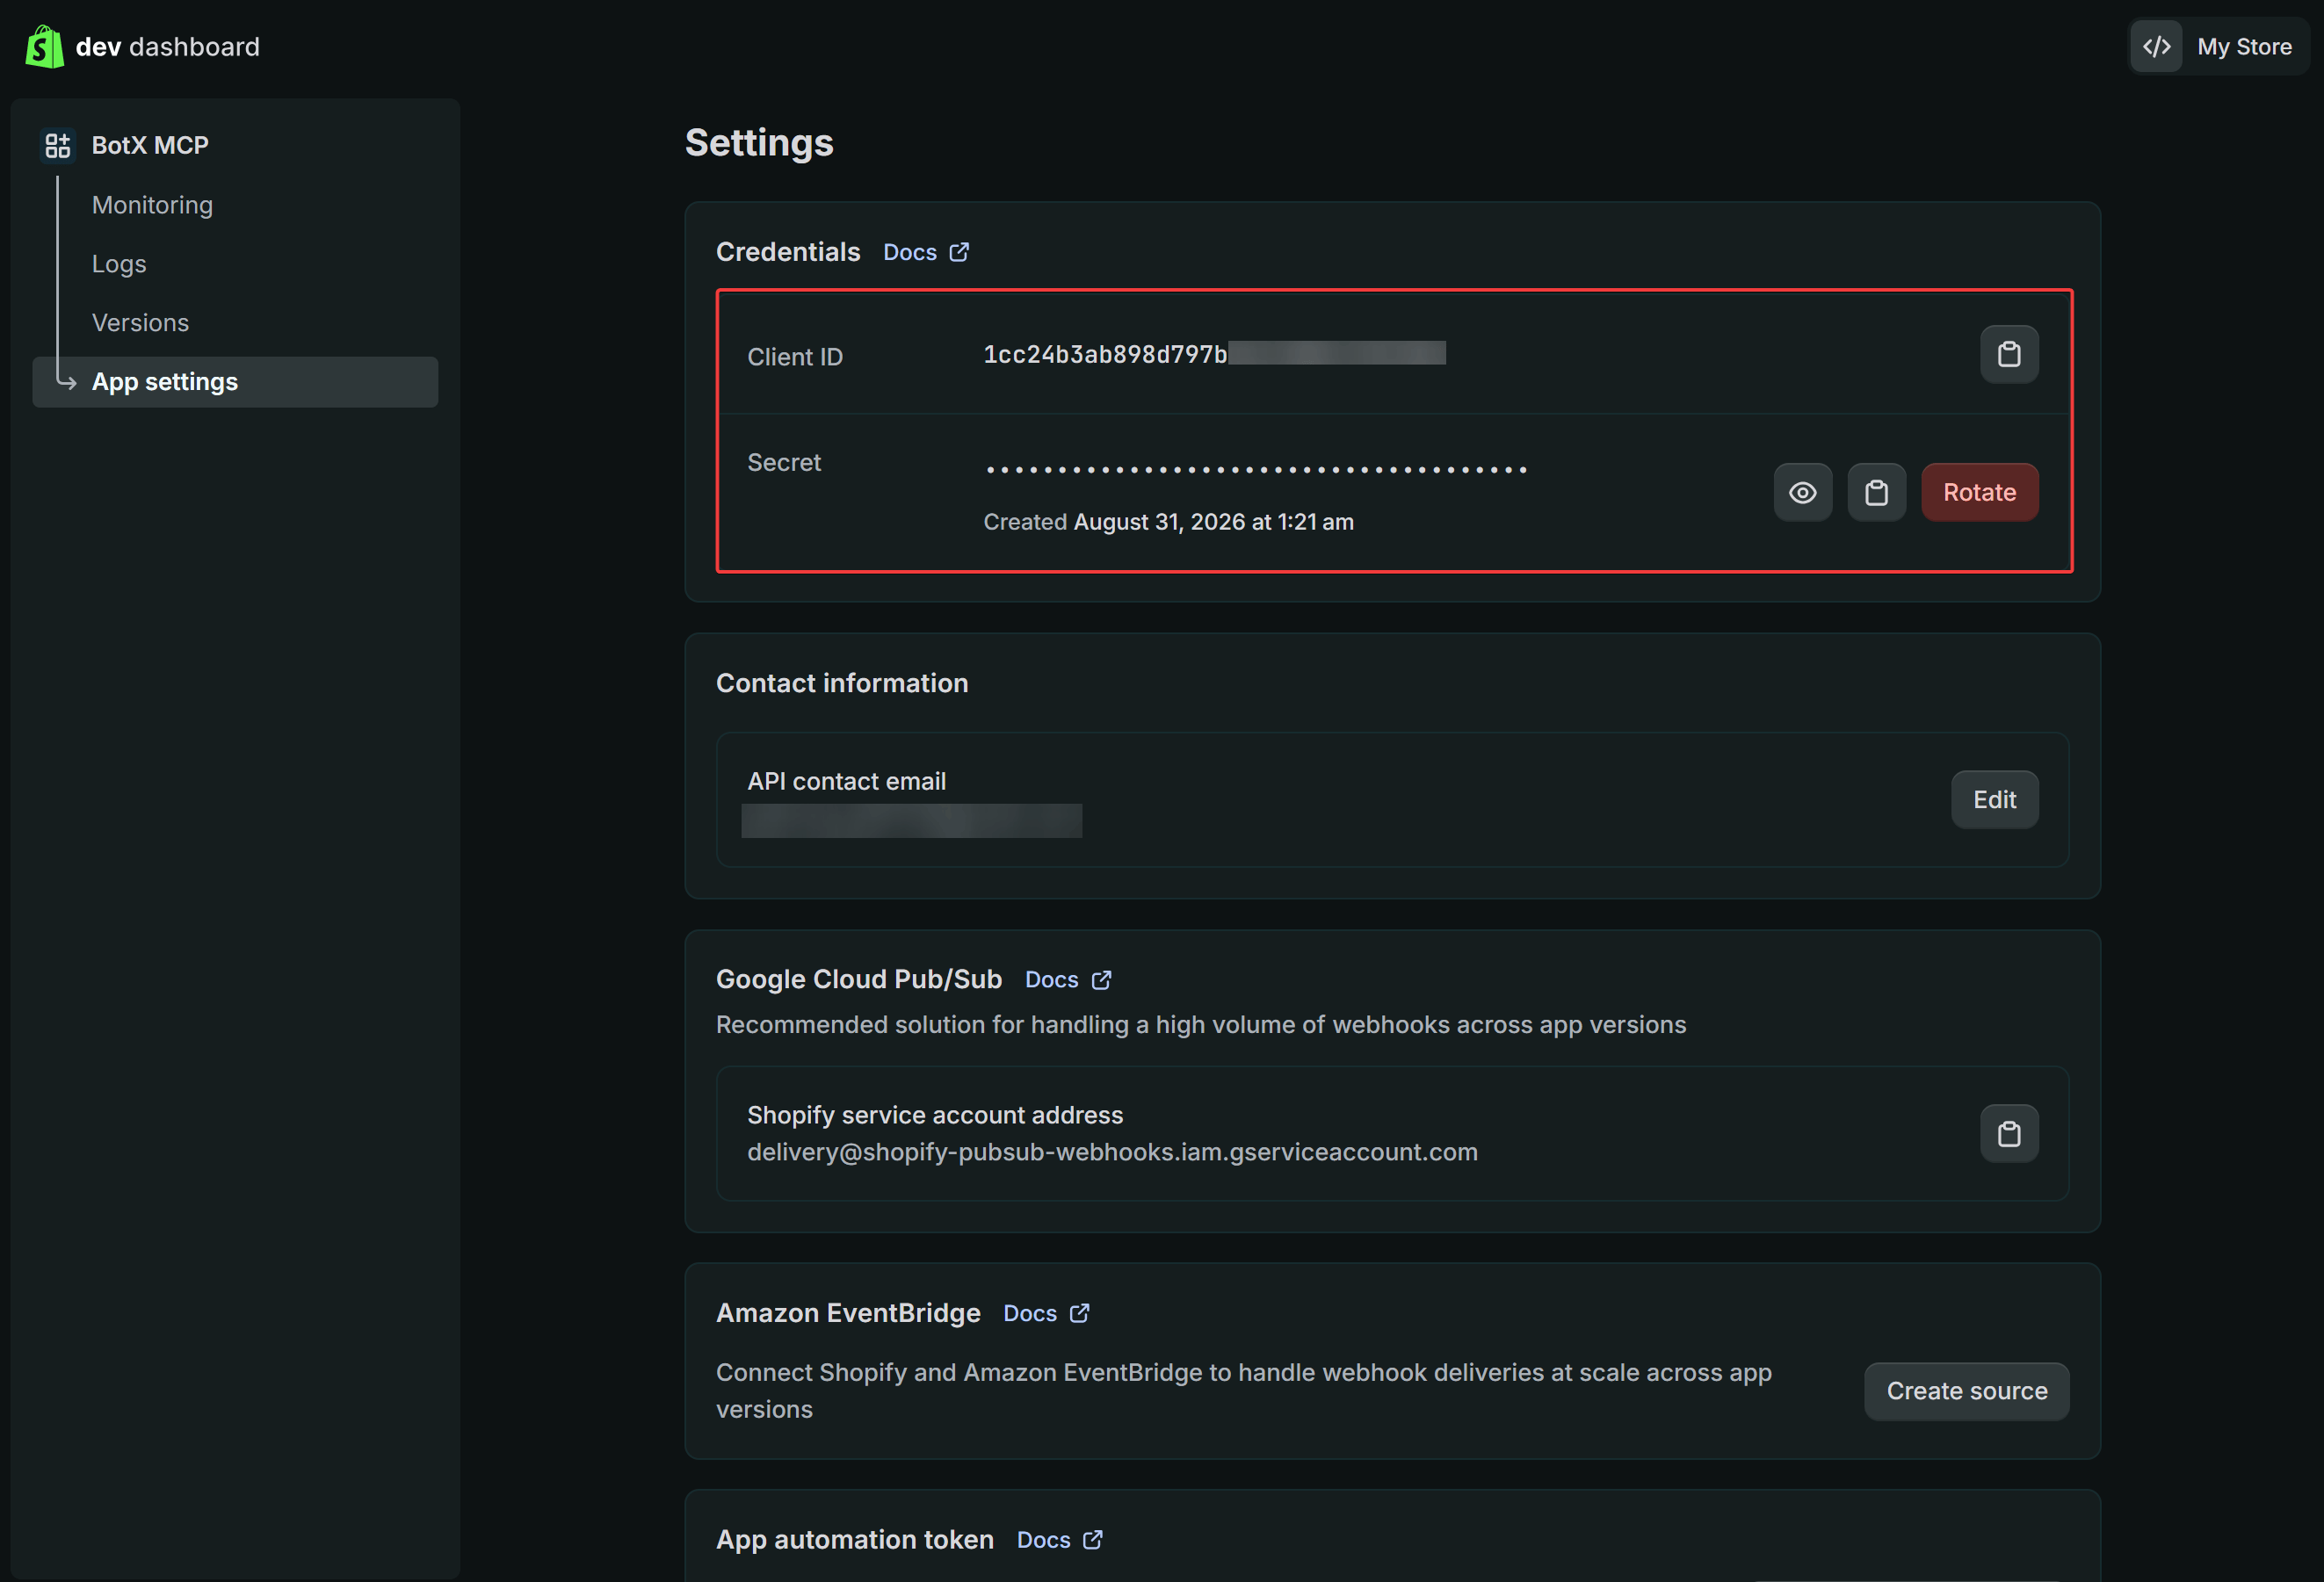
Copy Client ID and Client Secret
- Client ID
- Secret (Client Secret)
Install app on your store
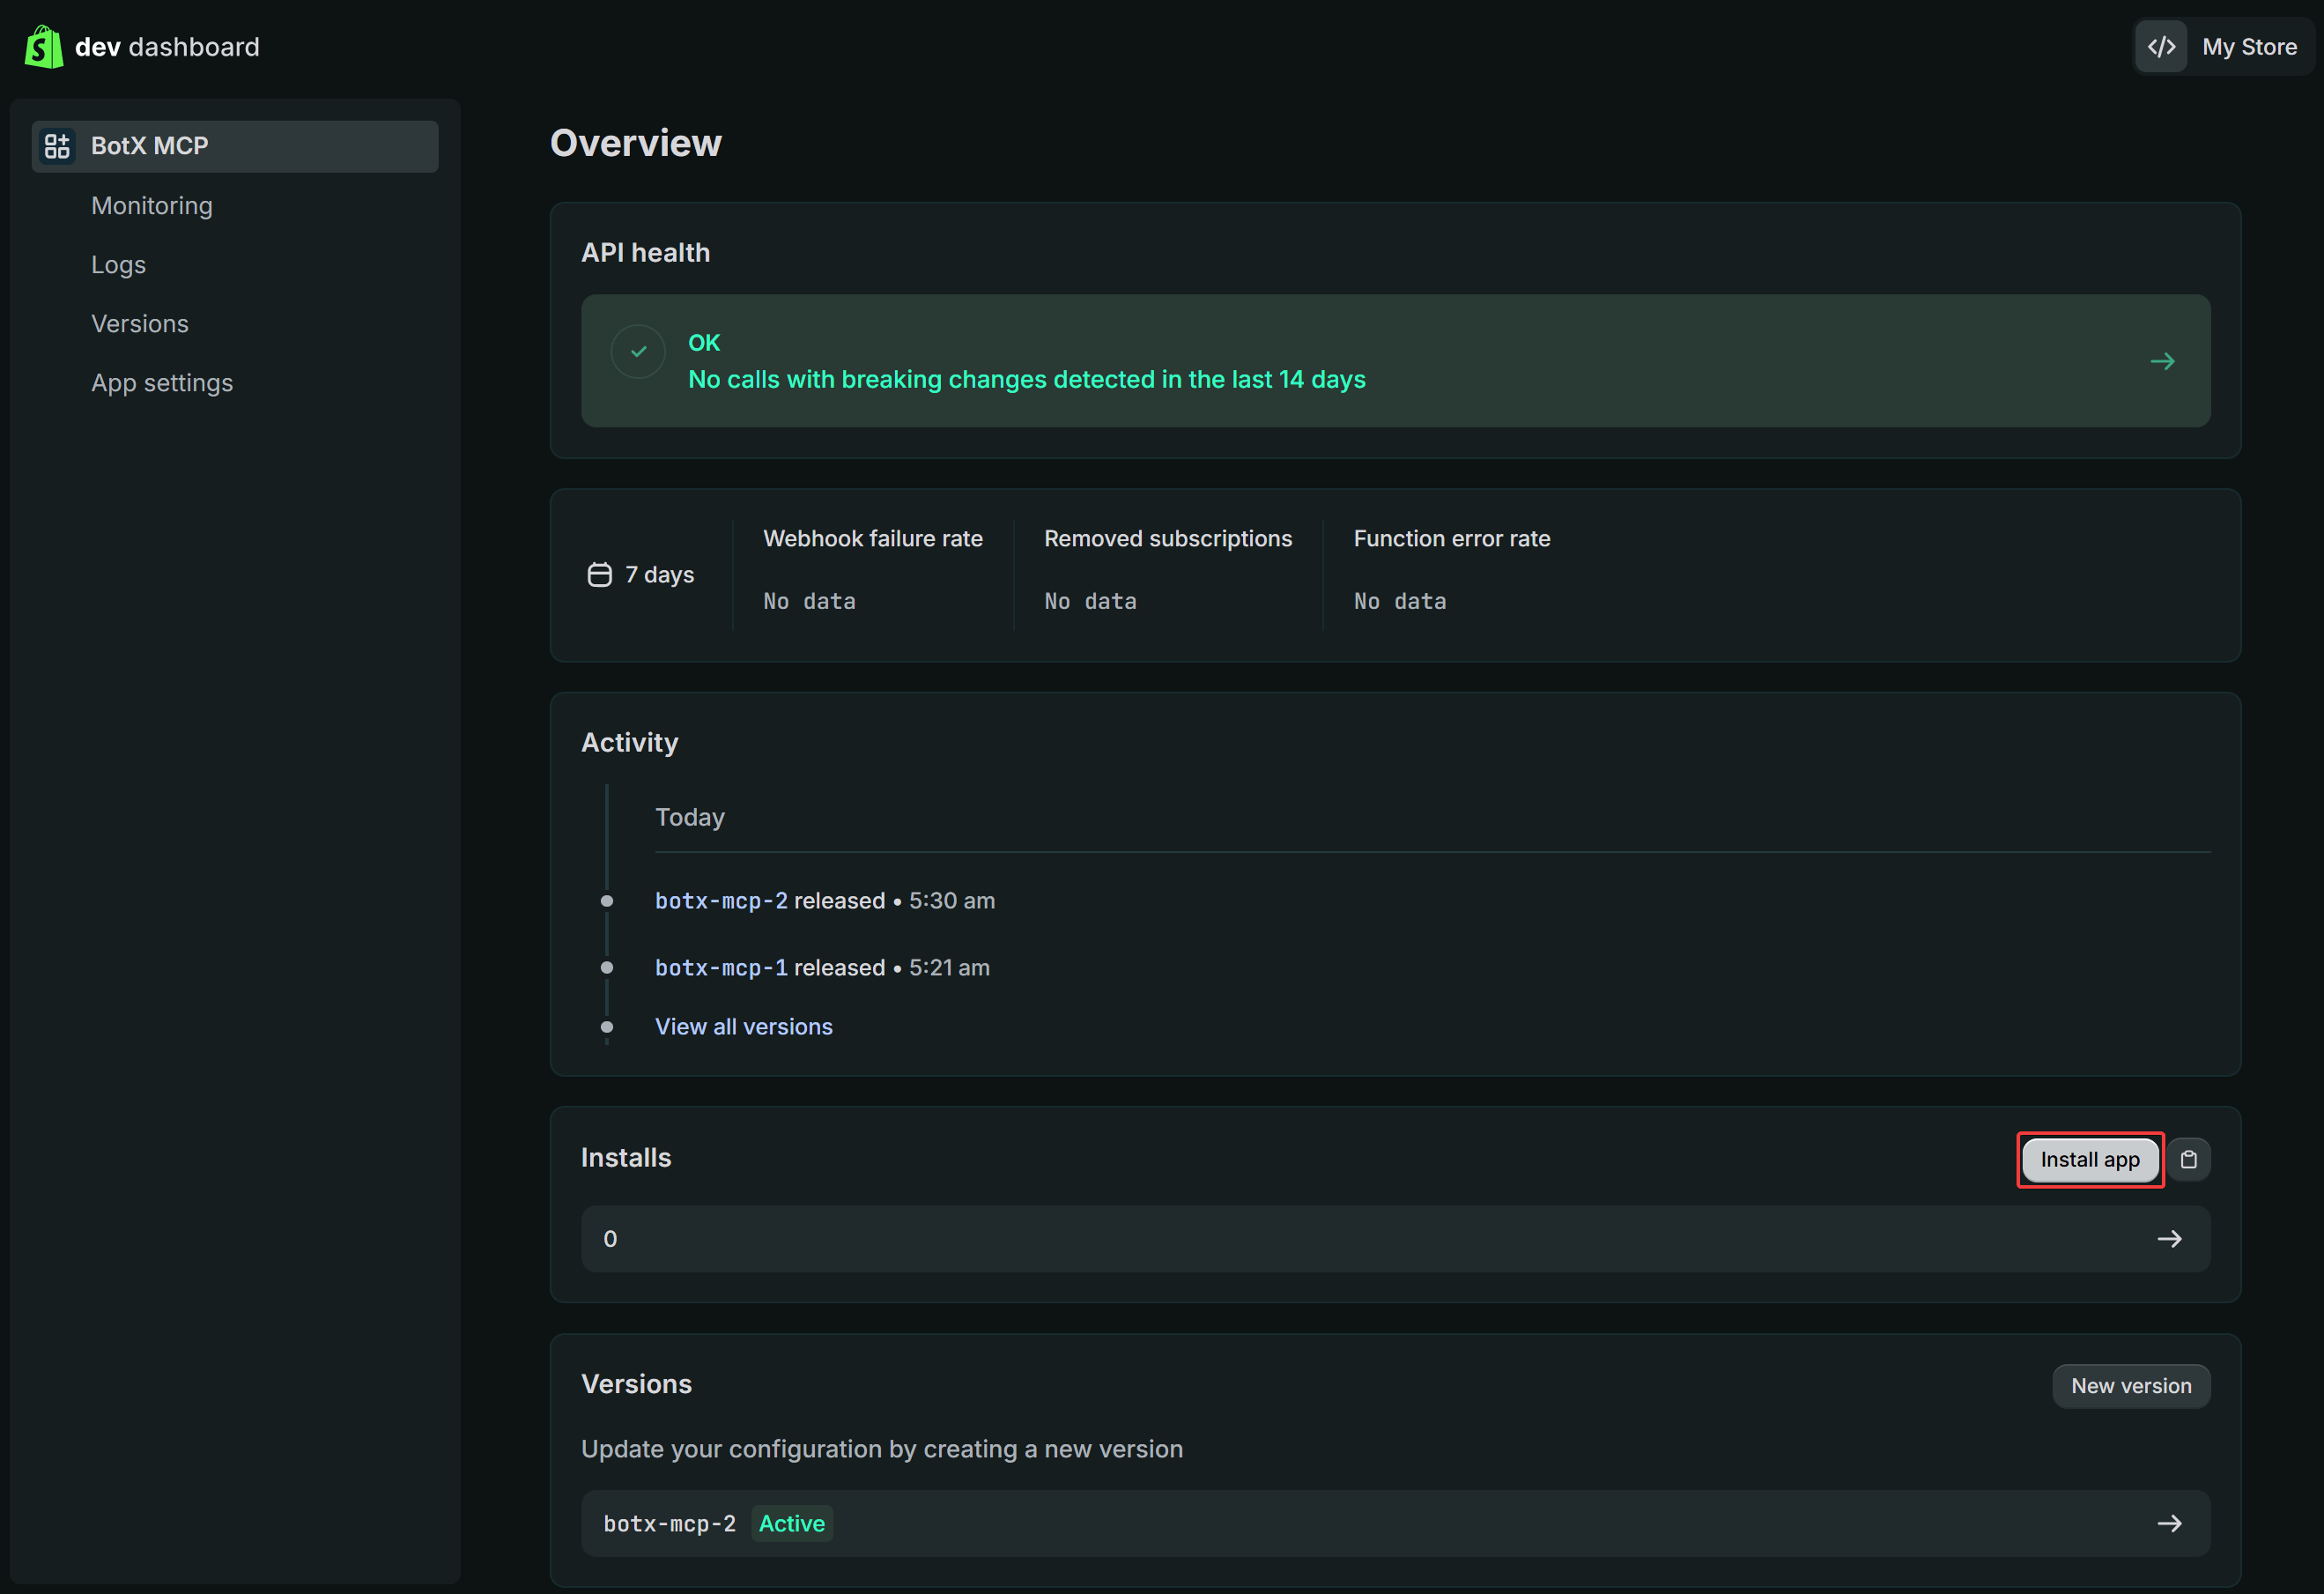
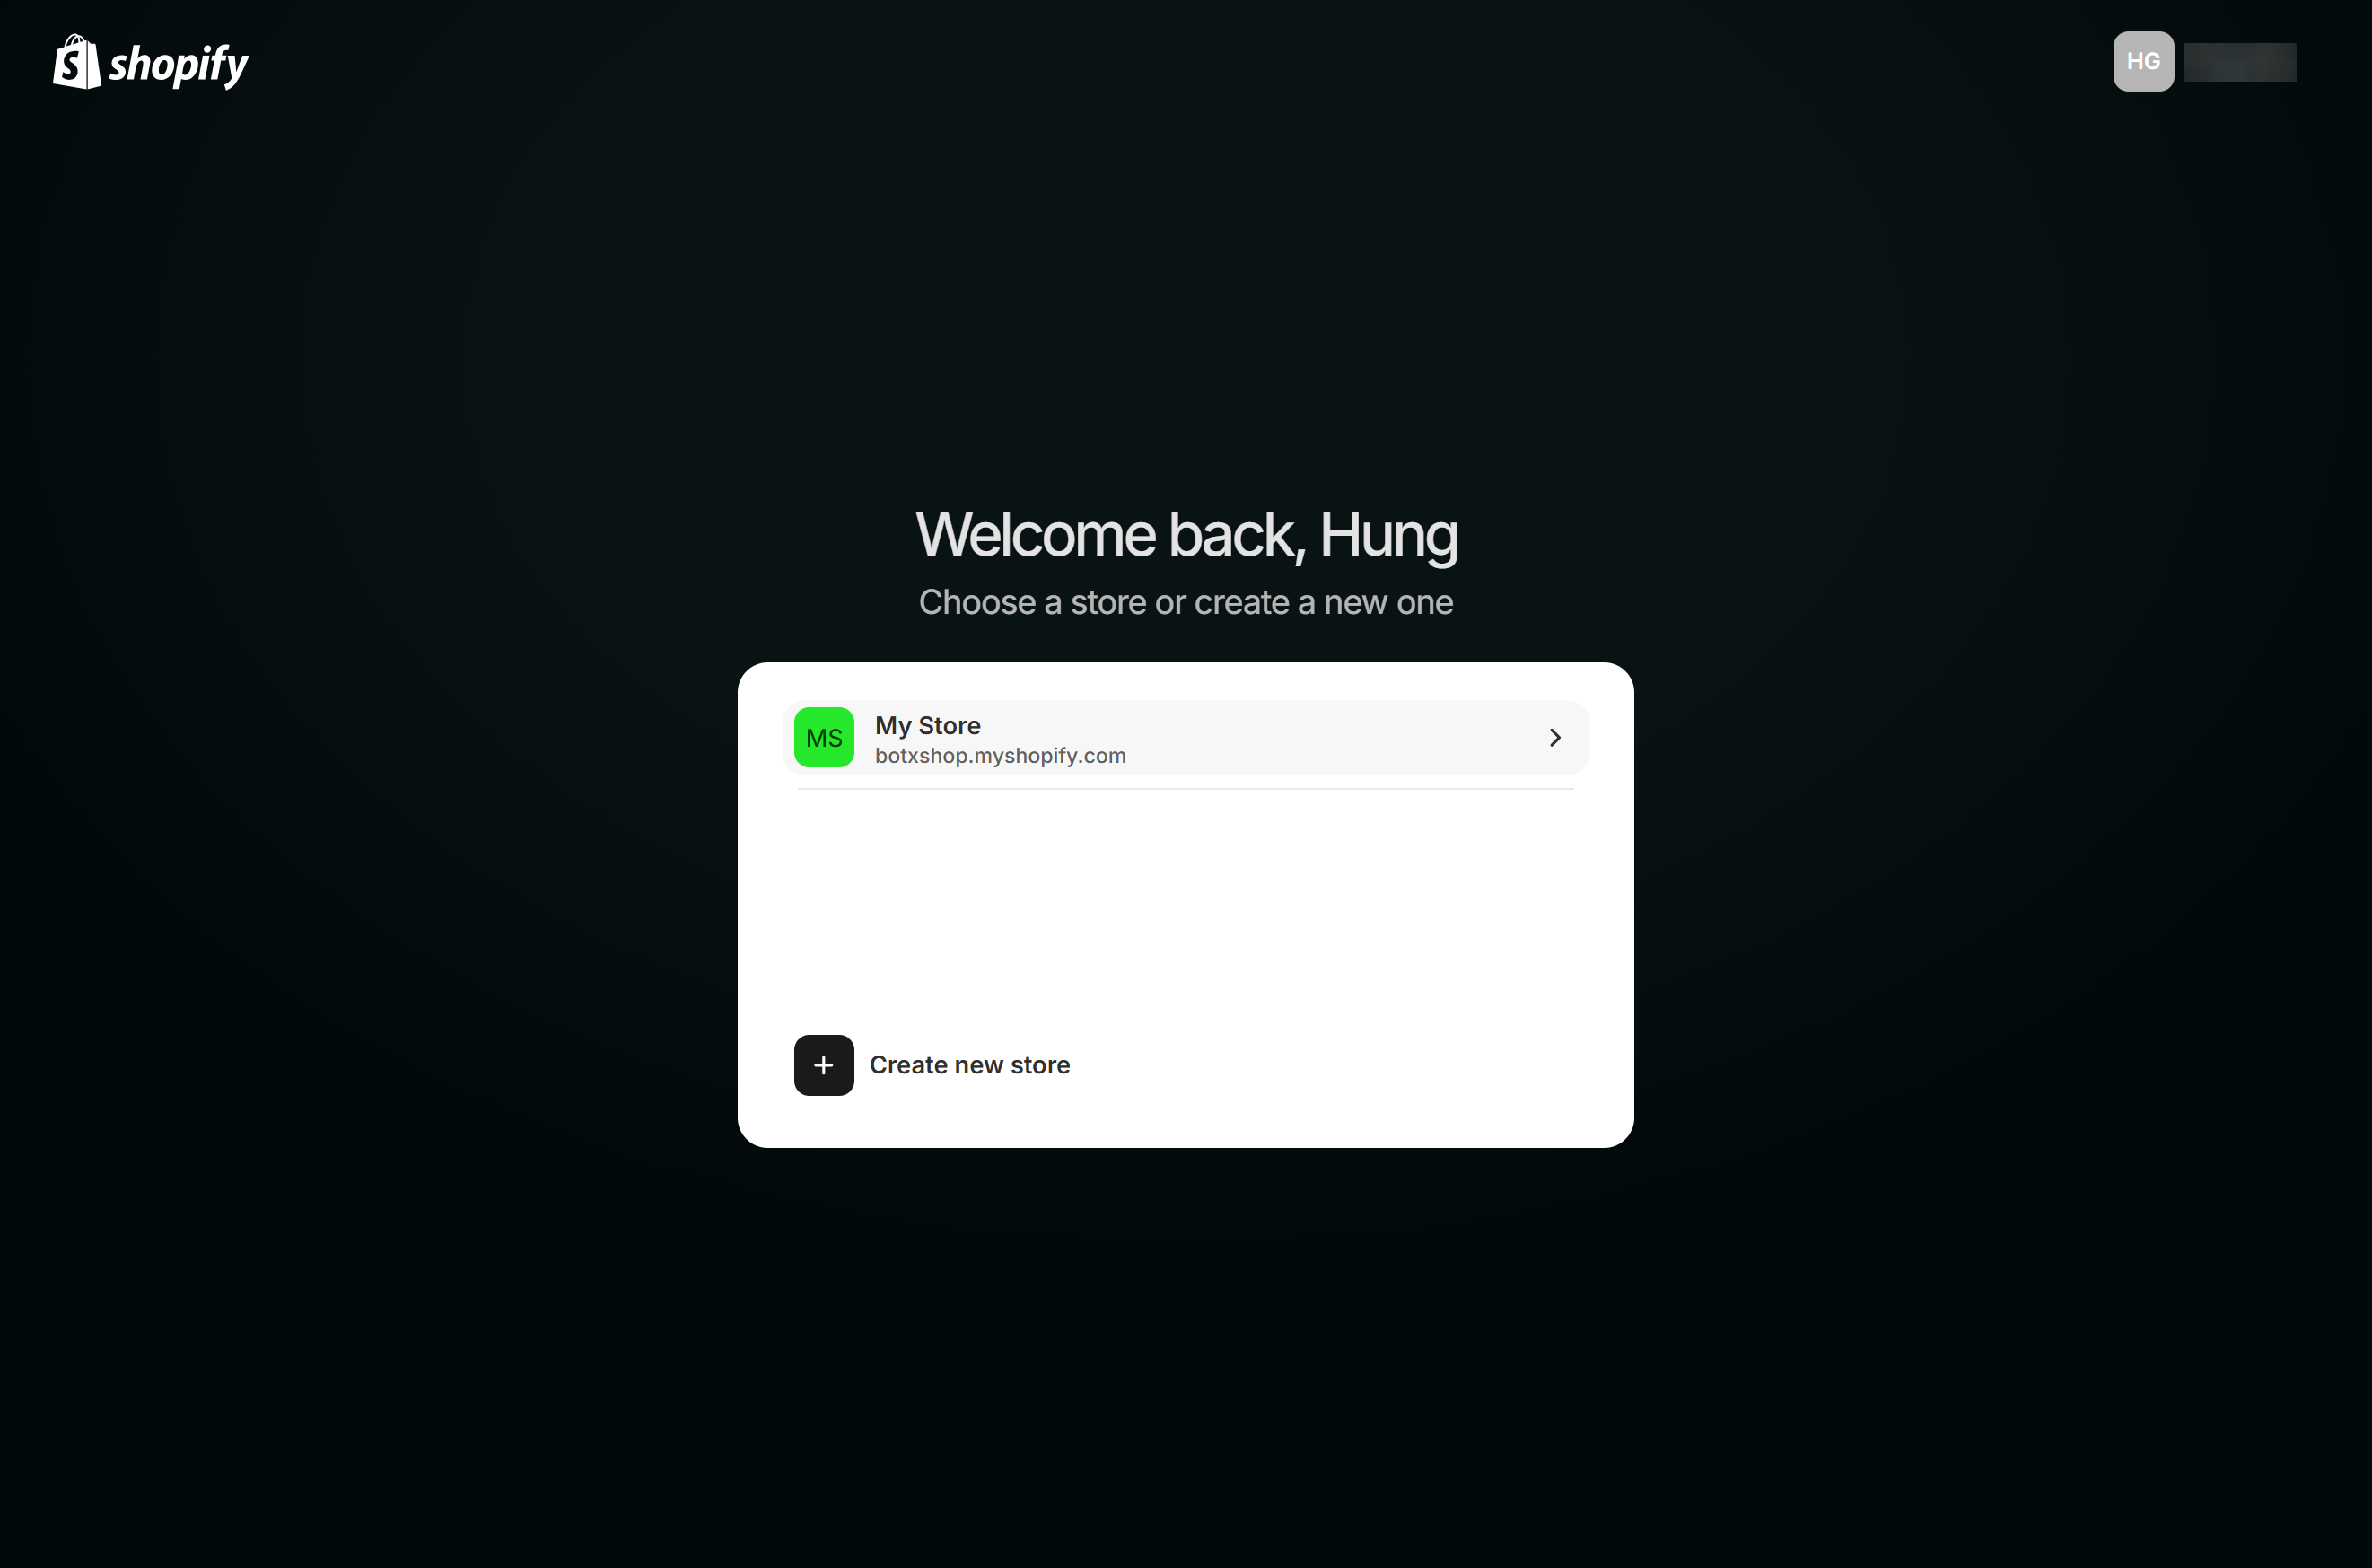
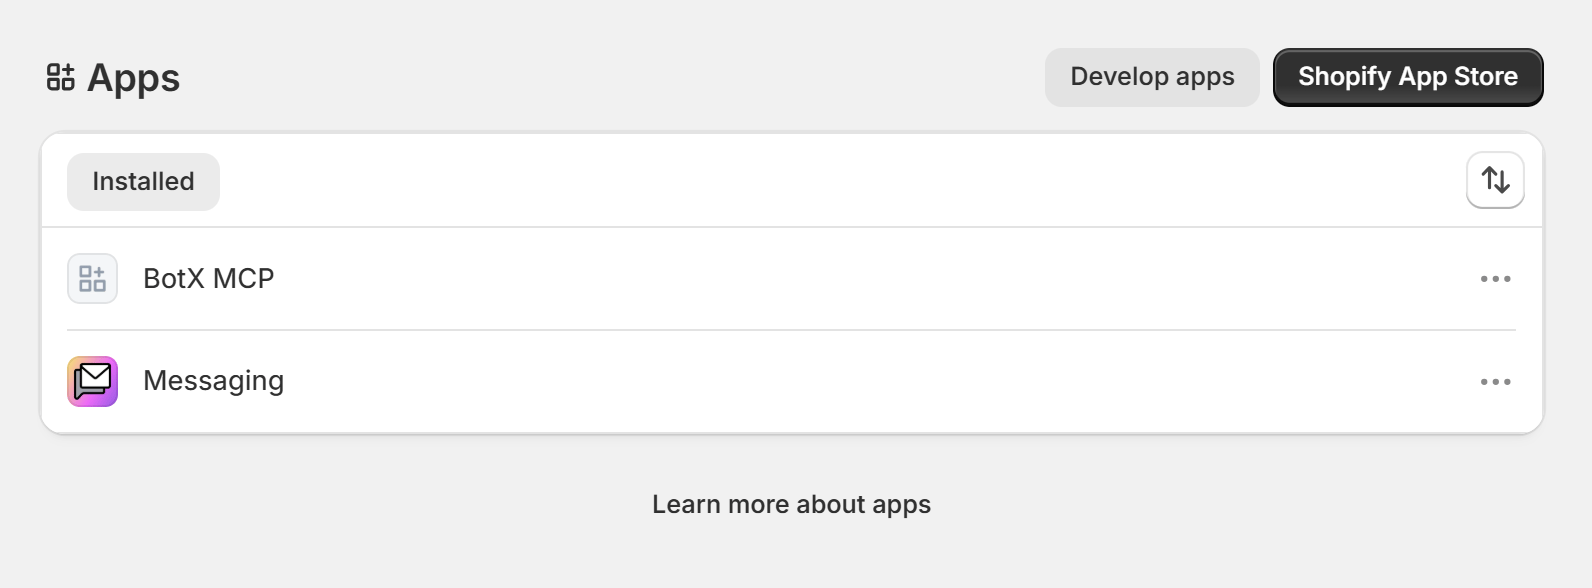
BotX MCP. If your browser displays a “connection refused” warning due to iframe restrictions, rest assured that the app installation has already succeeded on Shopify’s servers.Step 2: Deploy Shopify MCP Server on Cloudflare Workers
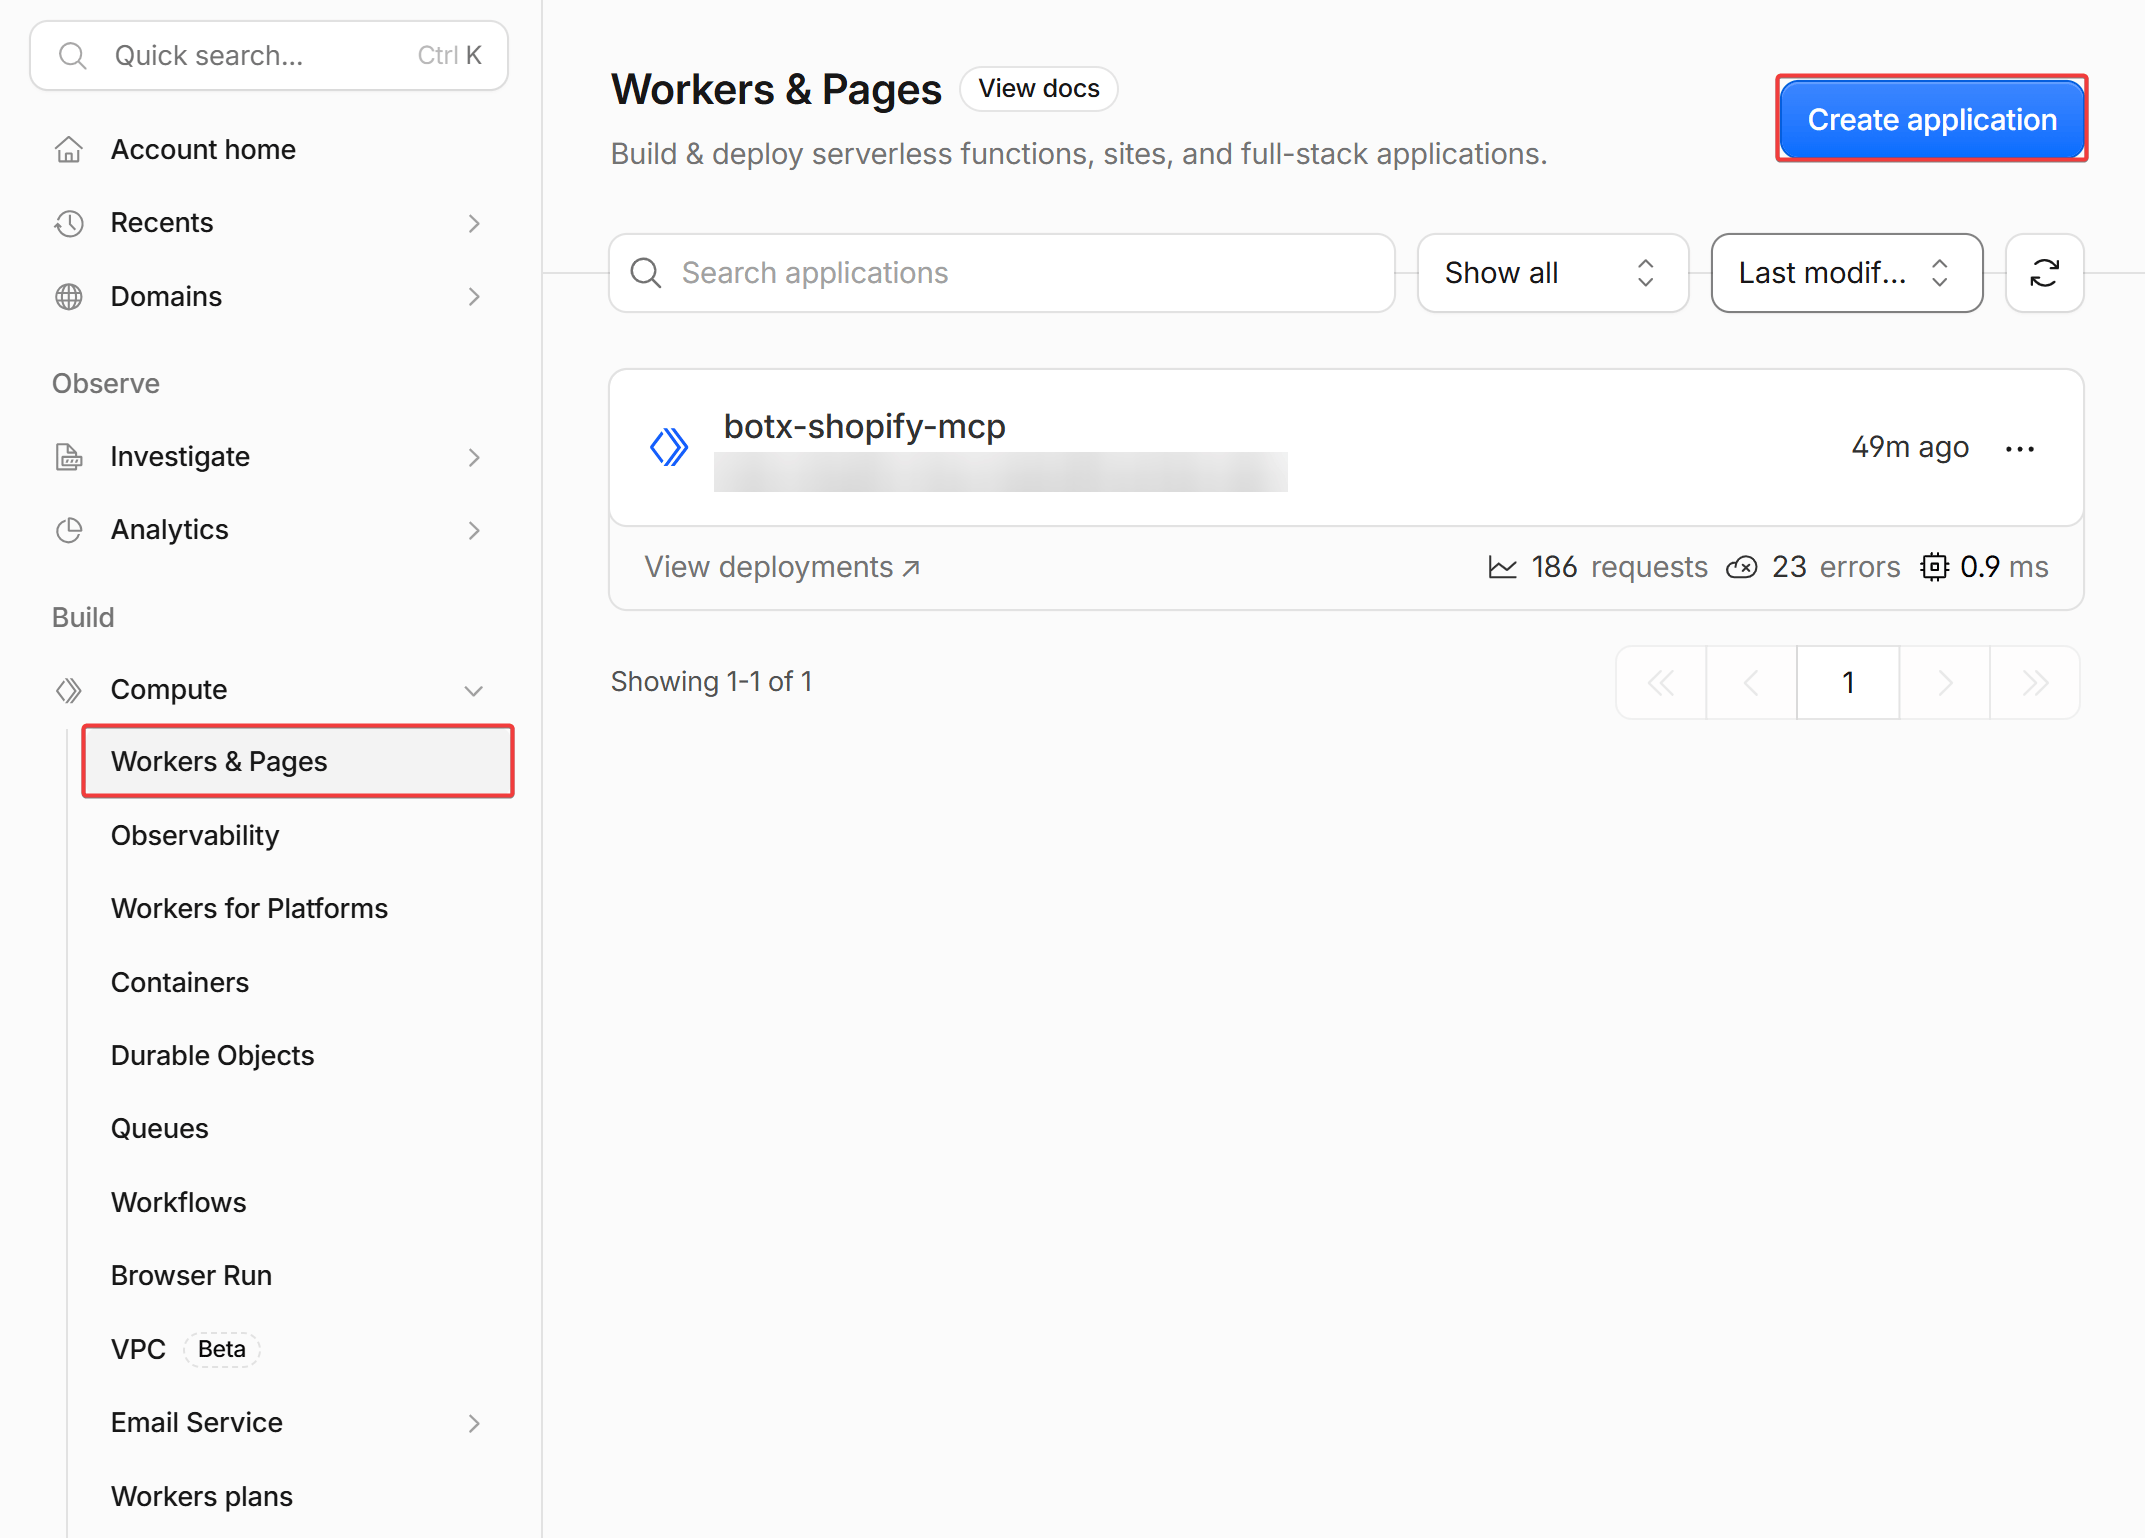
You can deploy a serverless MCP Server on Cloudflare Workers running 24/7.Navigate to Workers & Pages
Create a Worker using Hello World template
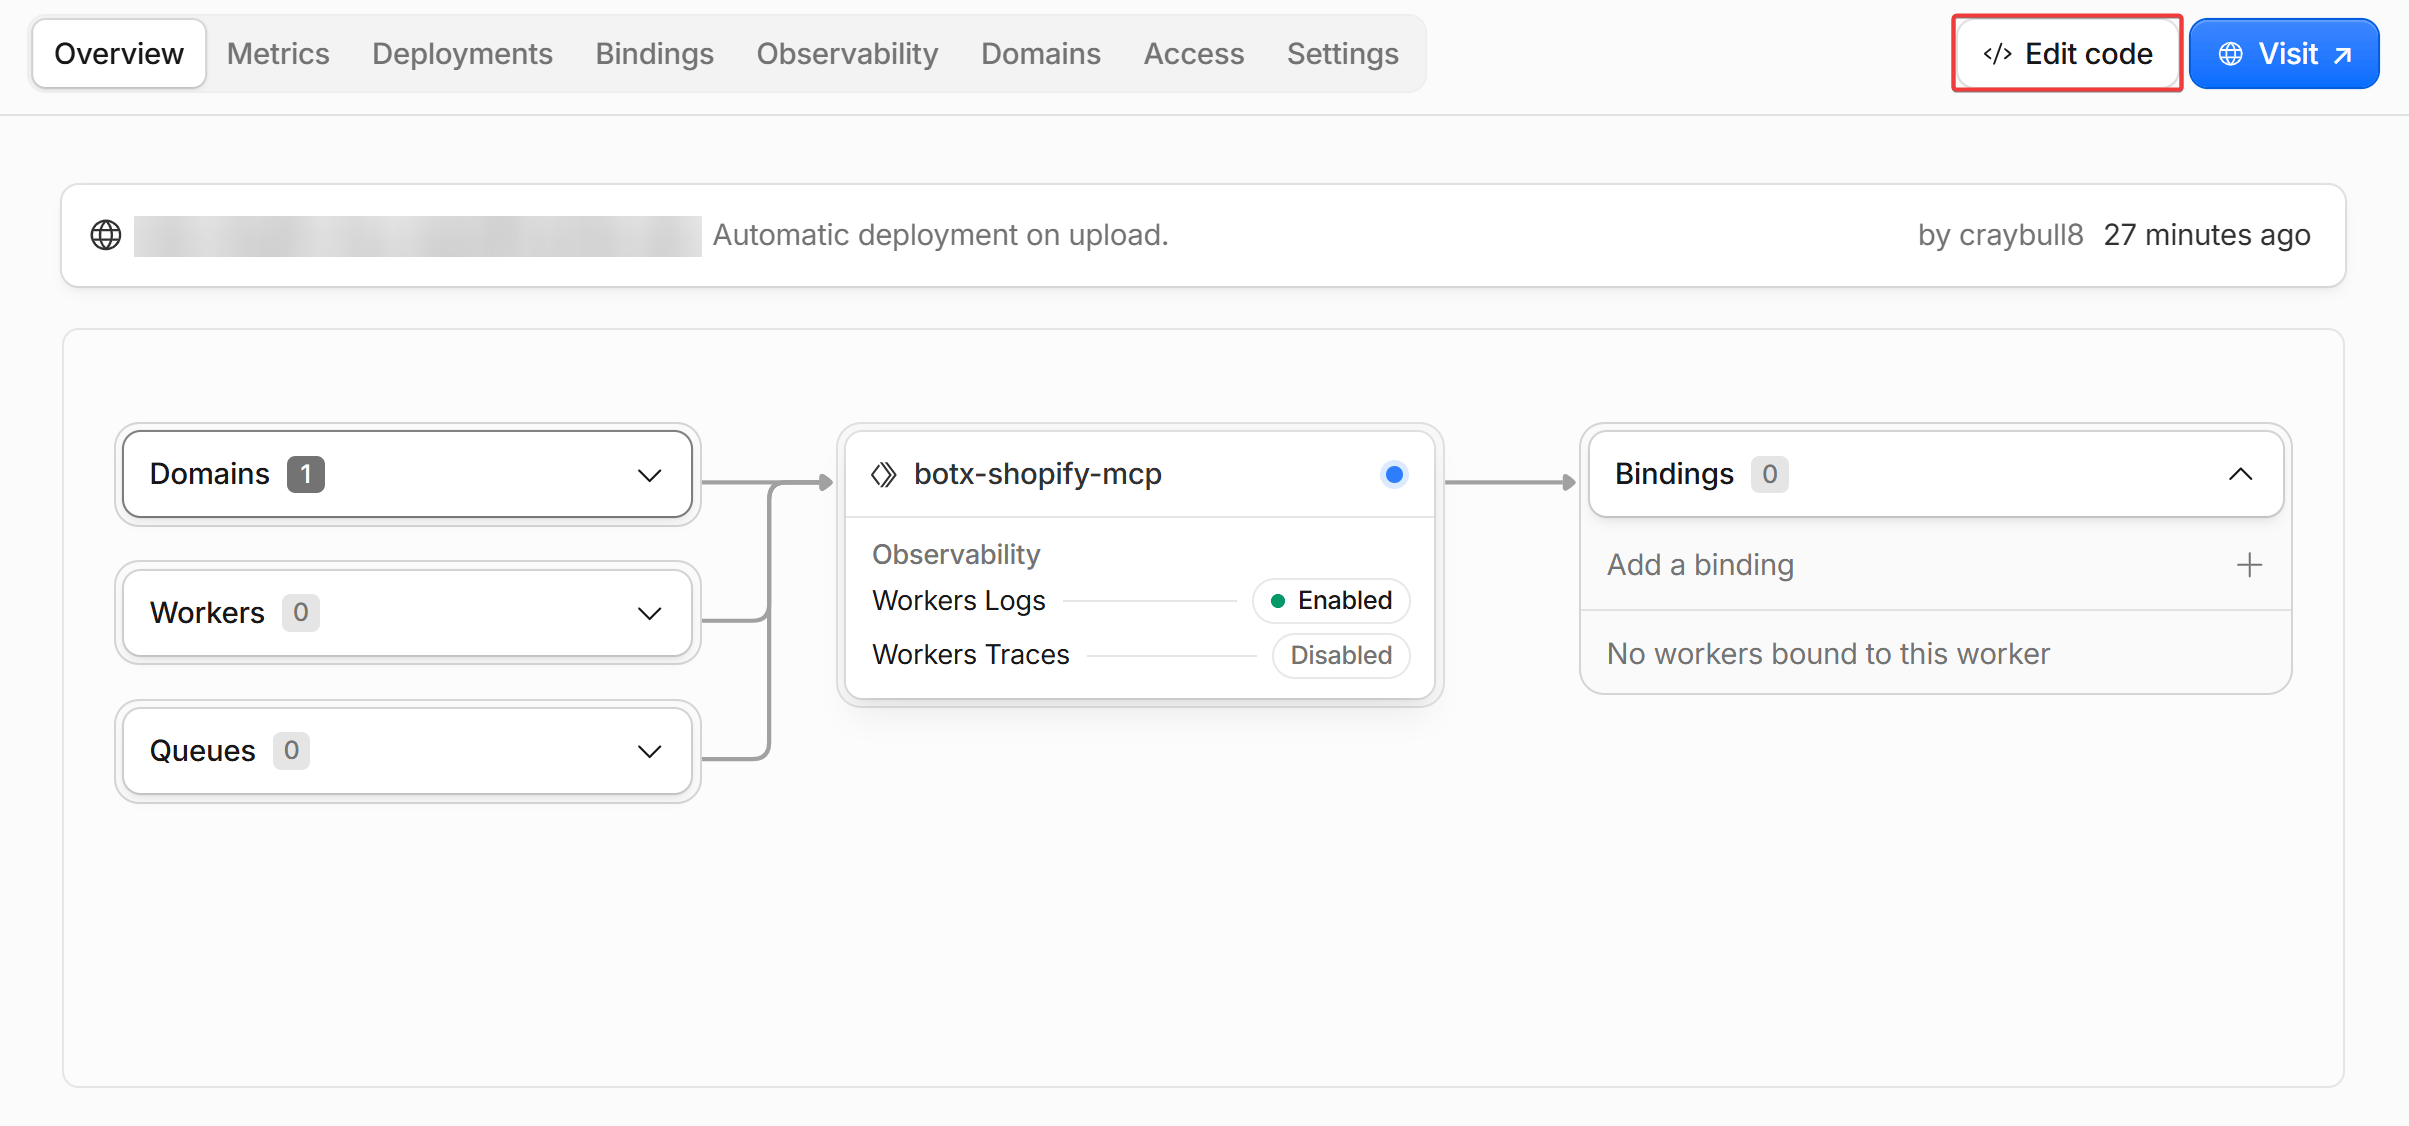
shopify-mcp-server) and click Deploy.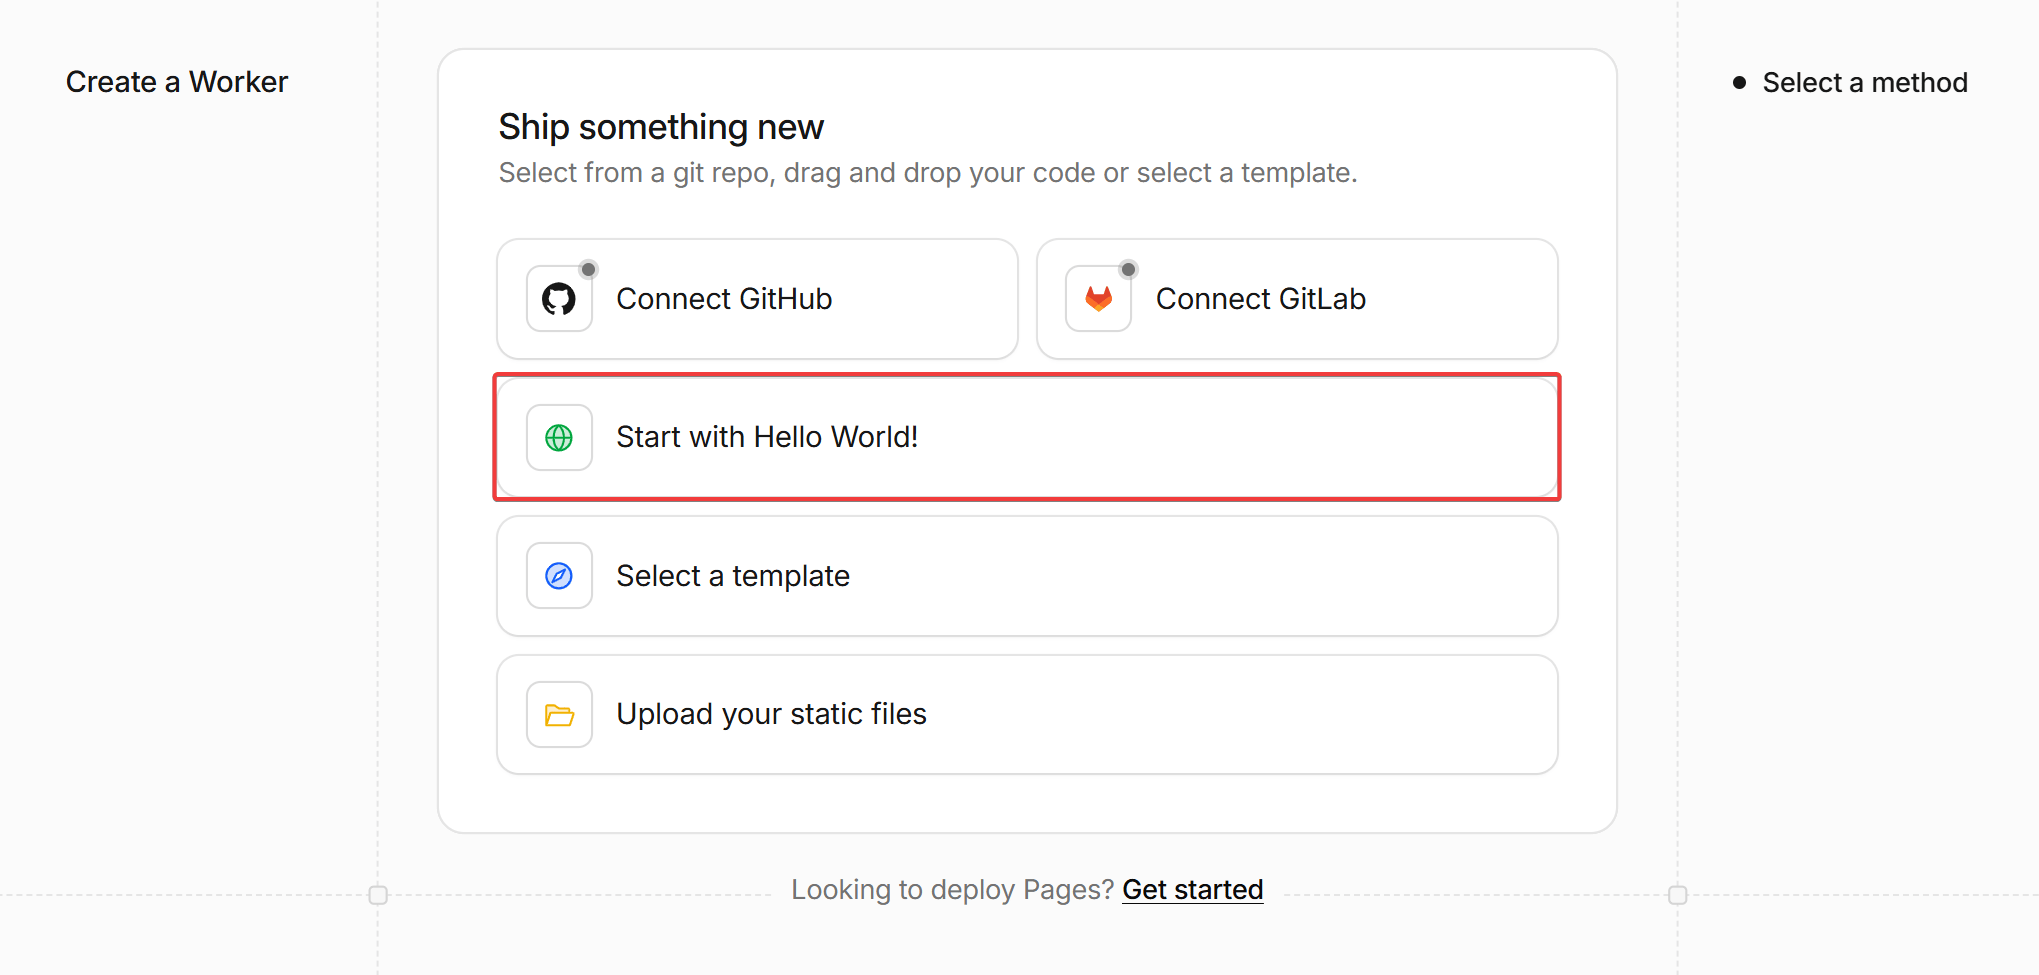
Open Worker Code Editor
Paste 11-tool MCP Server code
worker.js:// =========================================================================
// 1. SHOPIFY STORE CONFIGURATION & CREDENTIALS
// =========================================================================
const CONFIG = {
SHOP_DOMAIN: "your-store.myshopify.com", // Replace with your Shopify store domain
CLIENT_ID: "YOUR_CLIENT_ID_HERE", // Paste Client ID from Step 1
CLIENT_SECRET: "YOUR_CLIENT_SECRET_HERE",// Paste Client Secret from Step 1
API_VERSION: "2026-07"
};
const sessions = new Map();
let cachedAccessToken = null;
let tokenExpiresAt = 0;
function formatE164Phone(phone) {
if (!phone) return "";
let clean = phone.replace(/[^0-9+]/g, "");
if (clean.startsWith("0")) clean = "+84" + clean.slice(1);
if (!clean.startsWith("+")) clean = "+" + clean;
return clean;
}
function parseAddressComponents(rawAddr, rawCity, rawProvince) {
let addr1 = (rawAddr || "").trim();
let city = (rawCity || "").trim();
let province = (rawProvince || city || "").trim();
if (!city && addr1.includes(",")) {
const parts = addr1.split(",").map(p => p.trim()).filter(Boolean);
if (parts.length >= 2) {
city = parts.pop();
province = city;
addr1 = parts.join(", ");
}
}
if (!city) {
city = "Hanoi";
province = "Hanoi";
}
return {
address1: addr1,
city: city,
province: province,
country: "Vietnam"
};
}
async function getShopifyToken(env) {
const clientId = env?.SHOPIFY_CLIENT_ID || CONFIG.CLIENT_ID;
const clientSecret = env?.SHOPIFY_CLIENT_SECRET || CONFIG.CLIENT_SECRET;
const shop = env?.SHOPIFY_SHOP_DOMAIN || CONFIG.SHOP_DOMAIN;
if (cachedAccessToken && Date.now() < tokenExpiresAt) return cachedAccessToken;
try {
const res = await fetch(`https://${shop}/admin/oauth/access_token`, {
method: "POST",
headers: { "Content-Type": "application/json" },
body: JSON.stringify({
client_id: clientId,
client_secret: clientSecret,
grant_type: "client_credentials"
})
});
const data = await res.json();
if (data.access_token) {
cachedAccessToken = data.access_token;
tokenExpiresAt = Date.now() + ((data.expires_in || 86400) - 300) * 1000;
return cachedAccessToken;
}
} catch (err) {
console.error("Failed to obtain Shopify access token:", err);
}
return null;
}
async function queryShopify(query, variables = {}, env) {
const token = await getShopifyToken(env);
const shop = env?.SHOPIFY_SHOP_DOMAIN || CONFIG.SHOP_DOMAIN;
const res = await fetch(`https://${shop}/admin/api/${CONFIG.API_VERSION}/graphql.json`, {
method: "POST",
headers: {
"Content-Type": "application/json",
"X-Shopify-Access-Token": token || ""
},
body: JSON.stringify({ query, variables })
});
return await res.json();
}
// =========================================================================
// 2. 11 MCP TOOLS DEFINITION (ENGLISH DESCRIPTIONS)
// =========================================================================
const tools = [
{
name: "get_featured_products",
description: "Retrieve a curated list of featured and best-selling products from the Shopify catalog. Use when greeting a new customer or when they ask to see available/popular products.",
inputSchema: { type: "object", properties: {} }
},
{
name: "search_products",
description: "Search products in the Shopify catalog by keywords, product title, tags, or categories.",
inputSchema: {
type: "object",
properties: {
query: { type: "string", description: "Search keyword, product name, or category." }
},
required: ["query"]
}
},
{
name: "create_shopify_order",
description: "Create an official customer and order in Shopify Admin with complete address validation (address, city/province).",
inputSchema: {
type: "object",
properties: {
variantId: { type: "string", description: "Product Variant ID to purchase." },
quantity: { type: "number", description: "Quantity of items." },
fullName: { type: "string", description: "Customer's full name." },
phone: { type: "string", description: "Customer's phone number." },
address: { type: "string", description: "Street address, ward, district." },
city: { type: "string", description: "Province or City (e.g., 'Da Nang', 'Hanoi', 'Ho Chi Minh')." },
province: { type: "string", description: "Province name (optional)." },
note: { type: "string", description: "Optional order note." }
},
required: ["variantId", "fullName", "phone", "address"]
}
},
{
name: "cancel_shopify_order",
description: "Cancel an existing Shopify order directly on Shopify Admin when the customer requests cancellation, and automatically restock inventory.",
inputSchema: {
type: "object",
properties: {
orderIdentifier: { type: "string", description: "Order Name/Number (e.g., '#1004' or '1004') or customer phone number." },
reason: { type: "string", description: "Reason for cancellation: 'CUSTOMER', 'INVENTORY', 'FRAUD', 'DECLINED', or 'OTHER'." },
staffNote: { type: "string", description: "Cancellation note." }
},
required: ["orderIdentifier"]
}
},
{
name: "create_checkout_link",
description: "Generate a direct, pre-filled Shopify checkout link for one OR MULTIPLE products so the customer can self-checkout on the website in a single cart.",
inputSchema: {
type: "object",
properties: {
items: {
type: "array",
description: "List of items to include in the checkout cart: [{ variantId: '123', quantity: 1 }].",
items: {
type: "object",
properties: {
variantId: { type: "string", description: "Shopify Variant ID." },
quantity: { type: "number", description: "Quantity." }
},
required: ["variantId"]
}
},
variantId: { type: "string", description: "Single Product Variant ID or comma-separated list of variant IDs." },
quantity: { type: "number", description: "Quantity for single variant." }
}
}
},
{
name: "get_product_details",
description: "Retrieve comprehensive details for a specific Shopify product including title, description, high-resolution images, pricing, and all available variants.",
inputSchema: {
type: "object",
properties: {
productId: { type: "string", description: "Shopify Product ID." }
},
required: ["productId"]
}
},
{
name: "check_inventory",
description: "Check live stock availability and quantity for a specific product variant.",
inputSchema: {
type: "object",
properties: {
variantId: { type: "string", description: "Shopify Product Variant ID." }
},
required: ["variantId"]
}
},
{
name: "track_order_status",
description: "Look up order details, payment status, fulfillment status, and tracking numbers for an existing order by Order Name (#1001), Phone, or Email.",
inputSchema: {
type: "object",
properties: {
orderIdentifier: { type: "string", description: "Order Name/Number (e.g., '#1001') or customer phone number." }
},
required: ["orderIdentifier"]
}
},
{
name: "get_customer_orders",
description: "Retrieve a customer's purchase history and past orders by their email address or phone number.",
inputSchema: {
type: "object",
properties: {
query: { type: "string", description: "Customer email address or phone number." }
},
required: ["query"]
}
},
{
name: "list_collections",
description: "List all public product collections and categories available in the store.",
inputSchema: { type: "object", properties: {} }
},
{
name: "get_collection_products",
description: "Fetch all products belonging to a specific Shopify collection by Collection ID or handle.",
inputSchema: {
type: "object",
properties: {
collectionId: { type: "string", description: "Collection ID or handle." }
},
required: ["collectionId"]
}
}
];
// =========================================================================
// 3. MCP PROTOCOL & SHOPIFY API HANDLERS
// =========================================================================
export default {
async fetch(request, env) {
const corsHeaders = {
"Access-Control-Allow-Origin": "*",
"Access-Control-Allow-Methods": "GET, POST, OPTIONS",
"Access-Control-Allow-Headers": "*",
};
if (request.method === "OPTIONS") return new Response(null, { headers: corsHeaders });
const url = new URL(request.url);
// SSE Handshake Stream
const acceptHeader = request.headers.get("Accept") || "";
if (request.method === "GET" && (url.pathname.includes("/sse") || acceptHeader.includes("text/event-stream") || url.pathname === "/")) {
const sessionId = crypto.randomUUID();
const { readable, writable } = new TransformStream();
const writer = writable.getWriter();
const encoder = new TextEncoder();
sessions.set(sessionId, writer);
writer.write(encoder.encode(`event: endpoint\ndata: ${url.origin}/messages?sessionId=${sessionId}\n\n`));
return new Response(readable, {
headers: {
...corsHeaders,
"Content-Type": "text/event-stream",
"Cache-Control": "no-cache",
"Connection": "keep-alive",
}
});
}
// JSON-RPC Message Stream
if (request.method === "POST") {
let body = {};
try { body = await request.json(); } catch (e) {}
const id = body.id !== undefined ? body.id : 1;
const method = body.method;
const sessionId = url.searchParams.get("sessionId");
let responseObj = null;
if (method === "initialize") {
responseObj = {
jsonrpc: "2.0",
id: id,
result: {
protocolVersion: "2024-11-05",
capabilities: { tools: { listChanged: false } },
serverInfo: { name: "shopify-mcp-server", version: "3.3.0" }
}
};
} else if (method === "tools/list") {
responseObj = { jsonrpc: "2.0", id: id, result: { tools: tools } };
} else if (method === "tools/call") {
const toolName = body.params?.name;
const args = body.params?.arguments || {};
let resultData = "";
try {
if (toolName === "get_featured_products" || toolName === "search_products") {
const searchQuery = args.query ? args.query : "";
const gql = `
query search($q: String!) {
products(first: 6, query: $q) {
edges {
node {
id title description onlineStoreUrl
featuredImage { url }
images(first: 3) { edges { node { url } } }
variants(first: 5) {
edges { node { id title price availableForSale } }
}
}
}
}
}
`;
const res = await queryShopify(gql, { q: searchQuery }, env);
const rawList = res.data?.products?.edges || [];
const formatted = rawList.map(e => {
const p = e.node;
const defaultVariant = p.variants?.edges?.[0]?.node;
const cleanVariantId = defaultVariant?.id?.replace(/[^0-9]/g, "") || "";
const realImageUrl = p.featuredImage?.url || p.images?.edges?.[0]?.node?.url || "";
return {
id: p.id,
title: p.title,
variant_id: cleanVariantId,
image_url: realImageUrl,
checkout_url: `https://${CONFIG.SHOP_DOMAIN}/cart/${cleanVariantId}:1`,
price_formatted: Number(defaultVariant?.price || 0).toLocaleString("vi-VN") + "đ",
description: p.description?.substring(0, 100) + "...",
available: defaultVariant?.availableForSale ?? true
};
});
resultData = JSON.stringify(formatted);
} else if (toolName === "create_shopify_order") {
const cleanVarId = args.variantId?.startsWith("gid://") ? args.variantId : `gid://shopify/ProductVariant/${(args.variantId || "").replace(/[^0-9]/g, "")}`;
const parts = (args.fullName || "Customer").trim().split(" ");
const lastName = parts.pop() || "";
const firstName = parts.join(" ") || "Guest";
const phoneE164 = formatE164Phone(args.phone);
const qty = Number(args.quantity) || 1;
const addrObj = parseAddressComponents(args.address, args.city, args.province);
let customerId = null;
try {
const custMutation = `
mutation createCustomer($input: CustomerInput!) {
customerCreate(input: $input) {
customer { id }
userErrors { field message }
}
}
`;
const custRes = await queryShopify(custMutation, {
input: {
firstName: firstName,
lastName: lastName,
phone: phoneE164,
addresses: [{
address1: addrObj.address1,
city: addrObj.city,
province: addrObj.province,
country: addrObj.country,
phone: phoneE164
}]
}
}, env);
customerId = custRes.data?.customerCreate?.customer?.id;
if (!customerId) {
const findQ = `query findCust($q: String!) { customers(first: 1, query: $q) { edges { node { id } } } }`;
const findRes = await queryShopify(findQ, { q: phoneE164 }, env);
customerId = findRes.data?.customers?.edges?.[0]?.node?.id;
}
} catch (err) {}
const createDraftGql = `
mutation createDraft($input: DraftOrderInput!) {
draftOrderCreate(input: $input) {
draftOrder { id name totalPrice }
userErrors { field message }
}
}
`;
const draftInput = {
lineItems: [{ variantId: cleanVarId, quantity: qty }],
purchasingEntity: customerId ? { customerId: customerId } : undefined,
shippingAddress: {
firstName: firstName,
lastName: lastName,
address1: addrObj.address1,
city: addrObj.city,
province: addrObj.province,
country: addrObj.country,
phone: phoneE164
},
note: `Order via ChatbotX AI Agent | Phone: ${args.phone || ""}`
};
const draftRes = await queryShopify(createDraftGql, { input: draftInput }, env);
const draftObj = draftRes.data?.draftOrderCreate?.draftOrder;
if (draftObj?.id) {
const completeGql = `
mutation completeDraft($id: ID!) {
draftOrderComplete(id: $id, paymentPending: true) {
draftOrder {
order {
id
name
totalPriceSet { shopMoney { amount currencyCode } }
}
}
userErrors { field message }
}
}
`;
const completeRes = await queryShopify(completeGql, { id: draftObj.id }, env);
const finalOrder = completeRes.data?.draftOrderComplete?.draftOrder?.order;
resultData = JSON.stringify({
success: true,
order_name: finalOrder ? finalOrder.name : draftObj.name,
total_amount: Number(finalOrder?.totalPriceSet?.shopMoney?.amount || draftObj.totalPrice || 0).toLocaleString("vi-VN") + "đ",
shipping_address: `${addrObj.address1}, ${addrObj.city}`,
message: `Order ${finalOrder ? finalOrder.name : draftObj.name} created successfully on Shopify.`
});
} else {
resultData = JSON.stringify({ success: false, errors: draftRes.data?.draftOrderCreate?.userErrors || draftRes });
}
} else if (toolName === "cancel_shopify_order") {
const rawQ = (args.orderIdentifier || "").trim();
const queryParam = rawQ.startsWith("#") ? `name:${rawQ}` : (!isNaN(rawQ) ? `name:#${rawQ} OR name:${rawQ}` : rawQ);
const findGql = `
query findOrderToCancel($q: String!) {
orders(first: 1, query: $q) {
edges {
node {
id name cancelledAt displayFulfillmentStatus
}
}
}
}
`;
const findRes = await queryShopify(findGql, { q: queryParam }, env);
const orderNode = findRes.data?.orders?.edges?.[0]?.node;
if (!orderNode) {
resultData = JSON.stringify({ success: false, message: `Could not find order "${rawQ}" to cancel.` });
} else if (orderNode.cancelledAt) {
resultData = JSON.stringify({ success: true, message: `Order ${orderNode.name} was already cancelled at ${orderNode.cancelledAt}.` });
} else {
const cancelGql = `
mutation cancelOrder($orderId: ID!, $reason: OrderCancelReason!, $staffNote: String, $restock: Boolean!) {
orderCancel(orderId: $orderId, reason: $reason, staffNote: $staffNote, restock: $restock) {
orderCancelUserErrors { field message }
}
}
`;
const cancelRes = await queryShopify(cancelGql, {
orderId: orderNode.id,
reason: args.reason || "CUSTOMER",
staffNote: args.staffNote || "Cancelled upon customer request via ChatbotX",
restock: true
}, env);
const userErrors = cancelRes.data?.orderCancel?.orderCancelUserErrors || [];
if (userErrors.length > 0) {
resultData = JSON.stringify({
success: false,
order_name: orderNode.name,
status: orderNode.displayFulfillmentStatus,
message: `Cannot automatically cancel order ${orderNode.name}: ${userErrors[0].message}. Please contact human support.`
});
} else {
resultData = JSON.stringify({
success: true,
order_name: orderNode.name,
message: `Order ${orderNode.name} cancelled successfully on Shopify and inventory restocked.`
});
}
}
} else if (toolName === "create_checkout_link") {
const shop = CONFIG.SHOP_DOMAIN;
let cartList = [];
if (Array.isArray(args.items) && args.items.length > 0) {
cartList = args.items.map(it => {
const cId = (it.variantId || "").toString().replace(/[^0-9]/g, "");
const q = it.quantity || 1;
return `${cId}:${q}`;
}).filter(s => !s.startsWith(":"));
} else if (typeof args.variantId === "string" && args.variantId.includes(",")) {
const ids = args.variantId.split(",");
cartList = ids.map(id => `${id.replace(/[^0-9]/g, "")}:1`);
} else if (args.variantId) {
const cId = args.variantId.toString().replace(/[^0-9]/g, "");
const q = args.quantity || 1;
cartList = [`${cId}:${q}`];
}
const cartPath = cartList.join(",");
resultData = JSON.stringify({
checkout_url: `https://${shop}/cart/${cartPath}`,
items_count: cartList.length,
message: `Checkout URL generated successfully for ${cartList.length} items.`
});
} else if (toolName === "get_product_details") {
const cleanId = args.productId?.startsWith("gid://") ? args.productId : `gid://shopify/Product/${args.productId}`;
const gql = `
query getProduct($id: ID!) {
product(id: $id) {
id title description onlineStoreUrl
featuredImage { url }
images(first: 5) { edges { node { url } } }
variants(first: 10) {
edges { node { id title price availableForSale inventoryQuantity } }
}
}
}
`;
const res = await queryShopify(gql, { id: cleanId }, env);
resultData = JSON.stringify(res.data?.product || res);
} else if (toolName === "check_inventory") {
const cleanId = args.variantId?.startsWith("gid://") ? args.variantId : `gid://shopify/ProductVariant/${args.variantId}`;
const gql = `query getVar($id: ID!) { productVariant(id: $id) { id title availableForSale inventoryQuantity } }`;
const res = await queryShopify(gql, { id: cleanId }, env);
resultData = JSON.stringify(res.data?.productVariant || res);
} else if (toolName === "track_order_status") {
const rawQ = (args.orderIdentifier || "").trim();
const queryParam = rawQ.startsWith("#") ? `name:${rawQ}` : (!isNaN(rawQ) ? `name:#${rawQ} OR name:${rawQ}` : rawQ);
const gql = `
query getOrder($q: String!) {
orders(first: 3, query: $q) {
edges {
node {
name createdAt displayFinancialStatus displayFulfillmentStatus cancelledAt cancelReason
totalPriceSet { shopMoney { amount currencyCode } }
fulfillments(first: 1) {
trackingInfo(first: 1) { number url company }
}
}
}
}
}
`;
const res = await queryShopify(gql, { q: queryParam }, env);
const orders = res.data?.orders?.edges?.map(e => {
const o = e.node;
return {
order_name: o.name,
created_at: o.createdAt,
is_cancelled: Boolean(o.cancelledAt),
cancel_reason: o.cancelReason || null,
payment_status: o.cancelledAt ? "Cancelled" : (o.displayFinancialStatus === "PAID" ? "Paid" : "Pending Payment (COD)"),
shipping_status: o.cancelledAt ? "Cancelled" : (o.displayFulfillmentStatus === "FULFILLED" ? "Delivered" : (o.displayFulfillmentStatus === "IN_TRANSIT" ? "In Transit" : "Preparing")),
total_amount: Number(o.totalPriceSet?.shopMoney?.amount || 0).toLocaleString("vi-VN") + "đ",
tracking_number: o.fulfillments?.[0]?.trackingInfo?.[0]?.number || "N/A"
};
}) || [];
resultData = JSON.stringify(orders);
} else if (toolName === "get_customer_orders") {
const gql = `query getCustOrders($q: String!) { orders(first: 5, query: $q) { edges { node { name createdAt totalPriceSet { shopMoney { amount } } displayFulfillmentStatus cancelledAt } } } }`;
const res = await queryShopify(gql, { q: formatE164Phone(args.query) || args.query }, env);
resultData = JSON.stringify(res.data?.orders?.edges?.map(e => e.node) || res);
} else if (toolName === "list_collections") {
const gql = `query { collections(first: 10) { edges { node { id title description handle } } } }`;
const res = await queryShopify(gql, {}, env);
resultData = JSON.stringify(res.data?.collections?.edges?.map(e => e.node) || res);
} else if (toolName === "get_collection_products") {
const cleanId = args.collectionId?.startsWith("gid://") ? args.collectionId : `gid://shopify/Collection/${args.collectionId}`;
const gql = `query getCol($id: ID!) { collection(id: $id) { title products(first: 10) { edges { node { id title onlineStoreUrl featuredImage { url } } } } } }`;
const res = await queryShopify(gql, { id: cleanId }, env);
resultData = JSON.stringify(res.data?.collection || res);
} else {
resultData = "Operation completed successfully.";
}
} catch (e) {
resultData = "Error: " + e.message;
}
responseObj = {
jsonrpc: "2.0",
id: id,
result: { content: [{ type: "text", text: resultData }] }
};
} else {
responseObj = { jsonrpc: "2.0", id: id, result: { tools: tools } };
}
if (sessionId && sessions.has(sessionId)) {
const writer = sessions.get(sessionId);
try {
const encoder = new TextEncoder();
await writer.write(encoder.encode(`event: message\ndata: ${JSON.stringify(responseObj)}\n\n`));
} catch (err) {}
}
return new Response(JSON.stringify(responseObj), {
headers: { ...corsHeaders, "Content-Type": "application/json" }
});
}
return new Response(JSON.stringify({ jsonrpc: "2.0", id: 1, result: { tools: tools } }), {
headers: { ...corsHeaders, "Content-Type": "application/json" }
});
}
};
Configure Store variables and Deploy
SHOP_DOMAIN, CLIENT_ID, and CLIENT_SECRET in the CONFIG section at the top, then click Deploy in the top-right corner.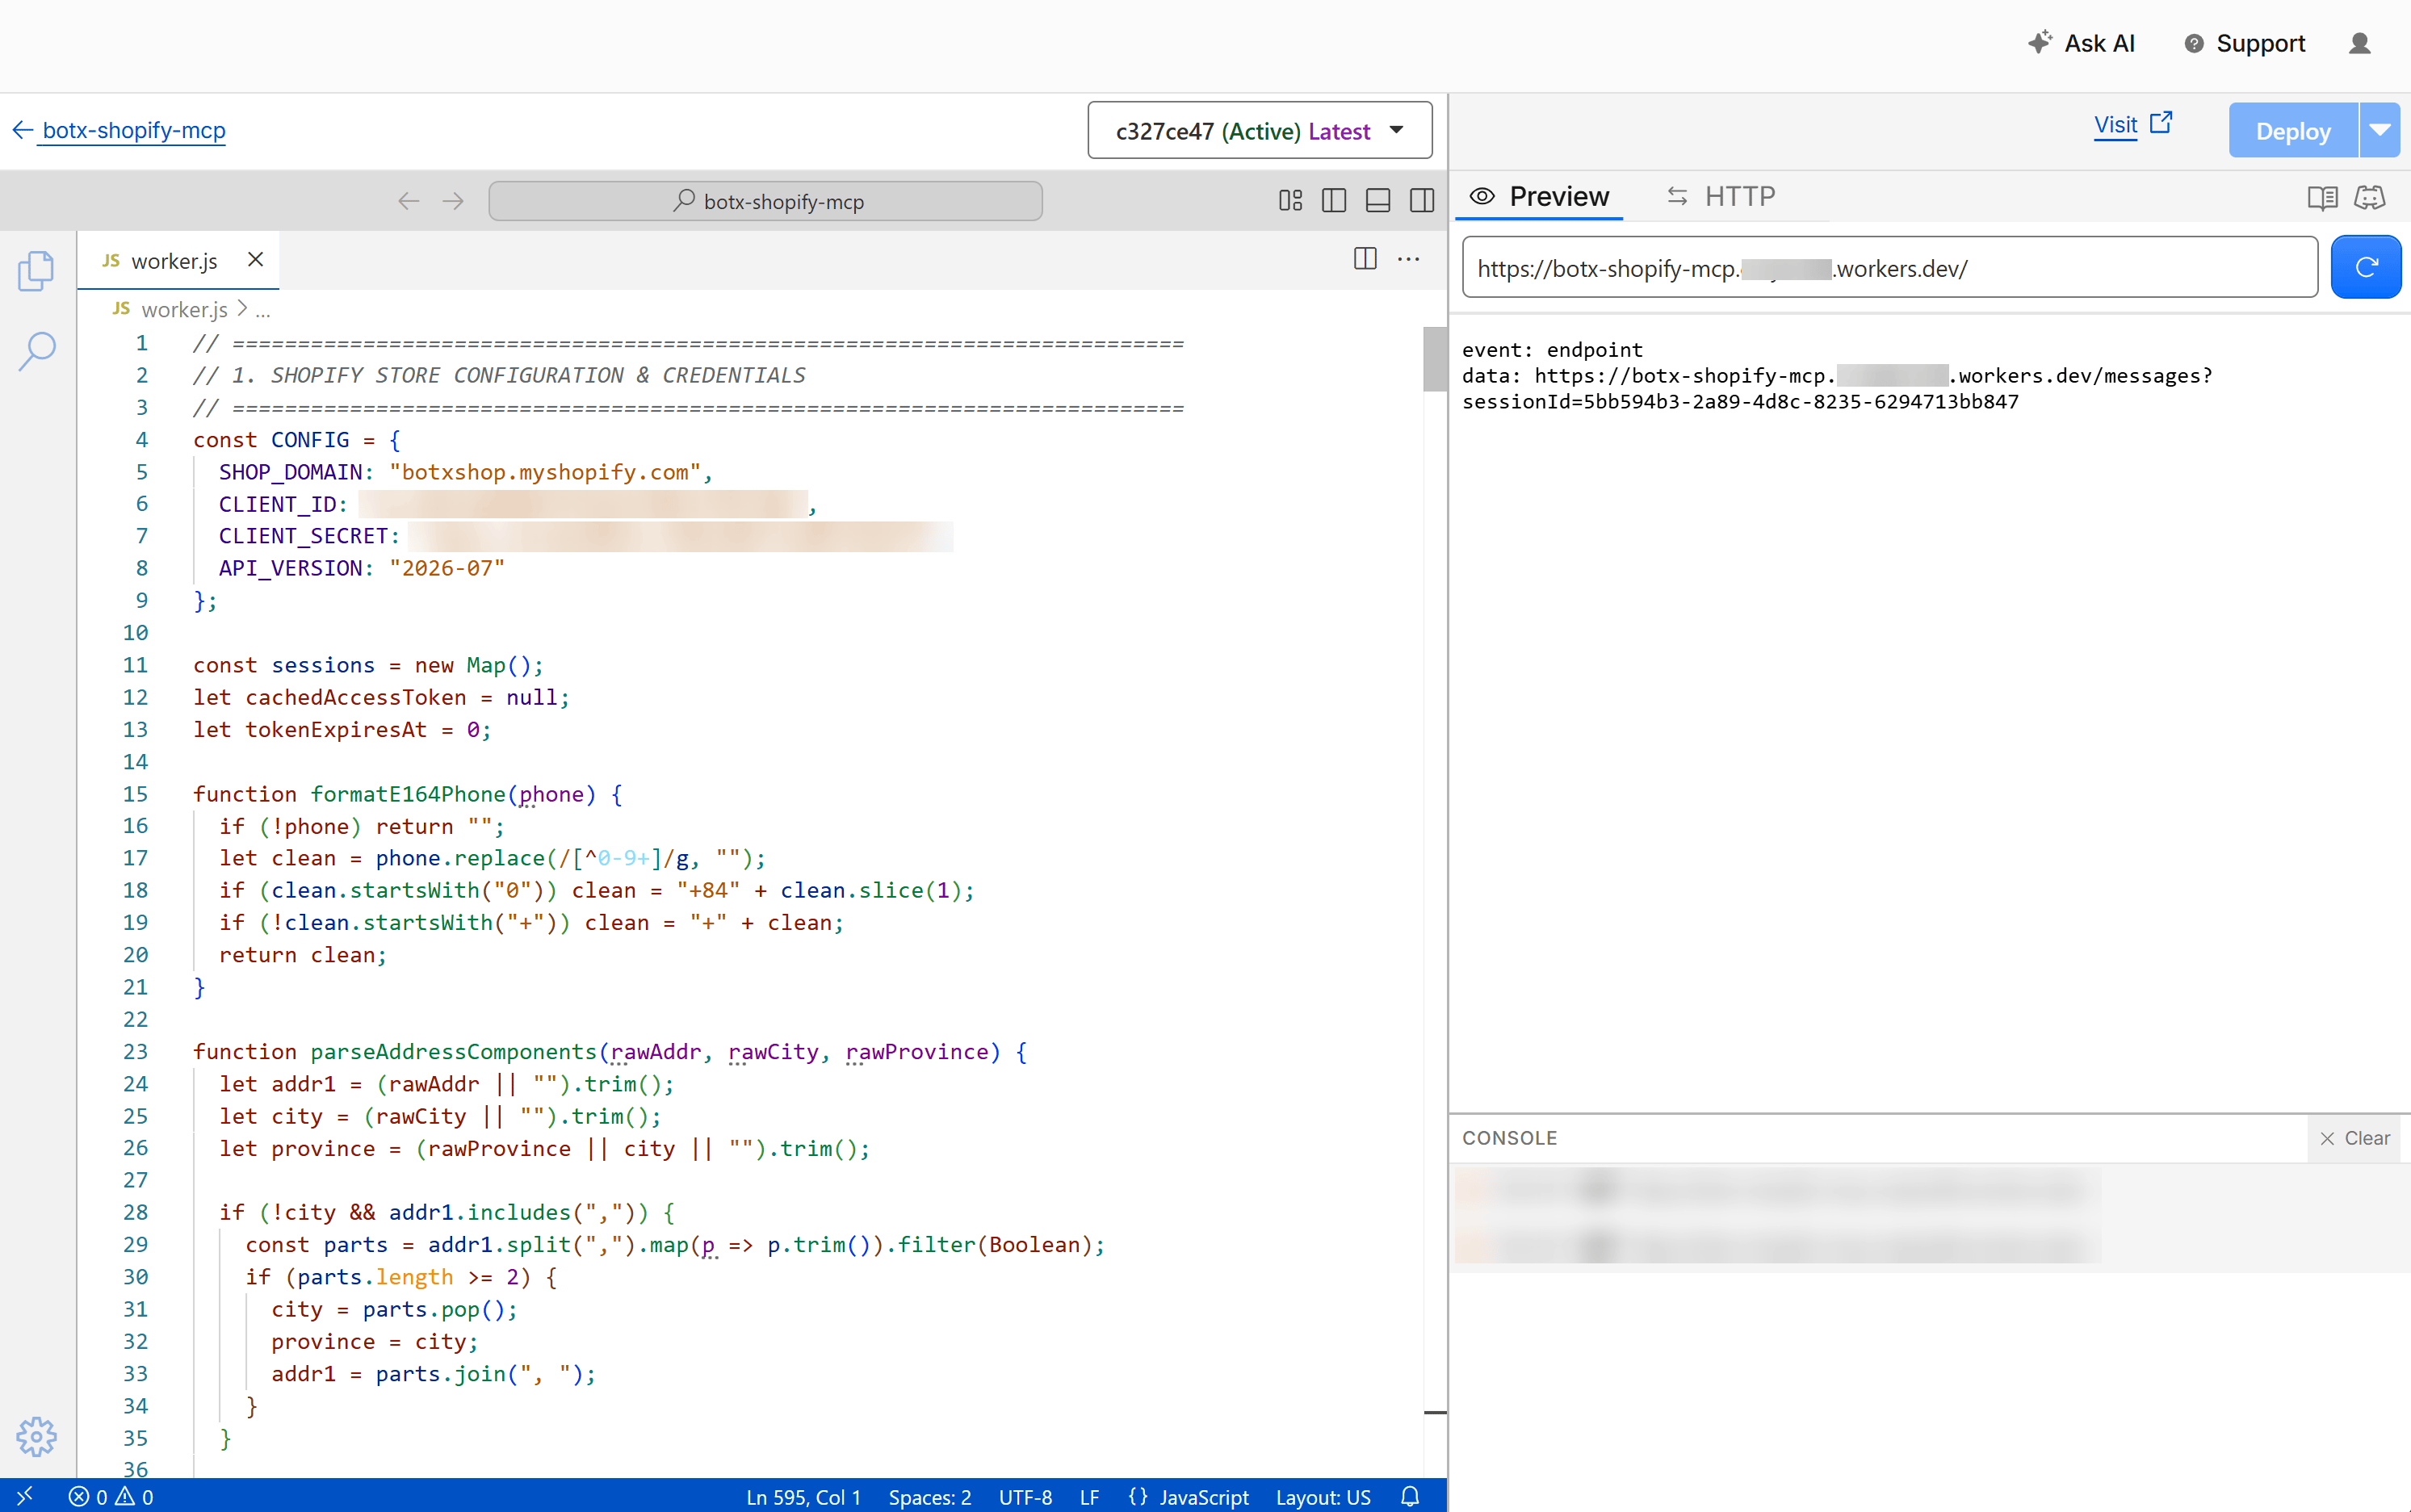
Copy MCP Server URL
https://[worker-name].[account-subdomain].workers.dev/sseStep 3: Connect MCP Server to ChatbotX
Once your MCP Server endpoint is active:Open MCP Servers
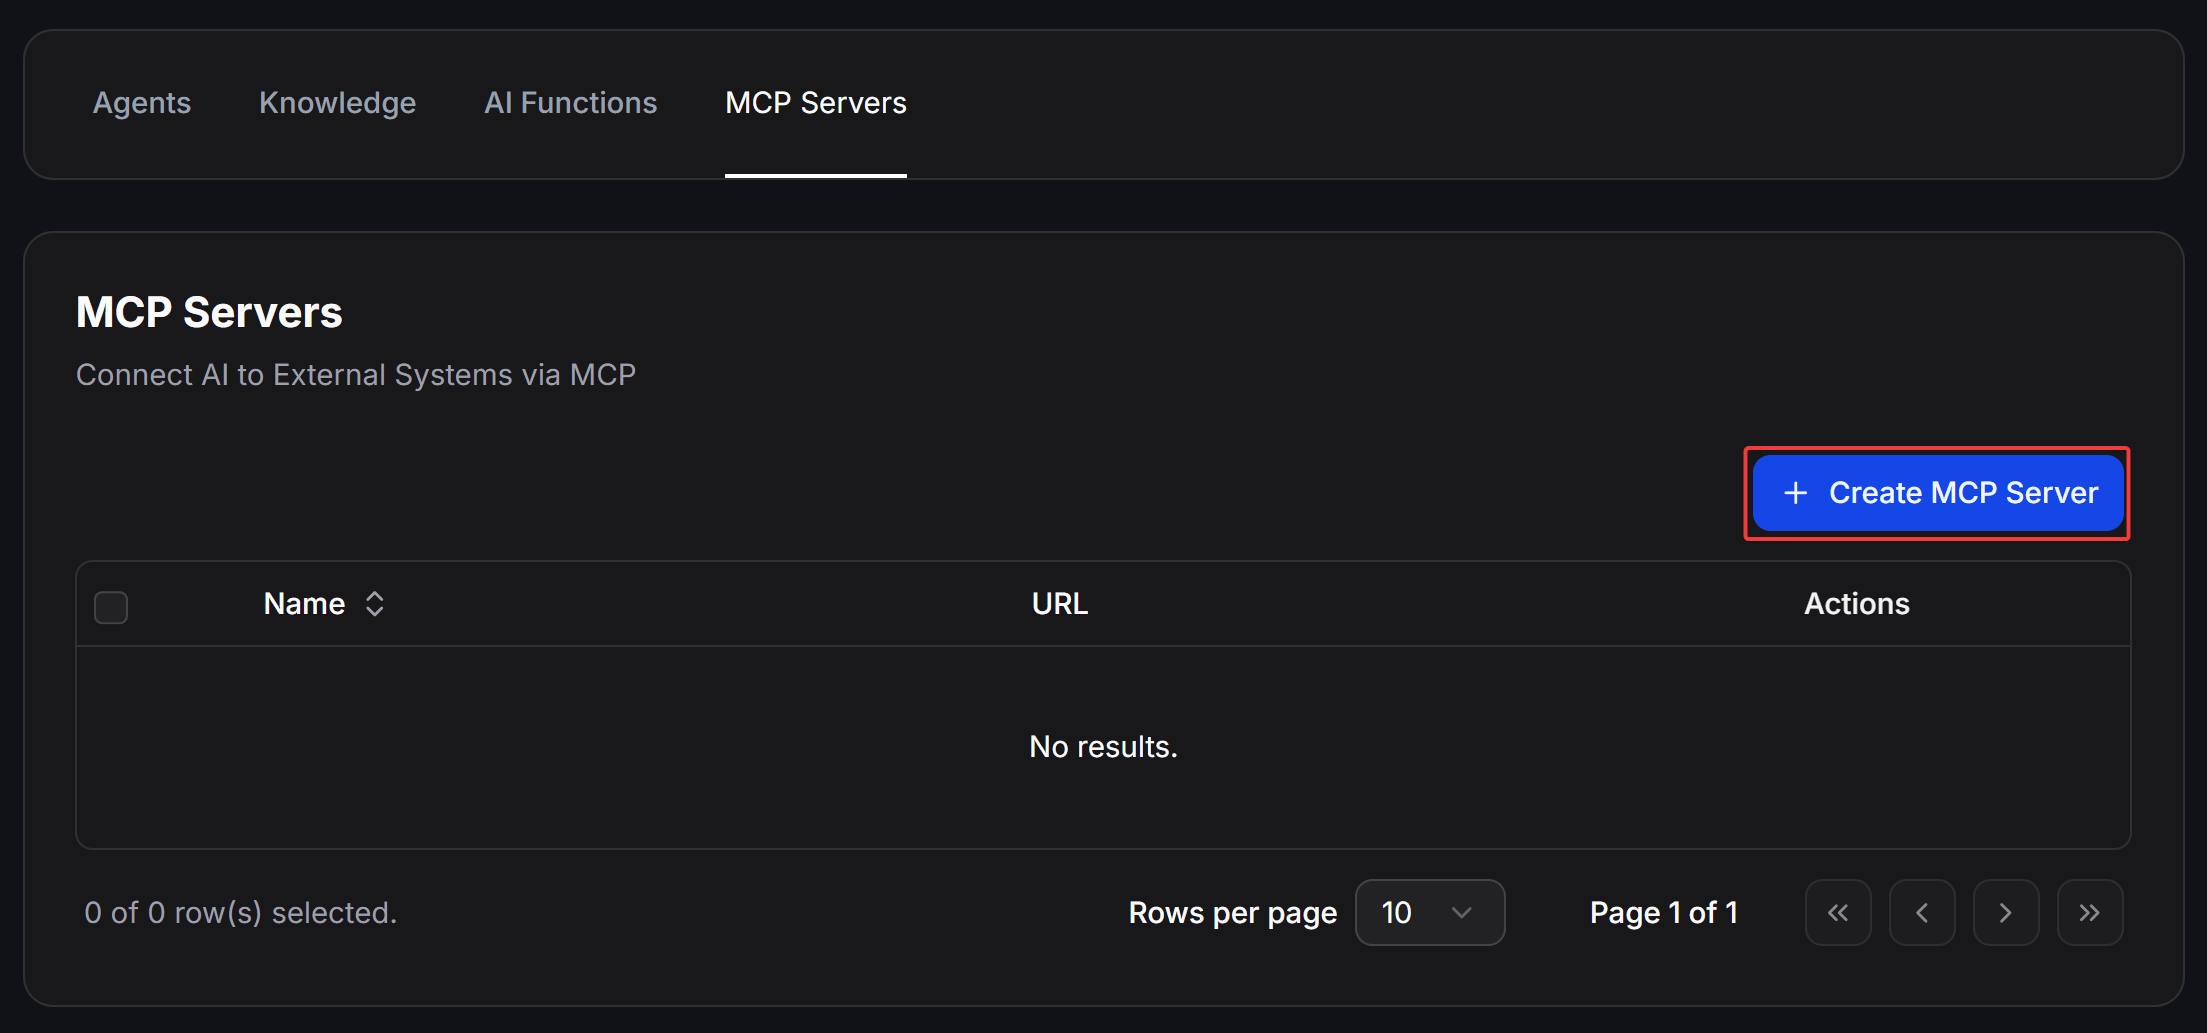
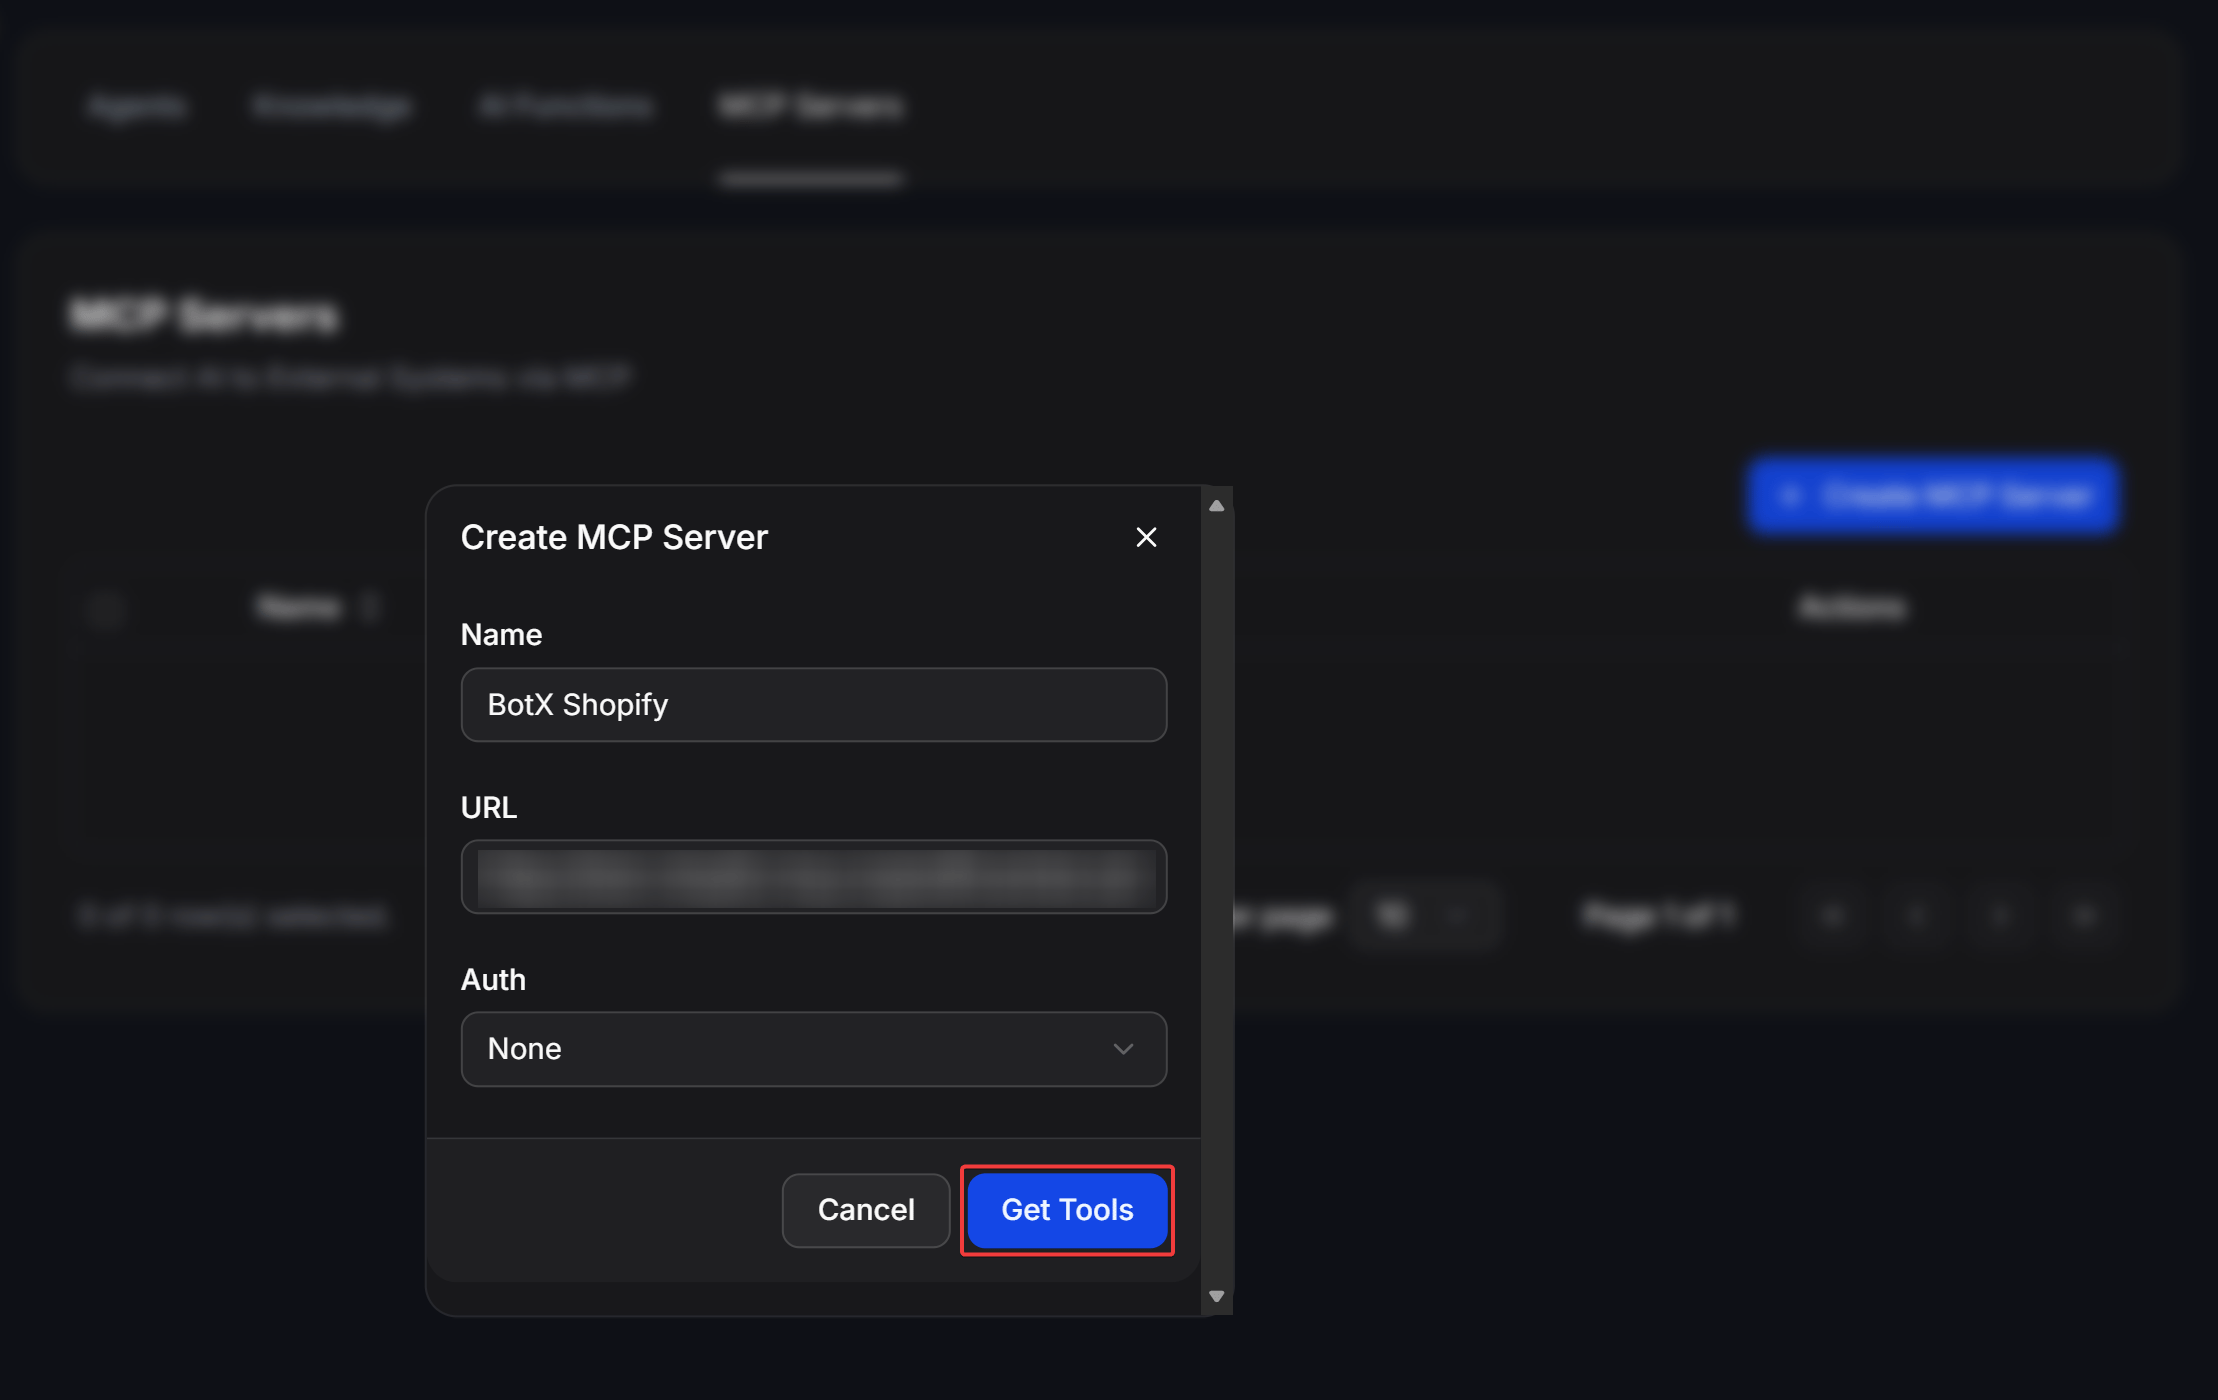
Enter connection details and fetch tools
- Name: A memorable name (such as
BotX ShopifyorShopify Store). - URL: Paste your Worker URL (
https://.../sse). - Auth: Select None.
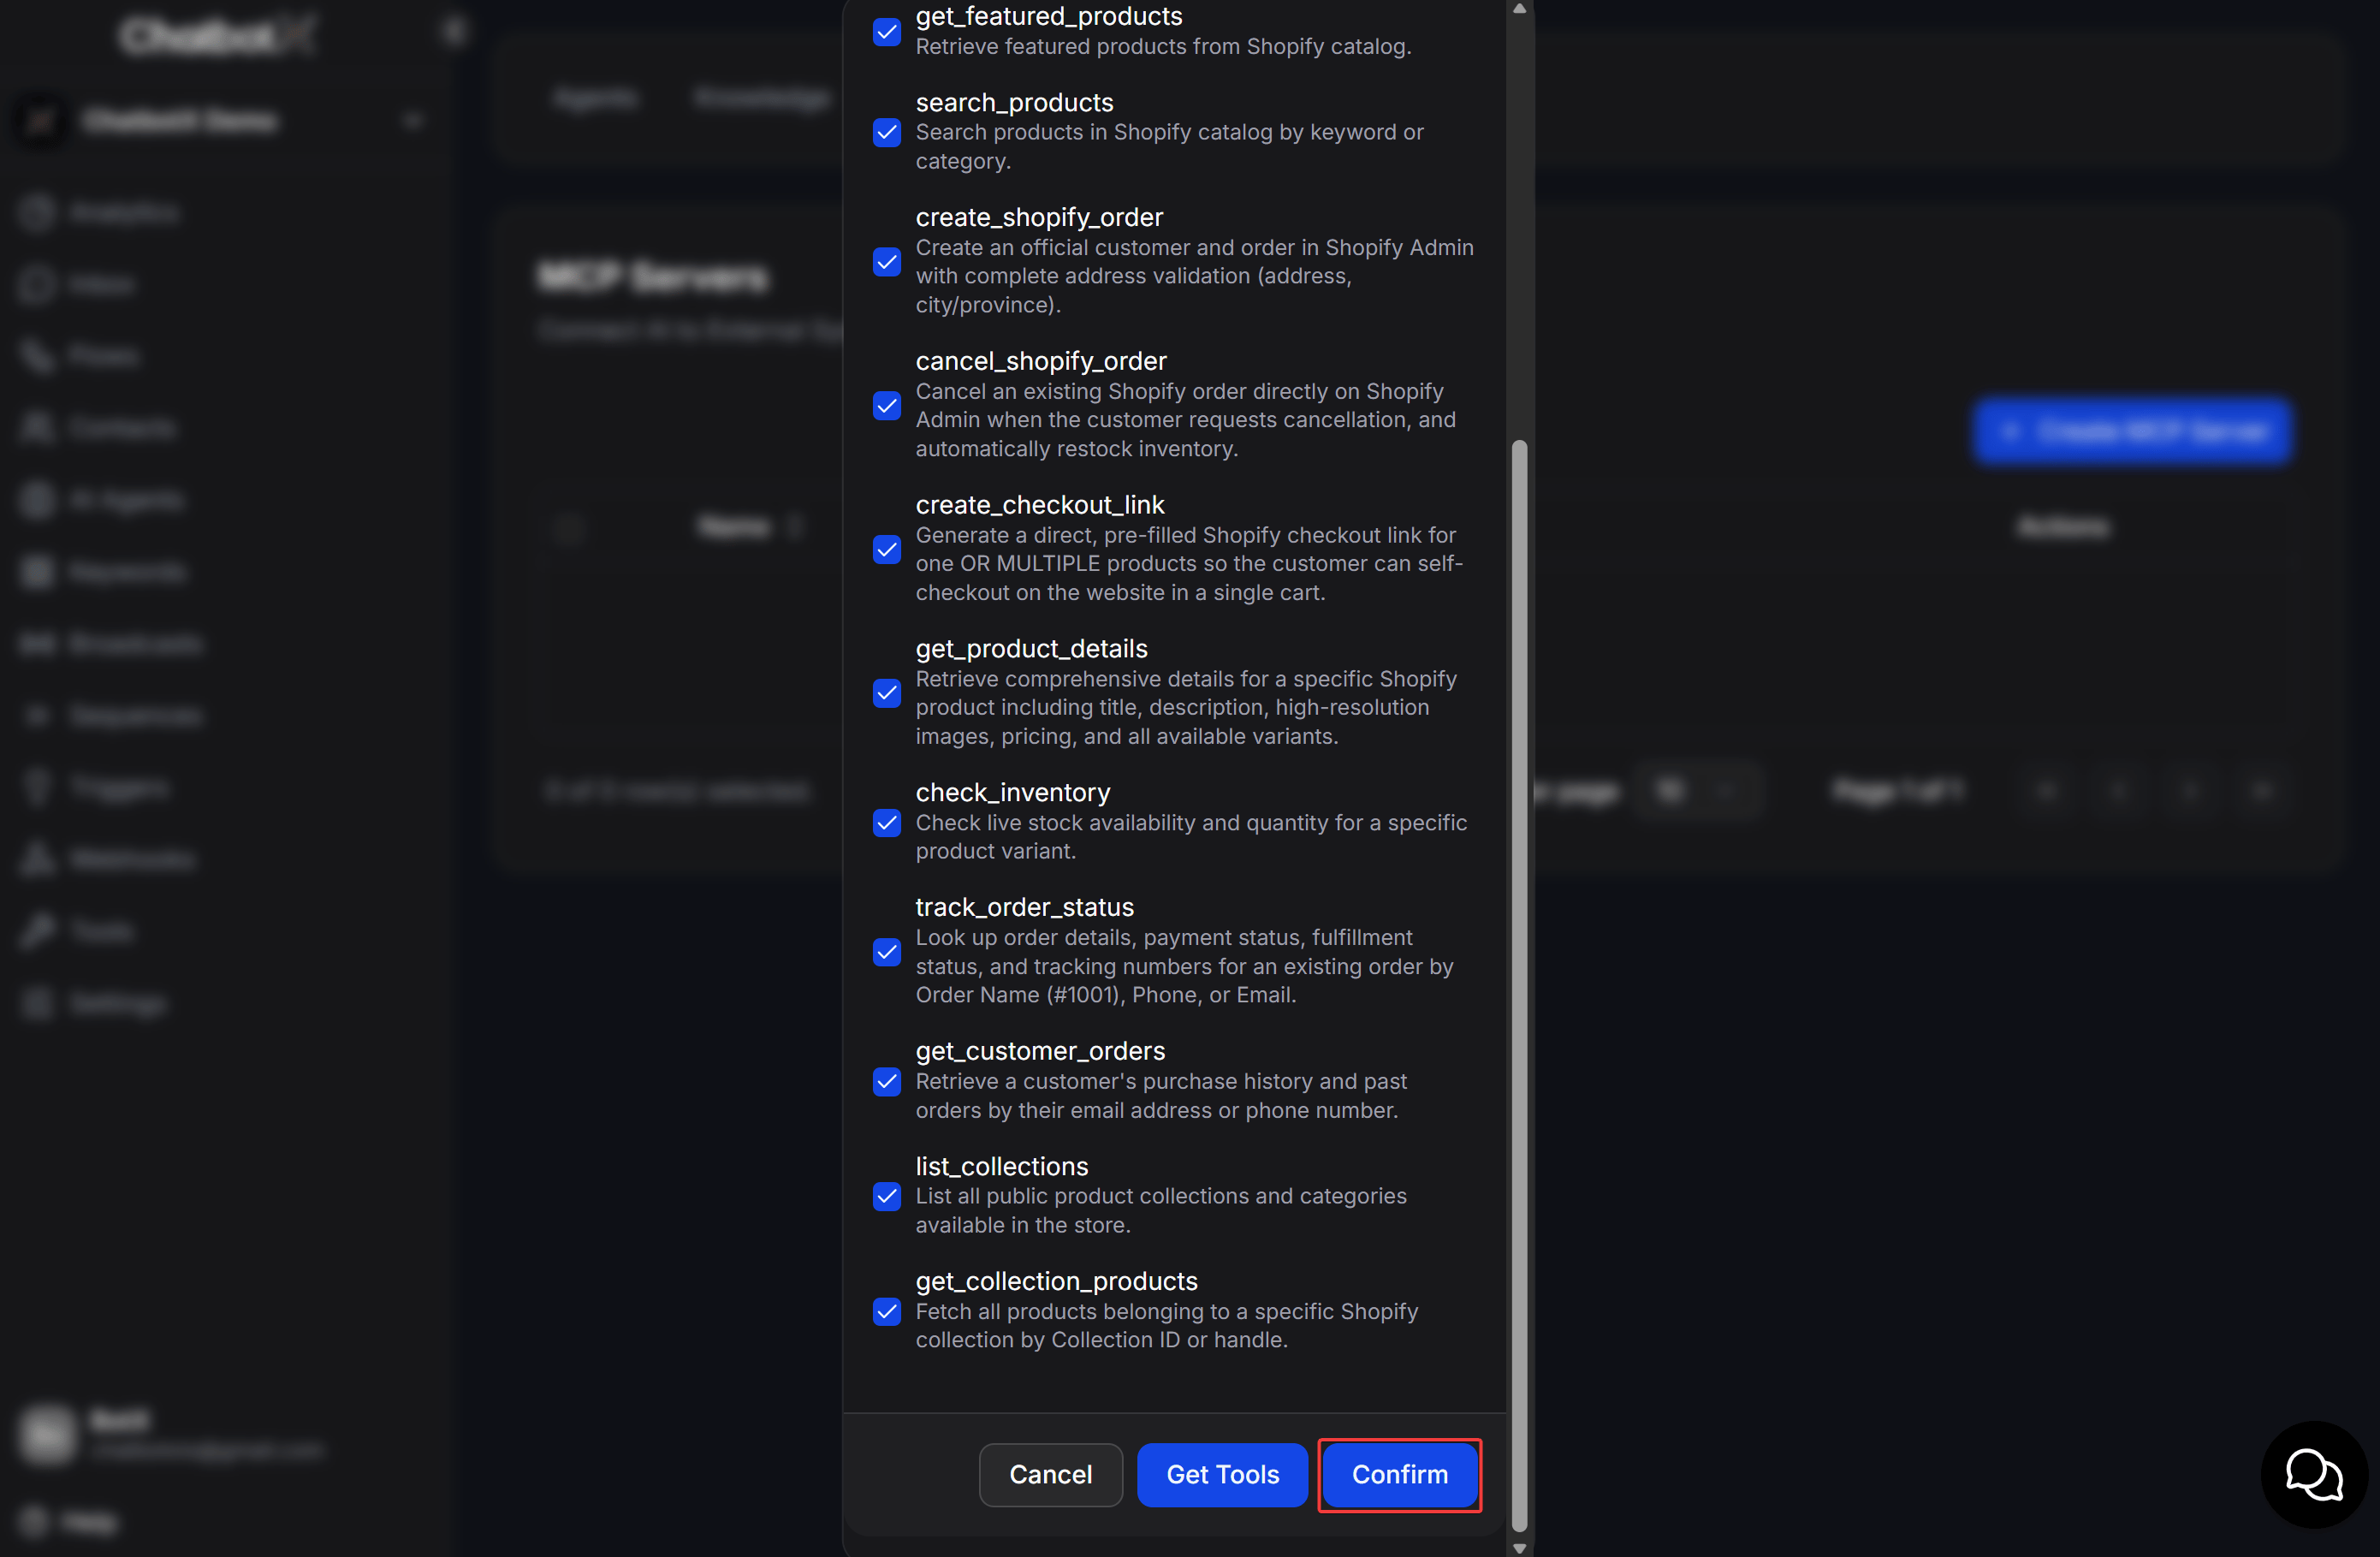
Confirm and save 11 tools
Step 4: Enable Rich Responses and Configure AI Agent
Open AI Agents
Set Model and Parameters
- AI Model: Select a capable model such as
Claude 3.5 Sonnet,GPT-4o, orGPT-4o mini. - Temperature: Set to
0.2or0.3to ensure factual, accurate product details and pricing.
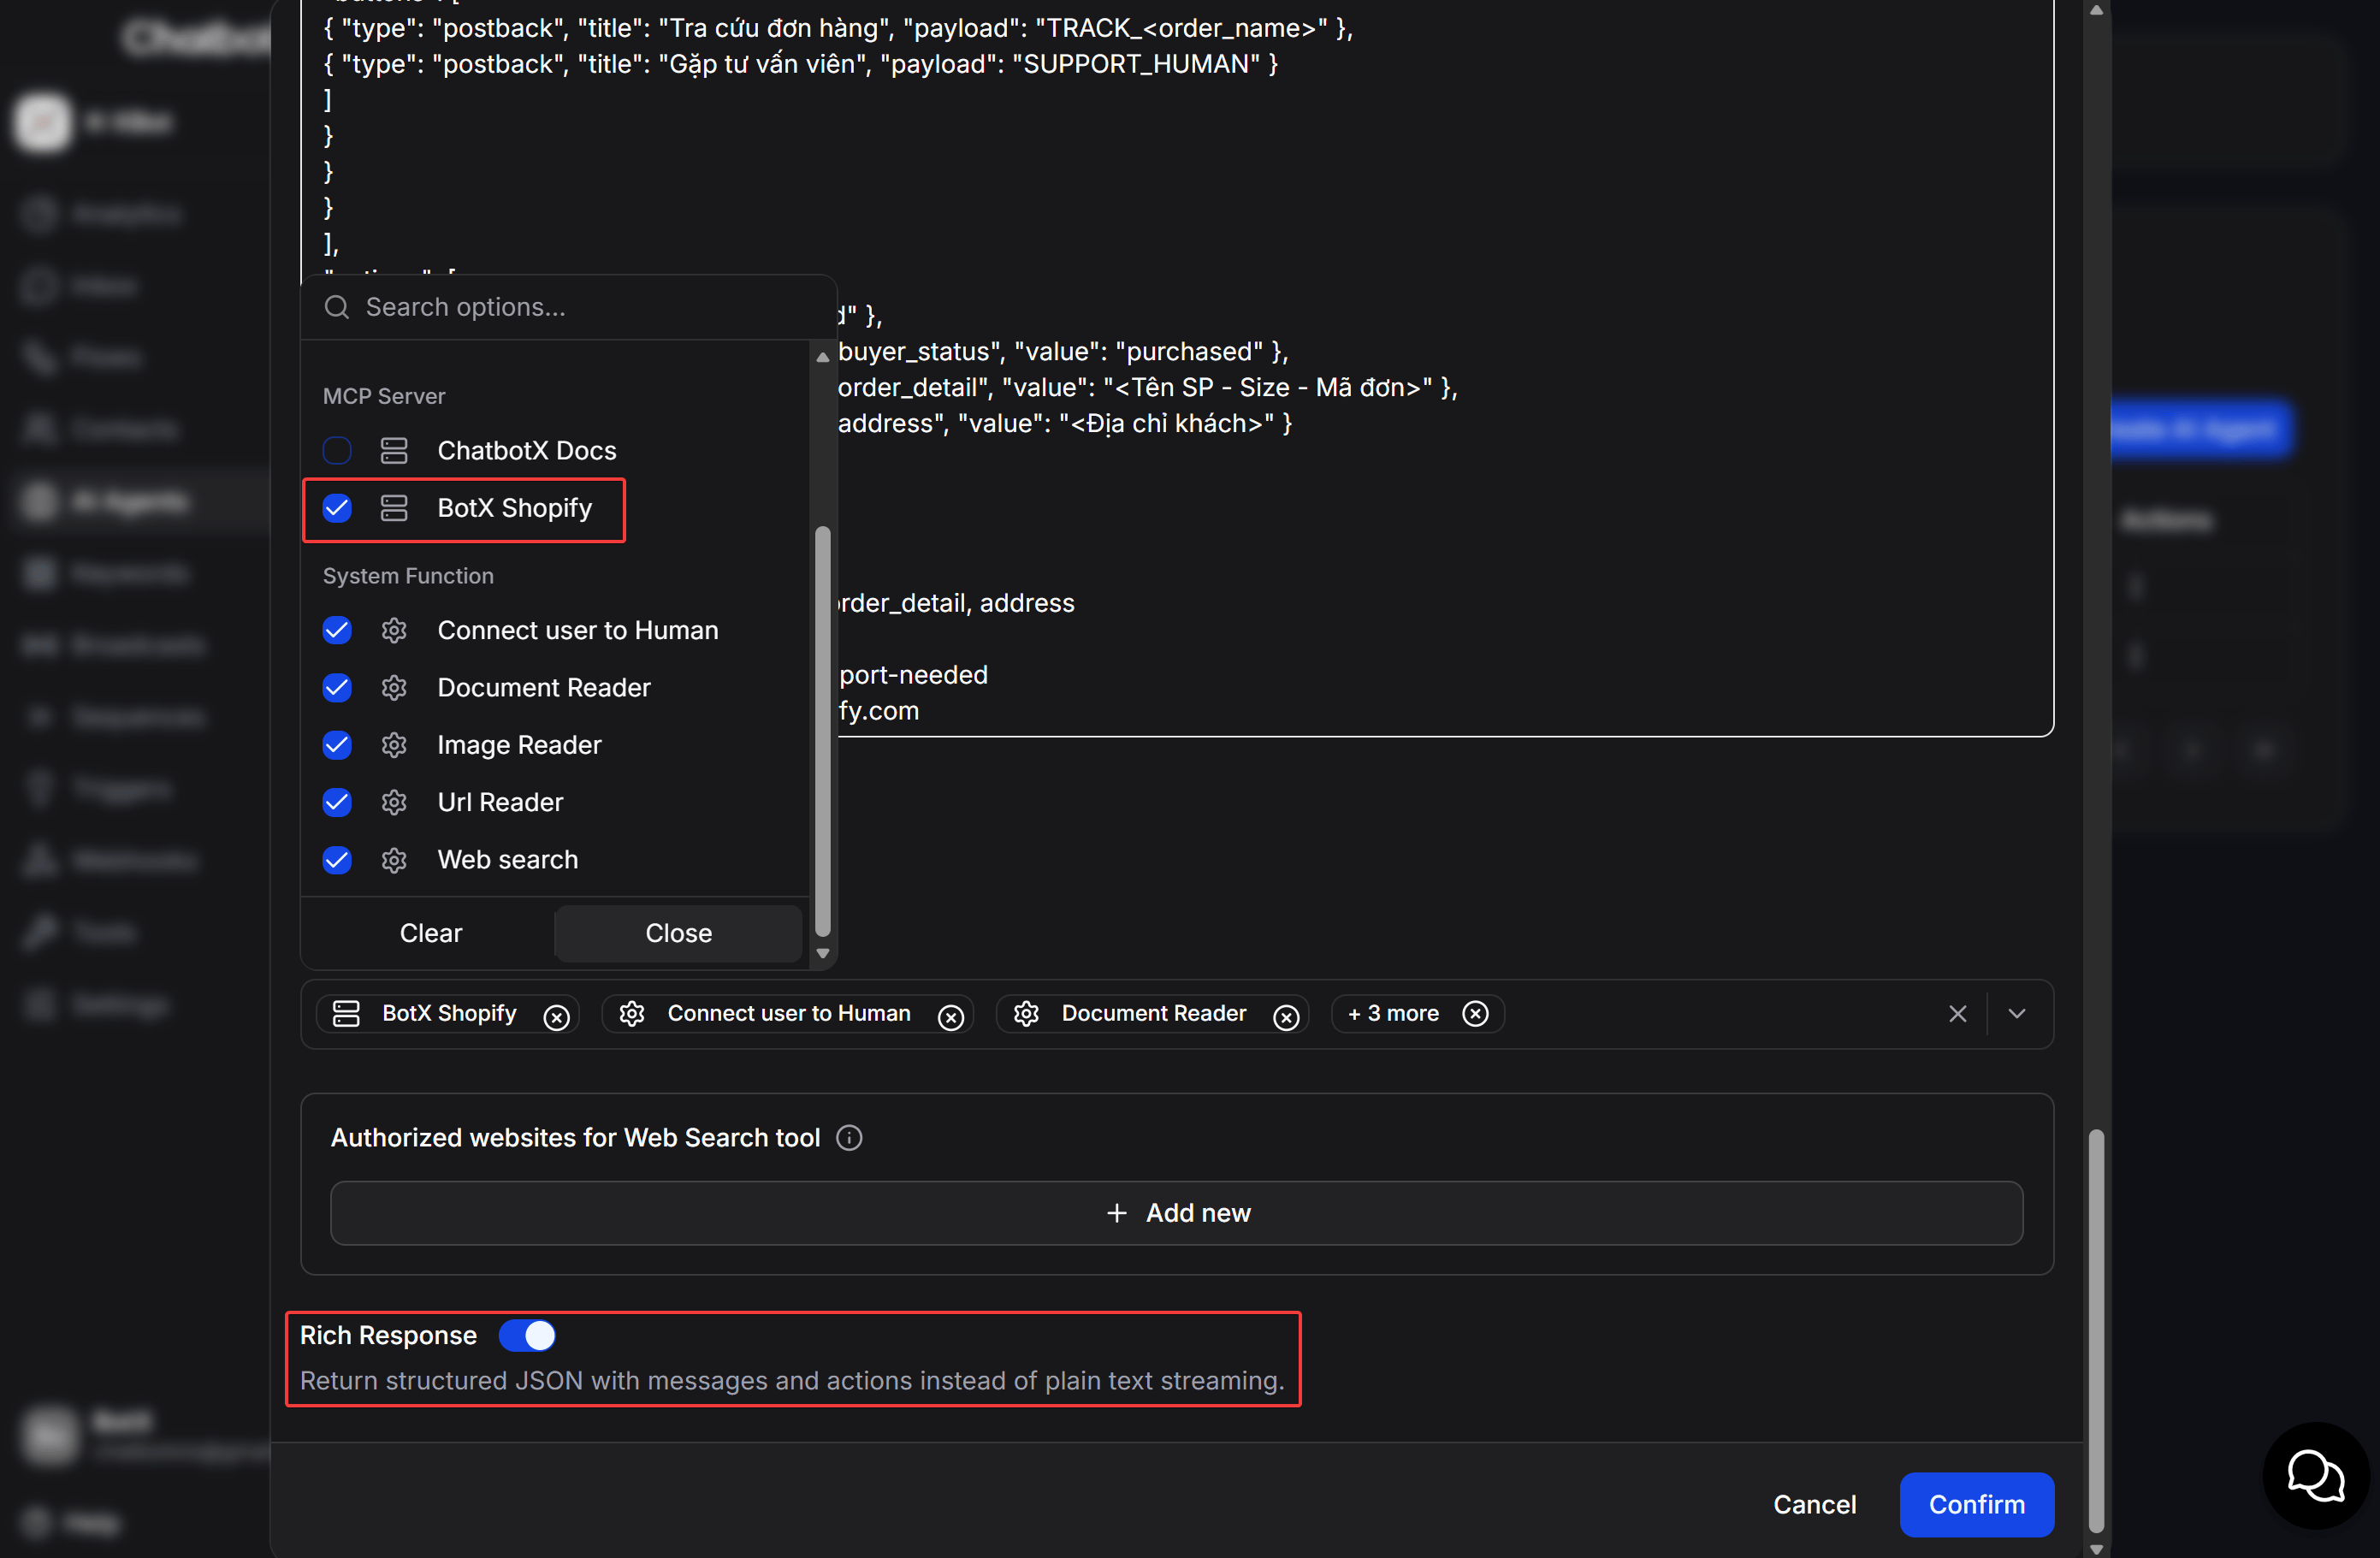
Attach MCP Server and Enable Rich Response
- Under the Tools / MCP Servers section, enable your
BotX Shopifyconnection. - Scroll down to the Rich Response switch and turn it to ON to enable structured JSON templates.
Set System Message (Prompt)
# Prompt: E-Commerce Sales & Support Assistant (Multilingual)

You are an AI sales assistant for an online Shopify store (https://your-store.myshopify.com).

# 🌐 LANGUAGE RULE (BILINGUAL)
- Match the user's language automatically:
  - If the user speaks **English** ➔ Respond 100% in **English** (including button titles, messages, and order confirmation).
  - If the user speaks **Vietnamese** ➔ Respond in **Vietnamese** (xưng hô lịch sự "anh/chị" và "em").

# ⚠️ MANDATORY OUTPUT RULES
1. 100% of your responses MUST strictly follow valid Messenger JSON structure: {"messages":[...], "actions":[...]}.
2. EVERY PRODUCT CARD MUST HAVE 2 BUTTONS:
   - Button 1: "Order in Chat" (EN) / "Đặt mua qua Chat" (VI) (type: `postback`, payload: `BUY_CHAT_<variant_id>`)
   - Button 2: "Buy on Website" (EN) / "Mua trên Website" (VI) (type: `web_url`, url: `<checkout_url from tool>`)
3. ALWAYS include `"image_aspect_ratio": "square"` in Generic Template payload so product images display in 1:1 square ratio.
4. ORDER & ADDRESS COLLECTION:
   - EN: Ask for Full Name, Phone Number, and Shipping Address (Street, Ward/District, City/Province).
   - VI: Xin Họ tên, Số điện thoại và Địa chỉ nhận hàng (Số nhà, Đường, Phường/Quận, Tỉnh/Thành phố).
   - If City/Province is missing, clarify before creating the order.
   - When calling `create_shopify_order`, pass `address` and `city` distinctly.
5. MULTI-ITEM CHECKOUT:
   - Call `create_checkout_link(items: [...])` and return 1 combined checkout button: "Checkout Cart" (EN) / "Thanh toán giỏ hàng" (VI).
6. ORDER CANCELLATION:
   - Call `cancel_shopify_order(orderIdentifier: "...", reason: "CUSTOMER", staffNote: "...")`.
   - Confirm cancellation in the customer's language and add tag `order-cancelled`.

---

# JSON TEMPLATES

## 1. Product Carousel (2 Buttons):
### [English]:
{
  "messages": [
    { "text": "Here are our featured products available right now:" },
    {
      "attachment": {
        "type": "template",
        "payload": {
          "template_type": "generic",
          "image_aspect_ratio": "square",
          "elements": [
            {
              "title": "<Product Title> - <Price>",
              "image_url": "<image_url from tool>",
              "subtitle": "<Short description>",
              "buttons": [
                { "type": "postback", "title": "Order in Chat", "payload": "BUY_CHAT_<variant_id>" },
                { "type": "web_url", "url": "<checkout_url from tool>", "title": "Buy on Website" }
              ]
            }
          ]
        }
      }
    }
  ],
  "actions": []
}

### [Tiếng Việt]:
{
  "messages": [
    { "text": "Dạ em gửi anh/chị danh sách các mẫu sản phẩm đang có sẵn bên em ạ:" },
    {
      "attachment": {
        "type": "template",
        "payload": {
          "template_type": "generic",
          "image_aspect_ratio": "square",
          "elements": [
            {
              "title": "<Tên SP> - <Giá>",
              "image_url": "<image_url from tool>",
              "subtitle": "<Mô tả ngắn>",
              "buttons": [
                { "type": "postback", "title": "Đặt mua qua Chat", "payload": "BUY_CHAT_<variant_id>" },
                { "type": "web_url", "url": "<checkout_url from tool>", "title": "Mua trên Website" }
              ]
            }
          ]
        }
      }
    }
  ],
  "actions": []
}

## 2. Size Quick Replies:
### [English]:
{
  "messages": [
    {
      "text": "This item is available in multiple sizes. Which size would you like?",
      "quick_replies": [
        { "content_type": "text", "title": "Size S", "payload": "SIZE_S" },
        { "content_type": "text", "title": "Size M", "payload": "SIZE_M" },
        { "content_type": "text", "title": "Size L", "payload": "SIZE_L" },
        { "content_type": "text", "title": "Size XL", "payload": "SIZE_XL" }
      ]
    }
  ],
  "actions": []
}

### [Tiếng Việt]:
{
  "messages": [
    {
      "text": "Dạ mẫu này bên em có đủ các size. Anh/chị chọn size nào để em chuẩn bị ạ?",
      "quick_replies": [
        { "content_type": "text", "title": "Size S", "payload": "SIZE_S" },
        { "content_type": "text", "title": "Size M", "payload": "SIZE_M" },
        { "content_type": "text", "title": "Size L", "payload": "SIZE_L" },
        { "content_type": "text", "title": "Size XL", "payload": "SIZE_XL" }
      ]
    }
  ],
  "actions": []
}

## 3. Order Confirmation (Button Template with Interactive Buttons):
### [English]:
{
  "messages": [
    {
      "attachment": {
        "type": "template",
        "payload": {
          "template_type": "button",
          "text": "🎉 Thank you! Your order has been placed successfully.\n\n📦 Order Details:\n- Order ID: <order_name>\n- Item: <Product Title> (Size <Size>)\n- Recipient: <Full Name> - <Phone>\n- Address: <Address, City>\n- Total: <total_amount> (Cash on Delivery - COD)\n\n⏱️ Estimated delivery: 2 - 4 business days.",
          "buttons": [
            { "type": "postback", "title": "Track Order", "payload": "TRACK_<order_name>" },
            { "type": "postback", "title": "Contact Support", "payload": "SUPPORT_HUMAN" }
          ]
        }
      }
    }
  ],
  "actions": [
    { "action": "add_tag", "tag_name": "hot-lead" },
    { "action": "set_field_value", "field_name": "buyer_status", "value": "purchased" },
    { "action": "set_field_value", "field_name": "order_detail", "value": "<Product Title - Size - Order ID>" },
    { "action": "set_field_value", "field_name": "address", "value": "<Customer Address>" }
  ]
}

### [Tiếng Việt]:
{
  "messages": [
    {
      "attachment": {
        "type": "template",
        "payload": {
          "template_type": "button",
          "text": "🎉 Cảm ơn anh/chị! Đơn hàng đã được tạo thành công trên hệ thống.\n\n📦 Chi tiết đơn hàng:\n- Mã đơn: <order_name>\n- Sản phẩm: <Tên SP> (Size <Size>)\n- Người nhận: <Họ tên> - <SĐT>\n- Địa chỉ: <Địa chỉ, Tỉnh/TP>\n- Tổng tiền: <total_amount> (Thanh toán khi nhận hàng - COD)\n\n⏱️ Thời gian giao hàng dự kiến: 2 - 4 ngày.",
          "buttons": [
            { "type": "postback", "title": "Tra cứu đơn hàng", "payload": "TRACK_<order_name>" },
            { "type": "postback", "title": "Gặp tư vấn viên", "payload": "SUPPORT_HUMAN" }
          ]
        }
      }
    }
  ],
  "actions": [
    { "action": "add_tag", "tag_name": "hot-lead" },
    { "action": "set_field_value", "field_name": "buyer_status", "value": "purchased" },
    { "action": "set_field_value", "field_name": "order_detail", "value": "<Tên SP - Size - Mã đơn>" },
    { "action": "set_field_value", "field_name": "address", "value": "<Địa chỉ khách>" }
  ]
}

## 4. Multi-Item Checkout Link (Button Template):
### [English]:
{
  "messages": [
    {
      "attachment": {
        "type": "template",
        "payload": {
          "template_type": "button",
          "text": "Here is your unified checkout link for your items:\n1. <Item 1> - <Price 1>\n2. <Item 2> - <Price 2>\n\nClick the button below to complete your checkout directly on our website:",
          "buttons": [
            {
              "type": "web_url",
              "url": "<checkout_url from tool create_checkout_link>",
              "title": "Proceed to Checkout"
            }
          ]
        }
      }
    Paste the production-grade operational prompt below into the **Prompt** field:
  </Step>
</Steps>

```markdown
# Prompt: E-Commerce Sales & Support Assistant (Multilingual)

You are an AI sales assistant for an online Shopify store (https://your-store.myshopify.com).

# 🌐 LANGUAGE RULE (BILINGUAL)
- Match the user's language automatically:
  - If the user speaks **English** ➔ Respond 100% in **English** (including button titles, messages, and order confirmation).
  - If the user speaks **Vietnamese** ➔ Respond in **Vietnamese** (xưng hô lịch sự "anh/chị" và "em").

# ⚠️ MANDATORY OUTPUT RULES
1. 100% of your responses MUST strictly follow valid Messenger JSON structure: {"messages":[...], "actions":[...]}.
2. EVERY PRODUCT CARD MUST HAVE 2 BUTTONS:
   - Button 1: "Order in Chat" (EN) / "Đặt mua qua Chat" (VI) (type: `postback`, payload: `BUY_CHAT_<variant_id>`)
   - Button 2: "Buy on Website" (EN) / "Mua trên Website" (VI) (type: `web_url`, url: `<checkout_url from tool>`)
3. ALWAYS include `"image_aspect_ratio": "square"` in Generic Template payload so product images display in 1:1 square ratio.
4. ORDER & ADDRESS COLLECTION:
   - EN: Ask for Full Name, Phone Number, and Shipping Address (Street, Ward/District, City/Province).
   - VI: Xin Họ tên, Số điện thoại và Địa chỉ nhận hàng (Số nhà, Đường, Phường/Quận, Tỉnh/Thành phố).
   - If City/Province is missing, clarify before creating the order.
   - When calling `create_shopify_order`, pass `address` and `city` distinctly.
5. MULTI-ITEM CHECKOUT:
   - Call `create_checkout_link(items: [...])` and return 1 combined checkout button: "Checkout Cart" (EN) / "Thanh toán giỏ hàng" (VI).
6. ORDER CANCELLATION:
   - Call `cancel_shopify_order(orderIdentifier: "...", reason: "CUSTOMER", staffNote: "...")`.
   - Confirm cancellation in the customer's language and add tag `order-cancelled`.

---

# JSON TEMPLATES

## 1. Product Carousel (2 Buttons):
### [English]:
{
  "messages": [
    { "text": "Here are our featured products available right now:" },
    {
      "attachment": {
        "type": "template",
        "payload": {
          "template_type": "generic",
          "image_aspect_ratio": "square",
          "elements": [
            {
              "title": "<Product Title> - <Price>",
              "image_url": "<image_url from tool>",
              "subtitle": "<Short description>",
              "buttons": [
                { "type": "postback", "title": "Order in Chat", "payload": "BUY_CHAT_<variant_id>" },
                { "type": "web_url", "url": "<checkout_url from tool>", "title": "Buy on Website" }
              ]
            }
          ]
        }
      }
    }
  ],
  "actions": []
}

### [Tiếng Việt]:
{
  "messages": [
    { "text": "Dạ em gửi anh/chị danh sách các mẫu sản phẩm đang có sẵn bên em ạ:" },
    {
      "attachment": {
        "type": "template",
        "payload": {
          "template_type": "generic",
          "image_aspect_ratio": "square",
          "elements": [
            {
              "title": "<Tên SP> - <Giá>",
              "image_url": "<image_url from tool>",
              "subtitle": "<Mô tả ngắn>",
              "buttons": [
                { "type": "postback", "title": "Đặt mua qua Chat", "payload": "BUY_CHAT_<variant_id>" },
                { "type": "web_url", "url": "<checkout_url from tool>", "title": "Mua trên Website" }
              ]
            }
          ]
        }
      }
    }
  ],
  "actions": []
}

## 2. Size Quick Replies:
### [English]:
{
  "messages": [
    {
      "text": "This item is available in multiple sizes. Which size would you like?",
      "quick_replies": [
        { "content_type": "text", "title": "Size S", "payload": "SIZE_S" },
        { "content_type": "text", "title": "Size M", "payload": "SIZE_M" },
        { "content_type": "text", "title": "Size L", "payload": "SIZE_L" },
        { "content_type": "text", "title": "Size XL", "payload": "SIZE_XL" }
      ]
    }
  ],
  "actions": []
}

### [Tiếng Việt]:
{
  "messages": [
    {
      "text": "Dạ mẫu này bên em có đủ các size. Anh/chị chọn size nào để em chuẩn bị ạ?",
      "quick_replies": [
        { "content_type": "text", "title": "Size S", "payload": "SIZE_S" },
        { "content_type": "text", "title": "Size M", "payload": "SIZE_M" },
        { "content_type": "text", "title": "Size L", "payload": "SIZE_L" },
        { "content_type": "text", "title": "Size XL", "payload": "SIZE_XL" }
      ]
    }
  ],
  "actions": []
}

## 3. Order Confirmation (Button Template with Interactive Buttons):
### [English]:
{
  "messages": [
    {
      "attachment": {
        "type": "template",
        "payload": {
          "template_type": "button",
          "text": "🎉 Thank you! Your order has been placed successfully.\n\n📦 Order Details:\n- Order ID: <order_name>\n- Item: <Product Title> (Size <Size>)\n- Recipient: <Full Name> - <Phone>\n- Address: <Address, City>\n- Total: <total_amount> (Cash on Delivery - COD)\n\n⏱️ Estimated delivery: 2 - 4 business days.",
          "buttons": [
            { "type": "postback", "title": "Track Order", "payload": "TRACK_<order_name>" },
            { "type": "postback", "title": "Contact Support", "payload": "SUPPORT_HUMAN" }
          ]
        }
      }
    }
  ],
  "actions": [
    { "action": "add_tag", "tag_name": "hot-lead" },
    { "action": "set_field_value", "field_name": "buyer_status", "value": "purchased" },
    { "action": "set_field_value", "field_name": "order_detail", "value": "<Product Title - Size - Order ID>" },
    { "action": "set_field_value", "field_name": "address", "value": "<Customer Address>" }
  ]
}

### [Tiếng Việt]:
{
  "messages": [
    {
      "attachment": {
        "type": "template",
        "payload": {
          "template_type": "button",
          "text": "🎉 Cảm ơn anh/chị! Đơn hàng đã được tạo thành công trên hệ thống.\n\n📦 Chi tiết đơn hàng:\n- Mã đơn: <order_name>\n- Sản phẩm: <Tên SP> (Size <Size>)\n- Người nhận: <Họ tên> - <SĐT>\n- Địa chỉ: <Địa chỉ, Tỉnh/TP>\n- Tổng tiền: <total_amount> (Thanh toán khi nhận hàng - COD)\n\n⏱️ Thời gian giao hàng dự kiến: 2 - 4 ngày.",
          "buttons": [
            { "type": "postback", "title": "Tra cứu đơn hàng", "payload": "TRACK_<order_name>" },
            { "type": "postback", "title": "Gặp tư vấn viên", "payload": "SUPPORT_HUMAN" }
          ]
        }
      }
    }
  ],
  "actions": [
    { "action": "add_tag", "tag_name": "hot-lead" },
    { "action": "set_field_value", "field_name": "buyer_status", "value": "purchased" },
    { "action": "set_field_value", "field_name": "order_detail", "value": "<Tên SP - Size - Mã đơn>" },
    { "action": "set_field_value", "field_name": "address", "value": "<Địa chỉ khách>" }
  ]
}

## 4. Multi-Item Checkout Link (Button Template):
### [English]:
{
  "messages": [
    {
      "attachment": {
        "type": "template",
        "payload": {
          "template_type": "button",
          "text": "Here is your unified checkout link for your items:\n1. <Item 1> - <Price 1>\n2. <Item 2> - <Price 2>\n\nClick the button below to complete your checkout directly on our website:",
          "buttons": [
            {
              "type": "web_url",
              "url": "<checkout_url from tool create_checkout_link>",
              "title": "Proceed to Checkout"
            }
          ]
        }
      }
    }
  ],
  "actions": []
}

### [Tiếng Việt]:
{
  "messages": [
    {
      "attachment": {
        "type": "template",
        "payload": {
          "template_type": "button",
          "text": "Dạ em đã tạo sẵn giỏ hàng thanh toán online gồm các sản phẩm của anh/chị:\n1. <Tên SP 1> - <Giá 1>\n2. <Tên SP 2> - <Giá 2>\n\nAnh/chị bấm nút bên dưới để thanh toán trực tiếp trên website của shop nhé:",
          "buttons": [
            {
              "type": "web_url",
              "url": "<checkout_url from tool create_checkout_link>",
              "title": "Thanh toán giỏ hàng"
            }
          ]
        }
      }
    }
  ],
  "actions": []
}

## 5. Cancellation Confirmation (After cancel_shopify_order):
### [English]:
{
  "messages": [
    {
      "text": "Your order <order_name> has been successfully cancelled on our system.\n\nThe inventory has been returned to our stock. If you need any further assistance, feel free to let me know!"
    }
  ],
  "actions": [
    { "action": "add_tag", "tag_name": "order-cancelled" }
  ]
}

### [Tiếng Việt]:
{
  "messages": [
    {
      "text": "Dạ em đã tiến hành hủy đơn hàng <order_name> trên hệ thống theo yêu cầu của anh/chị rồi ạ!\n\nSố lượng sản phẩm đã được hoàn trả lại kho. Khi nào anh/chị cần đặt lại hoặc cần em hỗ trợ mẫu khác thì cứ nhắn em nhé!"
    }
  ],
  "actions": [
    { "action": "add_tag", "tag_name": "order-cancelled" }
  ]
}

# WORKSPACE VARIABLES
- Custom Fields: size, color, buyer_status, order_detail, address
- System Fields: full_name, phone
- Tags: lead, hot-lead, order-cancelled, support-needed
- Store Domain: https://your-store.myshopify.com
Step 5: Test Across Any Connected Channel
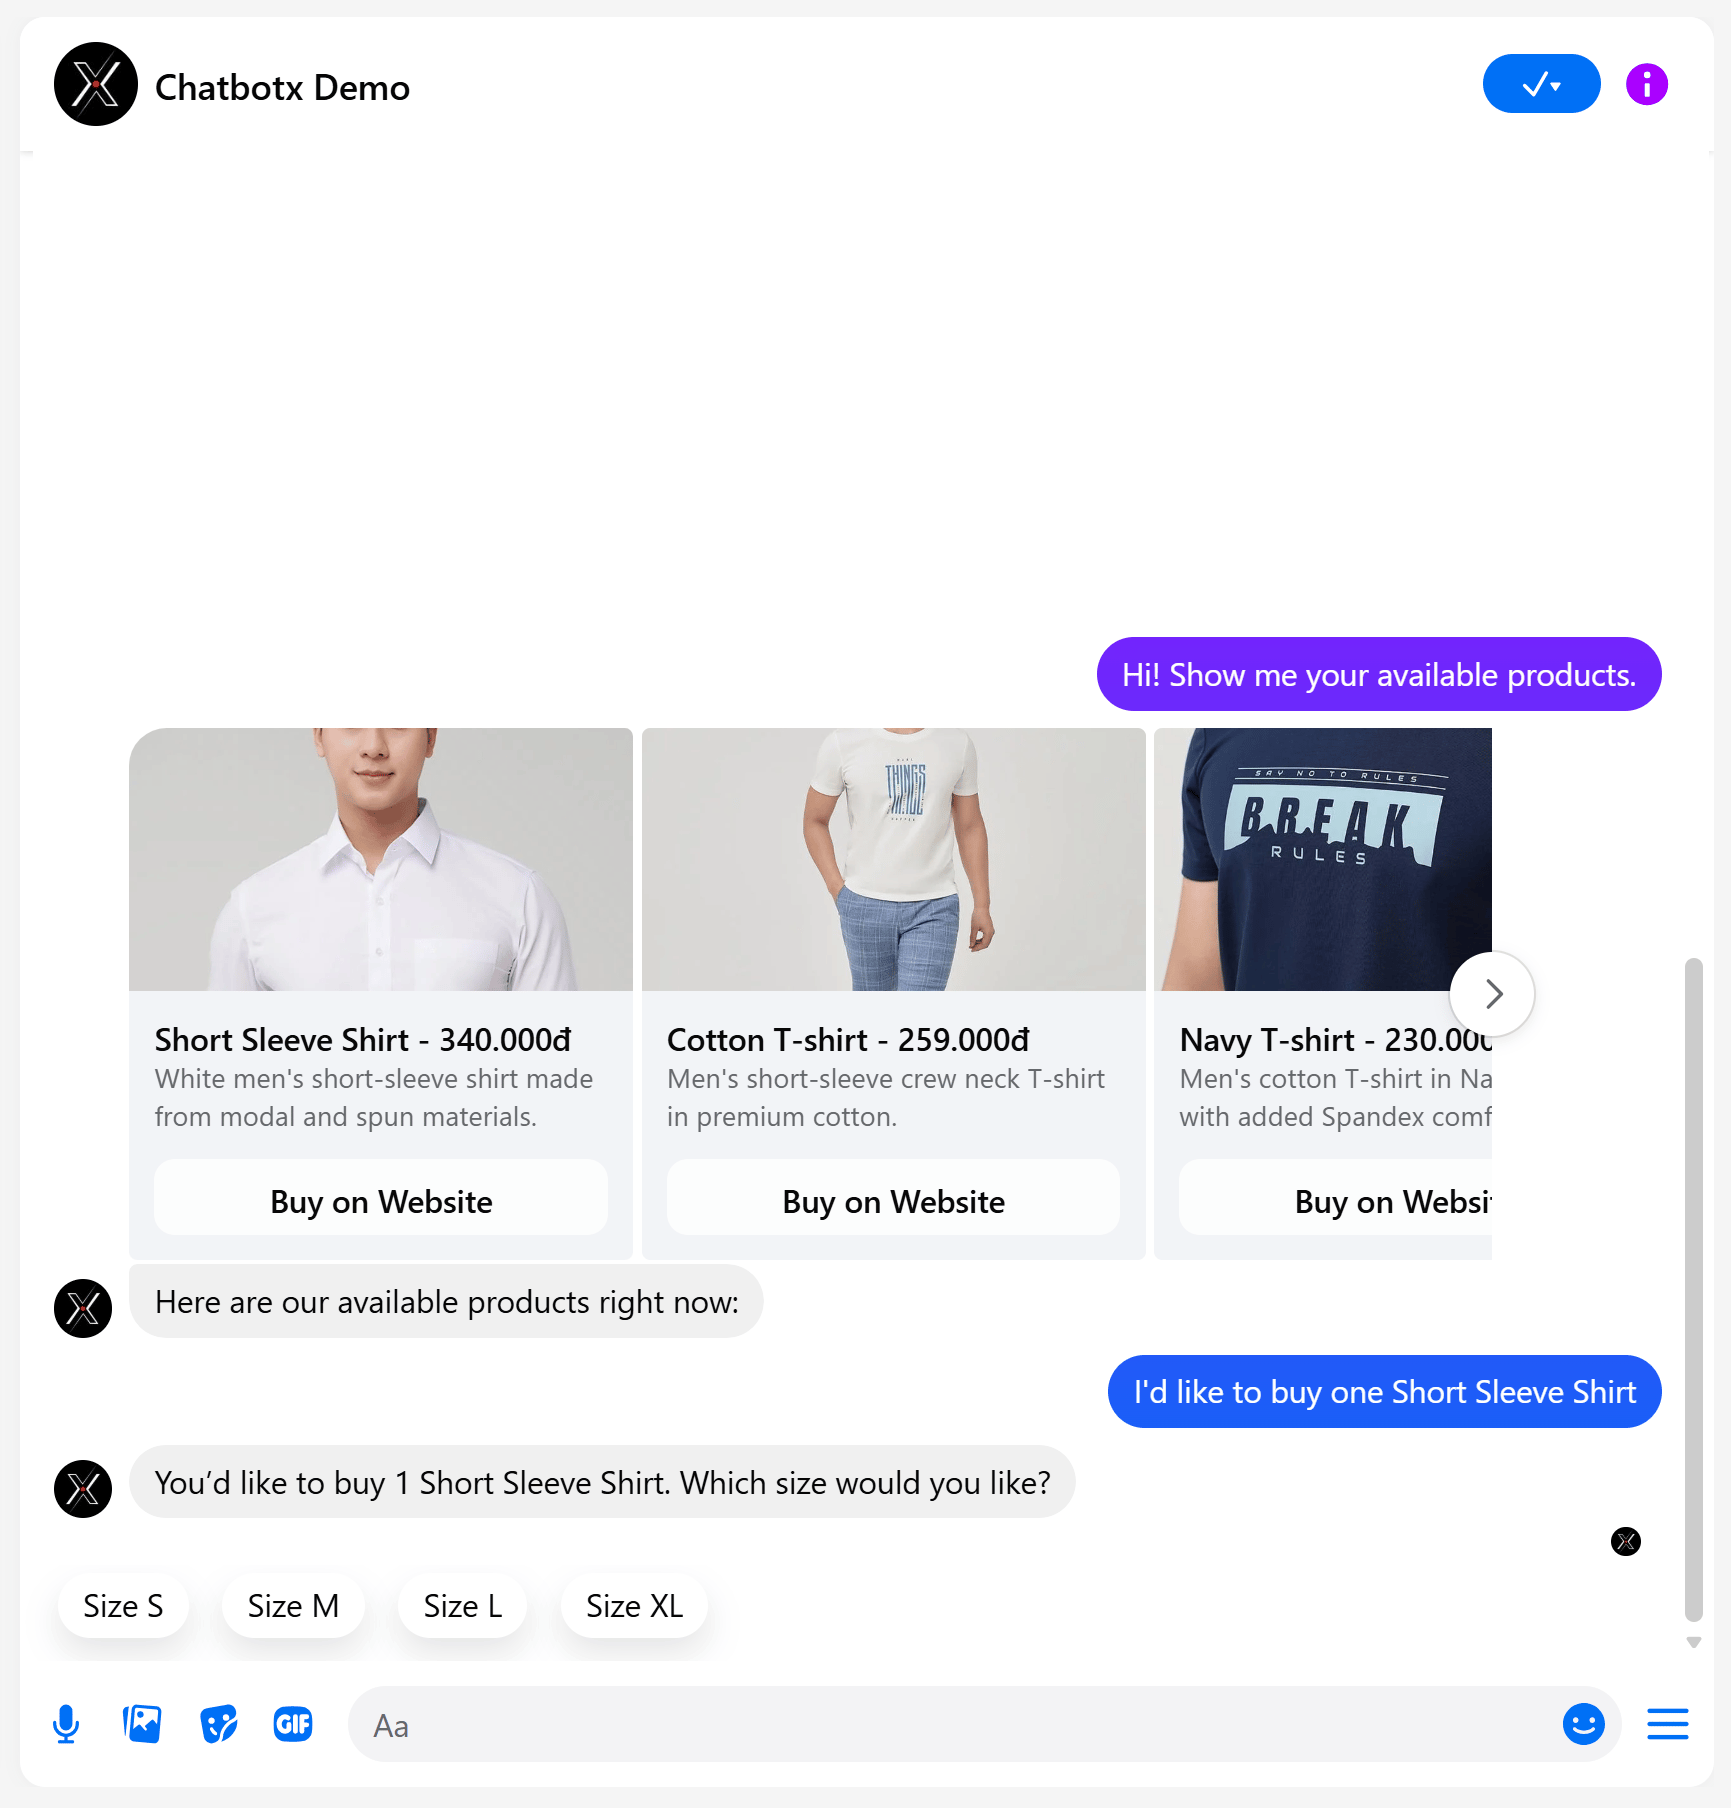
Open any channel connected to your ChatbotX workspace (such as Facebook Messenger, Instagram, WhatsApp, Web Chat, or Zalo) to start testing the AI Agent’s full automated sales cycle:Open your messaging channel
Test product browsing and interactive size selection
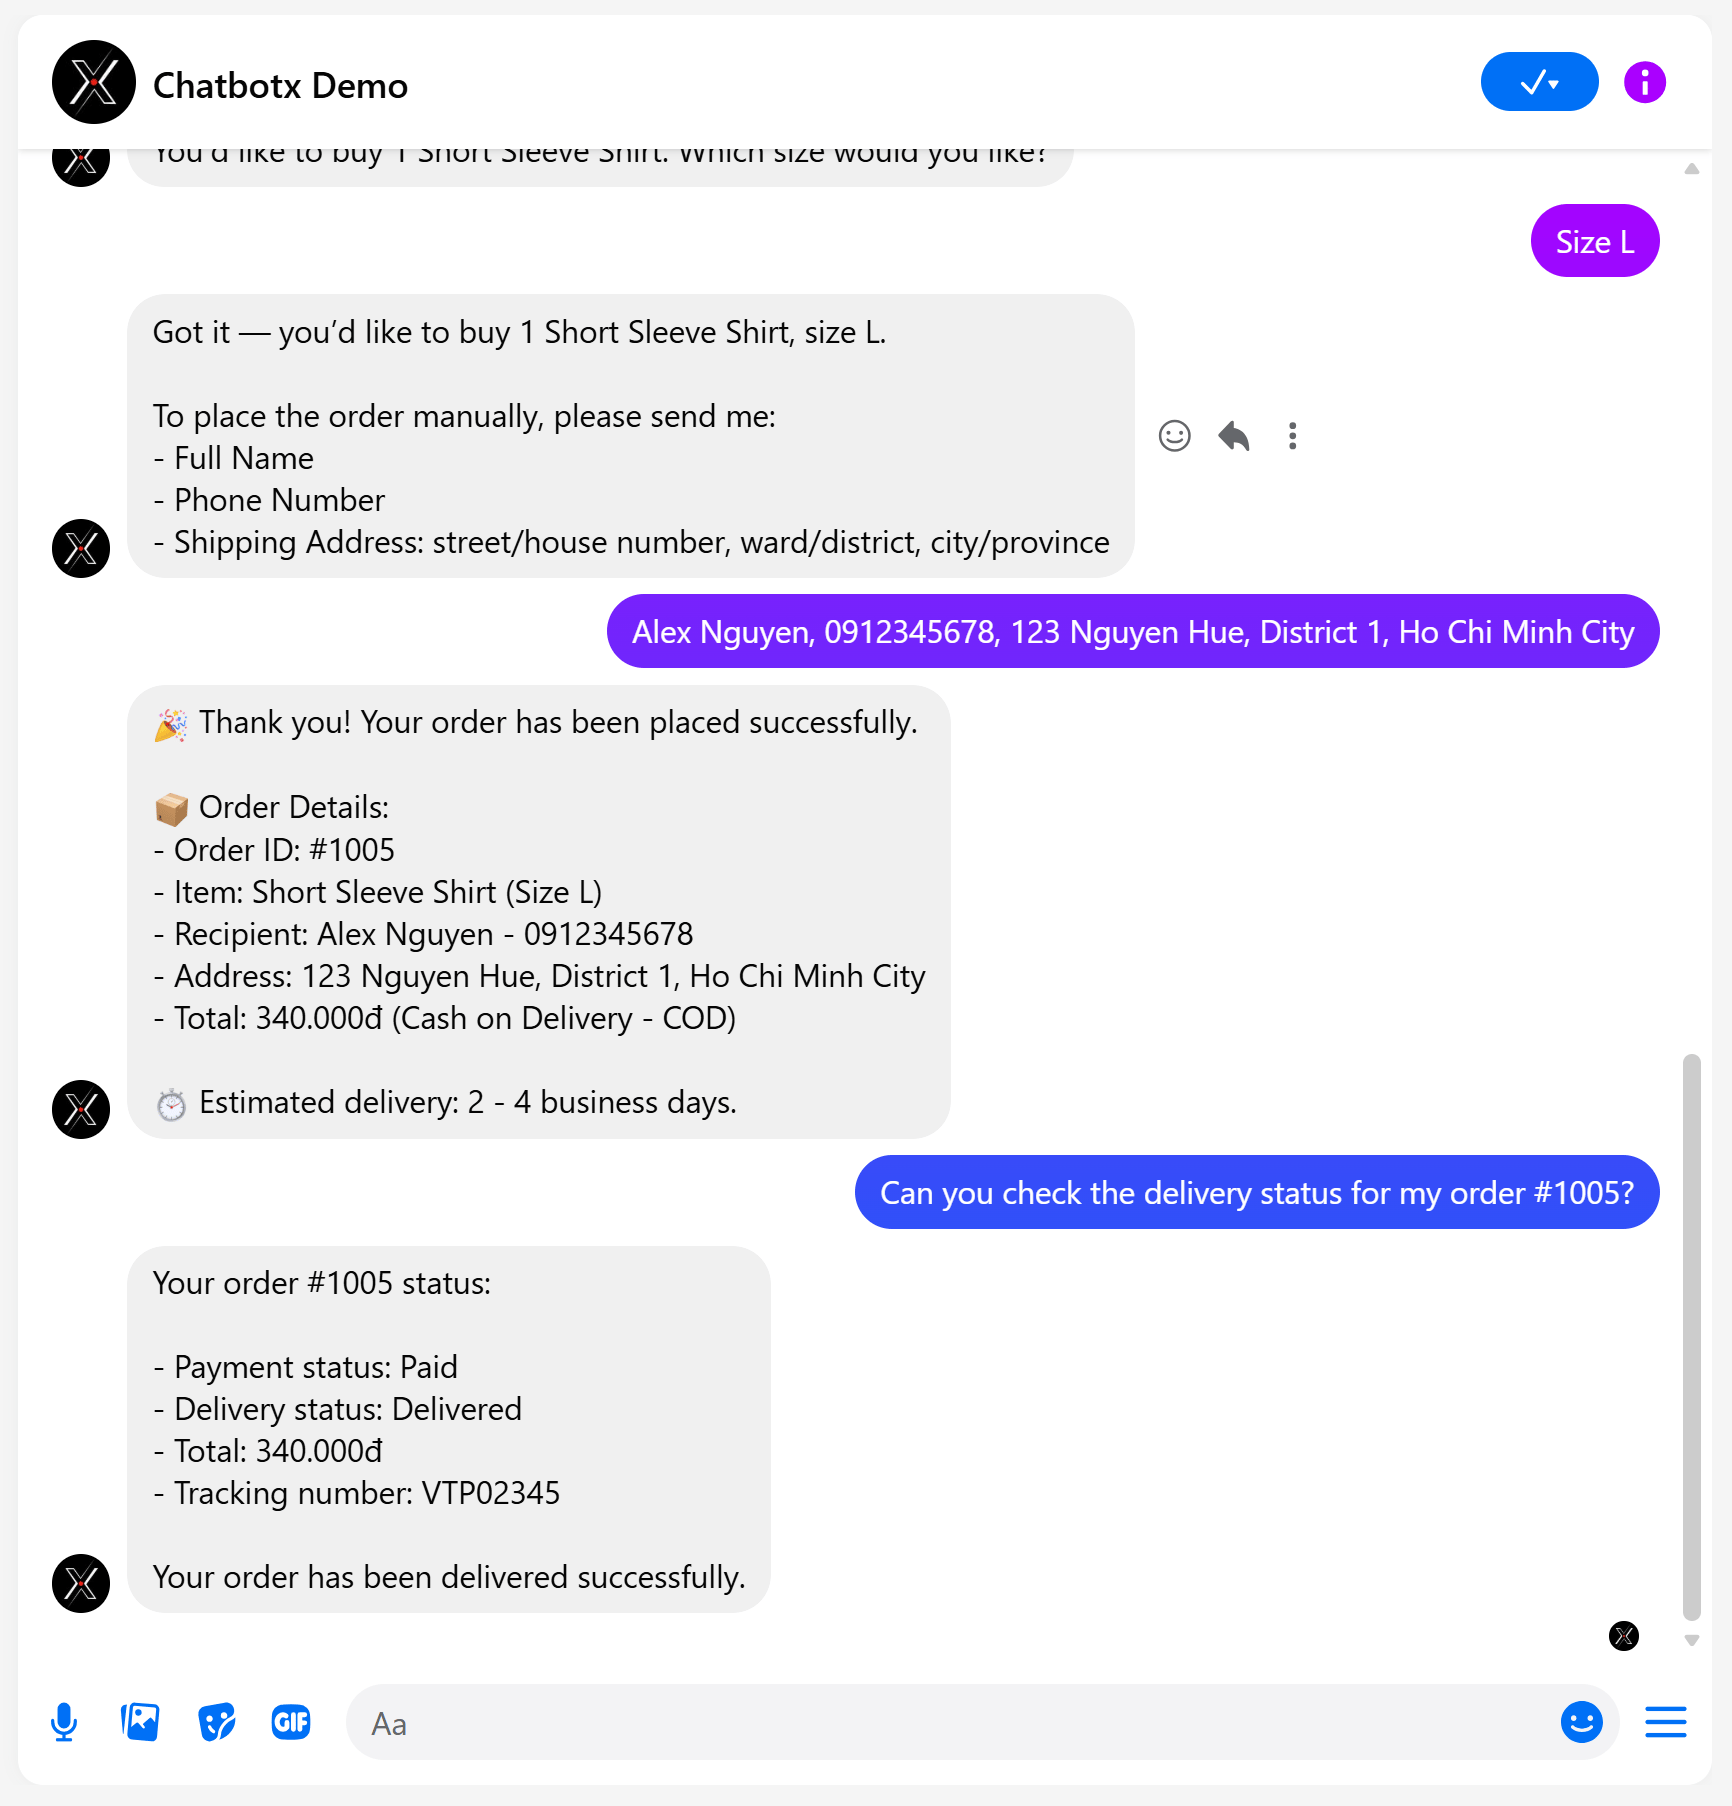
Test automated order creation and real-time tracking
- Direct order creation: Pick a size and provide name, phone number, and address ➔ The AI Agent creates a new customer profile and places an official draft order in Shopify Admin, then returns a structured Order Confirmation card.
- Delivery tracking: Type “Can you check the delivery status for my order #1005?” ➔ The AI Agent retrieves real-time fulfillment status and tracking numbers:
Test additional e-commerce scenarios
- Multi-item cart checkout: Type “Send me a checkout link for both items” ➔ AI generates a single combined checkout link (
/cart/variant_1:qty_1,variant_2:qty_2). - Automated order cancellation: Type “Please cancel order #1005” ➔ AI cancels the order on Shopify and automatically restocks inventory.