

Three Core Navigation Links
Use authenticated storefront (Shop), shopping cart (Cart), and product category (Category) links powered by the session token.
One-Click Ready-Made Flow Template
Download the pre-configured JSON sales flow template with Shop, Cart, and Category buttons and import it directly into your Workspace.
Seamless Webview Shopping
Customers search items, pick sizes and colors, apply promo codes, and enter delivery details without leaving their messaging app.
Instant Order Sync and Confirmation
Automatically display order receipts, send Messenger confirmation messages, and record orders in your dashboard in real time.
The Three Core Store Links and How to Copy Them
ChatbotX Ecommerce uses the{{shop_token}} system field as a personalized shopping session identifier for each contact. When a buyer taps a button containing a link with {{shop_token}}, the Webview store automatically recognizes the contact, preserves their shopping cart items, and links placed orders directly to their conversation.
To build a complete sales flow, you will use three core link types:
Download and Import the Ready-Made Sales Flow Template (.json)
To save setup time, you can download the ready-madestore-sales-shopping-flow.json template, which comes pre-built with two connected message nodes (Welcome & Store Menu and Browse Categories) and all three button types (Shop, Cart, Category).
JSON
store-sales-shopping-flow.json
Ready-Made ChatbotX Sales Flow Template
Download
View or Copy the Raw JSON Flow Template (store-sales-shopping-flow.json)
View or Copy the Raw JSON Flow Template (store-sales-shopping-flow.json)
You can also click the Copy icon at the top right of the code block below, paste the content into a local text file, and save it as
store-sales-shopping-flow.json:store-sales-shopping-flow.json
How to Import the Flow Template into Your Workspace
1
Click Import Flow on the Flows Screen
From the left navigation sidebar in ChatbotX, select Flows, click the Import Flow button at the top right of the table, and select the downloaded 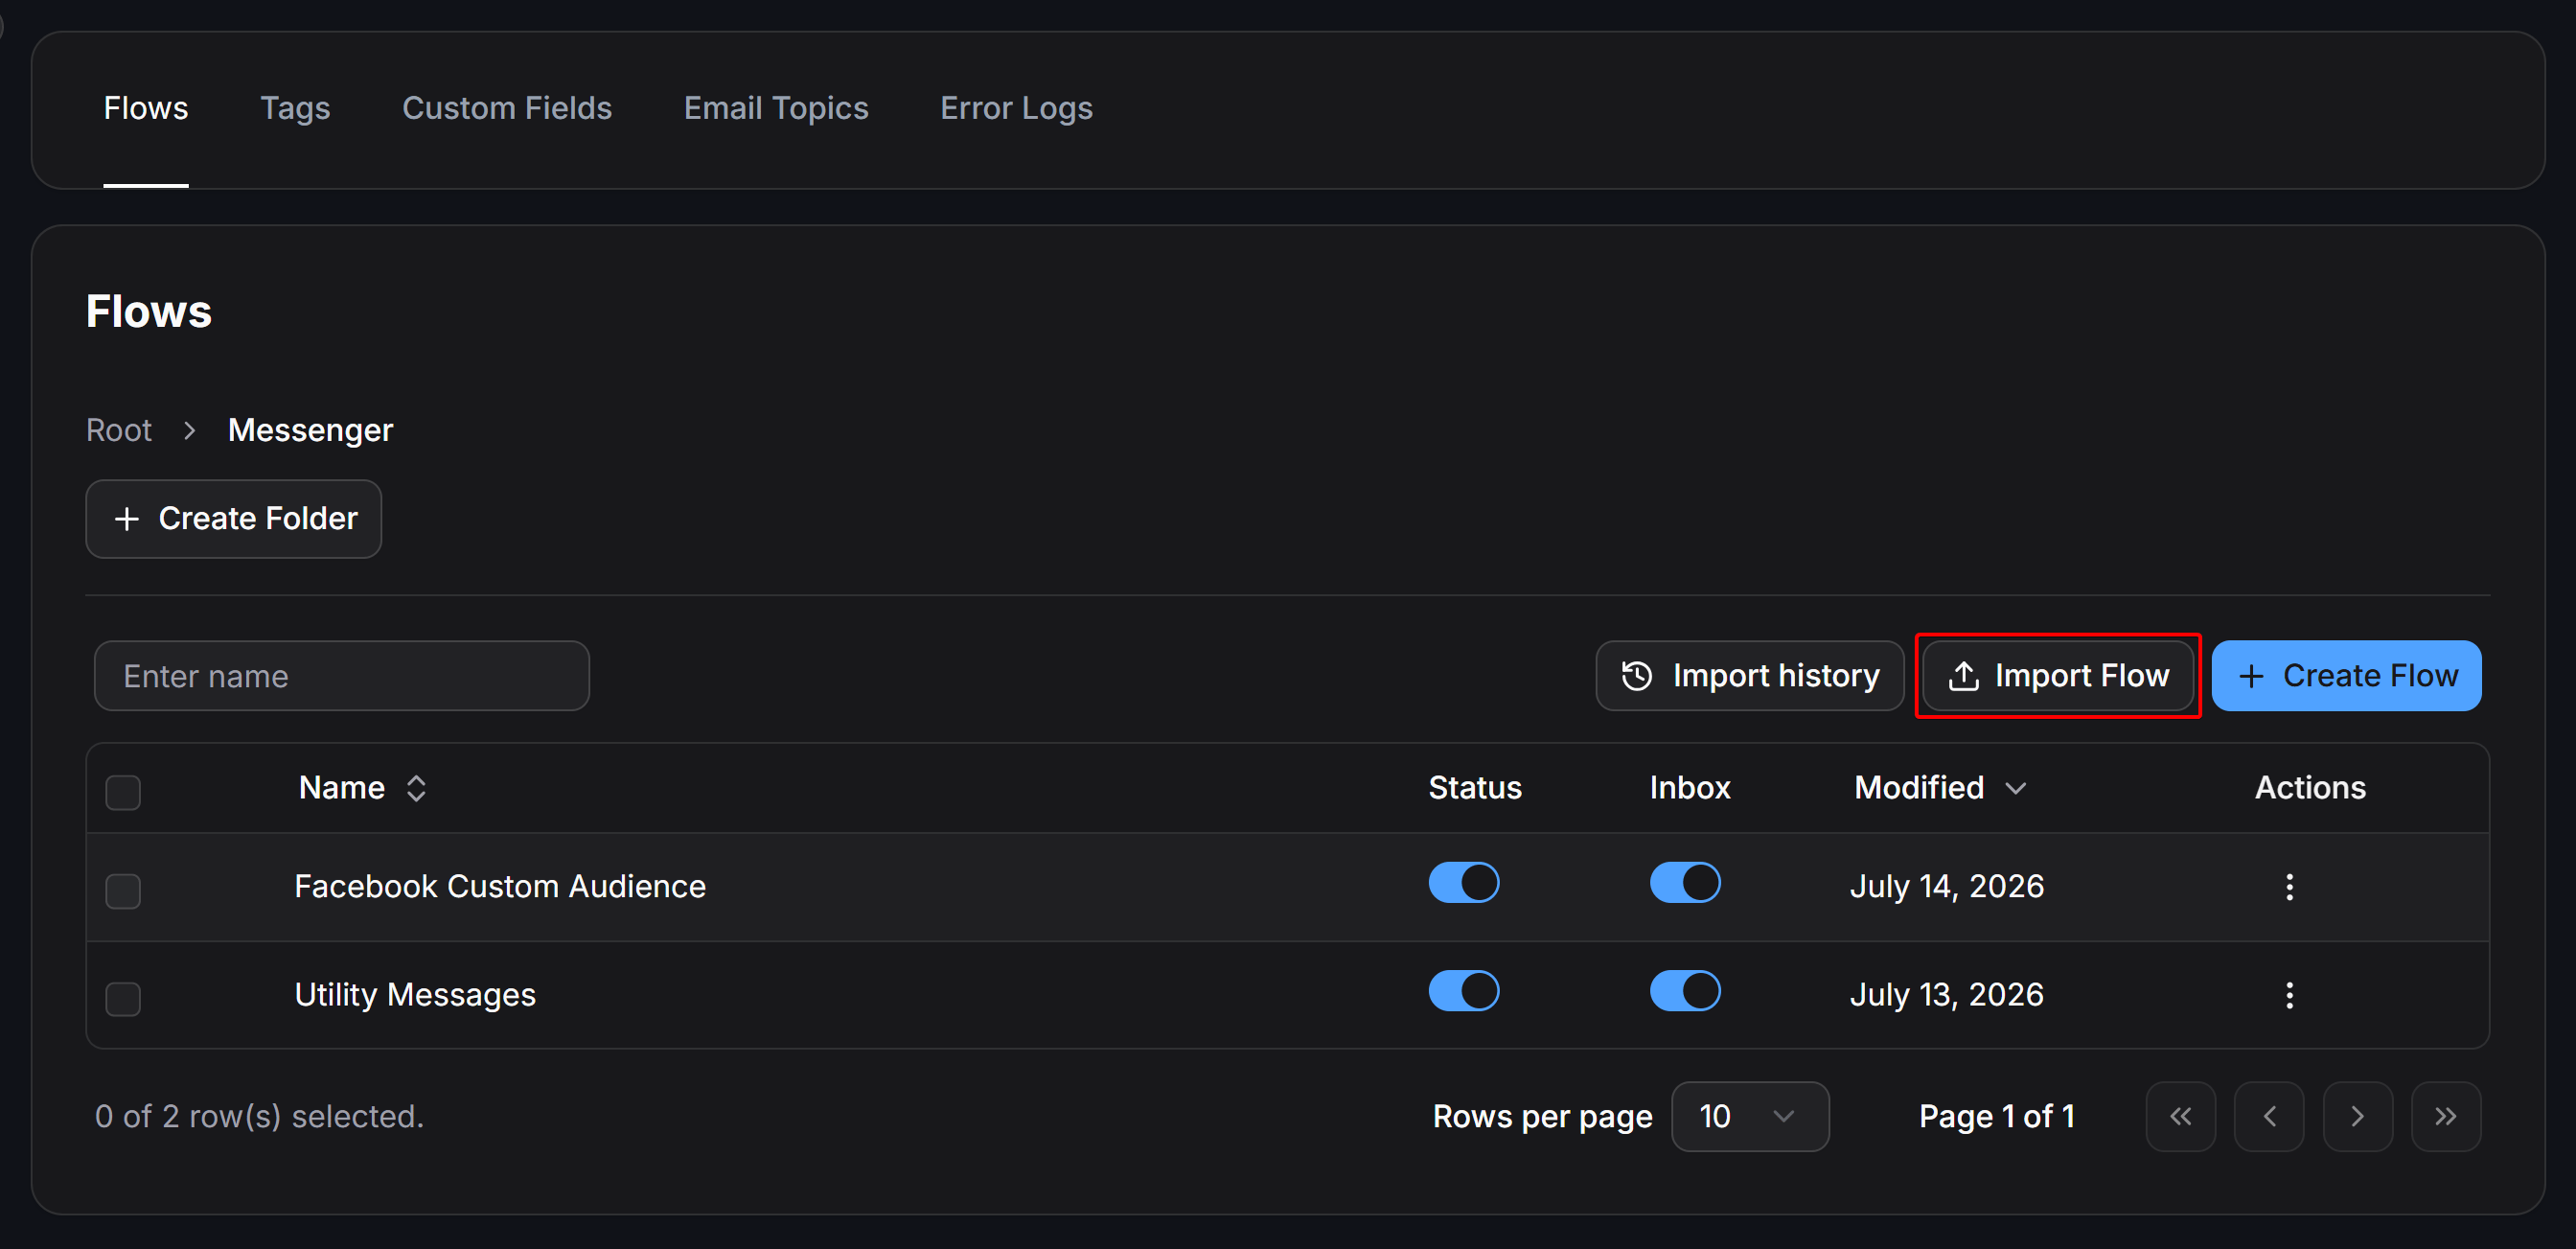
store-sales-shopping-flow.json file.2
Replace Sample URLs with Your Workspace Store Links
Once imported, open BotX Store - Sales & Shopping Flow in the Flow Builder. Click each button (Open BotX Shop, View My Cart, and the category buttons) to replace the sample Workspace ID (
11588479527206912) and category IDs with your own store’s Shop Link, Cart Link, and Category Link.Building or Customizing the Sales Flow and Embedding Store Links
Whether you are building the flow from scratch or customizing the imported template, follow these steps inside the Flow Builder:1
Set Up the Store Menu and Category Nodes
In the Flow Builder, design two connected message nodes: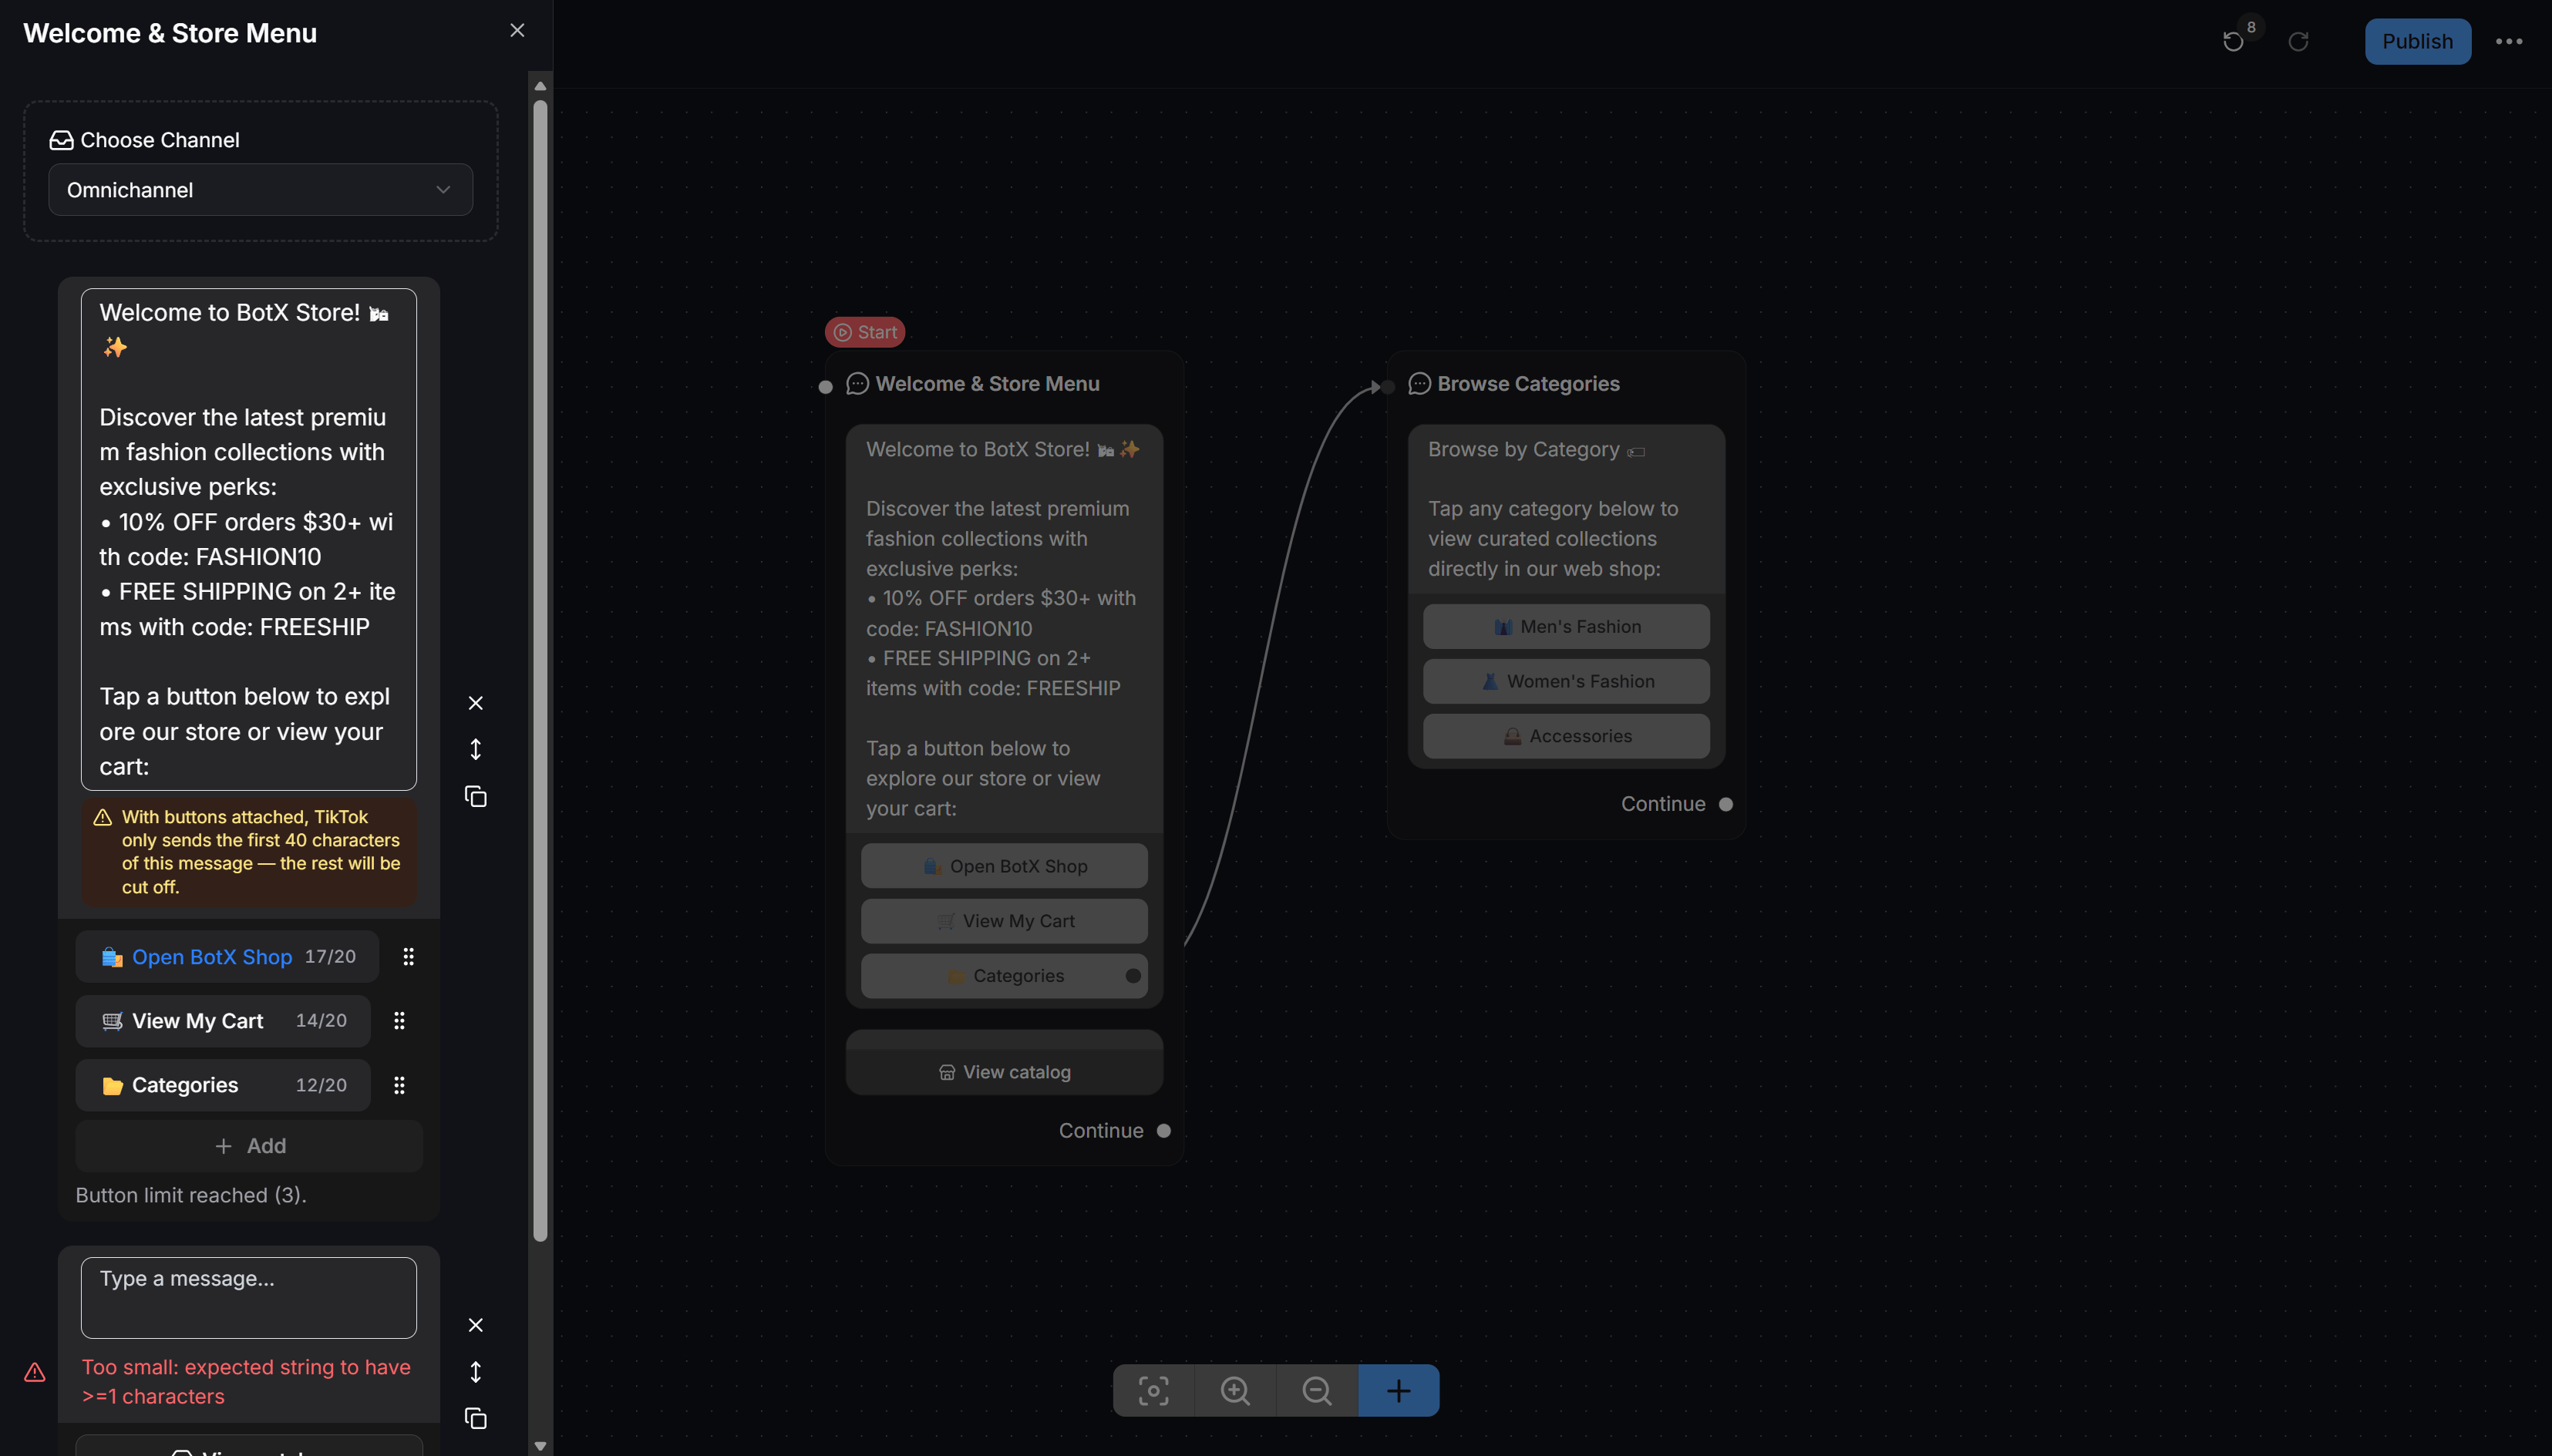
- Node 1 (
Welcome & Store Menu- Start Node): Contains your welcome text, promotional codes (FASHION10,FREESHIP), and 3 navigation buttons:🛍️ Open BotX Shop: Opens your main Webview storefront.🛒 View My Cart: Opens the customer’s shopping cart directly.📁 Categories: Connects to Node 2 so buyers can browse by department.
- Node 2 (
Browse Categories): Displays a prompt inviting customers to pick a department along with buttons for each category (such as👔 Men's Fashion,👗 Women's Fashion,👜 Accessories).
2
Embed Shop, Cart, and Category Links into Open Website Buttons
Click any storefront, cart, or category button to open the Edit Button dialog and configure its parameters: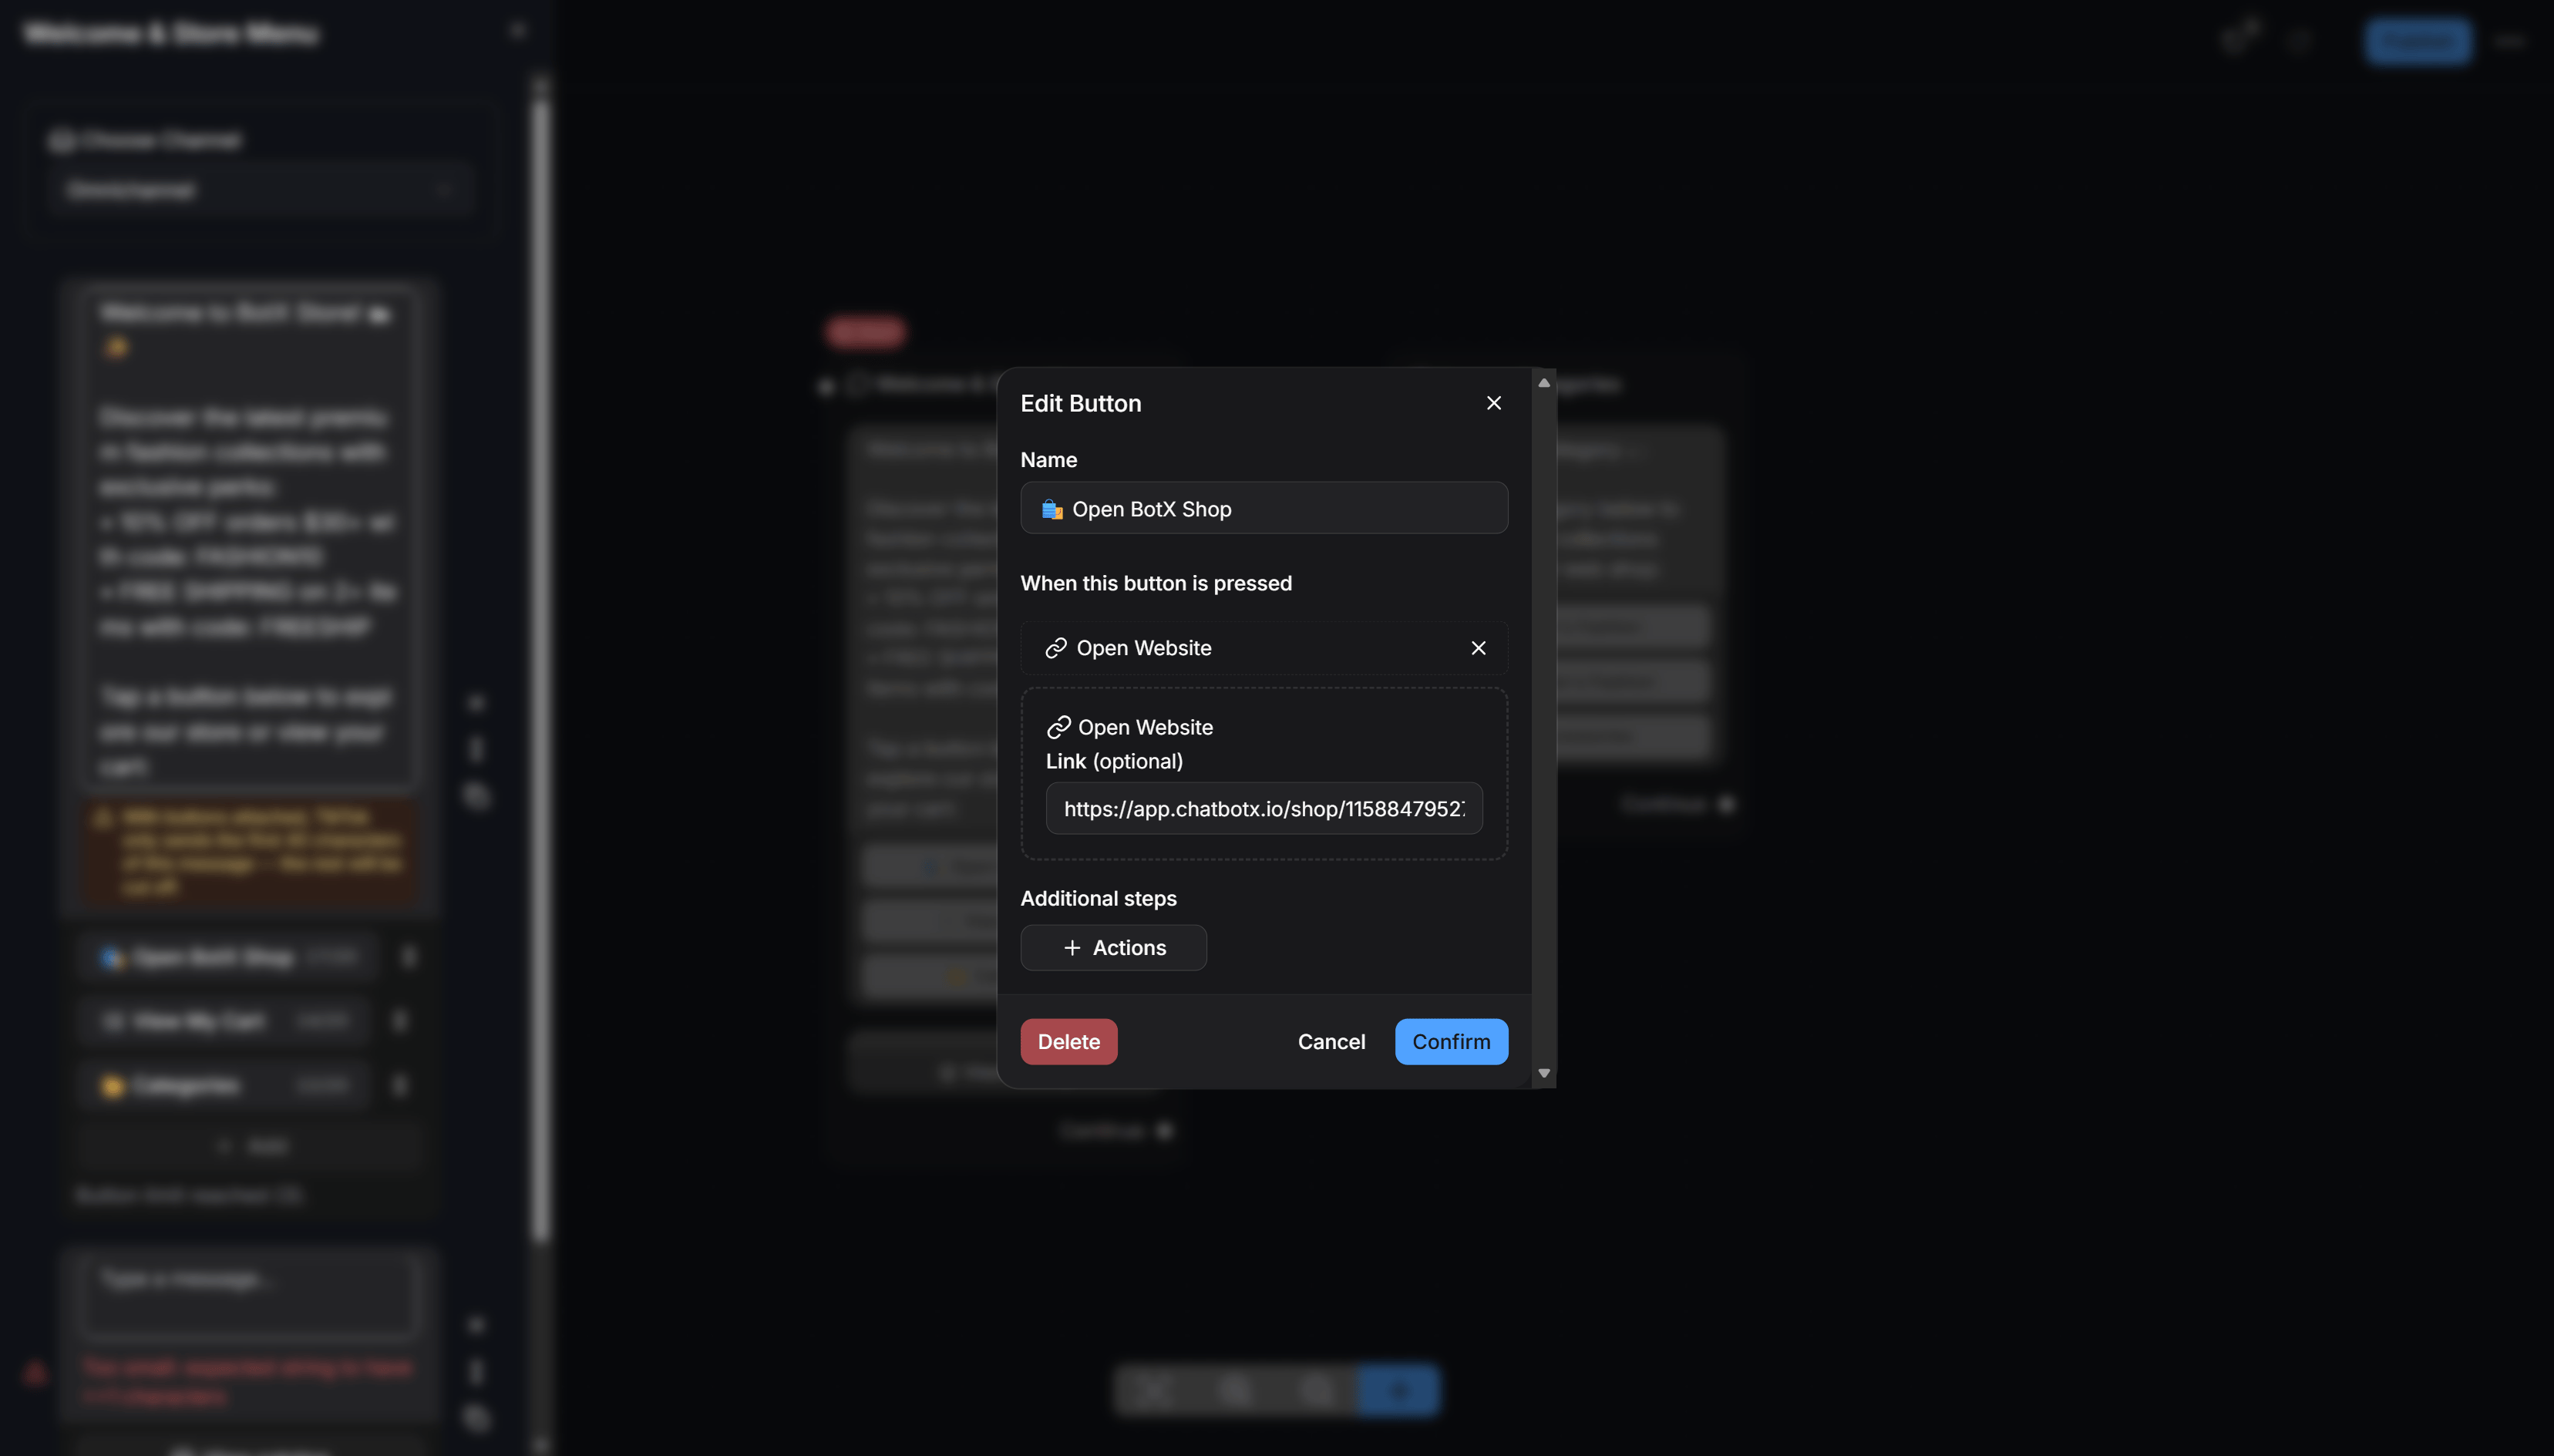
- Name: Enter the button label (for example,
🛍️ Open BotX Shop). - When this button is pressed: Select Open Website.
- Link: Paste the corresponding store URL:
- For the main store button: Paste your Shop Link (
https://app.chatbotx.io/shop/<WORKSPACE_ID>?token={{shop_token}}). - For the shopping cart button: Paste your Cart Link (
https://app.chatbotx.io/shop/<WORKSPACE_ID>/cart?token={{shop_token}}). - For the department buttons inside
Browse Categories: Paste each category’s Category Link (https://app.chatbotx.io/shop/<WORKSPACE_ID>?token={{shop_token}}&category=<CATEGORY_ID>).
- For the main store button: Paste your Shop Link (
- Click the blue Confirm button to save.
3
Publish the Flow and Copy the Published Link
After embedding your links: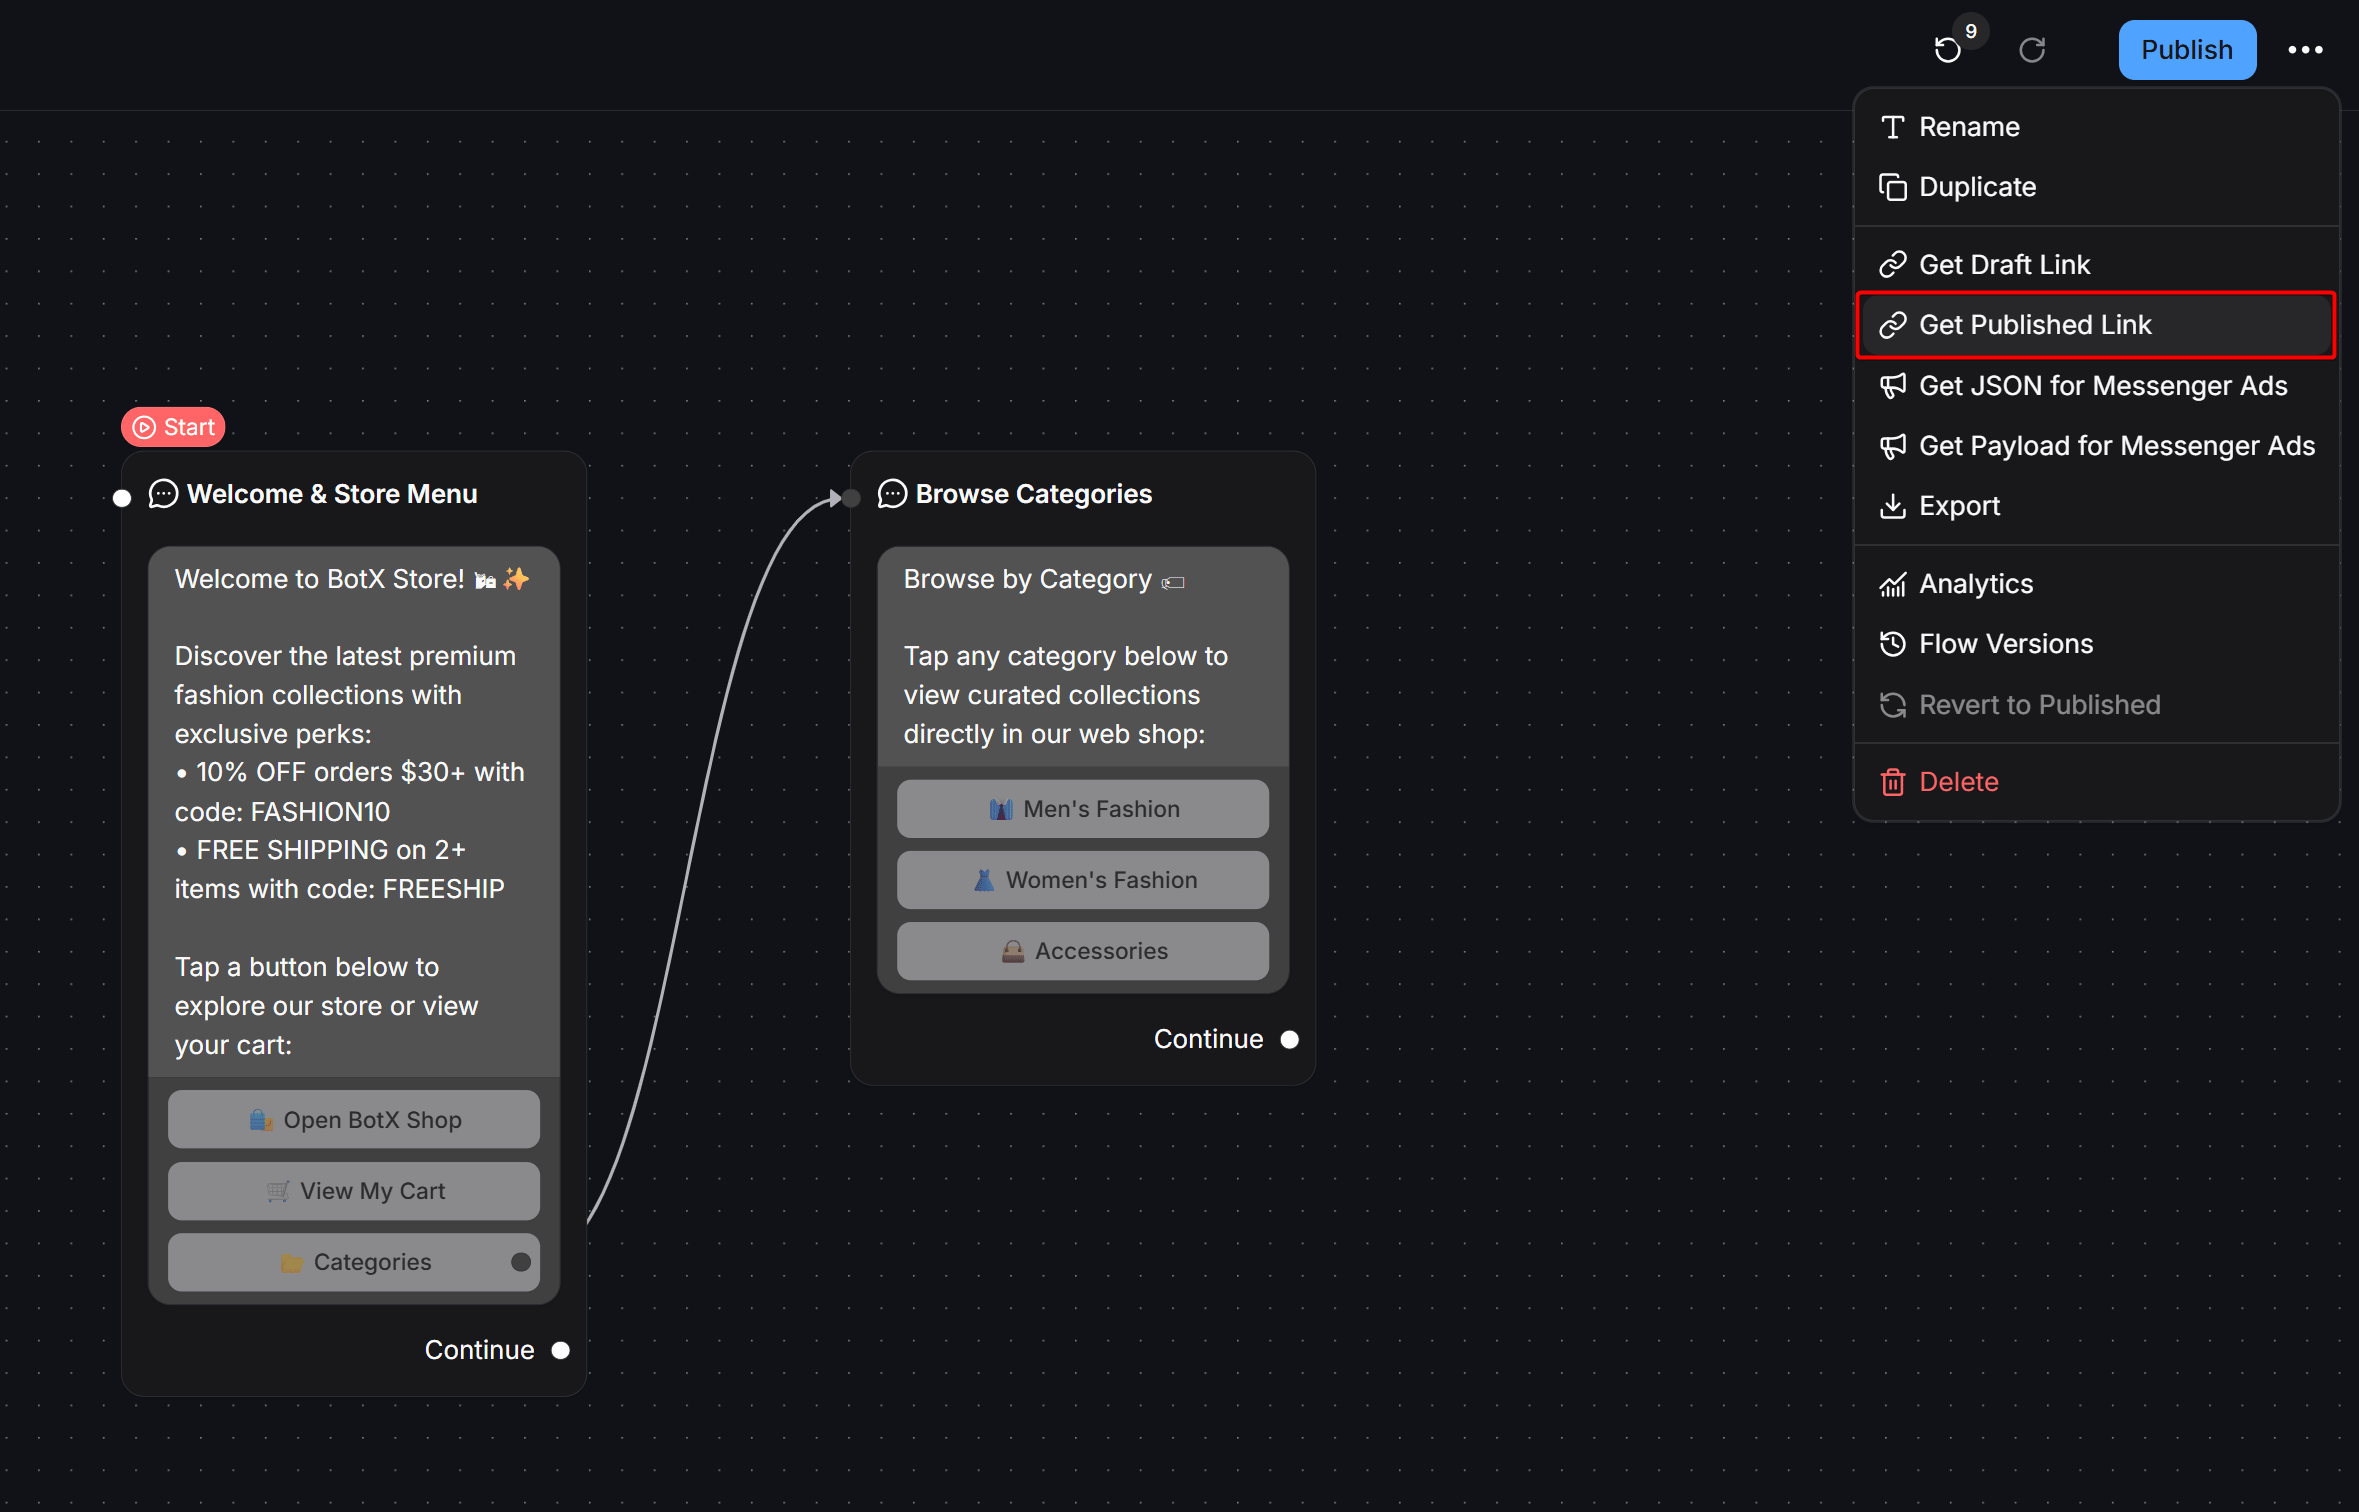
- Click the blue Publish button at the top right corner to make your changes live.
- Click the three-dot menu (
...) next to Publish and select Get Published Link to copy a direct link that launches this flow in Messenger (or select Export anytime you want to download the flow as a.jsonbackup).
End-to-End Customer Shopping Journey on ChatbotX
Once your sales flow is published and active on your messaging channel, customers experience a complete 8-step shopping journey from start to finish:1
Open the Store from the Welcome Message in Messenger
When a customer taps Get started or opens the published flow link, the chatbot replies with the welcome message featuring promo codes (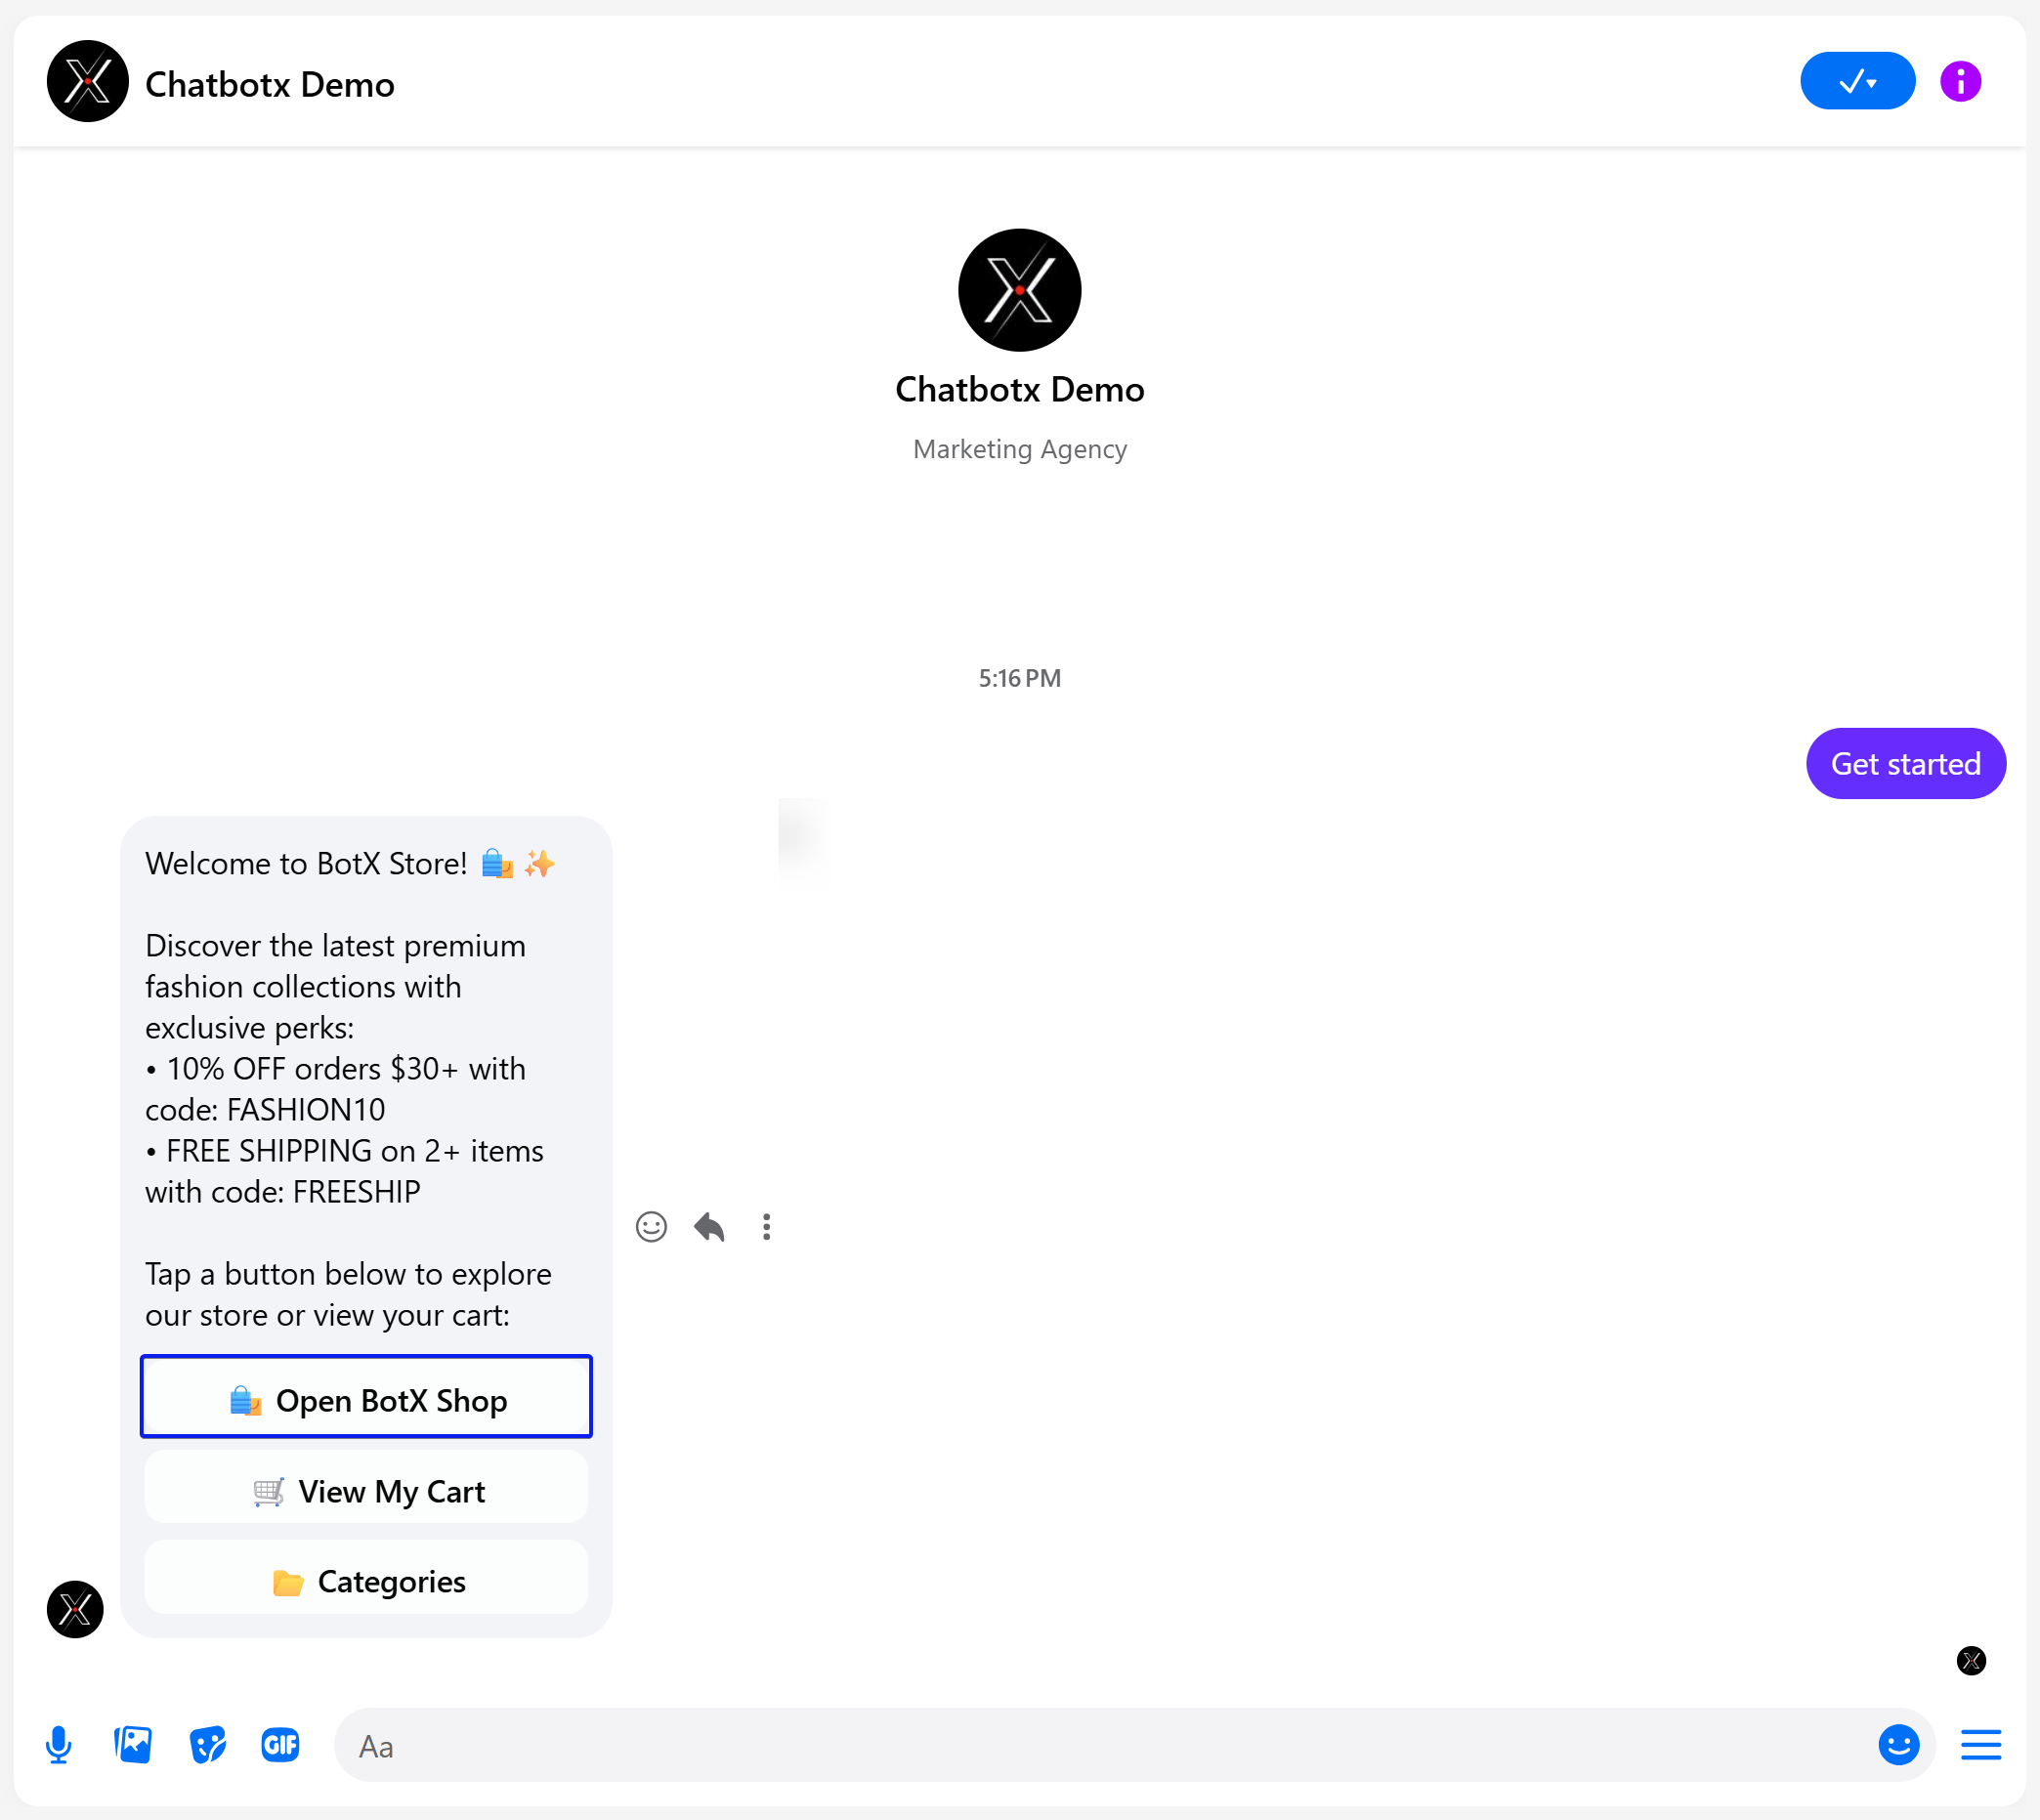
FASHION10, FREESHIP) and the 3 navigation buttons:- Open BotX Shop: Launches the main Webview storefront.
- View My Cart: Opens the customer’s shopping cart directly.
- Categories: Displays product categories to browse by department.
2
Browse the Storefront and Filter Products on Webview
The Webview storefront opens directly inside the chat app, showcasing your catalog: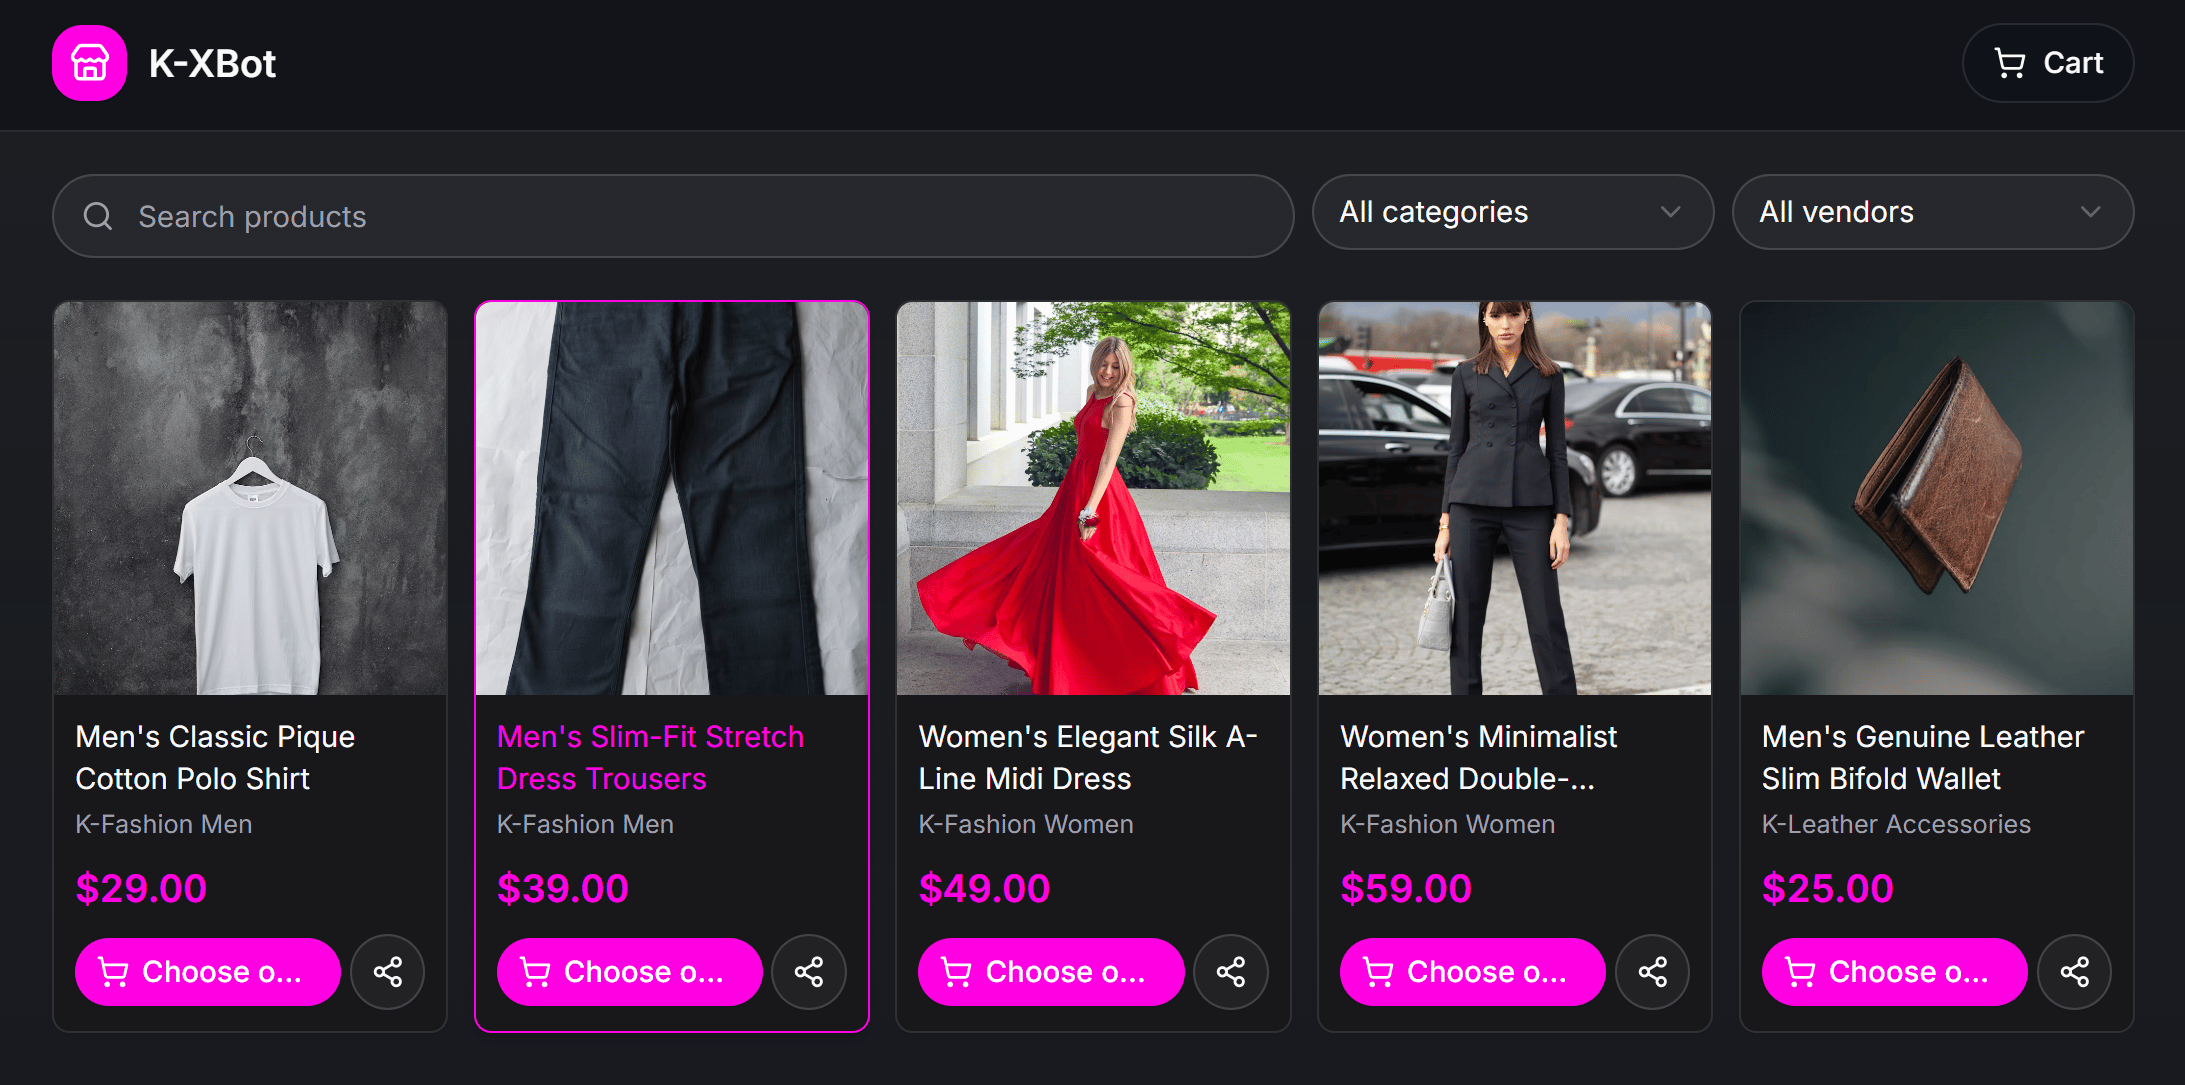
- Customers can type keywords into the Search products bar to find specific items.
- Filter the catalog by category (All categories) or brand/supplier (All vendors).
- Tap Choose options (for products with variants) or Add to cart on any product card.
3
Select Product Variants and Add to Cart
On the product detail page, buyers inspect high-resolution product images, read fabric and sizing descriptions, and select variant options: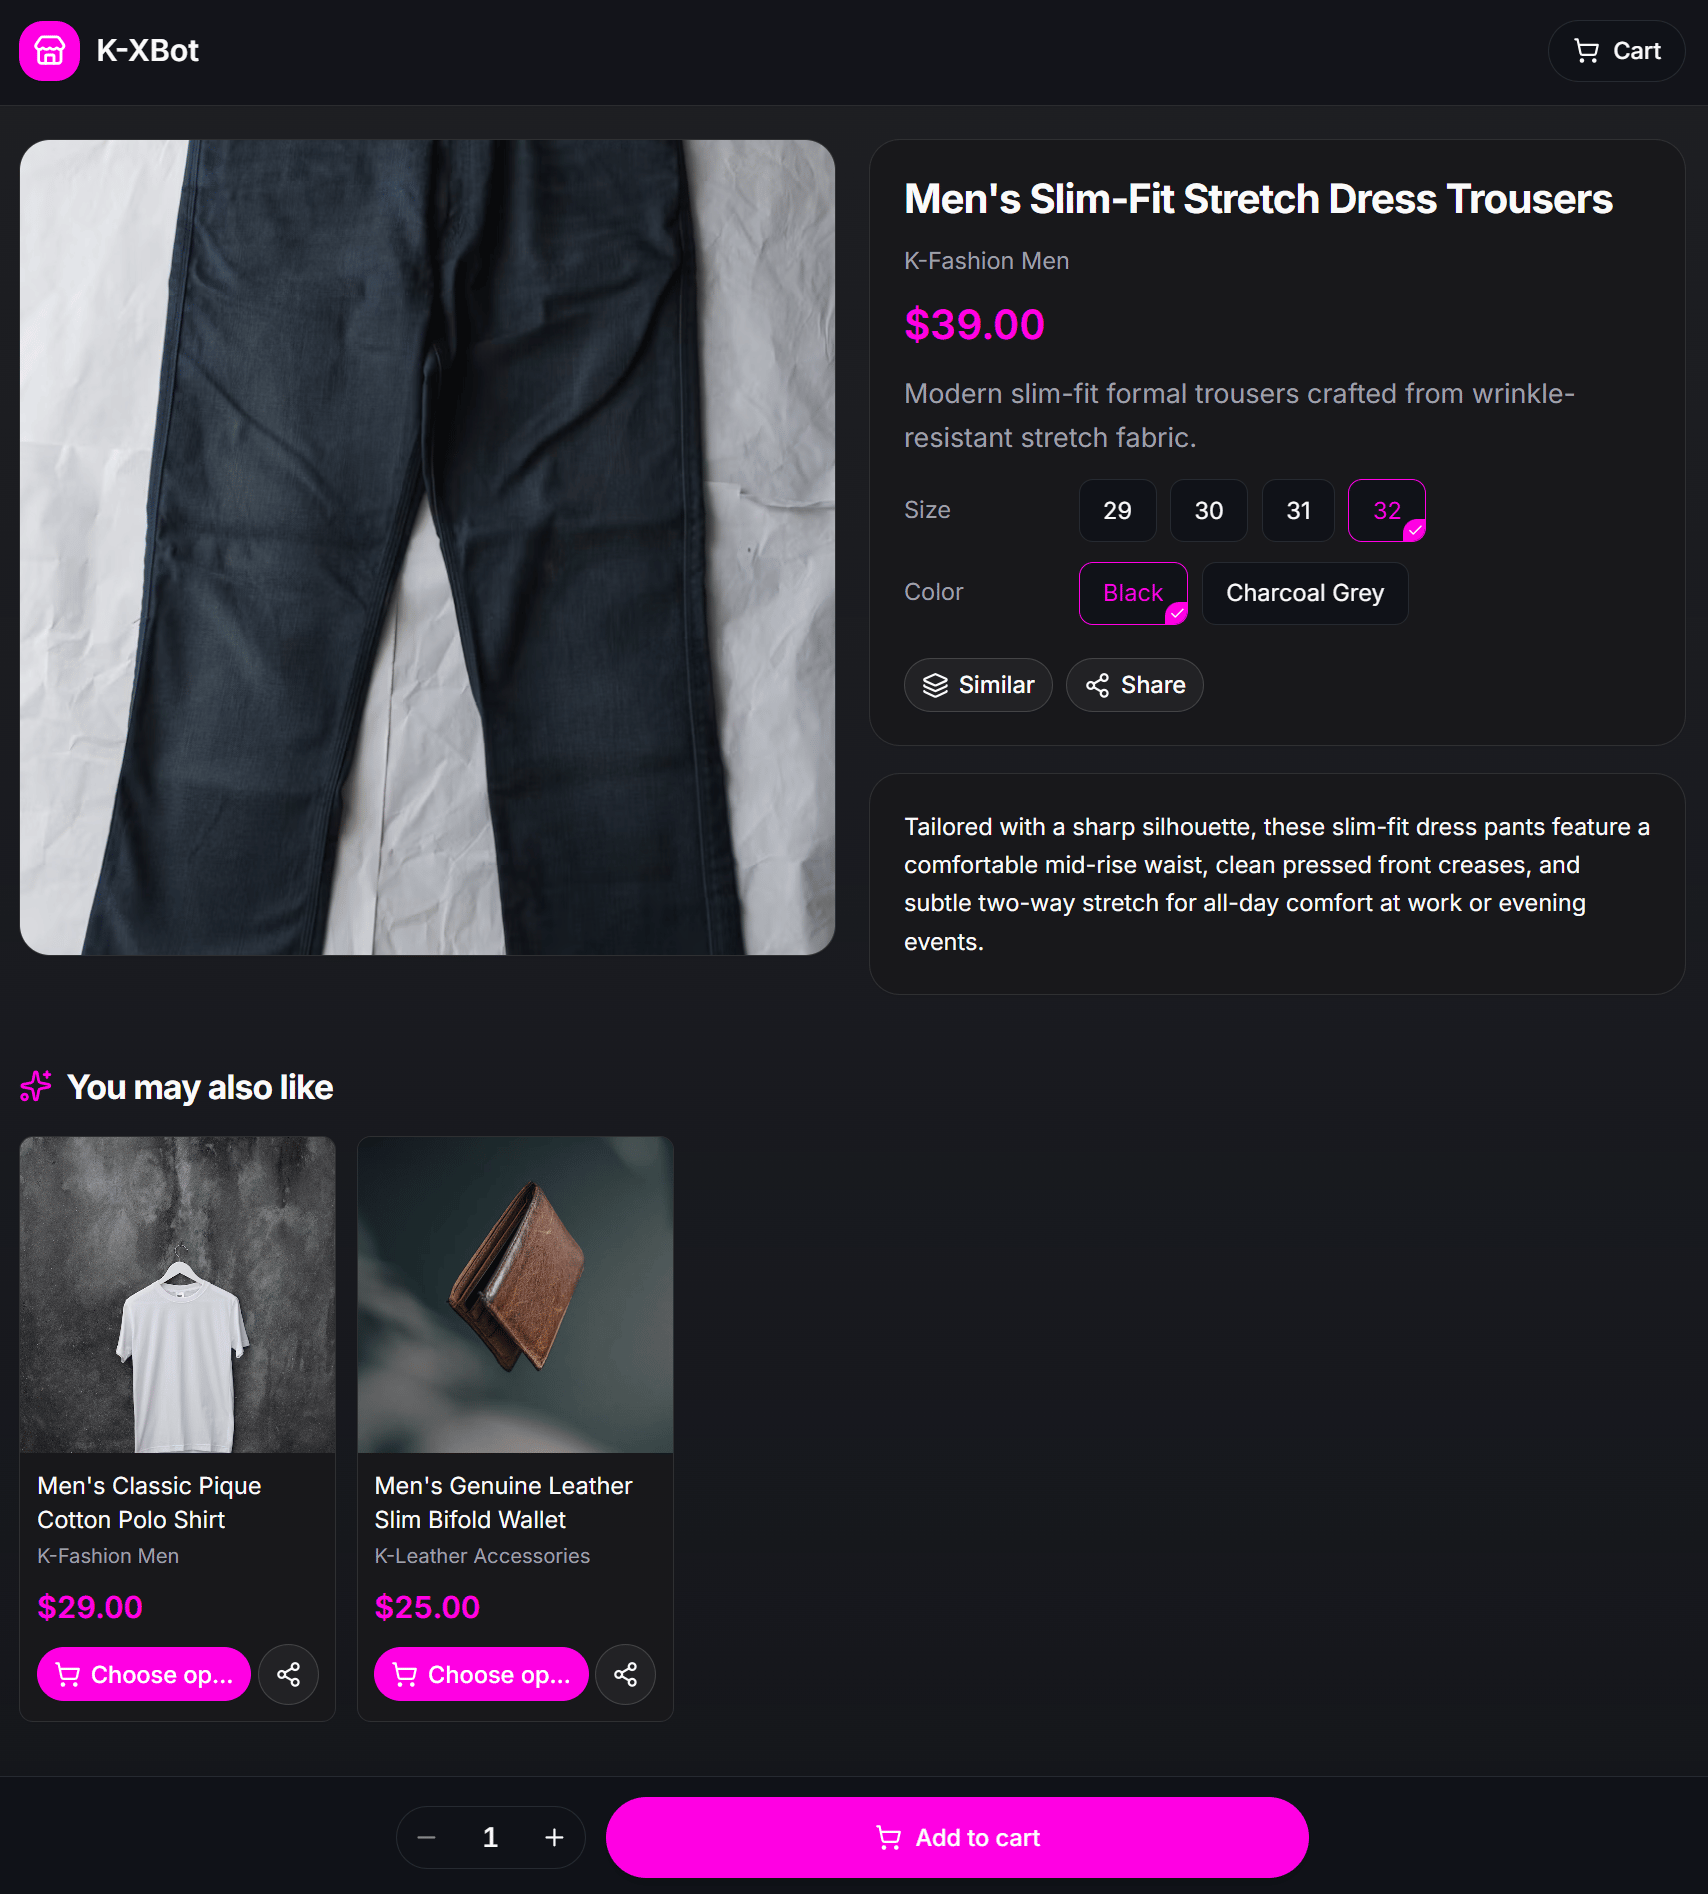
- Choose the desired Size and Color.
- Tap Similar to explore comparable products, Share to send the item link, or browse the You may also like recommendations at the bottom.
- Adjust item quantity using
-/+and tap Add to cart.
4
Review Shopping Cart and Apply Discount Codes
Tapping the Cart button at the top right corner (or tapping View My Cart in the chat) opens the shopping cart screen: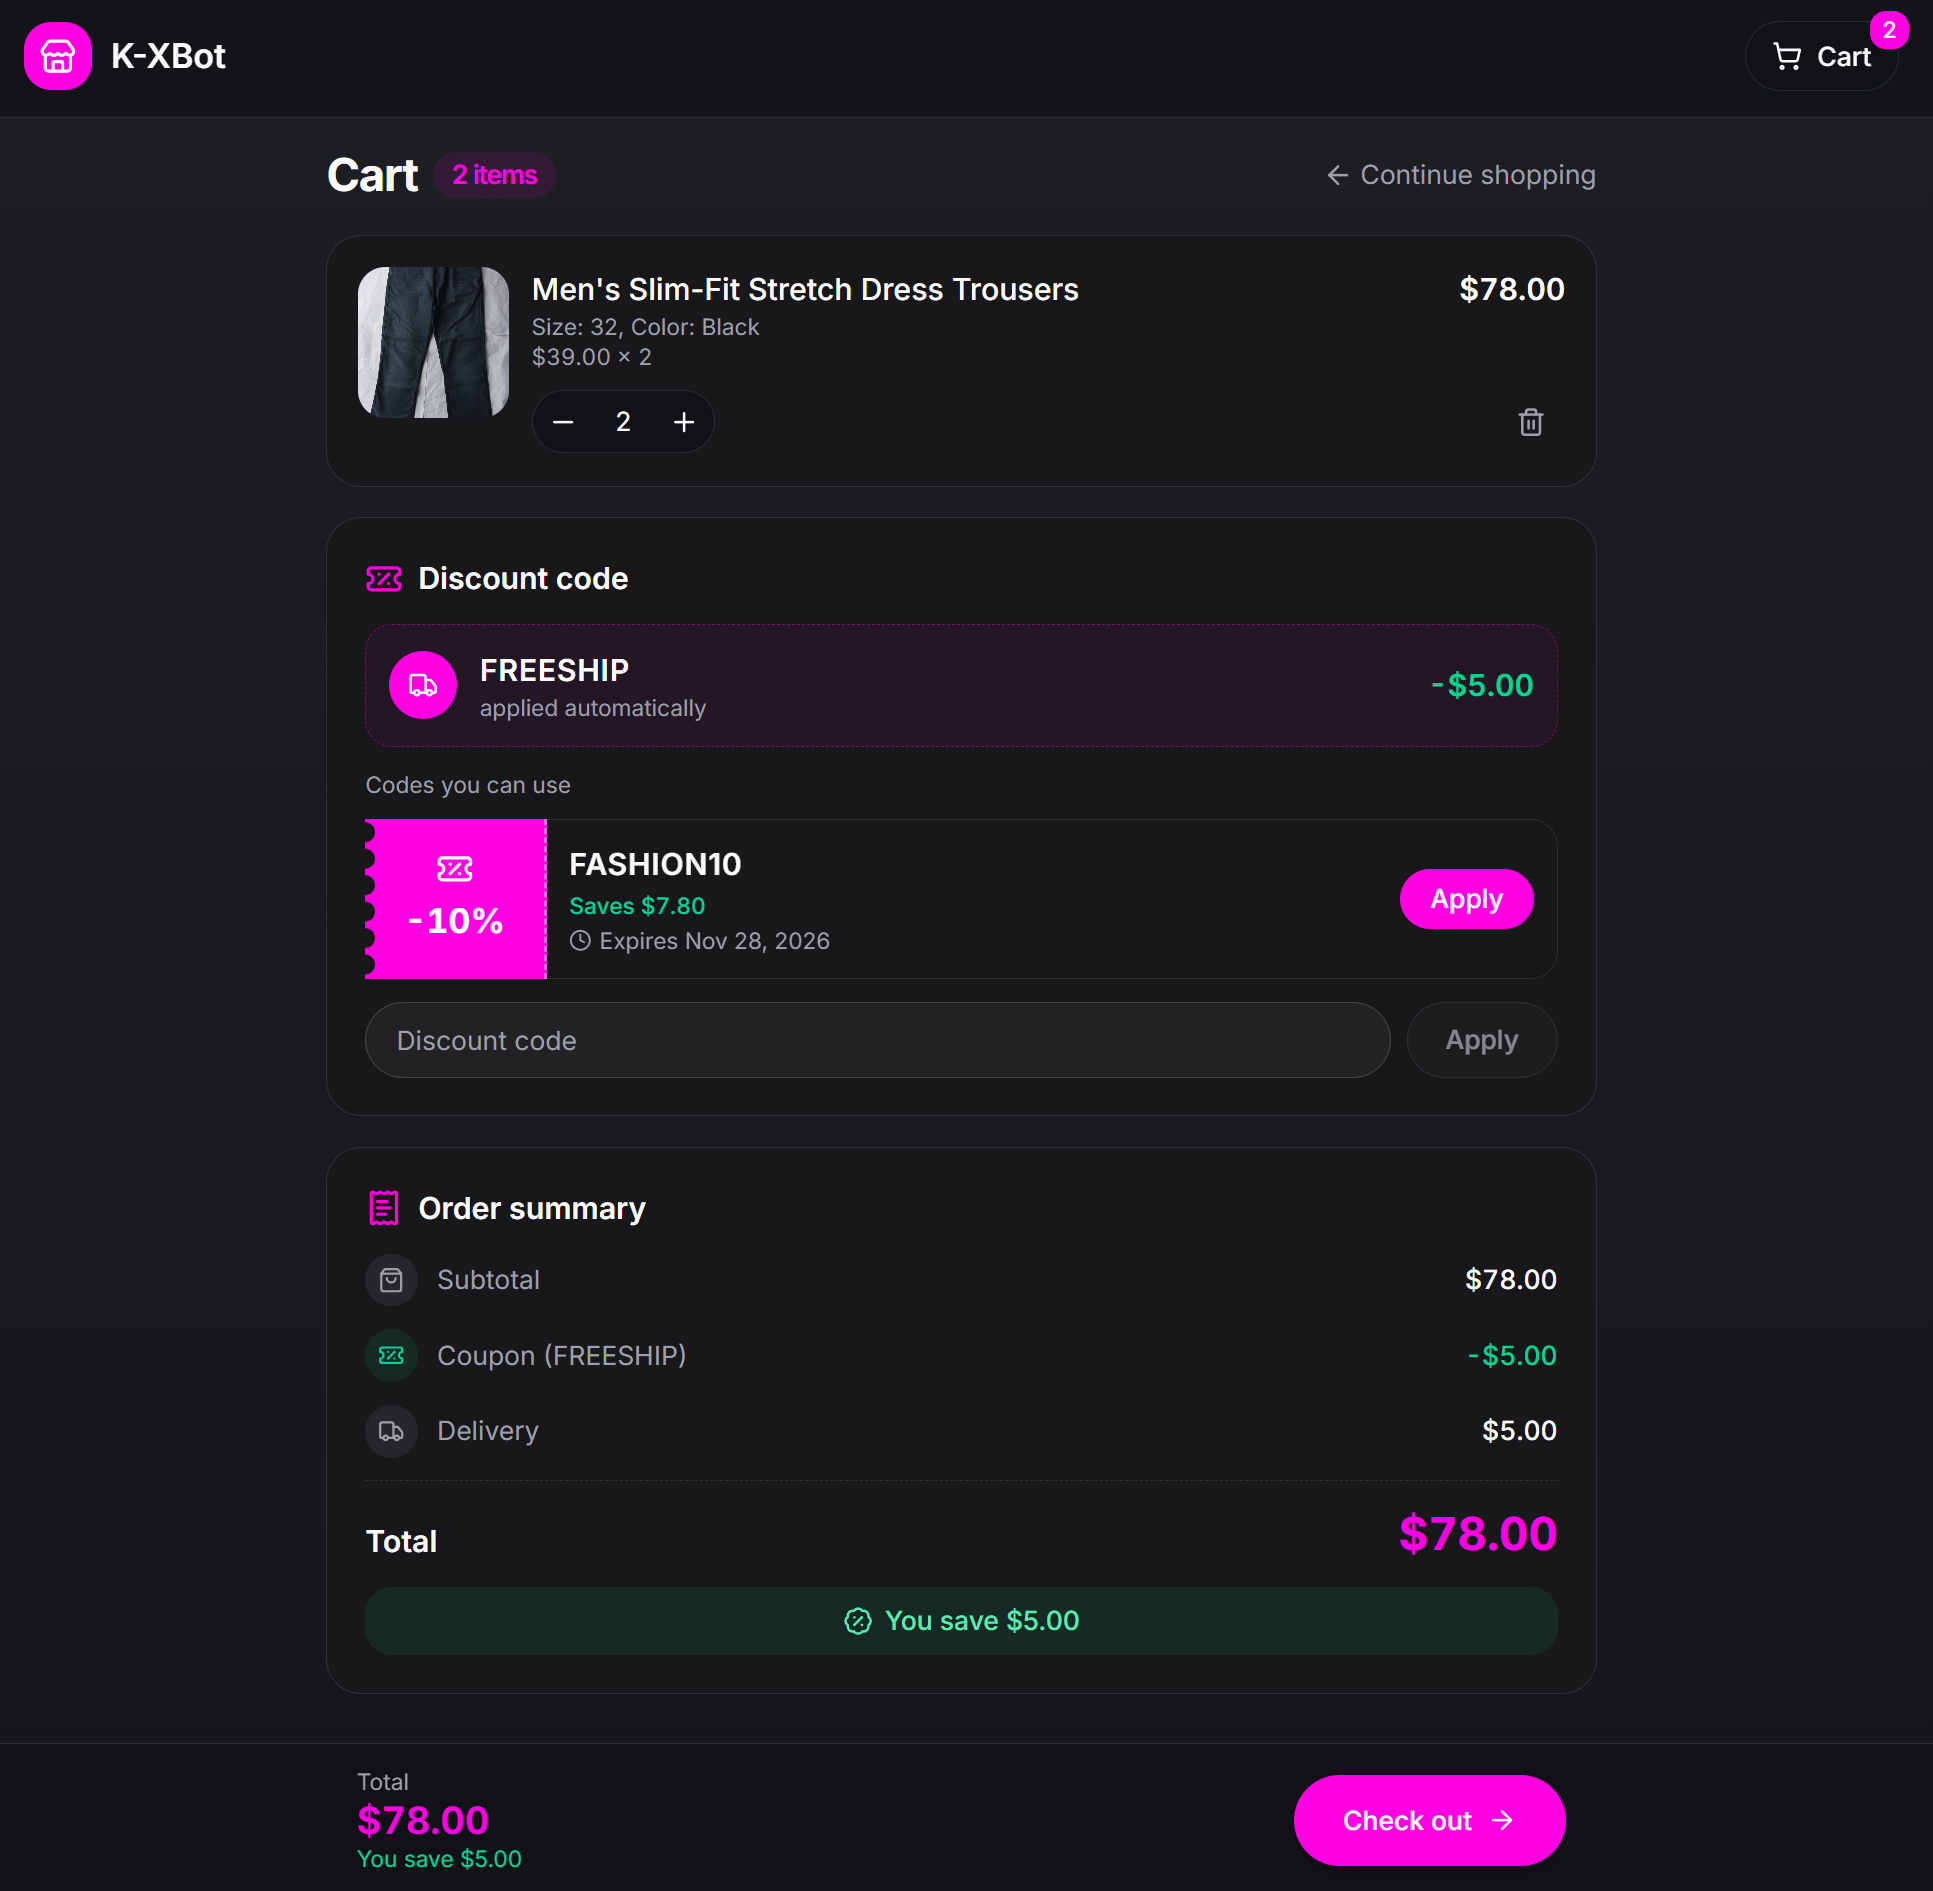
- Adjust item quantities or remove unwanted items.
- Under Discount code, eligible automatic coupons such as
FREESHIPare applied automatically. Buyers can also tap Apply on available promotional codes displayed in the list (such asFASHION10) or enter a discount code manually. - Review the Order summary breakdown (
Subtotal,Coupondiscount,Deliveryfee, and finalTotal) and tap Check out.
5
Fill In Recipient Details and Shipping Address
On the checkout screen, the customer enters their contact and delivery information: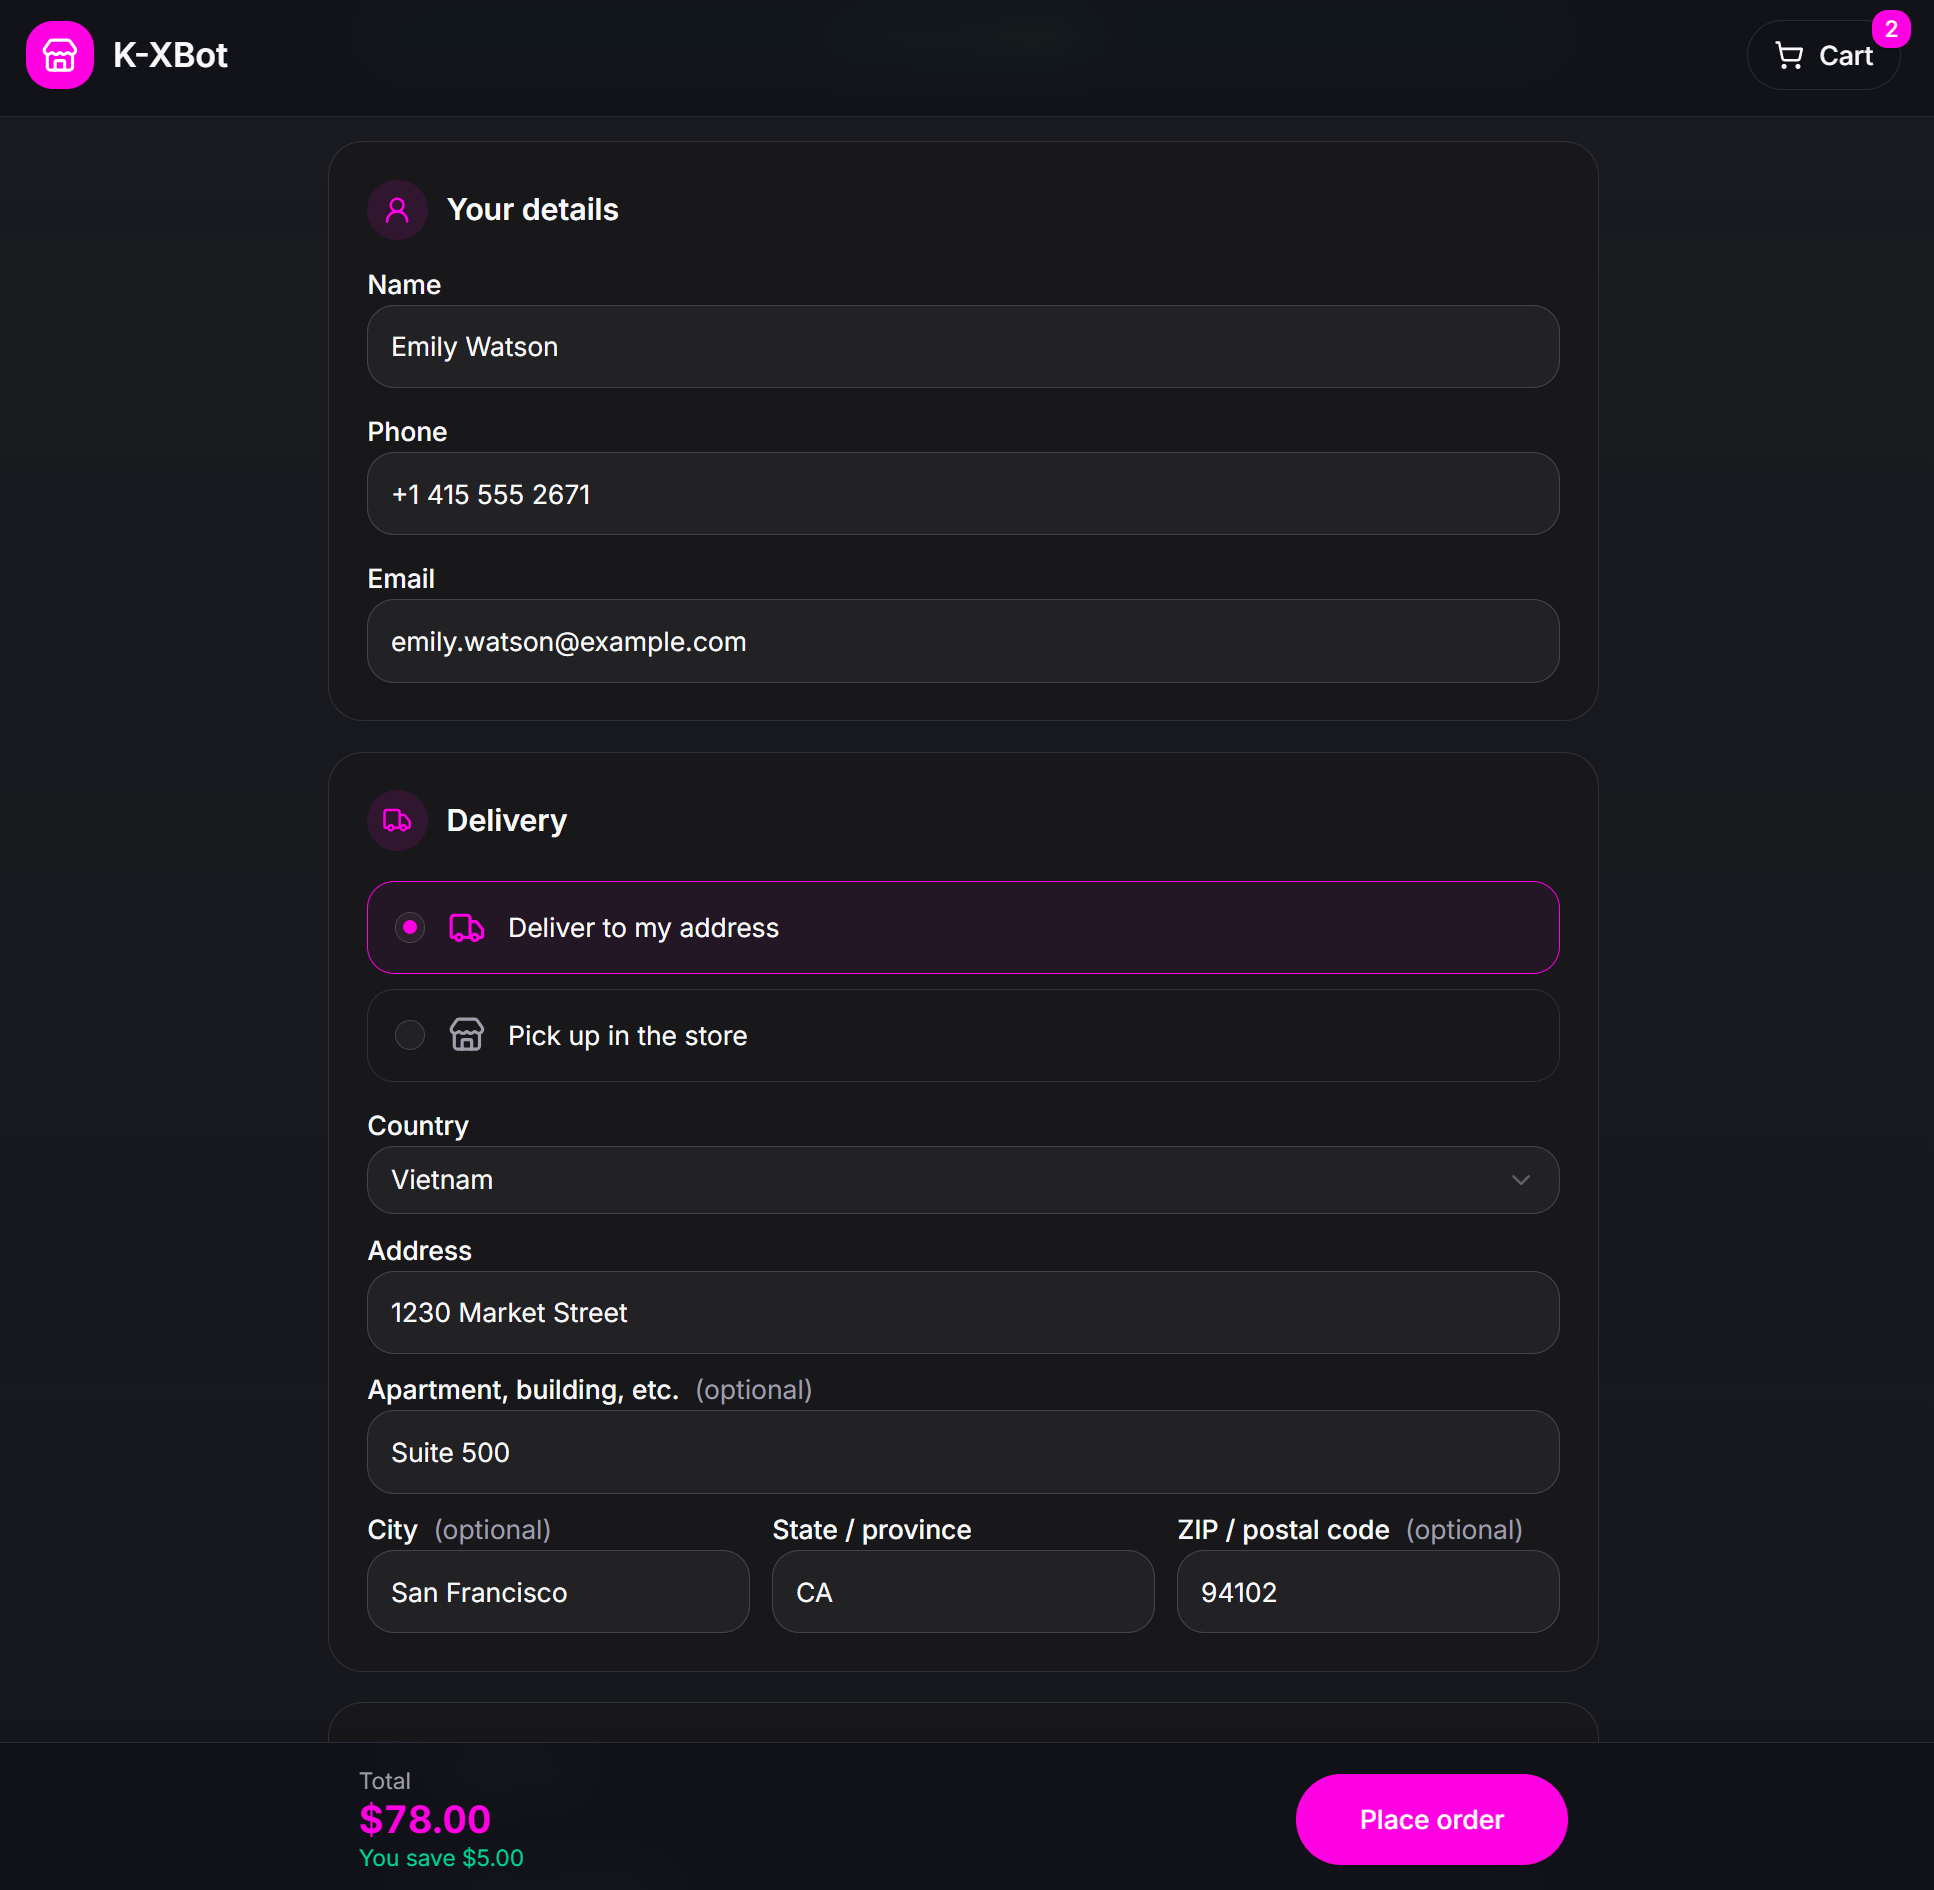
- Your details: Enter recipient Name, Phone, and Email.
- Delivery: Select Deliver to my address or Pick up in the store, then fill in Country, street Address, Apartment, building, etc., City, State / province, and ZIP / postal code.
- Verify the final total at the bottom bar and tap Place order to submit the order.
6
View Order Receipt on the Webview Confirmation Screen
Right after tapping Place order, the Webview transitions to the order confirmation receipt: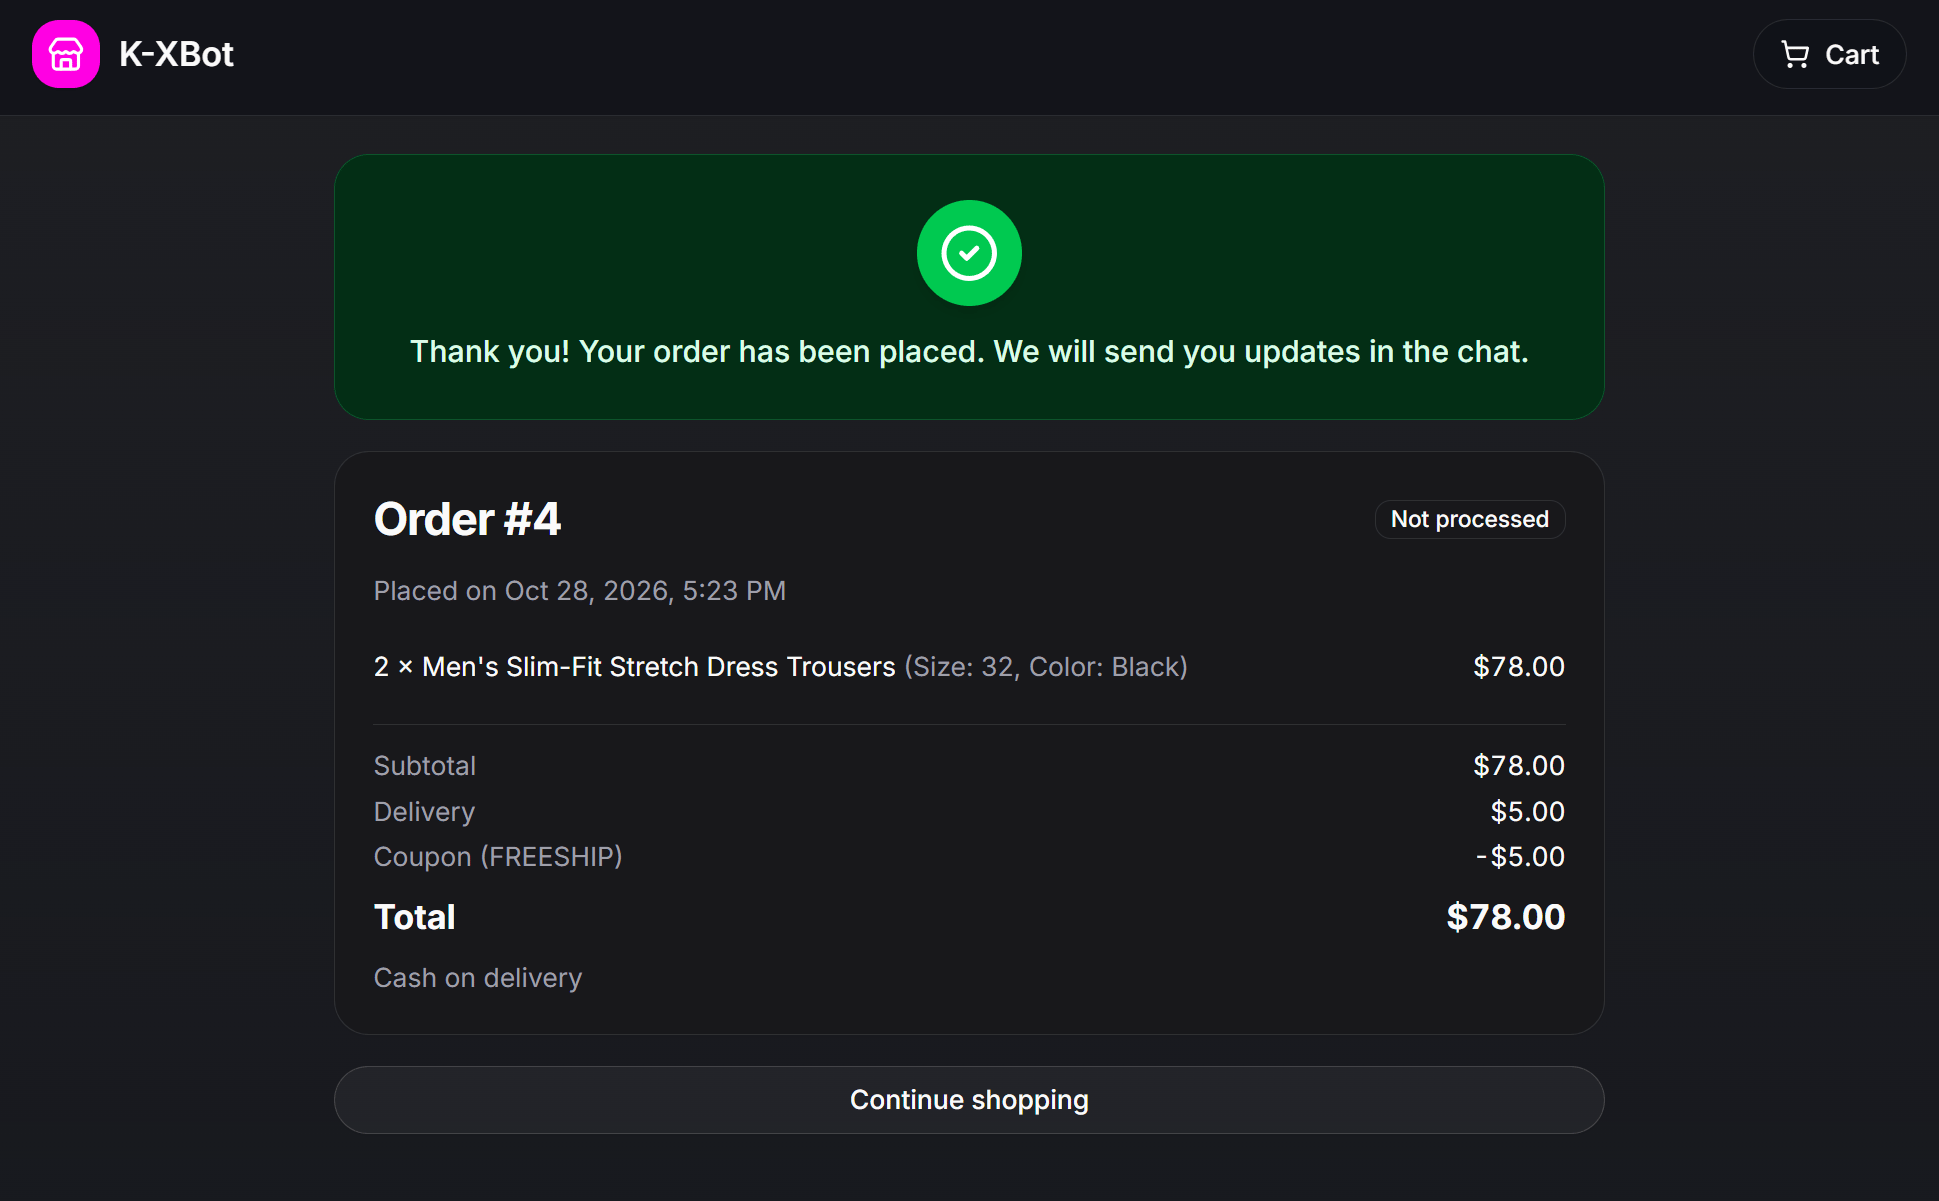
- Displays the confirmation banner with the assigned order ID (such as
Order #4), placement timestamp, and initial status (Not processed). - Summarizes ordered items, selected variants, quantities,
Subtotal,Deliveryfee, appliedCoupon, finalTotal, and payment method (Cash on delivery). - Buyers can tap Continue shopping to browse more items or close the Webview to return to the chat.
7
Receive Automatic Order Confirmation in Messenger
Simultaneously, ChatbotX sends the automatic order confirmation message directly into the buyer’s Messenger conversation: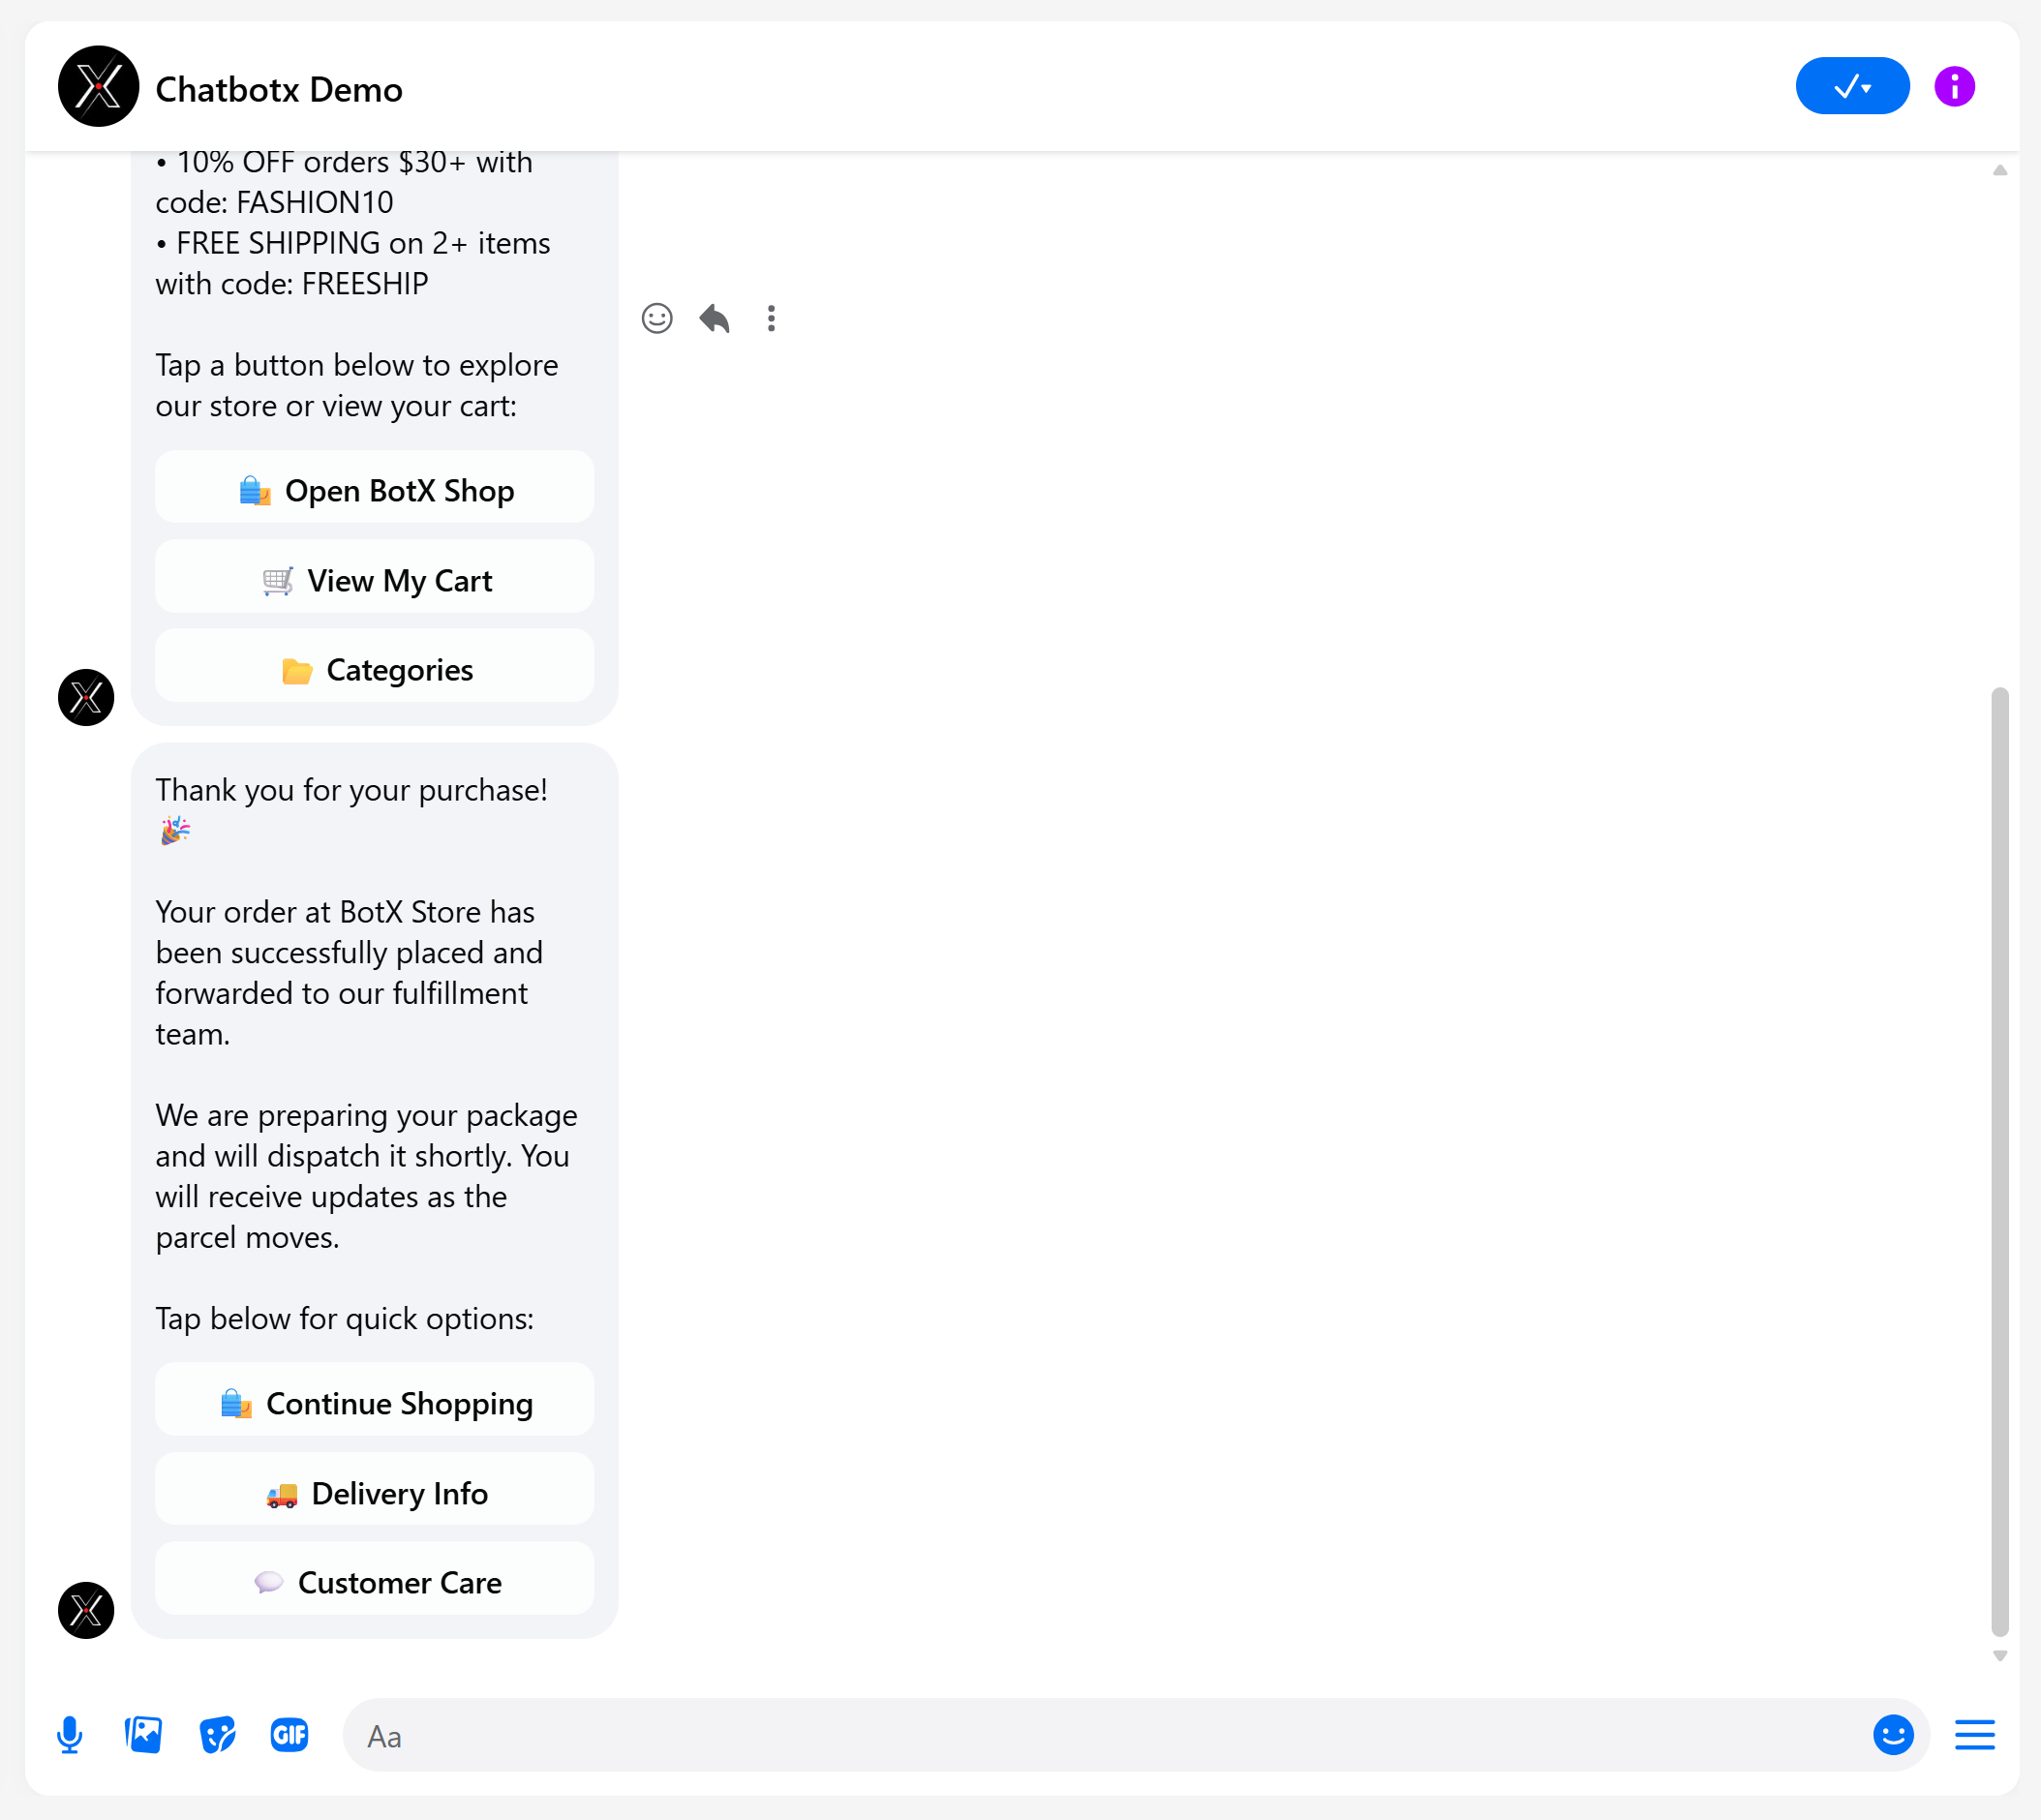
- Confirms that the order at the store has been placed and forwarded to the fulfillment team.
- Provides interactive buttons (Continue Shopping, Delivery Info, Customer Care) so the customer can track delivery details or request support anytime.
8
Order Synchronizes to the Admin Orders Dashboard
In your ChatbotX admin dashboard, the customer’s new order (for example, 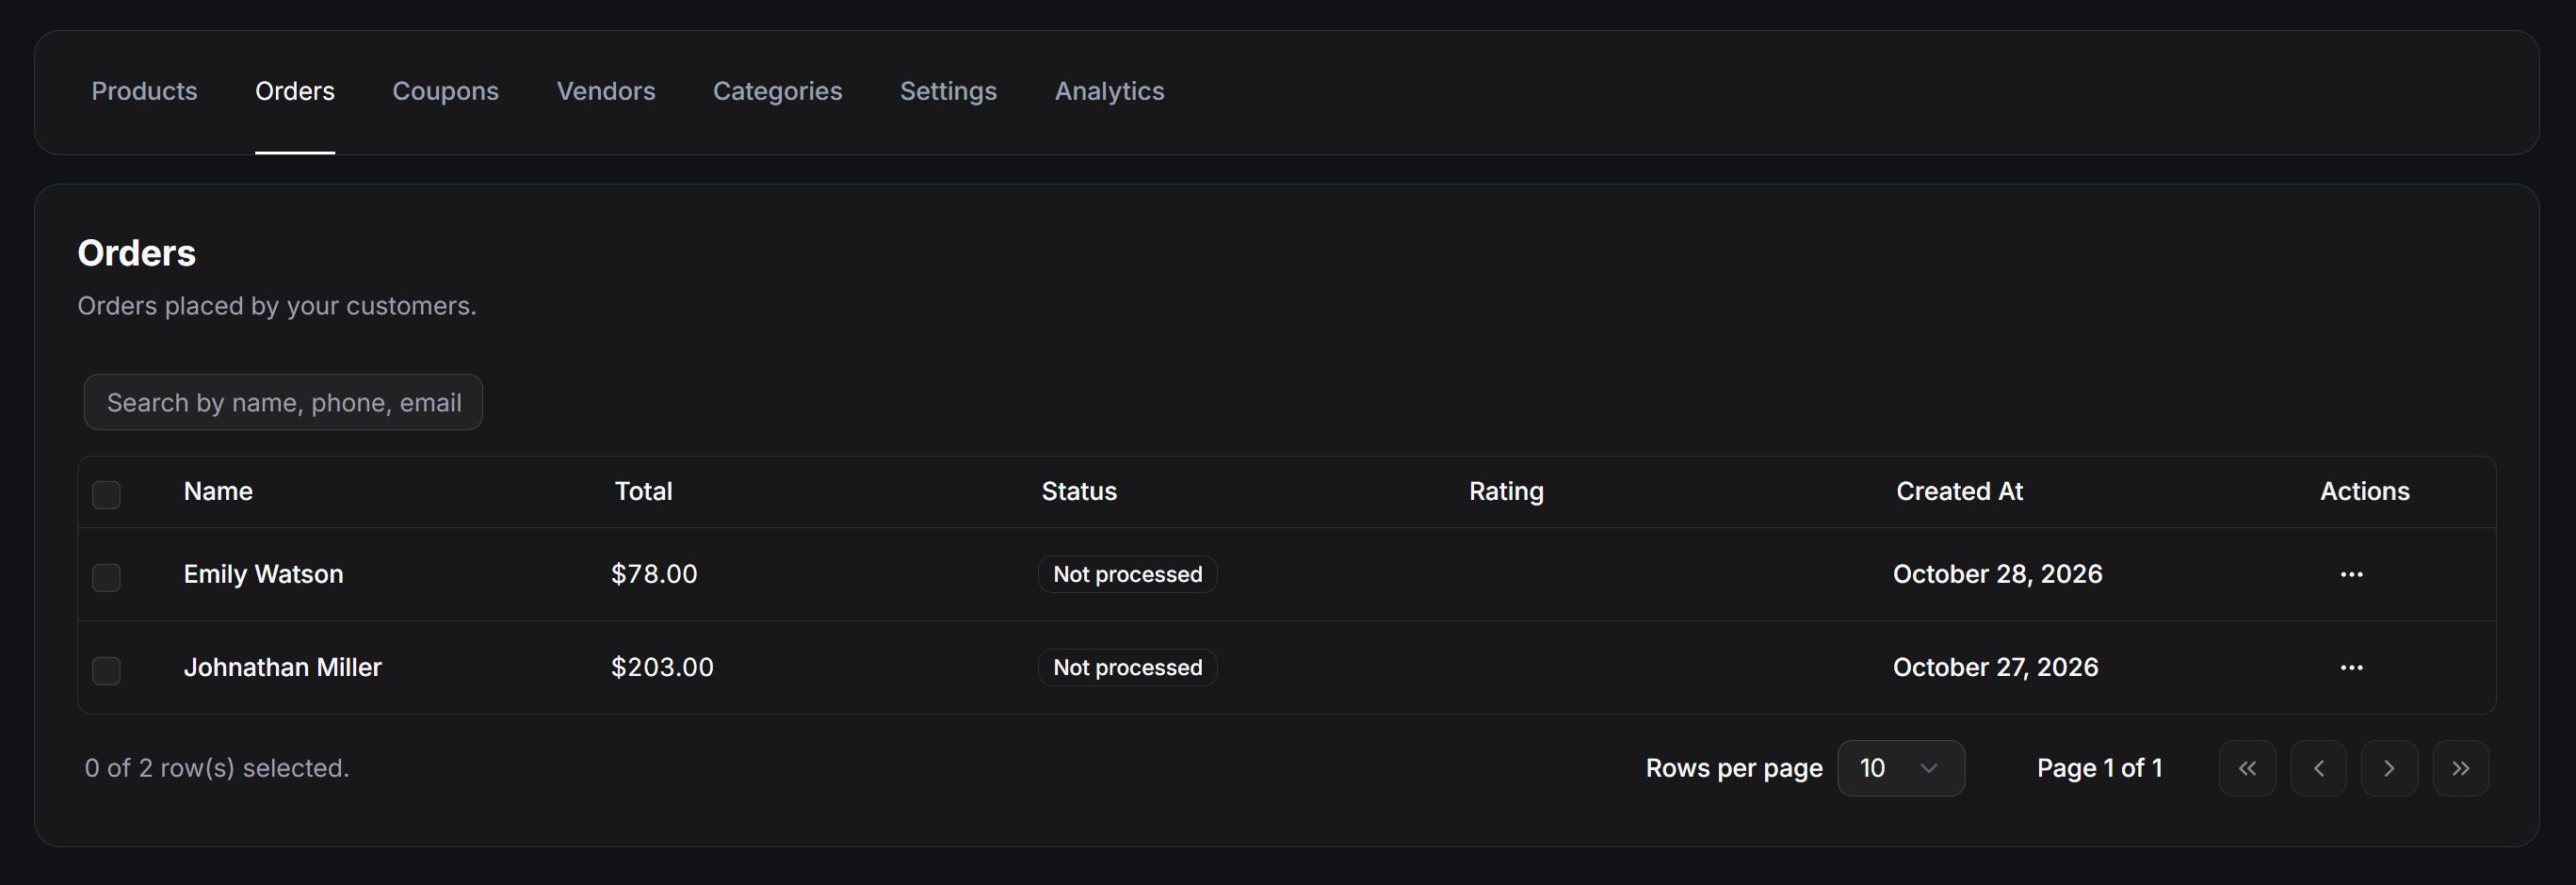
Emily Watson with a total of $78.00 and status Not processed) is immediately recorded under Tools > Ecommerce > Orders. From here, your fulfillment team can view full order details, print packing slips, and update order status.