

Omnichannel Webview Storefront
Display product catalogs natively inside chat threads while automatically binding each shopping session to the active contact.
Flexible Checkout Modes
Use the built-in checkout page, redirect to an external checkout URL, or collect buyer details through conversational flows.
Abandoned Cart Recovery
Automatically send reminders or trigger follow-up flows when shoppers leave items unpurchased in their cart.
Ad Conversion Tracking
Integrate Facebook Pixel to track content views, add-to-cart actions, checkout initiations, and completed purchases.
Open the Ecommerce Tool
1
Navigate to Tools
From the left navigation sidebar in ChatbotX, select Tools.
2
Select Ecommerce
Click the Ecommerce card to open your store management dashboard.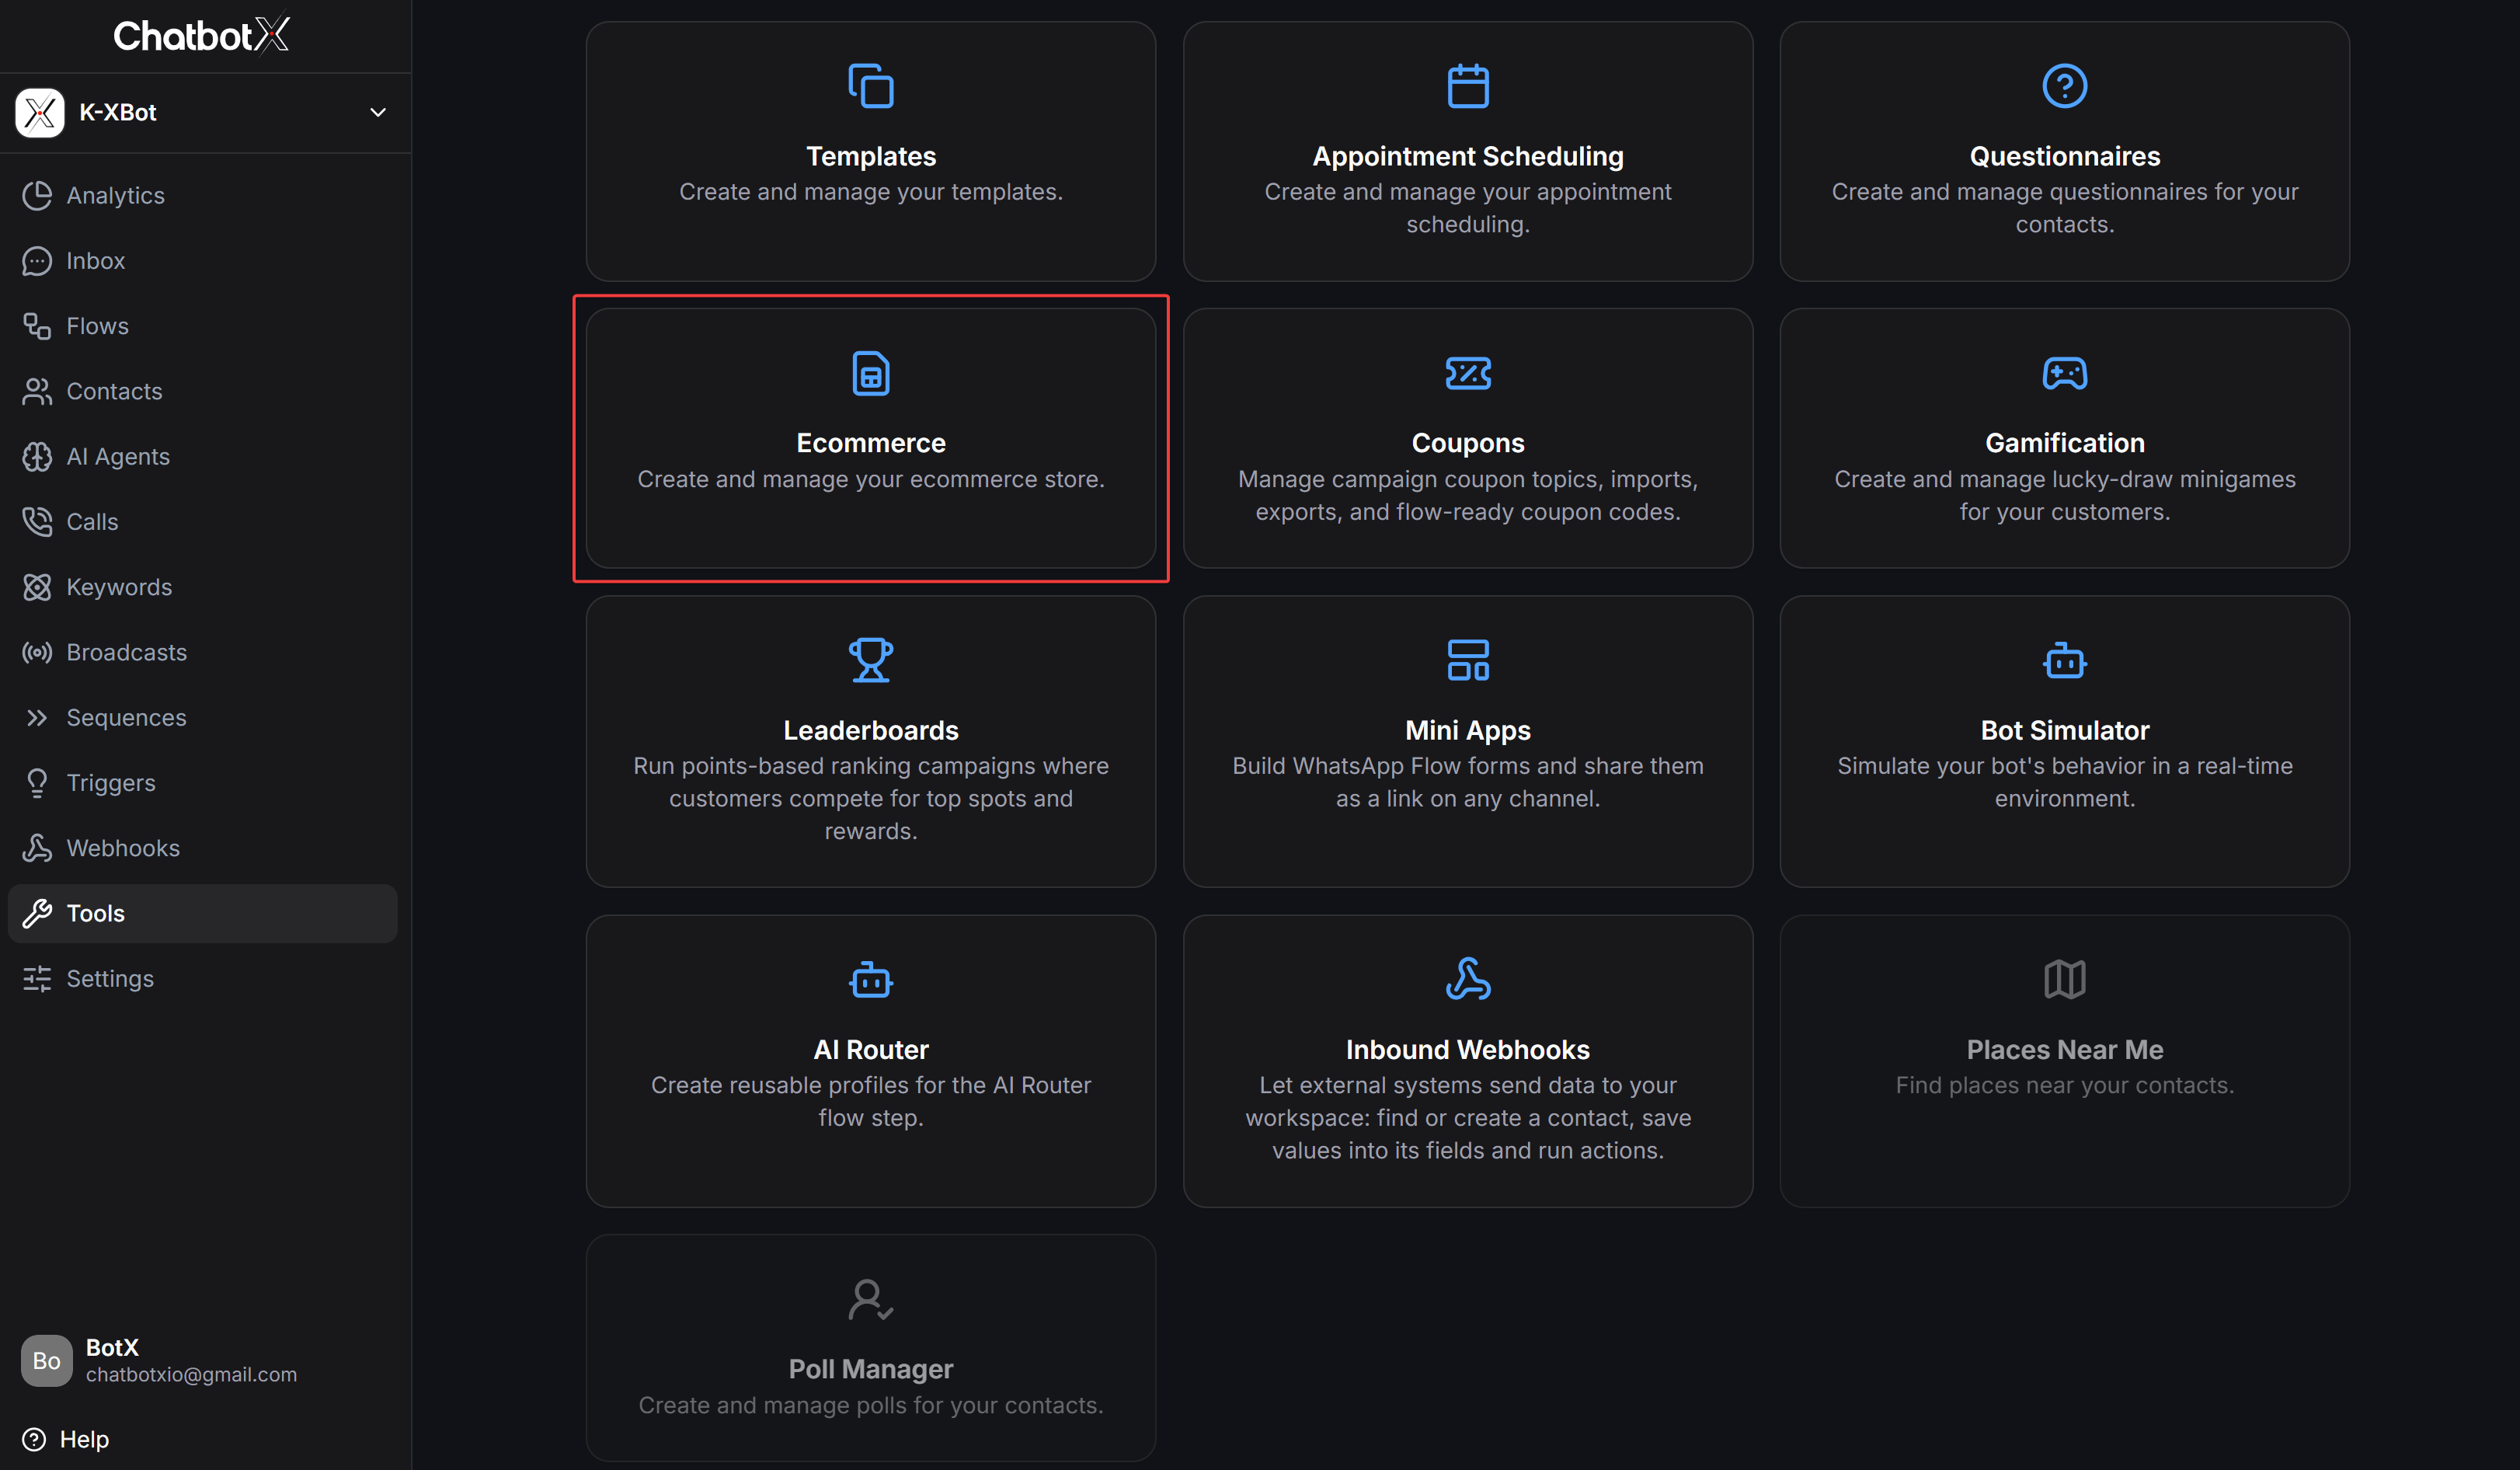
3
Choose a Management Section
The top navigation bar provides 7 management tabs:
- Products: Manage catalog items, pricing, inventory, variants, and Meta Catalog synchronization.
- Orders: Search, approve, print packing slips, and update order fulfillment statuses.
- Coupons: Create percentage, fixed-amount, or free-delivery discount codes.
- Vendors: Organize products by brand or supplier.
- Categories: Structure product categories and subcategories.
- Settings: Configure operational rules, currencies, shipping fees, and checkout behavior.
- Analytics: Monitor lifetime revenue, order volume trends, and top-performing products.
General Settings
Switch to the Settings tab and select General in the left menu to configure core storefront display and operational behaviors.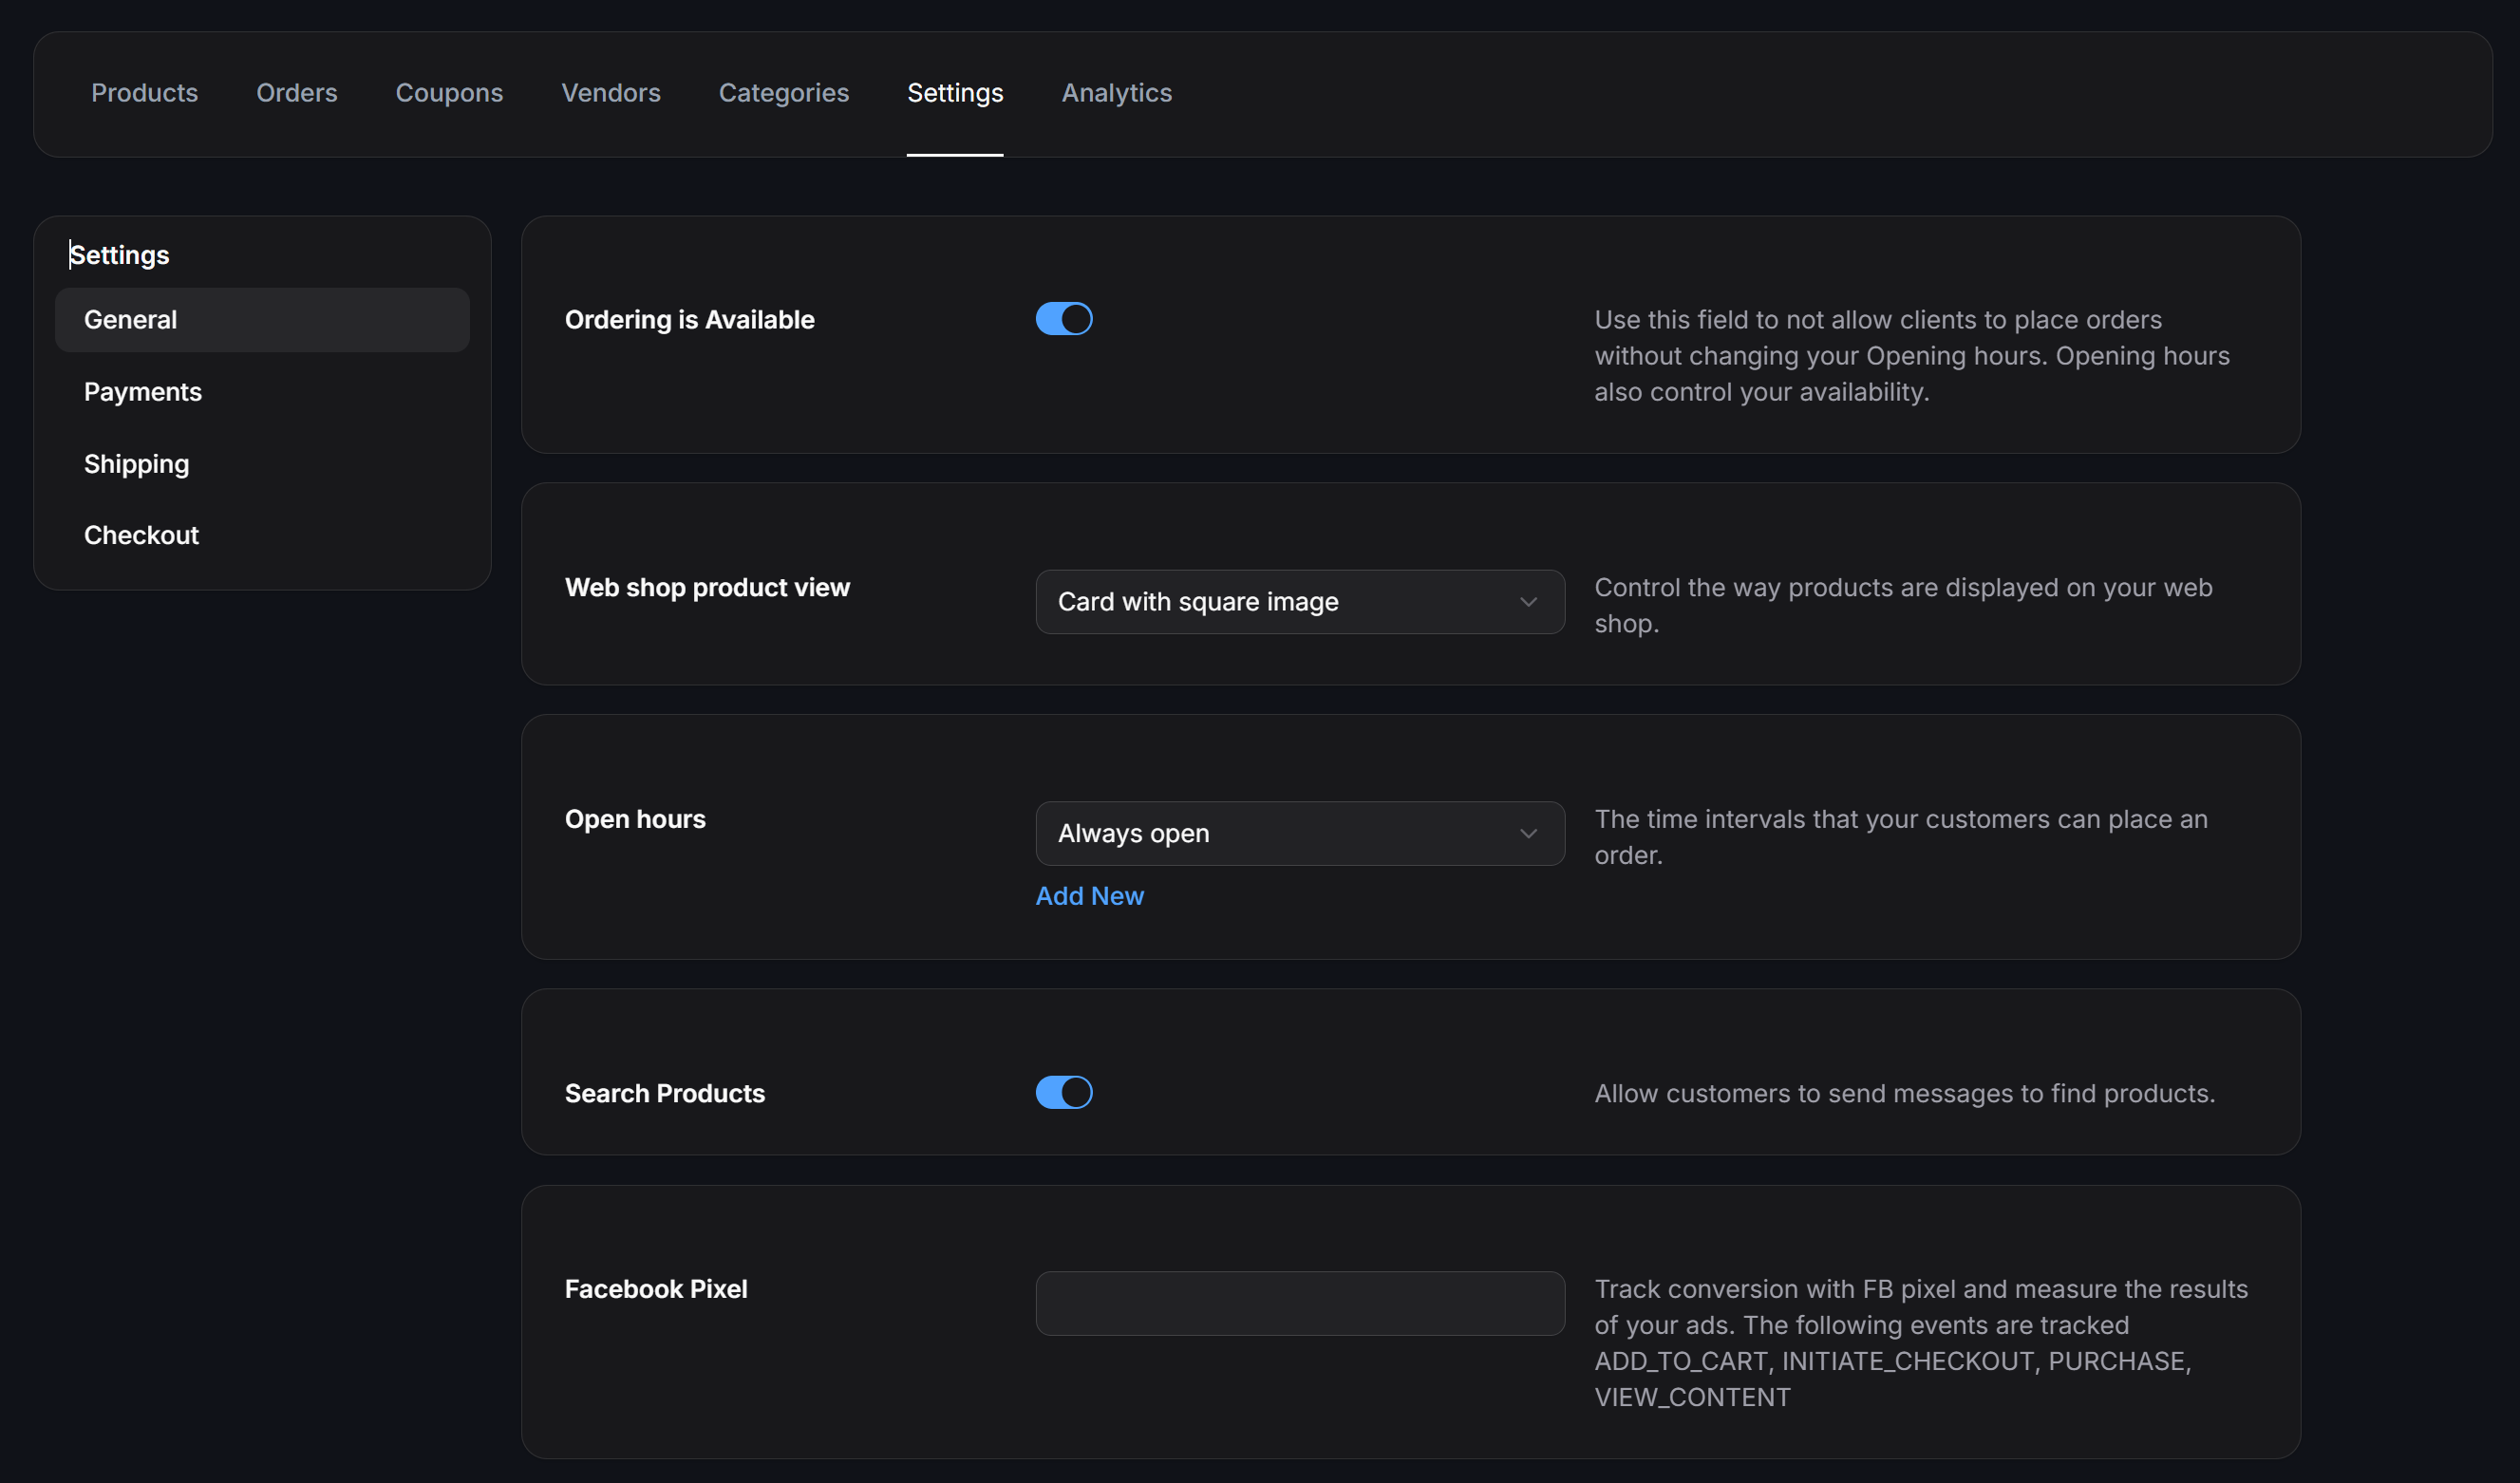
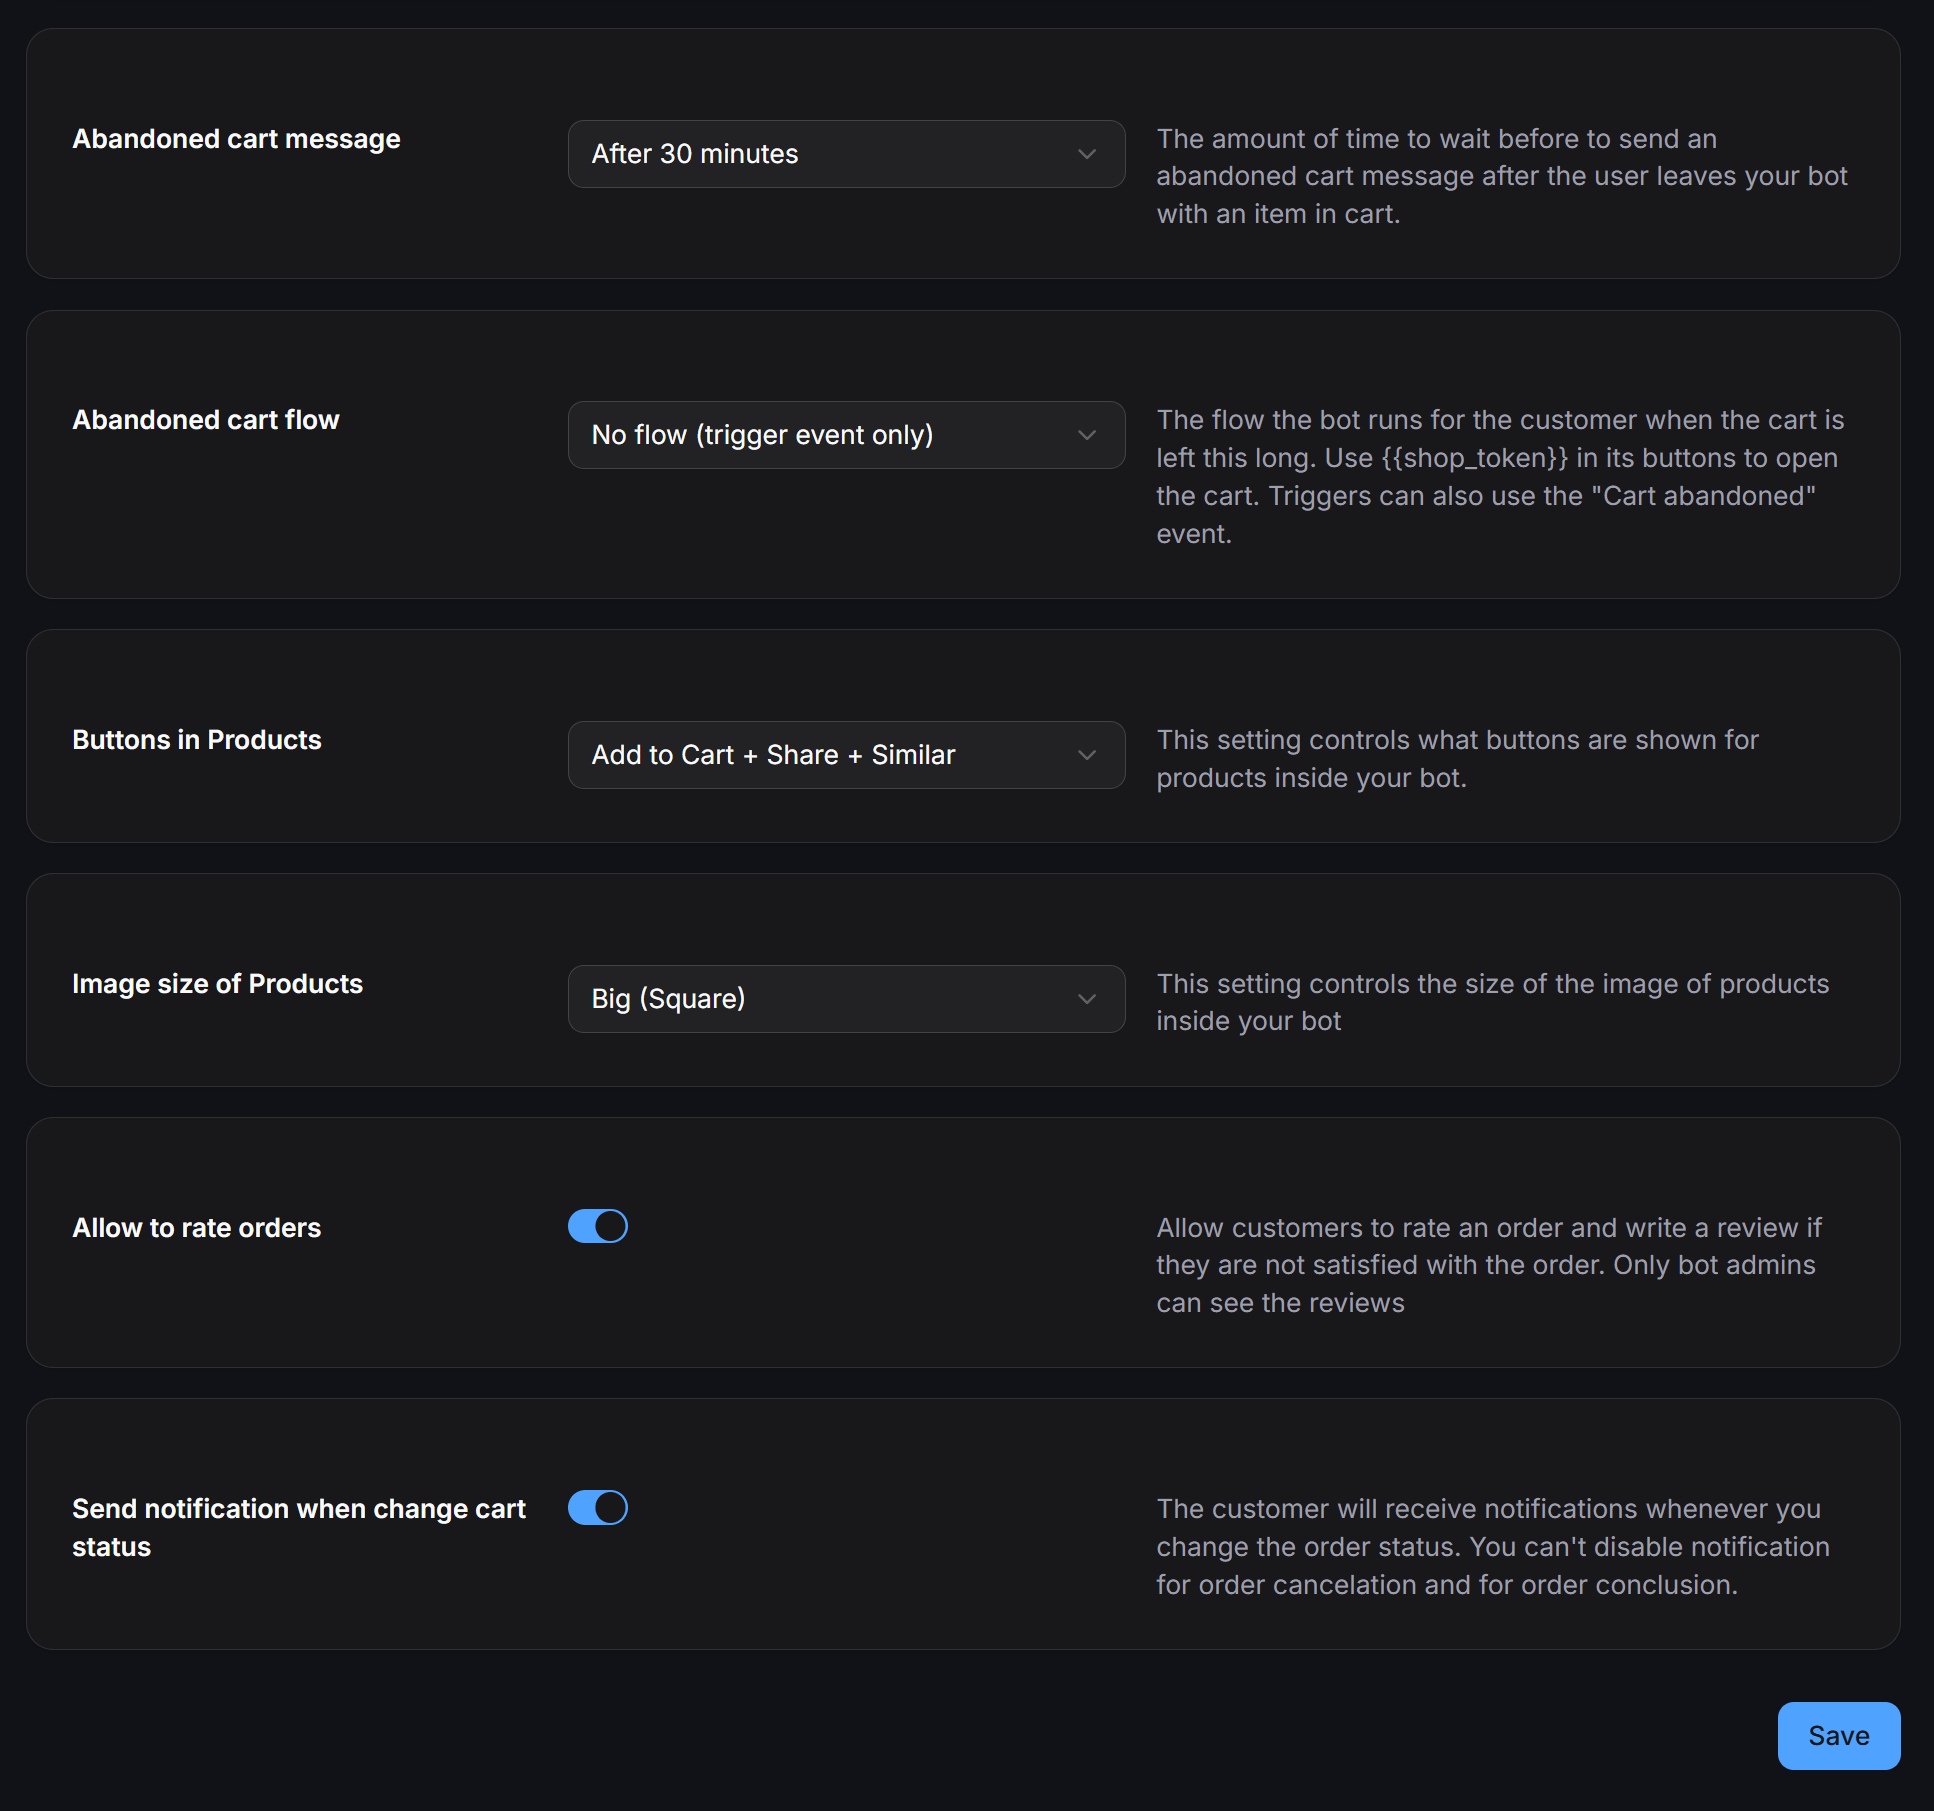
Scroll down to the lower section of General to configure cart recovery and status notifications:
Payment and Currency Settings
In the Settings tab, select Payments on the left sidebar to configure accepted payment methods and currency formatting.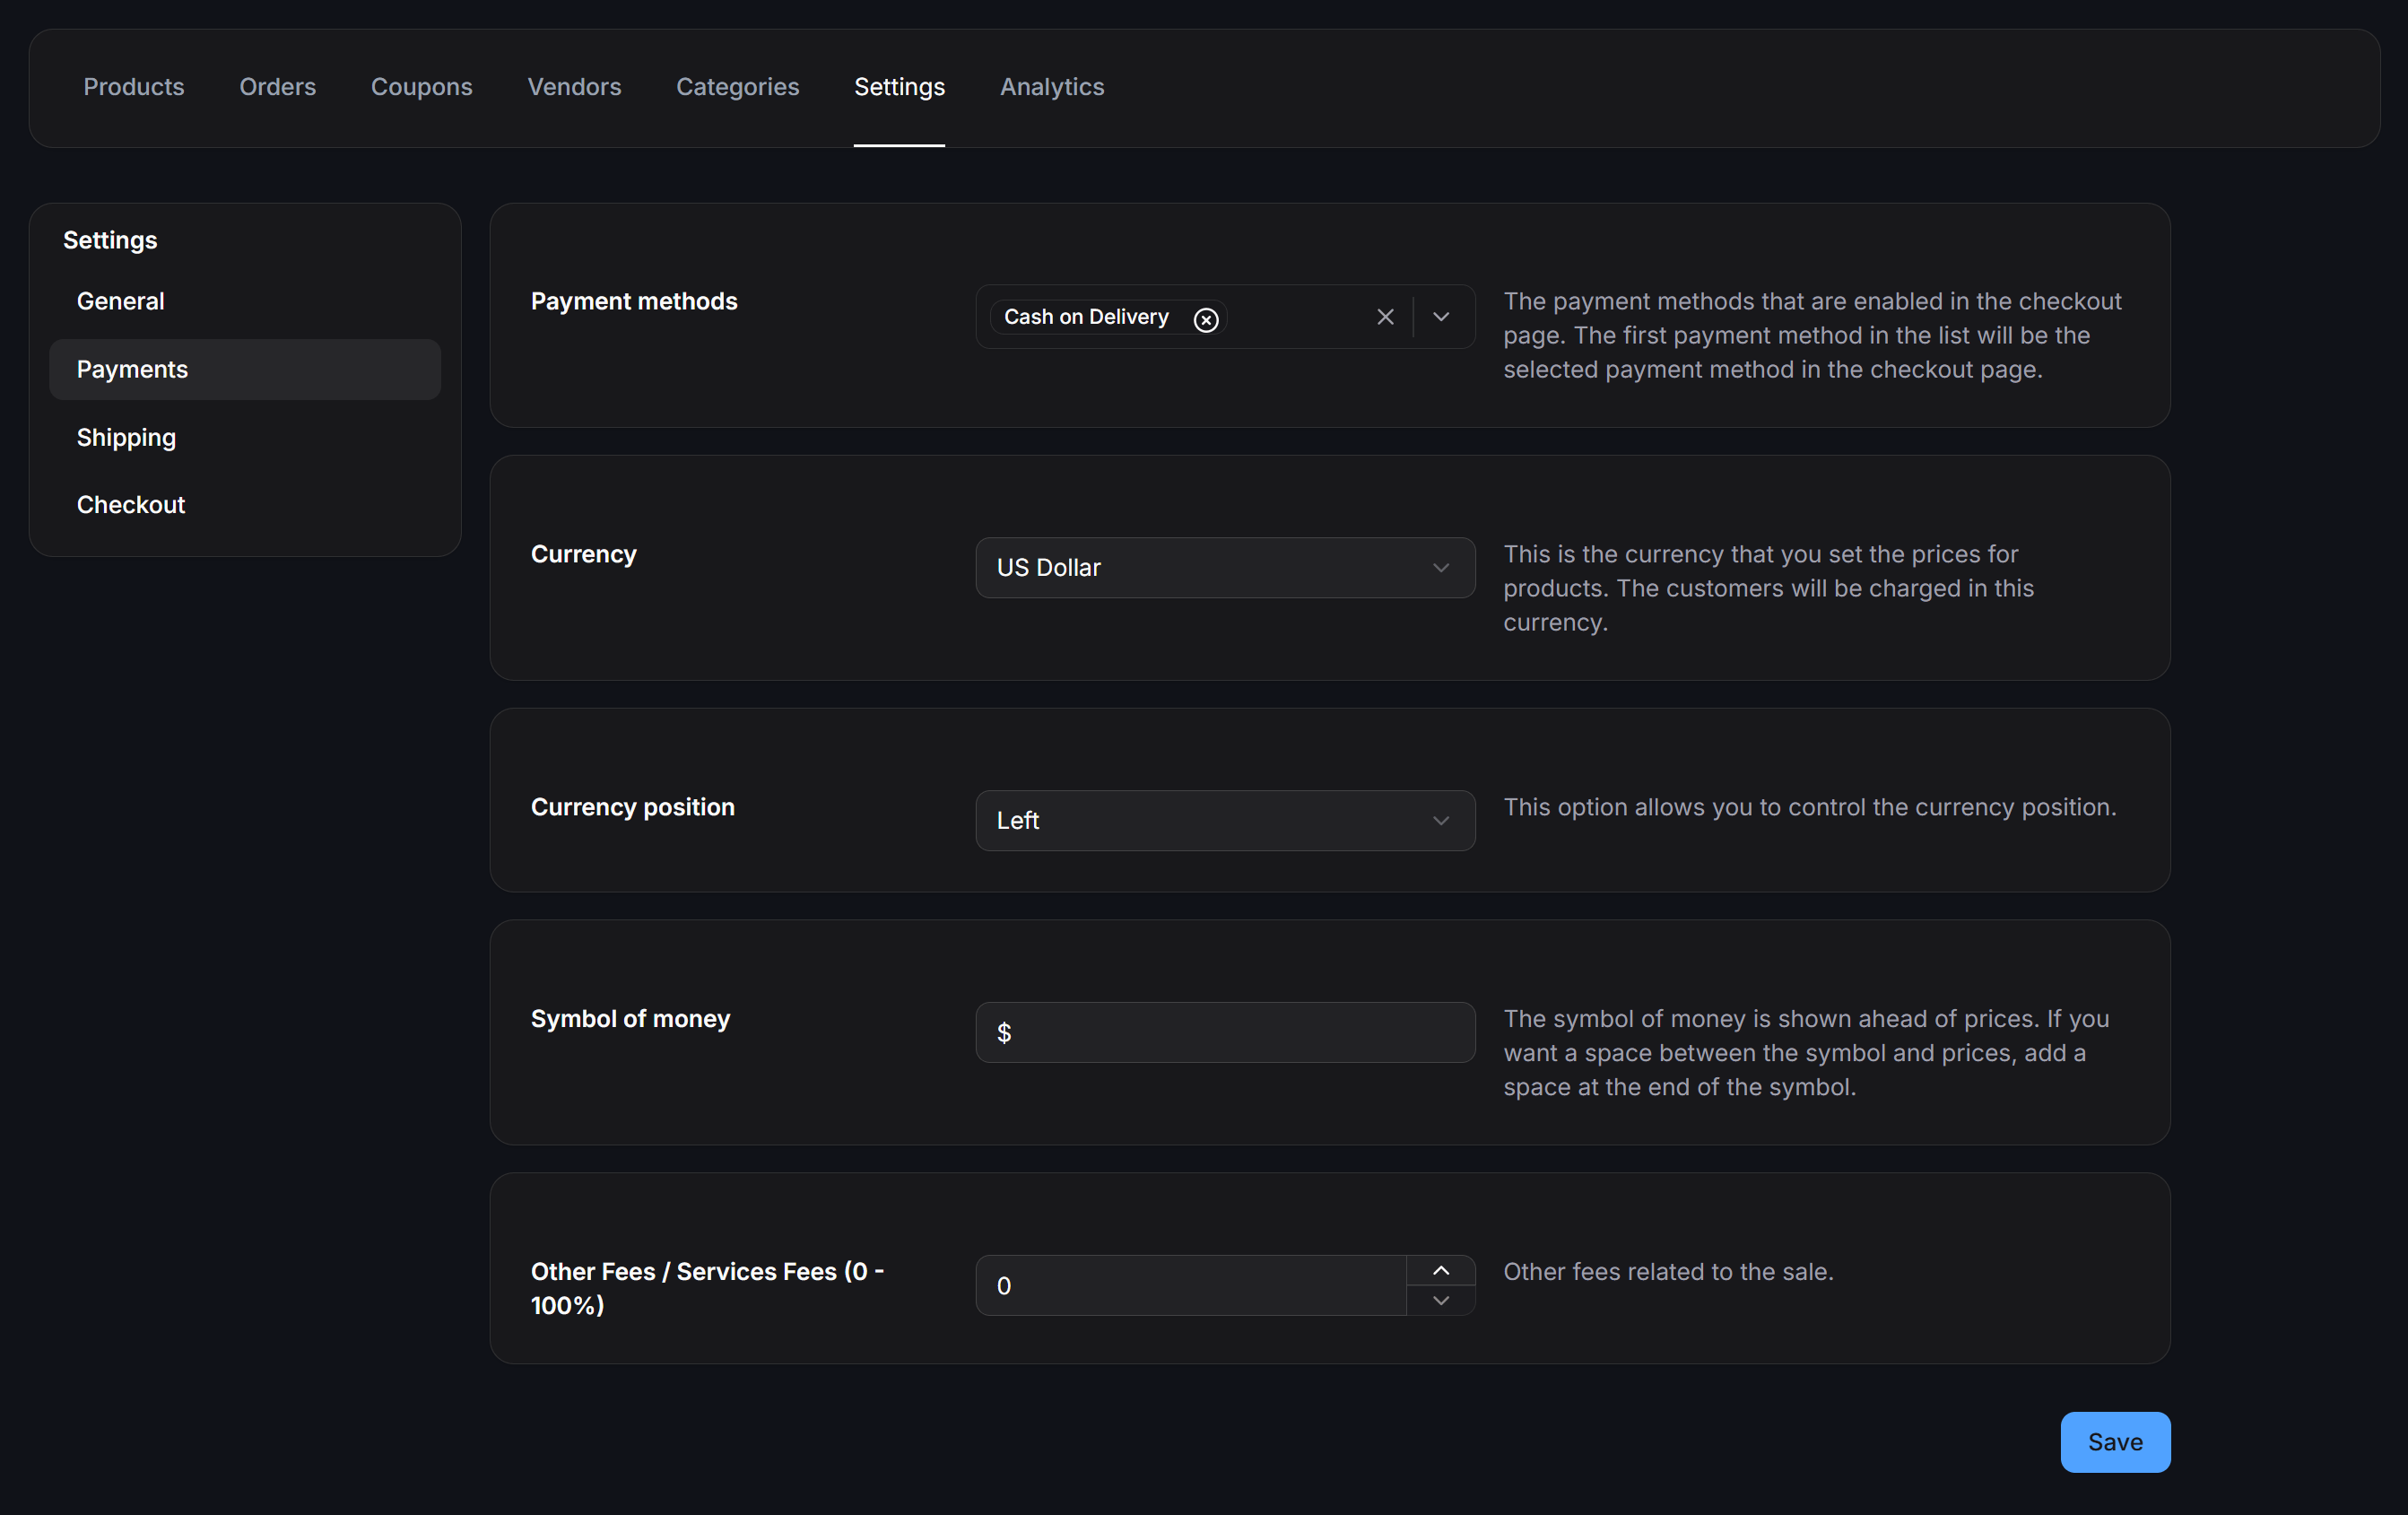
- Payment methods: Select the payment options enabled at checkout:
- Cash on Delivery: Collect cash payment from the buyer upon order delivery.
- PayPal: Accept online payments via PayPal digital wallet balances and linked cards.
- Card (Stripe): Accept credit and debit card payments securely processed by Stripe. (The first payment method in your selection list is automatically pre-selected as the default option at checkout).
- Currency: Choose the standard currency used to price items and calculate order totals.
- Currency position: Place the currency symbol to the Left or Right of the numeric amount.
- Symbol of money: Enter the currency symbol shown next to prices. You can include a trailing or leading space to separate the symbol from the price.
- Other Fees / Services Fees: Specify an optional percentage surcharge or service fee added to orders (
0%to100%).
Integrating PayPal Payments
Step-by-step instructions to connect Client ID and Secret credentials, activate PayPal payments, and monitor order settlement.
Integrating Stripe Payments
Comprehensive setup guide to connect your Stripe Secret Key, enable global card payments, and track payout statuses.
Shipping and Delivery Settings
Select Shipping under Settings to configure fulfillment methods, supported destination countries, and delivery fees.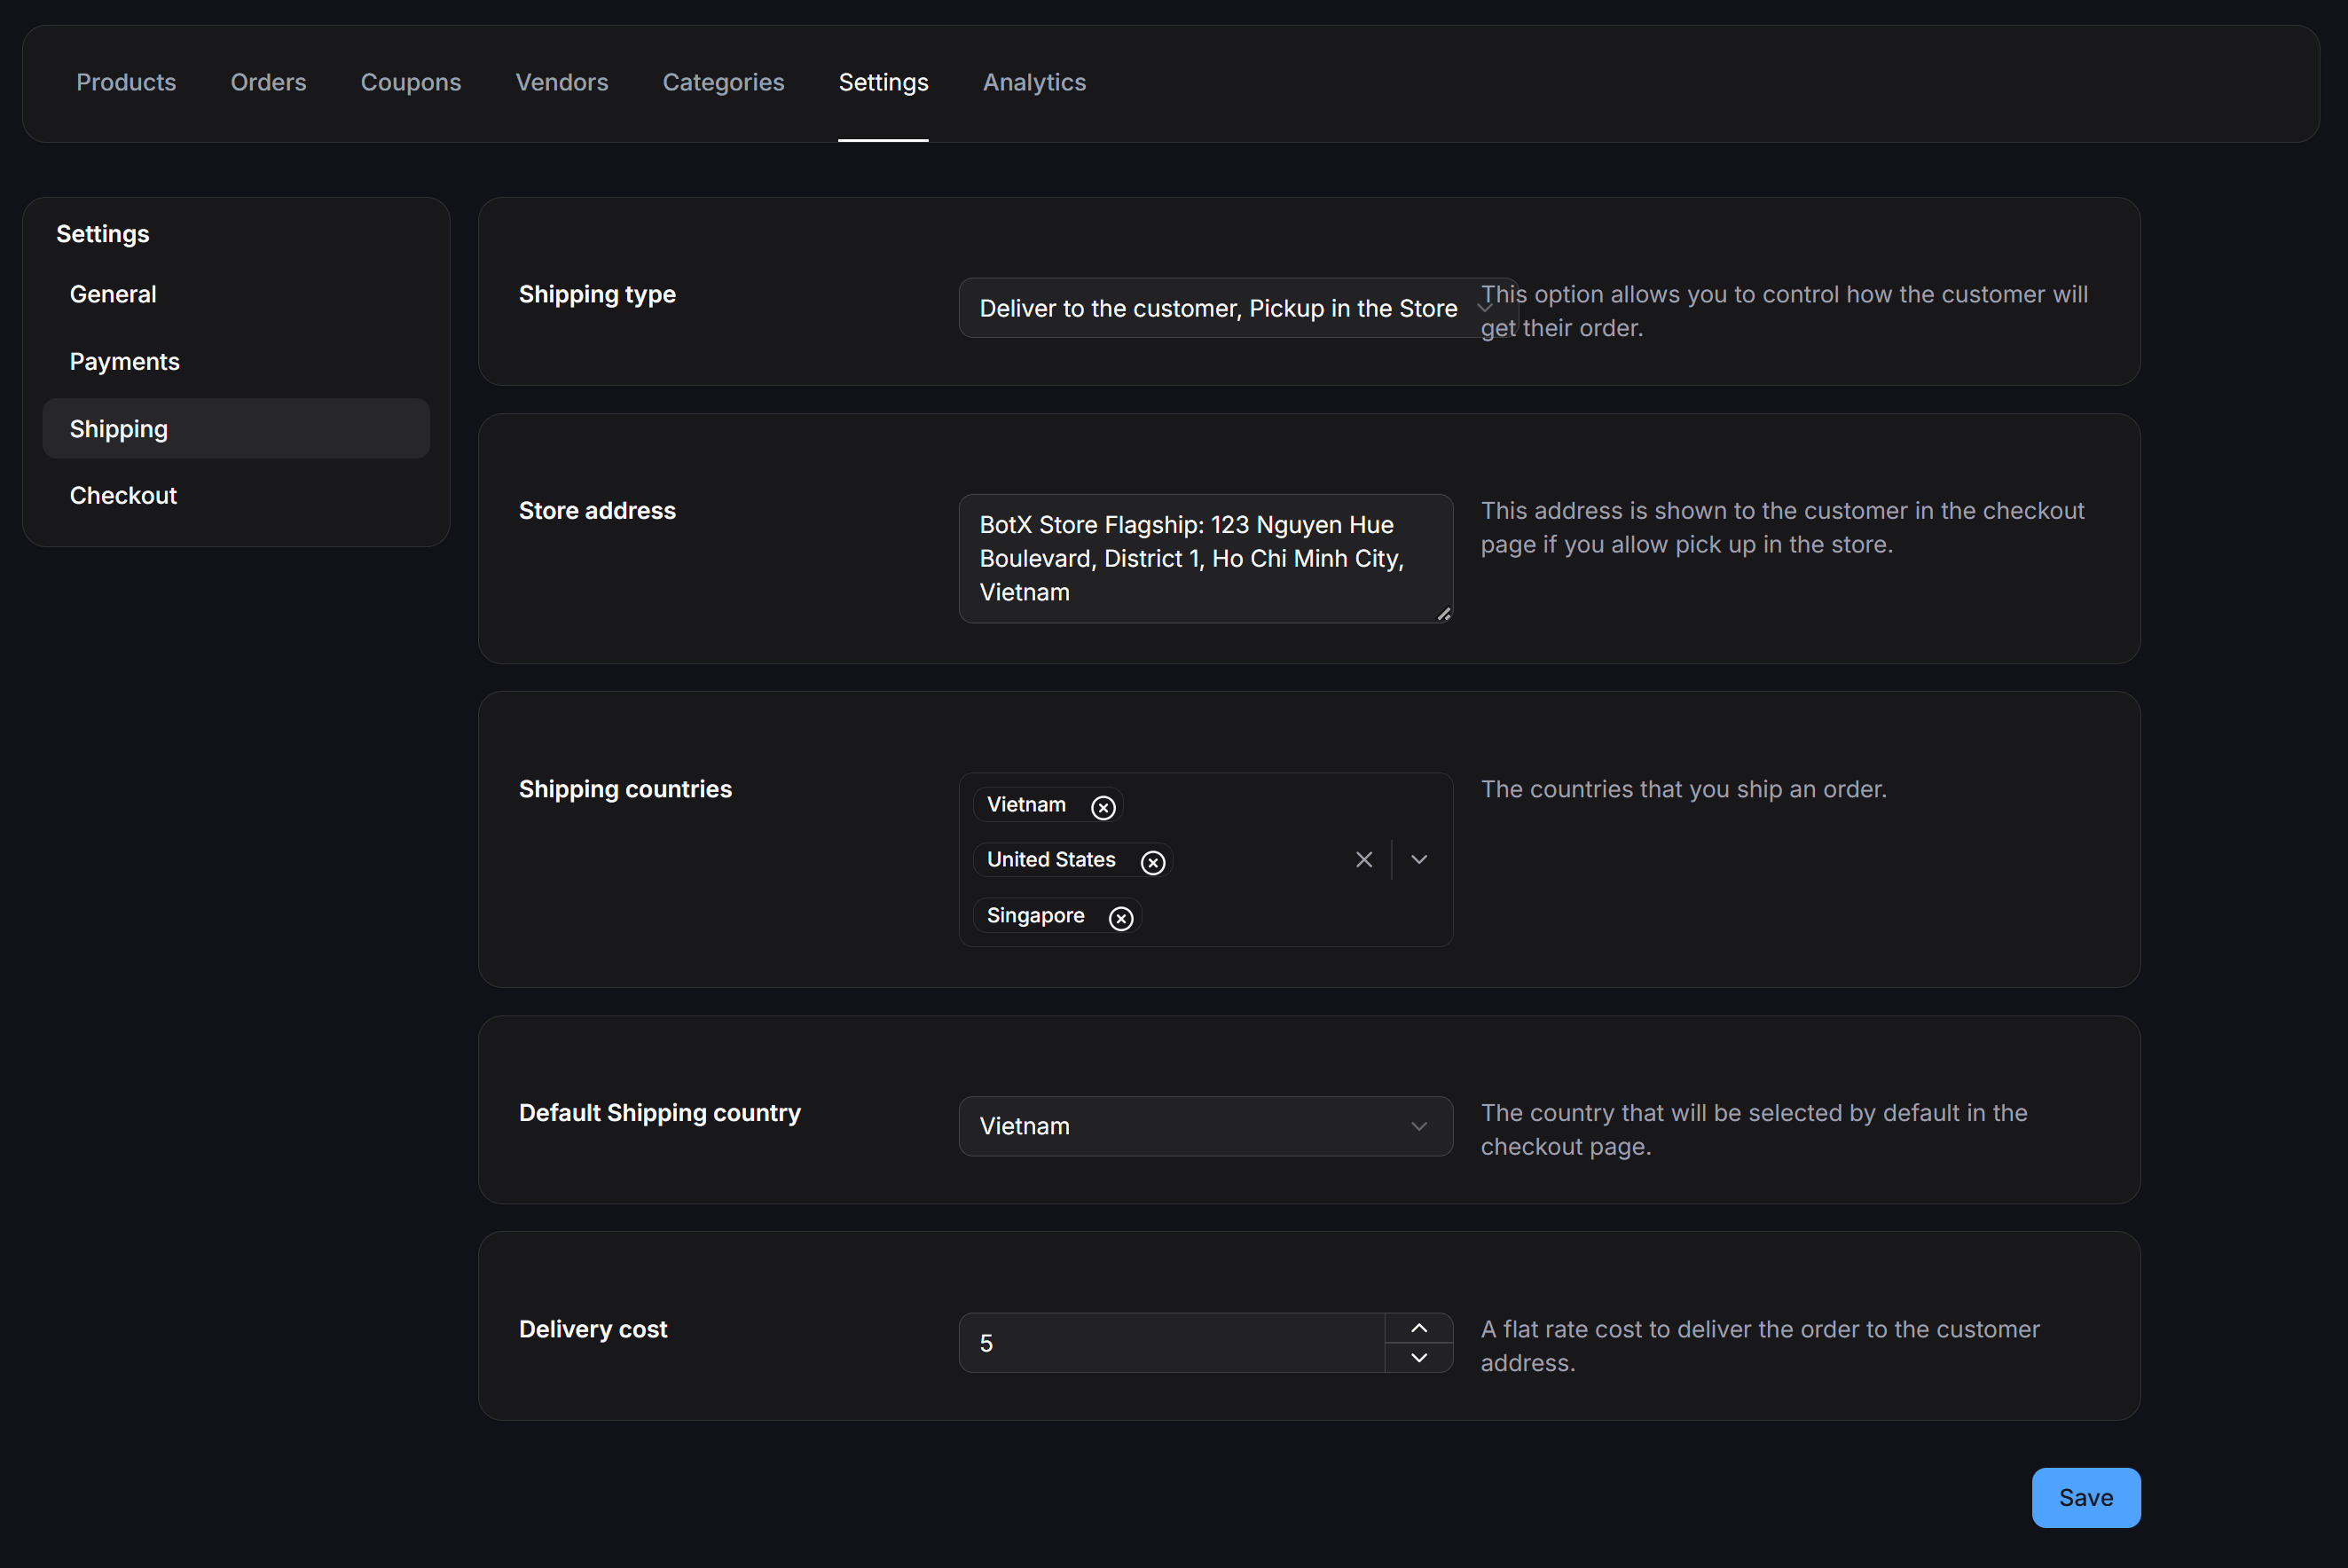
- Shipping type: Choose how customers receive their orders. Enable Deliver to customer, Pickup in Store, or both so buyers can select their preferred option at checkout.
- Store address: Enter your physical store or warehouse address. This address is displayed during checkout when a customer chooses in-store pickup.
- Shipping countries: Select all countries where your store delivers orders.
- Default Shipping country: Choose the country pre-selected by default on the checkout address form.
- Delivery cost: Enter the flat-rate shipping fee added to delivery orders.
To offer free shipping on orders that meet a minimum purchase threshold, create a free-delivery coupon in the Coupons tab and enable automatic cart application.
Checkout and Order Confirmation Settings
Select Checkout under Settings to define where customers finalize their orders and which buyer fields are mandatory.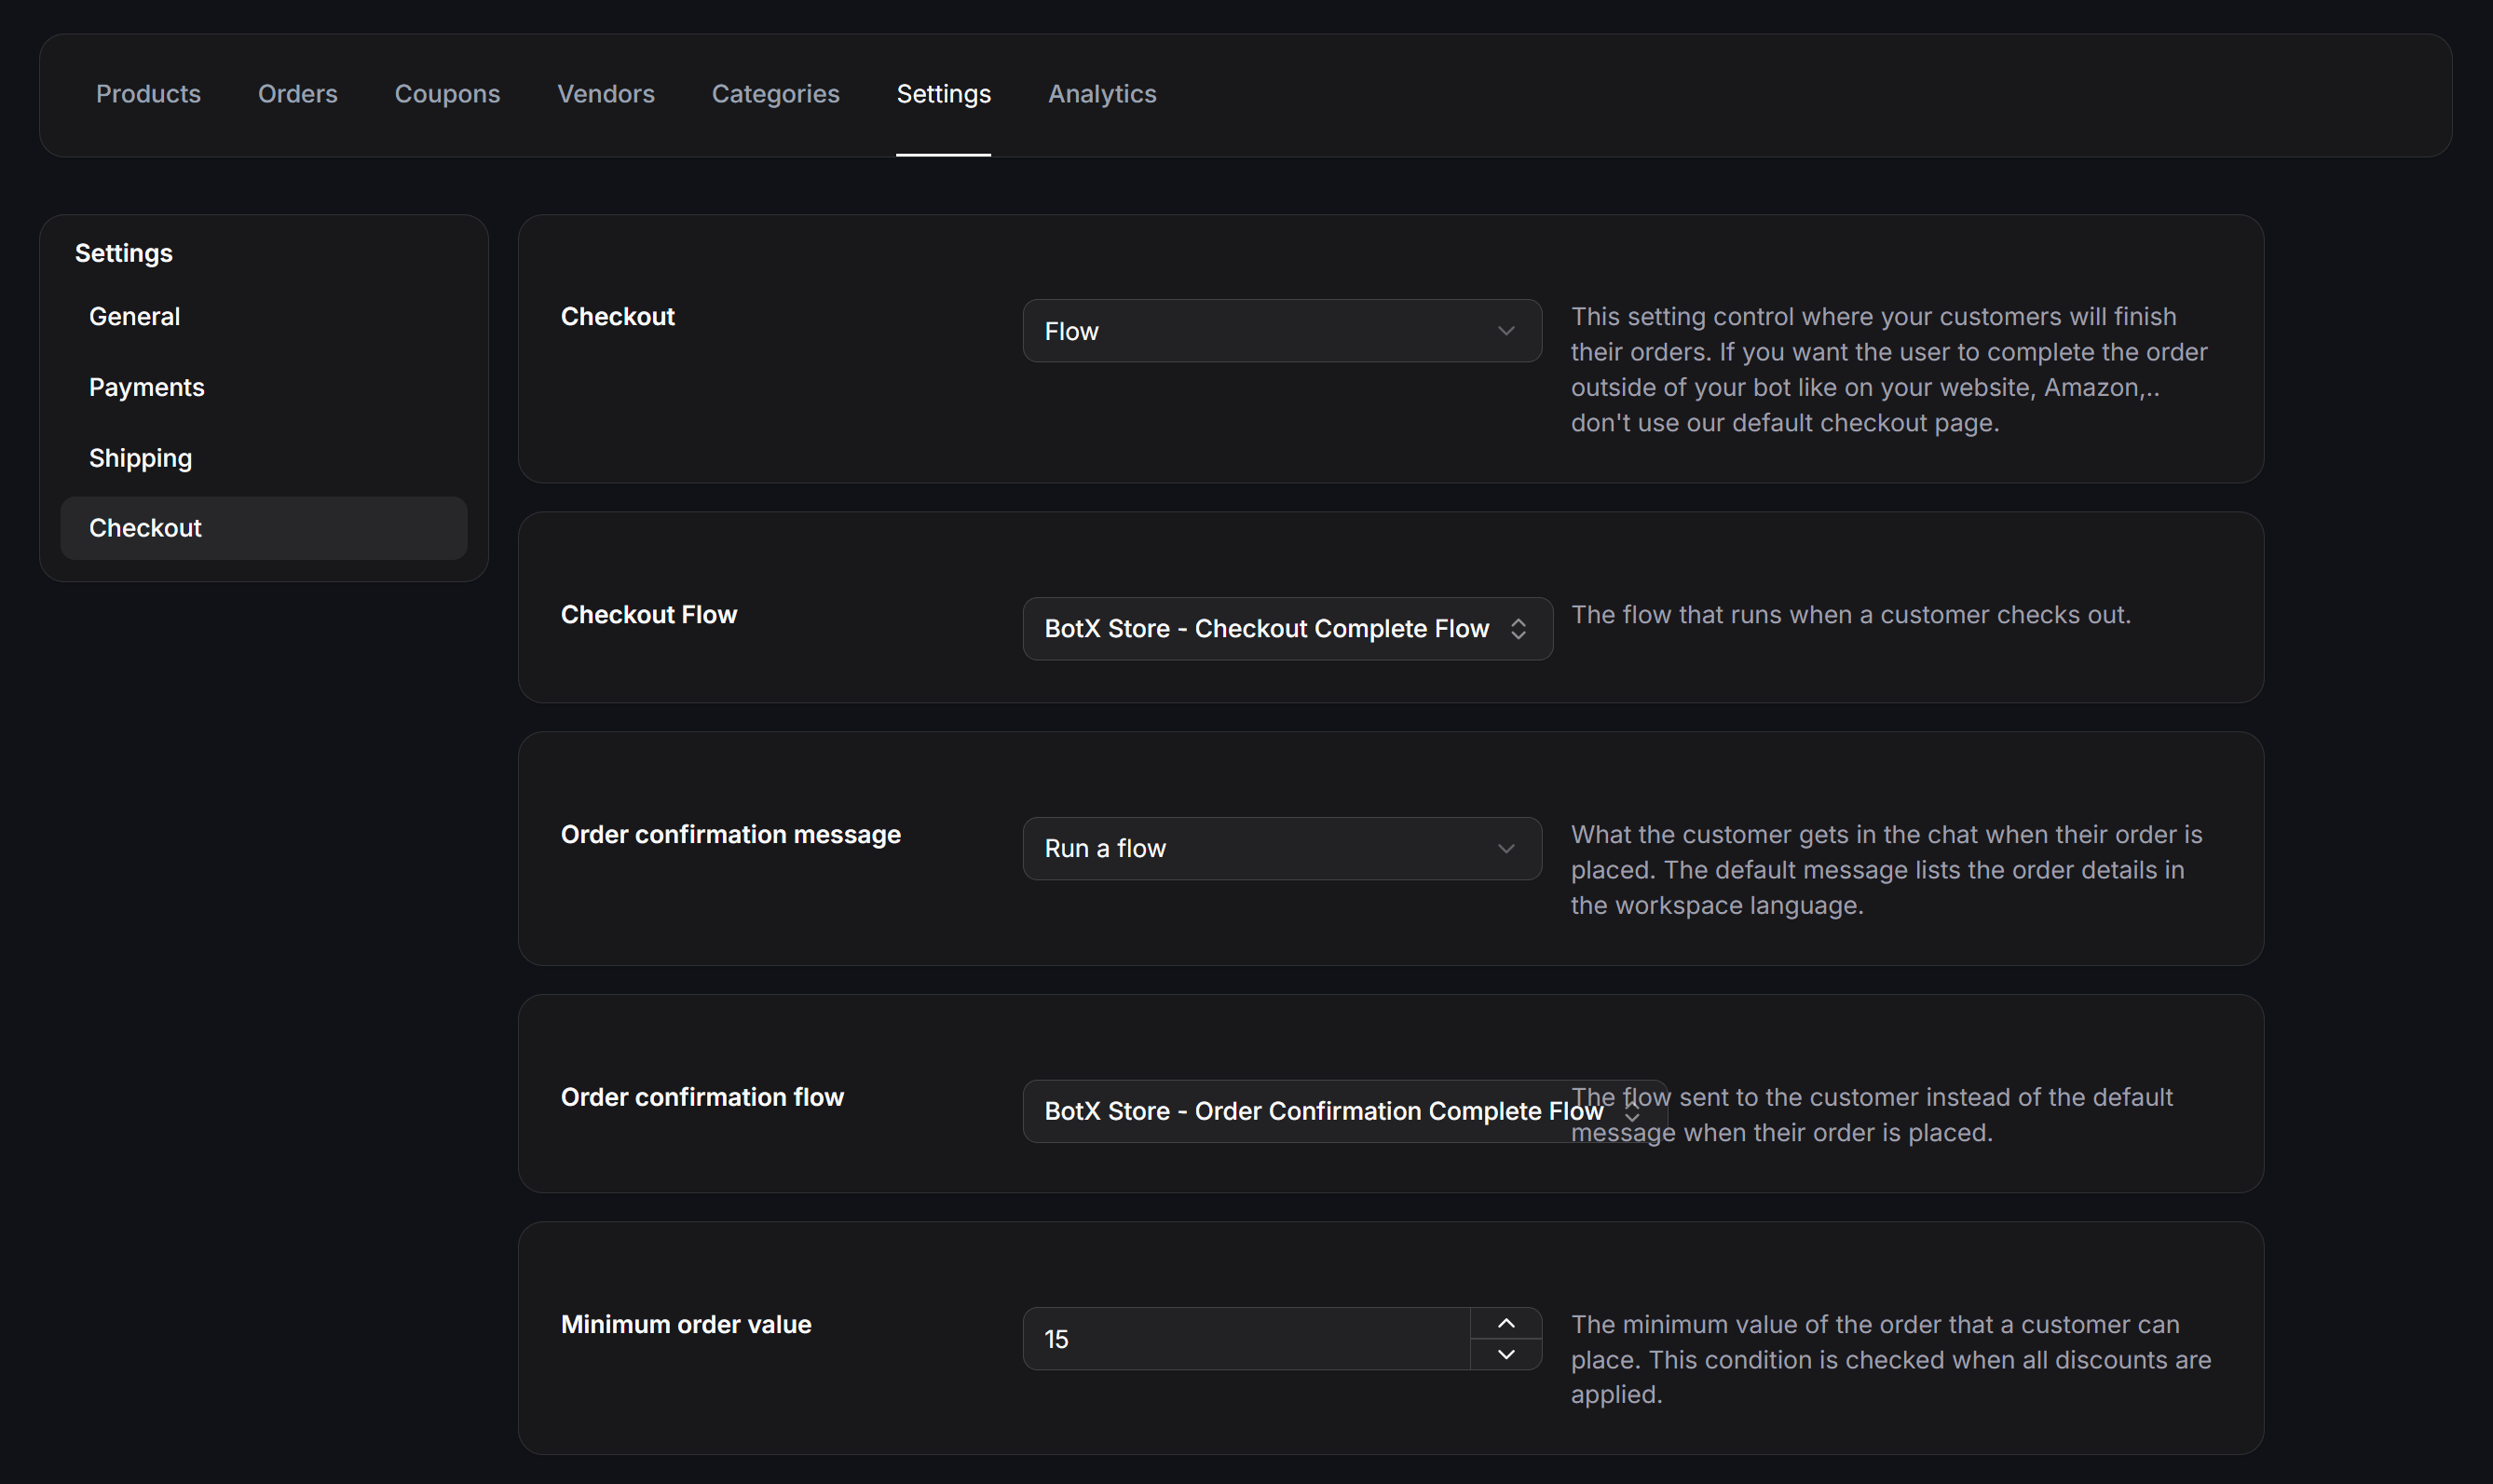
Checkout Modes
The Checkout dropdown offers 4 ways for buyers to complete their orders:Order Confirmation Message Modes
The Order confirmation message setting controls what the customer receives in chat once their order is placed:- Default message: Automatically sends a built-in receipt listing the order ID, buyer details, itemized products, and total amount in the workspace language.
- Run a flow: Runs the custom flow selected in Order confirmation flow instead of the default receipt.
- Don’t send anything: Suppresses automated confirmation messages when an order is placed.
Required Buyer Fields
Scroll to the bottom of the Checkout section to toggle which buyer fields are collected on the default checkout form: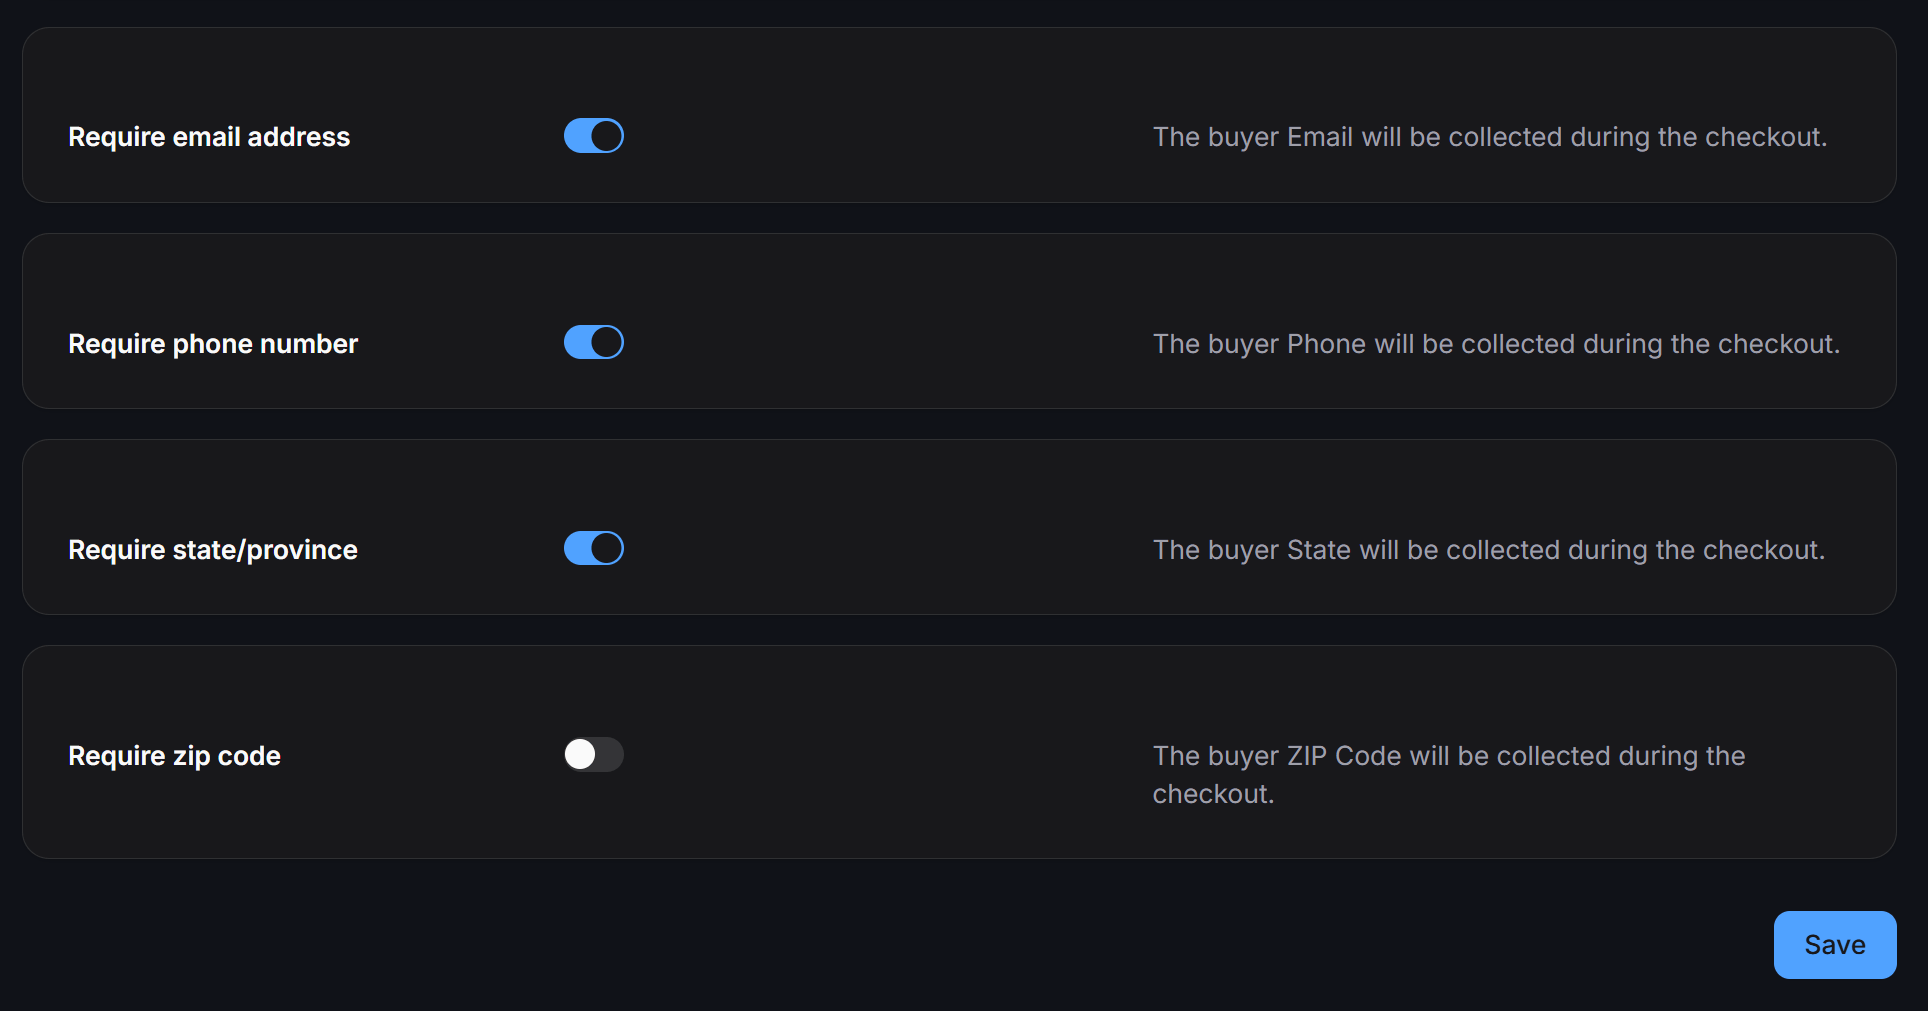
- Require email address: Collect the buyer’s email address during checkout.
- Require phone number: Collect the buyer’s phone number for delivery coordination.
- Require state/province: Collect the buyer’s state or province.
- Require zip code: Collect the buyer’s postal or ZIP code.
Building a Conversational Checkout Flow
When Checkout is set to Flow, the flow selected in Checkout Flow collects buyer details and finalizes the order. Build this flow using the following sequence:1
Collect Recipient Name
Add a Get User Data block to ask for the buyer’s full name and save the response to a custom field.
2
Collect Phone Number and Email
Add Get User Data blocks with phone and email validation to store the buyer’s contact details in custom fields.
3
Collect Shipping Address
Add a Get User Data block asking for the full delivery address and save it to an address custom field.
4
Show Order Review and Confirmation Button
Add a text block displaying the collected custom fields for verification, followed by a confirmation button that leads to the order completion message.
Sharing Shop Links and Using Fields
At the bottom right of the Products, Categories, and Vendors screens, ChatbotX provides two quick-access buttons:- Preview: Opens a read-only preview of your web shop in a browser tab. Preview links allow browsing items but cannot place orders.
- Get link: Copies the shop URL appended with the
{{shop_token}}system field.
Embedding Shop Links in Bot Buttons
The{{shop_token}} system field is a signed, contact-specific token generated automatically by ChatbotX. When a contact taps a button containing this token, the web shop links the cart and any placed orders directly to that contact’s profile and conversation.
You can copy targeted shop links to open specific views for your customers:
Using System and Custom Fields in Ecommerce Flows
Inside your checkout and order confirmation flows, you can personalize messages using contact system fields and custom fields:To automatically list the system-generated Order ID, itemized product lines, discounts, and final total, set Order confirmation message to Default message. When using Run a flow, reference the custom fields captured during your Checkout Flow so recipient details always match. For step-by-step instructions on embedding store links into buttons and walking through the customer buying flow, see Building a Sales Flow and End-to-End Shopping Journey.